This the multi-page printable view of this section. Click here to print.
Installation and Configuration Guide
- 1: Welcome to the Connector for Veeva Vault
- 1.1: Terminology
- 1.2: About the Content API
- 1.3: How the Connector Works with Veeva Vault
- 1.4: Using this Guide
- 1.5: How to Contact Lionbridge Connector Support
- 2: Before You Install
- 3: Importing the Configuration Package
- 4: Configuring the Lionbridge Connector Connection
- 5: Importing the Code Package
- 6: Configuring the Users and Administrators
- 7: Configure Translation Settings
- 8: Configuring Send for Translation User Action
- 9: Configuring State Changes to the Document
- 10: How to setup Languages, and Providers
- 11: Appendix Language Codes
1 - Welcome to the Connector for Veeva Vault
Welcome to the Lionbridge Connector for Veeva Vault version 1.0.0. This is the Connector between Veeva Vault and the Clay Tablet Platform, which enables you to manage the translation lifecycle effectively in Veeva Vault.
The Connector is designed to help Veeva Vault users select and send documents for translation using a document translation workflow that can be configured to work the way your organization needs. Facilitating faster and easier translation processes.
1.1 - Terminology
| Amazon AWS | Amazon Web Services. A suite of web application products developed and sold by Amazon.com. Clay Tablet uses various AWS offerings in order to leverage their infrastructure and build rich, dynamic solutions for its customers, specifically, the Clay Tablet Platform. For details, see http://aws.amazon.com. |
| Amazon S3 | Amazon Simple Storage Service. For details, see: http://aws.amazon.com/s3/. The Connector and the Clay Tablet Platform use Amazon S3 to provide temporary storage services for the content sent to and from translation. |
| Amazon SQS | Amazon Simple Queue Service. For details, see: http://aws.amazon.com/sqs/. The Connector uses Amazon SQS to provide Message Queue Services. |
| Asset | Any content or document being sent for translation, including metadata. Assets are created by the Connector. |
| CloudBroker | Lionbridge’s server application for hosting the Lionbridge Connector for Veeva Vault. As a SaaS (Software as a Service), Veeva Vault does not support installing the Lionbridge Connector or any other external applications on its server. Therefore, the Lionbridge Connector is hosted on the Lionbridge CloudBroker server. |
| Freeway | The name of the Lionbridge translation portal for submitting content to and retrieving content from the Lionbridge translation provider. |
| FTP Server | File Transfer Protocol (FTP) is a standard network protocol used to transfer files from one host to another host over a TCP-based network, such as the Internet. Translation providers may receive and send files for translation using an FTP server. |
| IaaS | Infrastructure as a Service. The Clay Tablet Platform is an IaaS, because it is a hosted platform. |
| Keys | The Connector uses keys to establish a secure, discrete connection between the Connector instance and the Platform. Very important: Do not use the same account keys on multiple instances, because this is a violation of the License Agreement. Using the same account keys on multiple instances will cause the Connector to behave unexpectedly, which can result in lost translation content, orphaned projects, and inaccurate translation status reports. The Lionbridge Connector team will support technical issues caused by duplicating or incorrectly installing CMS address keys only on a time and materials basis. |
| Lionbridge | The publisher of the Freeway translation portal and a translation provider. Users connect to the Freeway translation portal to submit content to and retrieve content from the Lionbridge translation provider. |
| Lionbridge Connector for Veeva Vault (Connector) | The Connector software that Lionbridge has developed, which plugs into your Veeva Vault installation to provide connectivity to our hosted Platform. In this document it is referred to as the Connector. This is the software you are installing and configuring as you work through this document. |
| MT | Machine translation. The translation provider can be a machine translation service, such as Bing. |
| Producer | CMS or another system that sends content or documents out for translation. In this case, this is your Veeva Vault. |
| Provider | A provider of translation services. The delivery of assets to the provider may be via an FTP server or a TMS connector. |
| Support Asset | Supporting documents and their metadata. Support assets are not translated by the translation provider, but they provide helpful context for the translator. |
| TMS | Translation management system that the translation provider uses. |
1.2 - About the Content API
The Content API is the easiest, most flexible way to integrate content systems, including content management systems (CMSs) and other content producers, with translation providers and translation technologies.
1.3 - How the Connector Works with Veeva Vault
The Lionbridge Connector (Connector) is an important part of the Lionbridge translation solution.
The Connector is installed on the Veeva Vault system. Its functionality is displayed to the users as part of Veeva Vault.

Your translation systems architecture might look like the configuration above. It may have additional content systems or translation providers, but the core concepts remain the same.
During implementation, Lionbridge Connector Support works with you and your translation provider to configure and test the other elements of your translation solution.
1.4 - Using this Guide
Purpose of this guide
This guide describes everything you need to know to install and configure the Lionbridge Connector (“Connector”) for Veeva Vault. It describes the delivery package contents, system requirements, installation instructions, and configuration procedures.
Recommendation: Review the user guide to fully understand the powerful features of the Connector.
Who should use this guide
This guide is intended for Veeva Vault administrators and system integrators.
What you should already know
This document assumes that your company already has an installed instance of Veeva Vault. It assumes that you have a strong working knowledge of Veeva Vault and its features.
If Lionbridge is your company’s translation provider, it assumes that Freeway is already set up for your company.
How to find out more about the Lionbridge Connector for Veeva Vault
For information on using the Lionbridge Connector to send and receive content for translation from Veeva Vault, read the Lionbridge Connector for Veeva Vault User Guide.
Documentation conventions
This guide uses the following conventions:
| Convention | Description |
|---|---|
| Bold | Highlights screen elements such as buttons, menu items, and fields. |
| Courier | Highlights input, file names, and paths. |
| Italics | Highlights terms for emphasis, variables, or document titles. |
| > | Indicates a menu choice. For example, “Select Admin Tools > Configuration.” |
1.5 - How to Contact Lionbridge Connector Support
How to Contact Lionbridge Connector Support
You can submit a support ticket either:
- by emailing connectors@lionbridge.com
- from the Lionbridge Connector Zendesk page https://lionbridge-connectors.zendesk.com/
See also:
2 - Before You Install
Before installing the Connector for Veeva Vault, ensure that the following tasks are completed:
-
You have received your user name and password combination from the Lionbridge support team to allow you to configure your Translation Settings at the end of your installation process.
-
You must create a Lionbridge Connector as Vault Owner so that CloudBroker can access Vault API.
- Go to Admin > Users & Groups > Users.
- Click Create.
- Complete the following fields:
- Domain User: Lionbridge Connector
- First Name: Lionbridge
- Last Name: Connector
- Email Address (assign a contact for password renewal and other notifications)
- Complete any other fields required by your organization
- Assign a Full User License Type.
- Assign Vault Owner Security Profile.
-
Create Translation Administrator:
-
Go to Admin > Users & Groups > Groups.
-
Click Create.
-
Enter “Translation Administrators” as the label, and click Save.
-
-
Create Translation Users Groups:
-
Go to Admin > Users & Groups > Groups.
-
To add Translation Users group, click Create.
-
Enter “Translation Users” as the label, and click Save.
-
3 - Importing the Configuration Package
-
If you cannot see the Deployment tab in the Admin interface, you need to enable Inbound Packages in the Veeva Vault:
-
Go to Admin > Settings > General Settings.
-
Select Edit.
-
Under Configuration Management, enable Allow Inbound Packages.
-
-
After enabling the Inbound Packages, you should be able to see the Deployment tab. If you cannot see the tab, log out and log in again to see the tab.
To import the Veeva Vault Configuration Package (VPK) for the Lionbridge Connector:
- Go to Admin > Deployment > Inbound Packages.
Note: You must name the VPK file in a specific way, as LionbridgeVaultConnector_config_xxxx.vpk (xxxx stands for connector version number).
-
Click Import and select the Configuration VPK from the file system.
An e-mail notification is sent upon the successful import of the VPK file.
-
Click the Name of the imported package.
-
Confirm that the Deployment Status is displayed as Verified.
-
Click the settings icon
 and select Review & Deploy.
 -
Click Next.
-
Click Finish to complete the import of VPK Configuration.
An e-mail notification is sent after the VPK import is completed.
Important: It is normal for some of the steps to be in the Deployed with warnings or Skipped status after deployment. However, if there are components in the Error status after deployment, please contact Lionbridge support.
4 - Configuring the Lionbridge Connector Connection
To complete the connection configuration, perform the following:
- Create the connection
- Create the Translation Configuration Object Record
To create the connection:
-
Go to Admin > Connections.
-
Click Create.
-
Select External from the Connection Type drop-down.
-
Click Continue.
-
Enter the following fields with the exact details as below:
-
Name—Lionbridge Translation Connector
-
API Name—lionbridge_translation_connector
-
URL—For Staging environment, enter “https://cloudbroker-staging.ctt.lionbridge.com/CloudBroker/plugins/vault".
For Production environment, enter “https://cb1-prod-na.ctt.lionbridge.com/CloudBroker/plugins/vault”.
-
-
Click Save.
Please ensure the Connection is made Active.
To create the Translation Configuration Object Record:
-
Go to Admin > Settings > General.
Take a note of the Vault ID for future use.
-
Go to Admin > Business Admin.
-
Under the Object tab, select the Translation Configuration Object.
-
Click Create.
-
Enter the following with the exact details as below:
-
Name—Vault ID
-
Status— Active
-
Vault ID—{Enter the Vault ID obtained}
-
-
Click Save.
With this, the Translation Configuration object record is created .
5 - Importing the Code Package
To import the Veeva Vault Custom Configuration Package (VPK) for the Lionbridge Connector:
- Go to Admin > Deployment > Inbound Packages.
Note: You must name the VPK file in a specific way, as LionbridgeVaultConnector_code_xxxx.vpk (xxxx stands for connector version number).
- Click Import and select the Custom VPK from the file system.
An e-mail notification is sent upon the successful import of the Custom VPK file.
-
Click the Name of the imported custom package.
-
Confirm that the Deployment Status is displayed as Imported.
-
Click the settings icon
and select Review & Deploy. -
Click Next in the Review and Select Steps screen.
-
Click Finish to complete the import of Custom VPK package.
An e-mail notification is sent after the Custom VPK package import is completed.
6 - Configuring the Users and Administrators
Translation Users and Administrators can create and process the Translation Jobs. The Translation Users can see only the Translation Jobs created by them, where as the Admins can see and interact with all Translation Jobs in the system.
To configure the Translation User:
- Add the Translation User Permission Set to Security profiles that must have the Translation User permissions.
- Add users to the Translation Users group.
- (Optional) Set the Translation Users group to include the Translation User Profiles.
To configure the Translation Admin:
- Add the Translation Admin Permission Set to Security profiles that must have the Translation Admin permissions.
- Add appropriate users to the Translation Administrators group.
- (Optional) Set the Translation Administrators group to include the Translation Admin User Profiles.
You need separate installation package for PromoMats and MedComms
To configure the Translation Admin:
-
Security setup is client-specific, but the following example works for a testing environment.
-
Add “Translation User” permission set to “PromoMats User”.
-
Edit “Translation Users” Group to include Security Profile “PromoMats User”.
-
Edit “Translation Administrator” Group to include Security Profile “PromoMats User” and “System Administrator”.
7 - Configure Translation Settings
The Translation Settings tab is by default configured to connect to the Staging environment. If you are connecting to the Production environment, please update the tab settings using the following instructions:
Note: If you are not sure which environment you are connecting to, please refer the environment used in Section 4 - Configuring the Lionbridge Connector Connection.
To update the Tab:
- Go to Admin > Configuration > Tabs.
- Find the Translation Tab in the list and expand to find the Translations Settings.
- Select Translations Settings then Edit.
- Edit the URL:
- For Staging environment, enter https://cloudbrokerstaging.ctt.lionbridge.com/CloudBroker/vaultside/settings?VaultID=${Vault.id}&SessionID=${Session.id}.
- For Production environment, enter https://cb1-prodna.ctt.lionbridge.com/CloudBroker/vaultside/settings?VaultID=${Vault.id}&SessionID=${Session.id}.
- Save your changes.
To configure Translation Settings follow these steps:
- Go to Translation tab, and select Translation Settings.
- Click Configuration Site, and select Veeva Vault tab.
- Enter API URL, API Username (this is the Lionbridge Connector User you created in Section 2), API Password (this is the Lionbridge Connector User password), Vault ID, and click Test.
- If the Test is passed, click Save.
To find the information to Configure the site:
- On the Site tab, enter the Content API Token provided to you by the Connector Support team.
- On the Veeva Vault tab:
- The API URL, the API URL is determined by concatenating your Vault URL plus “api/v20.3”
The Vault URL can be found in Admin > Settings > General Settings > Vault Information.
This is an example: https://vvtechpartner-lionbridge-medcomms01.veevavault.com/api/v20.3
- The API Username (this is the Lionbridge Connector User you created in Section 2)
- The API Password (this is the Lionbridge Connector User password)
- Vault ID
8 - Configuring Send for Translation User Action
Send for Translation user action must be configured for each Document Type and State so that the user can send a single document out for translation directly from the document.
To configure the User Action:
-
Go to Configuration > Document Lifecycles > {Desired Document LC}.
-
Click the States tab.
-
Click the desired state(s) on which you would like to add the Send for Translation action.
-
Click the User Actions tab.
-
Click the Edit button.
-
Click on Add Action to add the following User Action details:
-
Type—Create Related Record
-
Label—Send for Translation
-
Objects—Translation Job
-
Field to Default—Source Document
-
-
Click Save to complete the User Action configuration.
-
(Optional) To control user access to the User Actions, enable Document Atomic Security.
-
Repeat the above steps to configure for each document type and state where the user action is required.
9 - Configuring State Changes to the Document
To configure state changes to the document while the Translation Job is out for translation:
- Create the desired Lifecycle State in the appropriate Document Lifecycle.
- Create a User Action in the Lifecycle State the State change will be made from.
For example, if documents are sent for translation from the Draft State, and the Document State should be changed to Sent for Translation, create the User Action in the Draft State. - Share the call name with Lionbridge Support to be setup in CloudBroker, call should look like Sent_for_Translation__c.
Note: The calls are case sensitive.
To configure state changes to the document when the Translation Job is returned from translation:
- Create the desired Lifecycle State in the appropriate Document Lifecycle.
- Create a User Action in the Lifecycle State the State change will be made from. This will be the initial state the document was sent for translation from, not the new state created in the previous step.
For example, if documents are sent for translation from the Draft State, and the Document State should be changed to Returned from Translation, create the User Action in the Draft State. - Share the call name with Lionbridge Support to be setup in CloudBroker, call should look like Returned_from_Translation__c.
Note: The calls are case sensitive.
- The returned document state can be configured directly in CloudBroker by going into Translation Settings in Veeva. The below highlighted section is where this change can be made. Click Configure Site and then Click Veeva Vault tab.
10 - How to setup Languages, and Providers
- Go to Translation, and select Translation Settings.
![]()
- In Translation Settings, click Languages, and select Source Languages and Target Languages, then Click Save.
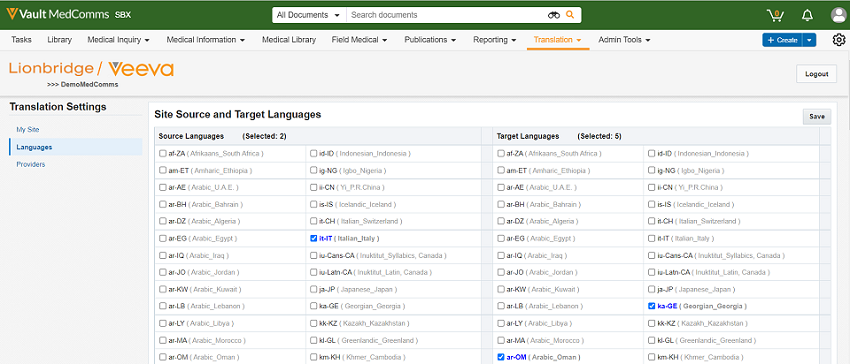
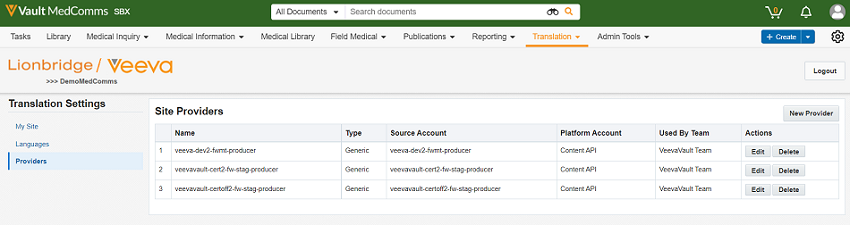
- In Translation Settings, click New Provider and provide Product Name, Product Keys, select Custom Source Languages and Custom Target Languages and click Add.
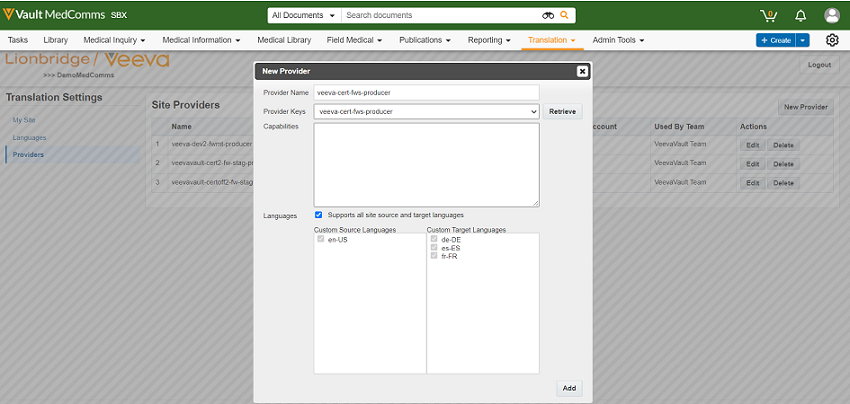
- You can click Edit or Delete the existing Providers.
11 - Appendix Language Codes
The Connector has the following language codes:
| Language Identifier | Language Code |
|---|---|
| Afrikaans (South Africa) | af-ZA |
| Albanian (Albania) | sq-AL |
| Alsatian (France) | gsw-FR |
| Amharic (Ethiopia) | am-ET |
| Arabic (Algeria) | ar-DZ |
| Arabic (Bahrain) | ar-BH |
| Arabic (Egypt) | ar-EG |
| Arabic (Iraq) | ar-IQ |
| Arabic (Jordan) | ar-JO |
| Arabic (Kuwait) | ar-KW |
| Arabic (Lebanon) | ar-LB |
| Arabic (Libya) | ar-LY |
| Arabic (Morocco) | ar-MA |
| Arabic (Oman) | ar-OM |
| Arabic (Qatar) | ar-QA |
| Arabic (Saudi Arabia) | ar-SA |
| Arabic (Syria) | ar-SY |
| Arabic (Tunisia) | ar-TN |
| Arabic (U.A.E.) | ar-AE |
| Arabic (Yemen) | ar-YE |
| Armenian (Armenia) | hy-AM |
| Assamese (India) | as-IN |
| Azeri (Cyrillic, Azerbaijan) | az-Cyrl-AZ |
| Azeri (Latin, Azerbaijan) | az-Latn-AZ |
| Bashkir (Russia) | ba-RU |
| Basque (Basque) | eu-ES |
| Belarusian (Belarus) | be-BY |
| Bengali (Bangladesh) | bn-BD |
| Bengali (India) | bn-IN |
| Bosnian (Cyrillic, Bosnia and Herzegovina) | bs-Cyrl-BA |
| Bosnian (Latin, Bosnia and Herzegovina) | bs-Latn-BA |
| Breton (France) | br-FR |
| Bulgarian (Bulgaria) | bg-BG |
| Catalan (Catalan) | ca-ES |
| Chinese (Simplified,P.R.China) | zh-CN |
| Chinese (Simplified,Singapore) | zh-SG |
| Chinese (Traditional, Hong Kong S.A.R.) | zh-HK |
| Chinese (Traditional, Macao S.A.R.) | zh-MO |
| Chinese (Traditional, Taiwan) | zh-TW |
| Corsican (France) | co-FR |
| Croatian (Croatia) | hr-HR |
| Croatian (Latin, Bosnia and Herzegovina) | hr-BA |
| Czech (Czech Republic) | cs-CZ |
| Danish (Denmark) | da-DK |
| Dari (Afghanistan) | prs-AF |
| Divehi (Maldives) | dv-MV |
| Dutch (Belgium) | nl-BE |
| Dutch (Netherlands) | nl-NL |
| English (Australia) | en-AU |
| English (Belize) | en-BZ |
| English (Canada) | en-CA |
| English (India) | en-IN |
| English (Ireland) | en-IE |
| English (Jamaica) | en-JM |
| English (Malaysia) | en-MY |
| English (New Zealand) | en-NZ |
| English (Philippines) | en-PH |
| English (Singapore) | en-SG |
| English (South Africa) | en-ZA |
| English (Trinidad and Tobago) | en-TT |
| English (United Kingdom) | en-GB |
| English (United States) | en-US |
| English (Zimbabwe) | en-ZW |
| Estonian (Estonia) | et-EE |
| Faroese (Faroe Islands) | fo-FO |
| Filipino (Philippines) | fil-PH |
| Finnish (Finland) | fi-FI |
| French (Belgium) | fr-BE |
| French (Canada) | fr-CA |
| French (France) | fr-FR |
| French (Luxembourg) | fr-LU |
| French (Monaco) | fr-MC |
| French (Switzerland) | fr-CH |
| Frisian (Netherlands) | fy-NL |
| Galician (Galician) | gl-ES |
| Georgian (Georgia) | ka-GE |
| German (Austria) | de-AT |
| German (Germany) | de-DE |
| German (Liechtenstein) | de-LI |
| German (Luxembourg) | de-LU |
| German (Switzerland) | de-CH |
| Greek (Greece) | el-GR |
| Greenlandic (Greenland) | kl-GL |
| Gujarati (India) | gu-IN |
| Hausa (Latin, Nigeria) | ha-Latn-NG |
| Hebrew (Israel) | he-IL |
| Hindi (India) | hi-IN |
| Hungarian (Hungary) | hu-HU |
| Icelandic (Iceland) | is-IS |
| Igbo (Nigeria) | ig-NG |
| Indonesian (Indonesia) | id-ID |
| Inuktitut (Latin, Canada) | iu-Latn-CA |
| Inuktitut (Syllabics, Canada) | iu-Cans-CA |
| Irish (Ireland) | ga-IE |
| isiXhosa (South Africa) | xh-ZA |
| isiZulu (South Africa) | zu-ZA |
| Italian (Italy) | it-IT |
| Italian (Switzerland) | it-CH |
| Japanese (Japan) | ja-JP |
| K’iche (Guatemala) | qut-GT |
| Kannada (India) | kn-IN |
| Kazakh (Kazakhstan) | kk-KZ |
| Khmer (Cambodia) | km-KH |
| Kinyarwanda (Rwanda) | rw-RW |
| Kiswahili (Kenya) | sw-KE |
| Konkani (India) | kok-IN |
| Korean (Korea) | ko-KR |
| Kyrgyz (Kyrgyzstan) | ky-KG |
| Lao (Lao P.D.R.) | lo-LA |
| Latvian (Latvia) | lv-LV |
| Lithuanian (Lithuania) | lt-LT |
| Lower Sorbian (Germany) | dsb-DE |
| Luxembourgish (Luxembourg) | lb-LU |
| Macedonian (Former Yugoslav Republic of Macedonia) | mk-MK |
| Malay (Brunei Darussalam) | ms-BN |
| Malay (Malaysia) | ms-MY |
| Malayalam (India) | ml-IN |
| Maltese (Malta) | mt-MT |
| Maori (New Zealand) | mi-NZ |
| Mapudungun (Chile) | arn-CL |
| Marathi (India) | mr-IN |
| Mohawk (Mohawk) | moh-CA |
| Mongolian (Cyrillic, Mongolia) | mn-MN |
| Mongolian (Mongolian, P.R.China) | mn-Mong-CN |
| Nepali (Nepal) | ne-NP |
| Norwegian, Nynorsk (Norway) | nn-NO |
| Norwegian (Norway) | nb-NO |
| Occitan (France) | oc-FR |
| Oriya (India) | or-IN |
| Pashto (Afghanistan) | ps-AF |
| Persian (Iran) | fa-IR |
| Polish (Poland) | pl-PL |
| Portuguese (Brazil) | pt-BR |
| Portuguese (Portugal) | pt-PT |
| Punjabi (India) | pa-IN |
| Quechua (Bolivia) | quz-BO |
| Quechua (Peru) | quz-PE |
| Quechua (Peru) | es-PE |
| Quechua (Quechua) | quz-EC |
| Romanian (Romania) | ro-RO |
| Romansh (Switzerland) | rm-CH |
| Russian (Russia) | ru-RU |
| Sami, Inari (Finland) | smn-FI |
| Sami, Lule (Norway) | smj-NO |
| Sami, Lule (Sweden) | smj-SE |
| Sami, Northern (Finland) | sv-FI |
| Sami, Northern (Norway) | se-NO |
| Sami, Northern (Sweden) | se-SE |
| Sami, Skolt (Finland) | sms-FI |
| Sami, Southern (Norway) | sma-NO |
| Sami, Southern (Sweden) | sma-SE |
| Sanskrit (India) | sa-IN |
| Scottish (United Kingdom) | gd-GB |
| Serbian (Cyrillic, Bosnia and Herzegovina) | sr-Cyrl-BA |
| Serbian (Cyrillic, Montenegro) | sr-Cyrl-ME |
| Serbian (Cyrillic, Serbia) | sr-Cyrl-RS |
| Serbian (Latin, Bosnia and Herzegovina) | sr-Latn-BA |
| Serbian (Latin, Montenegro) | sr-Latn-ME |
| Serbian (Latin, Serbia) | sr-Latn-RS |
| Serbian (Latin, Serbia and Montenegro) | sr-Latn-CS |
| Sesotho sa Leboa (South Africa) | nso-ZA |
| Setswana (South Africa) | tn-ZA |
| Sinhala (Sri Lanka) | si-LK |
| Slovak (Slovakia) | sk-SK |
| Slovenian (Slovenia) | sl-SI |
| Spanish (Argentina) | es-AR |
| Spanish (Bolivarian Republic of Venezuela) | es-VE |
| Spanish (Bolivia) | es-BO |
| Spanish (Chile) | es-CL |
| Spanish (Colombia) | es-CO |
| Spanish (Costa Rica) | es-CR |
| Spanish (Dominican Republic) | es-DO |
| Spanish (Ecuador) | es-EC |
| Spanish (El Salvador) | es-SV |
| Spanish (Guatemala) | es-GT |
| Spanish (Honduras) | es-HN |
| Spanish (Nicaragua) | es-NI |
| Spanish (Panama) | es-PA |
| Spanish (Paraguay) | es-PY |
| Spanish (Puerto Rico) | es-PR |
| Spanish (Spain) | es-ES |
| Spanish (United States) | es-US |
| Spanish (Uruguay) | es-UY |
| Swedish (Finland) | sv-FI |
| Swedish (Sweden) | sv-SE |
| Syriac (Syria) | syr-SY |
| Tajik (Cyrillic, Tajikistan) | tg-Cyrl-TJ |
| Tamazight (Latin, Algeria) | tzm-Latn-DZ |
| Tamil (India) | ta-IN |
| Tatar (Russia) | tt-RU |
| Telugu (India) | te-IN |
| Thai (Thailand) | th-TH |
| Tibetan (P.R.China) | bo-CN |
| Turkish (Turkey) | tr-TR |
| Turkmen (Turkmenistan) | tk-TM |
| Ukrainian (Ukraine) | uk-UA |
| Upper Sorbian (Germany) | hsb-DE |
| Urdu (Islamic Republic of Pakistan) | ur-PK |
| Uyghur (P.R.China) | ug-CN |
| Uzbek (Cyrillic, Uzbekistan) | uz-Cyrl-UZ |
| Uzbek (Latin, Uzbekistan) | uz-Latn-UZ |
| Vietnamese (Vietnam) | vi-VN |
| Welsh (United Kingdom) | cy-GB |
| Wolof (Senegal) | wo-SN |
| Yakut (Russia) | sah-RU |
| Yi (P.R.China) | ii-CN |
| Yoruba (Nigeria) | yo-NG |