Submitting Content for Translation from the Translation Queue
8 minute read
You submit content for translation from the Translation Queue in the following scenarios:
-
When you reviewed content, you submitted it to the Translation Queue, by selecting the Send items to translation queue radio button, instead of immediately sending it for translation, as described in the previous sections:
-
Your company is configured to always submit content items to the Translation Queue before sending them out for translation.
Submitting content to the Translation Queue before sending it out for translation has the following advantages:
-
You may not want to send out each content item individually as soon as you finish reviewing it. The Translation Queue facilitates your management of reviewed content, so that you do not forget about sending individual reviewed content items for translation.
-
Your translation provider may prefer receiving fewer but larger batches of content to translate, rather than individual content items, as this facilitates project preparation, resource assignment, and file analysis.
-
If you want to translate many items into multiple languages, but you want to translate into only one target language at a time, this is a good way to manage that process.
If you or your colleagues have added content items to the Translation Queue, you must access it and approve the files you want to send out.
Note: If you do not approve content items in the Translation Queue, the Connector does not send them out for translation.
When you send content for translation from the Translation Queue, you can add job metadata, including a job name and a requested delivery date, when the translations will be returned.
Note: These instructions assume you already have content items in the Translation Queue. For information on submitting content to the Translation Queue, see Submitting a Content Item for Translation using the Content Editor.
To submit one or more content items from the Translation Queue for translation:
- In the Sitecore Content Editor ribbon, click the Lionbridge Translation tab, and then in the Translation Tools section, click Translation Queue.

The Translation Queue opens.

The top of the window displays the total number of estimated words in all the content items in the queue.
The window displays all the content items in the queue that you submitted.
Note: You can group the content items by column. For detailed instructions, see Grouping Content Items by Column.
Note: If you are assigned to the sitecore\Translation Administrator role, the Show queue items from all users check box is displayed. To view all items in the queue, select this check box.
The window displays the following information about the content items in the queue:
| Column | Description |
|---|---|
| Item Path | The path and name of the content item. |
| Database | The database that stores this content item. |
| Language | The language code of the source language of the content item to send for translation. Note: Your company’s Connector configuration determines the format of the displayed language name. For more information, refer to the Lionbridge Connector for Sitecore Installation and Configuration Guide. |
| Version | The version of the content item to send for translation. Note: Your company’s Only keep latest source versions in Translation Queue setting determines whether this is the version initially added to the queue or the latest available source version. For more information, refer to the Lionbridge Connector for Sitecore Installation and Configuration Guide. |
| Translate To | The language codes of the target languages into which to translate the content item. Note: Your company’s Connector configuration determines the format of the displayed language name. For more information, refer to the Lionbridge Connector for Sitecore Installation and Configuration Guide. |
| Local TM | Indicates whether the Use Local TM feature is enabled for this content item. This feature sends only changed content fields out for translation, which reduces translation costs. * If this column has a value of Yes, then this feature is enabled for this content item. * If this column is blank, then this feature is not enabled for this content item. |
| Deadline | The requested date for received the translated content back from the translation provider, in MM/DD/YYYY format. |
| Created | The date when the source content item was created, in MM/DD/YYYY format. |
| Words | The number of words in the content item. |
| Media | Indicates whether the content item is a binary asset, such as a .jpg or .pdf file or another media file. |
| Ref | Indicates whether the content item is a reference file (support asset), which provides helpful context for the translator. |
| User | The user who submitted this content item to the queue. Displayed only if you are assigned to the sitecore\Translation Administrator role, and if you selected the Show queue items from all users check box, described above. |
| Field Type | The field type of the content item. |
| Profile | If the user who submitted this content item to the queue is assigned to one or more team profiles, then this is the team profile used when submitting this item to the queue. |
Note: To change the number of items displayed on a page in the queue, select a number from the Page size dropdown list. By default, 20 items are displayed on a page.
- Do one of the following:
- Select one or more content items to send for translation, and click Send Selected.
Tips: Use the Shift key to select a range of adjacent items. Use the Ctrl key to select multiple non-adjacent items.
- Click Send All.
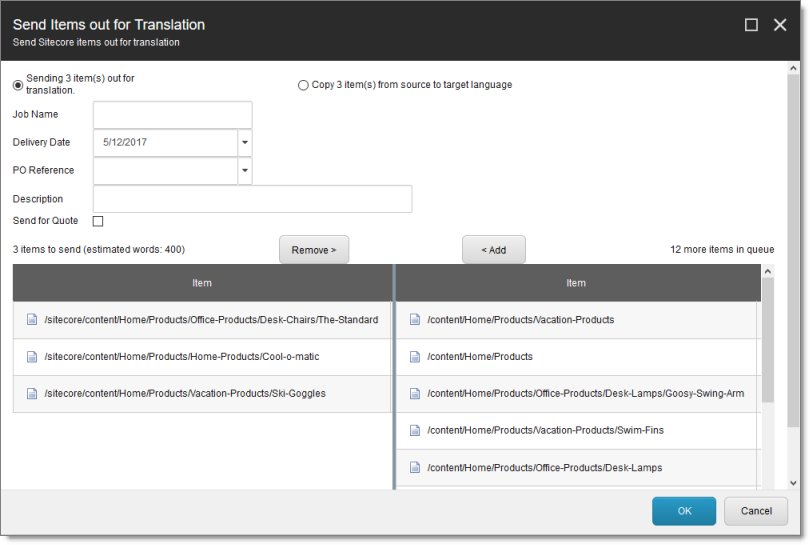
The Send Items Out for Translation dialog box opens.

The items you selected to send are in the items to send pane on the left. If you did not select all the items in the queue, then the items you did not select are in the items in queue pane on the right.
Note: If you selected one or more content items currently in translation to a specified target language, then the following warning message is displayed in the middle of the page: X items are currently in translation process as part of previous jobs, where X is the number of duplicate content items, and it is displayed in read. Click Show Details to view a detailed list of the duplicate content items, along with the specified source and target languages.
- Choose one of the following:
- To send the selected items to your translation provider, select Sending X items for translation to, where X is the number of selected items. If your company has multiple translation providers, and if your company’s Connector configuration enables selecting the translation provider (instead of using automatic routing rules), you can select the provider for this job in the Translation Provider dropdown list.
Enter the following information about the job in the fields at the top:
| Option | Description |
|---|---|
| Profile | If you have been assigned to a team profile, select the team profile to use for this translation job. Displayed only if you have been assigned to a team profile. |
| Delivery Date | The requested translation deadline. This is the date when you expect the translated content to return. By default, it is two weeks from the current date. To select a different date, either type the delivery date in the field in MM/DD/YYYY format, or click the arrow and select a different date in the calendar that opens. This information is sent to the translation provider as metadata of the translation package. Note: The default displayed date is based on your company’s Connector configuration. Recommendation: Discuss with your translation provider whether to use the information in this field. |
| PO Reference | The purchase order reference number. You can select a number from the list or enter a number. This field may be mandatory, depending on your translation-provider configuration. |
| Description | A description of the translation job, including any special instructions or requests. Displayed only if a translation provider other than Freeway is selected in the Send to box, above. |
| Job Name | Your name for this translation job. |
| Send for Quote | Select this check box to inform the translation provider that you want to receive a quote before the translation process starts. Displayed only if supported for the selected translation provider and enabled in your Connector installation. |
| Special Instruction | Any additional instructions for Freeway. Displayed only if Freeway is selected in the Sending items for translation to box, above. |
| Analysis Code | The analysis codes for the translation. Displayed only if: * Freeway is selected in the **Sending for translation items** to box, above. * The Connector is configured to display these fields. You specify the analysis codes that are relevant to your content. Your Lionbridge setup determines which analysis codes are available for you to specify, and the values available for selection for each analysis code. For example, the Region, Department, and Priority analysis codes may be available for you to specify. |
This information is delivered to your translation provider along with the content items for translation.
- To copy over the selected items to the target version, without translating them, select Copy X items from source to target language, where X is the number of selected items.
- Optional. To add other items to your job, select them in the more items in queue pane on the right and click Add.
Note: To remove items from your job, select them in the items to send pane on the left and click Remove.
- To send the items for translation or copy the source to the target, without translation, click OK.
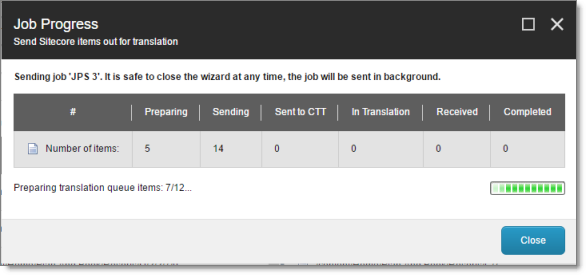
The Job Progress box opens, indicating the Connector’s progress in sending out the items for translation or copying over the content. Each target language represents an item.

- Click Close at any time to close the Job Progress box. The processing and sending continues in the background.
Tip: To monitor the translation progress, In the Translation Tools section of the Lionbridge Translation tab, click Translation Status. For detailed instructions, see Monitoring Translation Status.