Sending Content to Translation
If you send a single content item for translation, it must be in a workflow state that enables it to be sent for translation. This corresponds to the Reviewing workflow state that is part of the default Lionbridge Sample Workflow translation workflow. If you send multiple content items for translation using the Bulk Translation feature, you can assign a workflow and workflow state to the items at that time.
When the Connector sends out content items for translation, the following events occur:
-
The Connector exports the content from the Sitecore CMS as HTML or XML files. The format is determined by the ClayTablet.PackedFileFormat setting in the CT3Translation.config file. For details, refer to the Lionbridge Connector for Sitecore Installation and Configuration Guide.
-
The Connector creates placeholders for the content of the language versions of the specified target languages.
-
The Connector delivers the export files to the Content API Platform, along with information about the target languages, and source location within Sitecore. The Content API Platform then delivers these files to the translation provider(s) specified in your company’s routing rules.
Note: Using the translation workflow for a content item does not obligate you to send out that content item for translation. You can move the content item through the entire workflow without sending it out for translation.
1 - Workflow States
The sitecore/System/Workflows/Lionbridge Sample Workflow workflow contains all required states for the Connector translation management process.
By default, it has the following seven states, which are listed, in order, below.
| Workflow State |
Relevant for Source Content |
Relevant for Target Content |
| Editing |
ü |
|
| Reviewing |
ü |
|
| Sending for Translation |
ü |
|
| In Translation |
|
ü |
| Editing Translated Version |
|
ü |
| Reviewing Translated Version |
|
ü |
| Done |
ü |
ü |
Note: Only content in the Done state is publishable.
2 - Submitting a Content Item for Translation using the Content Editor
This section describes how to submit a content item for translation using the Sitecore Content Editor. It is relevant only for a single content item that uses a template that has a translation workflow attached, as described in Creating Content for Translation. For instructions on submitting multiple content items for translation, see Sending Multiple Content Items for Translation. For instructions on submitting a single content item for translation using the Sitecore Page Editor, see Submitting Content for Translation from the Experience Editor.
Depending on your company’s Connector configuration, when you submit the item for translation, either:
- The Connector immediately sends out the item for translation.
- The Connector sends the item to the Translation Queue, which is a holding area for items that are ready for translation.
To submit a content item for translation:
-
In the Sitecore Content Editor, navigate to the content item that is ready to sent for translation and select it.
-
In the Sitecore Content Editor ribbon, click the Review tab.
-
In the Workflow section, click Submit.
Note: The Submit button is displayed only if the content item’s workflow state is Editing.
A dialog box opens.
- Optional. Add a comment to this action. The Connector does not use this comment, but it is available in Sitecore.
The content item moves to the next state in the workflow, which is Reviewing.
The Workflow section of the Review tab is updated to display the Publish, Reject, and Translate buttons.

Note: These buttons are displayed only if the content item is in the Reviewing workflow state.
Note: Using the translation workflow for a content item does not obligate you to send out that content item for translation. You can move the content item through the entire workflow without sending it out for translation.
-
Click Translate.
-
Optional. Depending on your company’s Sitecore configuration, an additional comment box may be displayed. If so, you can enter a comment and click OK.
The next step depends on your company’s Connector configuration. Usually, the Automatic Item Export for Translation dialog box opens.
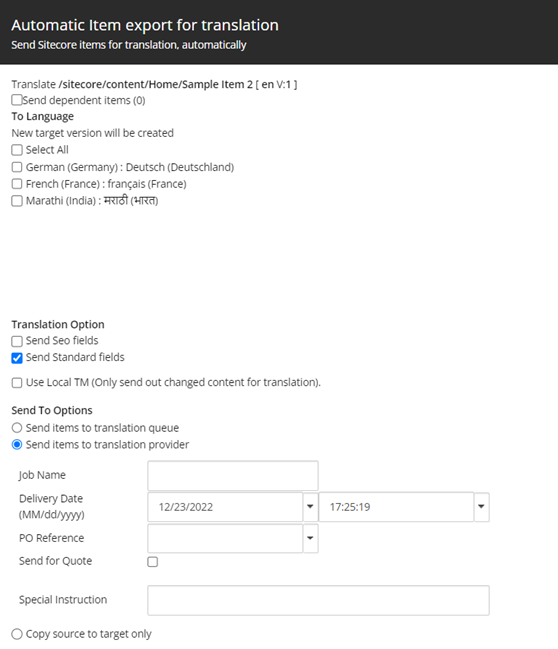
The following options may be available, depending on your company’s Connector configuration:
| Option |
Description |
| Send Dependent Items |
Select this check box to include items from the layout and final layout that are dependent on the selected content item. This is useful, for example, if a page item has multiple layers with different data sources, and you want to translate all the items displayed in the page. The number in parentheses indicates the number of dependent items. For a detailed description of the default behavior of this check box, see Understanding the Send Dependent Items Check Box. |
| Profile |
If you have been assigned to a team profile, select the team profile to use for this translation job. Displayed only if you have been assigned to a team profile. |
| To Language |
Select the check boxes for the target languages into which you want to translate the content. If you want to translate the content into all available target languages, select the Select All check box.- When you select a target language, if an error states that the language code is misconfigured, it means that you do not have read access to that language. You require read access to a language to send out content for translation to that language.
- If you select a target language for which this content item is currently in translation, then a warning message is displayed. Click OK to close the warning message.
- Depending on your company’s Connector configuration, some languages may already be selected. If so, you can clear any selected languages that you do not want to include.
Note: Your company’s Connector configuration determines the format of the displayed language name. For more information, refer to the Lionbridge Connector for Sitecore Installation and Configuration Guide. |
| Use Local TM |
Determines whether to check each field of the source version for any content changes, and send only changed content fields out for translation. If a field was previously translated and it has not changed, then the Connector does not send it for translation again: Instead, it uses the stored translation.- When this check box is selected, the Connector sends only changed content fields out for translation. This may reduce translation costs, but it increases the processing time before the Connector sends out the items for translation.
- When this check box is cleared, the Connector sends all specified source content for translation, even if it has not changed since it was previously sent for translation.
Note: If the Use Local TM feature is enabled, the Connector checks each field of the source version for any content changes, and it sends only changed content fields out for translation, to ensure that all target versions reflect these changes. This option may also not be available based your company’s Connector configuration. For details, refer to the description of the Use Local TM setting in the Lionbridge Connector for Sitecore Installation and Configuration Guide. |
| Send SEO fields or Send Standard fields |
Select the check boxes for the types of content to send out for translation.- Send SEO fields: The Connector sends fields defined in the SEO Fields section of the Lionbridge Connector Settings item for translation. Cleared by default.
- Send standard fields: The Connector sends the fields specified by the Field Types Need Translation parameter in the Bulk Translation section of the /sitecore/system/Settings/Lionbridge Settings/Lionbridge Connector Settings/ item. Selected by default.
For more information, refer to the Lionbridge Connector for Sitecore Installation and Configuration Guide. |
| Select one of the following Send To Options: |
|
| Send items to translation queue |
The Connector sends the content item to the Translation Queue, where a user must approve it to send it out for translation. |
| Send items to translation provider |
The Connector sends the content item to the Content API Platform, which sends it to the translation provider specified in the company’s routing rules. The Connector displays additional fields below, where you can specify additional information.
Recommendation: Select this option if you need to quickly send out content and do not need to arrange or filter it, for example, by language.- Job Name: Your name for this translation job.
- Translation Provider: If your company has multiple translation providers, and if your company’s Connector configuration enables selecting the translation provider (instead of using automatic routing rules), you can select the provider for this item in the dropdown list.
- Delivery Date: The requested translation deadline. This is the date when you expect the translated content to return. By default, it is two weeks from the current date. To select a different date, either type the delivery date in the field in MM/DD/YYYY format, or click the arrow and select a different date in the calendar that opens. This information is sent to the translation provider as metadata of the translation package.
Note: The default displayed date is based on your company’s Connector configuration.
Recommendation: Discuss with your translation provider whether to use the information in this field.- PO Reference: The purchase order reference number. You can select a number from the list or enter a number. This field may be mandatory, depending on your translation-provider configuration.
- Special Instruction: Any additional instructions for Lionbridge Freeway. Displayed only if Lionbridge Freeway is selected in the Translation Provider box, above.
- Analysis Code: The analysis codes for the translation.
Displayed only if:- Lionbridge Freeway is selected in the Translation Provider box, above.
- The Connector is configured to display these fields.
You specify the analysis codes that are relevant to your content. Your Lionbridge setup determines which analysis codes are available for you to specify, and the values available for selection for each analysis code. For example, the Region, Department, and Priority analysis codes may be available for you to specify. - Description: A description of the translation job, including any special instructions or requests. Displayed only if a translation provider other than Freeway is selected in the Send to box, above.
- Send for Quote: Select this check box to inform the translation provider that you want to receive a quote before the translation process starts. Displayed only if supported for the selected translation provider and enabled in your Connector installation.
|
| Copy source to target only |
The Connector copies the source content to the target content item without sending it out for translation. This is useful when there is content that you do not want to translate, but that you want to include in the target version. The Connector displays an additional field below, where you specify the job name.
Job Name: Your name for this job. |
- Click OK to close the dialog box and send the content item to the next step, as described above.
Note: If you click Cancel to close the dialog box without saving your changes, the item’s workflow state is displayed as Sending for Translation, which is incorrect. To display the item’s correct workflow state, which remains Reviewing, refresh the Web page in your browser.
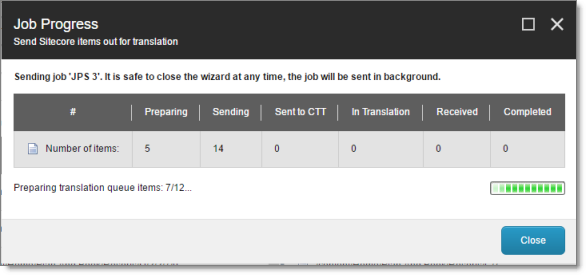
- If you sent the content item to a translation provider, or copied the source content to the target, the Job Progress box opens, indicating the Connector’s progress in sending out the item for translation or copying over the content. Each target language represents an item. Click Close at any time to close the Job Progress box. The processing and sending continues in the background.
- If you sent the content items to the Translation Queue, a message box opens, indicating that the Connector sent the content and the source and target languages. Click OK to close the message box.

Important: If the Connector sent the item to the Translation Queue, you must approve it there to send it out for translation. For detailed instructions, see Submitting Content for Translation from the Translation Queue.
Note: The Connector never sends out shared fields for translation, because these fields are shared across all versions and languages of an item.
For information about the events that occur when the Connector sends out content for translation, see Sending Content to Translation.
Tip: You can monitor the translation progress from within the Sitecore Content Editor. For detailed instructions, see Monitoring Translation Status.
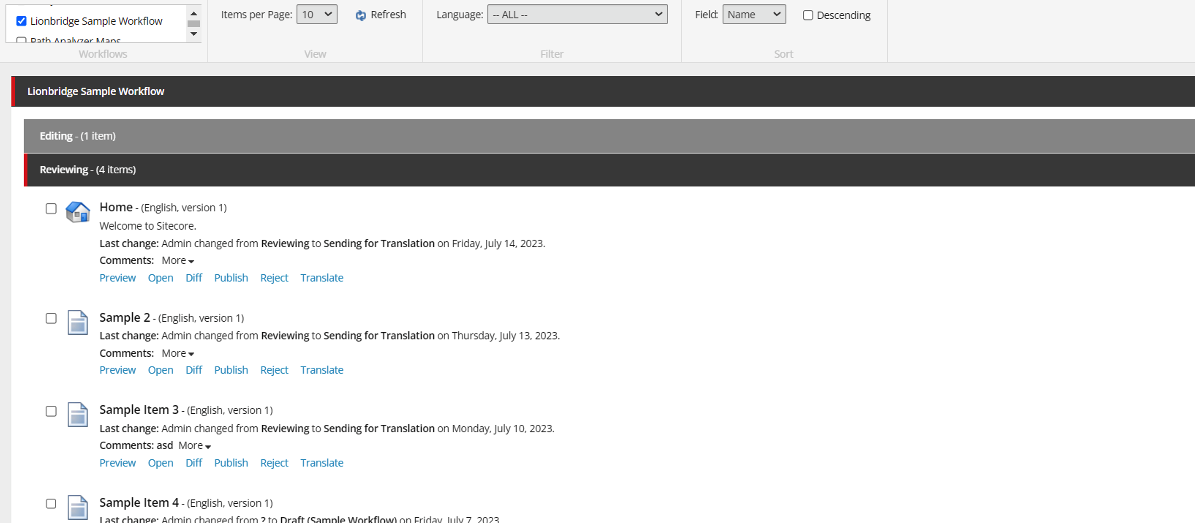
3 - Submitting Content for Translation from the Enhanced Workbox
This section describes how to submit a content item for translation using the Enhanced Workbox. Depending on your company’s Connector configuration, when you submit the item for translation, either:
- The Connector immediately sends out the item for translation.
- The Connector sends the item to the Translation Queue, which is a holding area for items that are ready for translation.
For instructions on submitting a content item for translation using the Sitecore Content Editor, see Submitting Content for Translation from the Translation Queue.
- In the Enhanced Workbox, select Lionbridge Sample Workflow.

Once you select the ‘Lionbridge Sample Workflow’ from the list. You will see all the content items having workflow as ‘Lionbridge Sample Workflow’ grouped on the basis of their workflow state.
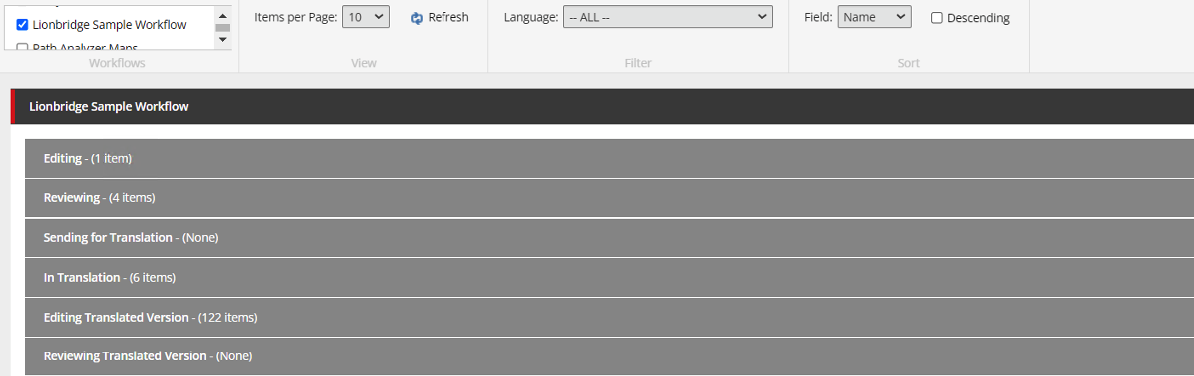
- Expand ‘Reviewing’ section, you will see the items with ‘Reviewing’ state and those items can be sent for translation by clicking ‘Translate’ link/button.
- Optional. Depending on your company’s Sitecore configuration, an additional comment box may be displayed. If so, you can enter a comment and click OK.
The Automatic Item export for translation dialog box opens.
The following options may be available, depending on your company’s Connector configuration:
| Option |
Description |
| Send Dependent Items |
Select this check box to include items from the layout and final layout that are dependent on the selected content item. This is useful, for example, if a page item has multiple layers with different data sources, and you want to translate all the items displayed in the page. The number in parentheses indicates the number of dependent items. For a detailed description of the default behavior of this check box, see Understanding the Send Dependent Items Check Box. |
| Profile |
If you have been assigned to a team profile, select the team profile to use for this translation job. Displayed only if you have been assigned to a team profile. |
| To Language |
Select the check boxes for the target languages into which you want to translate the content. If you want to translate the content into all available target languages, select the Select All check box. - When you select a target language, if an error states that the language code is misconfigured, it means that you do not have read access to that language. You require read access to a language to send out content for translation to that language. If you select a target language for which this content item is currently in translation, then a warning message is displayed. Click OK to close the warning message.
- Depending on your company’s Connector configuration, some languages may already be selected. If so, you can clear any selected languages that you do not want to include.
Note: Your company’s Connector configuration determines the format of the displayed language name. For more information, refer to the Lionbridge Connector for Sitecore Installation and Configuration Guide. |
| Use Local TM |
Determines whether to check each field of the source version for any content changes, and send only changed content fields out for translation. If a field was previously translated and it has not changed, then the Connector does not send it for translation again: Instead, it uses the stored translation. - When this check box is selected, the Connector sends only changed content fields out for translation. This may reduce translation costs, but it increases the processing time before the Connector sends out the items for translation.
- When this check box is cleared, the Connector sends all specified source content for translation, even if it has not changed since it was previously sent for translation.
Note: If the Use Local TM feature is enabled, the Connector checks each field of the source version for any content changes, and it sends only changed content fields out for translation, to ensure that all target versions reflect these changes. This option may also not be available based your company’s Connector configuration. For details, refer to the description of the Use Local TM setting in the Lionbridge Connector for Sitecore Installation and Configuration Guide. |
| Send SEO fields or Send Standard fields |
Select the check boxes for the types of content to send out for translation.
Send SEO fields: The Connector sends fields defined in the SEO Fields section of the Lionbridge Connector Settings item for translation. Cleared by default.
Send standard fields: The Connector sends the fields specified by the Field Types Need Translation parameter in the Bulk Translation section of the /sitecore/system/Settings/Lionbridge Settings/Lionbridge Connector Settings/ item. Selected by default.
For more information, refer to the Lionbridge Connector for Sitecore Installation and Configuration Guide. |
| Select one of the following Send To Options: |
|
| Send items to translation queue |
The Connector sends the content item to the Translation Queue, where a user must approve it to send it out for translation. |
| Send items to translation provider |
The Connector sends the content item to the Content API Platform, which sends it to the translation provider specified in the company’s routing rules. The Connector displays additional fields below, where you can specify additional information.
Recommendation: Select this option if you need to quickly send out content and do not need to arrange or filter it, for example, by language.
Job Name: Your name for this translation job.
Translation Provider: If your company has multiple translation providers, and if your company’s Connector configuration enables selecting the translation provider (instead of using automatic routing rules), you can select the provider for this item in the dropdown list.
Delivery Date: The requested translation deadline. This is the date when you expect the translated content to return. By default, it is two weeks from the current date. To select a different date, either type the delivery date in the field in MM/DD/YYYY format, or click the arrow and select a different date in the calendar that opens. This information is sent to the translation provider as metadata of the translation package.
Note: The default displayed date is based on your company’s Connector configuration.
Recommendation: Discuss with your translation provider whether to use the information in this field.
PO Reference: The purchase order reference number. You can select a number from the list or enter a number. This field may be mandatory, depending on your translation-provider configuration.
Special Instruction: Any additional instructions for Lionbridge Freeway. Displayed only if Lionbridge Freeway is selected in the Translation Provider box, above.
Analysis Code: The analysis codes for the translation. Displayed only if: - Lionbridge Freeway is selected in the Translation Provider box, above.
- The Connector is configured to display these fields.
You specify the analysis codes that are relevant to your content. Your Lionbridge setup determines which analysis codes are available for you to specify, and the values available for selection for each analysis code. For example, the Region, Department, and Priority analysis codes may be available for you to specify.
Description: A description of the translation job, including any special instructions or requests. Displayed only if a translation provider other than Freeway is selected in the Send to box, above.
Send for Quote: Select this check box to inform the translation provider that you want to receive a quote before the translation process starts. Displayed only if supported for the selected translation provider and enabled in your Connector installation. |
| Copy source to target only |
The Connector copies the source content to the target content item without sending it out for translation. This is useful when there is content that you do not want to translate, but that you want to include in the target version. The Connector displays an additional field below, where you specify the job name.
Job Name: Your name for this job. |
- Click OK to close the dialog box and send the content item to the next step, as described above.
Note: If you click Cancel to close the dialog box without saving your changes, the item’s workflow state is displayed as Sending for Translation, which is incorrect. To display the item’s correct workflow state, which remains Reviewing, refresh the Web page in your browser.
- If you sent the content item to a translation provider, or copied the source content to the target, the Job Progress box opens, indicating the Connector’s progress in sending out the item for translation or copying over the content. Each target language represents an item. Click Close at any time to close the Job Progress box. The processing and sending continues in the background.
- If you sent the content items to the Translation Queue, a message box opens, indicating that the Connector sent the content and the source and target languages. Click OK to close the message box.
Important: If the Connector sent the item to the Translation Queue, you must approve it there to send it out for translation. For detailed instructions, see Submitting Content for Translation from the Translation Queue.
Note: The Connector never sends out shared fields for translation, because these fields are shared across all versions and languages of an item.
For information about the events that occur when the Connector sends out content for translation, see Sending Content to Translation.
4 - Submitting Content for Translation from the Experience Editor
This section describes how to submit a content item for translation using the Sitecore Experience Editor. Depending on your company’s Connector configuration, when you submit the item for translation, either:
- The Connector immediately sends out the item for translation.
- The Connector sends the item to the Translation Queue, which is a holding area for items that are ready for translation.
For instructions on submitting a content item for translation using the Sitecore Content Editor, see Submitting Content for Translation from the Translation Queue.
- In the Sitecore Experience Editor ribbon, click the Lionbridge Translation tab.
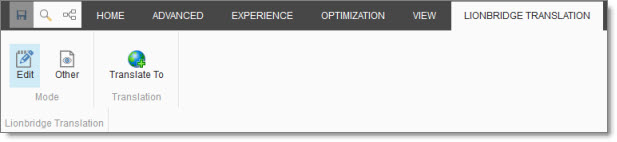
- In the Lionbridge Translation section, click the Translate To button.
Note: This button is displayed only if the content item is in the Reviewing workflow state.
- Optional. Depending on your company’s Sitecore configuration, an additional comment box may be displayed. If so, you can enter a comment and click OK.
The Automatic Item export for translation dialog box opens.
The following options may be available, depending on your company’s Connector configuration:
| Option |
Description |
| Send Dependent Items |
Select this check box to include items from the layout and final layout that are dependent on the selected content item. This is useful, for example, if a page item has multiple layers with different data sources, and you want to translate all the items displayed in the page. The number in parentheses indicates the number of dependent items. For a detailed description of the default behavior of this check box, see Understanding the Send Dependent Items Check Box. |
| Profile |
If you have been assigned to a team profile, select the team profile to use for this translation job. Displayed only if you have been assigned to a team profile. |
| To Language |
Select the check boxes for the target languages into which you want to translate the content. If you want to translate the content into all available target languages, select the Select All check box. - When you select a target language, if an error states that the language code is misconfigured, it means that you do not have read access to that language. You require read access to a language to send out content for translation to that language. If you select a target language for which this content item is currently in translation, then a warning message is displayed. Click OK to close the warning message.
- Depending on your company’s Connector configuration, some languages may already be selected. If so, you can clear any selected languages that you do not want to include.
Note: Your company’s Connector configuration determines the format of the displayed language name. For more information, refer to the Lionbridge Connector for Sitecore Installation and Configuration Guide. |
| Use Local TM |
Determines whether to check each field of the source version for any content changes, and send only changed content fields out for translation. If a field was previously translated and it has not changed, then the Connector does not send it for translation again: Instead, it uses the stored translation. - When this check box is selected, the Connector sends only changed content fields out for translation. This may reduce translation costs, but it increases the processing time before the Connector sends out the items for translation.
- When this check box is cleared, the Connector sends all specified source content for translation, even if it has not changed since it was previously sent for translation.
Note: If the Use Local TM feature is enabled, the Connector checks each field of the source version for any content changes, and it sends only changed content fields out for translation, to ensure that all target versions reflect these changes. This option may also not be available based your company’s Connector configuration. For details, refer to the description of the Use Local TM setting in the Lionbridge Connector for Sitecore Installation and Configuration Guide. |
| Send SEO fields or Send Standard fields |
Select the check boxes for the types of content to send out for translation.
Send SEO fields: The Connector sends fields defined in the SEO Fields section of the Lionbridge Connector Settings item for translation. Cleared by default.
Send standard fields: The Connector sends the fields specified by the Field Types Need Translation parameter in the Bulk Translation section of the /sitecore/system/Settings/Lionbridge Settings/Lionbridge Connector Settings/ item. Selected by default.
For more information, refer to the Lionbridge Connector for Sitecore Installation and Configuration Guide. |
| Select one of the following Send To Options: |
|
| Send items to translation queue |
The Connector sends the content item to the Translation Queue, where a user must approve it to send it out for translation. |
| Send items to translation provider |
The Connector sends the content item to the Content API Platform, which sends it to the translation provider specified in the company’s routing rules. The Connector displays additional fields below, where you can specify additional information.
Recommendation: Select this option if you need to quickly send out content and do not need to arrange or filter it, for example, by language.
Job Name: Your name for this translation job.
Translation Provider: If your company has multiple translation providers, and if your company’s Connector configuration enables selecting the translation provider (instead of using automatic routing rules), you can select the provider for this item in the dropdown list.
Delivery Date: The requested translation deadline. This is the date when you expect the translated content to return. By default, it is two weeks from the current date. To select a different date, either type the delivery date in the field in MM/DD/YYYY format, or click the arrow and select a different date in the calendar that opens. This information is sent to the translation provider as metadata of the translation package.
Note: The default displayed date is based on your company’s Connector configuration.
Recommendation: Discuss with your translation provider whether to use the information in this field.
PO Reference: The purchase order reference number. You can select a number from the list or enter a number. This field may be mandatory, depending on your translation-provider configuration.
Special Instruction: Any additional instructions for Lionbridge Freeway. Displayed only if Lionbridge Freeway is selected in the Translation Provider box, above.
Analysis Code: The analysis codes for the translation. Displayed only if: - Lionbridge Freeway is selected in the Translation Provider box, above.
- The Connector is configured to display these fields.
You specify the analysis codes that are relevant to your content. Your Lionbridge setup determines which analysis codes are available for you to specify, and the values available for selection for each analysis code. For example, the Region, Department, and Priority analysis codes may be available for you to specify.
Description: A description of the translation job, including any special instructions or requests. Displayed only if a translation provider other than Freeway is selected in the Send to box, above.
Send for Quote: Select this check box to inform the translation provider that you want to receive a quote before the translation process starts. Displayed only if supported for the selected translation provider and enabled in your Connector installation. |
| Copy source to target only |
The Connector copies the source content to the target content item without sending it out for translation. This is useful when there is content that you do not want to translate, but that you want to include in the target version. The Connector displays an additional field below, where you specify the job name.
Job Name: Your name for this job. |
- Click OK to close the dialog box and send the content item to the next step, as described above.
Note: If you click Cancel to close the dialog box without saving your changes, the item’s workflow state is displayed as Sending for Translation, which is incorrect. To display the item’s correct workflow state, which remains Reviewing, refresh the Web page in your browser.
- If you sent the content item to a translation provider, or copied the source content to the target, the Job Progress box opens, indicating the Connector’s progress in sending out the item for translation or copying over the content. Each target language represents an item. Click Close at any time to close the Job Progress box. The processing and sending continues in the background.
- If you sent the content items to the Translation Queue, a message box opens, indicating that the Connector sent the content and the source and target languages. Click OK to close the message box.
Important: If the Connector sent the item to the Translation Queue, you must approve it there to send it out for translation. For detailed instructions, see Submitting Content for Translation from the Translation Queue.
Note: The Connector never sends out shared fields for translation, because these fields are shared across all versions and languages of an item.
For information about the events that occur when the Connector sends out content for translation, see Sending Content to Translation.
5 - Sending Multiple Content Items for Translation
The Bulk Translation feature enables you to select, send, and receive large quantities of content for translation in only a few clicks.
This is useful for quickly sending out entire sections, sites, or content trees for translation.
You access the Bulk Translation feature from either the Lionbridge Translation tab on the Sitecore Content Editor ribbon, or from the Start menu on the Sitecore Desktop.
You can also access this feature from Sitecore search results. For details, see Submitting Content for Translation from Sitecore Search Results.
Important: When you use the Bulk Translation tool, you can initially select a large set of content items, based on the content tree, and then in subsequent steps you exclude items from that group that you do not want to send out for translation.
Bulk translation and workflow
Recall that you do not need to attach a translation workflow to the content items when you use the bulk translation feature. However, the Assign Translation Workflow to items with no workflow defined? option in the wizard enables you to attach a workflow to the items you send out, and you can set the workflow state for those items. This is recommended because it helps manage those items later, especially in the workbox.
Recommendation: Plot out your requirements before starting the Bulk Translation wizard, because this feature has powerful implications. Consider the following issues:
- Does every item already have a workflow attached?
- If every item does not already have a workflow attached, do you want to attach the translation workflow to those items?
- If you want to attach the translation workflow to items previously without a workflow, which workflow state do you want to assign to those items?
- What are the repercussions of attaching the workflow and assigning the workflow state to these items?
To send content for translation using the Bulk Translation feature, you complete the following steps:
-
Open the Bulk Translation wizard and specify initial settings in the Settings page of the wizard. For detailed instructions, see Specifying Initial Settings in the Bulk Translation Wizard.
-
In the Choose Items page of the wizard, you choose which items to send for translation. For detailed instructions, see Choosing which Items to Translate.
-
In the Specify Source Filters page of the wizard, you can specify the filters to apply to the source content, which limits the content that you send for translation. For detailed instructions, see Specifying Filters for Source Content.
Note: This page may not be available, depending on your company’s configuration.
- In the Excluding Item(s) page of the wizard, you can precisely control the translation parameters for each content item you sent for translation. This helps you manage any exceptional translation requirements. For detailed instructions, see Excluding Items from Translation.
Note: This page may not be available, depending on your company’s configuration.
- In the Translation Options page of the wizard, you can specify the following options:
- assign a workflow to items without a workflow
- set the workflow state for the content items you are sending to translation
- send only changed content fields for translation
- decide how to process the content:
- immediately send the content item out for translation
- send it to the Translation Queue first
- copy the source content to the target version without translating it
For detailed instructions, see Setting Translation Options.
- In the Summary Report page of the wizard, you review the content items you are sending for translation as well as the target languages, if applicable, and you send the content items to the next step, which you specified earlier in the Translation Options page of the wizard. For detailed instructions, see Reviewing and Submitting Content Items for Translation.
5.1 - Specifying Initial Settings in the Bulk Translation Wizard
To get started, you open the Bulk Translation wizard and specify the source and target languages and whether to select items from a previous translation job or new settings.
To send content for translation using the Bulk Translation feature:
- Do one of the following to open the Bulk Translation wizard:
- In the Sitecore Content Editor ribbon, click the Lionbridge Translation tab, and then in the Translation Tools section, click Bulk Translation.

- In the Sitecore Desktop, click the Sitecore menu, and then select All Applications > Lionbridge Translation > Bulk Translation from the menu.
The Settings page of the wizard opens.
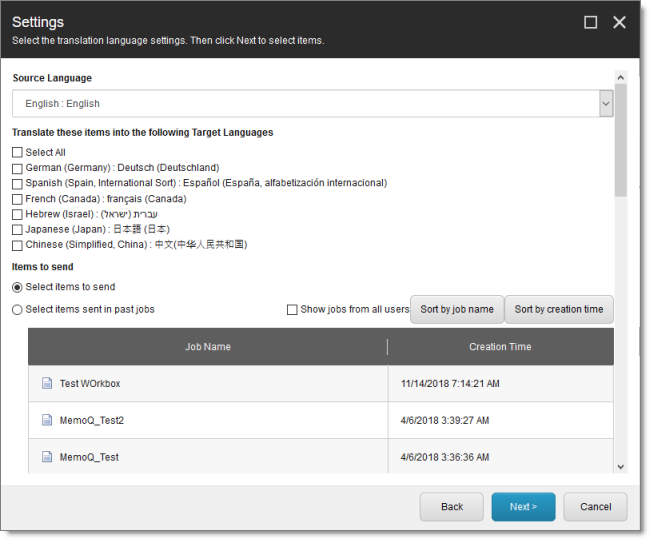
- In the Settings page, you choose the following settings:
| Setting |
Description |
| Choose Your Team |
If you have been assigned to a team profile, select the team profile to use for this translation job. Displayed only if you have been assigned to a team profile. |
| Source Language |
The Connector will send items in this source language for translation. By default this is the default Sitecore language. You can select another language from the list.
Note: Your company’s Connector configuration determines the format of the displayed language name. For more information, refer to the Lionbridge Connector for Sitecore Installation and Configuration Guide. |
| Translate these items into the following Target Languages |
Select the check boxes for all the target languages into which you want to translate the source content. The list displays all the Sitecore languages that are set up for the Connector.
Tip: Use the Select All check box to select all available languages.
When you select a target language, if an error states that the language code is misconfigured, it means that you do not have read access to that language. You require read access to a language to send out content for translation to that language.
Note: In the later Excluding Item(s) page of this wizard, you can select individual content items from the list of content items and modify their target languages. This is useful for any specific exceptions that may require special target language treatment.
Note: Your company’s Connector configuration determines the format of the displayed language name. For more information, refer to the Lionbridge Connector for Sitecore Installation and Configuration Guide. |
| Items to send |
This section displays the names of items you can send for translation and the date and time they were created. By default, these items are sorted in order of reverse chronological creation date.
- To sort these items by name, click Sort by job name.
- To sort these items by date, click Sort by creation date.
You can choose one of the following settings:
- Select items to send: This displays all items in the specified source language.
Tip: If you opened the wizard from Sitecore search results, ensure that Select items to send is selected.
- Select items sent in past jobs: This displays all items in the specified source language that were previously sent for translation.
- If you are an admin user, you can select the Show jobs from all users check box to view jobs submitted by other users. This enables you to select items from those jobs to send for translation.
Note: Later in the wizard you can exclude items from this list. |
- When you are done, click Next.
-
If in the previous step you selected Select items to send, then the Choose Items page of the wizard opens. For detailed instructions, see Choosing which Items to Translate.
-
If in the previous step you selected Select items sent in past jobs, then the Translation Options page of the wizard opens. For detailed instructions, see Setting Translation Options.
5.2 - Choosing which Items to Translate
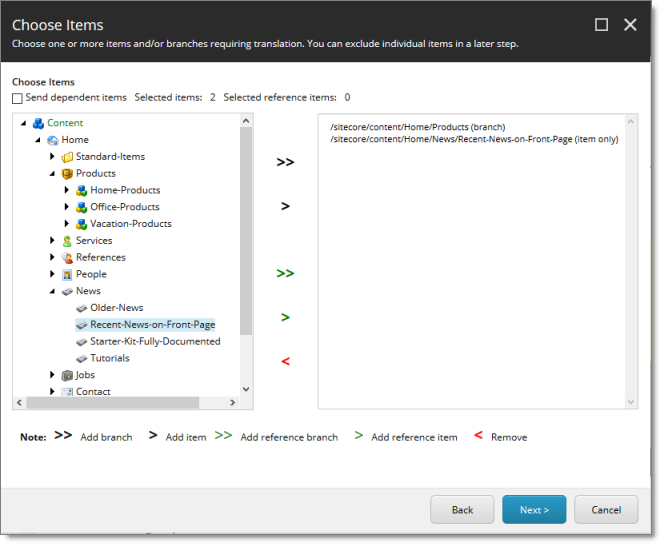
After selecting the Select items to send radio button and then clicking Next in the Settings page of the Bulk Translation wizard, the Choose Items page opens.
In the Choose Items page, you select the source items to send for translation. You can select individual items or all the items in a branch either for translation or as reference items (support assets), which provide helpful context for translators. In the later Excluding Item(s) page of this wizard, you can exclude items so that you do not send them for translation. If you send content to the Translation Queue, you can further sort and select the items there to send for translation.
Note: If you opened the wizard from Sitecore search results, those items are already selected.
Note about binary assets: Select binary assets to send for translation from sitecore/Media Library.
-
Use the Expand and Collapse icons to navigate the tree, and then use the following buttons to collect the items and branches of items for translation in the right pane of this page:
-
Use the following buttons to specify which items to collect for translation:
-
To add a branch of content items to the right pane, select it and click the black double-arrow icon  . It is displayed in the right pane following by (branch).
-
To add one content item to the right pane, select it and click the black single-arrow icon  . It is displayed in the right pane following by (item).
-
To add a branch of reference files to the right pane, select it and click the green double-arrow icon  . It is displayed in the right pane, in green, under the Reference items heading, following by (branch).
-
To add one reference file to the right pane, select it and click the green single-arrow icon  . It is displayed in the right pane, in green, under the Reference items heading, following by (item).
-
To remove one or more items from the right pane, select them and click  .
.
Tip: If you specify the highest root in your Sitecore project and click , all content from a site or Content Server, you can send all your project content for translation at one time.
- Optional. To include items from the layout and final layout that are dependent on the selected content items, select the Send dependent items check box at the top of the page. This is useful, for example, if a page item has multiple layers with different data sources, and you want to translate all the items displayed in the page. For a detailed description of the default behavior of this check box, see Understanding the Send Dependent Items Check Box.
Notes: Your company can configure which dependent items the Connector sends for translation when this check box is selected. It can also configure the default value of this check box. For detailed instructions, refer to the Lionbridge Connector for Sitecore Installation and Configuration Guide.
- When you are done, click Next.
The Specify Source Filters page of the wizard opens. For detailed instructions, see Specifying Filters for Source Content.
Note: This page may not be available, depending on your company’s configuration. For detailed configuration instructions, refer to the Lionbridge Connector for Sitecore Installation and Configuration Guide. If this page is hidden, then the Excluding Item(s) page of the wizard opens instead. For detailed instructions, see Excluding Items from Translation. If that page is also hidden, based on your company’s configuration, then the Translation Options page of the wizard opens instead. For detailed instructions, see Setting Translation Options.
5.3 - Specifying Filters for Source Content
After clicking Next in the Choose Items page of the Bulk Translation wizard, the Specify Source Filters page opens.
Note: This page may not be available, depending on your company’s configuration. For detailed configuration instructions, refer to the Lionbridge Connector for Sitecore Installation and Configuration Guide. If this page is hidden, the Excluding Item(s) page of the wizard opens instead. For detailed instructions, see Excluding Items from Translation. If that page is also hidden, based on your company’s configuration, then the Translation Options page of the wizard opens instead. For detailed instructions, see Setting Translation Options.
In the Specify Source Filters page, you specify the filters to apply to the source content, which limits the content that you send for translation. It enables you to apply very specific conditions and precisely control which content you send out for translation. For example, using the filters on this page, you can select all the items created by a certain user, during a given date range, and then send only the latest version of those items.
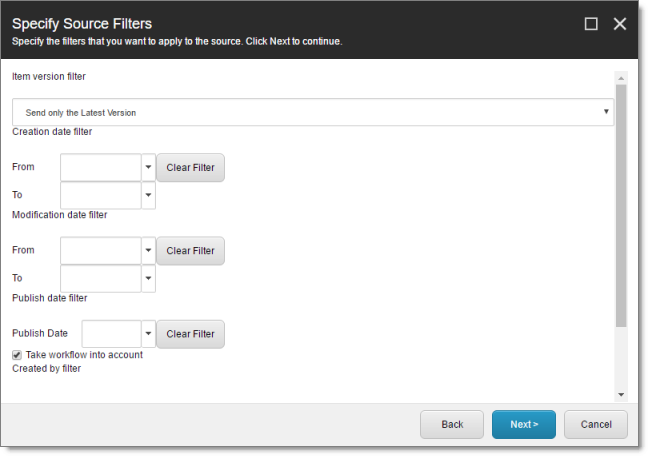
Important: These filters are inclusive parameters. Only items that match all filter parameters will be available for further selection on subsequent pages of the wizard.
You can use the following filters:
| Filter |
Description |
| Item version filter |
You filter the version or versions of the content items that the Connector sends out for translation. The following options are available:
* **Send only the latest version:** The Connector sends only the latest version of content for translation. This latest version may be either published or unpublished.
* **Send the latest published version:** The Connector sends only the latest published version of content for translation. This is suitable when a company publishes content before sending it for translation.
**Note:** The default value of this setting is **Send only the latest version**. However, you can change the default value to **Send the latest published version** by selecting the **Send latest published version as default** check box in the **Bulk Translation** section of the /sitecore/system/Settings/Lionbridge Settings/Lionbridge Connector Settings/ item. For detailed instructions, refer to the Lionbridge Connector for Sitecore Installation and Configuration Guide. |
| Creation date filter |
You filter the creation date of the content items that the Connector sends out for translation. In the From and To fields, either enter the range of content-creation dates in MM/DD/YYYY format, or click the arrow and select a date from the calendar that opens. |
| Modification date filter |
You filter the modification date of the content items that the Connector sends out for translation. In the From and To fields, either enter the range of content-modification dates in MM/DD/YYYY format, or click the arrow and select a date from the calendar that opens. |
| Publish date filter – Publish Date |
You filter the publication date of the content items that the Connector sends out for translation. In the Publish Date field, either enter the content-publication date in MM/DD/YYYY format, or click the arrow and select a date from the calendar that opens. |
| Publish date filter – Take workflow into account |
This setting determines whether the Connector checks the Publish date filter.
* If this check box is selected (default value), then the Connector includes in the filter only items that both match the publish date and those that need publishing to be approved through the workflow.
* If this check box is cleared, then the Connector includes in the filter items that match the publish date whether or not publishing must be approved through the workflow. |
| Created by filter |
You create a filter based on who created the content item. This can be either users, or roles assigned to users, or both.
* To add a filter to this list, click **Add**. For detailed instructions, see Adding a Source Filter when Sending Multiple Items for Translation.
* To remove a filter from this list, select it and click **Remove**. |
| Updated by filter |
You create a filter based on who updated the content item in Sitecore. This can be either users, or roles assigned to users, or both.
* To add a filter to this list, click **Add**. For detailed instructions, see Adding a Source Filter when Sending Multiple Items for Translation.
* To remove a filter from this list, select it and click **Remove**. |
Tip: To clear the information from any filter, click the corresponding Clear Filter button.
- When you are done, click Next.
The Excluding Item(s) page of the wizard opens. For detailed instructions, see Excluding Items from Translation.
Note: This page may not be available, depending on your company’s configuration. For detailed configuration instructions, refer to the Lionbridge Connector for Sitecore Installation and Configuration Guide. If this page is hidden, then the Translation Options page of the wizard opens instead. For detailed instructions, see Setting Translation Options.
5.3.1 - Adding a Source Filter when Sending Multiple Items for Translation
The Add an Account dialog box opens when you click the Add button in the Created by filter section or the Updated by filter section in the Specify Source Filters page of the Bulk Translation wizard.
You use the Add an Account dialog box to create a filter for sending bulk content for translation based on roles or individual users who created or updated the content items.
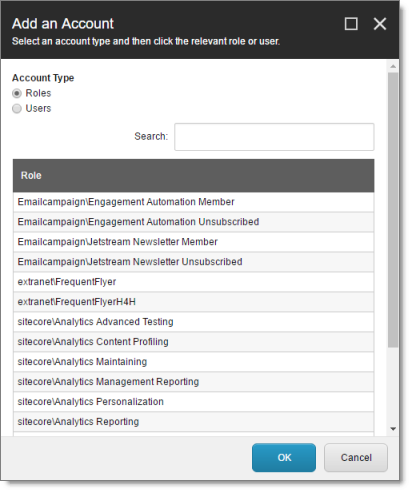
By default, this window displays all roles. By default, the items in the list are displayed in alphabetical order.
- To display users instead of roles, click Users in the Account Type box at the topic of the window.
Roles are displayed in alphabetical order.
If users are displayed, they are displayed in alphabetical order.
You select the roles for the filter. For example, if you are creating a filter to include only content created by users assigned to certain roles, you select these roles.
Tips: Use the Shift key to select a range of adjacent roles or users. Use the Ctrl key to select multiple non-adjacent roles or users.
For information about navigating the pages in the list, see Navigating Pages in a List.
When you are done, click OK.
5.4 - Excluding Items from Translation
After clicking Next in the Specify Source Filters page of the Bulk Translation wizard, the Excluding Item(s) page opens.
Note: This page may not be available, depending on your company’s configuration. For detailed configuration instructions, refer to the Lionbridge Connector for Sitecore Installation and Configuration Guide. If this page is hidden, then the Translation Options page of the wizard opens instead. For detailed instructions, see Setting Translation Options.
Optional. In the Excluding Item(s) page of the wizard, you can precisely control the translation parameters for each content item you sent for translation. This helps you manage any exceptional translation requirements.
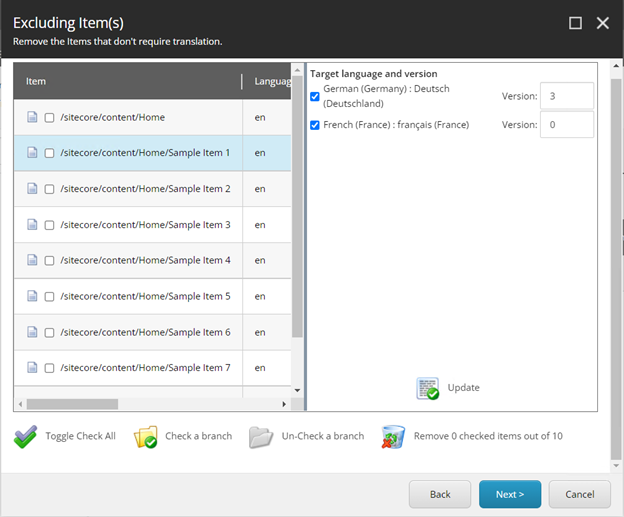
In this page of the wizard, you can:
- Remove content items from the list, so that you do not send them out for translation.
Note: If you previously selected the Send dependent items check box at the bottom of the earlier Choose Items page in this wizard, above, then if you exclude some items from the list, their dependent items will automatically be excluded.
-
Change the target language of each item to send out for translation. For example, you may select a section of your web site to be bulk exported for translation into German, but you want to translate the top-level page items of that section into Spanish and French too.
-
Change the version of each item to send out for translation for each target language. For example, you may want an older version of the source content translated into a specific target language.
-
Remove one or more content items from the list, so that you do not send it out for translation.
Select the corresponding check boxes in the left page, and click  Remove X checked items out of Y at the bottom of the list, where X is the number of items that are already selected for removal, and Y is the total number of items displayed in the list.
Tips: Use the Shift key to select a range of adjacent items. Use the Ctrl key to select multiple non-adjacent items. To select or clear all content items in the list, click  Toggle Check All.
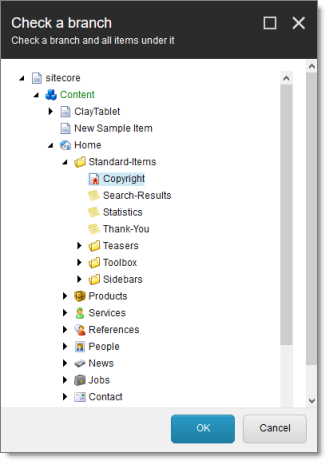
- Select a branch to exclude its child items from the list of content items to send out for translation.
Tip: You can also exclude a branch that was not selected explicitly in the earlier Choose Items page of the wizard. This enables you to exclude items that were automatically included when you selected the Send dependent items check box on that page.
- Click
 Check a branch to open the Check a branch dialog box.
-
Click to highlight the branch to exclude from this job.
-
Click OK.
The Remove X checked items out of Y field updates to indicate the number of items to remove from this job.
- Click Remove X checked items out of Y at the bottom of the list, where X is the number of items that are already selected for removal, and Y is the total number of items displayed in the list.
- Remove a branch from the exclusion list, so that the items in the branch will still be sent for translation.
Note: This option is relevant only after clicking Check All or Check a Branch, as described above.
- Click
 Un-Check a branch to open the Un-Check a branch dialog box.

-
Click to highlight the branch to remove from the exclusion list.
-
Click OK.
The Remove X checked items out of Y field updates to indicate the number of items to remove from this job.
- Click Remove X checked items out of Y at the bottom of the list, where X is the number of items that are already selected for removal, and Y is the total number of items displayed in the list.
- Change the target languages and versions to translate.
Click a content item in the left pane to highlight it, as shown in the above screen capture. The right pane now displays the target languages set up for the Connector. Any target languages that you selected earlier, in the Settings page of the wizard, are selected. You can change this default selection by selecting the check boxes for additional target languages or clearing the check boxes for selected target languages.
- Change the version assigned to the content item
Change the version number in the Version box for the language. If you select Default, the version number is incremented by one.
To save your changes to a target language and version for a content item, click  Update at the bottom of the right pane.
- When you are done, click Next.
The Translation Options page of the wizard opens. For detailed instructions, see Setting Translation Options.
5.5 - Setting Translation Options
After clicking Next in the Excluding Item(s) page of the Bulk Translation wizard, the Translation Options page opens.
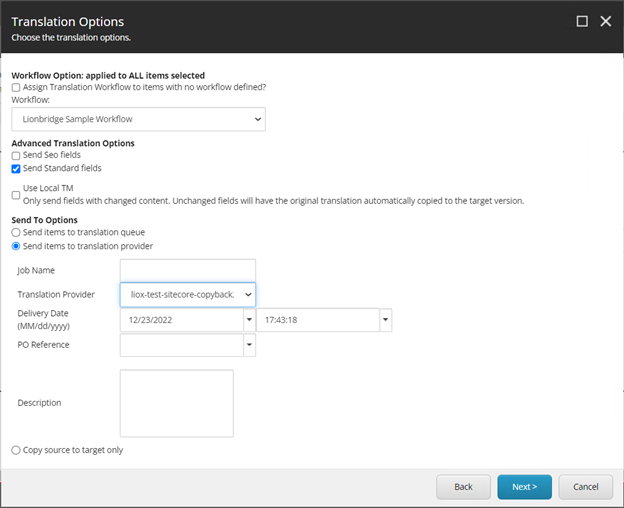
In the Translation Options page of the wizard, you can assign a workflow to items without a workflow, set the workflow state for the content items you are sending to translation, send only changed content fields for translation, and decide whether to immediately send the content item out for translation, send it to the Translation Queue first, or copy the source content to the target version without translating it. You can set the following options:
| Option |
Description |
| Assign Translation Workflow to items with no workflow defined? |
You can attach a translation workflow to the content items you send out for translation, and you can set the workflow state for those items. This is recommended because it helps manage those items later, especially in the workbox.
Tip: If you initially send out your entire site for translation before setting up workflow, do not set the bulk items to an initial workflow state.
Note: Depending on your company’s configuration, you may not be able to send out content items for translation unless they are attached to a translation workflow. You can change this configuration with the Content API.PreventSentingItemsWithoutWorkflow setting in the CT3Translation.config file. For details, refer to the Lionbridge Connector for Sitecore Installation and Configuration Guide.
Note: By default, the translation workflow is the Lionbridge Sample Workflow. You can set the default workflow or workflow state using the Content API.StateToAssignInBulkTranslation setting in the CT3Translation.config file. For details, refer to the Lionbridge Connector for Sitecore Installation and Configuration Guide.- To assign the translation workflow or workflow state to any content items without a workflow assigned, select this check box.
- To proceed with the translation process without assigning a translation workflow or workflow state to content items without a workflow, clear this check box.
With state: If you select this check box, you select the workflow state to apply to all source content items that previously did not have a translation workflow assigned. For a list and description of workflow states, see Workflow States. |
| Send SEO fields or Send Standard fields |
Select the check boxes for the types of content to send out for translation.- Send SEO fields: The Connector sends fields defined in the SEO Fields section of the Lionbridge Connector Settings item for translation. Cleared by default.
- Send standard fields: The Connector sends the fields specified by the Field Types Need Translation parameter in the Bulk Translation section of the /sitecore/system/Settings/Lionbridge Settings/Lionbridge Connector Settings/ item. Selected by default.
For more information, refer to the Lionbridge Connector for Sitecore Installation and Configuration Guide.
Note: This section may not be available, depending on your company’s configuration. For detailed configuration instructions, refer to the Lionbridge Connector for Sitecore Installation and Configuration Guide. |
| Use Local TM: Only send fields with changed content. Unchanged fields will have the original translation automatically copied to the target version. |
Determines whether to check each field of the source version for any content changes, and send only changed content fields out for translation. If a field was previously translated and it has not changed, then the Connector does not send it for translation again: Instead, it uses the stored translation.- When this check box is selected, the Connector sends only changed content fields out for translation. This may reduce translation costs, but it increases the processing time before the Connector sends out the items for translation.
- When this check box is cleared, the Connector sends all specified source content for translation, even if it has not changed since it was previously sent for translation.
Note: If the Use Local TM feature is enabled, the Connector checks each field of the source version for any content changes, and it sends only changed content fields out for translation, to ensure that all target versions reflect these changes. This option may also not be available based your company’s Connector configuration. For details, refer to the description of the Use Local TM setting in the Lionbridge Connector for Sitecore Installation and Configuration Guide.
Note: This option may not be available, depending your company’s configuration. For detailed configuration instructions, refer to the Lionbridge Connector for Sitecore Installation and Configuration Guide. |
| Select one of the following Send To Options: |
|
| Send items to translation queue |
The Connector sends the content items to the Translation Queue, where a user must approve them to send them out for translation.
Recommendation: Select this option if you want to use the Translation Queue to batch together many items for translation into many target languages, but then only immediately send out those items for translation into a single language. |
| Send items to translation provider |
The Connector sends the content items to the Content API Platform, which sends it to the translation provider specified in the company’s routing rules. The Connector displays additional fields below, where you can specify additional information.
Recommendation: Select this option if you need to quickly send out content and do not need to arrange or filter it, for example, by language.- Job Name:Your name for this translation job.
- Translation Provider: If your company has multiple translation providers, and if your company’s Connector configuration enables selecting the translation provider (instead of using automatic routing rules), you can select the provider in the dropdown list.
- Delivery Date: The requested translation deadline. This is the date when you expect the translated content to return. By default, it is two weeks from the current date. To select a different date, either type the delivery date in the field in MM/DD/YYYY format, or click the arrow and select a different date in the calendar that opens. This information is sent to the translation provider as metadata of the translation package.
Note: The default displayed date is based on your company’s Connector configuration.
Recommendation: Discuss with your translation provider whether to use the information in this field. - PO Reference: The purchase order reference number. You can select a number from the list or enter a number. This field may be mandatory, depending on your translation-provider configuration.
- Special Instruction: Any additional instructions for Lionbridge Freeway. Displayed only if Lionbridge Freeway is selected in the Translation Provider box, above.
- Analysis Code: The analysis codes for the translation. Displayed only if:
Lionbridge Freeway is selected in the Translation Provider box, above.- The Connector is configured to display these fields.
You specify the analysis codes that are relevant to your content. Your Lionbridge setup determines which analysis codes are available for you to specify, and the values available for selection for each analysis code. For example, the Region, Department, and Priority analysis codes may be available for you to specify. - Description: A description of the translation job, including any special instructions or requests. Displayed only if a translation provider other than Freeway is selected in the Send to box, above.
- Send for Quote: Select this check box to inform the translation provider that you want to receive a quote before the translation process starts. Displayed only if supported for the selected translation provider and enabled in your Connector installation.
|
| Copy source to target only |
The Connector copies the source content to the target content item without sending it out for translation. This is useful when there is content that you do not want to translate, but that you want to include in the target version. The Connector displays an additional field below, where you specify the job name.
Job Name: Your name for this job. |
- When you are done, click Next.
The Summary Report page of the wizard opens. For detailed instructions, see Reviewing and Submitting Content Items for Translation.
5.6 - Reviewing and Submitting Content Items for Translation
After clicking Next in the Translation Options page of the Bulk Translation wizard, the Summary Report page opens. You can review the content items you are sending for translation as well as the target languages, if applicable.
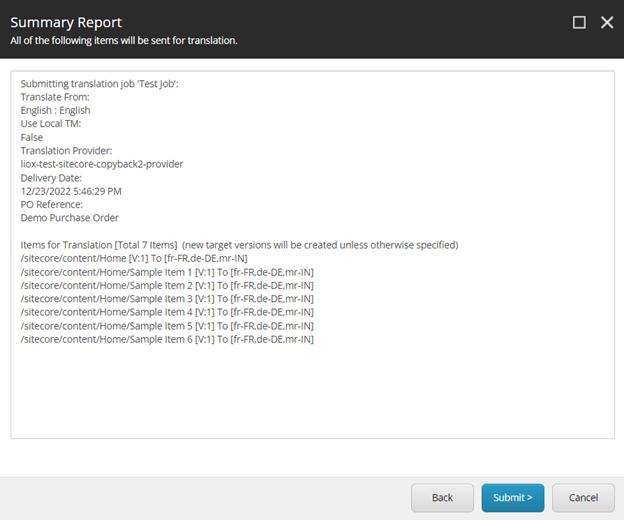
If you select a target language for which one or more content items are currently in translation, then a warning message is displayed. Click OK to close the warning message.
Tip: To remove the duplicate content items from the wizard, click Back.
To submit content items for translation:
- Click Submit to send the content items to the next step, which you specified earlier in the Translation Options page of the wizard.
The final page of the wizard opens.
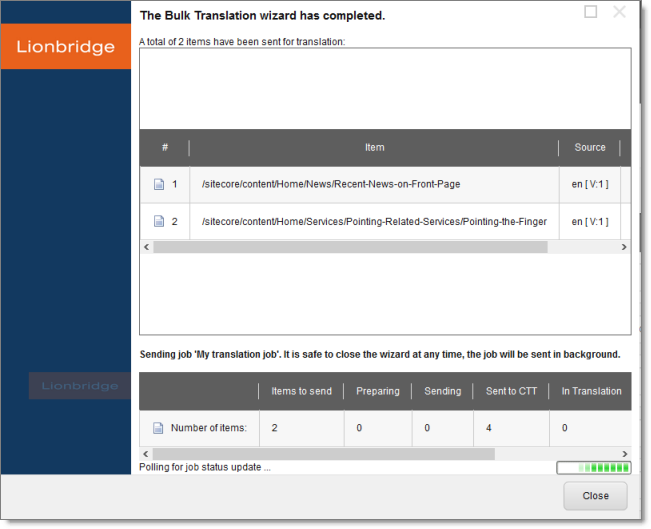
This page displays the following information:
-
The number of content items sent out for translation, to the Translation Queue, or copied over to the target version without translation.
-
Whether the items were sent out for translation, to the Translation Queue, or copied over to the target version without translation.
Important: If the Connector sent the items to the Translation Queue, you must approve them there to send them out for translation. For detailed instructions, see Submitting Content for Translation from the Translation Queue.
- A list of all content items, including their paths, that the Connector sent out for translation, to the Translation Queue or copied over to the target version without translation.
If you sent the content items to a translation provider, or copied the source content to the target, the Job Progress box is displayed at the bottom of the page, indicating the Connector’s progress in sending out the items for translation or copying over the content. The Number of Items refers to the number of content items in the source language. In the other columns, each target language represents an item.
- Click Close to close the wizard.
The processing and sending continues in the background.
6 - Submitting Content for Translation from Sitecore Search Results
You can send content items from Sitecore search results to the Bulk Translation wizard. In the Bulk Translation wizard, you can choose to send these content items:
- directly to a translation provider
- to the Translation Queue, so that you can send them to a translation provider later
- copy the source files to the target version without translation
To send content for translation from Sitecore search results:
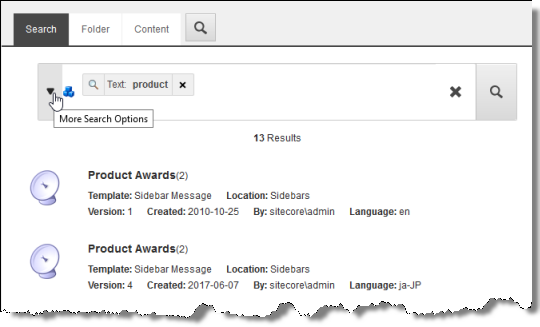
- In the Sitecore Content Editor, in the content area, click the Search icon
 to open the Search tab, so that the Search bar and button are displayed.

-
In the Search field, enter the keywords that characterize the items that you want to search for, or build a query, and then click Search. For detailed instructions on searching in Sitecore, refer to the Sitecore documentation, at: https://doc.sitecore.net/sitecore_experience_platform/content_authoring/searching/search_for_an_item.
-
After the search results are displayed, click the More Search Options icon  on the left side of the Search field, and select Search Operations from the expanding menu.
The menu expands further.
- Under Search Operations, click the Translate link.
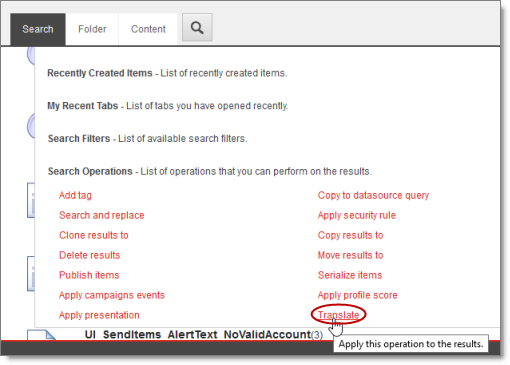
The Bulk Translation wizard opens.
- Follow the steps in the Bulk Translation wizard to send the content items directly to your translation provider, to the Translation Queue, or to copy the source items to the target version without translation. For detailed instructions, see Sending Multiple Content Items for Translation.
Note: In the Bulk Translation wizard, ensure that in the Settings page, in the Items to send section, you do not change the default selection of Select items to send. On the next page of the wizard (the Choose Items page), the items from the Sitecore search results are automatically selected.
7 - Submitting Content for Translation from the Translation Queue
You submit content for translation from the Translation Queue in the following scenarios:
-
When you reviewed content, you submitted it to the Translation Queue, by selecting the Send items to translation queue radio button, instead of immediately sending it for translation, as described in the previous sections:
-
Your company is configured to always submit content items to the Translation Queue before sending them out for translation.
Submitting content to the Translation Queue before sending it out for translation has the following advantages:
-
You may not want to send out each content item individually as soon as you finish reviewing it. The Translation Queue facilitates your management of reviewed content, so that you do not forget about sending individual reviewed content items for translation.
-
Your translation provider may prefer receiving fewer but larger batches of content to translate, rather than individual content items, as this facilitates project preparation, resource assignment, and file analysis.
-
If you want to translate many items into multiple languages, but you want to translate into only one target language at a time, this is a good way to manage that process.
If you or your colleagues have added content items to the Translation Queue, you must access it and approve the files you want to send out.
Note: If you do not approve content items in the Translation Queue, the Connector does not send them out for translation.
When you send content for translation from the Translation Queue, you can add job metadata, including a job name and a requested delivery date, when the translations will be returned.
Note: These instructions assume you already have content items in the Translation Queue. For information on submitting content to the Translation Queue, see Submitting a Content Item for Translation using the Content Editor.
To submit one or more content items from the Translation Queue for translation:
- In the Sitecore Content Editor ribbon, click the Lionbridge Translation tab, and then in the Translation Tools section, click Translation Queue.
The Translation Queue opens.
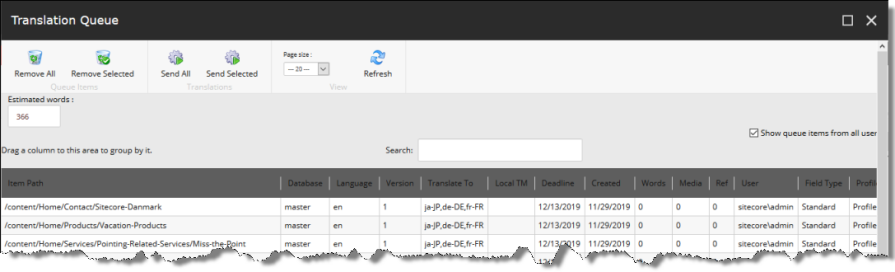
The top of the window displays the total number of estimated words in all the content items in the queue.
The window displays all the content items in the queue that you submitted.
Note: You can group the content items by column. For detailed instructions, see Grouping Content Items by Column.
Note: If you are assigned to the sitecore\Translation Administrator role, the Show queue items from all users check box is displayed. To view all items in the queue, select this check box.
The window displays the following information about the content items in the queue:
| Column |
Description |
| Item Path |
The path and name of the content item. |
| Database |
The database that stores this content item. |
| Language |
The language code of the source language of the content item to send for translation.
Note: Your company’s Connector configuration determines the format of the displayed language name. For more information, refer to the Lionbridge Connector for Sitecore Installation and Configuration Guide. |
| Version |
The version of the content item to send for translation.
Note: Your company’s Only keep latest source versions in Translation Queue setting determines whether this is the version initially added to the queue or the latest available source version. For more information, refer to the Lionbridge Connector for Sitecore Installation and Configuration Guide. |
| Translate To |
The language codes of the target languages into which to translate the content item.
Note: Your company’s Connector configuration determines the format of the displayed language name. For more information, refer to the Lionbridge Connector for Sitecore Installation and Configuration Guide. |
| Local TM |
Indicates whether the Use Local TM feature is enabled for this content item. This feature sends only changed content fields out for translation, which reduces translation costs.
* If this column has a value of Yes, then this feature is enabled for this content item.
* If this column is blank, then this feature is not enabled for this content item. |
| Deadline |
The requested date for received the translated content back from the translation provider, in MM/DD/YYYY format. |
| Created |
The date when the source content item was created, in MM/DD/YYYY format. |
| Words |
The number of words in the content item. |
| Media |
Indicates whether the content item is a binary asset, such as a .jpg or .pdf file or another media file. |
| Ref |
Indicates whether the content item is a reference file (support asset), which provides helpful context for the translator. |
| User |
The user who submitted this content item to the queue. Displayed only if you are assigned to the sitecore\Translation Administrator role, and if you selected the Show queue items from all users check box, described above. |
| Field Type |
The field type of the content item. |
| Profile |
If the user who submitted this content item to the queue is assigned to one or more team profiles, then this is the team profile used when submitting this item to the queue. |
Note: To change the number of items displayed on a page in the queue, select a number from the Page size dropdown list. By default, 20 items are displayed on a page.
- Do one of the following:
- Select one or more content items to send for translation, and click Send Selected.
Tips: Use the Shift key to select a range of adjacent items. Use the Ctrl key to select multiple non-adjacent items.
The Send Items Out for Translation dialog box opens.

The items you selected to send are in the items to send pane on the left. If you did not select all the items in the queue, then the items you did not select are in the items in queue pane on the right.
Note: If you selected one or more content items currently in translation to a specified target language, then the following warning message is displayed in the middle of the page: X items are currently in translation process as part of previous jobs, where X is the number of duplicate content items, and it is displayed in read. Click Show Details to view a detailed list of the duplicate content items, along with the specified source and target languages.
- Choose one of the following:
- To send the selected items to your translation provider, select Sending X items for translation to, where X is the number of selected items. If your company has multiple translation providers, and if your company’s Connector configuration enables selecting the translation provider (instead of using automatic routing rules), you can select the provider for this job in the Translation Provider dropdown list.
Enter the following information about the job in the fields at the top:
| Option |
Description |
| Profile |
If you have been assigned to a team profile, select the team profile to use for this translation job. Displayed only if you have been assigned to a team profile. |
| Delivery Date |
The requested translation deadline. This is the date when you expect the translated content to return. By default, it is two weeks from the current date. To select a different date, either type the delivery date in the field in MM/DD/YYYY format, or click the arrow and select a different date in the calendar that opens.
This information is sent to the translation provider as metadata of the translation package.
Note: The default displayed date is based on your company’s Connector configuration.
Recommendation: Discuss with your translation provider whether to use the information in this field.
|
| PO Reference |
The purchase order reference number. You can select a number from the list or enter a number. This field may be mandatory, depending on your translation-provider configuration. |
| Description |
A description of the translation job, including any special instructions or requests. Displayed only if a translation provider other than Freeway is selected in the Send to box, above. |
| Job Name |
Your name for this translation job. |
| Send for Quote |
Select this check box to inform the translation provider that you want to receive a quote before the translation process starts. Displayed only if supported for the selected translation provider and enabled in your Connector installation. |
| Special Instruction |
Any additional instructions for Freeway. Displayed only if Freeway is selected in the Sending items for translation to box, above. |
| Analysis Code |
The analysis codes for the translation. Displayed only if:
* Freeway is selected in the **Sending for translation items** to box, above.
* The Connector is configured to display these fields.
You specify the analysis codes that are relevant to your content. Your Lionbridge setup determines which analysis codes are available for you to specify, and the values available for selection for each analysis code. For example, the Region, Department, and Priority analysis codes may be available for you to specify. |
This information is delivered to your translation provider along with the content items for translation.
- To copy over the selected items to the target version, without translating them, select Copy X items from source to target language, where X is the number of selected items.
- Optional. To add other items to your job, select them in the more items in queue pane on the right and click Add.
Note: To remove items from your job, select them in the items to send pane on the left and click Remove.
- To send the items for translation or copy the source to the target, without translation, click OK.
The Job Progress box opens, indicating the Connector’s progress in sending out the items for translation or copying over the content. Each target language represents an item.
- Click Close at any time to close the Job Progress box. The processing and sending continues in the background.
Tip: To monitor the translation progress, In the Translation Tools section of the Lionbridge Translation tab, click Translation Status. For detailed instructions, see Monitoring Translation Status.
8 - Understanding the Send Dependent Items Check Box
The Send Dependent Items check box is displayed in:
- the Choose Items page of the Bulk Translation wizard
- the Automatic Item Export for Translation dialog box
The following diagram and scenarios illustrate which data sources the Send Dependent Items check box sends to translation by default.
Note: The behavior of the Send Dependent Items check box is configurable. For detailed configuration instructions, refer to the Lionbridge Connector for Sitecore Installation and Configuration Guide.
`-- sitecore
|-- content
| `-- home
| |-- pages
| | |-- page 1 Datasource: /sitecore/content/home/partials/about us/
| | |-- page 2 Datasource: /sitecore/content/home/components/component 2
| | |-- page 3
| | `-- page 4
| |-- partials
| | |-- about us Datasource: /sitecore/content/home/components/component 2
| | | `-- more details page
| | `-- more info
| `-- components
| |-- component 1
| |-- component 2 Datasources: (empty)
| | |-- sub-component 1
| | `-- sub-component 2
| |-- component 3
| `-- component 4
`-- system
Scenario 1
When sending the single item /sitecore/content/home/pages/page 1 for translation:
- /sitecore/content/home/pages/page 1 is included as the item
- /sitecore/content/home/partials/about us is included as the dependent item
- /sitecore/content/home/components/component 2 is included as the dependent item of the dependent item
Children of about us and component 2are not included, because these are not dependent items of dependent items: rather, they are children of dependent items.
Scenario 2
When sending the single item /sitecore/content/home/pages/page 2 for translation:
- /sitecore/content/home/pages/page 2 is included as the item
- /sitecore/content/home/components/component 2 is included as the dependent item
Children of component 2are not included, because these are not dependent items of dependent items: rather, they are children of dependent items.
Scenario 3
When sending the branch /sitecore/content/home/pages for translation:
- /sitecore/content/home/pages/page 1 is included as the item
- /sitecore/content/home/partials/about us is included as the dependent item
- /sitecore/content/home/components/component 2 is included as the dependent item of the dependent item
- /sitecore/content/home/pages/page 2 is included as the item
- /sitecore/content/home/pages/page 3 is included as the item
- /sitecore/content/home/pages/page 4 is included as the item
Children of component 2are not included, because the branch of /sitecore/content/home/pages is sent for translation: the branch of component 2 is not sent for translation.