-
If you are sending a single content item for translation, it must have a translation workflow assigned.
-
There are three ways to do this when you create a content item:
- Assign it to the sitecore/System/Templates/Lionbridge Settings/Lionbridge Workflow Config template. This template uses the translation workflow, which is contained in the sitecore/System/Workflows/Lionbridge Sample Workflow.
- Assign it to your own template. Ensure that your template uses the translation workflow, which is contained in the sitecore/System/Workflows/Lionbridge Sample Workflow.
- Assign it to your own template, which uses your own workflow. Ensure that the base template of your workflow is /sitecore/templates/System/Workflow/TranslationWorkflow. For detailed instructions, refer to the Lionbridge Connector for Sitecore Installation and Configuration Guide.
-
If a content item was already created, but a translation workflow was not assigned to it, you must assign a translation workflow to that item. For details, see Attaching a Translation Workflow to an Existing Content Item.
-
-
If you are sending multiple content items together using the Bulk Translation feature, you do not need to assign a translation workflow to individual content items. You can assign a translation workflow and assign a workflow state to all items without an assigned workflow. For details, see Sending Multiple Content Items for Translation.
This the multi-page printable view of this section. Click here to print.
Creating Content for Translation
- 1: Attaching a New Content Item to a Translation Workflow
- 2: Attaching a Translation Workflow to an Existing Content Item
- 3: Filtering Fields in Items that Do Not Need Translation
1 - Attaching a New Content Item to a Translation Workflow
To create an item that you can send for translation individually, you must either use a template that has the Content API Platform workflow attached, or use a template that is attached to your custom translation workflow.
Note: If you will be sending an item for translation using the Bulk Translation feature, described in Sending Multiple Content Items for Translation, you do not need to assign a template with a translation workflow to the item.
- In the Sitecore Content Editor, under Content in the content tree, locate the place in the tree where you want to create a new item that will be sent for translation. Next, right-click and select Insert > Insert from Template in the context menu.
The Insert from Template dialog box opens.
-
Select one of the following templates:
-
The template attached to the default Connector workflow, Templates/Lionbridge Settings/Lionbridge Workflow Config.
-
The template attached to your custom translation workflow, if you have created one.
-
-
Click Insert.
The item opens, displaying the Content tab.
-
Enter the content to translate in the Data section.
-
In the LionbridgeTranslation section, specify the following workflow options:
| Parameter | Description | Default Value |
|---|---|---|
| Translate From (Source Language) | The source language from which to translate the items. Select a language from the list. | Usually this is the Sitecore default language. |
| Translate To (Target Language) | The target languages that are available for translating the items attached to the workflow. To translate into specific target languages, select the corresponding check boxes. | n/a |
| Use Local TM (detect changed content and resend) | Determines whether the Use Local TM feature is available when translating items attached to this workflow. This feature checks each field of the source version for any content changes, and it sends only changed content fields out for translation, to ensure that all target versions reflect these changes. * When this check box is selected, you can activate this feature by selecting a check box in either the **Bulk Translation** wizard or the **Automatic Item Export for Translation** dialog box. The **Use Local TM** feature may reduce translation costs, but it needs the Connector translation backup data, and it increases the Connector processing time before the Connector sends out the items for translation. * When this check box is cleared, you cannot activate this feature, because the related user interface is not displayed. The Connector sends all specified source content for translation, even if it has not changed since it was previously sent for translation. |
check box is cleared |
| Requested Translation Timeframe (Days) | Determines the translation deadline when sending out the translation automatically, without using the user interface that supports entering this information in the Delivery Date field. This information is sent to the translation provider as metadata of the translation package. If you set this parameter to 14, the deadline will be two calendar weeks after you submit an item for translation. Recommendation: Discuss whether to use this feature with your translation provider(s). |
15 |
| Workflow State to set when Sending Content for Translation | The workflow state to set when a source item has been selected for translation. | /sitecore/system/ Workflows/Lionbridge Sample Workflow/ Sending for Translation |
| Workflow State to set (for Source Content) once content has been sent for translation | The workflow state to set for a source item after the Connector has sent it out for translation. For example, in some companies, when you send out the content for translation, the source is ready for publishing. In this scenario, you can set this state to Done, which is a publishable state. Alternatively, if your company has a final review process, you can set this to another state that is not publishable. | By default, this state is not set, so the source item’s state does not change when you send it out for translation. |
| Workflow State to set for Content while it is out for translation | The workflow state to set for target content when an item is being translated. The default In Translation workflow state enables you to see which items are still out for translation. It facilitates following up with your translator about items that you have sent out for translation, but that you have not yet received back. | /sitecore/system/ Workflows/Lionbridge Sample Workflow/In Translation |
| Workflow State to set when a translation has been cancelled | The workflow state to set when an item’s translation request has been cancelled. A user can cancel translation from the Translation Queue. A translation request is automatically cancelled if a fatal error occurs while sending out an item for translation, such as an incorrect language code, or insufficient user permissions. |
/sitecore/system/ Workflows/Lionbridge Sample Workflow/ Reviewing |
| Workflow State to set for target items when no translation is required | The workflow state to set for all items that do not require translation. This is useful in when using the following features: * **Copy source to target only** * **Use local TM** **Tip:** Set this state to Done, and select the **Automatically Publish content when it reaches the Final State** check box, described below. |
field is blank |
| Workflow State to set when content Translation is complete | The workflow state to set when an item translation has been completed, and it is back in Sitecore for review and publishing. | /sitecore/system/ Workflows/Lionbridge Sample Workflow/ Editing Translated Version |
| Send Content automatically using pre-configured language settings | Enables sending all items to the Translation Queue without further user action. That is, the Connector automatically uses the Translate from, Translate to and Requested Translation Timeframe information, defined above, to immediately send content to the Translation Queue without enabling the user to change these parameters: the Language Selection pop-up window does not open. * If this check box is selected, the **Language Selection** pop-up window does not open when you send content to the Translation Queue: you cannot select the target languages or the destination, but sending items for translation is streamlined. * If this check box is cleared, the **Language Selection** pop-up window opens when you send content out for translation: you can select the target languages, so the process is less streamlined. However, this provides greater control for the user. |
check box is cleared |
| Automatically Publish content when it reaches the Final State | Determines whether the Connector automatically publishes the content when an item reaches the final state of the translation workflow. * If this check box is selected, the Connector automatically publishes the content when an item reaches the final state. * If this check box is cleared, the Connector does not automatically publish the content when an item reaches the final state. |
check box is cleared |
| Publish to which Database? | The target databases for publishing content if the Connector needs to publish an item. | n/a |
| Publish child items? | Determines whether the Connector publishes child items when it publishes their parent item. * If this check box is selected, the Connector publishes child items when it publishes their parent item. * If this check box is cleared, the Connector does not publish child items when it publishes their parent item. |
check box is selected |
| Keep final state for source items? | Determines whether the workflow state of the source item changes during the translation process if it was in a final workflow state before that process started. When you translate published source items into other language versions, this setting prevents Sitecore from unpublishing those source items. | check box is selected |
2 - Attaching a Translation Workflow to an Existing Content Item
If you have a content item that is attached to a template that does not include a translation workflow, you can still prepare to send it out for translation individually. To do so, you assign a translation workflow to the content item.
Note: You can assign a translation workflow to a content item only if you can assign a workflow to that content item. This means that the content item must inherit the workflow data item from its data template. For more information, refer to the Sitecore Data Definition Reference. This guide is available in the documentation section available at https://doc.sitecore.net.
To attach a translation workflow to an existing content item:
-
In the Sitecore Content Editor, navigate to the content item to which you want to attach a translation workflow and select it.
-
In the Sitecore Content Editor ribbon, click the Review tab.
-
In the Workflow section, click Edit.
Tip: If the Workflow section is not visible, then in the Sitecore Content Editor ribbon, click the View tab and select the Standard Fields check box.
-
In the Content tab, scroll down to the Workflow section.
-
If necessary, click the Expand button
 to expand the Workflow section.

-
In the Workflow field, click the arrow to select Lionbridge Sample Workflow or another translation workflow.
-
Optional. In the State field, click the arrow to select the workflow state.
-
In the Review tab on the Sitecore Content Editor ribbon, in the Workflow section, click Check In.
3 - Filtering Fields in Items that Do Not Need Translation
You can use the Translation Filter window to filter out fields that never need translation. You can access this feature from the Sitecore Content Editor.
You initially specify which types of fields the Connector sends for translation using the Field Types Need Translation parameter. For details,refer to the Lionbridge Connector for Sitecore Installation and Configuration Guide.
You use the Translation Filter feature to further exclude certain types of fields from content that the Connector sends for translation, per the template. You can create filters when initially configuring the Connector, or you can create or update the filters at any time.
When a user sends out an item for translation, the Connector collects the content from all fields in the item with the field types specified in that parameter, in preparation for sending them out for translation. Then, if there are some fields that you do not want to send for translation, even though they belong to field types that the Connector sends out for translation, you can use the Translation Filter to exclude them.
- Do one of the following to open the Translation Filter window:
- In the Sitecore Content Editor ribbon, click the Lionbridge Translation tab, and then in the Translation Tools section, click Translation Filter.

- In the Sitecore Desktop, click the Sitecore menu, and then select All Applications > Lionbridge Translation > Translation Filter from the menu.
The Translation Filter window opens.
![]()
- Click the Add button
 to add a new filter.
The Welcome page of the Field Filter wizard opens.
- Click Next.
The Choose a content template page of the Field Filter wizard opens.
![]()
- Select the content template to associate with the fields you want to filter, and exclude from translation. Use the Expand and Collapse
 icons to navigate the tree. Click Next.
The Select Fields that you don’t want sent out for translation page of the Field Filter wizard opens.
![]()
This page displays the following information about all the fields in the template you selected:
| Column | Description |
|---|---|
| Field | The name of a field type in the template. |
| Type | The description of the field type. |
| Shared | Indicates whether the field type is shared. |
| Template | The template where the field type is located. |
- Select the check boxes of the field types you want to exclude from translation, and click Next.
Note: Shared fields are never sent for translation, so they are automatically excluded from translation. You do not need to select them.
The Don’t transfer field value page of the Field Filter wizard opens.
![]()
This page displays only the field types you selected in the previous page of the wizard.
- For each field type, indicate whether you want the Connector to copy the source-language content to the target version.
-
If you do not want the Connector to copy the source-language content of a field type to the target version, select the corresponding check box. This field type will be excluded from the target content.
-
If you want the Connector to copy the source-language content of a field type to the target version, clear the corresponding check box. This field type will be included in the target content; however, the content will be in the source language.
Click Next.
The summary page of the wizard opens.
![]()
This page displays the following information about the fields to exclude in the new filter.
| Column | Description |
|---|---|
| Template | The name of the template where the field type to exclude from translation is located. |
| Field | The name of the field type to exclude from translation. |
| Type | The type of field to exclude from translation. |
| Don’t transfer field value | Indicates whether the Connector copies the source-language content to the target version for this field type. * Blank indicates that the Connector does copy the source-language content of a field to the target version, select the corresponding check box. This field will be included in the target content; however, it will be in the source language. * yes indicates that the Connector does not copy the source-language content of a field type to the target version. The Connector does not automatically transfer the value of the field in the source version to the field in the target version. |
-
Click Finish.
-
A message box opens, confirming that you want to close the wizard. Click OK.
The wizard closes, and the Translation Filter window displays each filter you created in a separate row:
![]()
This window displays the following information about the filters:
| Column | Description |
|---|---|
| Template Path | The path and name of the template. Field types in this template can be excluded from translations. |
| Field Name | When the Connector sends out content items based the specified template for translation, it does not send out this field’s content for translation. |
| Field Type | The type of this field to exclude from translation. When [ALL] is displayed, then all types of this field are excluded from translation. |
| Don’t transfer field value | Indicates whether the Connector copies the source-language content to the target version for this field type. * false indicates that the Connector does copy the source-language content of a field type to the target version, select the corresponding check box. This field will be included in the target content, however it will be in the source language. * true indicates that the Connector does not copy the source-language content of a field to the target version. The Connector does not automatically transfer the value of the field in the source version to the field in the target version. |
Now that you have created a filter, you can perform the following actions in the Translation Filter window (in addition to the Add Filter button, which was described above in step 3):
| Button | Description |
|---|---|
| Deletes all filters displayed in the Translation Filter window. | |
| Deletes all selected filters from the Translation Filter window. | |
| Applies the selected filter to all templates with the same field type. | |
| Opens a browser dialog box that prompts you to download the displayed filters as a .json file. | |
Enables you to import a previously downloaded .json file containing translation filters, by opening the Select file to import dialog box.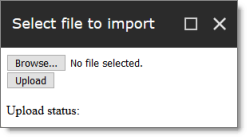 1. Click Browse to browse to and select the .json file to import. 2. Click Upload. A message at the bottom of the dialog box states that the file upload was successful. |
|
| Refreshes the list of displayed filters. |