Connector for ServiceNow
This the multi-page printable view of this section. Click here to print.
Service Now
- 1: Installation and Configuration Guide
- 1.1: Welcome to the Connector
- 1.1.1: Terminology
- 1.1.2: How the Connector Works with ServiceNow
- 1.1.3: Using this Guide
- 1.1.4: How to Contact Lionbridge Connector Support
- 1.2: Before You Install
- 1.2.1: System Requirements
- 1.2.2: Setting Your System Date, Time, and Time Zone Correctly
- 1.2.3: Configuring Network Settings for a Firewall
- 1.2.4: Obtaining Lionbridge Content API/Credentials
- 1.3: Installing the Connector
- 1.4: Configuring the Connector
- 1.4.1: Configuring the Content API Connection and Translation Settings
- 1.4.2: Configuring the Active Content API Connection
- 1.4.3: Configuring which Content to Translate
- 1.5: Testing the Connector
- 2: User Guide
- 2.1: Welcome to the Connector
- 2.1.1: The Translation Lifecycle
- 2.1.2: How the Connector Helps You Manage Your Translation Lifecycle
- 2.1.3: Using this Guide
- 2.1.4: How to Contact Lionbridge Connector Support
- 2.2: Getting Started with the Connector
- 2.2.1: The Connector at a Glance
- 2.3: Sending Content to Translation
- 2.3.1: Creating a Job
- 2.3.2: Adding Content to a Job
- 2.3.2.1: Adding One Content Item to a Job
- 2.3.2.2: Adding Multiple Content Items to a Job
- 2.3.3: Sending a Job to Translation
- 2.3.3.1: Viewing Request Details
- 2.3.3.2: Editing a Request
- 2.4: Monitoring Translation States
- 2.4.1: Translation States
- 2.4.2: Viewing Your Translation Summary
- 2.4.3: Viewing All Jobs
- 2.4.4: Previewing Job Details
- 2.4.5: Viewing Job Details
- 2.4.6: Viewing Request Field Details
- 2.4.7: Viewing Request Field Values
- 2.5: Reviewing, Approving, and Rejecting Translated Content
- 2.6: Publishing Translated Content
- 2.7: Archiving and Unarchiving Jobs
1 - Installation and Configuration Guide
1.1 - Welcome to the Connector
Welcome to the Lionbridge Connector for ServiceNow (“Connector”) version 1.0.0. This is Lionbridge’s connector between ServiceNow and the Clay Tablet.
1.1.1 - Terminology
| Freeway | The name of the Lionbridge translation portal for submitting content to and retrieving content from the Lionbridge translation provider. |
| FTP Server | File Transfer Protocol (FTP) is a standard network protocol used to transfer files from one host to another host over a TCP-based network, such as the Internet. Translation providers may receive and send files for translation using an FTP server. |
| Lionbridge | The publisher of the Freeway translation portal and a translation provider. Users connect to the Freeway translation portal to submit content to and retrieve content from the Lionbridge translation provider. |
| Lionbridge Connector for ServiceNow(“Connector”) | The connector software that Lionbridge has developed and provides, which plugs into your ServiceNow installation to provide connectivity to the Lionbridge translation services. In this document it is referred to as the Connector. This is the software you are installing and configuring as you work through this document. |
| MT | Machine translation. The translation provider can be a machine translation service, such as Google Translate. |
| Producer | Content system that sends content or documents out for translation. In this case, this is ServiceNow. |
| Provider | A provider of translation services. The delivery of assets to the provider may be via an FTP server or a TMS connector. |
| TMS | Translation management system that the translation provider users. |
1.1.2 - How the Connector Works with ServiceNow
The Lionbridge Connector (“Connector”) is an important part of the Lionbridge translation solution.
The Connector is installed on your system as an add-in to ServiceNow. Its functionality is displayed to the users as part of ServiceNow.

Your translation systems architecture might look like the configuration above. It may have additional content systems or translation providers, but the core concepts remain the same. If your translation provider is Lionbridge, it is accessed via Freeway.
During implementation, Lionbridge Connector Support works with you and your translation providers to configure and test the other elements of your translation solution, which are the connections to your translation providers' systems.
1.1.3 - Using this Guide
Purpose of this guide
This guide describes everything you need to know to install and configure the Lionbridge Connector (“Connector”) for ServiceNow. It describes the delivery package contents, system requirements, installation instructions, and configuration procedures.
Recommendation: Review the user guide to fully understand the powerful features of the Connector.
Who should use this guide
This guide is intended for ServiceNow administrators and system integrators.
What you should already know
This document assumes that your company already has an installed instance of ServiceNow. It assumes that you have a strong working knowledge of ServiceNow features.
If Lionbridge is your company’s translation provider, it assumes that Freeway is already set up for your company.
How to find out more about the Lionbridge Connector for ServiceNow
For information on using the Lionbridge Connector to send and receive content for translation from ServiceNow, read the Lionbridge Connector for ServiceNow User Guide.
Documentation conventions
This guide uses the following conventions:
| Convention | Description |
|---|---|
| Bold | Highlights screen elements such as buttons, menu items, and fields. |
| Courier | Highlights input, file names, and paths. |
| Italics | Highlights terms to emphasize, variables, or document titles. |
| > | Indicates a menu choice. For example, “Navigate to Lionbridge Connector > Jobs > Create New.” |
1.1.4 - How to Contact Lionbridge Connector Support
How to Contact Lionbridge Connector Support
You can submit a support ticket either:
- by emailing connectors@lionbridge.com
- from the Lionbridge Connector Zendesk page https://lionbridge-connectors.zendesk.com/
See also:
1.2 - Before You Install
Before you begin to install the Lionbridge Connector for ServiceNow, please review the system requirements, described in System Requirements, and perform the following pre-installation procedures:
-
Optional step. If you have a firewall, you must configure your ports so that the Connector can communicate with the Lionbridge system. For details, see Configuring Network Settings for a Firewall.
Note: If you have already set up your Clay Tablet account, you can skip this step. Ensure that you know your account credentials.
1.2.1 - System Requirements
The Lionbridge Connector for ServiceNow (Connector) must be installed on the machine where ServiceNow is installed. The Connector supports the following ServiceNow versions:
- London
- Madrid
- New York
The Connector has no additional hardware or software requirements beyond those of ServiceNow.
1.2.2 - Setting Your System Date, Time, and Time Zone Correctly
To ensure your translation jobs are processed promptly and correctly, the Connector requires that any connecting machines have the correct system time and date settings.
Important: Before proceeding, ensure that the system date, time, and time zone are set correctly on any systems that will run the Connector. If these settings are incorrect, the following error message is displayed: Error. The difference between the request time and the current time is too large.
1.2.3 - Configuring Network Settings for a Firewall
Optional step. If you have a firewall, you must configure your ports so that the Connector can communicate with the Clay Tablet. The Connector must be able to communicate with the Clay Tablet by initiating the following outbound network connection:
| Protocol | Port Number | Description | Location to Configure |
|---|---|---|---|
| HTTPS | Port 443 | For secure access to the Clay Tablet | https://content-api.lionbridge.com/v1 |
To send content for translation to Lionbridge Freeway, also configure:
| Protocol | Port Number | Description | Location to Configure |
|---|---|---|---|
| HTTPS | Port 443 | For secure access to Lionbridge Freeway | https://fwapi.lionbridge.com/obvibundles/ freewayauth.asmx |
| HTTPS | Port 443 | For secure access to Lionbridge Freeway | https://fwapi.lionbridge.com/obvibundles/ service.asmx |
1.2.4 - Obtaining Lionbridge Content API/Credentials
The Clay Tablet uses OAuth2 for authentication. You authenticate with your Lionbridge Connector Support username and password to obtain an access token. These tokens do not expire.
-
Create an account at https://connectors.zendesk.com.
-
Send an email to connectors@lionbridge.com from the email you used to create your account, requesting access to the API.
Support will grant you access and set up a license to the Clay Tablet.
Important: You need a license when you are ready to send out a job for translation. You require a separate license for each translation provider (
providerId). If you do not already have a business relationship with Lionbridge, either the Lionbridge Channels team or the Sales team will contact you.
1.3 - Installing the Connector
This section describes how to install the Connector installation package into your ServiceNow system. Before you install the Lionbridge Connector (“Connector”), verify that you have reviewed the system requirements and followed all the pre-installation procedures described in Before You Install.
To install the Connector into ServiceNow:
- Log in to ServiceNow as a system administrator.
- Navigate to System Applications > Applications.
- Click the Downloads tab.
- Select or search for: “[Lionbridge Connector]”.
- Download the Connector package to the ServiceNow Application Repository.
- Install the Connector application from the ServiceNow Application Repository.
Next you can:
- Install the optional Global Components Update Set. For more information, see Installing the Lionbridge Connector Global Components Update Set.
- Configure Connector parameters, as described in Configuring the Lionbridge Connector for ServiceNow.
1.3.1 - Installing the Global Components Update Set
This section describes the Global Components Update Set and explains how to install it. The Global Components Update Set is an optional package that supports the following features in the Connector:
-
Auto accept translations when they are received: Determines whether by default the Connector automatically accepts all completed translation jobs.
-
Auto publish translations when they are received: Determines whether by default the Connector automatically publishes all completed translation jobs.
For more information about these features, see Configuring the Lionbridge Connector for ServiceNow.
To install the Global Components Update Set:
-
Contact Lionbridge Connector Support to obtain this optional package. For details, see How to Contact Lionbridge Connector Support.
-
Install the update set. For detailed instructions, refer to the ServiceNow documentation at: https://docs.servicenow.com/bundle/newyork-application-development/page/build/system-update-sets/reference/get-started-update-sets.html.
Next you configure Connector parameters, as described in Configuring the Lionbridge Connector for ServiceNow.
1.4 - Configuring the Connector
You must be assigned to an admin role to configure the Connector. You perform the following tasks to configure the Connector:
1.4.1 - Configuring the Content API Connection and Translation Settings
On the General Settings page, you configure:
- your connection to the Clay Tablet
- translation settings
To configure the Connector:
-
As a System Administrator, assign yourself, or create a user account, with the
x_73376_connector.adminrole. -
Impersonate or authenticate as that user.
-
Navigate to Lionbridge Connector > General Settings.
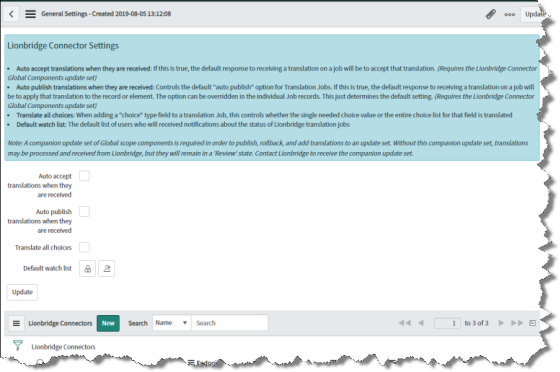
- Configure the following settings:
| Setting | Description |
|---|---|
| Auto accept translations when they are received | Determines whether the Connector automatically accepts all completed translation jobs. * To instruct the Connector to automatically accept all translation jobs without requiring a review first, select this check box. * To instruct the Connector to require a review of translation jobs before accepting them, clear this check box. **Note:** This feature requires the Lionbridge Connector Global Components update set. For more information, see Installing the Lionbridge Connector Global Components Update Set. **Recommendation**: Select this check box only if you are very confident that the translations will be ready for publication without review. |
| Auto publish translations when they are received | Determines whether by default the Connector automatically publishes all completed translation jobs. * To set the default setting of the Connector to automatically publish all translation jobs without reviewing them first, select this check box. * To set the default setting of the Connector to not automatically publish all translation jobs without reviewing them first, clear this check box. **Notes:** You can change this setting for individual translation jobs. This feature requires the Lionbridge Connector Global Components update set. For more information, see Installing the Lionbridge Connector Global Components Update Set. **Recommendation:** Select this check box only if you are very confident that the translations will be ready for publication without review. |
| Translate all choices | When a choice field is part of a translation job, this setting determines whether the Connector sends the single required choice value or the entire choice list for translation. * To send the entire choice list for translation, select this check box. * To send only the single required choice value for translation, clear this check box. |
| Default watch list | The default list of users who will receive notifications about the state of translation jobs. * To unlock the watch list so that you can edit the participants, click the **Unlock Watch list** icon * To add yourself to the watch list, click the **Add me** icon For information about configuring watch lists, refer to the appropriate version of the ServiceNow documentation, at https://docs.servicenow.com. |
- To create a Connector configuration, click New.
The New record dialog box opens.
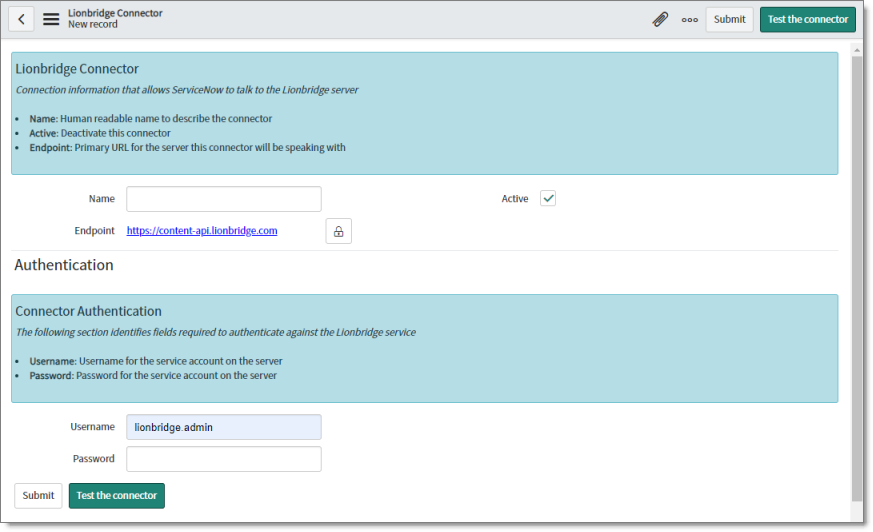
- Enter the following information about the Connector configuration to the Clay Tablet:
| Field | Description |
|---|---|
| Name | Enter your name for the Connector configuration. |
| Active | Determines whether this Connector configuration will be available for selection when creating a job for translation. * If this Connector configuration will be available for selection, then select this check box (the default value). * If this Connector configuration will not be available for selection, then clear this check box. |
| Endpoint | Enter the URL of the Clay Tablet. This is https://content-api.lionbridge.com. |
| Username | Enter your username for the Clay Tablet. |
| Password | Enter your password for the Clay Tablet. |
- Click Test the connector.
A message box indicates whether the endpoint and user credentials are accepted by the Clay Tablet.
Tip: You may want to create multiple Connector configurations, for example, for different accounts or departments.
- If the test was successful, click Submit.
1.4.2 - Configuring the Active Content API Connection
If you created multiple configurations for the Lionbridge Connector, as described in Configuring the Content API Connection and Translation Settings, you can make one of these configurations the default, by setting it as Active. You can also view the health of your Connector configurations.
Note: ServiceNow calls each Connector configuration a “connector”.
To configure the active Content API connection:
- Navigate to Lionbridge Connector > Connectors.
The Lionbridge Connectors page opens.
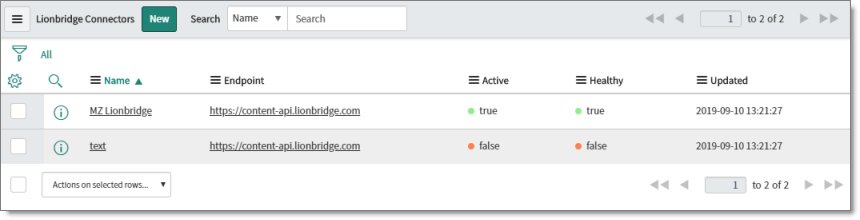
The following information is displayed about each Connector configuration.
| Column | Description |
|---|---|
| Name | The name of the Connector configuration. |
| Endpoint | The URL of the Clay Tablet. This is https://content-api.lionbridge.com. |
| Active | Indicates whether this Connector configuration is available for selection when creating a job for translation. * If this Connector configuration is available for selection, then a green circle is displayed and the value is true. * If this Connector configuration is not available for selection, then a red circle is displayed and the value is false. |
| Healthy | Indicates whether this Connector configuration is functioning properly. * If this Connector configuration is functioning properly, then a green circle is displayed and the value is true. * If this Connector configuration is not functioning properly, then a red circle is displayed and the value is false. **Tip:** If the Connector configuration is not functioning properly, the root cause may be that the Content API credentials and/or endpoint is incorrect. Check that these are correct. |
| Updated | The last time this Connector configuration was updated, in YYYY-MM-DD HH:MM:SS format. |
- To update a Connector configuration, click the link in the Name column.
The Lionbridge Connector page opens for the corresponding Connector configuration.
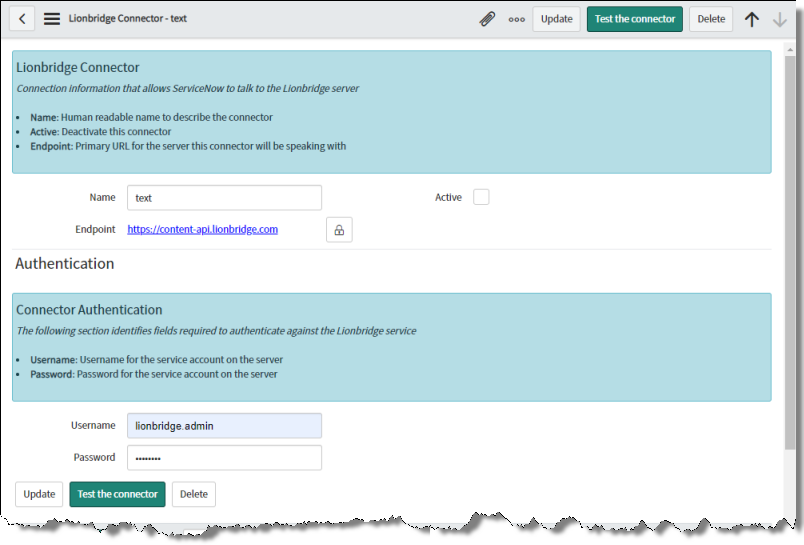
- You can modify any of the following values.
| Column | Description |
|---|---|
| Name | The name of the Connector configuration. |
| Endpoint | The URL of the Clay Tablet. This is https://content-api.lionbridge.com. |
| Active | Determines whether this Connector configuration will be available for selection when creating a job for translation. * If this Connector configuration will be available for selection, then select this check box (the default value). * If this Connector configuration will not be available for selection, then clear this check box. |
| Username | Enter your username for the Clay Tablet. |
| Password | Enter your password for the Clay Tablet. |
- If you modified the endpoint, username, or password, click Test the connector.
A message box indicates whether the endpoint and user credentials are accepted by the Clay Tablet.
-
Click Update.
-
If you selected the Active check box when it was previously cleared, messages displayed at the top of the page indicate that the active and default Connector have been changed.
1.4.3 - Configuring which Content to Translate
Translation rules define the content types that the Connector supports sending for translation. They define:
- the table where the content type is stored
- the fields in the translation type that you want to translate
By default, the Connector supports sending the following content types for translation:
- Choice
- Field Label
- Knowledge Article
- Knowledge Base
- Knowledge Category
- Message
- Translated Name
- Translated Text
You can view each supported content type and the fields within each content type in the corresponding translation rule.
To view the content types that are configured by default for the Connector to send for translation:
- Navigate to Lionbridge Connector > Configuration > Translation Rules.
The Translation Rules page opens.
![]()
This page lists all ServiceNow content types that are configured for translation. Each record on the page includes information about a different content type.
- To view information about a content type, click the corresponding link in the Name column. For example, click the Knowledge Article link.
The Translation Rule dialog box opens.
![]()
This dialog box displays the following information about the translation rule:
- Name: The name of the translation rule. This is generally the same as the content type that the Connector can send for translation.
- Active: Whether the translation rule is active, which determines whether the Connector can currently send this content type for translation.
- Table: The name of the table where the content type is stored.
- The list of fields in this content type that the Connector can send for translation.
If you want to translate a content type that is not listed in this page, then you can create a new translation rule.
Note: You can only add a content type that is defined in the Translatable Types page, which you open by navigating to Lionbridge Connector > Configuration > Translation Types. If the content type that you want to add is not listed in the Translatable Types page, please contact Lionbridge Connector Support. For details, see How to Contact Lionbridge Connector Support.
To add a new type of content for translation:
- Navigate to Lionbridge Connector > Configuration > Translation Rules.
The Translation Rules page opens, as described above.
- In the Translation Rules page, click New.
The Translation Rule - New record page opens.
![]()
- In the Name field, enter your name for the translation rule.
Tip: Enter the content type, to facilitate identification.
-
In the Table dropdown list, select the table where ServiceNow stores the corresponding content-type data.
-
Click Submit.
1.5 - Testing the Connector
After you complete the configuration, your Lionbridge Connector for ServiceNow installation is ready for testing. We recommend sending only a few pages for translation in one language as an initial test. For detailed instructions, refer to the Lionbridge Connector for ServiceNow User Guide. Once successful, you can send as many languages as required. Please coordinate with your translation provider for this test process.
If you have any concerns or questions, please contact Lionbridge Connector Support. For details, see How to Contact Lionbridge Connector Support.
From a testing perspective, do not treat the Connector as merely standalone software. It integrates into ServiceNow and your overall translation workflow. You must test the end-to-end process, from content creation to publishing, to ensure that the Connector is working as expected and configured to support your business needs.
In addition to following the guidelines below, you should also include any internal test or use cases that would normally be applied to any software that is deployed to ServiceNow. You must robustly test the Connector and the translation process against the (non-production) MT (machine translation) service. This saves time and project costs, because trying to solve issues during the production phase is costly and delays your translation timelines.
Recommendations: Complete your testing in a pre-production environment before deploying the Connector to your production environment. If you must perform testing in your production environment, you should create test content that can be deleted after completing the tests. The connector database translation memory must also be cleared in your production environment. For detailed instructions, contact Lionbridge Connector Support, as described in How to Contact Lionbridge Connector Support. Consider any changes in functionality, configuration, or customization between pre-production and production environments in this final test pass.
Testing the connector
- Verify that the Connector is configured to send all required content types for all required languages.
- Ensure that the Connector sends only translatable content for translation.
- Configure email notifications set and ensure that they are generated at the appropriate step in the translation workflow.
Integration with ServiceNow
- Ensure that the content authors how to interact with the Connector and send content to translation. For detailed instructions, refer them to the Lionbridge Connector for ServiceNow User Guide.
- Select a method of sending content to translation that aligns with how content authors work in ServiceNow.
- Ensure that the Connector users have the correct rights to access the Connector within ServiceNow.
Testing the translation workflow
- Ensure that the Connector translation workflow integrates with your overall strategy of managing source and translated content.
- Validate how the translated content will be reviewed during the translation process.
- Verify that the translation process integrates correctly with the publishing process.
2 - User Guide
2.1 - Welcome to the Connector
Welcome to the Lionbridge Connector for ServiceNow (“Connector”) version 1.0. The Connector enables you to automate sending and retrieving content from ServiceNow, which dramatically reduces the effort required to create, maintain, and publish Web content in multiple languages.
2.1.1 - The Translation Lifecycle
The translation lifecycle is the broad process of selecting content, sending it out for translation, and then receiving the translated content back from translation.
This set of steps usually fits inside a larger, more general process called the content lifecycle, which is the process of creating, reviewing, editing, approving, and publishing content.
When you consider the translation lifecycle and the content lifecycle together, you have the global content value chain, which is the strategy for managing multilingual content.
The content lifecycle and the translation lifecycle are impacted by the workflow steps you implement in Sitecore to manage multilingual content.
Remember that localizing content is a subset of steps in the broader content lifecycle. This will improve your focus on key localization considerations, improve processes, and keep all content stakeholders included. Together, this results in better content management.
2.1.2 - How the Connector Helps You Manage Your Translation Lifecycle
The Lionbridge Connector for ServiceNow (“Connector”) is a plug-in module for ServiceNow. It provides a range of features and user interface enhancements in ServiceNow that enable you to select, send, monitor, and retrieve content for translation into any language ServiceNow supports.
These features automate the process, which dramatically reduces the effort and time required to export and re-import content that needs to be localized. This is very helpful when translating large volumes of content or ensuring that translated content is quickly re-imported to meet deadlines.
When you use the Connector, you manage your translation lifecycle entirely from within ServiceNow:
- The Connector exports your content from ServiceNow in either XML or HTML format.
- The Connector interacts with the Clay Tablet to deliver your content to your translation provider, based on routing rules that your company chooses and the Lionbridge Connector Team implements.
- When the translated content is ready, the Clay Tablet retrieves it from your translators and delivers it to the Connector.
- The Connector automatically re-imports the content into the correct location in ServiceNow.
You can then review, revise, reject, or publish the translated content as needed.
Note: Neither the Connector nor the Clay Tablet performs any translation. Similarly, the Lionbridge Connector Team does not provide any translation services. Your company chooses the translation provider that performs the translation.
2.1.3 - Using this Guide
Purpose of this guide
This guide describes how to use the Lionbridge Connector for ServiceNow (“Connector”) to manage your translation lifecycle. It describes how to send ServiceNow items for translation and receive them back from translation.
Who should use this guide
This guide is intended for content editors, project, marketing, localization or translation managers, or others who are responsible for creating, editing, or approving content for translation that resides in your ServiceNow installation. This guide is also useful for translation providers who receive content from your ServiceNow installation, because it describes your company’s translation management process.
What your company setup should be
This document assumes that:
- Your company already has a functioning instance of ServiceNow.
- Your company has an account and credentials for the Clay Tablet.
- The Lionbridge Connector for ServiceNow (“Connector”) has been implemented, configured, and tested on your ServiceNow installation.
If Lionbridge is your company’s translation provider, it assumes that Freeway is already set up for your company.
What you should already know
This document assumes that:
- You are familiar with the Connector’s configuration for your ServiceNow installation, and the reasons for choosing certain configuration options. This is important because your company’s configuration determines which features are available.
- You have a strong working knowledge of the ServiceNow Content Editor.
- You are familiar with the basic concepts of the ServiceNow Workflow features. This is crucial, because workflow is a core concept required to use the Connector.
- You are familiar with your company’s translation process and requirements.
- You have valid user credentials to log into ServiceNow.
- You have the required permissions to access the Connector functionality described in this guide.
Note: Not all the features described in this guide may be available. Feature availability depends on both your company’s Connector setup and the roles to which you are assigned. If you cannot access functionality that you need, contact your company’s ServiceNow administrator.
How this guide is organized
This guide contains the following chapters:
| Chapter | Description |
|---|---|
| Welcome to the Lionbridge Connector for ServiceNow | A brief description of the connector solution for ServiceNow and how it fits into the translation lifecycle. It also includes information about this guide and Lionbridge Connector Support contact information. |
| Getting Started with the Lionbridge Connector for ServiceNow | How to get started and an overview of the Lionbridge Connector for ServiceNow interface and key features. |
| Sending Content for Translation | How to create a job, add ServiceNow content to it, and send it out for translation. |
| Monitoring Translation States | How to monitor the translation state of jobs and content that you sent out for translation. |
| Reviewing, Approving, and Rejecting Translated Content | How to review translated content after it returns from the translation provider to ServiceNow. |
| Publishing Translated Content | How to publish translated content after it returns from the translation provider to ServiceNow. |
| Archiving and Unarchiving Jobs | How to perform post-translation tasks, including archiving and unarchiving jobs. |
How to find out more about the Lionbridge Connector for ServiceNow
For information on installing and configuring the Lionbridge Connector for ServiceNow, read the Lionbridge Connector for ServiceNow Installation and Configuration Guide.
Documentation conventions
This guide uses the following conventions:
| Convention | Description |
|---|---|
| Bold | Highlights screen elements such as buttons, menu items, and fields. |
| Courier | Highlights input, file names, and paths. |
| Italics | Highlights terms to emphasize, variables, or document titles. |
| > | Indicates a menu choice. For example, “Navigate to Lionbridge Connector > Jobs > Create New.” |
2.1.4 - How to Contact Lionbridge Connector Support
How to Contact Lionbridge Connector Support
You can submit a support ticket either:
- by emailing connectors@lionbridge.com
- from the Lionbridge Connector Zendesk page https://lionbridge-connectors.zendesk.com/
See also:
2.2 - Getting Started with the Connector
The Connector supports the following ServiceNow versions:
- London
- Madrid
- New York
To access the Connector:
-
Log into ServiceNow.
-
Navigate to Lionbridge Connector.
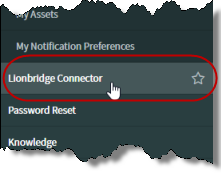
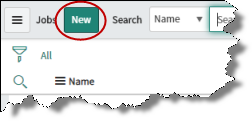
Tip: To easily access the Connector in future sessions, mouseover Lionbridge Connector in the application navigator and click the Add To Favorites icon.
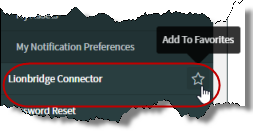
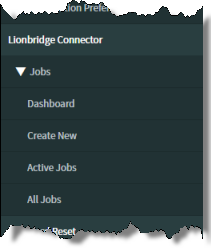
The Connector sub-menu opens, displaying all the Connector menu options under Jobs.
2.2.1 - The Connector at a Glance
You access the Lionbridge Connector for ServiceNow (“Connector”) directly from Lionbridge Connector in the application navigator.
It has the following main interfaces, accessible under Lionbridge Connector > Jobs:
Dashboard
- You click the Dashboard sub-menu item to view a summary of the translation state of all jobs in this ServiceNow instance.
Job - New record dialog box
- You click the Create New sub-menu item to open the Job - New record dialog box, where you can create a new job so that you can send content for translation.
Jobs page
- You click the Active Jobs or All Jobs sub-menu items to open the Jobs page, where you can view a summary of information about all jobs, and from where you can see detailed information about any job. Clicking Active Jobs displays only non-archived jobs, while clicking All Jobs displays both archived and non-archived jobs.
2.3 - Sending Content to Translation
There are three main steps to sending content for translation:
-
Creating a job. For detailed instructions, see Creating a Job.
-
Adding content to the job. For detailed instructions, see Adding Content to a Job.
-
Sending the job to translation. For detailed instructions, see Sending a Job to Translation.
2.3.1 - Creating a Job
To send content to translation, you create a job.
A job is a bundle of content to send to Lionbridge for translation. A job contains content from one or more records.
To create a new job:
- Navigate to Lionbridge Connector > Jobs > Create New.
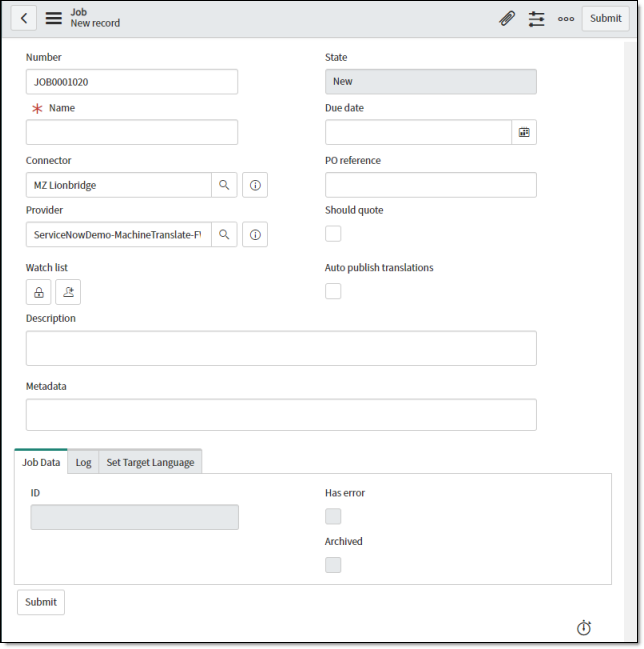
The Job - New record dialog box opens.
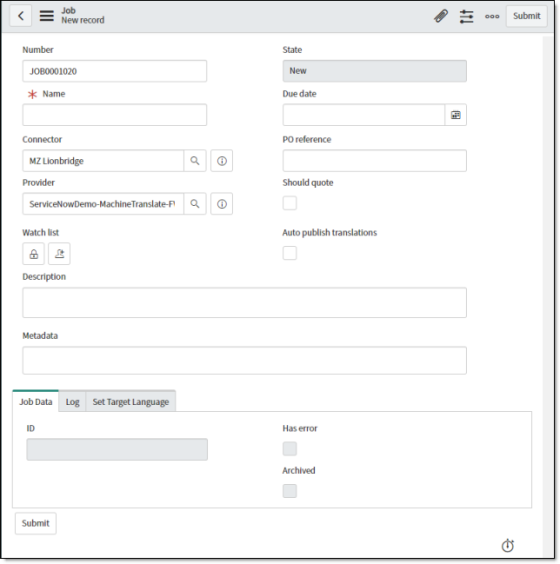
- Enter the following information about your translation job:
| Field | Description |
|---|---|
| Number | The job number. This is a unique identifier for your job, starting with JOB, and followed by a seven-digit number. By default, the job number is one number higher than the last job created. For example, if the number of the last created job was JOB0001029, the default number of the new job is JOB0001030. You can modify this. |
| Name | A descriptive name for the job. |
| Connector | The Connector configuration, which includes the endpoint and the Clay Tablet credentials. There may be multiple Connector configurations, for example, for different accounts or departments. For more information, refer to the Lionbridge Connector for ServiceNow Installation and Configuration Guide. By default, the most recently used Connector configuration populates this field. You can use the Lookup using list icon Tip: Click the Preview this record icon |
| Provider | The translation provider for this job. * Click the **Lookup using list** icon There may be multiple translation providers, for example, for different kinds of content. For example, one translation provider may translate legal content, while another translation provider may translate medical content. |
| Watch list | The list of users who will receive notifications about the state of this translation job. * To unlock the watch list so that you can edit the participants, click the **Unlock Watch list** icon * To add yourself to the watch list, click the **Add me** icon For information about configuring the default watch list, refer to the Lionbridge Connector for ServiceNow Installation and Configuration Guide. |
| Description | The description of the job. |
| Metadata | Additional information to send to the translation provider. |
| State | Read-only. The translation state of the job. For a list and description of translation states, see Translation States. |
| Due date | The requested translation deadline. This is the date when you expect the translated content to return. To select a date, either: * Type the delivery date in the field in YYYY-MM-DD format. * Click the **Select Date** icon This information is sent to the translation provider as metadata of the translation package. |
| PO reference | The purchase order number to reference for payment of this translation job. |
| Should quote | Select this check box to inform the translation provider that you want to receive a quote before the translation process starts. |
| Auto publish translations | Determines whether the Connector will automatically publish the translated content in this job when it is complete. Tip: Select this option if it is not necessary to review the translation before publishing it. Notes: This feature requires the Lionbridge Connector Global Components update set. For more information, refer to the Lionbridge Connector for ServiceNow Installation and Configuration Guide. If you do not select this check box, a ServiceNow administrator must either publish the completed translations and/or promote them to production via an update set. |
- Click the Set Target Language tab.
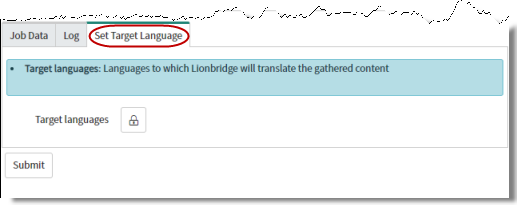
- Click the Unlock Target Languages icon
 to expand the tab, so that you can select the target languages for this job.
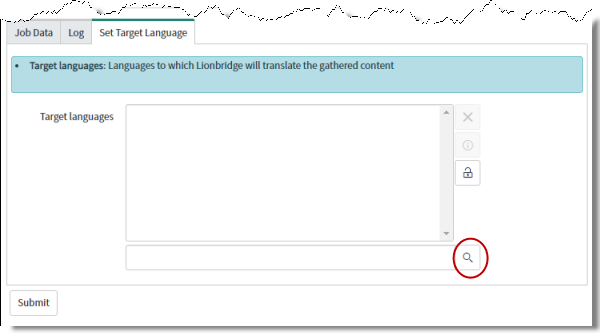
-
Click the Lookup Using List icon
 to open a dialog box where you can search for and select a target language. Repeat this step for each target language to select.
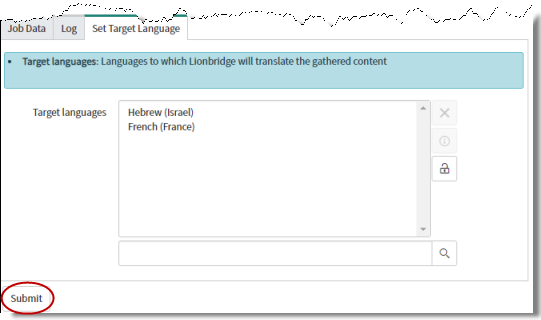
 -
In the bottom-left corner, click Submit.
Next, you add content to the job. You locate a record to translate, and then add it to the job. For detailed instructions, see Adding Content to a Job.
2.3.2 - Adding Content to a Job
To send content for translation, you must add it to a job.
You can add one item at a time or you can add multiple content items to a job from a list page. For detailed instructions, see:
2.3.2.1 - Adding One Content Item to a Job
To send content for translation, you must add it to a job. For instructions on adding multiple content items to a job, see Adding Multiple Content Items to a Job.
To add one content item to a job:
- Navigate to an open thecontent item to send for translation. For example, open a knowledge article.
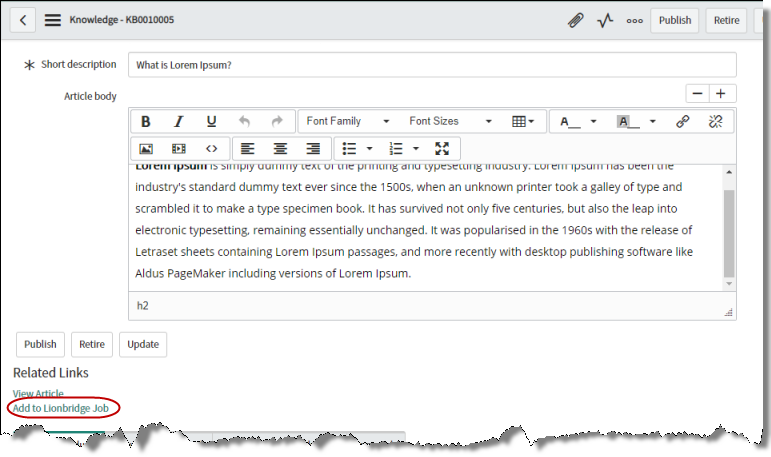
- Scroll down and click the Add to Lionbridge Job link on the left side.
TheSelect Job dialog box opens. By default, the most recently updated job is displayed.
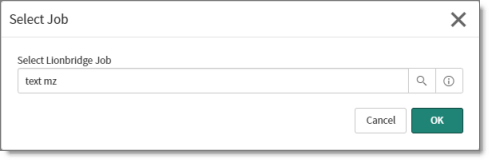
- The following sub-steps are optional:
-
To select a different job, click the Lookup Using List icon
. A dialog box opens where you can search for and select the job where you will add the previously selected content items. -
To view information about the displayed job, click the Preview this record icon
 . The Job window opens, displaying information about this job. For a description of the fields in this window, see Creating a Job. You can also click the Open Record button to open the job for editing.
 -
To create a new job, click the Lookup Using List icon
. In the dialog box that opens, click theNew button in the top-left corner to open the Job - New record dialog box. For a detailed description, see Creating a Job.
- Click OK.
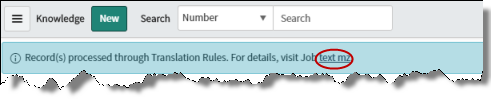
The content-item page reopens. A message at the top of the page states that the records were processed through translation rules. The message contains a link to the job.
Next, you can view the job details and send the job to translation. For detailed instructions, see Sending a Job to Translation.
2.3.2.2 - Adding Multiple Content Items to a Job
To send content for translation, you must add it to a job. For instructions on adding one content item to a job, see Adding One Content Item to a Job.
To add multiple content items to a job:
- Navigate to a list page for a type of content item. For example, navigate to My Knowledge Articles.
- Select the check boxes of the content items to send for translation. For example, select the check boxes of multiple knowledge articles.
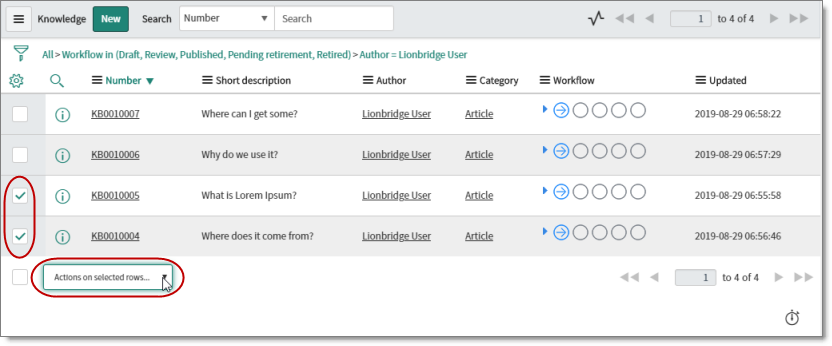
- In the bottom-left corner, click the Actions on selected rows button, and select Add to Lionbridge Job in the dropdown list.
The Select Job dialog box opens. By default, the most recently updated job is displayed.
- The following sub-steps are optional:
-
To select a different job, click the Lookup Using List icon
. A dialog box opens where you can search for and select the job where you will add the previously selected content items. -
To view information about the displayed job, click the Preview this record icon
. The Job window opens, displaying information about this job. For a description of the fields in this window, see Creating a Job. You can also click the Open Record button to open the job for editing. -
To create a new job, click the Lookup Using List icon
. In the dialog box that opens, click the New button in the top-left corner to open the Job - New record dialog box. For a detailed description, see Creating a Job.
- Click OK.
The content-item list page reopens. A message at the top of the page states that the records were processed through translation rules. The message contains a link to the job.
Next, you can view the job details and send the job to translation. For detailed instructions, see Sending a Job to Translation.
2.3.3 - Sending a Job to Translation
After you create a job and add content items to it, you are ready to send the job to translation.
Note: After you add a content item to a job, it is a request.
You send a job for translation from the Job dialog box.
To send a job to translation:
- Do one of the following:
- Immediately after adding content items to a job, click the job link in the confirmation message displayed at the top of the page.
- Navigate to Lionbridge Connector > Jobs > Active Jobs to open the Jobs page.
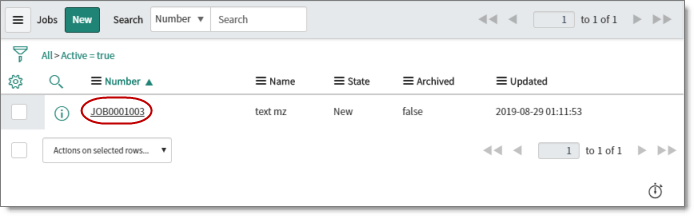
In the Number column, click the job-number link.
The Job dialog box opens.
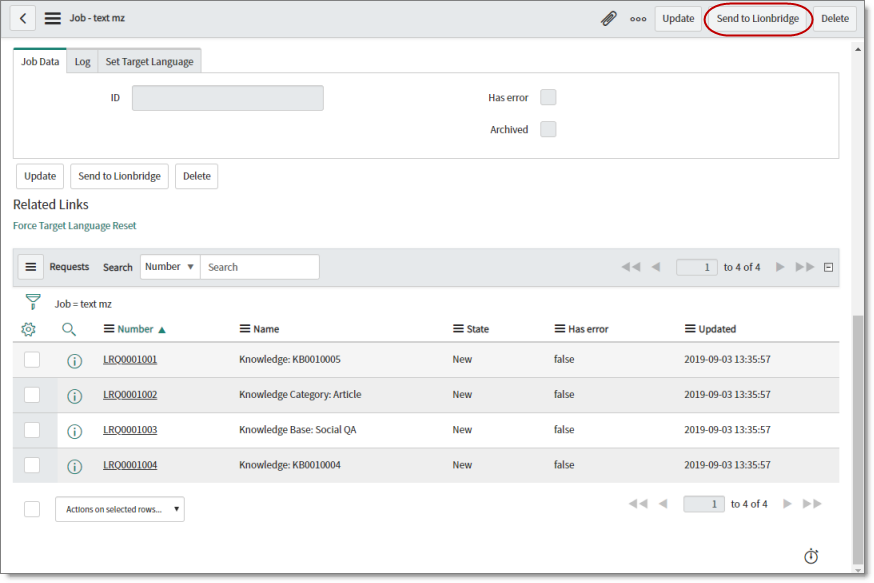
The Related Links section displays all the requests in the job, which are the individual content items to send for translation.
- The following sub-steps are optional.
- To view information about a request, click the Preview icon . The Request window opens, displaying information about this request. For a description of the fields in this window, see Viewing Request Details.
- To open the request for editing, click the request ID link in the Number column. For more information, see see Editing a Request.
- To change the target language for all requests in the job to the target language defined for the job, click the Force Target Language Reset link, which is in the Related Links section.
Tip: You can view the target language defined for the job in the Set Target Language tab of this page.
- In the top-left corner, click Send to Lionbridge.
The page updates, displaying a message at the top that the job has been submitted for translation.
You can monitor the job state in the Dashboard, which you open by navigating to Lionbridge Connector > Jobs > Dashboard. For a detailed description of the Dashboard, see Viewing Your Translation Summary.
In a few seconds, the State field changes from New to Created, which indicates that the Clay Tablet received the job.
2.3.3.1 - Viewing Request Details
Optional. You can view a request, which is a content item that has been added to a job, in the Request pop-up window.
To view a request:
- In the Related Links section of the Job dialog box, click the Preview icon
 for a request. For information about this dialog box, see:
 - Creating a Job (before sending the job for translation)
- Viewing Job Details (after sending the job for translation)
The Request pop-up window opens.
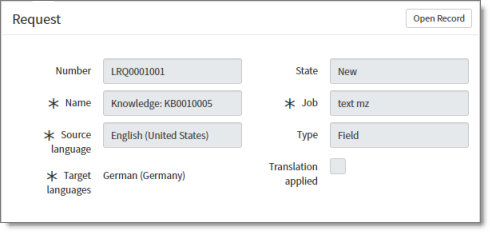
The Request pop-up window displays the following read-only information about the request:
| Field | Description |
|---|---|
| Number | The request number. This is a unique identifier for your request, starting with LRQ, and followed by a seven-digit number. By default, the request number is one number higher than the last request created. |
| Name | The name of the request. This includes the content type, such as a Knowledge Article, followed by the name or number of the content item. |
| Source language | The source language of the corresponding content item. |
| Target languages | The target language(s) into which to translate the source content items. |
| State | The translation state of this request. For a list and description of all translation states, see Translation States. |
| Job | The name of the job to which this request belongs. |
| Type | The type of content in the request. This is either: * Field: Text is part of the translation job. * File: The complete file is part of the translation job. |
| Translation applied | When the translation is auto-published, the check box is selected, and an additional field displays the ID of ServiceNow record that was created to publish the translation. |
- Optional. To edit this request, you can click the Open Record button in the top-right corner of the window to open the Request dialog box. For detailed instructions, see Editing a Request.
2.3.3.2 - Editing a Request
Optional. You can edit a request, which is a content item that has been added to a job, in the Request dialog box. This dialog box also displays summary information about each field in the request.
To edit a request:
- Do one of the following:
- In the Request pop-up window, click the Open Record button in the top-right corner of the window. For more information, see Viewing Request Details.
- In the Related Links section of the Job dialog box, click the request-number link in the Number column of the Related Links section for a request. For more information about this dialog box, see:
- Creating a Job (before sending the job for translation)
- Viewing Job Details (after sending the job for translation)
The Request dialog box opens.
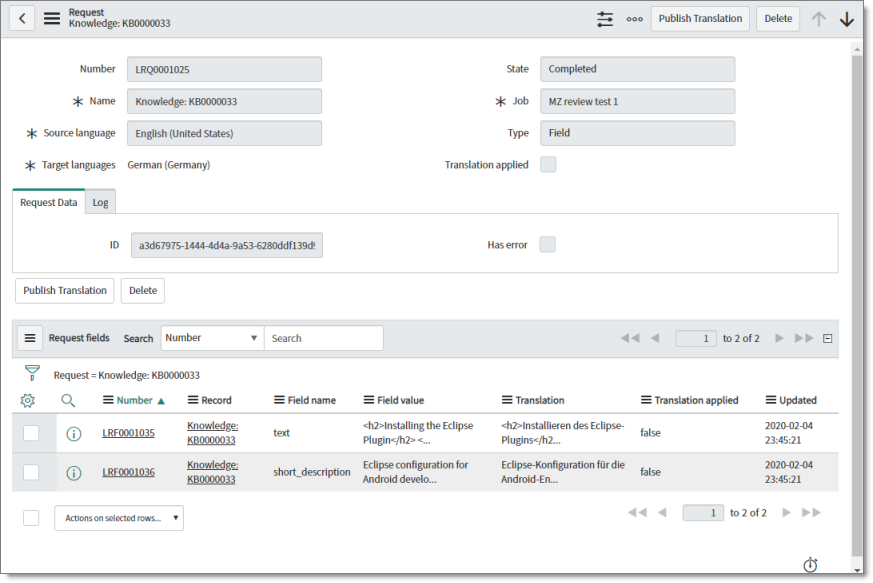
- You can edit the following fields:
| Field | Description |
|---|---|
| Number | The request number. This is a unique identifier for your job, starting with LRQ, and followed by a seven-digit number. By default, the request number is one number higher than the last request created. |
| Name | The name of the request. This includes the content type, such as a Knowledge Article, followed by the name or number of the content item. |
| Source language | The source language of the corresponding content item. |
| Target languages | The target language(s) into which to translate the source content items. |
| State | The translation state of this request. For a list and description of all translation states, see Translation States. |
| Job | The name of the job to which this request belongs. |
| Type | The type of content in the request. This is either: * Field: Text is part of the translation job. * File: The complete file is part of the translation job. |
| Translation applied | This check box is always read only. When the translation is auto-published, the check box is selected, and a new field displays the ID of ServiceNow record that was created to publish the translation. |
- Click Update to save your changes.
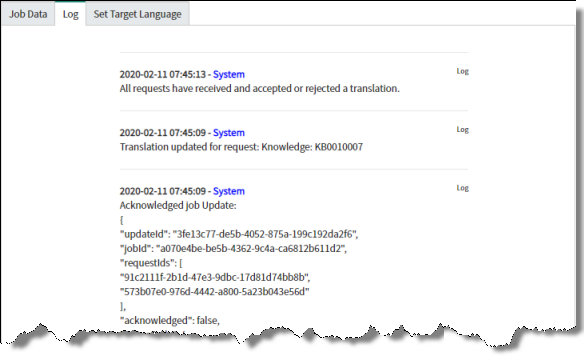
Note: The information in the Request Data and Log tabs and in the Request fields section is not editable.
- The Request Data tab displays: the ID field, the unique job identifier assigned by the Connector that identifies the job when it is processed by the Clay Tablet; the Has error check box, which indicates whether request has an error.
- The Log tab displays a list of all entries in the log file about this request.
Request fields
The Request fields section displays the following information about each field in the request:
| Column | Description |
|---|---|
| Clicking this icon opens the Request field pop-up window, displaying detailed information about the field in the request. For a detailed description, see Viewing Request Field Details. | |
| Number | The request field number. This is a unique identifier for your job, starting with LRF, and followed by a seven-digit number. By default, the request number is one number higher than the last request field created. Clicking the number opens the Request field dialog box, where you can view the fields in the request. For a detailed description, see Viewing Request Field Values. |
| Record | The name of the request. This includes an abbreviation of the content type, such as a Knowledge, followed by the name or number of the content item. |
| Field name | The type of field, for example, text or short_description. |
| Field value | The value of the field in the source language. |
| Translation | The value of the field in the target language, if the field has been translated. |
| Translation applied | Indicates whether the translation of this field is auto-published. This is either: * true: The translation of this field is auto-published. * false: The translation of this field is not auto-published. |
| Updated | The last time this field was updated, in YYYY-MM-DD HH:MM:SS format. |
2.4 - Monitoring Translation States
The Connector updates the job state at different milestones in the translation process.
For a list and description of translation states, see Translation States.
- You can view a summary of the translation state of all jobs in this ServiceNow instance on the Lionbridge Connector Dashboard. For detailed instructions, see Viewing Your Translation Summary.
- You can view all jobs in this ServiceNow instance on the Jobs page. You can then view jobs in a specific translation state. For detailed instructions, see Viewing All Jobs.
- You can view job metadata in the Job preview pop-up window. For detailed instructions, see Previewing Job Details.
- You can view detailed information about a job, including any errors that occurred, in the Job dialog box. For detailed instructions, see Viewing Job Details.
- You can view the source and translated fields in translation requests. For detailed instructions, see:
- Viewing Request Field Details
- Viewing Request Field Values
2.4.1 - Translation States
A job, or content items (requests) in a job, have one of the following translation states:
| Translation State | Description |
|---|---|
| New | The Connector created the job, but it did not send it for translation. |
| Pending | The Connector is preparing to send the job for translation. |
| Created | The Connector sent the job to the Clay Tablet. |
| Sending | The Connector is sending the job to the Clay Tablet for delivery to the translation provider. |
| Sent to Platform | The Connector finished sending the job to the Clay Tablet for delivery to the translation provider. |
| Sent to Translator | The Clay Tablet sent the job to the translation provider. |
| In Translation | The translation provider has received the job and has not yet returned the translated content. |
| Review translation | The Connector has received the translated content from the translation provider, and it is ready for review. Note: The Auto-accept option was not selected for this job. |
| Translation Rejected | A Connector user has reviewed and rejected the translated content. |
| Completed | The job was accepted (by clicking Accept Translation) during the review. It is ready for publishing. The Auto-publish option was not selected for this job. |
| Completed No Need to Translate | There is no translatable content in this job. |
| Published | The job has been completed in the Connector, and the translated content was published to the ServiceNow instance. |
| Cancelled | The job was canceled and the content was not translated. |
2.4.2 - Viewing Your Translation Summary
You can view a summary of the translation state of all jobs in this ServiceNow instance.
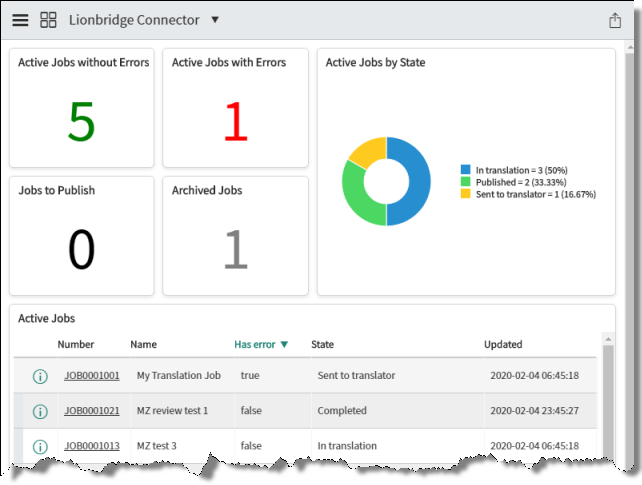
- To view this summary, navigate to Lionbridge Connector > Jobs > Dashboard.
The following information is displayed about your jobs:
| Section | Description |
|---|---|
| Active Jobs without Errors | All active jobs without errors. |
| Active Jobs with Errors | All active jobs with errors. |
| Jobs to Publish | All jobs that are ready to publish. These jobs are in Completed state. |
| Archived Jobs | All archived jobs. For information about archiving and unarchiving jobs, see Archiving and Unarchiving Jobs. |
| Active Jobs by State | All active jobs, displayed proportionally by translation state. This section also displays the number and percentage of jobs in each state. For a list and description of translation states, see Translation States. |
- Click in a section to view more information about the corresponding jobs:
- To view only the jobs in any section with a non-zero value, click that section.
- To view only the jobs with a specific translation state, click the corresponding section of the pie chart.
The Jobs pop-up window opens, displaying the following information about each relevant job.
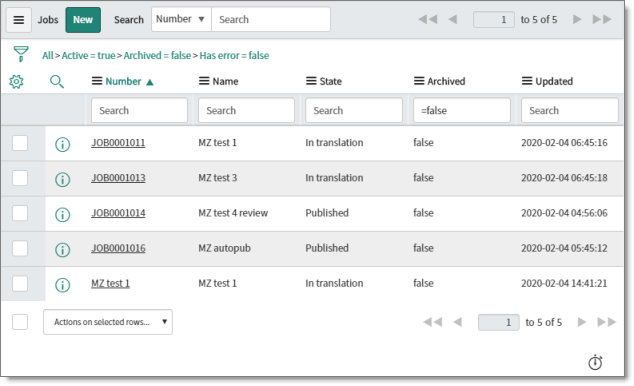
| Column | Description |
|---|---|
| Opens a pop-up window to preview the translation job. For a detailed description, see Previewing Job Details. | |
| Number | The job number, which is a unique identifier for your job, starting with JOB, and following by a seven-digit number. It is assigned by the Connector when you create a job. Click the link to open the Job dialog box for this job. For a detailed description, see Viewing Job Details. |
| Name | The name of the job. |
| State | The current translation state of the job. For a list and description of translation states, see Translation States. |
| Archived | Indicates whether this job is archived. This is either: * true: The job is archived. For more information, see Archiving and Unarchiving Jobs. * false: The job is not archived. |
| Updated | The last time this job was updated, in YYYY-MM-DD HH:MM:SS format. |
In the top-left corner of the pop-up window, the text beside the filter icon ![]() describes the section of jobs based on the section of the Dashboard you clicked. For example this text beside the filter icon (All > Active = true > Archived = false > Has error = false) indicates that the user clicked the Active Jobs without Errors section.
describes the section of jobs based on the section of the Dashboard you clicked. For example this text beside the filter icon (All > Active = true > Archived = false > Has error = false) indicates that the user clicked the Active Jobs without Errors section.

For a description of all other functionality in this pop-up window, see the description of the Jobs page, in Viewing All Jobs.
Active Jobs
A table below the visual summary displays the following information about each active (non-archived) job:
| Column | Description |
|---|---|
| Opens a pop-up window to preview the translation job. For a detailed description, see Previewing Job Details. | |
| Number | The job number, which is a unique identifier for your job, starting with JOB, and following by a seven-digit number. It is assigned by the Connector when you create a job. Click the link to open the Job dialog box for this job. For a detailed description, see Viewing Job Details. |
| Name | The name of the job. |
| Has Error | Indicates whether this job has an error. This is either: * true: The job has an error. You can view this error in the **Job** dialog box for this job. For a detailed description, see Viewing Job Details. * false: The job does not have an error. |
| State | The current translation state of the job. For a list and description of translation states, see Translation States. |
| Updated | The last time this job was updated, in YYYY-MM-DD HH:MM:SS format. |
2.4.3 - Viewing All Jobs
You can view all jobs in this ServiceNow instance.
- To view all jobs, navigate to Lionbridge Connector > Jobs > All Jobs.
Tip: To view only non-archived jobs, navigate to Lionbridge Connector > Jobs > Active Jobs.
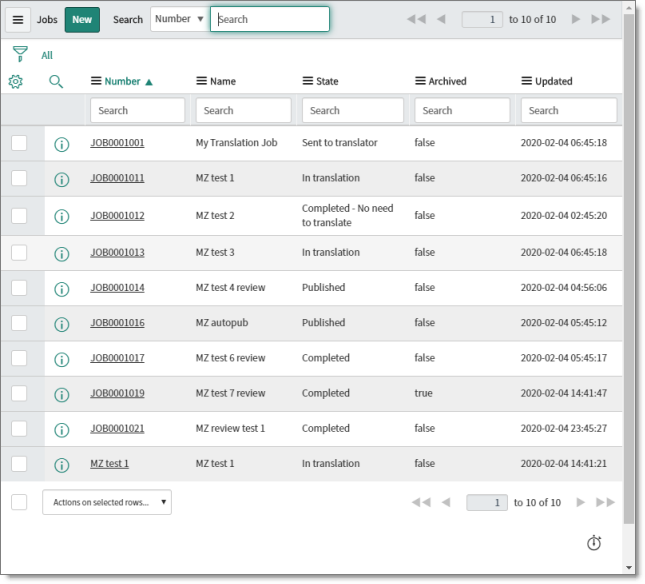
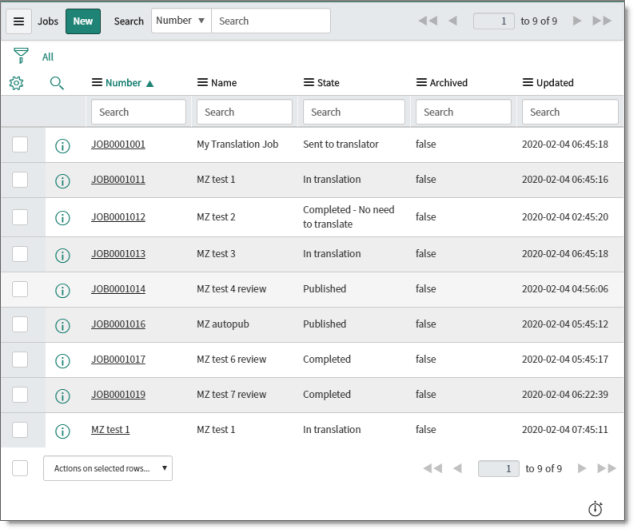
The Jobs page displays the following information about each job:
| Column | Description |
|---|---|
| Opens a pop-up window to preview the translation job. For a detailed description, see Previewing Job Details. | |
| Number | The job number, which is a unique identifier for your job, starting with JOB, and following by a seven-digit number. It is assigned by the Connector when you create a job. Click the link to open the Job dialog box for this job. For a detailed description, see Viewing Job Details. |
| Name | The name of the job. |
| State | The current translation state of the job. For a list and description of translation states, see Translation States. |
| Archived | Indicates whether this job is archived. This is either: * true: The job is archived. For more information, see Archiving and Unarchiving Jobs. * false: The job is not archived. |
| Updated | The last time this job was updated, in YYYY-MM-DD HH:MM:SS format. |
In the top-left corner of the pop-up window, the text beside the filter icon ![]() describes the section of jobs based on the section of the Dashboard you clicked. For example this text beside the filter icon (All) indicates that the user navigated to All Jobs. In contrast, navigating to Active Jobs displays (All > Active = true) beside the filter icon.
describes the section of jobs based on the section of the Dashboard you clicked. For example this text beside the filter icon (All) indicates that the user navigated to All Jobs. In contrast, navigating to Active Jobs displays (All > Active = true) beside the filter icon.

2.4.4 - Previewing Job Details
The Job preview pop-up window displays information about a job in any state.

This dialog box opens when you click the ![]() icon in the first column in the Jobs page or pop-up window.
icon in the first column in the Jobs page or pop-up window.
- For a description of the Jobs page, see Viewing All Jobs.
- For a description of the Jobs pop-up window, see Viewing Your Translation Summary.
Note: All fields are read only.
The Job preview pop-up window displays the following information about a job in any state.
| Field | Description |
|---|---|
| Number | The job number, which is a unique identifier for your job, starting with JOB, and following by a seven-digit number. It is assigned by the Connector when you create a job. |
| Name | The name of the job. |
| Connector | The name of the Connector configuration to the Clay Tablet. For more information, refer to the Lionbridge Connector for ServiceNow Installation and Configuration Guide. |
| Provider | The translation provider for this job. |
| Watch list | The list of users who receive notifications about the state of this job. |
| State | The current translation state of the job. For a list and description of translation states, see Translation States. |
| Due date | The requested translation deadline, when the job creator expects the translated content to return, in YYYY-MM-DD format. |
| PO reference | The purchase order number referenced for payment of this job. |
| Should quote | If this check box is selected, then the translation provider was instructed to send a quote before starting the translation process. |
| Auto publish translations | If this check box is selected, then when this job is complete, the Connector automatically publishes the translated content. |
| Description | The description of the job. |
| Metadata | Additional information sent to the translation provider. |
2.4.5 - Viewing Job Details
The Job dialog box displays detailed information about a job in any state.
This dialog box opens when you click a link in the Number column in the Jobs page or pop-up window.
- For a description of the Jobs page, see Viewing All Jobs.
- For a description of the Jobs pop-up window, see Viewing Your Translation Summary.
Note: Some fields may be editable, depending on the job state. For example, the fields of a job in Published state are not editable, while the fields of a job in Sent to translator state may be editable. For information about modifying editable fields, see the corresponding descriptions in Creating a Job.
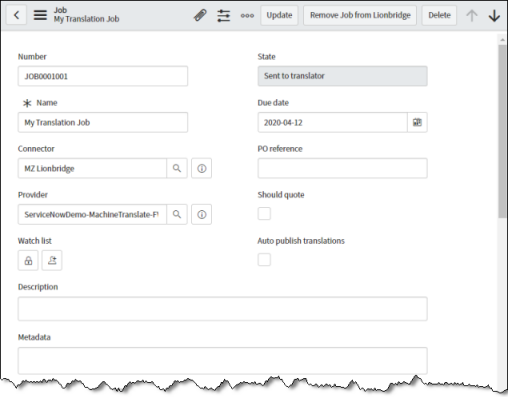
The Job dialog box displays the following information about a job in any state:
| Field | Description |
|---|---|
| Number | The job number, which is a unique identifier for your job, starting with JOB, and following by a seven-digit number. It is assigned by the Connector when you create a job. |
| Name | The name of the job. |
| Connector | The name of the Connector configuration to the Clay Tablet. For more information, refer to the Lionbridge Connector for ServiceNow Installation and Configuration Guide. |
| Provider | The translation provider for this job. |
| Watch list | The list of users who receive notifications about the state of this job. |
| State | The current translation state of the job. For a list and description of translation states, see Translation States. |
| Due date | The requested translation deadline, when the job creator expects the translated content to return, in YYYY-MM-DD format. |
| PO reference | The purchase order number referenced for payment of this job. |
| Should quote | If this check box is selected, then the translation provider was instructed to send a quote before starting the translation process. |
| Auto publish translations | If this check box is selected, then when this job is complete, the Connector automatically publishes the translated content. |
| Description | The description of the job. |
| Metadata | Additional information sent to the translation provider. |
- To view additional information about the job, click the Job Data tab.
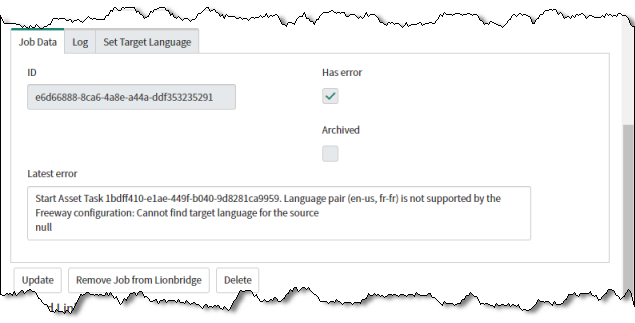
The Job Data tab displays the following information:
| Field | Description |
|---|---|
| ID | The unique job identifier assigned by the Connector. This identifies the job when it is processed by the Clay Tablet. |
| Has error | Indicates whether the job has an error. |
| Archived | Indicates whether the job is archived. |
| Latest error | Displayed only if the Has error check box, described above, is selected. Displays the latest error, which can be either from the Clay Tablet or Lionbridge Freeway, depending where the error occurred. |
- To view a list of all entries in the log file about this job, click the Log tab.
- To view the target languages for this job, click the Set Target Language tab.

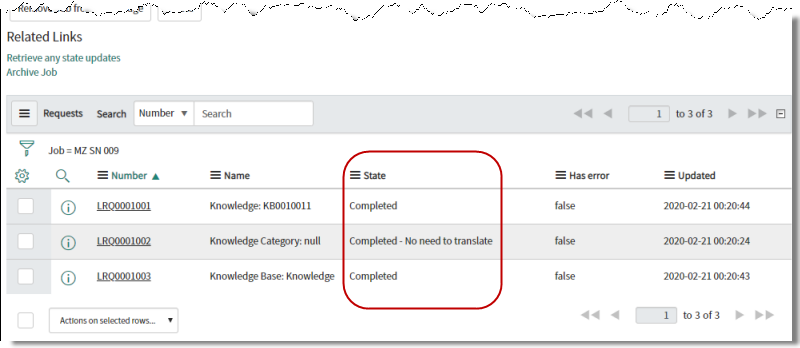
- To view all the requests in the job, which are the individual content items to send for translation, scroll down to the Related Links section.
The Related Links section displays the following information about each request (content item) in the job:
| Column | Description |
|---|---|
| Clicking this icon opens the Request pop-up window, displaying detailed information about the request. For a detailed description, see Viewing Request Details. | |
| Number | The request number, which is a unique identifier for your request, starting with LRQ, and followed by a seven-digit number. By default, the request number is one number higher than the last request created. Clicking the number opens the Request dialog box, where you can edit the request. For a detailed description, see Editing a Request. |
| Name | The name of the request. This includes the content type, such as a Knowledge Article, followed by the name or number of the content item. |
| State | The current translation state of the request. For a list and description of translation states, see Translation States. |
| Has Error | Indicates whether this request has an error. This is either: * true: The request has an error. * false: The request does not have an error. |
| Updated | The last time this request was updated, in YYYY-MM-DD HH:MM:SS format. |
Actions
You can perform the following actions by clicking the corresponding buttons at the top of the dialog box.
- Depending on the job state, you may be able to modify some of the values in this dialog box. Click Update to save any changes.
- To remove this job from the Connector, click Remove Job from Lionbridge. A message box opens, confirming that you want to remove this job. Click OK to continue. The job remains in ServiceNow, and you can send it for translation another time.
Recommendation: Contact Lionbridge before removing a job, as this disrupts translation work in progress.
- To remove this job and the translation requests within it from the Connector and from ServiceNow, click Delete. A message box opens, confirming that you want to delete this job. Click Delete to continue.
Warning: Deleting a job deletes the translation requests within it. To send the corresponding content items for translation after deleting a job, you must create a new job.
2.4.6 - Viewing Request Field Details
Optional. You can view detailed information about a field in a request in the Request field pop-up window.
To view a request:
- In the Related Links section of the Request dialog box, click the Preview icon for a request. For information about this dialog box, see Editing a Request.
The Request field pop-up window opens.
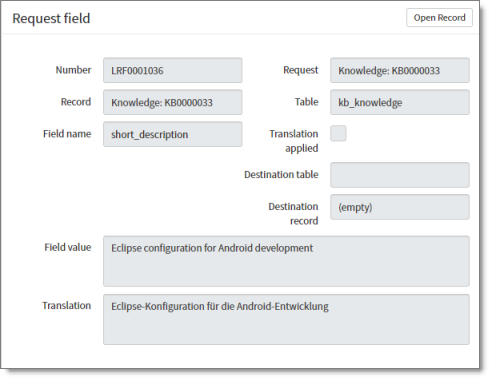
The Request field pop-up window displays the following read-only information about the field in the request:
| Field | Description |
|---|---|
| Number | The request field number. This is a unique identifier for your job, starting with LRF, and followed by a seven-digit number. By default, the request number is one number higher than the last request field created. |
| Record | The name of the request. This includes an abbreviation of the content type, such as a Knowledge, followed by the name or number of the content item. |
| Field name | The type of field, for example, text or short_description. |
| Field value | The value of the field in the source language. |
| Translation | The value of the field in the target language, if the field has been translated. |
| Request | The request number to which this request field belongs. This is a unique identifier for your job, starting with LRQ, and followed by a seven-digit number. By default, the request number is one number higher than the last request created. |
| Table | The name of the table to which this request field belongs, in the source language. |
| Translation applied | When the translation is auto-published, the check box is selected. |
| Destination table | The name of the table to which this request field belongs, in the target language. |
| Destination record | The name of the translated version of the request field. This includes an abbreviation of the content type, such as a Knowledge, followed by the name or number of the content item. |
- Optional. To view the values in this request field, you can click the Open Record button in the top-right corner of the window to open the Request field dialog box. For detailed instructions, see Viewing Request Field Values.
2.4.7 - Viewing Request Field Values
Optional. You can view the values of a field in a request in the Request field dialog box.
To view request field values:
- In the Related Links section of the Request dialog box, click the request-field number link in the Number column for a request. For information about this dialog box, see Editing a Request.
The Request field dialog box opens.
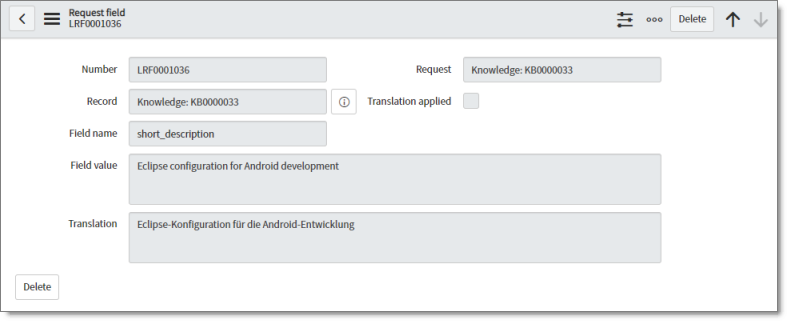
The Request field dialog box displays the following read-only information about the field in the request:
| Field | Description |
|---|---|
| Number | The request field number. This is a unique identifier for your job, starting with LRF, and followed by a seven-digit number. By default, the request number is one number higher than the last request field created. |
| Record | The name of the request. This includes an abbreviation of the content type, such as a Knowledge, followed by the name or number of the content item. |
| Field name | The type of field, for example, text or short_description. |
| Field value | The value of the field in the source language. |
| Translation | The value of the field in the target language, if the field has been translated. |
| Request | The request number to which this request field belongs. This is a unique identifier for your job, starting with LRQ, and followed by a seven-digit number. By default, the request number is one number higher than the last request created. |
| Translation applied | When the translation is auto-published, the check box is selected. |
- Optional. To edit this request field, you can click the Delete button in the top-right corner or the bottom-left corner of the dialog box.
2.5 - Reviewing, Approving, and Rejecting Translated Content
If a job is not auto-accepted, you must review it and then either accept or reject the translation.
- You can accept or reject the translation of a single translation request in the Request dialog box.
- You can accept or reject the translation of multiple translation requests in the Job dialog box.
When a job is in Review translation state, it is ready for you to review.
Note: The auto-accept feature is available if the Lionbridge Connector Global Components update set is installed and if this feature is either configured globally or specified for a specific job. For more information, refer to the Lionbridge Connector for ServiceNow Installation and Configuration Guide.
To review translated content:
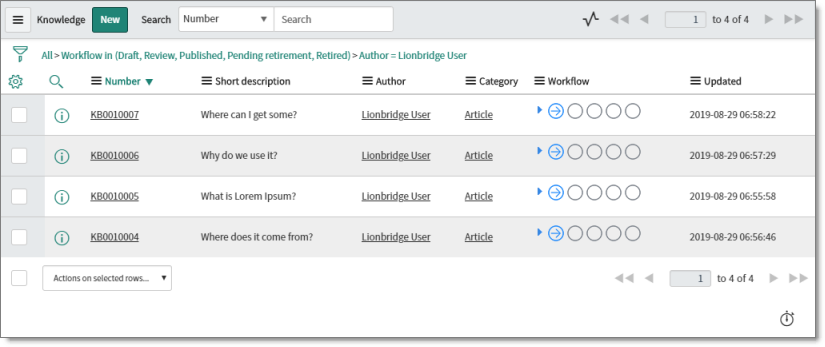
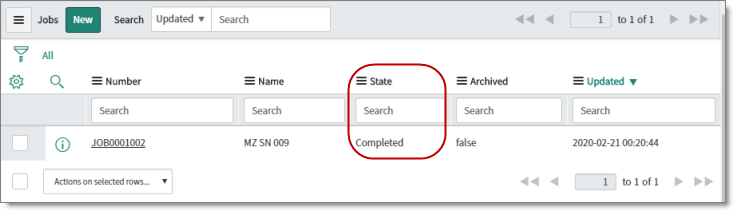
- Navigate to Lionbridge Connector > Jobs > Active Jobs.
The Jobs page opens.
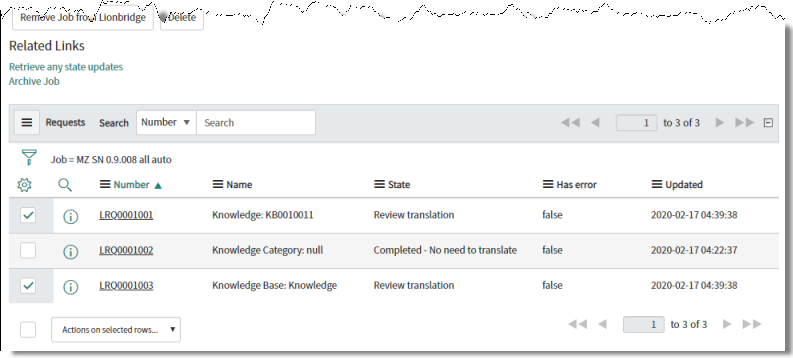
![]()
-
In the State column, locate a job in the Review translation state.
-
In the Number column, click the job-number link.
The Job dialog box opens. For a detailed description of this dialog box, see Viewing Job Details.
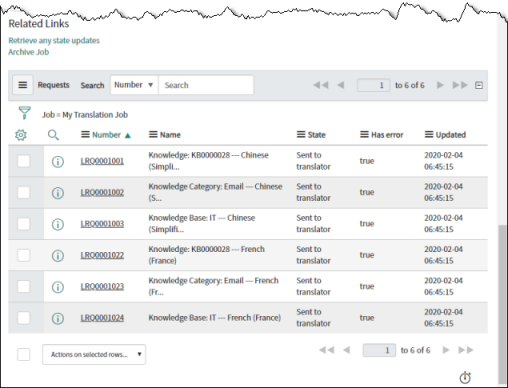
- Scroll down to the Related Links section.
-
To view the translated content (translation request) and compare it with the source content:
-
In the Number column, click the corresponding request-number link to open the Request dialog box. For a detailed description, see Editing a Request.
-
In the Related Links section of the Request dialog box, do one of the following:
-
Click the Preview icon
for a request to open the Request field pop-up window. For a detailed description, see Viewing Request Field Details. -
In the Number column, click the request-field number to open the Request field dialog box. For a detailed description, see Viewing Request Field Values.
-
-
When you are done, click the Back icon
 in the top-left corner of the Request field pop-up window or dialog box to return to the Request dialog box.
 -
Optional. To approve or reject a single translation request in the Request dialog box, click the Accept Translation or Reject Translation button.
-
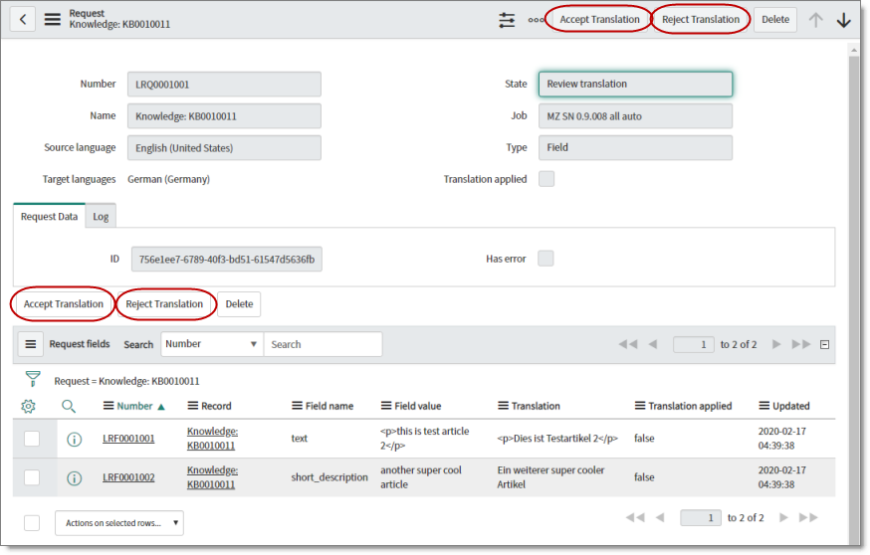
- When you are done, click the Back icon in the top-left corner of the Request dialog box to return to the Job dialog box.
- If you want to approve or reject multiple translation requests, then in the Job dialog box, scroll down again to the Related Links section.
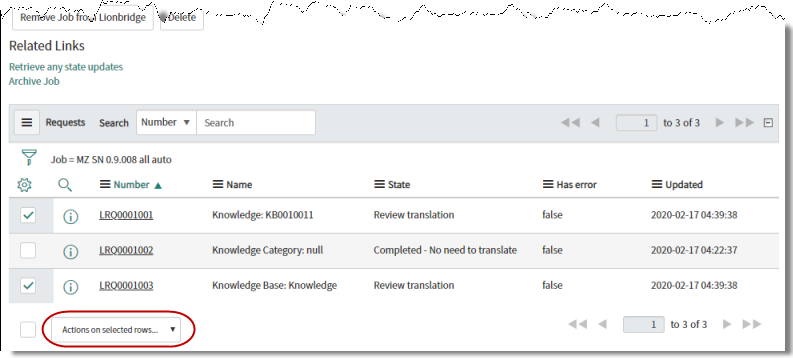
-
Select the check boxes of the translation requests to approve or reject.
-
At the bottom of the dialog box, click the Actions on selected rows button.
In the dropdown list, do one of the following:
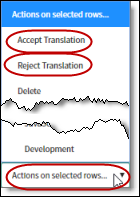
- To accept the translation, select Accept Translation.
- To reject the translation, select Reject Translation.
2.6 - Publishing Translated Content
If a job is not auto-published, you can publish it when it is in Completed state, after it has been accepted or auto-accepted.
Note: The auto-publish feature is available only if the Lionbridge Connector Global Components update set is installed and if this feature is configured globally. For more information, refer to the Lionbridge Connector for ServiceNow Installation and Configuration Guide.
To publish translated content:
- Navigate to Lionbridge Connector > Jobs > Active Jobs.
The Jobs page opens.
-
In the State column, locate a job in the Completed state.
-
In the Number column, click the job-number link.
The Job dialog box opens. For a detailed description of this dialog box, see Viewing Job Details.
- Scroll down to the Related Links section.
-
Select the check boxes of the translation requests to publish.
-
At the bottom of the dialog box, click the Actions on selected rows button.
-
In the dropdown list, click Publish Translation. If only x of y requests in the job are ready to publish, then those numbers will be displayed adjacent to the Publish Translation item.
2.7 - Archiving and Unarchiving Jobs
You archive a job so that you can easily hide it from the Jobs page, and focus only on active jobs.
You can archive jobs of any status. If a job has already been archived, then the Archive Job menu option is not available, and the Unarchive Job menu option is available instead.
To archive a job:
- Navigate to Lionbridge Connector > Jobs > All Jobs.
The Jobs page opens.
-
Select the check boxes of the jobs to archive.
-
In the bottom-left corner, click the Actions on selected rows button, and select Archive Job in the dropdown list.
To unarchive a job:
- Navigate to Lionbridge Connector > Jobs > All Jobs.
The Jobs page opens.

-
Select the check boxes of the jobs to unarchive.
-
In the bottom-left corner, click the Actions on selected rows button, and select Unarchive Job in the dropdown list.