Sending Content for Translation
You use the Connector to send out localized attributes, including keywords, of business objects in the Administration Cockpit, the Product Cockpit and the WCMS Cockpit (Hybris versions 6.1 to 6.6 only), and the Backoffice Cockpit, specifically products and website pages, for translation.
When the Connector sends out a business object for translation, it actually sends out the configured localized attributes in that business object for translation. You can send out for translation any configured localized attributes of any configured business object.
Each localized attribute of a business object that is sent out for translation is a content item.
Note: Although you can view non-localized attributes and select them to send them out for translation, the Connector does not actually send out non-localized attributes for translation.
Note: You configure which business objects, sub-types, and corresponding localized attributes you can send out for translation in the Content Mapping page. For detailed instructions, refer to the Lionbridge Connector for SAP Commerce Installation and Configuration Guide.
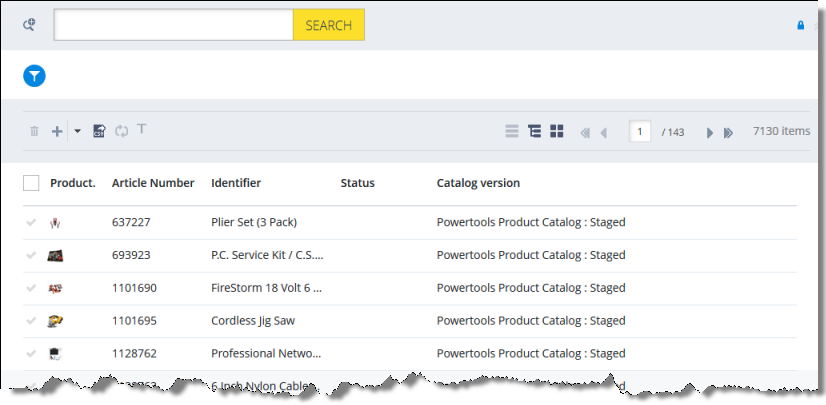
- In SAP Commerce or SAP Commerce Cloud, you can send out products for translation from the Product Cockpit. For detailed instructions, see: Sending Products for Translation from SAP Commerce or SAP Commerce Cloud.
- In Hybris version 6.4 or higher, you can send out products for translation from the Hybris Backoffice Product Cockpit. For detailed instructions, see: Sending Products for Translation from the Hybris Backoffice Product Cockpit (Hybris 6.4 and higher).
- In all supported versions of Hybris, you can send out products for translation from the Hybris Backoffice Products page. For detailed instructions, see: Sending Products for Translation from the Hybris Backoffice Products Page.
- In Hybris versions 6.1 to 6.6, you can send out products for translation from the Hybris Product cockpit. For detailed instructions, see: Sending Products for Translation from the Hybris Product Cockpit (Hybris 6.1 to 6.6).
- In SAP Commerce or SAP Commerce Cloud, you can send out website pages for translation from the Administration Cockpit. For detailed instructions, see: Sending Website Pages for Translation from SAP Commerce or SAP Commerce Cloud.
- In all supported versions of Hybris, you can send out website pages for translation from within Hybris Backoffice. For detailed instructions, see: Sending Website Pages for Translation from the Hybris Backoffice.
- In Hybris versions 6.1 to 6.6, you can send out website pages for translation from the Hybris WCMS cockpits. For detailed instructions, see: Sending Website Pages for Translation from the Hybris WCMS Cockpit (Hybris 6.1 to 6.6).
1 - Sending Products for Translation from SAP Commerce or SAP Commerce Cloud
You use the Connector to send out configured localized attributes of products for translation from SAP Commerce or SAP Commerce Cloud.
Note: You configure which localized attributes of products you can send out for translation in the Content Mapping page. For detailed instructions, refer to the Lionbridge Connector for SAP Commerce Installation and Configuration Guide.
To send out the localized attributes of business objects that are products for translation from SAP Commerce or SAP Commerce Cloud:
- In your Web browser, navigate to /backoffice/ on your SAP Commerce instance or on SAP Commerce Cloud.
- Log in to SAP Commerce or SAP Commerce Cloud.
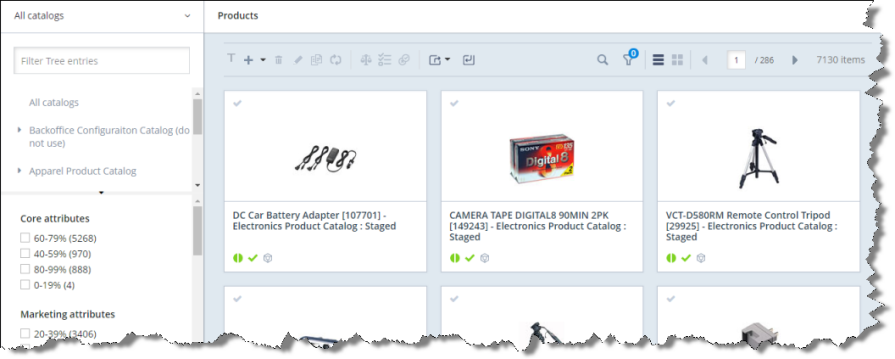
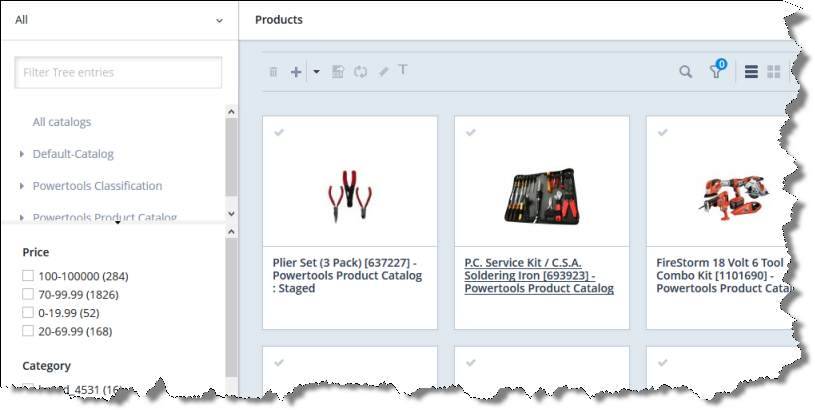
- In the Administration Cockpit menu, select Product Cockpit.
- In the bottom-right corner, click the arrow to display the left menu
 .
.
- In the left menu, select Products.
The Products page opens.
-
Optional. In the Filter Tree in the left pane, you can select a specific catalog or classification, and price range and/or category to display only products that meet the filter criteria.
-
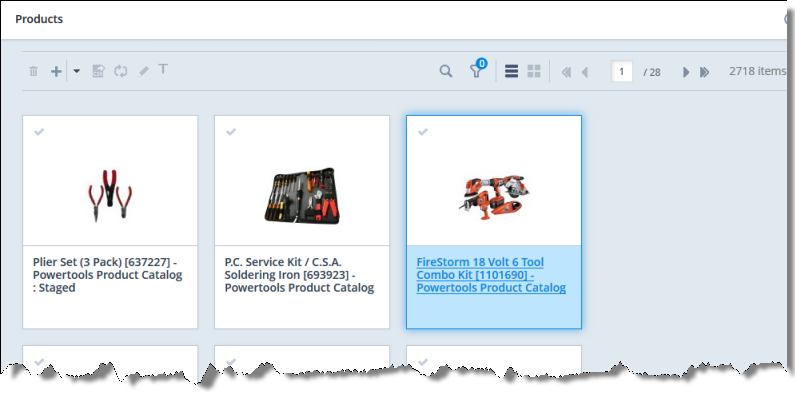
Locate the products to send out for translation. You can view the items in either the Grid view  or the List view
  .
.
Tip: You can use the search and filter functionality at the top of the page to display only the products to send out for translation.
- Select the products to translate.
Note: All selected items must have the same source language.
- In the Grid view, click a checkmark
 in the top-left corner to select it and the corresponding product.
- In the List view, click a checkmark in the left column to select it and the corresponding product.
Tip about selecting all displayed products: To send all the displayed products for translation, view them in the List view and then select the check box in the column header. For example, to send all products in a catalog for translation, click the catalog in the Filter Tree in the left pane, and then select the check box in the column header.
- In the toolbar, click the Translate action button
 .
.
The Job Type page of the Send to translation wizard opens.
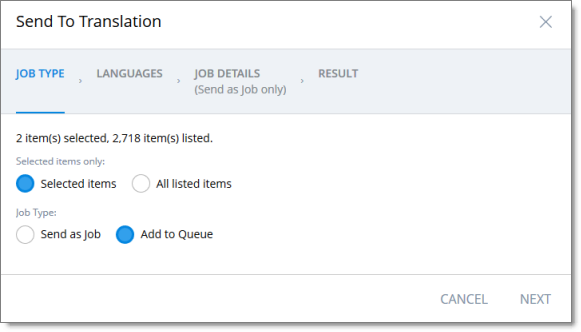
This page displays the number of items selected and the number of items available for selection.
- In the Job Type page, you specify the following settings:
- which items the Connector will send for translation. Select one of the following radio buttons:
- Selected items: These are the items you selected in step 6, above.
- All listed items: All the items that were availabe for selection, after the filtering in step 4, above.
- how the Connector will process the items to send for translation. Select one of the following radio buttons:
- Send as Job: The Connector will send out the items for translation as a single job. The Connector will send the job to the Lionbridge Content API Platform, which will send it to the translation provider that you will specify later in this wizard.
- Add to Queue (the default selection): The Connector will send the items to the Translation Queue, where a user must send them out for translation.
When you are done, click Next.
The Languages page of the wizard opens.
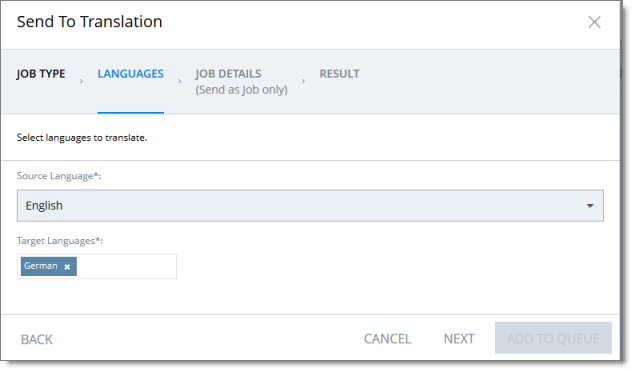
- In the Languages page, you specify the following settings:
- Source Language: Select the source language of the items from the dropdown list. The Connector will send items in this source language for translation.
Note: All selected items must have the same source language.
- Target Languages: Select one or more target languages, into which to translate the items. The list displays all the languages that are set up for the Connector.
When you are done, do one of the following:
- If you selected Add to Queue in the Job Type page of the wizard, click Add to Queue.
Note: The Add to Queue button is available only if you selected Add to Queue in the Job Type page of the wizard.
The Result page of the wizard opens, displaying the number of items that the Connector sent to the Translation Queue.
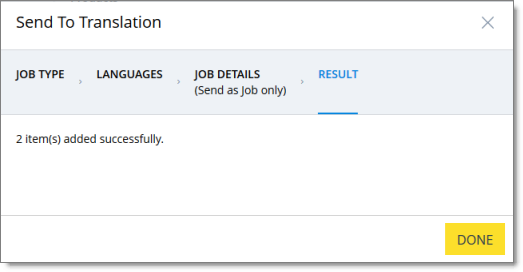
Click Done to close the wizard.
Important: You must open the Translation Queue to send out these items for translation. For detailed instructions, see Sending Items for Translation from the Translation Queue.
- If you selected Send as job in the Job Type page of the wizard, click Next.
Note: The Next button is displayed only if you selected Send as job in the Job Type page of the wizard.
- If you clicked Next, the Job Details page of the wizard opens.
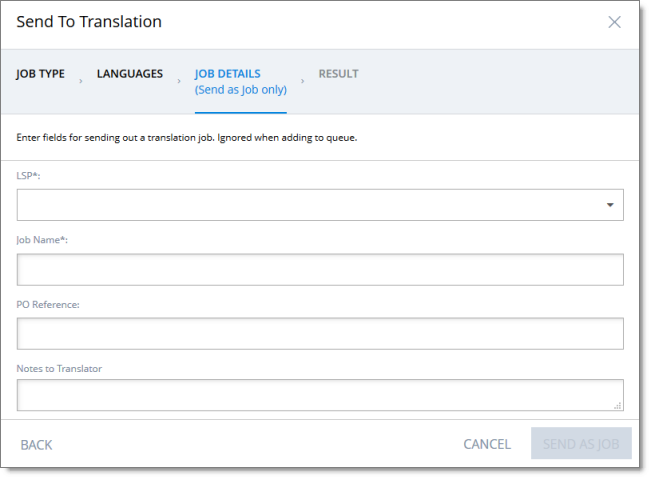
In the page you specify the following job settings:
Note: You specify job settings for the items you sent to the Translation Queue when you send them out for translation from the queue, as described in Sending Items for Translation from the Translation Queue.
| Field |
Description |
| LSP |
Select the translation provider for this translation job from the list. |
| Job Name |
Your name for this translation job. A translation job contains all the items that the Connector sends out together for translation. |
| PO Reference |
The purchase order reference number. |
| Notes to Translator |
Any special instructions or requests.
Note: Displayed only when any translation provider other than Lionbridge Freeway is selected in the LSP field, above. |
| Special Instructions |
Any special instructions or requests.
Note: Displayed only when the Lionbridge Freeway translation provider is selected in the LSP field, above. |
| Analysis Codes |
You can specify the configured Lionbridge Freeway analysis codes for the translation job.
Note: Displayed only when the Lionbridge Freeway translation provider is selected in the LSP field, above. |
When you are done, click Send as Job.
The Results page of the wizard opens, displaying the number of products the Connector sent for translation.
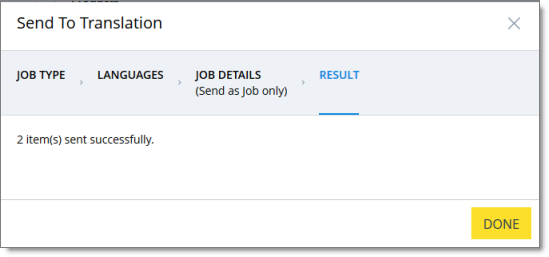
- Click Done to close the wizard.
Tip: You can monitor the progress of your job on the Translation Jobs page. For details, see Monitoring Translation Status.
2 - Sending Products for Translation from the Hybris Backoffice Product Cockpit (Hybris 6.4 and higher)
Note: This functionality is supported only for Hybris versions 6.4 and higher.
You use the Connector to send out configured localized attributes of products for translation from the Hybris Backoffice Product Cockpit.
Note: You configure which localized attributes of products you can send out for translation in the Content Mapping page. For detailed instructions, refer to the Lionbridge Connector for SAP Commerce Installation and Configuration Guide.
To send out the localized attributes of business objects that are products for translation from the Backoffice Product Cockpit:
- In your Web browser, navigate to /backoffice/ on your Hybris instance.
- Log in to the Hybris Backoffice.
- In the Administration menu, select Product Cockpit.
The Products page opens.
- Optional. In the Filter Tree in the left pane, you can select a specific catalog or classification, and price range and/or category to display only products that meet the filter criteria.
- Locate the products to send out for translation. You can view the items in either the Grid view or the List view .
Tip: You can use the search and filter functionality at the top of the page to display only the products to send out for translation.
- Select the products to translate.
Note: All selected items must have the same source language.
- In the Grid view, click a checkmark in the top-left corner to select it and the corresponding product.
- In the List view, click a checkmark in the left column to select it and the corresponding product.
Tip about selecting all displayed products: To send all the displayed products for translation, view them in the List view and then select the check box in the column header. For example, to send all products in a catalog for translation, click the catalog in the Filter Tree in the left pane, and then select the check box in the column header.
- In the toolbar, click the Translate action button .
The Job Type page of the Send to translation wizard opens.
This page displays the number of items selected and the number of items available for selection.
- In the Job Type page, you specify the following settings:
- which items the Connector will send for translation. Select one of the following radio buttons:
- Selected items: These are the items you selected in step 6, above.
- All listed items: All the items that were availabe for selection, after the filtering in step 4, above.
- how the Connector will process the items to send for translation. Select one of the following radio buttons:
- Send as Job: The Connector will send out the items for translation as a single job. The Connector will send the job to the Lionbridge Connector API Platform, which will send it to the translation provider that you will specify later in this wizard.
- Add to Queue (the default selection): The Connector will send the items to the Translation Queue, where a user must send them out for translation.
When you are done, click Next.
The Languages page of the wizard opens.
- In the Languages page, you specify the following settings:
- Source Language: Select the source language of the items from the dropdown list. The Connector will send items in this source language for translation.
Note: All selected items must have the same source language.
- Target Languages: Select one or more target languages, into which to translate the items. The list displays all the languages that are set up for the Connector.
When you are done, do one of the following:
- If you selected Add to Queue in the Job Type page of the wizard, click Add to Queue.
Note: The Add to Queue button is available only if you selected Add to Queue in the Job Type page of the wizard.
The Result page of the wizard opens, displaying the number of items that the Connector sent to the Translation Queue.
Click Done to close the wizard.
Important: You must open the Translation Queue to send out these items for translation. For detailed instructions, see Sending Items for Translation from the Translation Queue.
- If you selected Send as job in the Job Type page of the wizard, click Next.
Note: The Next button is displayed only if you selected Send as job in the Job Type page of the wizard.
- If you clicked Next, the Job Details page of the wizard opens.
In the page you specify the following job settings:
Note: You specify job settings for the items you sent to the Translation Queue when you send them out for translation from the queue, as described in Sending Items for Translation from the Translation Queue.
| Field |
Description |
| LSP |
Select the translation provider for this translation job from the list. |
| Job Name |
Your name for this translation job. A translation job contains all the items that the Connector sends out together for translation. |
| PO Reference |
The purchase order reference number. |
| Notes to Translator |
Any special instructions or requests.
Note: Displayed only when any translation provider other than Lionbridge Freeway is selected in the LSP field, above. |
| Special Instructions |
Any special instructions or requests.
Note: Displayed only when the Lionbridge Freeway translation provider is selected in the LSP field, above. |
| Analysis Codes |
You can specify the configured Lionbridge Freeway analysis codes for the translation job.
Note: Displayed only when the Lionbridge Freeway translation provider is selected in the LSP field, above. |
When you are done, click Send as Job.
The Results page of the wizard opens, displaying the number of products the Connector sent for translation.
- Click Done to close the wizard.
Tip: You can monitor the progress of your job on the Translation Jobs page. For details, see Monitoring Translation Status.
3 - Sending Products for Translation from the Hybris Backoffice Products Page
You use the Connector to send out configured localized attributes of products for translation from the Backoffice Products page.
Note: You configure which localized attributes of products you can send out for translation in the Content Mapping page. For detailed instructions, refer to the Lionbridge Connector for SAP Commerce Installation and Configuration Guide.
To send out the localized attributes of business objects for translation from the Backoffice Products page:
- In your Web browser, navigate to /backoffice/ on your Hybris instance.
- Log in to the Hybris Backoffice.
- Ensure that the Administration menu is selected.
- In the navigation tree on the left, navigate to Catalog > Products.
The Products page opens.
- Locate the products to send out for translation. You can view the products in the List View
 , Tree View
  , or the Grid View
  mode.
mode.
Tip: You can use the search and advanced search functionality to display only the products to send out for translation.
- Select the products to translate:
Tips: To select a range of adjacent products, press the Shift key. To select multiple non-adjacent products, press the Ctrl key. Before selecting products, ensure that the lock icon  is displayed in the top-right corner. If the unlock icon
  is displayed, click it to toggle it to the lock icon.
- In the toolbar, click the Send selection to translation button
 .
.
The Job Type page of the Send to translation wizard opens.
This page displays the number of items selected and the number of items available for selection.
- In the Job Type page, you specify the following settings:
- which items the Connector will send for translation. Select one of the following radio buttons:
- Selected items: These are the items you selected in step 6, above.
- All listed items: All the items that were availabe for selection, after the filtering in step 4, above.
- how the Connector will process the items to send for translation. Select one of the following radio buttons:
- Send as Job: The Connector will send out the items for translation as a single job. The Connector will send the job to the Lionbridge Connector API Platform, which will send it to the translation provider that you will specify later in this wizard.
- Add to Queue (the default selection): The Connector will send the items to the Translation Queue, where a user must send them out for translation.
When you are done, click Next.
The Languages page of the wizard opens.
- In the Languages page, you specify the following settings:
- Source Language: Select the source language of the items from the dropdown list. The Connector will send items in this source language for translation.
Note: All selected items must have the same source language.
- Target Languages: Select one or more target languages, into which to translate the items. The list displays all the languages that are set up for the Connector.
When you are done, do one of the following:
- If you selected Add to Queue in the Job Type page of the wizard, click Add to Queue.
Note: The Add to Queue button is available only if you selected Add to Queue in the Job Type page of the wizard.
The Result page of the wizard opens, displaying the number of items that the Connector sent to the Translation Queue.
Click Done to close the wizard.
Important: You must open the Translation Queue to send out these items for translation. For detailed instructions, see Sending Items for Translation from the Translation Queue.
- If you selected Send as job in the Job Type page of the wizard, click Next.
Note: The Next button is displayed only if you selected Send as job in the Job Type page of the wizard.
- If you clicked Next, the Job Details page of the wizard opens.
In the page you specify the following job settings:
Note: You specify job settings for the items you sent to the Translation Queue when you send them out for translation from the queue, as described in Sending Items for Translation from the Translation Queue.
| Field |
Description |
| LSP |
Select the translation provider for this translation job from the list. |
| Job Name |
Your name for this translation job. A translation job contains all the items that the Connector sends out together for translation. |
| PO Reference |
The purchase order reference number. |
| Notes to Translator |
Any special instructions or requests.
Note: Displayed only when any translation provider other than Lionbridge Freeway is selected in the LSP field, above. |
| Special Instructions |
Any special instructions or requests.
Note: Displayed only when the Lionbridge Freeway translation provider is selected in the LSP field, above. |
| Analysis Codes |
You can specify the configured Lionbridge Freeway analysis codes for the translation job.
Note: Displayed only when the Lionbridge Freeway translation provider is selected in the LSP field, above. |
When you are done, click Send as Job.
The Results page of the wizard opens, displaying the number of products the Connector sent for translation.
- Click Done to close the wizard.
Tip: You can monitor the progress of your job on the Translation Jobs page. For details, see Monitoring Translation Status.
4 - Sending Products for Translation from the Hybris Product Cockpit (Hybris 6.1 to 6.6)
Note: This functionality is supported only for Hybris versions 6.1 to 6.6.
Notes: In Hybris 6.4 or higher, you can also send products for translation from the Hybris Backoffice Product Cockpit. For detailed instructions, see Sending Products for Translation from the Hybris Backoffice Product Cockpit (Hybris 6.4 and higher). In all supported versions of Hybris, you can also send products for translation from the Hybris Backoffice Products page. For detailed instructions, see Sending Products for Translation from the Hybris Backoffice Products Page.
You use the Connector to send out configured localized attributes of products for translation from the Hybris Product Cockpit.
Note: You configure which localized attributes of products you can send out for translation in the Content Mapping page. For detailed instructions, refer to the Lionbridge Connector for SAP Commerce Installation and Configuration Guide.
To send out the localized attributes of business objects for translation from the Product Cockpit:
-
In your Web browser, navigate to /ctcockpit/ on your Hybris instance.
-
Log in to the Hybris Product Cockpit.
-
In the All Products tab, locate the products to send out for translation. You can view the items in either the Grid view or the List view.
Tip: You can use the search, advanced search, and saved search query functionality to display only the products to send out for translation.
- Select the products to translate.
Tips: To select a range of adjacent business objects, press the Shift key. To select multiple non-adjacent products, press the Ctrl key.
Tip about catalogs: To send all the products in a catalog for translation, click the catalog in the left pane and then select all the objects within it.
- In the toolbar, click the Send selection to translation button .
The first page of the Send selection to translation wizard opens.
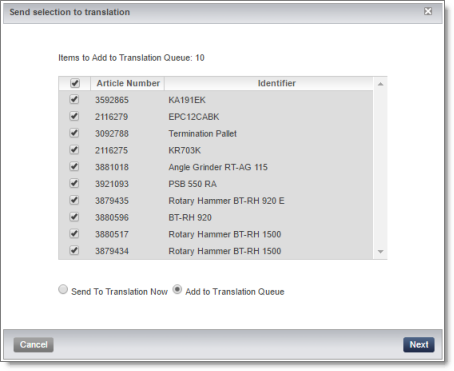
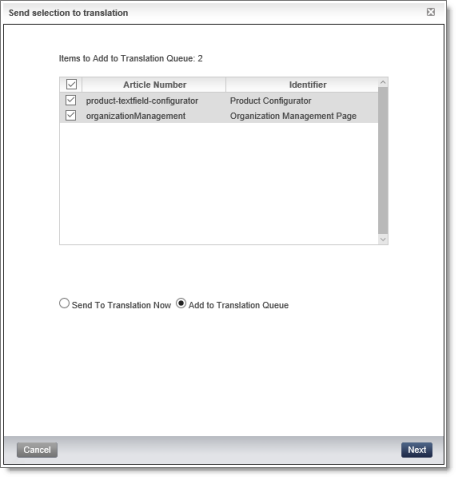
The following information is displayed about each product you selected previously:
- Article Number: The product code.
- Identifier: The product identifier.
These are both displayed in the List view in the Product Cockpit.
Tip: You can clear the check box for any product you do not want to send out for translation.
- Select one of the following radio buttons:
- Add to Translation Queue (the default selection): The Connector sends the content items to the Translation Queue, where a user must send them out for translation.
- Send to Translation Now: The Connector sends the content items to the Lionbridge Content API Platform, which sends them to the translation provider specified in the company’s routing rules. The Connector displays additional fields below, where you can specify additional information about this translation job.
Note: This setting determines which fields are displayed on the following page of the wizard.
-
Click Next.
-
One of the following happens.
- If you previously selected the Add to Translation Queue radio button, the second page of the wizard is displayed as follows:

- If you previously selected the Send to Translation Now radio button, the second page of the wizard is displayed as follows:
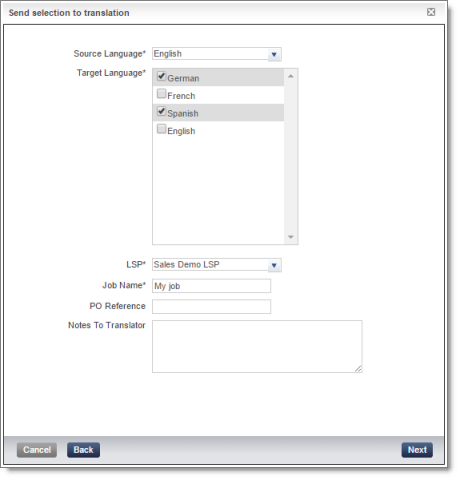
- Enter the following information about the content items to translate:
| Field |
Description |
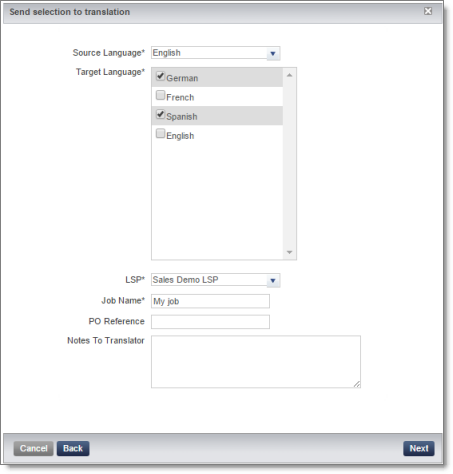
| Source Language |
Required. Select the source language of the selected items to send for translation.
Note: All selected items must have the same source language. |
| Target Language |
Required. Select the check boxes of one or more target languages into which to translate the content. |
| LSP |
Select the translation provider for this translation job from the list. Required and displayed only if you selected the Send to Translation Now radio button in the previous page of the wizard. |
| Job Name |
Your name for this translation job. A translation job contains all the content items that the Connector sends out together for translation. Required and displayed only if you selected the Send to Translation Now radio button in the previous page of the wizard. |
| PO Reference |
The purchase order reference number. Displayed only if you selected the Send to Translation Now radio button in the previous page of the wizard. |
| Notes to Translator |
Any special instructions or requests. Displayed only if you selected the Send to Translation Now radio button in the previous page of the wizard and when any translation provider other than Lionbridge Freeway is selected in the LSP field, above. |
| Special Instructions |
Any special instructions or requests. Displayed only when both:
* Send to Translation is selected in the previous page of the wizard.
* The Lionbridge Freeway translation provider is selected in **Choose LSP**, above. |
| Analysis Codes |
You can specify the configured Lionbridge Freeway analysis codes for the translation job.
Displayed only when both:
* Send to Translation is selected in the previous page of the wizard.
* The Lionbridge Freeway translation provider is selected in **Choose LSP**, above. |
- Click Next.
Note: The Next button is displayed only after at least one target language is selected.
-
If you selected the Send to Translation Now radio button in the previous page of the wizard, then the final page of the wizard states the number of items that were sent out to translation. Click Done to close the wizard.
-
If you selected the Add to Translation Queue radio button in the previous page of the wizard, then the final page of the wizard states the number of items that were sent to the queue. Click Done to close the wizard.
Important: You must open the Translation Queue to send out these items for translation. For detailed instructions, see Sending Items for Translation from the Translation Queue.
5 - Sending Website Pages for Translation from SAP Commerce or SAP Commerce Cloud
You use the Connector to send out website pages (“pages”) for translation from the Hybris Backoffice.
When the Connector sends out pages for translation, it actually sends out the configured localized attributes of the content in that page for translation.
Each localized attribute of a business object that is sent out for translation is a content item.
Note: Although you can view non-localized attributes and select them to send them out for translation, the Connector does not actually send out non-localized attributes for translation.
Note: You configure which pages (Content Page objects) and corresponding localized attributes you can send out for translation in the Content Mapping page. For detailed instructions, refer to the Lionbridge Connector for SAP Commerce Installation and Configuration Guide.
To send out website pages for translation from WCMS:
- In your Web browser, navigate to /backoffice/ on your SAP Commerce instance or on SAP Commerce Cloud.
- Log in to SAP Commerce or SAP Commerce Cloud.
- Ensure that the Administration Cockpit menu is selected. This is the default menu selection.
- In the navigation tree on the left, navigate to WCMS > Page.
The page that opens displays a list of website pages.
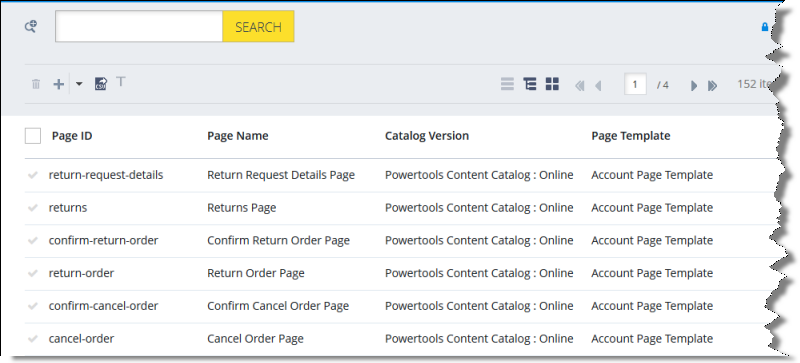
- Locate the website pages to send out for translation. You can view the pages in the List View , Tree View , or the Grid View mode.
Tip: You can use the search and advanced search functionality to display only the website pages to send out for translation.
- Select the website pages to translate:
Tips: To select a range of adjacent pages, press the Shift key. To select multiple non-adjacent pages, press the Ctrl key. Before selecting pages, ensure that the lock icon is displayed in the top-right corner. If the unlock icon is displayed, click it to toggle it to the lock icon.
- In the toolbar, click the Send selection to translation button .
The Job Type page of the Send to translation wizard opens.
This page displays the number of items selected and the number of items available for selection.
- In the Job Type page, you specify the following settings:
- which items the Connector will send for translation. Select one of the following radio buttons:
- Selected items: These are the items you selected in step 6, above.
- All listed items: All the items that were availabe for selection, after the filtering in step 4, above.
- how the Connector will process the items to send for translation. Select one of the following radio buttons:
- Send as Job: The Connector will send out the items for translation as a single job. The Connector will send the job to the Lionbridge Connector API Platform, which will send it to the translation provider that you will specify later in this wizard.
- Add to Queue (the default selection): The Connector will send the items to the Translation Queue, where a user must send them out for translation.
When you are done, click Next.
The Languages page of the wizard opens.
- In the Languages page, you specify the following settings:
- Source Language: Select the source language of the items from the dropdown list. The Connector will send items in this source language for translation.
Note: All selected items must have the same source language.
- Target Languages: Select one or more target languages, into which to translate the items. The list displays all the languages that are set up for the Connector.
When you are done, do one of the following:
- If you selected Add to Queue in the Job Type page of the wizard, click Add to Queue.
Note: The Add to Queue button is available only if you selected Add to Queue in the Job Type page of the wizard.
The Result page of the wizard opens, displaying the number of items that the Connector sent to the Translation Queue.
Click Done to close the wizard.
Important: You must open the Translation Queue to send out these items for translation. For detailed instructions, see Sending Items for Translation from the Translation Queue.
- If you selected Send as job in the Job Type page of the wizard, click Next.
Note: The Next button is displayed only if you selected Send as job in the Job Type page of the wizard.
- If you clicked Next, the Job Details page of the wizard opens.
In the page you specify the following job settings:
Note: You specify job settings for the items you sent to the Translation Queue when you send them out for translation from the queue, as described in Sending Items for Translation from the Translation Queue.
| Field |
Description |
| LSP |
Select the translation provider for this translation job from the list. |
| Job Name |
Your name for this translation job. A translation job contains all the items that the Connector sends out together for translation. |
| PO Reference |
The purchase order reference number. |
| Notes to Translator |
Any special instructions or requests.
Note: Displayed only when any translation provider other than Lionbridge Freeway is selected in the LSP field, above. |
| Special Instructions |
Any special instructions or requests.
Note: Displayed only when the Lionbridge Freeway translation provider is selected in the LSP field, above. |
| Analysis Codes |
You can specify the configured Lionbridge Freeway analysis codes for the translation job.
Note: Displayed only when the Lionbridge Freeway translation provider is selected in the LSP field, above. |
When you are done, click Send as Job.
The Results page of the wizard opens, displaying the number of products the Connector sent for translation.
- Click Done to close the wizard.
Tip: You can monitor the progress of your job on the Translation Jobs page. For details, see Monitoring Translation Status.
6 - Sending Website Pages for Translation from the Hybris Backoffice
You use the Connector to send out website pages (“pages”) for translation from the Hybris Backoffice.
When the Connector sends out pages for translation, it actually sends out the configured localized attributes of the content in that page for translation.
Each localized attribute of a business object that is sent out for translation is a content item.
Note: Although you can view non-localized attributes and select them to send them out for translation, the Connector does not actually send out non-localized attributes for translation.
Note: You configure which pages (Content Page objects) and corresponding localized attributes you can send out for translation in the Content Mapping page. For detailed instructions, refer to the Lionbridge Connector for SAP Commerce Installation and Configuration Guide.
To send out website pages for translation from WCMS:
- In your Web browser, navigate to /backoffice/ on your Hybris instance.
- Log in to the Hybris Backoffice.
- Ensure that the Administration menu is selected.
- In the navigation tree on the left, navigate to WCMS > Page.
The page that opens displays a list of website pages.
- Locate the website pages to send out for translation. You can view the pages in the List View , Tree View , or the Grid View mode.
Tip: You can use the search and advanced search functionality to display only the website pages to send out for translation.
- Select the website pages to translate:
Tips: To select a range of adjacent pages, press the Shift key. To select multiple non-adjacent pages, press the Ctrl key. Before selecting pages, ensure that the lock icon is displayed in the top-right corner. If the unlock icon is displayed, click it to toggle it to the lock icon.
- In the toolbar, click the Send selection to translation button .
The Job Type page of the Send to translation wizard opens.
This page displays the number of items selected and the number of items available for selection.
- In the Job Type page, you specify the following settings:
- which items the Connector will send for translation. Select one of the following radio buttons:
- Selected items: These are the items you selected in step 6, above.
- All listed items: All the items that were availabe for selection, after the filtering in step 4, above.
- how the Connector will process the items to send for translation. Select one of the following radio buttons:
- Send as Job: The Connector will send out the items for translation as a single job. The Connector will send the job to the Lionbridge Connector API Platform, which will send it to the translation provider that you will specify later in this wizard.
- Add to Queue (the default selection): The Connector will send the items to the Translation Queue, where a user must send them out for translation.
When you are done, click Next.
The Languages page of the wizard opens.
- In the Languages page, you specify the following settings:
- Source Language: Select the source language of the items from the dropdown list. The Connector will send items in this source language for translation.
Note: All selected items must have the same source language.
- Target Languages: Select one or more target languages, into which to translate the items. The list displays all the languages that are set up for the Connector.
When you are done, do one of the following:
- If you selected Add to Queue in the Job Type page of the wizard, click Add to Queue.
Note: The Add to Queue button is available only if you selected Add to Queue in the Job Type page of the wizard.
The Result page of the wizard opens, displaying the number of items that the Connector sent to the Translation Queue.
Click Done to close the wizard.
Important: You must open the Translation Queue to send out these items for translation. For detailed instructions, see Sending Items for Translation from the Translation Queue.
- If you selected Send as job in the Job Type page of the wizard, click Next.
Note: The Next button is displayed only if you selected Send as job in the Job Type page of the wizard.
- If you clicked Next, the Job Details page of the wizard opens.
In the page you specify the following job settings:
Note: You specify job settings for the items you sent to the Translation Queue when you send them out for translation from the queue, as described in Sending Items for Translation from the Translation Queue.
| Field |
Description |
| LSP |
Select the translation provider for this translation job from the list. |
| Job Name |
Your name for this translation job. A translation job contains all the items that the Connector sends out together for translation. |
| PO Reference |
The purchase order reference number. |
| Notes to Translator |
Any special instructions or requests.
Note: Displayed only when any translation provider other than Lionbridge Freeway is selected in the LSP field, above. |
| Special Instructions |
Any special instructions or requests.
Note: Displayed only when the Lionbridge Freeway translation provider is selected in the LSP field, above. |
| Analysis Codes |
You can specify the configured Lionbridge Freeway analysis codes for the translation job.
Note: Displayed only when the Lionbridge Freeway translation provider is selected in the LSP field, above. |
When you are done, click Send as Job.
The Results page of the wizard opens, displaying the number of products the Connector sent for translation.
- Click Done to close the wizard.
Tip: You can monitor the progress of your job on the Translation Jobs page. For details, see Monitoring Translation Status.
7 - Sending Website Pages for Translation from the Hybris WCMS Cockpit (Hybris 6.1 to 6.6)
Note: This functionality is supported only for Hybris versions 6.1 to 6.6.
Note: In all supported versions of Hybris, you can also send website pages for translation from the Hybris Backoffice. For detailed instructions, see Sending Website Pages for Translation from the Hybris Backoffice.
You use the Connector to send out website pages (“pages”) for translation from the Hybris WCMS Cockpit.
When the Connector sends out pages for translation, it actually sends out the configured localized attributes of the content in that page for translation.
Each localized attribute of a business object that is sent out for translation is a content item.
Note: Although you can view non-localized attributes and select them to send them out for translation, the Connector does not actually send out non-localized attributes for translation.
Note: You configure which business objects and corresponding localized attributes you can send out for translation in the Content Mapping page. For detailed instructions, refer to the Lionbridge Connector for SAP Commerce Installation and Configuration Guide.
To send out website pages for translation from WCMS:
- In your Web browser, navigate to /ctwcms/ on your Hybris instance.
- Log in to the Hybris WCMS Cockpit.
- In the navigation area, in the Websites box, click the catalog version of the website whose pages you want to translate. You can view website pages in either the Grid View mode or the List View mode.
- In the Filter tab, select the website pages to translate.
Tip: You can use the search and advanced search functionality to display only the website pages to send out for translation.
- Click to select the website pages to translate.
Tips: To select a range of adjacent pages, press the Shift key. To select multiple non-adjacent pages, press the Ctrl key.
- In the toolbar, click the Send selection to translation button .
The first page of the Send selection to translation wizard opens.
The following information is displayed about each page you selected previously:
- Name: The name of the page. This is displayed in the List view of the WCMS Cockpit.
- Identifier: The label of the page in the WCMS Cockpit. This is the same as the Label field displayed in a page’s editing view in the WCMS Cockpit.
Tip: You can clear the check box for any page you do not want to send out for translation.
- Select one of the following radio buttons:
- Add to Translation Queue (the default selection): The Connector sends the pagesto the Translation Queue, where a user must send them out for translation.
- Send to Translation Now: The Connector sends the pages to the Lionbridge Content API Platform, which sends them to the translation provider specified in the company’s routing rules. The Connector displays additional fields below, where you can specify additional information about this translation job.
Note: This setting determines which fields are displayed on the following page of the wizard.
- Click Next.
- One of the following happens.
- If you previously selected the Add to Translation Queue radio button, the second page of the wizard is displayed as follows:
- If you previously selected the Send to Translation Now radio button, the second page of the wizard is displayed as follows:
- Enter the following information about the content items to translate:
| Field |
Description |
| Source Language |
Required. Select the source language of the selected items to send for translation.
Note: All selected items must have the same source language. |
| Target Language |
Required. Select the check boxes of one or more target languages into which to translate the content. |
| LSP |
Select the translation provider for this translation job from the list. Required and displayed only if you selected the Send to Translation Now radio button in the previous page of the wizard. |
| Job Name |
Your name for this translation job. A translation job contains all the content items that the Connector sends out together for translation. Required and displayed only if you selected the Send to Translation Now radio button in the previous page of the wizard. |
| PO Reference |
The purchase order reference number. Displayed only if you selected the Send to Translation Now radio button in the previous page of the wizard. |
| Notes to Translator |
Any special instructions or requests. Displayed only if you selected the Send to Translation Now radio button in the previous page of the wizard and when any translation provider other than Lionbridge Freeway is selected in the LSP field, above. |
| Special Instructions |
Any special instructions or requests. Displayed only when both:
* Send to Translation is selected in the previous page of the wizard.
* The Lionbridge Freeway translation provider is selected in **Choose LSP**, above. |
| Analysis Codes |
You can specify the configured Lionbridge Freeway analysis codes for the translation job.
Displayed only when both:
* Send to Translation is selected in the previous page of the wizard.
* The Lionbridge Freeway translation provider is selected in **Choose LSP**, above. |
- Click Next.
Note: The Next button is displayed only after you populate all required fields, which are marked with an asterisk (*).
Tip: If the last required field you populate is Job Name, click anywhere in the user interface to display the Next button.
-
If you selected the Send to Translation Now radio button in the previous page of the wizard, then the final page of the wizard states the number of items that were sent out to translation. Click Done to close the wizard.
-
If you selected the Add to Translation Queue radio button in the previous page of the wizard, then the final page of the wizard states the number of items that were sent to the queue. Click Done to close the wizard.
Important: You must open the Translation Queue to send out these items for translation. For detailed instructions, see Sending Items for Translation from the Translation Queue.
8 - Sending Items for Translation from the Translation Queue
The goal of the Translation Queue is to control translation costs and the translation process. This design assumes that the person with the authority to send content for translation from the Translation Queue manages the translation budget of the organization.
You can send out one, multiple, or all items from the Translation Queue at one time.
You originally submitted items to the Translation Queue by doing one of the following:
- in the Job Type page of the Send to translation wizard in the SAP Commerce Backoffice Product Cockpit, clicking the Add to Queue radio button. For details, see: Sending Products for Translation from SAP Commerce or SAP Commerce Cloud.
- in the Job Type page of the Send to translation wizard in the Hybris Backoffice Product Cockpit, clicking the Add to Queue radio button. For details, see: Sending Products for Translation from the Hybris Backoffice Product Cockpit (Hybris 6.4 and higher).
- in the Job Type page of the Send to translation wizard opened from the Hybris Backoffice Products Page, clicking the Add to Queue radio button. For details, see: Sending Products for Translation from the Hybris Backoffice Products Page.
- in the first page of the Send selection to translation wizard in the Hybris Product Cockpit, clicking the Add to Translation Queue radio button. For details, see: Sending Products for Translation from the Hybris Product Cockpit (Hybris 6.1 to 6.6).
- in the Job Type page of the Send to translation wizard opened from the Page page in SAP Commerce or SAP Commerce Cloud. clicking the Add to Queue radio button. For details, see: Sending Website Pages for Translation from SAP Commerce or SAP Commerce Cloud.
- in the Job Type page of the Send to translation wizard opened from the Page page in the Hybris Backoffice. clicking the Add to Queue radio button. For details, see: Sending Website Pages for Translation from the Hybris Backoffice.
- in the first page of the Send selection to translation wizard in the Hybris WCMS Cockpit, clicking the Add to Translation Queue radio button. For details, see: Sending Website Pages for Translation from the Hybris WCMS Cockpit (Hybris 6.1 to 6.6).
Submitting content to the Translation Queue before sending it out for translation has the following advantages:
- You may not want to send out the localized attributes in each business object individually as soon as you finish reviewing it. The Translation Queue facilitates your management of reviewed items, so that you do not forget about sending individual reviewed items for translation.
- Your translation provider may prefer receiving fewer but larger batches of items to translate, rather than items from individual business objects, as it facilitates project preparation, resource assignment, and content analysis.
- If you want to translate many items into multiple languages, but you want to translate into only one target language at a time, this is a good way to manage that process.
- The Translation Queue manager may want to route jobs to certain translation providers.
- The Translation Queue manager may want to add job-specific metadata, such as a purchase order number.
If you or your colleagues have sent items to the Translation Queue, you must access the Translation Queue to send out the items from there.
Note: If you do not send out items from the Translation Queue, the items remain in the queue, and the Connector does not send them out for translation.
To submit one or more items from the Translation Queue for translation:
- Do one of the following:
- In your Web browser, navigate to /backoffice/ on your Hybris instance.
- Log in to the Hybris Backoffice.
- In the Administration menu, select Translation Queue.
- In SAP Commerce or SAP Commerce Cloud:
- In your Web browser, navigate to /backoffice/ on your SAP Commerce instance or on SAP Commerce Cloud.
- Log in to SAP Commerce or SAP Commerce Cloud.
- In the Administration Cockpit menu, select Translation Queue.
The Translation Queue opens.
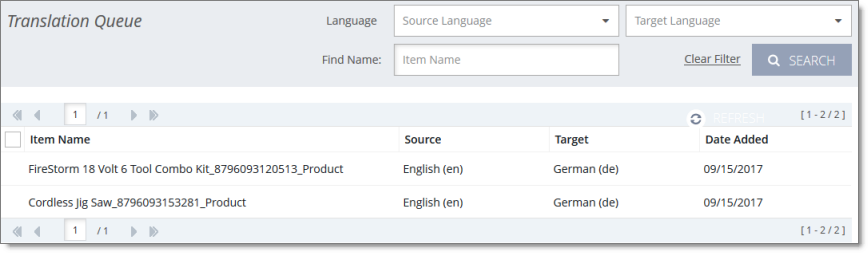
The following information is displayed about each item in the queue:
- Item Name: The name of the business object to send for translation. If the name is long, this wraps to the next row.
- Source Language: The name and language code of the source language of the business object to send for translation. This was specified when the business object was added to the queue.
- Target Language: The name and language code of the target language into which to translate the business object.
Note: If you specified translating a business object into multiple target languages, then each instance of a source language-target language pair is displayed in a separate row in the list, as a separate item. For example, if you want to translate a business object into five languages, then there are five rows in the list, one for each target language.
- Date Added: The date the business object was added to the queue, in the following format: MM/DD/YYYY.
The header and footer display information about how many items are in the queue, and how they are displayed. If there are more than 25 items in the queue, they are displayed in multiple sub-pages.
- The left sides of the header and footer display the total number of sub-pages in the queue. To navigate to a different sub-page, enter the sub-page number or click an arrow.
- The right sides of the header and footer display the total number of items displayed on the current sub-page of the queue and the total number of items in the queue.
-
Optional. Click a column heading to sort by a column or to reverse the sort order of a sorted column.
-
Optional. In the top of the queue, you can filter the displayed items in the queue. You can search by the following criteria:
- item name
- source language
- target language
Click Search.
Tip: To clear your search filters, click Clear Filter.
-
Optional. Click Refresh in the top-right corner of the list to update the items in the queue.
-
In the list, select the check boxes of the items that you want to send out for translation.
Tips: To select the check boxes of all items in the sub-page, select the check box in the column header. If all check boxes in the sub-page are selected, clear the check box in the column header.
Note: To remove items from the queue, select the corresponding check boxes and click Remove Select Item.
- Click Send to Translation.
The Send Items to Translation dialog box opens.
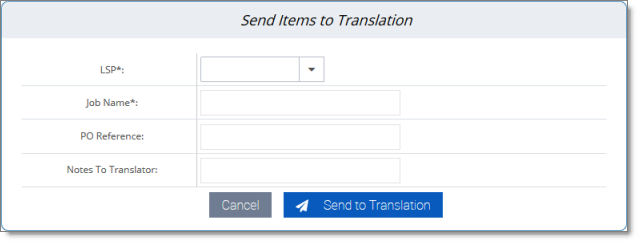
- Enter the following information about the items to translate:
| Field |
Description |
| LSP |
Select the translation provider for this translation job from the list. |
| Job Name |
Your name for this translation job. |
| PO Reference |
Optional. The purchase order reference number for this translation job. |
| Notes to Translator |
Any special instructions or requests. Displayed only when any translation provider other than Lionbridge Freeway is selected in the LSP field, above. |
| Special Instructions |
Any special instructions or requests. Displayed only when the Lionbridge Freeway translation provider is selected in the LSP field, above. |
| Analysis Codes |
You can specify the configured Lionbridge Freeway analysis codes for the translation job.
Displayed only when the Lionbridge Freeway translation provider is selected in Choose LSP, above. |
- Click Send to Translation.
A message box confirms that the Connector started processing the translation job with the selected items. Click OK to close the message box.