Configuring the Lionbridge Connector
After you install the Connector, you configure your Connector installation in Backoffice.
- Do one of the following:
- In your Web browser, navigate to /backoffice/ on your Hybris instance.
- Log in to the Hybris Backoffice.
- In the Administration menu, select ConnectorConfig.
In the System Information section User can see below Information:

-
SAP CC Version
-
Connector Version
-
Build
- Do one of the following:
- In your Web browser, navigate to /backoffice/ on your Hybris instance.
- Log in to the Hybris Backoffice.
- In the Administration menu, select ConnectorConfig.
- In the secondary ConnectorConfig menu that opens, select System Configuration.
- In SAP Commerce or SAP Commerce Cloud:
-
In your Web browser, navigate to /backoffice/ on your SAP Commerce instance or on SAP Commerce Cloud.
-
Log in to SAP Commerce or SAP Commerce Cloud.
-
In the Administration Cockpit menu, select ConnectorConfig.
-
In the secondary ConnectorConfig menu that opens, select System Configuration.
-
Configure the settings in the following sections:
- In the ConnectorConfig menu, select Content Mapping to open the Content Mapping page.
-
In the Item Type Attributes tab, you configure the localized Item Type attributes of business objects and sub-types to send out for translation. For detailed instructions, see Configuring Business Objects, Sub-Types, and Localized Attributes.
-
Optional. In the Classification Attributes tab, you can configure the product classification attributes of business objects that are Products for the Connector to send for translation. All classification attributes belong to a category. When you add a product to a category, Hybris or SAP Commerce attaches those attributes to it. For detailed configuration instructions, see Configuring Product Classification Attributes for Translation.
- Optional. In Hybris versions 6.1 or 6.2, you can configure the multi-select feature to support sending multiple products and pages for translation concurrently from the Hybris Backoffice. For detailed instructions, see Configuring the Multi-Select Feature in Hybris.
Note: This step is not relevant for Hybris versions 6.3 or higher, SAP Commerce, or SAP Commerce Cloud.
- Optional. You can configure how frequently the Connector sends jobs to the Lionbridge Content API Platform. For detailed instructions, see Configuring the Frequency of Sending Jobs to the Lionbridge Content API Platform.
Important: You must configure your browser to allow pop-up windows on the Hybris, SAP Commerce, or SAP Commerce Cloud server.
1 - LSP Configuration
Setting Up Your Connector License
You set up your Connector license in the License Configuration section of the System Configuration page.
To set up your License Configuration:
-
Open the System Configuration page. For detailed instructions, see Configuring the Lionbridge Connector.
-
In the License Configuration](#) section of the System Configuration page, in the Client ID and Client Secret field, enter your Client ID and Client Secret key, which you obtain from Lionbridge.

- Click Save License.
A message box opens, stating Save License Sucessfully.
Configuring your LSP:
Once you setup your connector license in the previous step and click Save License, you should see your Providers(#) list automatically refreshes to show you providers available with your license.
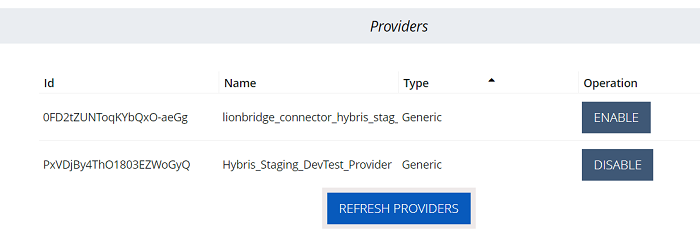
- ID: Provider.
- Name: Name for the language service provider (LSP). This is what your users will select when sending out content for translation to this provider.
- Type: Select your translation provider. The type of translation provider determines whether additional configuration is required.
- Operation: You can enable or disable the provider. Disabled providers would not be available as an option when you send out content to translation.
If you need more providers configured, please contact Lionbridge support team.
Click REFRESH PROVIDERS to see latest updates.
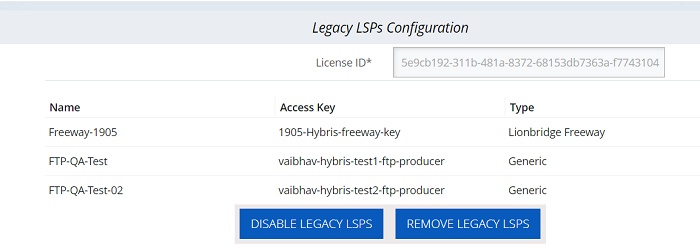
2 - Legacy LSPs Configuration
If you have upgraded your Lionbridge connector from an earlier (2.x) version, your previous LSP configuration will show up in the Legacy LSPs Configuration section. They are maintained so that you can still receive back any pending jobs sent to those legacy LSPs. You won’t be able to send any new jobs out to legacy LSPs though. If you have done a brand-new installation of the connector, this section won’t appear on your System Configuration screen.
You cannot make any changes to legacy license settings and legacy LSPs. The only operations you can perform in this section are:
-
Disable/Enable Legacy LSPs: You can disable all legacy LSPs. By doing so, the connector will stop checking for any jobs returning from those legacy LSPs. You can also re-enable all legacy LSPs after you disable them. After re-enabled them, the connector will restart checking for jobs returning from legacy LSPs.
-
Remove Legacy LSPs: You can remove all legacy LSPs. After that, the Legacy LSPs Configuration section will disappear from your System Configuration screen.
Important: You cannot reverse the operation once, you remove legacy LSPs, you cannot get them back, and if there are any outstanding jobs sent to any of those legacy LSPs, the connector won’t be able to receive the translation back for those jobs. So please make sure you have completed all outstanding jobs. Removing legacy LSPs does not affect completed jobs sent to legacy LSPs in the past. You can still see them in the Translation Jobs view and check their job details on the Job Details page.
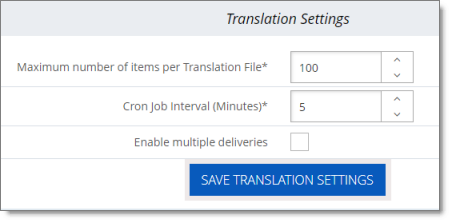
3 - Configuring Translation Settings
In the Translation Settings section of the System Configuration page, you configure the following settings:
- the maximum number of items in a translation file
- how frequently to download and import translations
- whether you can receive revisions of translated content, which determines whether approval is required for a job
-
Open the System Configuration page. For detailed instructions, see Configuring the Lionbridge Connector.
-
Locate the Translation Settings section of the System Configuration page.
Tip: Depending on your screen size and resolution, you may need to scroll down to view this section.
- Configure any of the following settings:
| Setting |
Description |
| Maximum number of items per translation file |
This setting enables you to configure the maximum number of items in a translation file generated by the Connector. An item is an asset that is being translated into a specific target language.
For example, suppose you are translating 150 assets from one source language into three target languages. If you use the default value of 100, then for each language pair, there are 2 translation files, and there are a total of 6 generated files.
By default, the maximum number of items that the Connector sends out for translation in a single translation file is 100. You can change this number by selecting one of the following numbers instead: 150, 200, or 250. |
| Cron Job Interval (Minutes) |
This setting enables you to configure how frequently to download and import translations.
The ctPerformable CronJob automatically downloads and imports translations from the Lionbridge Content API Platform into Hybris. By default, this CronJob runs once every minute.
This CronJob consumes resources such as memory space, network bandwidth, and database connections. Therefore, by design, the CronJob is active only when required, which is when the Connector submits a translation job and expects translated content to return from the Lionbridge Content API Platform. When the CronJob is active, it polls the Lionbridge Content API Platform to update the job status and retrieve any translated content.
At the start of each interval, the CronJob checks whether it is required to remain active. If it is not required, it de-activates internally. It automatically re-activates when there is a job to retrieve.
You can change this interval so that the CronJob runs every 5 or 10 minutes.
Note: If the Lionbridge Content API Platform is waiting for a message about translated content for a submitted job, and a network outage prevents this message from being delivered, the CronJob keeps polling the Lionbridge Content API Platform until the job is manually stopped.
Tip: You can temporarily prevent this job from running and consuming resources, for example, if you are not currently sending out content items for translation. For detailed instructions, refer to the appropriate version of the Hybris documentation at https://wiki.hybris.com. |
| Enable multiple deliveries |
This optional setting enables receiving revisions of translated content and requires approval for received translations.
* If this check box is selected:
* In the **Translation Status** column of the **Translation Jobs** page:
* The status of delivered projects is Reviewing Translation.
* The **Approve** button is displayed.
* You can click the **Approve** button to mark the job as complete, which prevents any re-deliveries.
* Multiple re-deliveries are allowed and processed into SAP Commerce until clicking the **Approve** button in the **Translation Jobs** page, which marks the job as complete.
* If this check box is cleared (the default setting):
* In the **Translation Status** column of the **Translation Jobs** page, the status of delivered projects is Completed.
* There is no approval step.
* Multiple re-deliveries are not supported. |
- Click Save Translation Settings.
Note: Saving these settings creates and registers the ctPerformable CronJob with the interval you specified.
4 - Mapping Language Codes
You map Hybris language codes to Lionbridge language codes in the Language Mapping section of the System Configuration page.
You must map the Hybris language codes to the Lionbridge language code for the source and target languages that you will use for translation. Otherwise, then Connector will not send out content for translation.
For a list of Lionbridge language code, see Appendix: Language Codes.
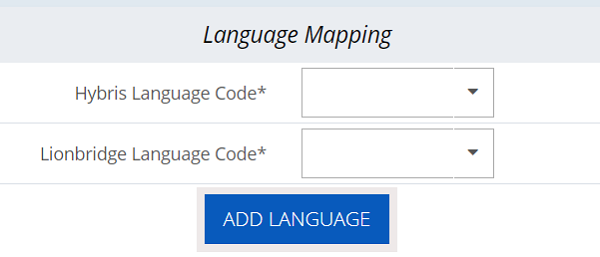
To map language codes:
-
Open the System Configuration page. For detailed instructions, see Configuring the Lionbridge Connector.
-
Locate the Language Mapping section of the System Configuration page.
Tip: Depending on your screen size and resolution, you may need to scroll down to view this section.
-
Perform the following steps for each language to map:
-
In the Hybris Language Code list, select the Hybris language code to map.
Tip: Languages that are already mapped are displayed in gray with a gray background. Languages that are not currently mapped are displayed in black with a white background.
-
In the Lionbridge language code list, select the corresponding Lionbridge language code to map.
-
Click Add Language.
The list at the bottom of the section now displays the mapping you just added.
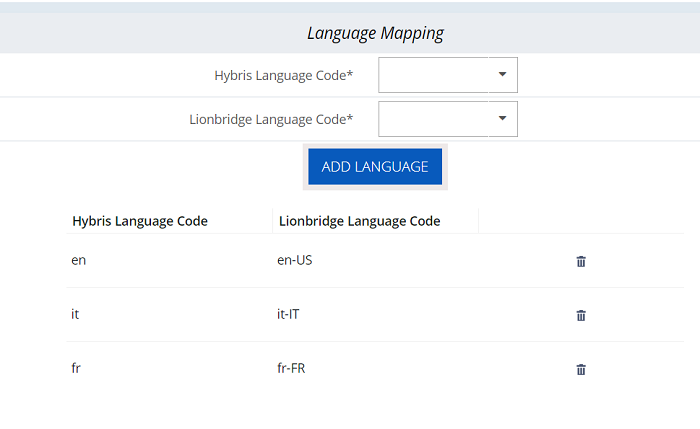
Tip: To delete a language mapping, click the corresponding Delete button  .
.
5 - Configuring Proxy Server Implementations
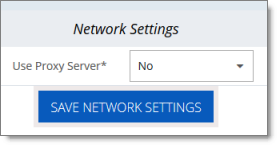
You can configure proxy server implementations of the Connector in the Network Settings section of the System Configuration page.
-
Open the System Configuration page. For detailed instructions, see Configuring the Lionbridge Connector.
-
Locate the Network Settings section of the System Configuration page.
Tip: Depending on your screen size and resolution, you may need to scroll down to view this section.
- In the Use Proxy Server dropdown list, select Yes.
The section expands.
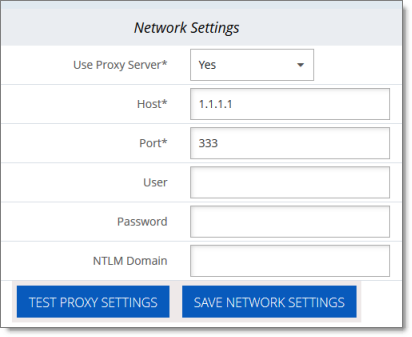
- Edit the following information:
| Field |
Description |
| Host |
Required. The IP address or domain name for the proxy server. |
| Port |
Required. The port number for the proxy server. |
| User |
Optional. The username for authentication to the proxy server. |
| Password |
Optional. The password for authentication to the proxy server. |
| NTLM Domain |
Optional. The domain for authentication to the proxy server. |
-
Click Test Proxy Settings.
-
If the test is successful, click Save Network Settings.
6 - Configuring Attributes for Translation
There are two ways to configure business objects, sub-types, and localized attributes, including keywords, for translation:
6.1 - Configuring Business Objects, Localized Attributes, and Sub-Types
In the Content Mapping page, you can configure which business objects and localized attributes and sub-types in those objects the Connector will send for translation. The Mapped Content section, on the right side of that page, displays all configured objects, localized attributes, and sub-types, including localized attributes of sub-types.
Important: You can configure only localized attributes for the Connector. If there are attributes you want to send out for translation that are not localized by default, you must configure them to be localized. For detailed instructions, refer to “Localized Attributes” in the Internationalization and Localization Overview in the SAP Commerce documentation, available at: https://help.sap.com/viewer/d0224eca81e249cb821f2cdf45a82ace/6.3.0.0/en-US/8bfc204086691014a345f64b08505839.html.
Note: In exceptional cases, configuring certain business objects and localized attributes, as described below, may not be sufficient to support the Connector sending them out for translation, and custom code may be required.
Tip: To translate content slot components, such as CMSParagraphComponent, you must map them.
- Do one of the following:
- In your Web browser, navigate to /backoffice/ on your Hybris instance.
- Log in to the Hybris Backoffice.
- In the Administration menu, select ConnectorConfig.
- In SAP Commerce or SAP Commerce Cloud:
- In your Web browser, navigate to /backoffice/ on your SAP Commerce instance or on SAP Commerce Cloud.
- Log in to SAP Commerce or SAP Commerce Cloud.
- In the Administration Cockpit menu, select ConnectorConfig.
The Item Type Attributes tab of the Content Mapping page opens.
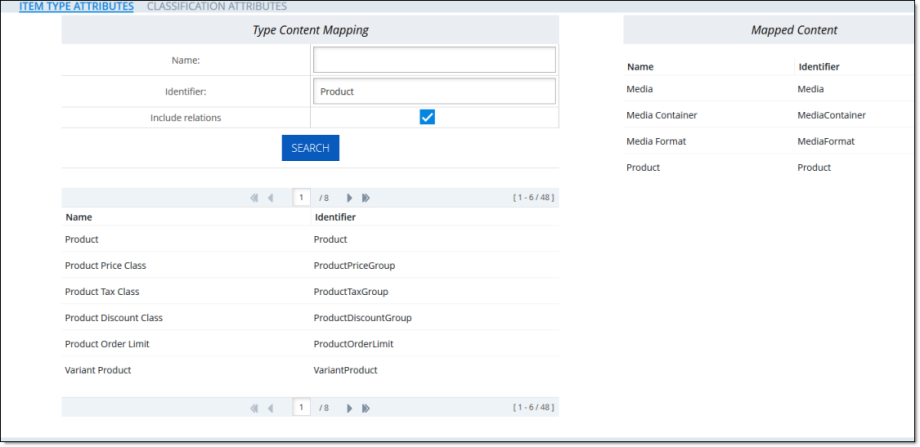
- The Type Content Mapping section, on the left side of the tab, displays all the available business objects and sub-types.
- The Mapped Content section, on the right side of the tab, displays all business objects and sub-types, and their corresponding attributes, that have already been mapped.
The section footers display the total number of items in each list, and the total number of items displayed on this sub-page of the list.
- If there are more than seven items in the Type Content Mapping section, they are displayed in multiple sub-pages.
- If there are more than twelve items in the Mapped Content section, they are displayed in multiple sub-pages.
Tip: Use the sub-page nagivation arrows to navigate between sub-pages. To navigate among sub-pages, at the bottom of the list, click an arrow or enter the number of the sub-page to display.
- In the Type Content Mapping section of the page, use the Name and/or Identifier fields at the top of the section to search for the business object or sub-type you want to be available for translation. By default, the Include relations check box is selected, so that Relation type attributes and types that contain only Relation type attributes to one level of recursion are also displayed. If you want to exclude these attributes and types from the search results, clear this check box. Then click Search.
Note: You can configure the number of recursion levels for the Relation type attributes and types that contain only Relation type attributes that are displayed in search results. For detailed instructions, see Configuring the Number of Recursion Levels for Relation Type Attributes.
The list below the Search button updates with the search results. For example, if you searched for business objects with the name Product, the list displays all matching results, which are objects or sub-types with Product in their name.
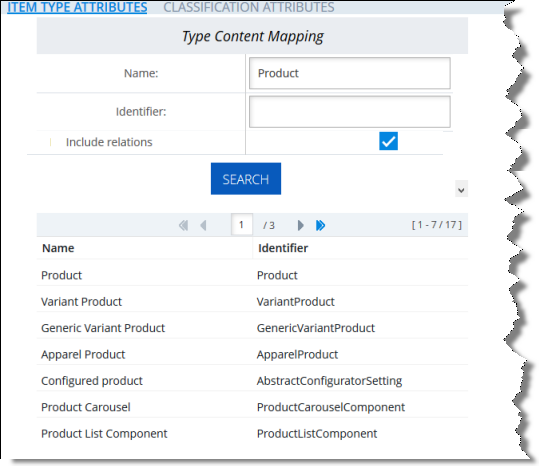
- In the search results, click the row for the business object or sub-type to map.
A dialog box opens, displaying the object’s or sub-type’s localized attributes. The title of the dialog box is the object or sub-type.
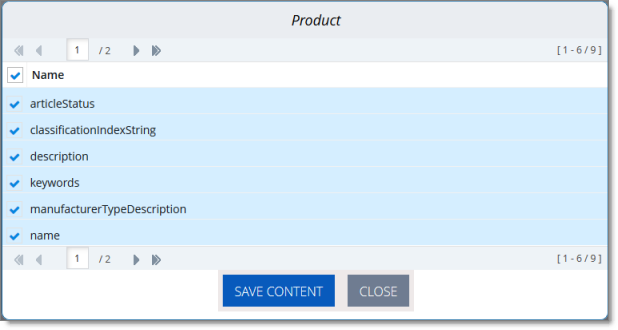
- Configure the localized attributes for translation.
a. Select the check boxes for the localized attributes to configure for translation.
Tip: To select all check boxes, click the check box in the Name column header.
b. Click Save Content.
A message box states that the selected localized attributes were successfully saved.
c. Click OK to close the message box.
Note: Use the above steps to add additional localized attributes to a previously configured business object or sub-type.
- Do one of the following:
- In your Web browser, navigate to /backoffice/ on your Hybris instance.
- Log in to the Hybris Backoffice.
- In the Administration menu, select ConnectorConfig.
- In SAP Commerce or SAP Commerce Cloud:
- In your Web browser, navigate to /backoffice/ on your SAP Commerce instance or on SAP Commerce Cloud.
- Log in to SAP Commerce or SAP Commerce Cloud.
- In the Administration Cockpit menu, select ConnectorConfig.
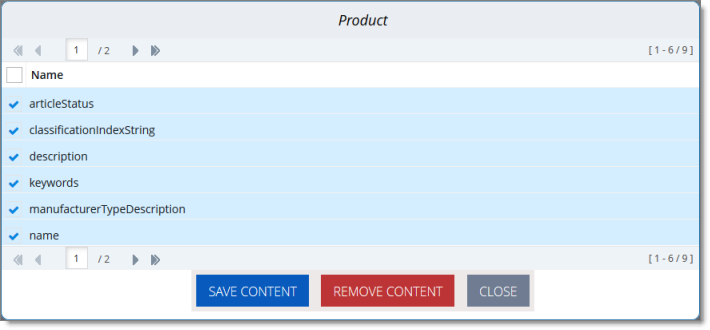
The Content Mapping page opens. The Mapped Content section on the right side of the page displays all the previously configured business objects and sub-types.
- Locate the configured business object to edit or delete, and click the corresponding row.
Tip: Use the sub-page nagivation arrows to navigate between sub-pages. To navigate among sub-pages, at the bottom of the list, click an arrow or enter the number of the sub-page to display.
A dialog box opens. The title of the dialog box is the object or sub-type.
Tip: Use the sub-page nagivation arrows to navigate between sub-pages. To navigate among sub-pages, at the bottom of the list, click an arrow or enter the number of the sub-page to display.
- Do one of the following:
- To edit the localized attributes to configure for translation, select or clear the appropriate check boxes, and then click Save Content.
A message box states that the configuration was saved.
- To remove the object or sub-type from configuration for translation, cllick Remove Content.
A message box states that the item was deleted.
6.1.1 - Configuring the Number of Recursion Levels for Relation Type Attributes
You can configure the number of recursion levels for the Relation type attributes and types that contain only Relation type attributes that are displayed in search results in the Item Type Attributes tab of the Content Mapping page. For more information about this tab, see Configuring Business Objects, Sub-Types, and Localized Attributes.
By default, when the Include relations check box is selected, one level of recursion of the Relation type attributes is displayed in search results. However, you can change the number of levels of recursion of the Relation type attributes that is displayed in the search results.
Warning: Changing the default value of 1 to a larger number may produce large process-consuming tasks that can affect system performance.
To change the number of levels of recursion of the Relation type attributes:
-
Open {HYBRIS_HOME}/hybris/bin/custom/ctcore/project.properties for editing.
-
Locate the contentextraction.requestsSourcesExtractionRecursivenessMaxDepth parameter.
-
Change the value of this parameter to any integer.
Note: The default value of this parameter is 1.
- Save your change.
6.2 - Configuring Product Classification Attributes for Translation
For business objects that are Products, you can configure the product classification attributes that the Connector will send for translation. All classification attributes belong to a category. When you add a product to a category, Hybris or SAP Commerce attaches those attributes to it. For more information about this feature, refer to the classification documentation at: https://help.sap.com/viewer/eb9d43275268474aa75793d699de709b/6.4.0.0/en-US/8b7aa49c86691014ae51c3b0d38cd87b.html.
- Do one of the following:
- In your Web browser, navigate to /backoffice/ on your Hybris instance.
- Log in to the Hybris Backoffice.
- In the Administration menu, select ConnectorConfig.
- In SAP Commerce or SAP Commerce Cloud:
- In your Web browser, navigate to /backoffice/ on your SAP Commerce instance or on SAP Commerce Cloud.
- Log in to SAP Commerce or SAP Commerce Cloud.
- In the Administration Cockpit menu, select ConnectorConfig.
The Item Type Attributes tab of the Content Mapping page opens.
- Click the Classification Attributes link in the top of the page to open the corresponding tab.
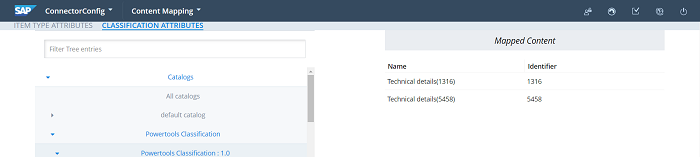
- In the Filter Tree in the left pane, navigate in the catalogs and classification to select a classifying category. For example, navigate to: Powertools Classification classification system > Powertools Classification: 1.0 classification system version > Weight & Dimensions classifying category.
Note: In Backoffice, you can choose which classification to enable. For details, refer to the documentation, available at: https://help.sap.com/viewer/eb9d43275268474aa75793d699de709b/6.4.0.0/en-US/8b7aa49c86691014ae51c3b0d38cd87b.html.
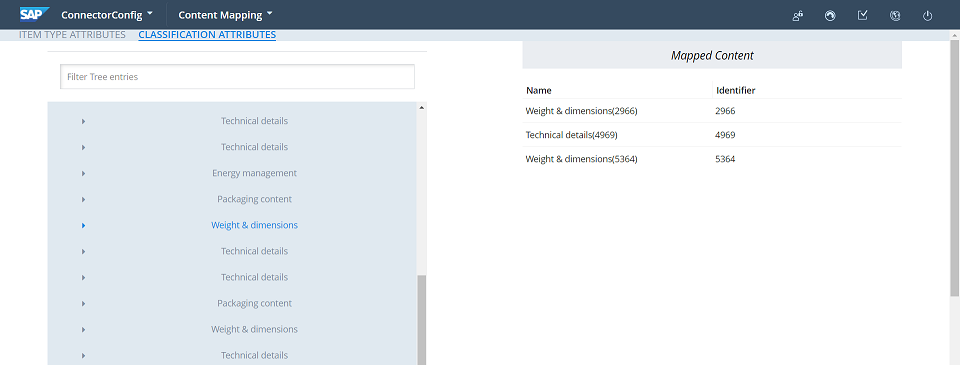
The Mapped Content pane on the right displays a list of all classification entries with attributes mapped.
-
To map the classification attributes, so that the Connector can send them out for translation, navigate in the catalogs and classification to select the corresponding classifying category ,select the corresponding check box, or to select all classification attributes of the classifying category, select the check box in the Namecolumn header.
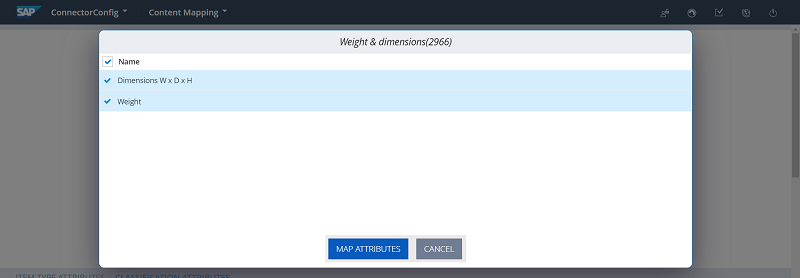
-
Click Map Attributes.
A message box confirms that the configuration was saved.
-
Click OK to close the message box.
-
Repeat steps 3 through 6 for all the classification attributes to configure for translation.
7 - Configuring the Multi-Select Feature in Hybris
In Hybris versions 6.1 and 6.2, if you want to select multiple products and website pages (“pages”) for translation concurrently in the Hybris Backoffice, you must enable the multi-select feature by configuring the multiSelect setting, as described below:
Note: This feature is enabled by default in Hybris versions 6.3 and higher.
To enable the multi-select feature in Hybris versions 6.1 and 6.2:
-
Log into the Hybris Backoffice Administration Cockpit (“Backoffice”).
-
Press the F4 key.
The Application Orchestrator opens.
- In the toolbar at the top, select the Symbolic Widgets](#) check box.
The page updates.
-
Scroll down to locate the Collection Browser.
-
Click the Widget Settings](#) icon of the Collection Browser.
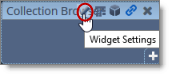
The Settings dialog box opens.
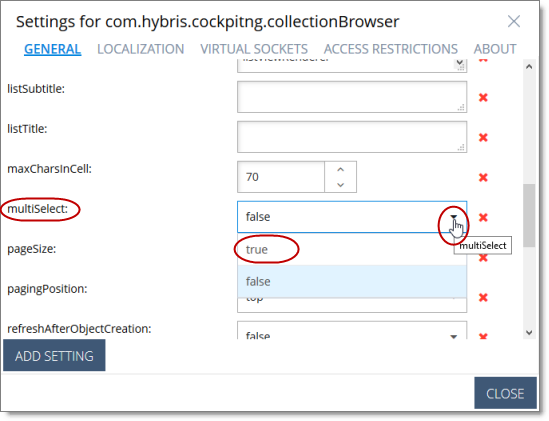
- Scroll down to the multiSelect](#) option, and in the corresponding dropdown list, select true.
-
In the bottom-right corner, click Close the dialog box.
-
Press the F4 key to close the Application Orchestrator.
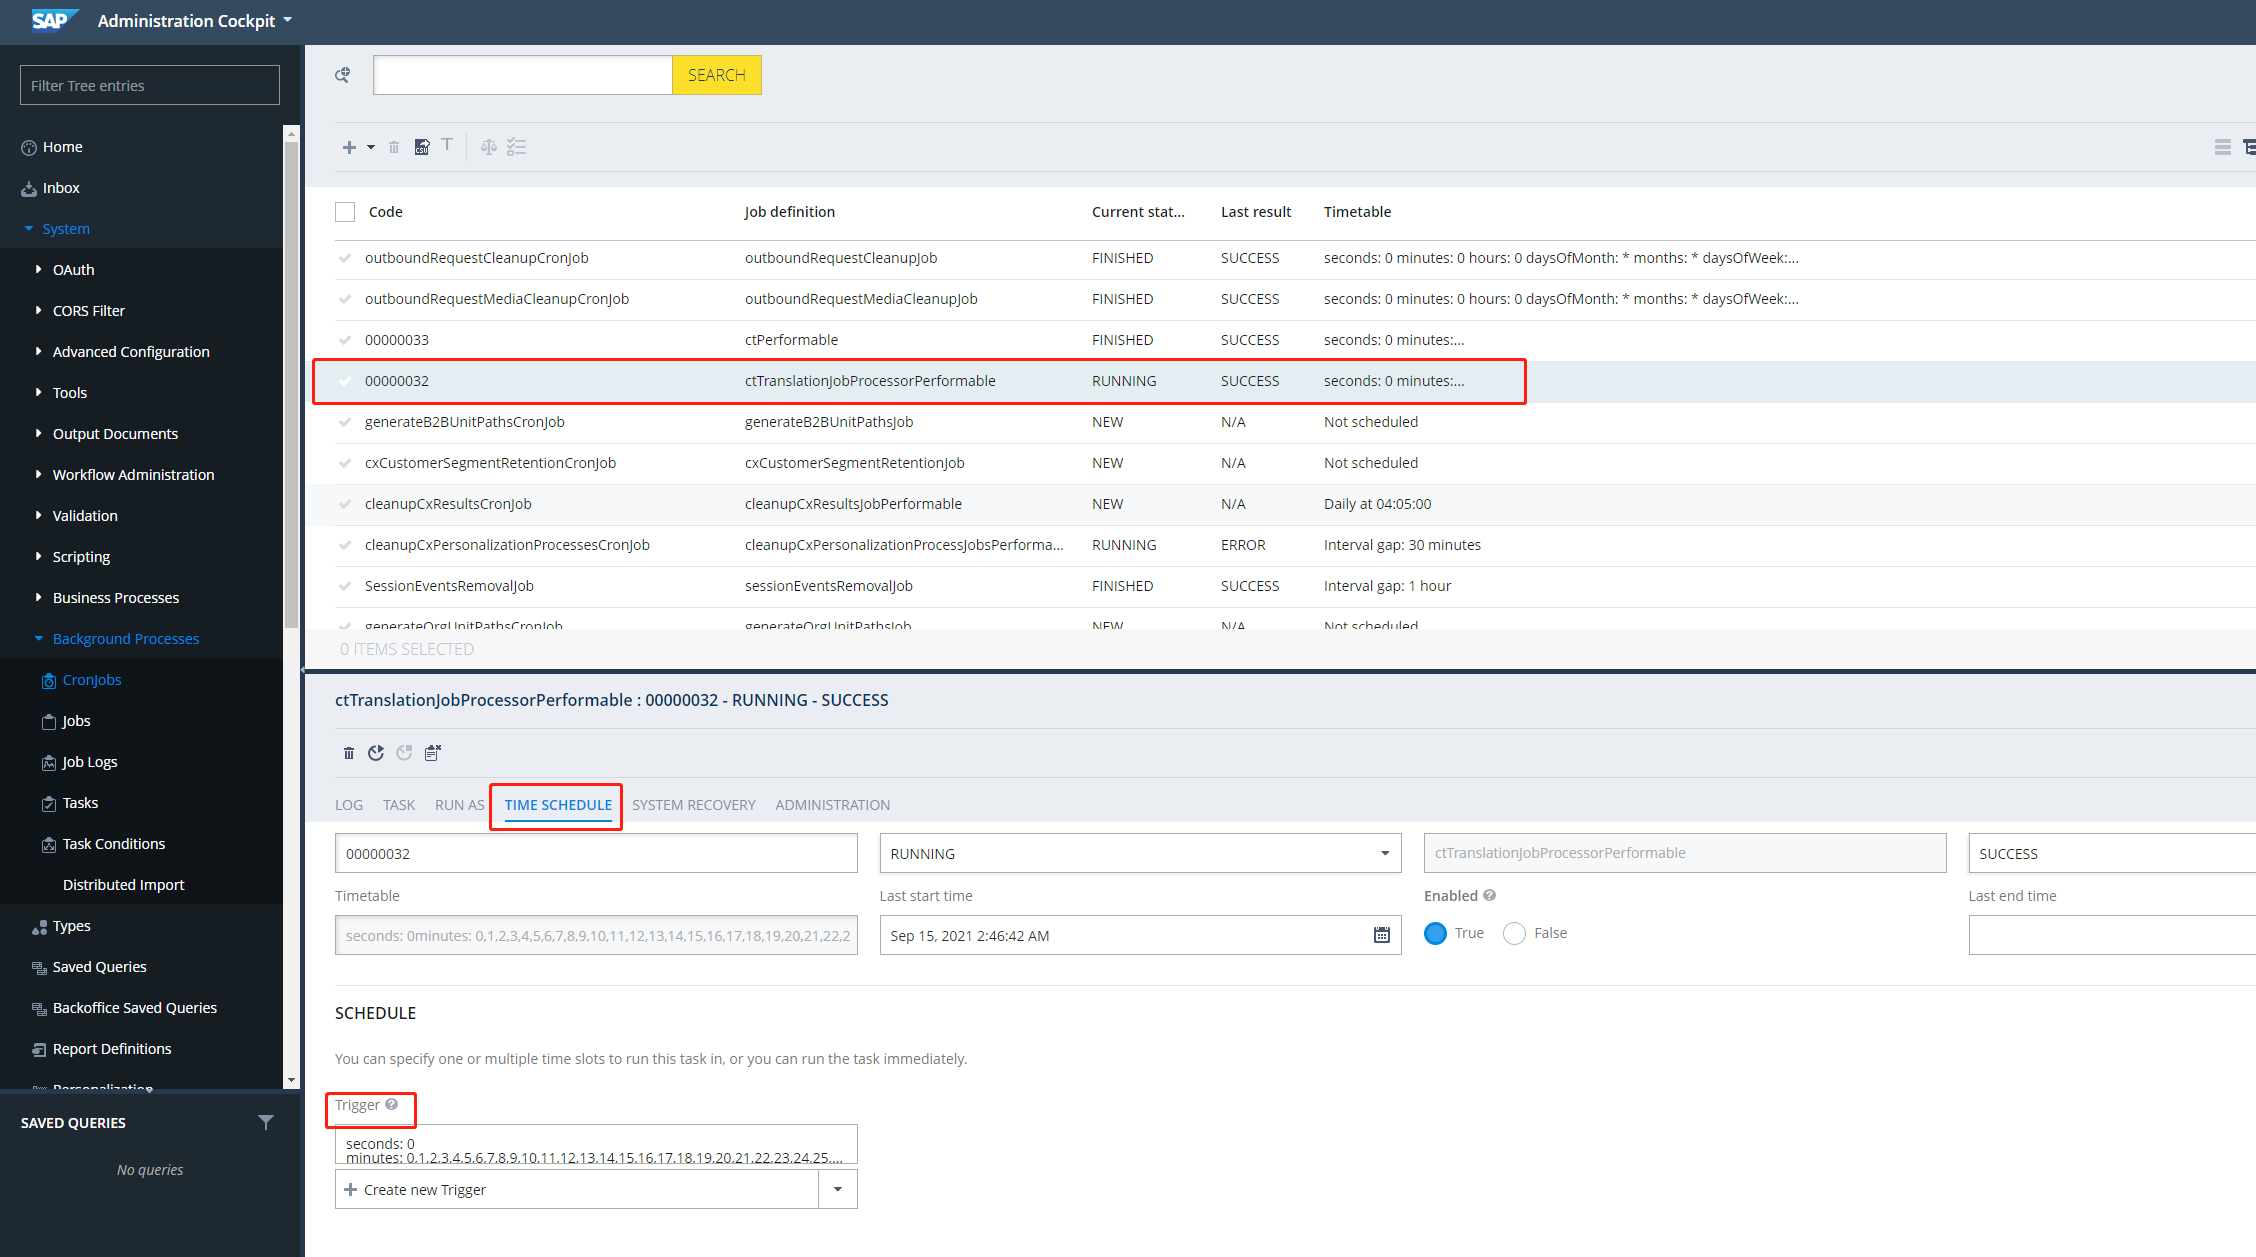
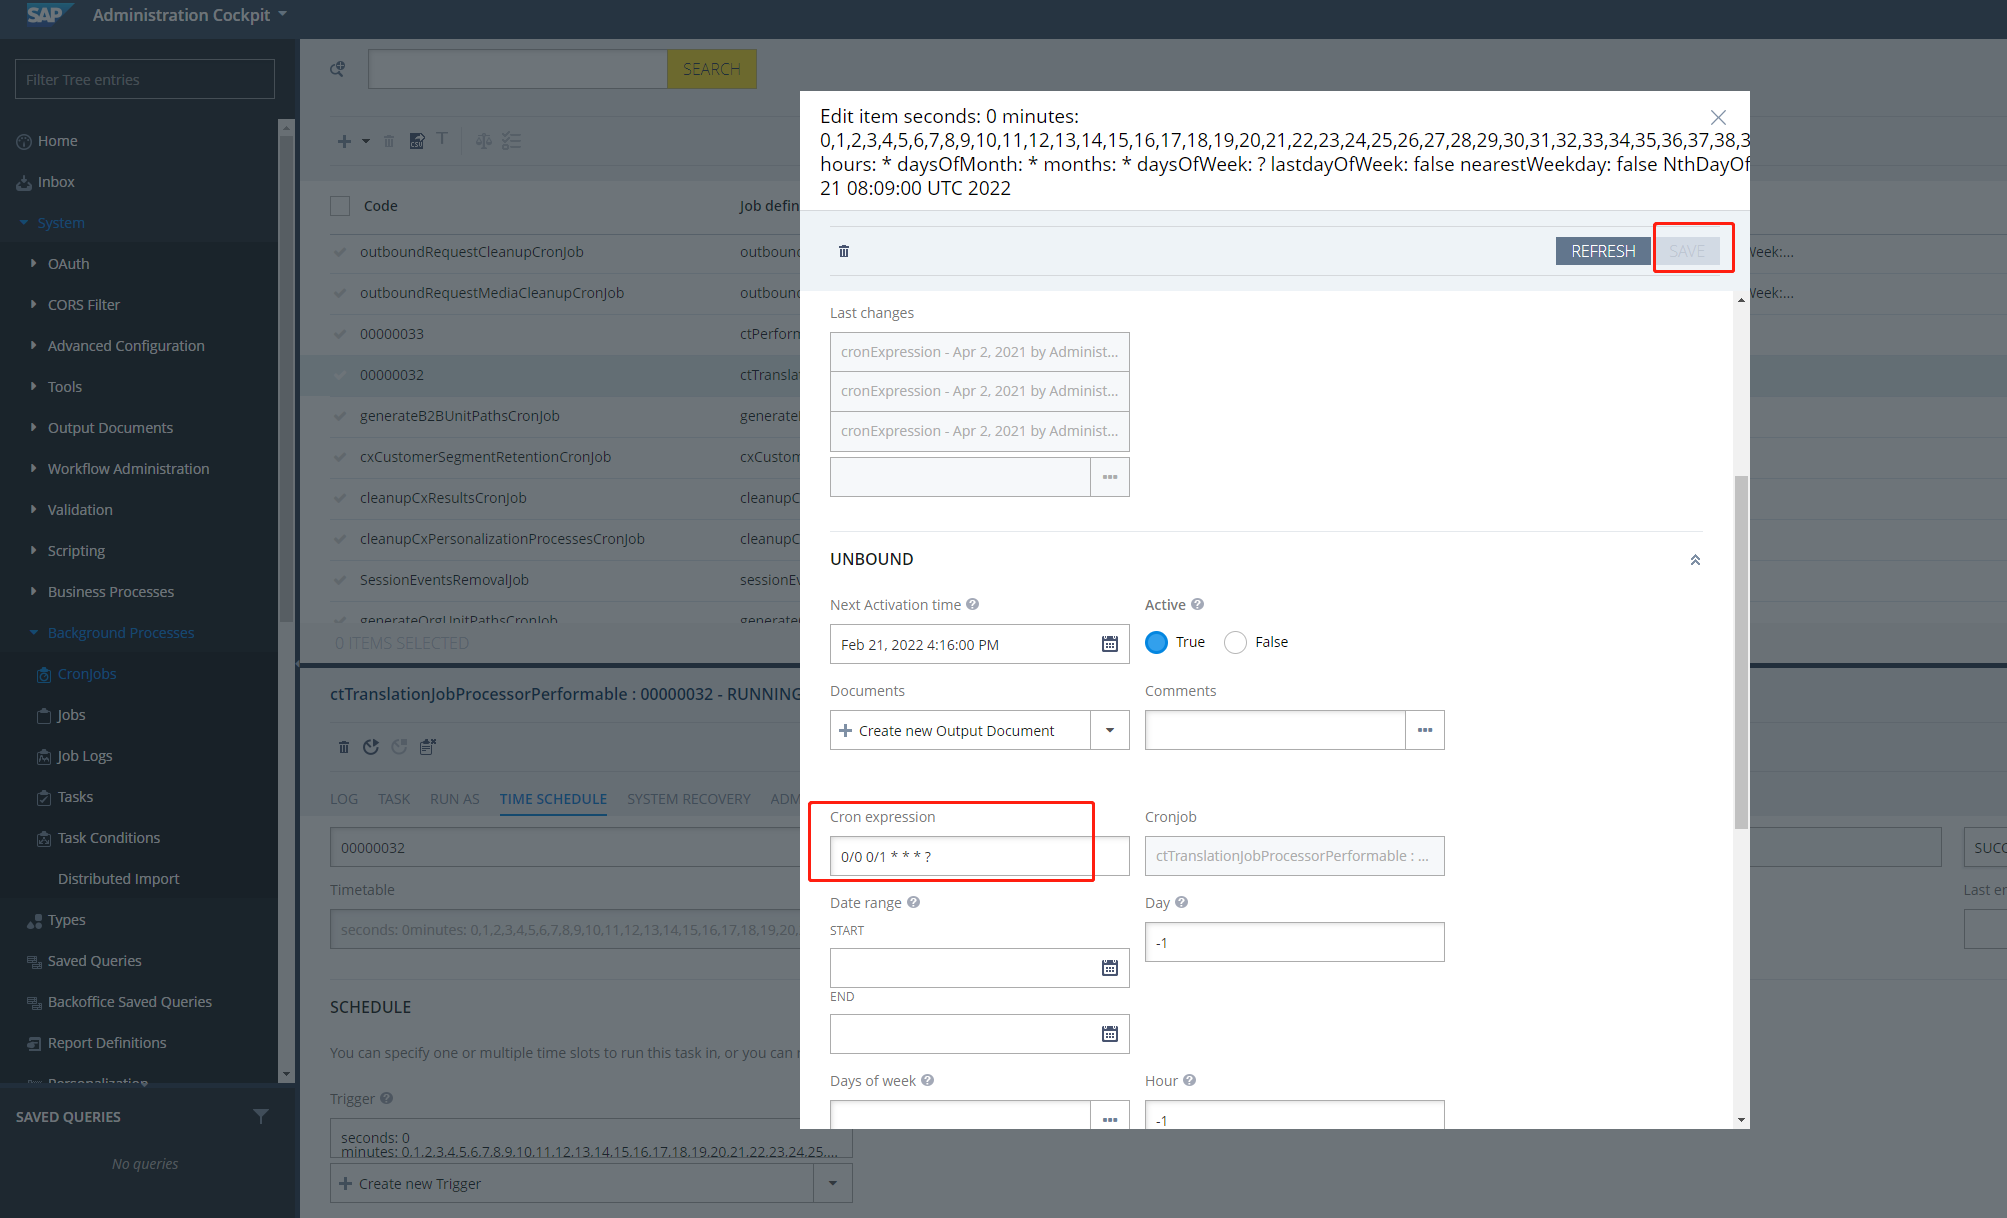
8 - Configuring the Frequency of Sending Jobs to the Lionbridge Content API Platform
You can configure how frequently the Connector sends jobs to the Lionbridge Content API Platform.
The Connector uses the ctTranslationJobProcessorPerformable cron job to send translation jobs to the Lionbridge Content API Platform. This cron job runs by default every minute.
You may want to modify the interval that this job runs, depending on your priorities or requirements for system resources.
- Navigate to the Administration Cockpit > Background Processes > Cronjobs section.
9 - Configuring Email Settings
Starting from the Connector version 2.4.3, support for sending e-mail notifications is added. With this, an email notification is sent whenever a file passes through the translation events such as Job Submission, Job Received, and Job Errors. To receive these email notifications, users must configure the email notification settings.
To configure the email notifications in the application:
-
Go to Administration > Connector Configuration > Content Mapping > System Configuration > Email Setting.
-
Configure the following SMTP settings for the email address:
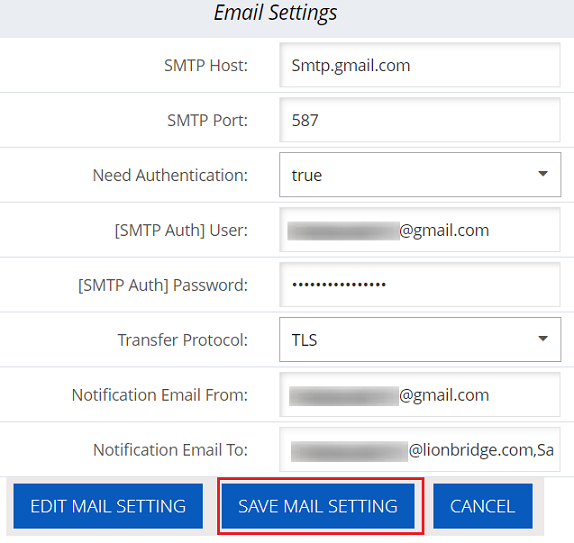
-
Click EDIT MAIL SETTING.
-
Click SAVE MAIL SETTING.
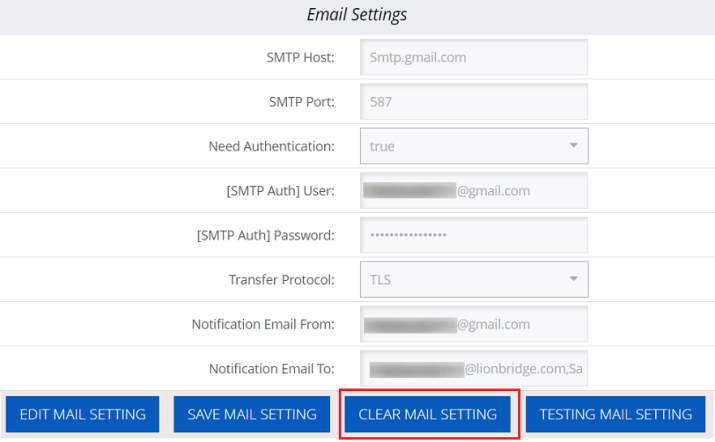
After saving email settings, two new buttons (CLEAR EMAIL SETTING, TESTING MAIL SETTING) appear at the bottom of the Email Settings screen.
You can also configure a new email setting by clicking CLEAR EMAIL SETTING, which removes existing settings.
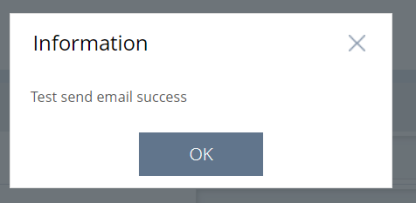
Testing an Email Setting
After the email setting is configured, test it to verify the configuration is successful and you are receiving a test email notification.
-
To test an email setting, click TESTING MAIL SETTING in the Email Setting screen. A dialogue box appears with a success message as follows:
-
A test email notification will be sent to the email address specified in Notification Email To field. The following is an test email notification:
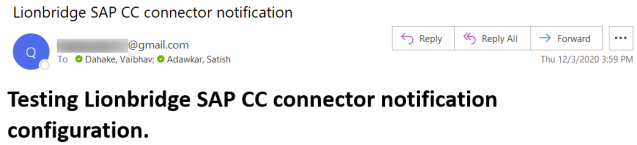
Similarly, the email notifications are sent when a translation is submitted, received, and has errors.
10 - Configuring Translation URL Conversion Settings
When there are links in content for translation, and if you automatically want to update the links in the translated content, use Translation URL Conversion functionality.
To configure settings for Translation URL Conversion in translated content:
-
Go to Administration > Connector Configuration > Content Mapping > System Configuration > Translation URL Conversion> click Add URL Conversion.
-
Specify the following URL conversion settings for a target language:
-
URL—Enter the base URL of the links in the source content. For example, http://example.com
-
To—Enter the desired base URL for the links in the target (translated) content, for example, http://ja-jp.example.com
-
For —Select the target language code for applying this URL conversion rule.
-
Rule —Select any of the following options:
-
Full —Select this to convert the URL only if it is identical to the base URL specified.
For example:
URL: www.google.com and To: www.google.it
-
Partial— Select this to convert the URL that includes the base URL specified.
For example:
URL: www.google.com and To: http://www.google.com/content/us/en
-
IsConvertLinkText— Select any of the following options:
The following are the examples for Full and Partial URL conversion.
Full URL conversion example:
Settings:
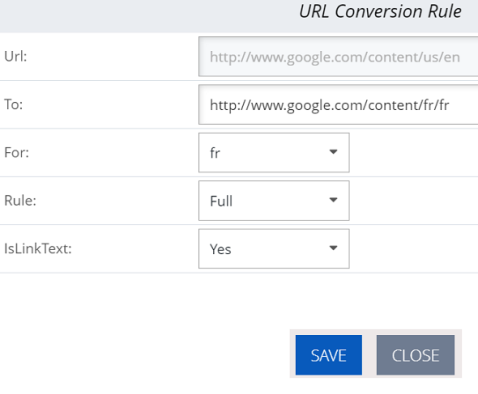
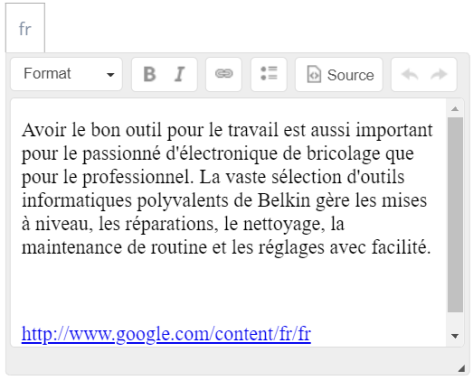
Source:
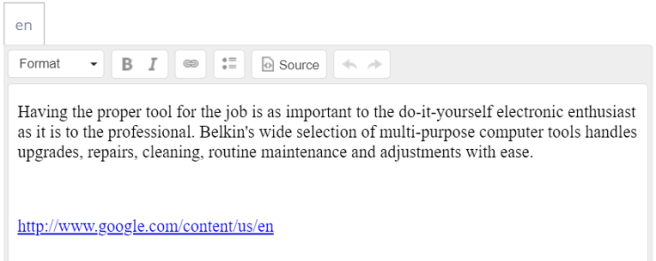
Target:
Partial URL conversion example:
Settings:
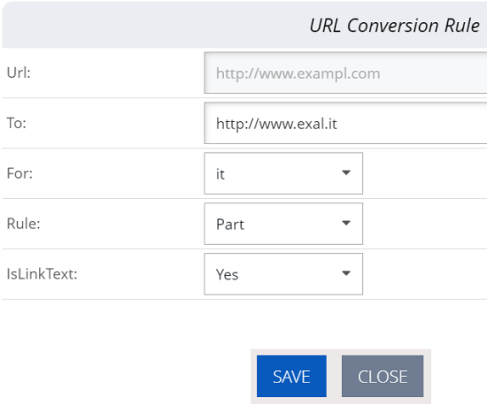
Source:
Target: