SAP Commerce (formerly Hybris)
Connector for SAP Commerce (formerly Hybris)
Documentation Resources
Note: Starting with version 2.1.0, the special versions of the guides for use with Lionbridge Freeway have been discontinued. All Freeway-specific information is included in the main guides, including in this searchable online help.
1 - Installation Guide
1.1 - Welcome to the Connector
Welcome to the Lionbridge Connector for SAP Commerce (“Connector”) version 3.0. This is Lionbridge’s connector between SAP Commerce (formerly Hybris) and the Lionbridge Content API Platform.
1.1.1 - Terminology
|
|
| Asset |
A content item that you manage using SAP Commerce, for example, supported business objects. |
| Freeway |
The name of the Lionbridge translation portal for submitting content to and retrieving content from the Lionbridge translation provider. |
| FTP Server |
File Transfer Protocol (FTP) is a standard network protocol used to transfer files from one host to another host over a TCP-based network, such as the Internet. Translation providers may receive and send files for translation using an FTP server. |
| Keys |
The Connector uses keys to establish a secure, discrete connection between the Connector instance and the Platform.
Very important: Do not copy the CMS address keys to multiple instances, because this is a violation of the License Agreement. Using the same CMS address keys on multiple instances will cause the Lionbridge App or Connector to behave unexpectedly, which can result in lost translation content, orphaned projects, and inaccurate translation status reports. The Lionbridge Connector team will support technical issues caused by duplicating or incorrectly installing CMS address keys only on a time and materials basis. |
| Lionbridge |
The publisher of the Freeway translation portal and a translation provider. Users connect to the Freeway translation portal to submit content to and retrieve content from the Lionbridge translation provider. |
| Lionbridge Connector for SAP Commerce (“Connector”) |
The connector software that a Lionbridge company, has developed and provides, which plugs into your SAP Commerce installation to provide connectivity to our hosted Platform. In this document it is referred to as the Connector. This is the software you are installing and configuring as you work through this document. |
| MT |
Machine translation. The translation provider can be a machine translation service, such as Google Translate. |
| Producer |
CMS or another system that sends content or documents out for translation. In this case, this is SAP Commerce. |
| Provider |
A provider of translation services. The delivery of assets to the provider may be via an FTP server or a TMS connector. |
| Support Asset |
Supporting documents and their metadata. Support assets are not translated by the translation provider, but they provide helpful context for the translator. |
| TMS |
Translation management system that the translation provider uses. |
1.1.2 - How the Connector Works with SAP Commerce
The Lionbridge Connector (“Connector”) is an important part of the Lionbridge Content API translation solution.
The Connector is installed on your system as an add-in to SAP Commerce. Its functionality is displayed to the users as part of SAP Commerce.

Your translation systems architecture might look like the configuration above. It may have additional content producers or translation providers, but the core concepts remain the same.
During implementation, the Lionbridge Connector team works with you and your translation providers to ensure your connector sends and receives content properly to and from your translation provider via Lionbridge Content API.
1.1.3 - Using this Guide
Purpose of this guide
This guide describes everything you need to know to install and configure the Lionbridge Connector (“Connector”) for SAP Commerce. It describes the delivery package contents, system requirements, installation instructions, and configuration procedures.
Recommendation: Review the user guide to fully understand the powerful features of the Connector.
Who should use this guide
This guide is intended for SAP Commerce administrators and system integrators.
What you should already know
This document assumes that your company already has an installed instance of SAP Commerce. It assumes that you have a strong working knowledge of SAP Commerce and its features.
How to find out more about the Lionbridge Connector for SAP Commerce
For information on using the Lionbridge Connector to send and receive content for translation from SAP Commerce, read the Lionbridge Connector for SAP Commerce User Guide.
Documentation conventions
This guide uses the following conventions:
| Convention |
Description |
| Bold |
Highlights screen elements such as buttons, menu items, and fields. |
| Courier |
Highlights input, file names, and paths. |
| Italics |
Highlights terms for emphasis, variables, or document titles. |
| > |
Indicates a menu choice. For example, “Select Translation > Translate Asset.” |
1.1.4 - How to Contact Lionbridge Connector Support
You can submit a support ticket either:
See also:
1.2 - Before You Install
Before you begin to install the Lionbridge Connector (“Connector”) for SAP Commerce, please review the system requirements, described in System Requirements, and perform the following pre-installation procedures:
-
Setting Your System Date, Time, and Time Zone Correctly.
-
Ensure that in your SAP Commerce environment, the SAP Commerce suite user has sufficient access rights to control job execution in SAP Commerce via CronJobs. For detailed instructions, refer to the appropriate version of the SAP Commerce documentation at https://wiki.hybris.com.
-
Optional step. If you have a firewall, you must configure your ports so that the Connector can communicate with the Lionbridge Content API Platform. For details, see Configuring Network Settings for a Firewall.
1.2.1 - System Requirements
The Lionbridge Connector for SAP Commerce (“Connector”) supports:
- Hybris versions 6.1 and higher
- SAP Commerce versions 18xx, 19xx, and higher
- SAP Commerce Cloud versions 18xx, 19xx, and higher
The Connector has several pre-installation requirements, described in Before You Install.
- On Hybris or SAP Commerce, the Connector requires Java 8.
- On SAP Commerce Cloud 19xx or higher, the Connector requires sapmachine-jdk-11 or oracle-jdk-11.
The Connector has no additional hardware or software requirements beyond those of SAP Commerce. For detailed requirements, refer to the appropriate version of the SAP Commerce documentation at https://help.sap.com/viewer/product/SAP_COMMERCE_CLOUD/SHIP/en-US.
|
|
| Memory |
16 GB minimum is recommended by SAP Commerce. This is recommended for the Connector to function as expected. |
| Disk Space |
* 5 GB is recommended by SAP Commerce.
* The Connector installation requires an additional 170 MB of disk space.
* Space for storing log files. |
1.2.2 - Setting Your System Date, Time, and Time Zone Correctly
The Lionbridge Connector sends content to and receives content from the Lionbridge Connector API Platform, which is hosted in the Amazon Web Services (AWS) environment. AWS requires any machines that connect to its applications to have the correct system time and date settings.
Important: Before proceeding, ensure that the system date, time, and time zone are set correctly on any systems that will run the Lionbridge Connector. If these settings are incorrect, the following error message is displayed: Error. The difference between the request time and the current time is too large.
1.2.3 - Configuring Network Settings for a Firewall
Optional step. If you have a firewall, you must configure your ports so that the Connector can communicate with the Lionbridge Content API Platform. The Connector must be able to communicate with the Lionbridge Content API Platform by initiating the following outbound network connections:
To send content for translation to Lionbridge Freeway, also configure:
1.3 - Installing the Lionbridge Connector onto SAP Commerce Cloud
This section describes how to install the Connector package onto SAP Commerce Cloud.
Note: If you are installing the Connector package into Hybris or SAP Commerce, follow the detailed instructions in Installing the Lionbridge Connector into Hybris or SAP Commerce.
To install the Connector onto SAP Commerce Cloud:
- At the root level of the Commerce Cloud code repository, create the custom folder.
- Add the following Connector package files to the custom folder you just created.
- /custom/ctcore
- /custom/ctbackoffice
- In your
manifest.json file, add the Connector packages to the extensions list, for example:
“extensions”: [
…,
“ctcore”
“ctbackoffice”
],
- Save, commit, and push the changes.
- Create a build in the Commerce Cloud Dashboard.
- Deploy the build to the desired environment, using one of the following options, depending on your requirements and capabilities:
- Update database and deploy with downtime
- Update database and deploy with rolling update
1.4 - Installing the Lionbridge Connector into Hybris or SAP Commerce
This section describes how to install the Connector package into your Hybris or SAP Commerce system.
Note: If you are installing the Connector package onto SAP Commerce Cloud, follow the detailed instructions in Installing the Lionbridge Connector onto SAP Commerce Cloud.
Before you install the Connector, verify that you have reviewed the system requirements and performed the pre-installation tasks described in Before You Install.
To install the Connector into Hybris or SAP Commerce:
- Download the Lionbridge Connector (“Connector”) delivery package, from the link that Lionbridge sends you.
- Unzip the delivery package into any working folder on your server.
- If the ${HYBRIS_BINDIR}/custom folder does not already exist, then create it, for example:
- In Windows: C:\hybris\bin\custom.
- In Unix: $HYBRIS_HOME/bin/custom.
- Copy all the Connector packages in the delivery package to the custom folder, for example:
|
|
| C:\hybris\bin\custom\ctbackoffice |
all Hybris and SAP Commerce versions |
| C:\hybris\bin\custom\ctbasecockpit |
Hybris versions 6.1 to 6.6 only |
| C:\hybris\bin\custom\ctcockpit |
Hybris versions 6.1 to 6.6 only |
| C:\hybris\bin\custom\ctcore |
all Hybris and SAP Commerce versions |
| C:\hybris\bin\custom\ctwcms |
Hybris versions 6.1 to 6.6 only |
|
|
| $HYBRIS_HOME/bin/custom/ctbackoffice |
all Hybris and SAP Commerce versions |
| $HYBRIS_HOME/bin/custom/ctbasecockpit |
Hybris versions 6.1 to 6.6 only |
| $HYBRIS_HOME/bin/custom/ctcockpit |
Hybris versions 6.1 to 6.6 only |
| $HYBRIS_HOME/bin/custom/ctcore |
all Hybris and SAP Commerce versions |
| $HYBRIS_HOME/bin/custom/ctwcms |
Hybris versions 6.1 to 6.6 only |
Note: The ctbasecockpit, ctcockpit, and ctwcms folders support the corresponding Hybris cockpits, which are not included in Hybris versions 6.7 and higher. Version 6.7 includes only the Backoffice Cockpit.
- If the Hybris server is running, then stop it.
- Open the Command Prompt window in which the server is running.
- Press Ctrl and C.
- In Unix: In the Terminal, press Ctrl and C.
- In the ${HYBRIS_CONFIGDIR}/localextensions.xml file, add the following entries for the new extensions:
- In Hybris versions 6.1 to 6.6:
<extension name=“ctbackoffice”/>
<extension name=“ctbasecockpit”/>
<extension name=“ctcockpit”/>
<extension name=“ctcore”/>
<extension name=“ctwcms”/>
- In Hybris versions 6.7 and higher:
<extension name=“ctbackoffice”/>
<extension name=“ctcore”/>
For example, add this entry to the following file:
- In Windows: C:\hybris\config\localextensions.xml.
- In Unix: $HYBRIS_HOME/config/localextensions.xml.
- If you are installing the Connector in Hybris version 6.1 or 6.2, complete the following sub-steps:
a. Edit
hybris/bin/custom/ctbackoffice/resources/ctbackoffice-backoffice-config.xml.
b. Locate the section that starts with the following XML comment:
!-- Enable-multi-select Attribute (6.3+).
c. Comment out or remove the configuration enabling the Connector to send content for translation from the Backoffice. This section is on lines 55-154.
d. Comment out both sub-sections that start with <context component=“collection-browser”/> . These sub-sections are on lines 159-177.
Note: This feature is enabled by default in Hybris versions 6.3 and higher.
- In Hybris versions 6.6 and higher, in ctbackoffice\resources\ctbackoffice-backoffice-config.xml, at line 55, note the configuration file for your supported version of Hybris.
Note: This step is not required in Hybris versions 6.1 to 6.5.
- In Hybris versions 6.6 and higher, edit the configuration file you identified in the previous step as follows:
Note: This step is not required in Hybris versions 6.1 to 6.5.
<context type=“Item” component=“listviewactions”>
<y:actions>
<y:group qualifier=“common”>
<y:label>actiongroup.common</y:label>
<y:action action-id=“com.lionbridge.hybris.connector.ctbackoffice.actions.sendtotranslation” property=“selectedObjects” />
</y:group>
</y:actions>
</context>
- Comment out the following:
<context component=“listviewactions”>
<y:actions>
<y:group qualifier=“common”>
<y:label>actiongroup.common</y:label>
<y:action action-id=“com.lionbridge.hybris.connector.ctbackoffice.actions.sendtotranslation” property=“selectedObjects” />
</y:group>
</y:actions>
</context>
- Navigate to the ${HYBRIS_BINDIR}/platform directory, for example:
- In Windows: C:\hybris\bin\platform.
- In Unix: $HYBRIS_HOME/bin/platform.
- Do one of the following:
-
Press the Shift button and right-click, and select Open command window here from the context menu.
The Command Prompt window opens.
-
Type setantenv.bat and press Enter.
- In Unix: In the Terminal, type . ./setantenv.sh and press Enter.
- After setting ant home, type ant clean all and press Enter.
This takes a few minutes to run. When it is finished, BUILD SUCCESSFUL is displayed in the Terminal, along with the build time.
- Do one of the following to start the Hybris server, so that you can deploy the Connector:
- In Windows: In the Command Prompt window, type hybrisserver.bat and press Enter.
- In Unix: In the Terminal, type hybrisserver.sh and press Enter.
This takes a few minutes to run.
- Update the Hybris suite.
- Open the Hybris Administration Console in a browser, at http://localhost:9001.
- Mouseover the Platform tab.
- Click the Update menu item.
The **Update** page opens.
Note: If you are updating from a previous version of the Connector, scroll down, and clear the Create essential data and Localize types check boxes.
d. Click the Update button to start updating Hybris with the Connector.
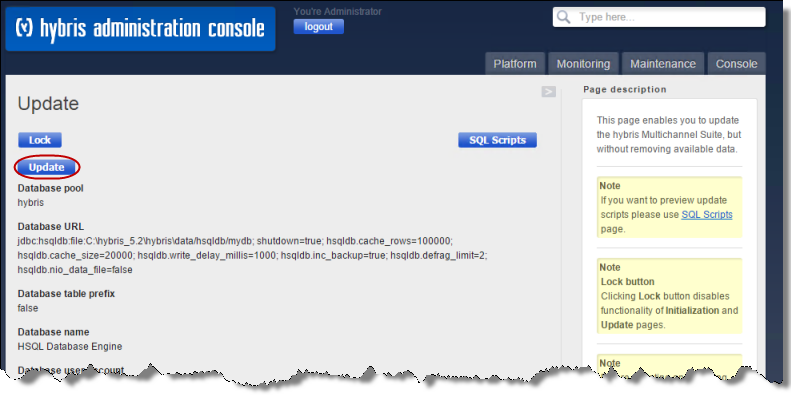
This takes a few minutes to run.
e. When it is done, scroll down to the bottom of the page.
The console displays FINISHED, along with the updating time.
- In Backoffice, open Orchestrator mode:
- In Microsoft Windows, press the F4 key.
- In UNIX, press the
fn and F4 keys.
- Click the Orchestrator hamburger menu in the top-right corner, and select Reset Everything from the menu.
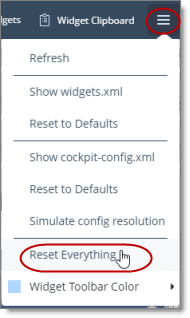
This clears cached UI configurations and loads new added widgets, including their styles,
- Close Orchestrator mode.
- In Microsoft Windows, press the F4 key.
- In UNIX, press the
fn and F4 keys.
For more information about updating the Hybris suite, see: https://wiki.hybris.com/display/release5/Initializing+and+Updating+the+hybris+Commerce+Suite.
1.4.1 - Upgrading the Connector Database
This section describes how to upgrade the Connector database.
Important: This step is required when updating your Connector installation from version 2.1.x-2.4.0 to the current version. It is required to support changes to how classification content mapping is saved in the Connector database.
To upgrade the Connector database:
-
Open the Hybris Administration Console in a browser. For detailed instructions, refer to the SAP Commerce documenation at: https://help.sap.com/viewer/5c9ea0c629214e42b727bf08800d8dfa/1905/en-US/7d4ea11ee6da48b5b3b49304ab52b9f0.html.
-
Mouseover the Platform tab.
-
Click the Update menu item.
The Update page opens.
-
Ensure that in the General settings section, all the check boxes are selected.
-
Ensure that in the Project data settings section, the check box for the ctcore extension item (not shown) is selected.
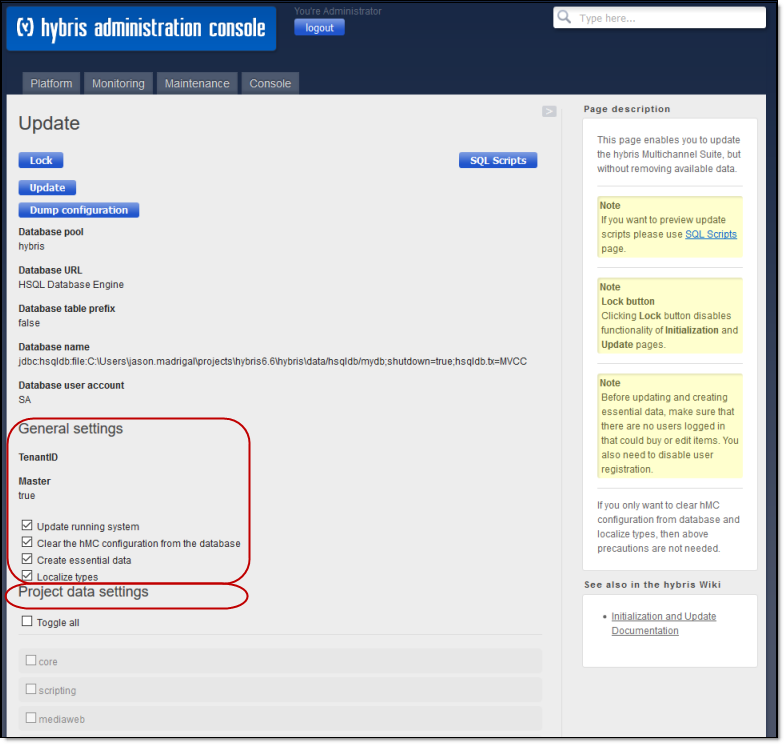
-
At the bottom of the page, click the Update button to start updating the Connector database.
-
In the the Hybris Administration Console, click the Console tab and then click ImpEx Import.
-
Run the following ImpEx:
$targetType=CtConfigContentMapping
REMOVE $targetType[batchmode=true];itemtype(code)[unique=true]
;$targetType
1.5 - Configuring the Lionbridge Connector
After you install the Connector, you configure your Connector installation in Backoffice.
- Do one of the following:
- In your Web browser, navigate to /backoffice/ on your Hybris instance.
- Log in to the Hybris Backoffice.
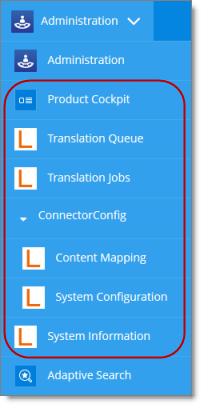
- In the Administration menu, select ConnectorConfig.
In the System Information section User can see below Information:

-
SAP CC Version
-
Connector Version
-
Build
- Do one of the following:
- In your Web browser, navigate to /backoffice/ on your Hybris instance.
- Log in to the Hybris Backoffice.
- In the Administration menu, select ConnectorConfig.
- In the secondary ConnectorConfig menu that opens, select System Configuration.
- In SAP Commerce or SAP Commerce Cloud:
-
In your Web browser, navigate to /backoffice/ on your SAP Commerce instance or on SAP Commerce Cloud.
-
Log in to SAP Commerce or SAP Commerce Cloud.
-
In the Administration Cockpit menu, select ConnectorConfig.
-
In the secondary ConnectorConfig menu that opens, select System Configuration.
-
Configure the settings in the following sections:
- In the ConnectorConfig menu, select Content Mapping to open the Content Mapping page.
-
In the Item Type Attributes tab, you configure the localized Item Type attributes of business objects and sub-types to send out for translation. For detailed instructions, see Configuring Business Objects, Sub-Types, and Localized Attributes.
-
Optional. In the Classification Attributes tab, you can configure the product classification attributes of business objects that are Products for the Connector to send for translation. All classification attributes belong to a category. When you add a product to a category, Hybris or SAP Commerce attaches those attributes to it. For detailed configuration instructions, see Configuring Product Classification Attributes for Translation.
- Optional. In Hybris versions 6.1 or 6.2, you can configure the multi-select feature to support sending multiple products and pages for translation concurrently from the Hybris Backoffice. For detailed instructions, see Configuring the Multi-Select Feature in Hybris.
Note: This step is not relevant for Hybris versions 6.3 or higher, SAP Commerce, or SAP Commerce Cloud.
- Optional. You can configure how frequently the Connector sends jobs to the Lionbridge Content API Platform. For detailed instructions, see Configuring the Frequency of Sending Jobs to the Lionbridge Content API Platform.
Important: You must configure your browser to allow pop-up windows on the Hybris, SAP Commerce, or SAP Commerce Cloud server.
1.5.1 - LSP Configuration
Setting Up Your Connector License
You set up your Connector license in the License Configuration section of the System Configuration page.
To set up your License Configuration:
-
Open the System Configuration page. For detailed instructions, see Configuring the Lionbridge Connector.
-
In the License Configuration](#) section of the System Configuration page, in the Client ID and Client Secret field, enter your Client ID and Client Secret key, which you obtain from Lionbridge.

- Click Save License.
A message box opens, stating Save License Sucessfully.
Configuring your LSP:
Once you setup your connector license in the previous step and click Save License, you should see your Providers(#) list automatically refreshes to show you providers available with your license.
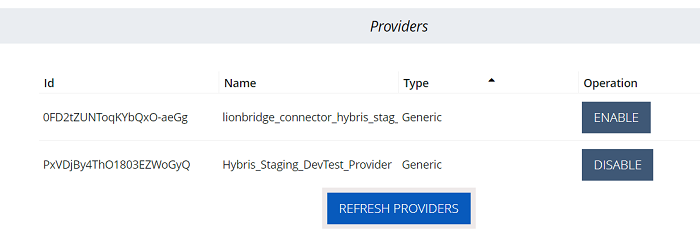
- ID: Provider.
- Name: Name for the language service provider (LSP). This is what your users will select when sending out content for translation to this provider.
- Type: Select your translation provider. The type of translation provider determines whether additional configuration is required.
- Operation: You can enable or disable the provider. Disabled providers would not be available as an option when you send out content to translation.
If you need more providers configured, please contact Lionbridge support team.
Click REFRESH PROVIDERS to see latest updates.
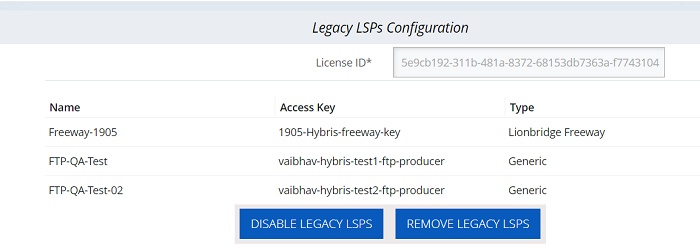
1.5.2 - Legacy LSPs Configuration
If you have upgraded your Lionbridge connector from an earlier (2.x) version, your previous LSP configuration will show up in the Legacy LSPs Configuration section. They are maintained so that you can still receive back any pending jobs sent to those legacy LSPs. You won’t be able to send any new jobs out to legacy LSPs though. If you have done a brand-new installation of the connector, this section won’t appear on your System Configuration screen.
You cannot make any changes to legacy license settings and legacy LSPs. The only operations you can perform in this section are:
-
Disable/Enable Legacy LSPs: You can disable all legacy LSPs. By doing so, the connector will stop checking for any jobs returning from those legacy LSPs. You can also re-enable all legacy LSPs after you disable them. After re-enabled them, the connector will restart checking for jobs returning from legacy LSPs.
-
Remove Legacy LSPs: You can remove all legacy LSPs. After that, the Legacy LSPs Configuration section will disappear from your System Configuration screen.
Important: You cannot reverse the operation once, you remove legacy LSPs, you cannot get them back, and if there are any outstanding jobs sent to any of those legacy LSPs, the connector won’t be able to receive the translation back for those jobs. So please make sure you have completed all outstanding jobs. Removing legacy LSPs does not affect completed jobs sent to legacy LSPs in the past. You can still see them in the Translation Jobs view and check their job details on the Job Details page.
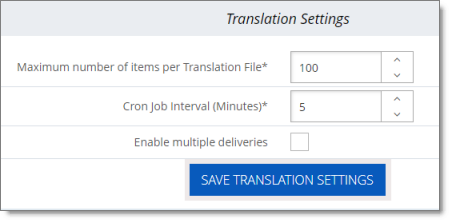
1.5.3 - Configuring Translation Settings
In the Translation Settings section of the System Configuration page, you configure the following settings:
- the maximum number of items in a translation file
- how frequently to download and import translations
- whether you can receive revisions of translated content, which determines whether approval is required for a job
-
Open the System Configuration page. For detailed instructions, see Configuring the Lionbridge Connector.
-
Locate the Translation Settings section of the System Configuration page.
Tip: Depending on your screen size and resolution, you may need to scroll down to view this section.
- Configure any of the following settings:
| Setting |
Description |
| Maximum number of items per translation file |
This setting enables you to configure the maximum number of items in a translation file generated by the Connector. An item is an asset that is being translated into a specific target language.
For example, suppose you are translating 150 assets from one source language into three target languages. If you use the default value of 100, then for each language pair, there are 2 translation files, and there are a total of 6 generated files.
By default, the maximum number of items that the Connector sends out for translation in a single translation file is 100. You can change this number by selecting one of the following numbers instead: 150, 200, or 250. |
| Cron Job Interval (Minutes) |
This setting enables you to configure how frequently to download and import translations.
The ctPerformable CronJob automatically downloads and imports translations from the Lionbridge Content API Platform into Hybris. By default, this CronJob runs once every minute.
This CronJob consumes resources such as memory space, network bandwidth, and database connections. Therefore, by design, the CronJob is active only when required, which is when the Connector submits a translation job and expects translated content to return from the Lionbridge Content API Platform. When the CronJob is active, it polls the Lionbridge Content API Platform to update the job status and retrieve any translated content.
At the start of each interval, the CronJob checks whether it is required to remain active. If it is not required, it de-activates internally. It automatically re-activates when there is a job to retrieve.
You can change this interval so that the CronJob runs every 5 or 10 minutes.
Note: If the Lionbridge Content API Platform is waiting for a message about translated content for a submitted job, and a network outage prevents this message from being delivered, the CronJob keeps polling the Lionbridge Content API Platform until the job is manually stopped.
Tip: You can temporarily prevent this job from running and consuming resources, for example, if you are not currently sending out content items for translation. For detailed instructions, refer to the appropriate version of the Hybris documentation at https://wiki.hybris.com. |
| Enable multiple deliveries |
This optional setting enables receiving revisions of translated content and requires approval for received translations.
* If this check box is selected:
* In the **Translation Status** column of the **Translation Jobs** page:
* The status of delivered projects is Reviewing Translation.
* The **Approve** button is displayed.
* You can click the **Approve** button to mark the job as complete, which prevents any re-deliveries.
* Multiple re-deliveries are allowed and processed into SAP Commerce until clicking the **Approve** button in the **Translation Jobs** page, which marks the job as complete.
* If this check box is cleared (the default setting):
* In the **Translation Status** column of the **Translation Jobs** page, the status of delivered projects is Completed.
* There is no approval step.
* Multiple re-deliveries are not supported. |
- Click Save Translation Settings.
Note: Saving these settings creates and registers the ctPerformable CronJob with the interval you specified.
1.5.4 - Mapping Language Codes
You map Hybris language codes to Lionbridge language codes in the Language Mapping section of the System Configuration page.
You must map the Hybris language codes to the Lionbridge language code for the source and target languages that you will use for translation. Otherwise, then Connector will not send out content for translation.
For a list of Lionbridge language code, see Appendix: Language Codes.
To map language codes:
-
Open the System Configuration page. For detailed instructions, see Configuring the Lionbridge Connector.
-
Locate the Language Mapping section of the System Configuration page.
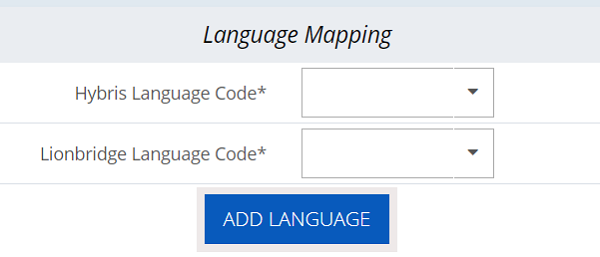
Tip: Depending on your screen size and resolution, you may need to scroll down to view this section.
-
Perform the following steps for each language to map:
-
In the Hybris Language Code list, select the Hybris language code to map.
Tip: Languages that are already mapped are displayed in gray with a gray background. Languages that are not currently mapped are displayed in black with a white background.
-
In the Lionbridge language code list, select the corresponding Lionbridge language code to map.
-
Click Add Language.
The list at the bottom of the section now displays the mapping you just added.
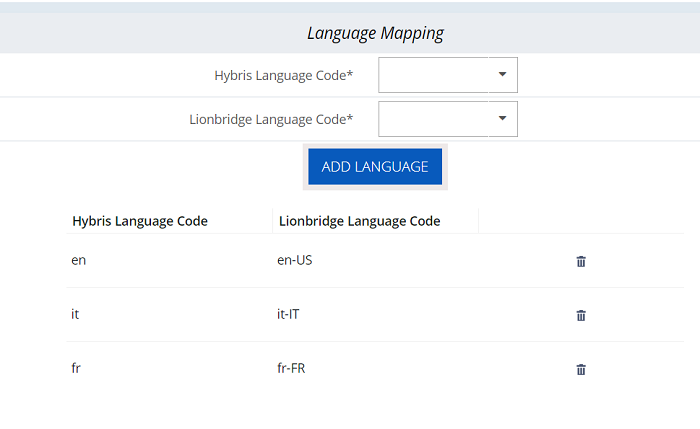
Tip: To delete a language mapping, click the corresponding Delete button  .
.
1.5.5 - Configuring Proxy Server Implementations
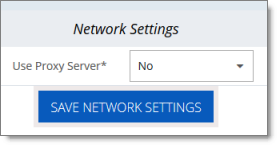
You can configure proxy server implementations of the Connector in the Network Settings section of the System Configuration page.
-
Open the System Configuration page. For detailed instructions, see Configuring the Lionbridge Connector.
-
Locate the Network Settings section of the System Configuration page.
Tip: Depending on your screen size and resolution, you may need to scroll down to view this section.
- In the Use Proxy Server dropdown list, select Yes.
The section expands.
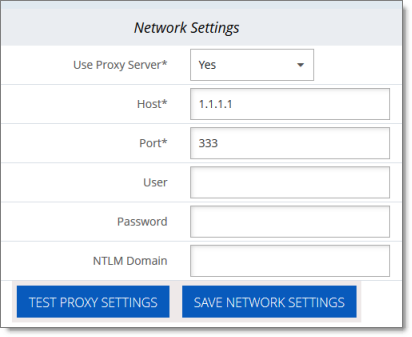
- Edit the following information:
| Field |
Description |
| Host |
Required. The IP address or domain name for the proxy server. |
| Port |
Required. The port number for the proxy server. |
| User |
Optional. The username for authentication to the proxy server. |
| Password |
Optional. The password for authentication to the proxy server. |
| NTLM Domain |
Optional. The domain for authentication to the proxy server. |
-
Click Test Proxy Settings.
-
If the test is successful, click Save Network Settings.
1.5.6 - Configuring Attributes for Translation
There are two ways to configure business objects, sub-types, and localized attributes, including keywords, for translation:
1.5.6.1 - Configuring Business Objects, Localized Attributes, and Sub-Types
In the Content Mapping page, you can configure which business objects and localized attributes and sub-types in those objects the Connector will send for translation. The Mapped Content section, on the right side of that page, displays all configured objects, localized attributes, and sub-types, including localized attributes of sub-types.
Important: You can configure only localized attributes for the Connector. If there are attributes you want to send out for translation that are not localized by default, you must configure them to be localized. For detailed instructions, refer to “Localized Attributes” in the Internationalization and Localization Overview in the SAP Commerce documentation, available at: https://help.sap.com/viewer/d0224eca81e249cb821f2cdf45a82ace/6.3.0.0/en-US/8bfc204086691014a345f64b08505839.html.
Note: In exceptional cases, configuring certain business objects and localized attributes, as described below, may not be sufficient to support the Connector sending them out for translation, and custom code may be required.
Tip: To translate content slot components, such as CMSParagraphComponent, you must map them.
- Do one of the following:
- In your Web browser, navigate to /backoffice/ on your Hybris instance.
- Log in to the Hybris Backoffice.
- In the Administration menu, select ConnectorConfig.
- In SAP Commerce or SAP Commerce Cloud:
- In your Web browser, navigate to /backoffice/ on your SAP Commerce instance or on SAP Commerce Cloud.
- Log in to SAP Commerce or SAP Commerce Cloud.
- In the Administration Cockpit menu, select ConnectorConfig.
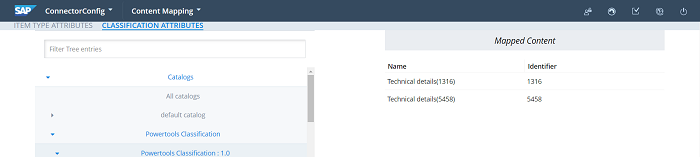
The Item Type Attributes tab of the Content Mapping page opens.
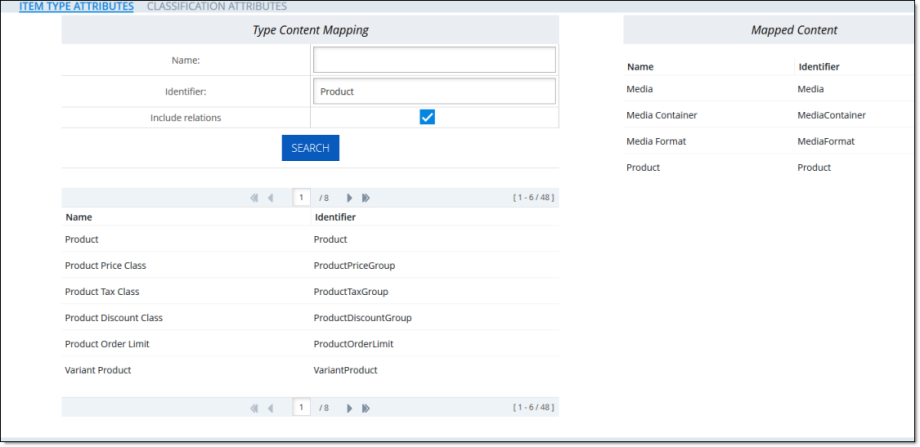
- The Type Content Mapping section, on the left side of the tab, displays all the available business objects and sub-types.
- The Mapped Content section, on the right side of the tab, displays all business objects and sub-types, and their corresponding attributes, that have already been mapped.
The section footers display the total number of items in each list, and the total number of items displayed on this sub-page of the list.
- If there are more than seven items in the Type Content Mapping section, they are displayed in multiple sub-pages.
- If there are more than twelve items in the Mapped Content section, they are displayed in multiple sub-pages.
Tip: Use the sub-page nagivation arrows to navigate between sub-pages. To navigate among sub-pages, at the bottom of the list, click an arrow or enter the number of the sub-page to display.
- In the Type Content Mapping section of the page, use the Name and/or Identifier fields at the top of the section to search for the business object or sub-type you want to be available for translation. By default, the Include relations check box is selected, so that Relation type attributes and types that contain only Relation type attributes to one level of recursion are also displayed. If you want to exclude these attributes and types from the search results, clear this check box. Then click Search.
Note: You can configure the number of recursion levels for the Relation type attributes and types that contain only Relation type attributes that are displayed in search results. For detailed instructions, see Configuring the Number of Recursion Levels for Relation Type Attributes.
The list below the Search button updates with the search results. For example, if you searched for business objects with the name Product, the list displays all matching results, which are objects or sub-types with Product in their name.
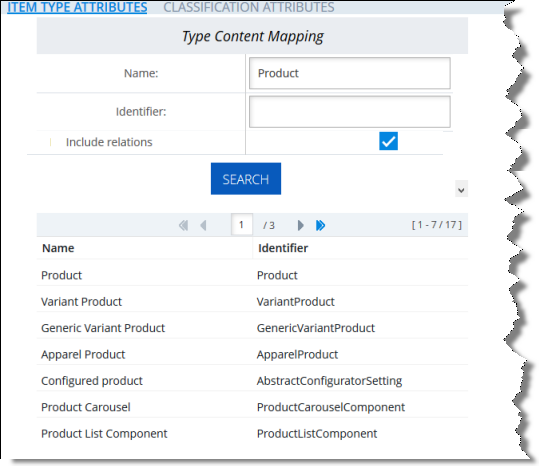
- In the search results, click the row for the business object or sub-type to map.
A dialog box opens, displaying the object’s or sub-type’s localized attributes. The title of the dialog box is the object or sub-type.
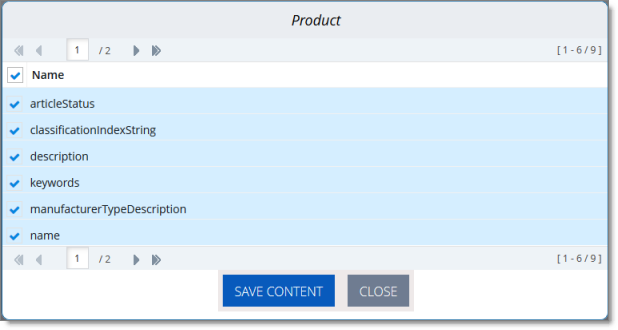
- Configure the localized attributes for translation.
a. Select the check boxes for the localized attributes to configure for translation.
Tip: To select all check boxes, click the check box in the Name column header.
b. Click Save Content.
A message box states that the selected localized attributes were successfully saved.
c. Click OK to close the message box.
Note: Use the above steps to add additional localized attributes to a previously configured business object or sub-type.
- Do one of the following:
- In your Web browser, navigate to /backoffice/ on your Hybris instance.
- Log in to the Hybris Backoffice.
- In the Administration menu, select ConnectorConfig.
- In SAP Commerce or SAP Commerce Cloud:
- In your Web browser, navigate to /backoffice/ on your SAP Commerce instance or on SAP Commerce Cloud.
- Log in to SAP Commerce or SAP Commerce Cloud.
- In the Administration Cockpit menu, select ConnectorConfig.
The Content Mapping page opens. The Mapped Content section on the right side of the page displays all the previously configured business objects and sub-types.
- Locate the configured business object to edit or delete, and click the corresponding row.
Tip: Use the sub-page nagivation arrows to navigate between sub-pages. To navigate among sub-pages, at the bottom of the list, click an arrow or enter the number of the sub-page to display.
A dialog box opens. The title of the dialog box is the object or sub-type.
Tip: Use the sub-page nagivation arrows to navigate between sub-pages. To navigate among sub-pages, at the bottom of the list, click an arrow or enter the number of the sub-page to display.
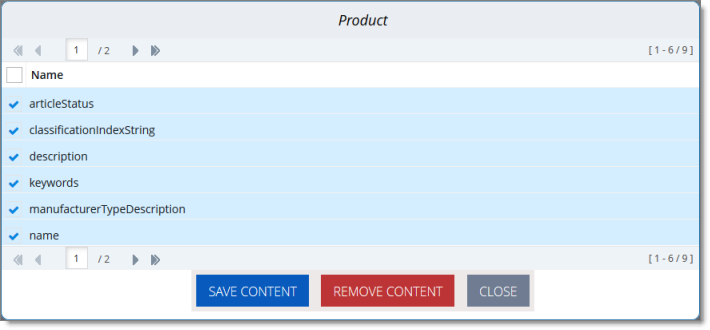
- Do one of the following:
- To edit the localized attributes to configure for translation, select or clear the appropriate check boxes, and then click Save Content.
A message box states that the configuration was saved.
- To remove the object or sub-type from configuration for translation, cllick Remove Content.
A message box states that the item was deleted.
1.5.6.1.1 - Configuring the Number of Recursion Levels for Relation Type Attributes
You can configure the number of recursion levels for the Relation type attributes and types that contain only Relation type attributes that are displayed in search results in the Item Type Attributes tab of the Content Mapping page. For more information about this tab, see Configuring Business Objects, Sub-Types, and Localized Attributes.
By default, when the Include relations check box is selected, one level of recursion of the Relation type attributes is displayed in search results. However, you can change the number of levels of recursion of the Relation type attributes that is displayed in the search results.
Warning: Changing the default value of 1 to a larger number may produce large process-consuming tasks that can affect system performance.
To change the number of levels of recursion of the Relation type attributes:
-
Open {HYBRIS_HOME}/hybris/bin/custom/ctcore/project.properties for editing.
-
Locate the contentextraction.requestsSourcesExtractionRecursivenessMaxDepth parameter.
-
Change the value of this parameter to any integer.
Note: The default value of this parameter is 1.
- Save your change.
1.5.6.2 - Configuring Product Classification Attributes for Translation
For business objects that are Products, you can configure the product classification attributes that the Connector will send for translation. All classification attributes belong to a category. When you add a product to a category, Hybris or SAP Commerce attaches those attributes to it. For more information about this feature, refer to the classification documentation at: https://help.sap.com/viewer/eb9d43275268474aa75793d699de709b/6.4.0.0/en-US/8b7aa49c86691014ae51c3b0d38cd87b.html.
- Do one of the following:
- In your Web browser, navigate to /backoffice/ on your Hybris instance.
- Log in to the Hybris Backoffice.
- In the Administration menu, select ConnectorConfig.
- In SAP Commerce or SAP Commerce Cloud:
- In your Web browser, navigate to /backoffice/ on your SAP Commerce instance or on SAP Commerce Cloud.
- Log in to SAP Commerce or SAP Commerce Cloud.
- In the Administration Cockpit menu, select ConnectorConfig.
The Item Type Attributes tab of the Content Mapping page opens.
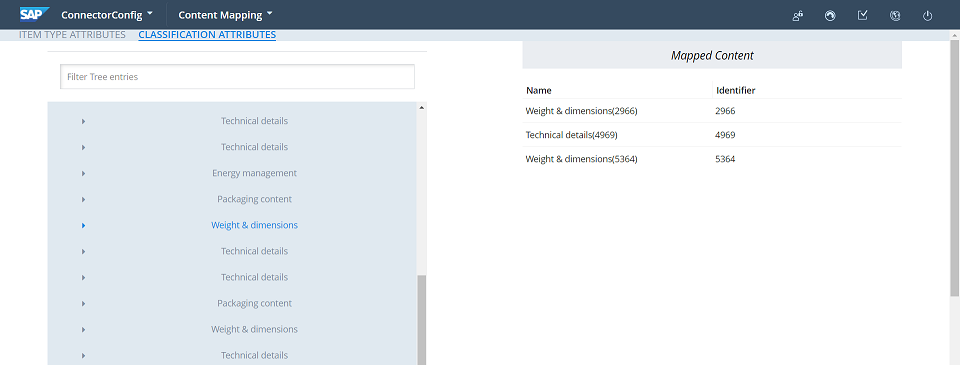
- Click the Classification Attributes link in the top of the page to open the corresponding tab.
- In the Filter Tree in the left pane, navigate in the catalogs and classification to select a classifying category. For example, navigate to: Powertools Classification classification system > Powertools Classification: 1.0 classification system version > Weight & Dimensions classifying category.
Note: In Backoffice, you can choose which classification to enable. For details, refer to the documentation, available at: https://help.sap.com/viewer/eb9d43275268474aa75793d699de709b/6.4.0.0/en-US/8b7aa49c86691014ae51c3b0d38cd87b.html.
The Mapped Content pane on the right displays a list of all classification entries with attributes mapped.
-
To map the classification attributes, so that the Connector can send them out for translation, navigate in the catalogs and classification to select the corresponding classifying category ,select the corresponding check box, or to select all classification attributes of the classifying category, select the check box in the Namecolumn header.
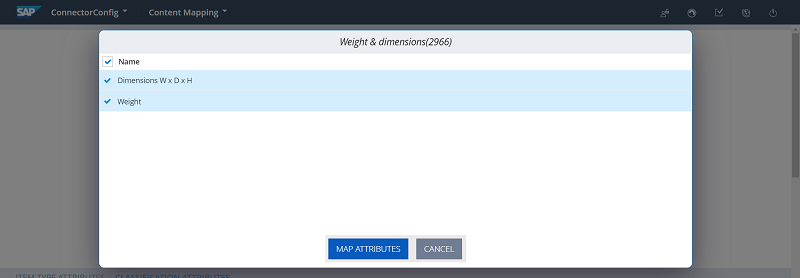
-
Click Map Attributes.
A message box confirms that the configuration was saved.
-
Click OK to close the message box.
-
Repeat steps 3 through 6 for all the classification attributes to configure for translation.
1.5.7 - Configuring the Multi-Select Feature in Hybris
In Hybris versions 6.1 and 6.2, if you want to select multiple products and website pages (“pages”) for translation concurrently in the Hybris Backoffice, you must enable the multi-select feature by configuring the multiSelect setting, as described below:
Note: This feature is enabled by default in Hybris versions 6.3 and higher.
To enable the multi-select feature in Hybris versions 6.1 and 6.2:
-
Log into the Hybris Backoffice Administration Cockpit (“Backoffice”).
-
Press the F4 key.
The Application Orchestrator opens.
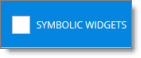
- In the toolbar at the top, select the Symbolic Widgets](#) check box.
The page updates.
-
Scroll down to locate the Collection Browser.
-
Click the Widget Settings](#) icon of the Collection Browser.
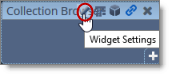
The Settings dialog box opens.
- Scroll down to the multiSelect](#) option, and in the corresponding dropdown list, select true.
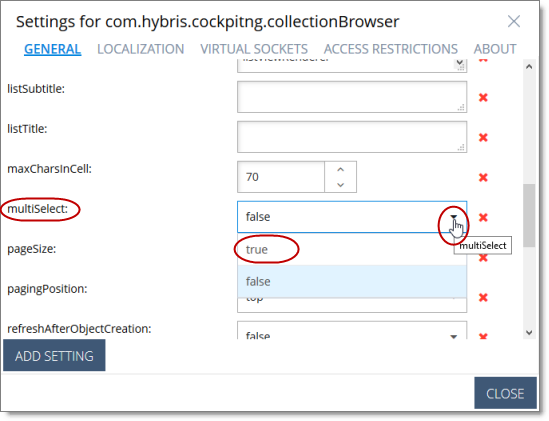
-
In the bottom-right corner, click Close the dialog box.
-
Press the F4 key to close the Application Orchestrator.
1.5.8 - Configuring the Frequency of Sending Jobs to the Lionbridge Content API Platform
You can configure how frequently the Connector sends jobs to the Lionbridge Content API Platform.
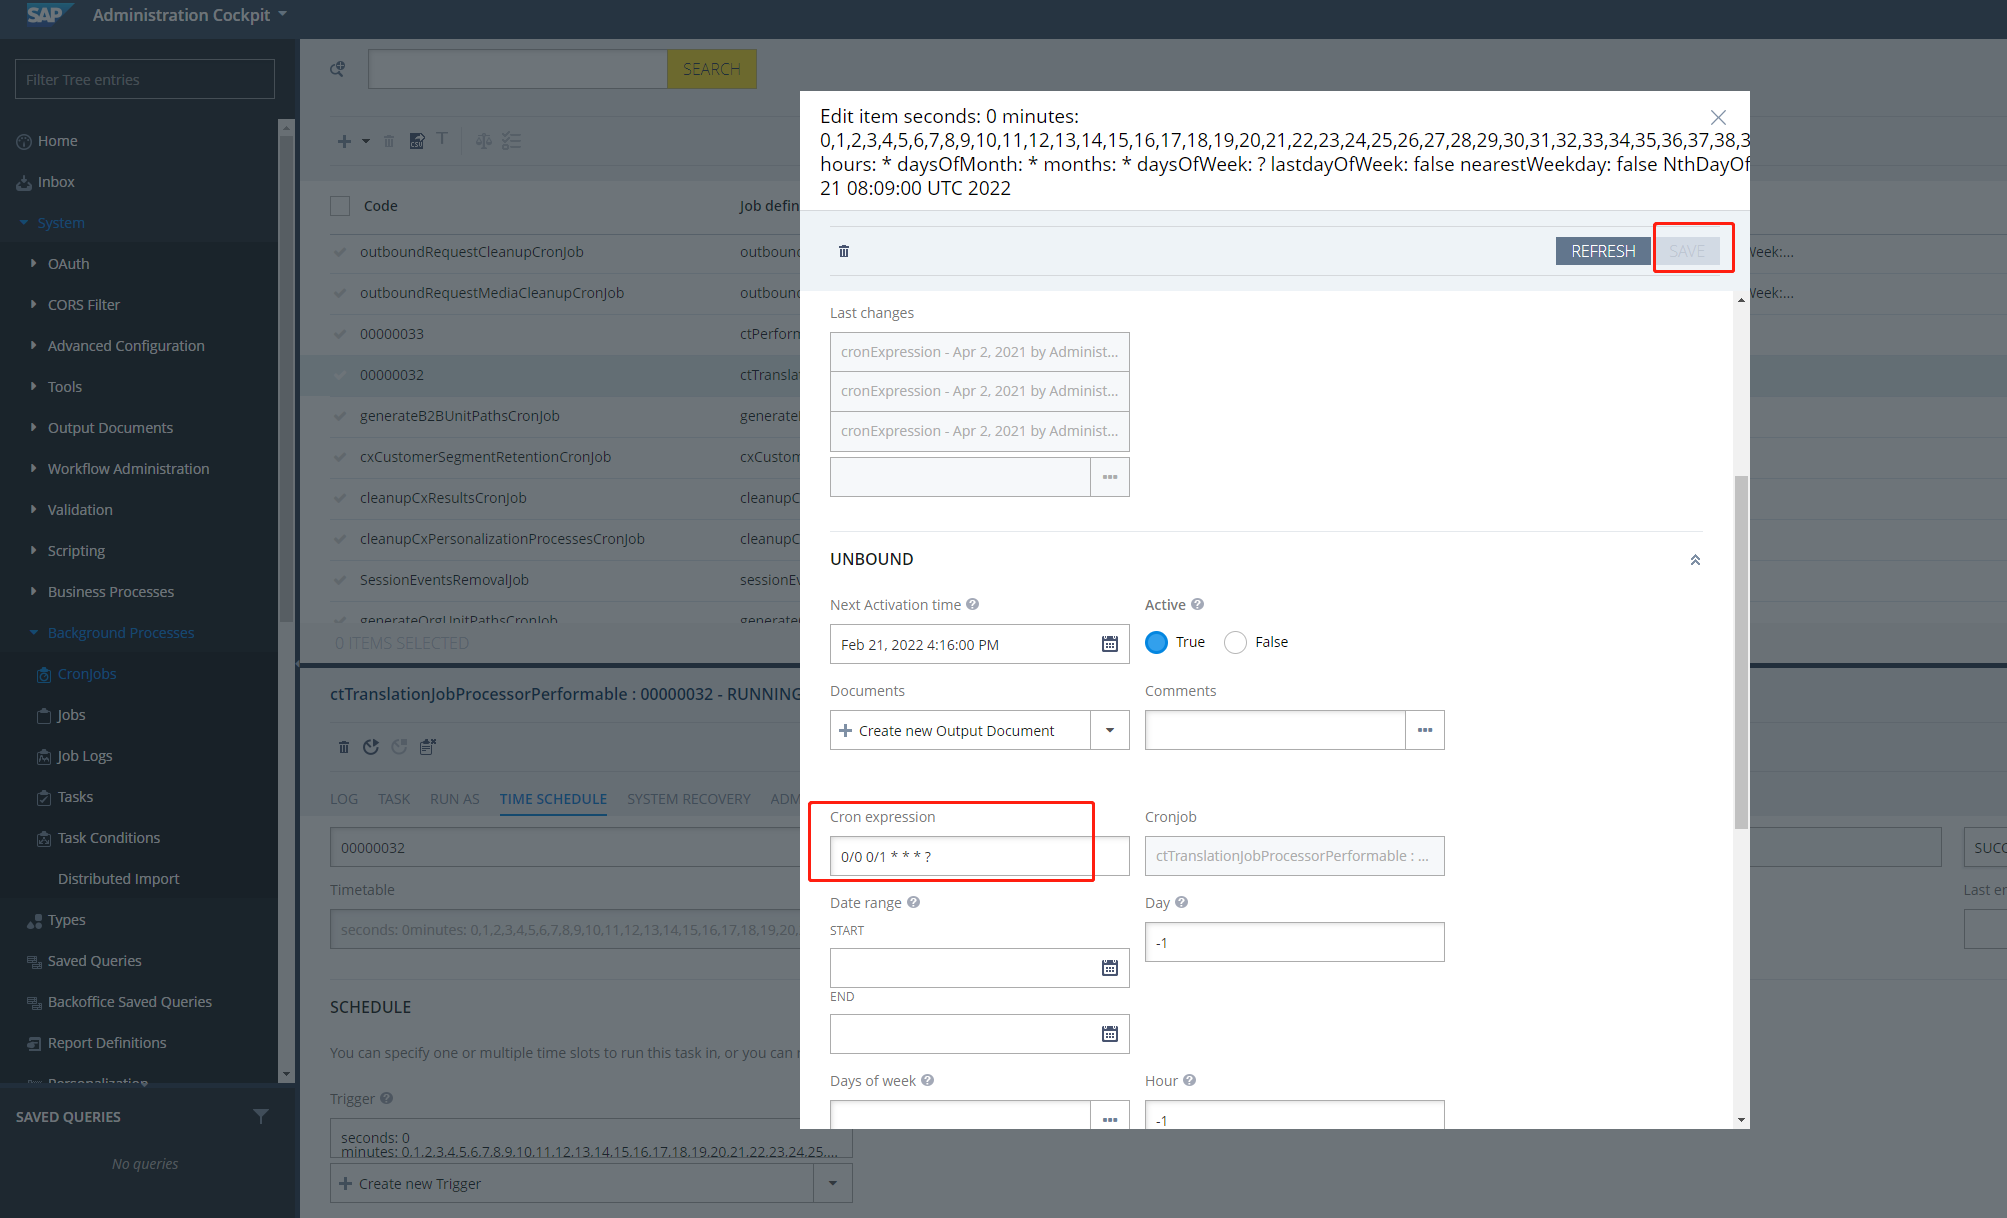
The Connector uses the ctTranslationJobProcessorPerformable cron job to send translation jobs to the Lionbridge Content API Platform. This cron job runs by default every minute.
You may want to modify the interval that this job runs, depending on your priorities or requirements for system resources.
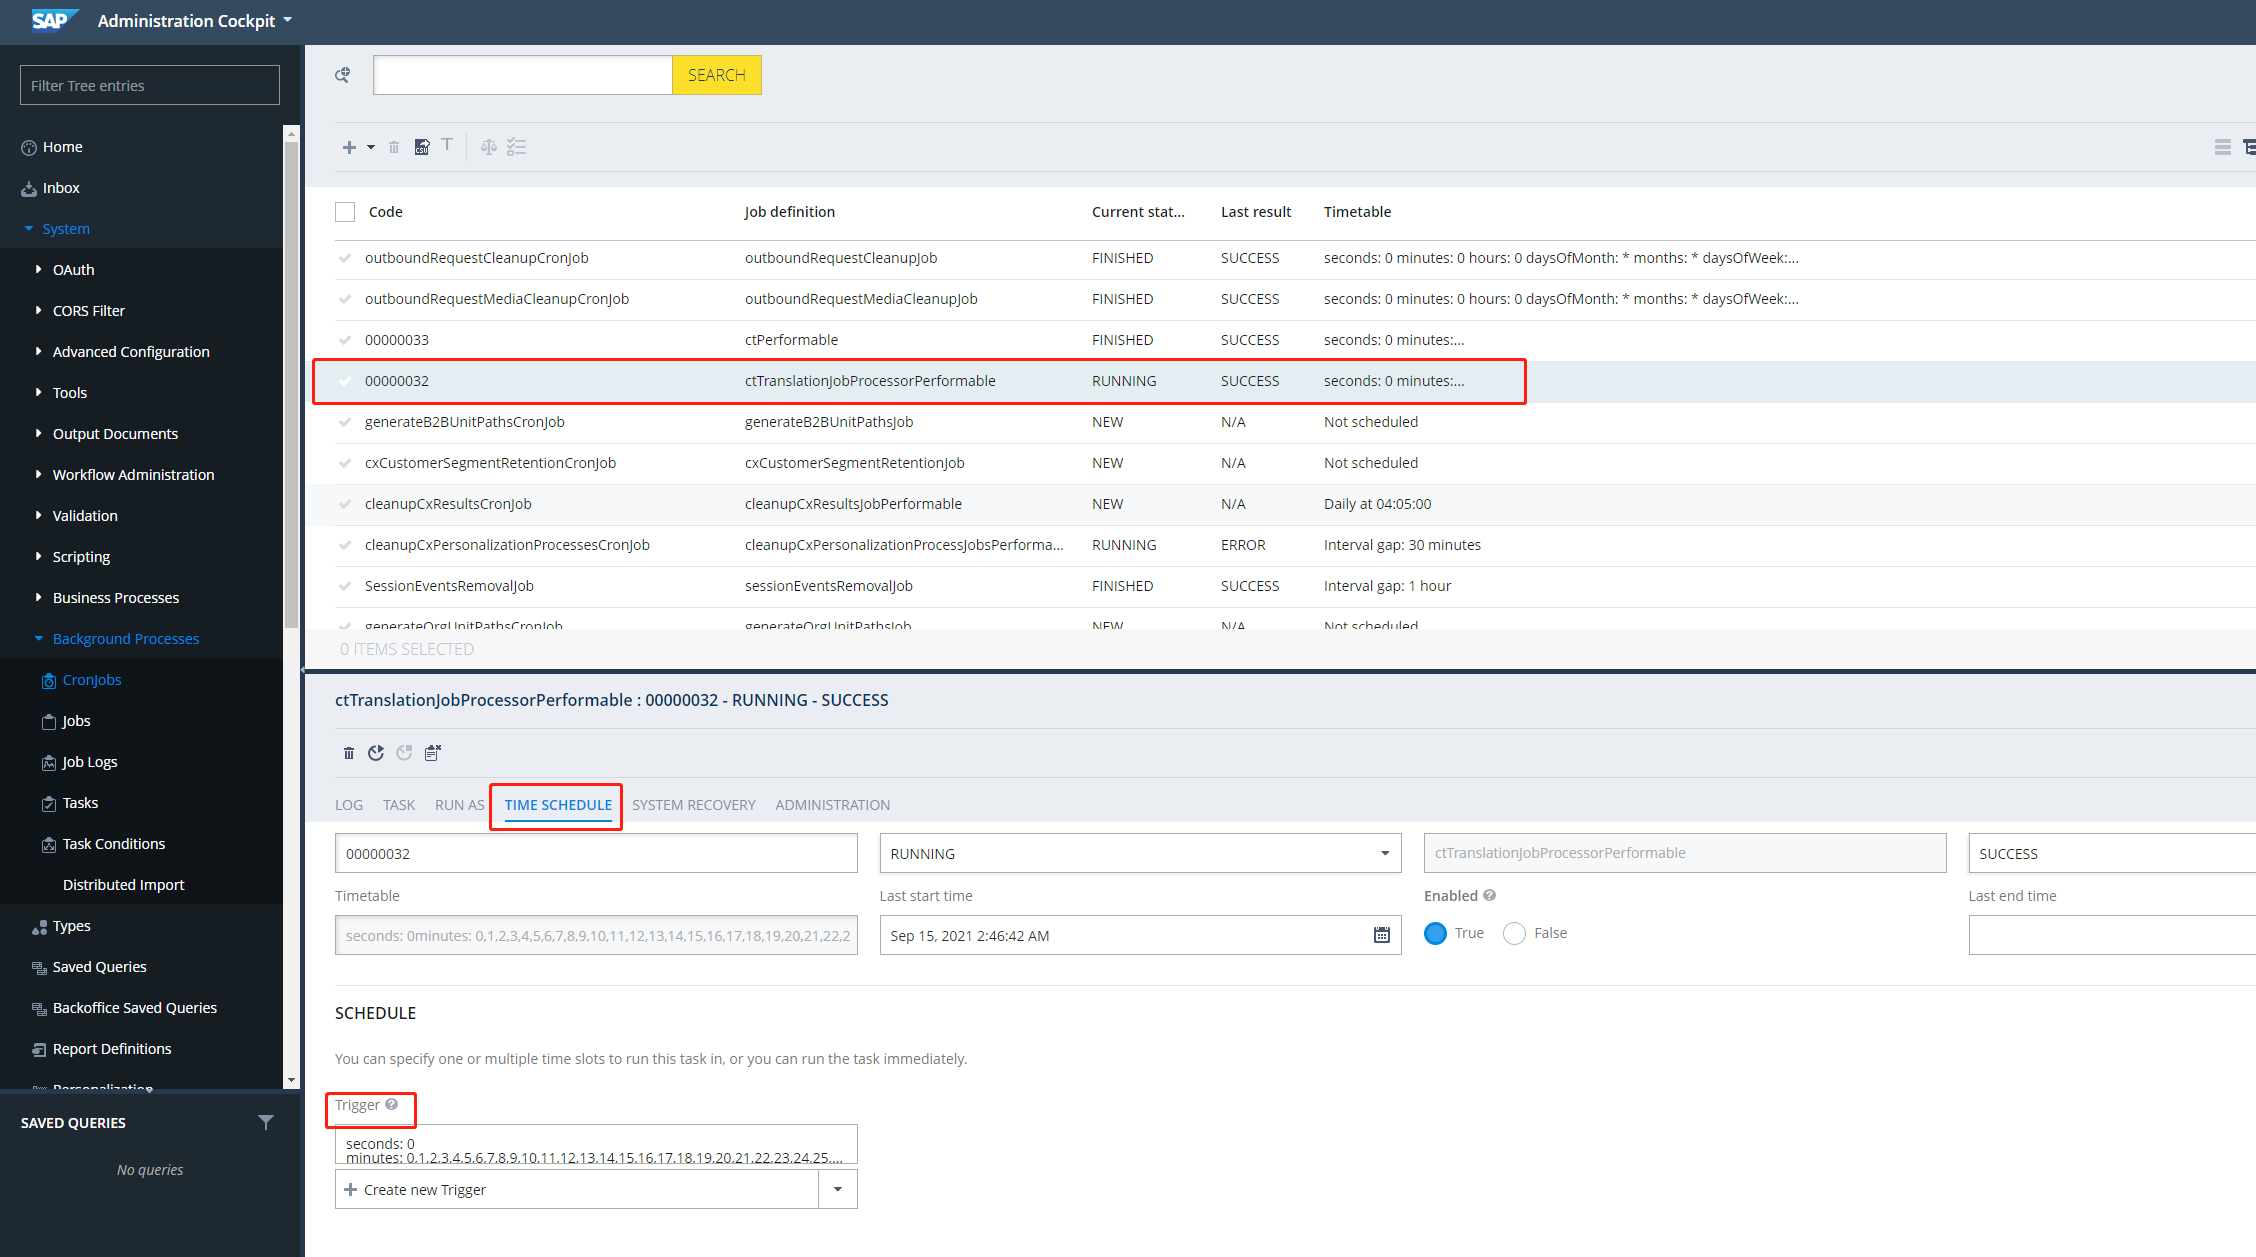
- Navigate to the Administration Cockpit > Background Processes > Cronjobs section.
1.5.9 - Configuring Email Settings
Starting from the Connector version 2.4.3, support for sending e-mail notifications is added. With this, an email notification is sent whenever a file passes through the translation events such as Job Submission, Job Received, and Job Errors. To receive these email notifications, users must configure the email notification settings.
To configure the email notifications in the application:
-
Go to Administration > Connector Configuration > Content Mapping > System Configuration > Email Setting.
-
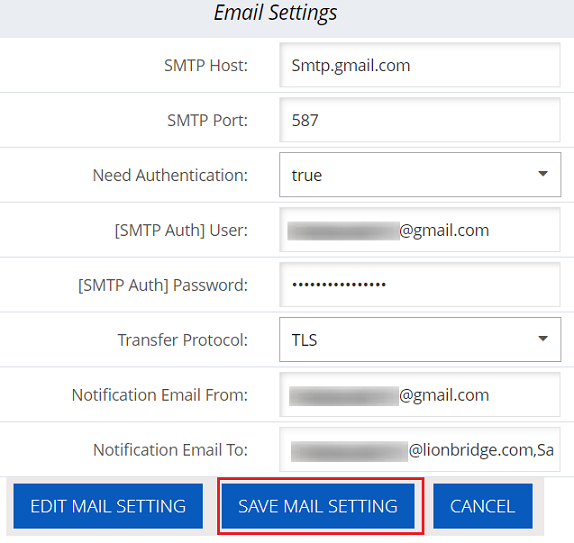
Configure the following SMTP settings for the email address:
-
Click EDIT MAIL SETTING.
-
Click SAVE MAIL SETTING.
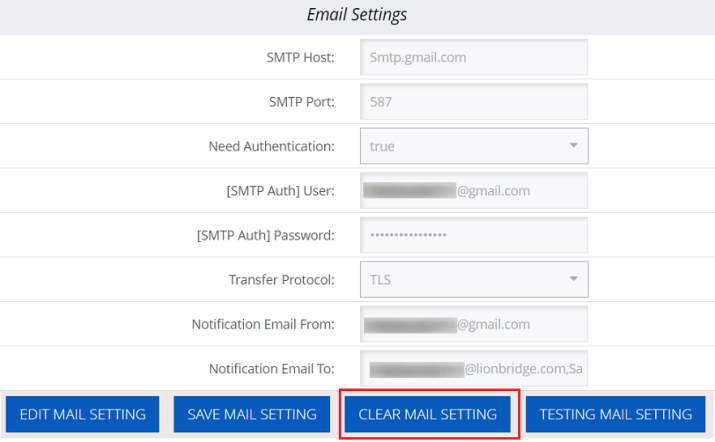
After saving email settings, two new buttons (CLEAR EMAIL SETTING, TESTING MAIL SETTING) appear at the bottom of the Email Settings screen.
You can also configure a new email setting by clicking CLEAR EMAIL SETTING, which removes existing settings.
Testing an Email Setting
After the email setting is configured, test it to verify the configuration is successful and you are receiving a test email notification.
-
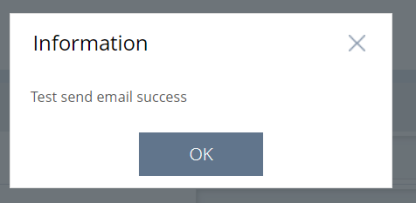
To test an email setting, click TESTING MAIL SETTING in the Email Setting screen. A dialogue box appears with a success message as follows:
-
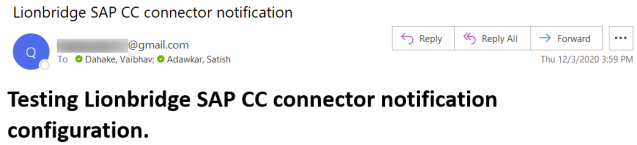
A test email notification will be sent to the email address specified in Notification Email To field. The following is an test email notification:
Similarly, the email notifications are sent when a translation is submitted, received, and has errors.
1.5.10 - Configuring Translation URL Conversion Settings
When there are links in content for translation, and if you automatically want to update the links in the translated content, use Translation URL Conversion functionality.
To configure settings for Translation URL Conversion in translated content:
-
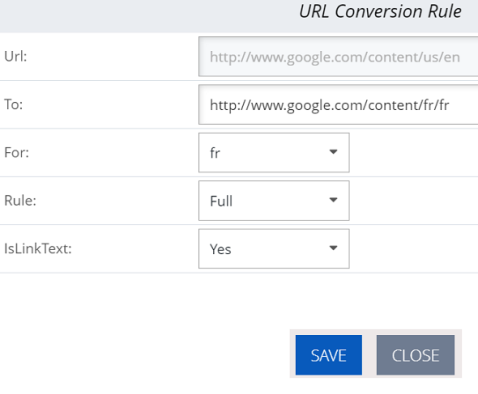
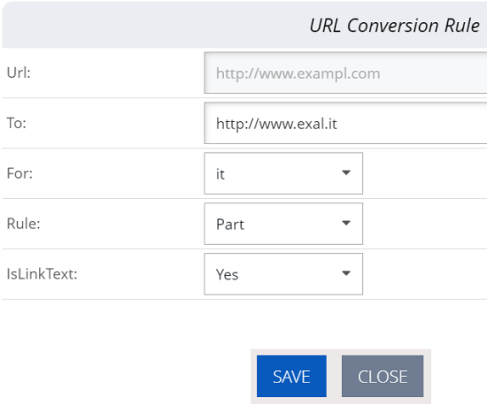
Go to Administration > Connector Configuration > Content Mapping > System Configuration > Translation URL Conversion> click Add URL Conversion.
-
Specify the following URL conversion settings for a target language:
-
URL—Enter the base URL of the links in the source content. For example, http://example.com
-
To—Enter the desired base URL for the links in the target (translated) content, for example, http://ja-jp.example.com
-
For —Select the target language code for applying this URL conversion rule.
-
Rule —Select any of the following options:
-
Full —Select this to convert the URL only if it is identical to the base URL specified.
For example:
URL: www.google.com and To: www.google.it
-
Partial— Select this to convert the URL that includes the base URL specified.
For example:
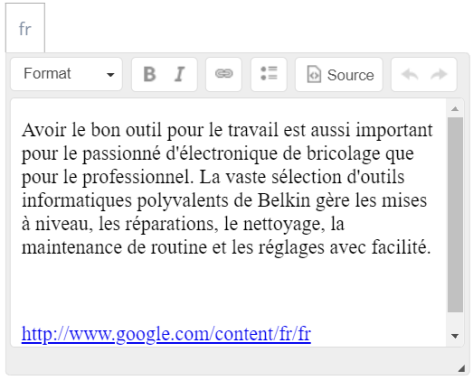
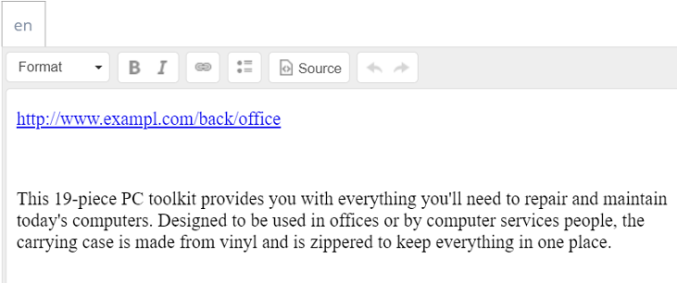
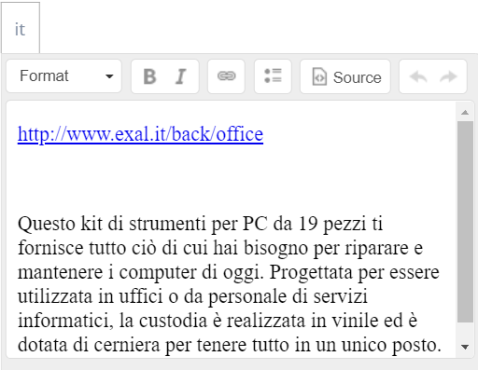
URL: www.google.com and To: http://www.google.com/content/us/en
-
IsConvertLinkText— Select any of the following options:
The following are the examples for Full and Partial URL conversion.
Full URL conversion example:
Settings:
Source:
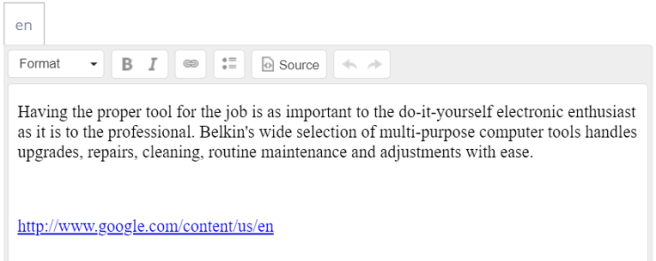
Target:
Partial URL conversion example:
Settings:
Source:
Target:
1.6 - Pre-Production Testing
After you complete the configuration, your Lionbridge Connector for Hybris installation is ready for testing. We recommend sending only a few pages for translation in one language as an initial test. For detailed instructions, refer to the Lionbridge Connector for Hybris User Guide. Once successful, you can send as many languages as required.
Please coordinate with your translation provider for this test process.
If you have any concerns or questions, please contact Lionbridge Connector Support. For details, see How to Contact Lionbridge Connector Support.
1.7 - Appendix Language Codes
For detailed instructions on mapping Hybris languages to Lionbridge languages, see Mapping Language Codes.
The Lionbridge Connector has the following language codes:
| Type |
Language Identifier |
Language Code |
| String |
Afrikaans |
“af-ZA” |
| String |
Albanian |
“sq-AL” |
| String |
Amharic |
“am-ET” |
| String |
Arabic_Algeria |
“ar-DZ” |
| String |
Arabic_Bahrain |
“ar-BH” |
| String |
Arabic_Egypt |
“ar-EG” |
| String |
Arabic_Iraq |
“ar-IQ” |
| String |
Arabic_Jordan |
“ar-JO” |
| String |
Arabic_Kuwait |
“ar-KW” |
| String |
Arabic_Lebanon |
“ar-LB” |
| String |
Arabic_Libya |
“ar-LY” |
| String |
Arabic_MiddleEast |
“ar-XR” |
| String |
Arabic_Morocco |
“ar-MA” |
| String |
Arabic_Oman |
“ar-OM” |
| String |
Arabic_Qatar |
“ar-QA” |
| String |
Arabic_Saudi_Arabia |
“ar-SA” |
| String |
Arabic_Syria |
“ar-SY” |
| String |
Arabic_Tunisia |
“ar-TM” |
| String |
Arabic_UAE |
“ar-AE” |
| String |
Arabic_Yemen |
“ar-YE” |
| String |
Armenian |
“hy-AM” |
| String |
Assamese |
“as-IN” |
| String |
Basque |
“eu-ES” |
| String |
Belarusian |
“be-BY” |
| String |
Bengali_Bangladesh |
“bn-BD” |
| String |
Bengali_India |
“bn-IN” |
| String |
Bosnian_Bosnia_Herzegovina |
“bs-BA” |
| String |
Bulgarian |
“bg-BG” |
| String |
Burmese |
“my-MM” |
| String |
Catalan |
“ca-ES” |
| String |
Chinese_Hong_Kong |
“zh-HK” |
| String |
Chinese_Macao |
“zh-MO” |
| String |
Chinese_PRC |
“zh-CN” |
| String |
Chinese_Singapore |
“zh-SG” |
| String |
Chinese_Taiwan |
“zh-TW” |
| String |
Croatian |
“hr-HR” |
| String |
Croatian_Bosnia_Herzegovina |
“hr-BA” |
| String |
Czech |
“cs-CZ” |
| String |
Danish |
“da-DK” |
| String |
Divehi |
“dv-MV” |
| String |
Dutch |
“nl-NL” |
| String |
Dutch_Belgium |
“nl-BE” |
| String |
English_Australia |
“en-AU” |
| String |
English_Belize |
“en-BZ” |
| String |
English_Canada |
“en-CA” |
| String |
English_HongKong |
“en-HK” |
| String |
English_India |
“en-IN” |
| String |
English_Indonesia |
“en-ID” |
| String |
English_Ireland |
“en-IE” |
| String |
English_Jamaica |
“en-JM” |
| String |
English_Malaysia |
“en-MY” |
| String |
English_New_Zealand |
“en-NZ” |
| String |
English_Philippines |
“en-PH” |
| String |
English_Singapore |
“en-SG” |
| String |
English_South_Africa |
“en-ZA” |
| String |
English_Trinidad |
“en-TT” |
| String |
English_UK |
“en-GB” |
| String |
English_US |
“en-US” |
| String |
English_Zimbabwe |
“en-ZW” |
| String |
Estonian |
“et-EE” |
| String |
Faroese |
“fo-FO” |
| String |
Farsi |
“fa-IR” |
| String |
Filipino |
“fil-PH” |
| String |
Finnish |
“fi-FI” |
| String |
French |
“fr-FR” |
| String |
French_Belgium |
“fr-BE” |
| String |
French_Cameroon |
“fr-CM” |
| String |
French_Canada |
“fr-CA” |
| String |
French_Cote_d_Ivoire |
“fr-CI” |
| String |
French_Democratic_Rep_Congo |
“fr-CD” |
| String |
French_Haiti |
“fr-HT” |
| String |
French_Luxembourg |
“fr-LU” |
| String |
French_Mali |
“fr-ML” |
| String |
French_Monaco |
“fr-MC” |
| String |
French_Morocco |
“fr-MA” |
| String |
French_Reunion |
“fr-RE” |
| String |
French_Senegal |
“fr-SN” |
| String |
French_Switzerland |
“fr-CH” |
| String |
Frisian_Netherlands |
“fy-NK” |
| String |
Fulfulde_Nigeria |
“ff-NG” |
| String |
FYRO_Macedonian |
“mk-MK” |
| String |
Gaelic_Ireland |
“gd-IE” |
| String |
Gaelic_Scotland |
“gd-GB” |
| String |
Gallegan |
“gl-ES” |
| String |
Georgian |
“ka-GE” |
| String |
German |
“de-DE” |
| String |
German_Austria |
“de-AT” |
| String |
German_Liechtenstein |
“de-LI” |
| String |
German_Luxembourg |
“de-LU” |
| String |
German_Switzerland |
“de-CH” |
| String |
Greek |
“el-GR” |
| String |
Guarani |
“gn-PY” |
| String |
Gujarati |
“gu-IN” |
| String |
Hausa |
“ha-NE” |
| String |
Hawaiian |
“haw-US” |
| String |
Hebrew |
“he-IL” |
| String |
Hindi |
“hi-IN” |
| String |
Hungarian |
“hu-HU” |
| String |
Icelandic |
“is-IS” |
| String |
Igbo |
“ig-NG” |
| String |
Indonesian |
“id-ID” |
| String |
Inuktitut |
“iu-CA” |
| String |
Italian |
“it-IT” |
| String |
Italian_Switzerland |
“it-CH” |
| String |
Japanese |
“ja-JP” |
| String |
Kannada |
“kn-IN” |
| String |
Kanuri |
“kr-TD” |
| String |
Kashmiri |
“ks-IN” |
| String |
Kazakh |
“kk-KZ” |
| String |
Khmer |
“km-KH” |
| String |
Konkani |
“kok-IN” |
| String |
Korean |
“ko-KR” |
| String |
Kyrgyz |
“ky-KZ” |
| String |
Lao |
“lo-LA” |
| String |
Latin |
“la-XL” |
| String |
Latvian |
“lv-LV” |
| String |
Lithuanian |
“lt-LT” |
| String |
Malay |
“ms-MY” |
| String |
Malay_Brunei_Darussalam |
“ms-BN” |
| String |
Malayalam |
“ml-IN” |
| String |
Maltese |
“mt-MT” |
| String |
Maori |
“mi-NZ” |
| String |
Marathi |
“mr-IN” |
| String |
Mongolian |
“mn-MN” |
| String |
Nepali |
“ne-NP” |
| String |
Nepali_India |
“ne-IN” |
| String |
Norwegian |
“nb-NO” |
| String |
Norwegian_Nynorsk |
“nn-NO” |
| String |
Oriya |
“or-IN” |
| String |
Oromo |
“om-ET” |
| String |
Panjabi |
“pa-PK” |
| String |
Polish |
“pl-PL” |
| String |
Portuguese |
“pt-PT” |
| String |
Portuguese_Brazil |
“pt-BR” |
| String |
Punjabi_Pakistan |
“pa-PK” |
| String |
Pushto |
“ps-AF” |
| String |
Quechua_Ecuador |
“qu-EC” |
| String |
Quechua_Peru |
“qu-PE” |
| String |
Rhaeto_Romance |
“rm-IT” |
| String |
Romanian |
“ro-RO” |
| String |
Romanian_Moldova |
“ro-MD” |
| String |
Russian |
“ru-RU” |
| String |
Russian_Moldava |
“ru-MD” |
| String |
Sami |
“se-NO” |
| String |
Sanskrit |
“sa-IN” |
| String |
Serbian_Cyrillic |
“sr-RS” |
| String |
Serbian_Latin |
“sr-SP” |
| String |
Sindhi_India |
“sd-IN” |
| String |
Sindhi_Pakistan |
“sd-PK” |
| String |
Sinhala |
“si-LK” |
| String |
Slovak |
“sk-SK” |
| String |
Slovenian |
“sl-SI” |
| String |
Somali |
“so-ET” |
| String |
Sorbian |
“wen-DE” |
| String |
Spanish |
“es-ES” |
| String |
Spanish_Argentina |
“es-AR” |
| String |
Spanish_Bolivia |
“es-BO” |
| String |
Spanish_Chile |
“es-CL” |
| String |
Spanish_Colombia |
“es-CO” |
| String |
Spanish_Costa_Rica |
“es-CR” |
| String |
Spanish_Dominican_Republic |
“es-DO” |
| String |
Spanish_Ecuador |
“es-EC” |
| String |
Spanish_El_Salvador |
“es-SV” |
| String |
Spanish_Honduras |
“es-HN” |
| String |
Spanish_LatinAmerica |
“es-XL” |
| String |
Spanish_Mexico |
“es-MX” |
| String |
Spanish_Nicaragua |
“es-NI” |
| String |
Spanish_Panama |
“es-PA” |
| String |
Spanish_Paraguay |
“es-PY” |
| String |
Spanish_Peru |
“es-PE” |
| String |
Spanish_Puerto_Rico |
“es-PR” |
| String |
Spanish_Uruguay |
“es-UY” |
| String |
Spanish_US |
“es-US” |
| String |
Spanish_Venezuela |
“es-VE” |
| String |
Swahili |
“sw-TZ” |
| String |
Swedish |
“sv-SE” |
| String |
Swedish_Finland |
“sv-FI” |
| String |
Syriac |
“syr-SY” |
| String |
Tajik |
“tg-TJ” |
| String |
Tamil |
“ta-IN” |
| String |
Tatar |
“tt-RU” |
| String |
Telugu |
“te-IN” |
| String |
Thai |
“th-TH” |
| String |
Tibetan |
“bo-CN” |
| String |
Tigrinya_Eritrea |
“ti-ER” |
| String |
Tigrinya_Ethiopia |
“ti-ET” |
| String |
Tsonga |
“ts-ZA” |
| String |
Tswana |
“tn-BW” |
| String |
Turkish |
“tr-TR” |
| String |
Turkmen |
“tk-TM” |
| String |
Uighur |
“ug-CN” |
| String |
Ukrainian |
“uk-UA” |
| String |
Urdu |
“ur-PK” |
| String |
Urdu_India |
“ur-IN” |
| String |
Uzbek |
“uz-UZ” |
| String |
Venda |
“ve-ZA” |
| String |
Vietnamese |
“vi-VN” |
| String |
Welsh |
“cy-GB” |
| String |
Xhosa |
“xh-ZA” |
| String |
Yi |
“ii-CN” |
| String |
Yiddish |
“yi-MD” |
| String |
Yoruba |
“yo-NG” |
| String |
Zulu |
“zu-ZA” |
1.8 - Appendix API for Automatic Translation Jobs Creation
Lionbridge Connector for SAP Commerce supports an API to create translation job programmatically using the defaultCtProducerClient bean:
/**
* The bean creates a Translation Job that will be sent by the connector’s cron job. Example usage in psuedo-code:
* ctproducerclient = spring.getBean(“defaultCtProducerClient”);
* modelService = spring.getBean(“modelService”);
* for (…) {
* //… gather a list of items
* long examplePK = 8796093251585L;
* item = modelService.get(PK.fromLong(examplePK));
* items.add(item)
* }
* provider = ctproducerclient.getProviderByName(“WorldServer Test”);
* ctproducerclient.createJobFromItemModels(“test job”, “this is a test”, null, “123456”, null, provider.getId(), “en”, {“fr”, “es”}, items);
* @param jobName Name of translation job
* @param jobDescription Description of the job
* @param dueDate Due date. Optional.
* @param poReference Purchase Order reference. Optional.
* @param sourceLanguage Source language code (Hybris)
* @param targetLanguages List of target language codes (Hybris)
* @param lspId ID of TranslationProvider. See getProviderByName(String providerName)
* @param itemsToTranslate List of Hybris ItemModels to translate. Can be retrieved using
* ModelService or FlexibleSearchService, for example.
*/
void createJobFromItemModels(
final String jobName, final String jobDescription,
final Date dueDate, final String poReference,
final String sourceLanguage, final String[] targetLanguages,
final String lspId, List<ItemModel> itemsToTranslate);
2 - User Guide
2.1 - Welcome to the Connector
Welcome to the Lionbridge Connector for SAP Commerce (“Connector”) version 3.0. This is Lionbridge’s connector for SAP Commerce and Hybris. The Connector enables you to automate sending and retrieving localized attributes in business objects, which dramatically reduces the effort required to create, maintain, and publish these items in multiple languages.
2.1.1 - The Translation Lifecycle
The translation lifecycle is the broad process of selecting content, sending it out for translation, and then receiving the translated content back from translation.
This set of steps usually fits inside a larger, more general process called the content lifecycle, which is the process of creating, reviewing, editing, approving, and publishing content.
When you consider the translation lifecycle and the content lifecycle together, you have the global content value chain, which is the strategy for managing multilingual content.
Remember that localizing content is a subset of steps in the broader content lifecycle. This will improve your focus on key localization considerations, improve processes, and keep all content stakeholders included. Together, this results in better content management.
2.1.2 - How the Connector Helps You Manage Your Translation Lifecycle
The Lionbridge Connector for SAP Commerce (“Connector”) is a plug-in module for Hybris, SAP Commerce, and SAP Commerce Cloud. It provides a range of features and user interface enhancements that enable you to select, send, monitor, and retrieve content for translation into any supported language.
These features automate the process, which dramatically reduces the effort and time required to export and re-import content that needs to be localized. This is very helpful when translating large volumes of content or ensuring that translated content is quickly re-imported to meet deadlines.
When you use the Connector, you manage your translation lifecycle entirely from within Hybris, SAP Commerce, or SAP Commerce Cloud (“e-commerce platform”):
- The Connector exports your content from the e-commerce platform in XML format and delivers these content files to the central, hosted Lionbridge Content API Platform.
- The Lionbridge Content API Platform delivers your content to your translation providers, based on routing rules that your company chooses and the Lionbridge Connector Team implements.
- When the translated content is ready, the Lionbridge Content API Platform retrieves it from your translators and delivers it to the Connector.
- The Connector automatically re-imports the content into the correct location in the e-commerce platform.
You can then review, revise, reject, or publish the translated content as needed.
Note: Neither the Connector nor the Lionbridge Content API Platform performs any translation. Similarly, the Lionbridge Connector Team does not provide any translation services. Your company chooses the translation provider that performs the translation.
2.1.3 - Using this Guide
Purpose of this guide
This guide describes how to use the Lionbridge Connector (“Connector”) for SAP Commerce to manage your translation lifecycle. It describes how to send out localized strings in certain business objects for translation and receive them back from translation.
Who should use this guide
This guide is intended for content editors, project, marketing, localization or translation managers, or others who are responsible for creating, editing, or approving business objects for translation. This guide is also useful for translation providers who receive business objects from your Hybris, SAP Commerce, or SAP Commerce Cloud installation, because it describes your company’s translation management process.
What your company setup should be
This document assumes that:
- Your company already has a functioning instance of Hybris, SAP Commerce, or SAP Commerce Cloud.
- The Connector has been installed, configured, and tested on your Hybris, SAP Commerce, or SAP Commerce Cloud instance.
- The Lionbridge Connector Team has set up the Lionbridge Content API Platform to send localized strings in certain business objects to your translation providers.
What you should already know
This document assumes that:
- You are familiar with the Connector’s configuration for Hybris, SAP Commerce, or SAP Commerce Cloud, and the reasons for choosing certain configuration options. This is important because your company’s configuration determines which features are available.
- You have a strong working knowledge of Hybris, SAP Commerce, or SAP Commerce Cloud, particularly the following modules:
- Hybris Backoffice
- Hybris Product Cockpit and/or Hybris WCMS Cockpit (Hybris versions 6.1 to 6.6 only)
- SAP Commerce or SAP Commerce Cloud Administration Cockpit
- You have valid user credentials to log into the Hybris, SAP Commerce, or SAP Commerce Cloud modules listed above.
- You are familiar with your company’s translation process and requirements.
- You have the required permissions to access the Connector functionality described in this guide.
Note: Not all the features described in this guide may be available. Feature availability depends on both your company’s Connector setup and the roles to which you are assigned. If you cannot access functionality that you need, contact your company’s Hybris, SAP Commerce, or SAP Commerce Cloud administrator.
How this guide is organized
This guide contains the following chapters
How to find out more about the Lionbridge Connector for SAP Commerce
For information on installing and configuring the Lionbridge Connector for SAP Commerce, read the Lionbridge Connector for SAP Commerce Installation and Configuration Guide.
Documentation conventions
This guide uses the following conventions:
| Convention |
Description |
| Bold |
Highlights screen elements such as buttons, menu items, and fields. |
| Courier |
Highlights input, file names, and paths. |
| Italics |
Highlights terms for emphasis, variables, or document titles. |
| > |
Indicates a menu choice. For example, “Select Catalog > Products.” |
2.1.4 - How to Contact Lionbridge Connector Support
You can submit a support ticket either:
See also:
2.2 - Getting Started with the Connector
The Connector supports all Web browsers that SAP Commerce supports.
Important: You must configure your browser to allow pop-up windows on the SAP Commerce server.
The Connector functionality is available in the following modules:
- Administration Cockpit SAP Commerce and SAP Commerce Cloud
This module contains Connector setup and configuration options, the Translation Queue, and functionality for sending out products and website pages for translation, monitoring job status, and archiving jobs.
-
To access the Administration Cockpit, in your Web browser, open http://your_SAP_Commerce_instance/backoffice/login.zul and log in.
-
Hybris Backoffice Administration Cockpit (“Backoffice”)
This module contains Connector setup and configuration options, the Translation Queue, and functionality for sending out products and website pages for translation, monitoring job status, and archiving jobs.
-
To access Backoffice, in your Web browser, open http://your_hybris_instance/backoffice/login.zul and log in.
-
Hybris Product Cockpit (Hybris versions 6.1 to 6.6 only)
This module contains the functionality for sending out products to the Translation Queue or directly for translation.
-
To access the Product Cockpit, in your Web browser, open http://your_hybris_instance/ctcockpit/login.zul and log in.
-
Hybris WCMS Cockpit (Hybris versions 6.1 to 6.6 only)
This module contains the functionality for sending out website pages to the Translation Queue or directly for translation.
- To access the WCMS Cockpit, in your Web browser, open http://your_hybris_instance/ctwcms/login.zul and log in.
2.2.1 - The Connector at a Glance
The Connector has interfaces in the following modules:
- SAP Commerce and SAP Commerce Cloud Administration Cockpit](#)

This module includes the following Connector interfaces:
-
Product Cockpit
-
Pages page (opened from WCMS > Pages in the navigation tree on the left)
-
Products page (opened from Catalog > Products in the navigation tree on the left)
-
Translation Queue
-
Translation Jobs page, and the related Job Details page and Archived Jobs page
-
System Configuration page, where you configure the Connector
-
Content Mapping page, where you configure:
- which business objects, sub-types, and localized attributes the Connector sends for translation
- the product classification attributes of business objects that are Products for the Connector to send for translation
-
System Information page, where you can view the Connector version and build information
-
Hybris Backoffice Administration Cockpit (“Backoffice”)](#)
This module includes the following Connector interfaces:
-
Product Cockpit (Hybris versions 6.4 and higher only)
-
Pages page (opened from WCMS > Pages in the navigation tree on the left)
-
Products page (opened from Catalog > Products in the navigation tree on the left)
-
Translation Queue
-
Translation Jobs page, and the related Job Details page and Archived Jobs page
-
System Configuration page, where you configure the Connector
-
Content Mapping page, where you configure:
- which business objects, sub-types, and localized attributes the Connector sends for translation
- the product classification attributes of business objects that are Products for the Connector to send for translation
-
System Information page, where you can view the Connector version and build information
-
Hybris Product Cockpit (Hybris versions 6.1 to 6.6 only)](#)
This module includes the Connector interface for sending products to the Translation Queue and directly out for translation.
- Hybris WCMS Cockpit (Hybris versions 6.1 to 6.6 only)](#)
This module includes the Connector interface for sending website pages to the Translation Queue and directly out for translation.
2.3 - Sending Content for Translation
You use the Connector to send out localized attributes, including keywords, of business objects in the Administration Cockpit, the Product Cockpit and the WCMS Cockpit (Hybris versions 6.1 to 6.6 only), and the Backoffice Cockpit, specifically products and website pages, for translation.
When the Connector sends out a business object for translation, it actually sends out the configured localized attributes in that business object for translation. You can send out for translation any configured localized attributes of any configured business object.
Each localized attribute of a business object that is sent out for translation is a content item.
Note: Although you can view non-localized attributes and select them to send them out for translation, the Connector does not actually send out non-localized attributes for translation.
Note: You configure which business objects, sub-types, and corresponding localized attributes you can send out for translation in the Content Mapping page. For detailed instructions, refer to the Lionbridge Connector for SAP Commerce Installation and Configuration Guide.
- In SAP Commerce or SAP Commerce Cloud, you can send out products for translation from the Product Cockpit. For detailed instructions, see: Sending Products for Translation from SAP Commerce or SAP Commerce Cloud.
- In Hybris version 6.4 or higher, you can send out products for translation from the Hybris Backoffice Product Cockpit. For detailed instructions, see: Sending Products for Translation from the Hybris Backoffice Product Cockpit (Hybris 6.4 and higher).
- In all supported versions of Hybris, you can send out products for translation from the Hybris Backoffice Products page. For detailed instructions, see: Sending Products for Translation from the Hybris Backoffice Products Page.
- In Hybris versions 6.1 to 6.6, you can send out products for translation from the Hybris Product cockpit. For detailed instructions, see: Sending Products for Translation from the Hybris Product Cockpit (Hybris 6.1 to 6.6).
- In SAP Commerce or SAP Commerce Cloud, you can send out website pages for translation from the Administration Cockpit. For detailed instructions, see: Sending Website Pages for Translation from SAP Commerce or SAP Commerce Cloud.
- In all supported versions of Hybris, you can send out website pages for translation from within Hybris Backoffice. For detailed instructions, see: Sending Website Pages for Translation from the Hybris Backoffice.
- In Hybris versions 6.1 to 6.6, you can send out website pages for translation from the Hybris WCMS cockpits. For detailed instructions, see: Sending Website Pages for Translation from the Hybris WCMS Cockpit (Hybris 6.1 to 6.6).
2.3.1 - Sending Products for Translation from SAP Commerce or SAP Commerce Cloud
You use the Connector to send out configured localized attributes of products for translation from SAP Commerce or SAP Commerce Cloud.
Note: You configure which localized attributes of products you can send out for translation in the Content Mapping page. For detailed instructions, refer to the Lionbridge Connector for SAP Commerce Installation and Configuration Guide.
To send out the localized attributes of business objects that are products for translation from SAP Commerce or SAP Commerce Cloud:
- In your Web browser, navigate to /backoffice/ on your SAP Commerce instance or on SAP Commerce Cloud.
- Log in to SAP Commerce or SAP Commerce Cloud.
- In the Administration Cockpit menu, select Product Cockpit.
- In the bottom-right corner, click the arrow to display the left menu
 .
.
- In the left menu, select Products.
The Products page opens.
-
Optional. In the Filter Tree in the left pane, you can select a specific catalog or classification, and price range and/or category to display only products that meet the filter criteria.
-
Locate the products to send out for translation. You can view the items in either the Grid view  or the List view
  .
.
Tip: You can use the search and filter functionality at the top of the page to display only the products to send out for translation.
- Select the products to translate.
Note: All selected items must have the same source language.
- In the Grid view, click a checkmark
 in the top-left corner to select it and the corresponding product.
- In the List view, click a checkmark in the left column to select it and the corresponding product.
Tip about selecting all displayed products: To send all the displayed products for translation, view them in the List view and then select the check box in the column header. For example, to send all products in a catalog for translation, click the catalog in the Filter Tree in the left pane, and then select the check box in the column header.
- In the toolbar, click the Translate action button
 .
.
The Job Type page of the Send to translation wizard opens.
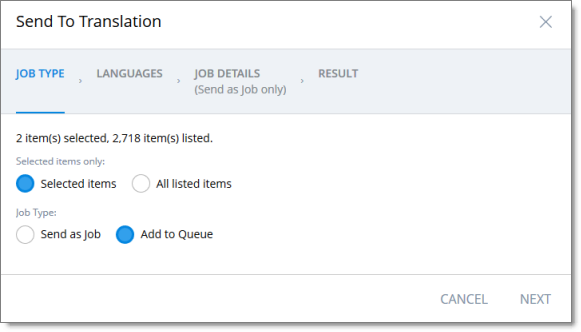
This page displays the number of items selected and the number of items available for selection.
- In the Job Type page, you specify the following settings:
- which items the Connector will send for translation. Select one of the following radio buttons:
- Selected items: These are the items you selected in step 6, above.
- All listed items: All the items that were availabe for selection, after the filtering in step 4, above.
- how the Connector will process the items to send for translation. Select one of the following radio buttons:
- Send as Job: The Connector will send out the items for translation as a single job. The Connector will send the job to the Lionbridge Content API Platform, which will send it to the translation provider that you will specify later in this wizard.
- Add to Queue (the default selection): The Connector will send the items to the Translation Queue, where a user must send them out for translation.
When you are done, click Next.
The Languages page of the wizard opens.
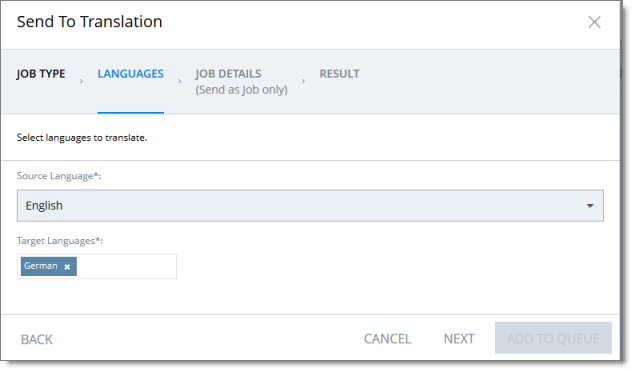
- In the Languages page, you specify the following settings:
- Source Language: Select the source language of the items from the dropdown list. The Connector will send items in this source language for translation.
Note: All selected items must have the same source language.
- Target Languages: Select one or more target languages, into which to translate the items. The list displays all the languages that are set up for the Connector.
When you are done, do one of the following:
- If you selected Add to Queue in the Job Type page of the wizard, click Add to Queue.
Note: The Add to Queue button is available only if you selected Add to Queue in the Job Type page of the wizard.
The Result page of the wizard opens, displaying the number of items that the Connector sent to the Translation Queue.
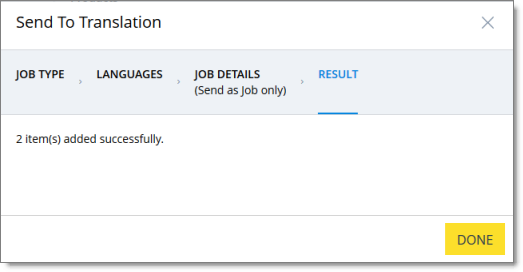
Click Done to close the wizard.
Important: You must open the Translation Queue to send out these items for translation. For detailed instructions, see Sending Items for Translation from the Translation Queue.
- If you selected Send as job in the Job Type page of the wizard, click Next.
Note: The Next button is displayed only if you selected Send as job in the Job Type page of the wizard.
- If you clicked Next, the Job Details page of the wizard opens.
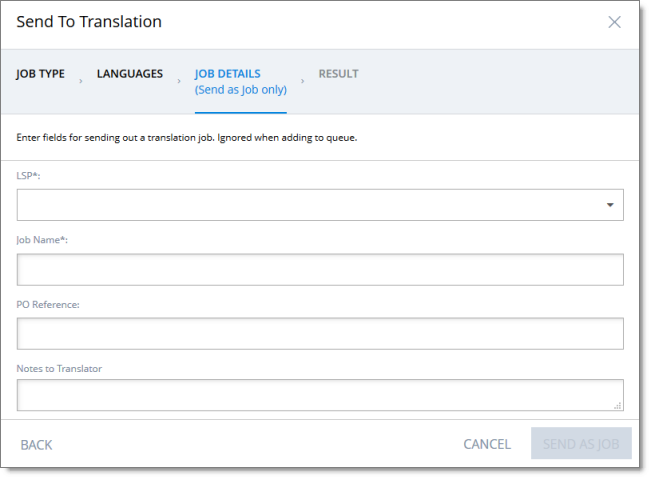
In the page you specify the following job settings:
Note: You specify job settings for the items you sent to the Translation Queue when you send them out for translation from the queue, as described in Sending Items for Translation from the Translation Queue.
| Field |
Description |
| LSP |
Select the translation provider for this translation job from the list. |
| Job Name |
Your name for this translation job. A translation job contains all the items that the Connector sends out together for translation. |
| PO Reference |
The purchase order reference number. |
| Notes to Translator |
Any special instructions or requests.
Note: Displayed only when any translation provider other than Lionbridge Freeway is selected in the LSP field, above. |
| Special Instructions |
Any special instructions or requests.
Note: Displayed only when the Lionbridge Freeway translation provider is selected in the LSP field, above. |
| Analysis Codes |
You can specify the configured Lionbridge Freeway analysis codes for the translation job.
Note: Displayed only when the Lionbridge Freeway translation provider is selected in the LSP field, above. |
When you are done, click Send as Job.
The Results page of the wizard opens, displaying the number of products the Connector sent for translation.
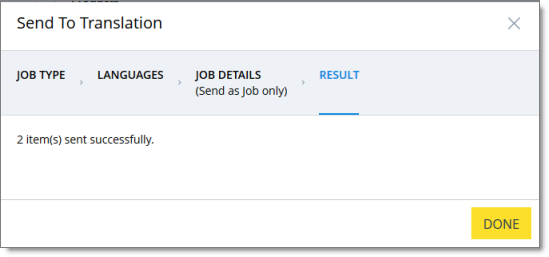
- Click Done to close the wizard.
Tip: You can monitor the progress of your job on the Translation Jobs page. For details, see Monitoring Translation Status.
2.3.2 - Sending Products for Translation from the Hybris Backoffice Product Cockpit (Hybris 6.4 and higher)
Note: This functionality is supported only for Hybris versions 6.4 and higher.
You use the Connector to send out configured localized attributes of products for translation from the Hybris Backoffice Product Cockpit.
Note: You configure which localized attributes of products you can send out for translation in the Content Mapping page. For detailed instructions, refer to the Lionbridge Connector for SAP Commerce Installation and Configuration Guide.
To send out the localized attributes of business objects that are products for translation from the Backoffice Product Cockpit:
- In your Web browser, navigate to /backoffice/ on your Hybris instance.
- Log in to the Hybris Backoffice.
- In the Administration menu, select Product Cockpit.
The Products page opens.
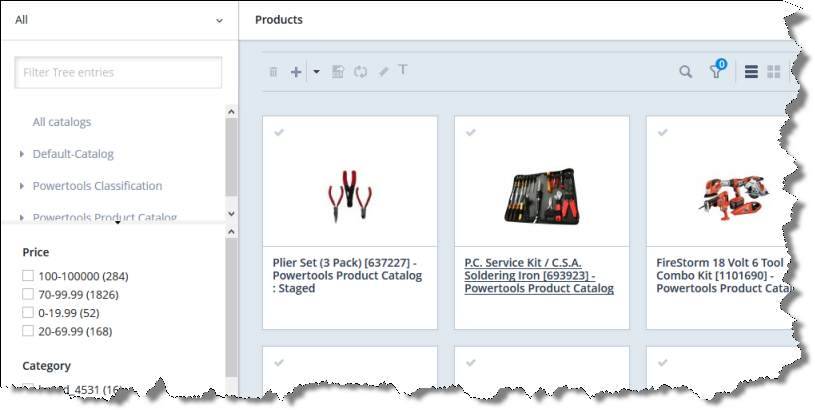
- Optional. In the Filter Tree in the left pane, you can select a specific catalog or classification, and price range and/or category to display only products that meet the filter criteria.
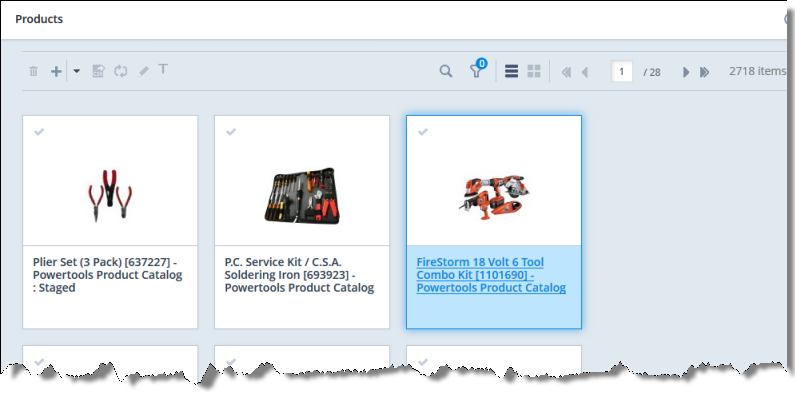
- Locate the products to send out for translation. You can view the items in either the Grid view or the List view .
Tip: You can use the search and filter functionality at the top of the page to display only the products to send out for translation.
- Select the products to translate.
Note: All selected items must have the same source language.
- In the Grid view, click a checkmark in the top-left corner to select it and the corresponding product.
- In the List view, click a checkmark in the left column to select it and the corresponding product.
Tip about selecting all displayed products: To send all the displayed products for translation, view them in the List view and then select the check box in the column header. For example, to send all products in a catalog for translation, click the catalog in the Filter Tree in the left pane, and then select the check box in the column header.
- In the toolbar, click the Translate action button .
The Job Type page of the Send to translation wizard opens.
This page displays the number of items selected and the number of items available for selection.
- In the Job Type page, you specify the following settings:
- which items the Connector will send for translation. Select one of the following radio buttons:
- Selected items: These are the items you selected in step 6, above.
- All listed items: All the items that were availabe for selection, after the filtering in step 4, above.
- how the Connector will process the items to send for translation. Select one of the following radio buttons:
- Send as Job: The Connector will send out the items for translation as a single job. The Connector will send the job to the Lionbridge Connector API Platform, which will send it to the translation provider that you will specify later in this wizard.
- Add to Queue (the default selection): The Connector will send the items to the Translation Queue, where a user must send them out for translation.
When you are done, click Next.
The Languages page of the wizard opens.
- In the Languages page, you specify the following settings:
- Source Language: Select the source language of the items from the dropdown list. The Connector will send items in this source language for translation.
Note: All selected items must have the same source language.
- Target Languages: Select one or more target languages, into which to translate the items. The list displays all the languages that are set up for the Connector.
When you are done, do one of the following:
- If you selected Add to Queue in the Job Type page of the wizard, click Add to Queue.
Note: The Add to Queue button is available only if you selected Add to Queue in the Job Type page of the wizard.
The Result page of the wizard opens, displaying the number of items that the Connector sent to the Translation Queue.
Click Done to close the wizard.
Important: You must open the Translation Queue to send out these items for translation. For detailed instructions, see Sending Items for Translation from the Translation Queue.
- If you selected Send as job in the Job Type page of the wizard, click Next.
Note: The Next button is displayed only if you selected Send as job in the Job Type page of the wizard.
- If you clicked Next, the Job Details page of the wizard opens.
In the page you specify the following job settings:
Note: You specify job settings for the items you sent to the Translation Queue when you send them out for translation from the queue, as described in Sending Items for Translation from the Translation Queue.
| Field |
Description |
| LSP |
Select the translation provider for this translation job from the list. |
| Job Name |
Your name for this translation job. A translation job contains all the items that the Connector sends out together for translation. |
| PO Reference |
The purchase order reference number. |
| Notes to Translator |
Any special instructions or requests.
Note: Displayed only when any translation provider other than Lionbridge Freeway is selected in the LSP field, above. |
| Special Instructions |
Any special instructions or requests.
Note: Displayed only when the Lionbridge Freeway translation provider is selected in the LSP field, above. |
| Analysis Codes |
You can specify the configured Lionbridge Freeway analysis codes for the translation job.
Note: Displayed only when the Lionbridge Freeway translation provider is selected in the LSP field, above. |
When you are done, click Send as Job.
The Results page of the wizard opens, displaying the number of products the Connector sent for translation.
- Click Done to close the wizard.
Tip: You can monitor the progress of your job on the Translation Jobs page. For details, see Monitoring Translation Status.
2.3.3 - Sending Products for Translation from the Hybris Backoffice Products Page
You use the Connector to send out configured localized attributes of products for translation from the Backoffice Products page.
Note: You configure which localized attributes of products you can send out for translation in the Content Mapping page. For detailed instructions, refer to the Lionbridge Connector for SAP Commerce Installation and Configuration Guide.
To send out the localized attributes of business objects for translation from the Backoffice Products page:
- In your Web browser, navigate to /backoffice/ on your Hybris instance.
- Log in to the Hybris Backoffice.
- Ensure that the Administration menu is selected.
- In the navigation tree on the left, navigate to Catalog > Products.
The Products page opens.
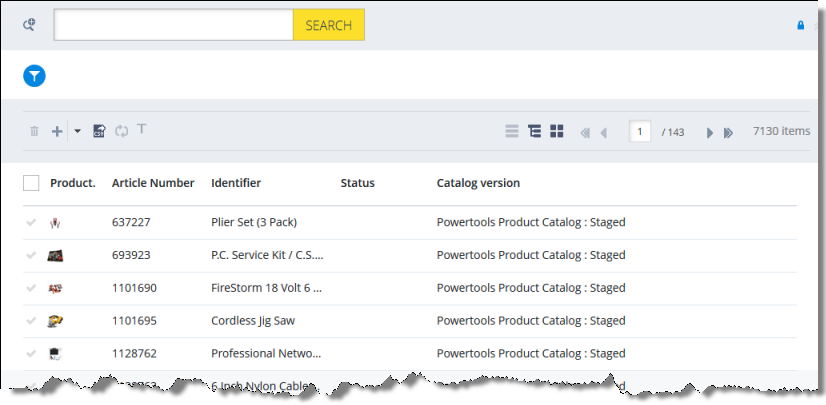
- Locate the products to send out for translation. You can view the products in the List View
 , Tree View
  , or the Grid View
  mode.
mode.
Tip: You can use the search and advanced search functionality to display only the products to send out for translation.
- Select the products to translate:
Tips: To select a range of adjacent products, press the Shift key. To select multiple non-adjacent products, press the Ctrl key. Before selecting products, ensure that the lock icon  is displayed in the top-right corner. If the unlock icon
  is displayed, click it to toggle it to the lock icon.
- In the toolbar, click the Send selection to translation button
 .
.
The Job Type page of the Send to translation wizard opens.
This page displays the number of items selected and the number of items available for selection.
- In the Job Type page, you specify the following settings:
- which items the Connector will send for translation. Select one of the following radio buttons:
- Selected items: These are the items you selected in step 6, above.
- All listed items: All the items that were availabe for selection, after the filtering in step 4, above.
- how the Connector will process the items to send for translation. Select one of the following radio buttons:
- Send as Job: The Connector will send out the items for translation as a single job. The Connector will send the job to the Lionbridge Connector API Platform, which will send it to the translation provider that you will specify later in this wizard.
- Add to Queue (the default selection): The Connector will send the items to the Translation Queue, where a user must send them out for translation.
When you are done, click Next.
The Languages page of the wizard opens.
- In the Languages page, you specify the following settings:
- Source Language: Select the source language of the items from the dropdown list. The Connector will send items in this source language for translation.
Note: All selected items must have the same source language.
- Target Languages: Select one or more target languages, into which to translate the items. The list displays all the languages that are set up for the Connector.
When you are done, do one of the following:
- If you selected Add to Queue in the Job Type page of the wizard, click Add to Queue.
Note: The Add to Queue button is available only if you selected Add to Queue in the Job Type page of the wizard.
The Result page of the wizard opens, displaying the number of items that the Connector sent to the Translation Queue.
Click Done to close the wizard.
Important: You must open the Translation Queue to send out these items for translation. For detailed instructions, see Sending Items for Translation from the Translation Queue.
- If you selected Send as job in the Job Type page of the wizard, click Next.
Note: The Next button is displayed only if you selected Send as job in the Job Type page of the wizard.
- If you clicked Next, the Job Details page of the wizard opens.
In the page you specify the following job settings:
Note: You specify job settings for the items you sent to the Translation Queue when you send them out for translation from the queue, as described in Sending Items for Translation from the Translation Queue.
| Field |
Description |
| LSP |
Select the translation provider for this translation job from the list. |
| Job Name |
Your name for this translation job. A translation job contains all the items that the Connector sends out together for translation. |
| PO Reference |
The purchase order reference number. |
| Notes to Translator |
Any special instructions or requests.
Note: Displayed only when any translation provider other than Lionbridge Freeway is selected in the LSP field, above. |
| Special Instructions |
Any special instructions or requests.
Note: Displayed only when the Lionbridge Freeway translation provider is selected in the LSP field, above. |
| Analysis Codes |
You can specify the configured Lionbridge Freeway analysis codes for the translation job.
Note: Displayed only when the Lionbridge Freeway translation provider is selected in the LSP field, above. |
When you are done, click Send as Job.
The Results page of the wizard opens, displaying the number of products the Connector sent for translation.
- Click Done to close the wizard.
Tip: You can monitor the progress of your job on the Translation Jobs page. For details, see Monitoring Translation Status.
2.3.4 - Sending Products for Translation from the Hybris Product Cockpit (Hybris 6.1 to 6.6)
Note: This functionality is supported only for Hybris versions 6.1 to 6.6.
Notes: In Hybris 6.4 or higher, you can also send products for translation from the Hybris Backoffice Product Cockpit. For detailed instructions, see Sending Products for Translation from the Hybris Backoffice Product Cockpit (Hybris 6.4 and higher). In all supported versions of Hybris, you can also send products for translation from the Hybris Backoffice Products page. For detailed instructions, see Sending Products for Translation from the Hybris Backoffice Products Page.
You use the Connector to send out configured localized attributes of products for translation from the Hybris Product Cockpit.
Note: You configure which localized attributes of products you can send out for translation in the Content Mapping page. For detailed instructions, refer to the Lionbridge Connector for SAP Commerce Installation and Configuration Guide.
To send out the localized attributes of business objects for translation from the Product Cockpit:
-
In your Web browser, navigate to /ctcockpit/ on your Hybris instance.
-
Log in to the Hybris Product Cockpit.
-
In the All Products tab, locate the products to send out for translation. You can view the items in either the Grid view or the List view.
Tip: You can use the search, advanced search, and saved search query functionality to display only the products to send out for translation.
- Select the products to translate.
Tips: To select a range of adjacent business objects, press the Shift key. To select multiple non-adjacent products, press the Ctrl key.
Tip about catalogs: To send all the products in a catalog for translation, click the catalog in the left pane and then select all the objects within it.
- In the toolbar, click the Send selection to translation button .
The first page of the Send selection to translation wizard opens.
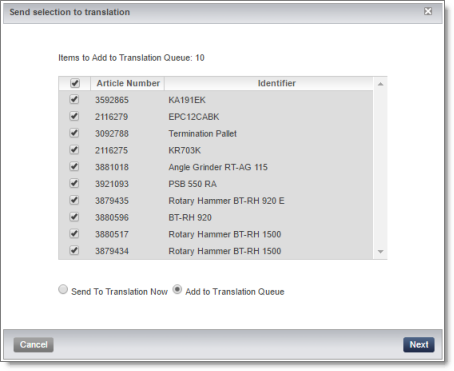
The following information is displayed about each product you selected previously:
- Article Number: The product code.
- Identifier: The product identifier.
These are both displayed in the List view in the Product Cockpit.
Tip: You can clear the check box for any product you do not want to send out for translation.
- Select one of the following radio buttons:
- Add to Translation Queue (the default selection): The Connector sends the content items to the Translation Queue, where a user must send them out for translation.
- Send to Translation Now: The Connector sends the content items to the Lionbridge Content API Platform, which sends them to the translation provider specified in the company’s routing rules. The Connector displays additional fields below, where you can specify additional information about this translation job.
Note: This setting determines which fields are displayed on the following page of the wizard.
-
Click Next.
-
One of the following happens.
- If you previously selected the Add to Translation Queue radio button, the second page of the wizard is displayed as follows:

- If you previously selected the Send to Translation Now radio button, the second page of the wizard is displayed as follows:
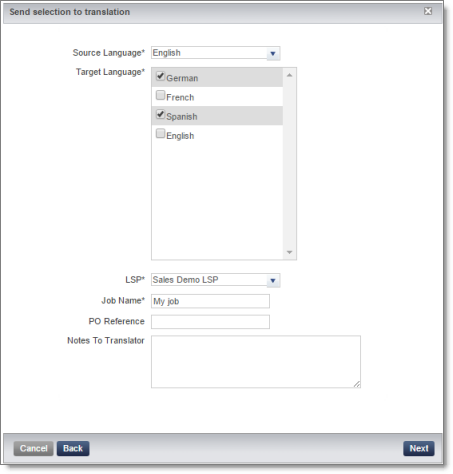
- Enter the following information about the content items to translate:
| Field |
Description |
| Source Language |
Required. Select the source language of the selected items to send for translation.
Note: All selected items must have the same source language. |
| Target Language |
Required. Select the check boxes of one or more target languages into which to translate the content. |
| LSP |
Select the translation provider for this translation job from the list. Required and displayed only if you selected the Send to Translation Now radio button in the previous page of the wizard. |
| Job Name |
Your name for this translation job. A translation job contains all the content items that the Connector sends out together for translation. Required and displayed only if you selected the Send to Translation Now radio button in the previous page of the wizard. |
| PO Reference |
The purchase order reference number. Displayed only if you selected the Send to Translation Now radio button in the previous page of the wizard. |
| Notes to Translator |
Any special instructions or requests. Displayed only if you selected the Send to Translation Now radio button in the previous page of the wizard and when any translation provider other than Lionbridge Freeway is selected in the LSP field, above. |
| Special Instructions |
Any special instructions or requests. Displayed only when both:
* Send to Translation is selected in the previous page of the wizard.
* The Lionbridge Freeway translation provider is selected in **Choose LSP**, above. |
| Analysis Codes |
You can specify the configured Lionbridge Freeway analysis codes for the translation job.
Displayed only when both:
* Send to Translation is selected in the previous page of the wizard.
* The Lionbridge Freeway translation provider is selected in **Choose LSP**, above. |
- Click Next.
Note: The Next button is displayed only after at least one target language is selected.
-
If you selected the Send to Translation Now radio button in the previous page of the wizard, then the final page of the wizard states the number of items that were sent out to translation. Click Done to close the wizard.
-
If you selected the Add to Translation Queue radio button in the previous page of the wizard, then the final page of the wizard states the number of items that were sent to the queue. Click Done to close the wizard.
Important: You must open the Translation Queue to send out these items for translation. For detailed instructions, see Sending Items for Translation from the Translation Queue.
2.3.5 - Sending Website Pages for Translation from SAP Commerce or SAP Commerce Cloud
You use the Connector to send out website pages (“pages”) for translation from the Hybris Backoffice.
When the Connector sends out pages for translation, it actually sends out the configured localized attributes of the content in that page for translation.
Each localized attribute of a business object that is sent out for translation is a content item.
Note: Although you can view non-localized attributes and select them to send them out for translation, the Connector does not actually send out non-localized attributes for translation.
Note: You configure which pages (Content Page objects) and corresponding localized attributes you can send out for translation in the Content Mapping page. For detailed instructions, refer to the Lionbridge Connector for SAP Commerce Installation and Configuration Guide.
To send out website pages for translation from WCMS:
- In your Web browser, navigate to /backoffice/ on your SAP Commerce instance or on SAP Commerce Cloud.
- Log in to SAP Commerce or SAP Commerce Cloud.
- Ensure that the Administration Cockpit menu is selected. This is the default menu selection.
- In the navigation tree on the left, navigate to WCMS > Page.
The page that opens displays a list of website pages.
- Locate the website pages to send out for translation. You can view the pages in the List View , Tree View , or the Grid View mode.
Tip: You can use the search and advanced search functionality to display only the website pages to send out for translation.
- Select the website pages to translate:
Tips: To select a range of adjacent pages, press the Shift key. To select multiple non-adjacent pages, press the Ctrl key. Before selecting pages, ensure that the lock icon is displayed in the top-right corner. If the unlock icon is displayed, click it to toggle it to the lock icon.
- In the toolbar, click the Send selection to translation button .
The Job Type page of the Send to translation wizard opens.
This page displays the number of items selected and the number of items available for selection.
- In the Job Type page, you specify the following settings:
- which items the Connector will send for translation. Select one of the following radio buttons:
- Selected items: These are the items you selected in step 6, above.
- All listed items: All the items that were availabe for selection, after the filtering in step 4, above.
- how the Connector will process the items to send for translation. Select one of the following radio buttons:
- Send as Job: The Connector will send out the items for translation as a single job. The Connector will send the job to the Lionbridge Connector API Platform, which will send it to the translation provider that you will specify later in this wizard.
- Add to Queue (the default selection): The Connector will send the items to the Translation Queue, where a user must send them out for translation.
When you are done, click Next.
The Languages page of the wizard opens.
- In the Languages page, you specify the following settings:
- Source Language: Select the source language of the items from the dropdown list. The Connector will send items in this source language for translation.
Note: All selected items must have the same source language.
- Target Languages: Select one or more target languages, into which to translate the items. The list displays all the languages that are set up for the Connector.
When you are done, do one of the following:
- If you selected Add to Queue in the Job Type page of the wizard, click Add to Queue.
Note: The Add to Queue button is available only if you selected Add to Queue in the Job Type page of the wizard.
The Result page of the wizard opens, displaying the number of items that the Connector sent to the Translation Queue.
Click Done to close the wizard.
Important: You must open the Translation Queue to send out these items for translation. For detailed instructions, see Sending Items for Translation from the Translation Queue.
- If you selected Send as job in the Job Type page of the wizard, click Next.
Note: The Next button is displayed only if you selected Send as job in the Job Type page of the wizard.
- If you clicked Next, the Job Details page of the wizard opens.
In the page you specify the following job settings:
Note: You specify job settings for the items you sent to the Translation Queue when you send them out for translation from the queue, as described in Sending Items for Translation from the Translation Queue.
| Field |
Description |
| LSP |
Select the translation provider for this translation job from the list. |
| Job Name |
Your name for this translation job. A translation job contains all the items that the Connector sends out together for translation. |
| PO Reference |
The purchase order reference number. |
| Notes to Translator |
Any special instructions or requests.
Note: Displayed only when any translation provider other than Lionbridge Freeway is selected in the LSP field, above. |
| Special Instructions |
Any special instructions or requests.
Note: Displayed only when the Lionbridge Freeway translation provider is selected in the LSP field, above. |
| Analysis Codes |
You can specify the configured Lionbridge Freeway analysis codes for the translation job.
Note: Displayed only when the Lionbridge Freeway translation provider is selected in the LSP field, above. |
When you are done, click Send as Job.
The Results page of the wizard opens, displaying the number of products the Connector sent for translation.
- Click Done to close the wizard.
Tip: You can monitor the progress of your job on the Translation Jobs page. For details, see Monitoring Translation Status.
2.3.6 - Sending Website Pages for Translation from the Hybris Backoffice
You use the Connector to send out website pages (“pages”) for translation from the Hybris Backoffice.
When the Connector sends out pages for translation, it actually sends out the configured localized attributes of the content in that page for translation.
Each localized attribute of a business object that is sent out for translation is a content item.
Note: Although you can view non-localized attributes and select them to send them out for translation, the Connector does not actually send out non-localized attributes for translation.
Note: You configure which pages (Content Page objects) and corresponding localized attributes you can send out for translation in the Content Mapping page. For detailed instructions, refer to the Lionbridge Connector for SAP Commerce Installation and Configuration Guide.
To send out website pages for translation from WCMS:
- In your Web browser, navigate to /backoffice/ on your Hybris instance.
- Log in to the Hybris Backoffice.
- Ensure that the Administration menu is selected.
- In the navigation tree on the left, navigate to WCMS > Page.
The page that opens displays a list of website pages.
- Locate the website pages to send out for translation. You can view the pages in the List View , Tree View , or the Grid View mode.
Tip: You can use the search and advanced search functionality to display only the website pages to send out for translation.
- Select the website pages to translate:
Tips: To select a range of adjacent pages, press the Shift key. To select multiple non-adjacent pages, press the Ctrl key. Before selecting pages, ensure that the lock icon is displayed in the top-right corner. If the unlock icon is displayed, click it to toggle it to the lock icon.
- In the toolbar, click the Send selection to translation button .
The Job Type page of the Send to translation wizard opens.
This page displays the number of items selected and the number of items available for selection.
- In the Job Type page, you specify the following settings:
- which items the Connector will send for translation. Select one of the following radio buttons:
- Selected items: These are the items you selected in step 6, above.
- All listed items: All the items that were availabe for selection, after the filtering in step 4, above.
- how the Connector will process the items to send for translation. Select one of the following radio buttons:
- Send as Job: The Connector will send out the items for translation as a single job. The Connector will send the job to the Lionbridge Connector API Platform, which will send it to the translation provider that you will specify later in this wizard.
- Add to Queue (the default selection): The Connector will send the items to the Translation Queue, where a user must send them out for translation.
When you are done, click Next.
The Languages page of the wizard opens.
- In the Languages page, you specify the following settings:
- Source Language: Select the source language of the items from the dropdown list. The Connector will send items in this source language for translation.
Note: All selected items must have the same source language.
- Target Languages: Select one or more target languages, into which to translate the items. The list displays all the languages that are set up for the Connector.
When you are done, do one of the following:
- If you selected Add to Queue in the Job Type page of the wizard, click Add to Queue.
Note: The Add to Queue button is available only if you selected Add to Queue in the Job Type page of the wizard.
The Result page of the wizard opens, displaying the number of items that the Connector sent to the Translation Queue.
Click Done to close the wizard.
Important: You must open the Translation Queue to send out these items for translation. For detailed instructions, see Sending Items for Translation from the Translation Queue.
- If you selected Send as job in the Job Type page of the wizard, click Next.
Note: The Next button is displayed only if you selected Send as job in the Job Type page of the wizard.
- If you clicked Next, the Job Details page of the wizard opens.
In the page you specify the following job settings:
Note: You specify job settings for the items you sent to the Translation Queue when you send them out for translation from the queue, as described in Sending Items for Translation from the Translation Queue.
| Field |
Description |
| LSP |
Select the translation provider for this translation job from the list. |
| Job Name |
Your name for this translation job. A translation job contains all the items that the Connector sends out together for translation. |
| PO Reference |
The purchase order reference number. |
| Notes to Translator |
Any special instructions or requests.
Note: Displayed only when any translation provider other than Lionbridge Freeway is selected in the LSP field, above. |
| Special Instructions |
Any special instructions or requests.
Note: Displayed only when the Lionbridge Freeway translation provider is selected in the LSP field, above. |
| Analysis Codes |
You can specify the configured Lionbridge Freeway analysis codes for the translation job.
Note: Displayed only when the Lionbridge Freeway translation provider is selected in the LSP field, above. |
When you are done, click Send as Job.
The Results page of the wizard opens, displaying the number of products the Connector sent for translation.
- Click Done to close the wizard.
Tip: You can monitor the progress of your job on the Translation Jobs page. For details, see Monitoring Translation Status.
2.3.7 - Sending Website Pages for Translation from the Hybris WCMS Cockpit (Hybris 6.1 to 6.6)
Note: This functionality is supported only for Hybris versions 6.1 to 6.6.
Note: In all supported versions of Hybris, you can also send website pages for translation from the Hybris Backoffice. For detailed instructions, see Sending Website Pages for Translation from the Hybris Backoffice.
You use the Connector to send out website pages (“pages”) for translation from the Hybris WCMS Cockpit.
When the Connector sends out pages for translation, it actually sends out the configured localized attributes of the content in that page for translation.
Each localized attribute of a business object that is sent out for translation is a content item.
Note: Although you can view non-localized attributes and select them to send them out for translation, the Connector does not actually send out non-localized attributes for translation.
Note: You configure which business objects and corresponding localized attributes you can send out for translation in the Content Mapping page. For detailed instructions, refer to the Lionbridge Connector for SAP Commerce Installation and Configuration Guide.
To send out website pages for translation from WCMS:
- In your Web browser, navigate to /ctwcms/ on your Hybris instance.
- Log in to the Hybris WCMS Cockpit.
- In the navigation area, in the Websites box, click the catalog version of the website whose pages you want to translate. You can view website pages in either the Grid View mode or the List View mode.
- In the Filter tab, select the website pages to translate.
Tip: You can use the search and advanced search functionality to display only the website pages to send out for translation.
- Click to select the website pages to translate.
Tips: To select a range of adjacent pages, press the Shift key. To select multiple non-adjacent pages, press the Ctrl key.
- In the toolbar, click the Send selection to translation button .
The first page of the Send selection to translation wizard opens.
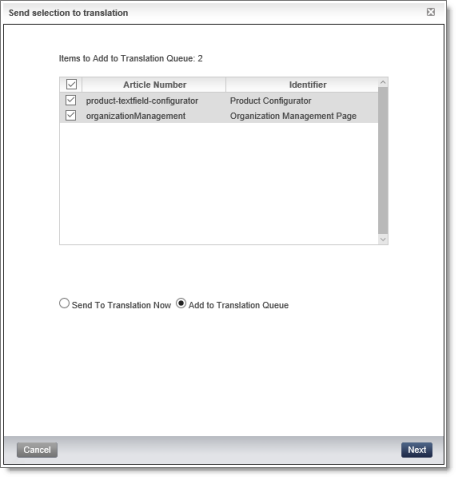
The following information is displayed about each page you selected previously:
- Name: The name of the page. This is displayed in the List view of the WCMS Cockpit.
- Identifier: The label of the page in the WCMS Cockpit. This is the same as the Label field displayed in a page’s editing view in the WCMS Cockpit.
Tip: You can clear the check box for any page you do not want to send out for translation.
- Select one of the following radio buttons:
- Add to Translation Queue (the default selection): The Connector sends the pagesto the Translation Queue, where a user must send them out for translation.
- Send to Translation Now: The Connector sends the pages to the Lionbridge Content API Platform, which sends them to the translation provider specified in the company’s routing rules. The Connector displays additional fields below, where you can specify additional information about this translation job.
Note: This setting determines which fields are displayed on the following page of the wizard.
- Click Next.
- One of the following happens.
- If you previously selected the Add to Translation Queue radio button, the second page of the wizard is displayed as follows:
- If you previously selected the Send to Translation Now radio button, the second page of the wizard is displayed as follows:
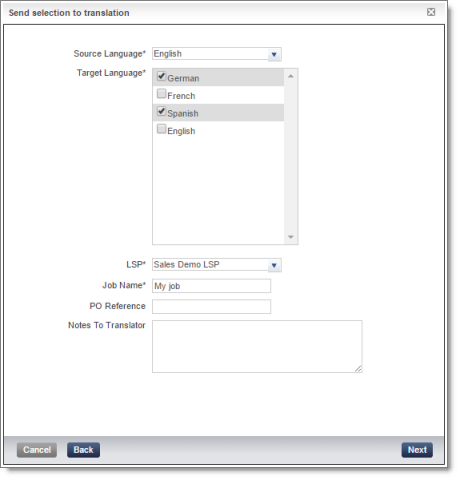
- Enter the following information about the content items to translate:
| Field |
Description |
| Source Language |
Required. Select the source language of the selected items to send for translation.
Note: All selected items must have the same source language. |
| Target Language |
Required. Select the check boxes of one or more target languages into which to translate the content. |
| LSP |
Select the translation provider for this translation job from the list. Required and displayed only if you selected the Send to Translation Now radio button in the previous page of the wizard. |
| Job Name |
Your name for this translation job. A translation job contains all the content items that the Connector sends out together for translation. Required and displayed only if you selected the Send to Translation Now radio button in the previous page of the wizard. |
| PO Reference |
The purchase order reference number. Displayed only if you selected the Send to Translation Now radio button in the previous page of the wizard. |
| Notes to Translator |
Any special instructions or requests. Displayed only if you selected the Send to Translation Now radio button in the previous page of the wizard and when any translation provider other than Lionbridge Freeway is selected in the LSP field, above. |
| Special Instructions |
Any special instructions or requests. Displayed only when both:
* Send to Translation is selected in the previous page of the wizard.
* The Lionbridge Freeway translation provider is selected in **Choose LSP**, above. |
| Analysis Codes |
You can specify the configured Lionbridge Freeway analysis codes for the translation job.
Displayed only when both:
* Send to Translation is selected in the previous page of the wizard.
* The Lionbridge Freeway translation provider is selected in **Choose LSP**, above. |
- Click Next.
Note: The Next button is displayed only after you populate all required fields, which are marked with an asterisk (*).
Tip: If the last required field you populate is Job Name, click anywhere in the user interface to display the Next button.
-
If you selected the Send to Translation Now radio button in the previous page of the wizard, then the final page of the wizard states the number of items that were sent out to translation. Click Done to close the wizard.
-
If you selected the Add to Translation Queue radio button in the previous page of the wizard, then the final page of the wizard states the number of items that were sent to the queue. Click Done to close the wizard.
Important: You must open the Translation Queue to send out these items for translation. For detailed instructions, see Sending Items for Translation from the Translation Queue.
2.3.8 - Sending Items for Translation from the Translation Queue
The goal of the Translation Queue is to control translation costs and the translation process. This design assumes that the person with the authority to send content for translation from the Translation Queue manages the translation budget of the organization.
You can send out one, multiple, or all items from the Translation Queue at one time.
You originally submitted items to the Translation Queue by doing one of the following:
- in the Job Type page of the Send to translation wizard in the SAP Commerce Backoffice Product Cockpit, clicking the Add to Queue radio button. For details, see: Sending Products for Translation from SAP Commerce or SAP Commerce Cloud.
- in the Job Type page of the Send to translation wizard in the Hybris Backoffice Product Cockpit, clicking the Add to Queue radio button. For details, see: Sending Products for Translation from the Hybris Backoffice Product Cockpit (Hybris 6.4 and higher).
- in the Job Type page of the Send to translation wizard opened from the Hybris Backoffice Products Page, clicking the Add to Queue radio button. For details, see: Sending Products for Translation from the Hybris Backoffice Products Page.
- in the first page of the Send selection to translation wizard in the Hybris Product Cockpit, clicking the Add to Translation Queue radio button. For details, see: Sending Products for Translation from the Hybris Product Cockpit (Hybris 6.1 to 6.6).
- in the Job Type page of the Send to translation wizard opened from the Page page in SAP Commerce or SAP Commerce Cloud. clicking the Add to Queue radio button. For details, see: Sending Website Pages for Translation from SAP Commerce or SAP Commerce Cloud.
- in the Job Type page of the Send to translation wizard opened from the Page page in the Hybris Backoffice. clicking the Add to Queue radio button. For details, see: Sending Website Pages for Translation from the Hybris Backoffice.
- in the first page of the Send selection to translation wizard in the Hybris WCMS Cockpit, clicking the Add to Translation Queue radio button. For details, see: Sending Website Pages for Translation from the Hybris WCMS Cockpit (Hybris 6.1 to 6.6).
Submitting content to the Translation Queue before sending it out for translation has the following advantages:
- You may not want to send out the localized attributes in each business object individually as soon as you finish reviewing it. The Translation Queue facilitates your management of reviewed items, so that you do not forget about sending individual reviewed items for translation.
- Your translation provider may prefer receiving fewer but larger batches of items to translate, rather than items from individual business objects, as it facilitates project preparation, resource assignment, and content analysis.
- If you want to translate many items into multiple languages, but you want to translate into only one target language at a time, this is a good way to manage that process.
- The Translation Queue manager may want to route jobs to certain translation providers.
- The Translation Queue manager may want to add job-specific metadata, such as a purchase order number.
If you or your colleagues have sent items to the Translation Queue, you must access the Translation Queue to send out the items from there.
Note: If you do not send out items from the Translation Queue, the items remain in the queue, and the Connector does not send them out for translation.
To submit one or more items from the Translation Queue for translation:
- Do one of the following:
- In your Web browser, navigate to /backoffice/ on your Hybris instance.
- Log in to the Hybris Backoffice.
- In the Administration menu, select Translation Queue.
- In SAP Commerce or SAP Commerce Cloud:
- In your Web browser, navigate to /backoffice/ on your SAP Commerce instance or on SAP Commerce Cloud.
- Log in to SAP Commerce or SAP Commerce Cloud.
- In the Administration Cockpit menu, select Translation Queue.
The Translation Queue opens.
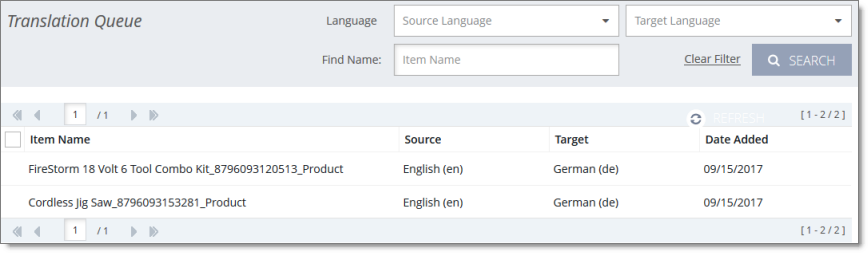
The following information is displayed about each item in the queue:
- Item Name: The name of the business object to send for translation. If the name is long, this wraps to the next row.
- Source Language: The name and language code of the source language of the business object to send for translation. This was specified when the business object was added to the queue.
- Target Language: The name and language code of the target language into which to translate the business object.
Note: If you specified translating a business object into multiple target languages, then each instance of a source language-target language pair is displayed in a separate row in the list, as a separate item. For example, if you want to translate a business object into five languages, then there are five rows in the list, one for each target language.
- Date Added: The date the business object was added to the queue, in the following format: MM/DD/YYYY.
The header and footer display information about how many items are in the queue, and how they are displayed. If there are more than 25 items in the queue, they are displayed in multiple sub-pages.
- The left sides of the header and footer display the total number of sub-pages in the queue. To navigate to a different sub-page, enter the sub-page number or click an arrow.
- The right sides of the header and footer display the total number of items displayed on the current sub-page of the queue and the total number of items in the queue.
-
Optional. Click a column heading to sort by a column or to reverse the sort order of a sorted column.
-
Optional. In the top of the queue, you can filter the displayed items in the queue. You can search by the following criteria:
- item name
- source language
- target language
Click Search.
Tip: To clear your search filters, click Clear Filter.
-
Optional. Click Refresh in the top-right corner of the list to update the items in the queue.
-
In the list, select the check boxes of the items that you want to send out for translation.
Tips: To select the check boxes of all items in the sub-page, select the check box in the column header. If all check boxes in the sub-page are selected, clear the check box in the column header.
Note: To remove items from the queue, select the corresponding check boxes and click Remove Select Item.
- Click Send to Translation.
The Send Items to Translation dialog box opens.
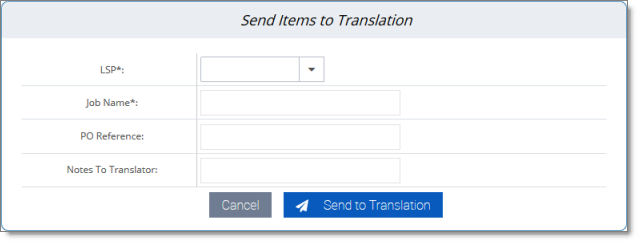
- Enter the following information about the items to translate:
| Field |
Description |
| LSP |
Select the translation provider for this translation job from the list. |
| Job Name |
Your name for this translation job. |
| PO Reference |
Optional. The purchase order reference number for this translation job. |
| Notes to Translator |
Any special instructions or requests. Displayed only when any translation provider other than Lionbridge Freeway is selected in the LSP field, above. |
| Special Instructions |
Any special instructions or requests. Displayed only when the Lionbridge Freeway translation provider is selected in the LSP field, above. |
| Analysis Codes |
You can specify the configured Lionbridge Freeway analysis codes for the translation job.
Displayed only when the Lionbridge Freeway translation provider is selected in Choose LSP, above. |
- Click Send to Translation.
A message box confirms that the Connector started processing the translation job with the selected items. Click OK to close the message box.
2.4 - Monitoring Translation Status
After you send out a job for translation, you can monitor its progress in the Translation Jobs page.
To monitor translation status:
- Do one of the following:
- In your Web browser, navigate to /backoffice/ on your Hybris instance.
- Log in to the Hybris Backoffice.
- In the Administration menu, select Translation Jobs.
- In SAP Commerce or SAP Commerce Cloud:
- In your Web browser, navigate to /backoffice/ on your SAP Commerce instance or on SAP Commerce Cloud.
- Log in to SAP Commerce or SAP Commerce Cloud.
- In the Administration Cockpit menu, select Translation Jobs.
The Translation Jobs page opens.
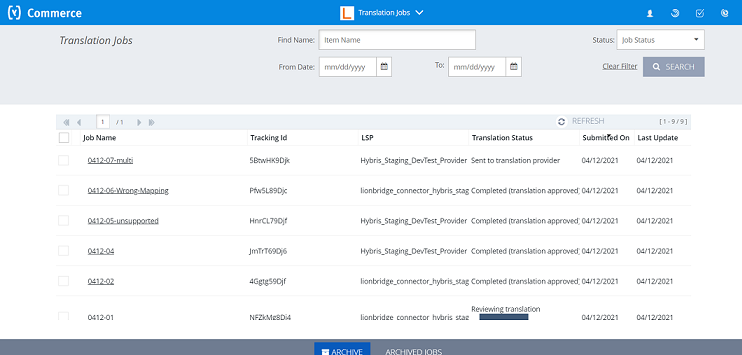
This page displays the following information about each translation job:
| Column |
Description |
| Job Name |
The name of this translation job. To view detailed information about the items in the job, click the link. If an error has occurred affecting the entire job, a red error icon is displayed in front of the job name. You can see the detailed error message by clicking on the icon. |
| Tracking ID |
Tracking Id for the job, when you need to contact Lionbridge for support wrt to certain job, this tracking id will help Lionbridge quickly and accurately identify the job in question. |
| LSP |
The translation provider to whom the Lionbridge Content API Platform sends the translation job. |
| Translation Status |
The translation status of the job. For a list and description of translation statuses, see Translation Statuses.
Note: If the Enable multiple deliveries setting is configured, then the Reviewing Translation status is displayed after translated content is received. If the translated content is not satisfactory, it can be re-delivered and re-imported into Hybris or SAP Commerce. You can click Approve to accept the translated content, which changes the job’s status to Completed and prevents any future re-deliveries. For more information about the Enable multiple deliveries setting, refer to the Lionbridge Connector for SAP Commerce Installation and Configuration Guide.
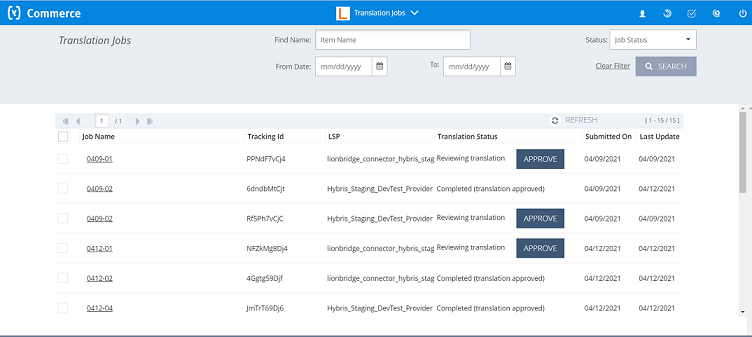 |
| Submitted On |
The job submission date, in the following format: MM/DD/YYYY. |
| Last Update |
The date the job was last updated, in the following format: MM/DD/YYYY. |
- Optional. Click a column heading to sort by a column or to reverse the sort order of a sorted column.
Tip: If you click the Translation Status column header to sort by this column, the jobs are sorted by percentage completed.
The list header and footer display the total number of items, and the total number of items displayed on this sub-page. If there are more than 25 items, they are displayed in multiple sub-pages.
- The left sides of the header and footer display the total number of sub-pages in the list. To navigate to a different sub-page, enter the sub-page number or click an arrow.
- The right sides of the header and footer display the total number of items displayed on the current sub-page of the list and the total number of items in the list.
-
Optional. Click Refresh in the top-right corner of the list to update the items in the list.
-
Optional. In the top-right corner of the page, search for the jobs whose translation status you want to view. You can search by any of the following criteria:
- Find Name: Enter the job name.
- Status: Select the translation status. For a list and description of translation statuses, see Translation Statuses.
- From Date and To: Specify the range of job-creation dates in the following format: MM/DD/YYYY, or click the calendar icon
 to select the dates.
Click Search.
Tip: To clear your search filters, click **Clear Filteviewing_archived_jobsviewing_archived_jobs
- Optional. To view detailed information about the items in the job, click the link in the Job Name column.
For details, see Viewing Job Details.
Note: This action highlights this job and selects the corresponding check box.
- Optional. If this job has Reviewing translation status, you can click Approve to accept the translated content, which changes the job’s status to Completed and prevents any future re-deliveries.
- Optional. If this job has either Reviewing translation or Completed (nothing to translate) status, you can archive it by clicking the Archive this job link. You can view an archived job in the Archived Jobs page. For details, see Viewing Archived Jobs.
Warning: Archiving active jobs is not recommended. If you archive an active job, it will no longer be displayed on the Translation Jobs page. Archiving a job also archives the assets in that job: If you archive content while it is being translated, then the Connector will not return the completed translation to you.
- Optional. To view all archived jobs, click the Archived Jobs link at the bottom of the page. For details, see Viewing Archived Jobs.
2.4.1 - Translation Statuses
After you send out localized attributes of business objects for translation, they are referred to as content items. The Connector sends out one or more content items for translation as a single translation job. Both content items and translation jobs can have the following translation statuses:
| Translation Status |
Description |
| Created |
The Connector created the job for sending out the item to the translation provider. |
| Pending |
The Connector is preparing to send out the item to the translation provider. |
| Sending |
The Connector is sending out the item to the translation provider. |
| In translation |
The translation provider has received the item for translation and has not yet returned the translated item. |
| Reviewing Translation |
The Connector has received the translated item back from the translation provider and imported it into Hybris.
Note: This is an intermediate state. If a job is stuck in this state, then an error may have occurred when the Connector imported the translation. |
| Completed |
The Connector has returned the translated item to Hybris or Commerce Cloud. You view translated content items in the interfaces where those content items are displayed. For detailed instructions, see Viewing Translated Content. |
2.4.2 - Viewing Job Details
You view job details in the Job Details page. To open this page, in the Translation Jobs page, click the link in the Job Name column. For details, see Monitoring Translation Status
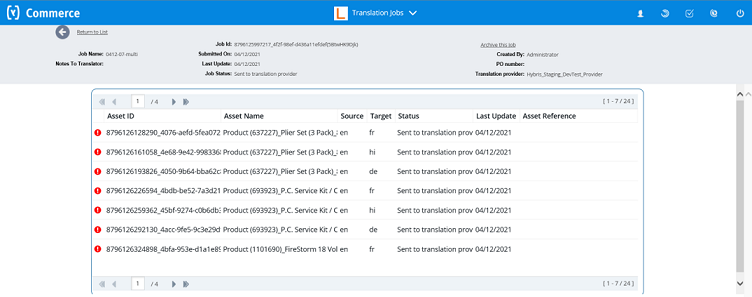
Note: You can also view the details of an archived job by clicking the link in the Job Name column in the Archived Jobs page. For details, see Viewing Archived Jobs.
The area at the top of the page displays the following read-only information about the job:
| Field |
Description |
| Job ID |
The Connector’s unique identifier for the job and tracking id of the job in bracket. |
| Job Name |
Your name for this translation job. |
| Submitted On |
The date, in MM/DD/YYYY format, when the job was submitted for translation. |
| Created By |
The name of the user who submitted this job for translation. |
| Notes to Translator |
Any special instructions or requests for the translation provider. |
| Special Instructions |
Any special instructions or requests.
Note: Displayed only when the Lionbridge Freeway translation provider is selected in the Translation provider field, below. |
| Last Update |
The date, in MM/DD/YYYY format, when the job was last updated. |
| PO Number |
The purchase order reference number for this translation job. |
| Job Status |
The translation status. For a list and description of translation statuses, see Translation Statuses. |
| Translation provider |
The translation provider for this job. |
The list header and footer display the total number of assets in the job, and the total number of assets displayed on this sub-page. If there are more than 8 assets, they are displayed in multiple sub-pages.
- The left sides of the header and footer display the total number of sub-pages in the list. To navigate to a different sub-page, enter the sub-page number or click an arrow.
- The right sides of the header and footer display the total number of assets displayed on the current sub-page of the list and the total number of items in the list.
This page displays the following information about each asset in the job:
| Column |
Description |
| Asset ID |
The Connector’s unique identifier for the item sent for translation, which includes information about the item, the target language, and the source language. If an error has occurred affecting the asset, a red error icon is displayed in front of the asset id. You can see the detailed error message by clicking on the icon. |
| Asset Name |
* For a Product or a Product descendant type, this is: Product (article code)_name_PK #.
* For a Category, this is: Category (article code) .
* For a website page, this is the page name. |
| Source |
The source language of the item. |
| Target |
The target language of the item. |
| Status |
The translation status. For a list and description of translation statuses, see Translation Statuses. |
| Last Update |
The time and date when the status was last updated, in the following format: MM/DD/YYYY. |
| Asset Reference |
The translation provider’s reference for the asset. |
- To return to the previous page, click the Return to list link or arrow at the top-left corner of the page.
- To archive this job, click the Archive this job link in the top-right corner of the page.
2.4.3 - Viewing Archived Jobs
You can view archived jobs in the Archived Jobs page.
To view archived jobs:
-
In the Translation Jobs page, click the Archived Jobs link at the bottom of the page. For instructions on opening that page, see Monitoring Translation Status.
-
The Archived Jobs page opens.
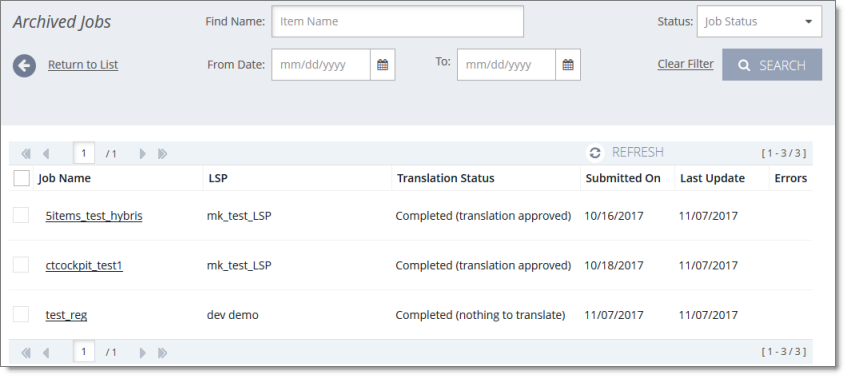
This page displays the following information about each archived translation job:
| Column |
Description |
| Job Name |
The name of this translation job. To view detailed information about the items in the job, click the link. |
| LSP |
The translation provider to whom the Lionbridge Content API Platform sends the translation job. |
| Translation Status |
The translation status of the job. For a list and description of translation statuses, see Translation Statuses. |
| Submitted On |
The job submission date, in the following format: MM/DD/YYYY. |
| Last Update |
The date the job was last updated, in the following format: MM/DD/YYYY. |
| Errors |
If an error has occurred, it is displayed here. |
By default, the items are sorted chronologically by submission date.
The list header and footer display the total number of items, and the total number of items displayed on this sub-page. If there are more than 25 items, they are displayed in multiple sub-pages.
- The left sides of the header and footer display the total number of sub-pages in the list. To navigate to a different sub-page, enter the sub-page number or click an arrow.
- The right sides of the header and footer display the total number of items displayed on the current sub-page of the list and the total number of items in the list.
- Optional. In the top-right corner of the page, search for the jobs whose translation status you want to view. You can search by any of the following criteria:
- Find Name: Enter the job name.
- Status: Select the translation status. For a list and description of translation statuses, see Translation Statuses.
- From Date and To: Specify the range of job-creation dates in the following format: MM-DD-YYYY
Click Search.
Tip: To clear your search filters, click Clear Filter.
-
Optional. To view detailed information about the items in the job, click the link in the Job Name column. For details, see Viewing Job Details.
-
To return to the Translation Jobs page, click the Return to list link or arrow at the top-left corner of the page.
2.5 - Viewing Translated Content
When a job has Completed status, the items in that job have been translated and returned to Hybris. For a description of translation statuses, see Translation Statuses. You view translated content items in the interfaces where those content items are displayed:
2.5.1 - Viewing Translated Products in SAP Commerce or SAP Commerce Cloud
When a job has Completed status, the products in that job have been translated and returned to SAP Commerce or SAP Commerce Cloud, where you can view them.
To view translated products in SAP Commerce or SAP Commerce Cloud:
- In your Web browser, navigate to /backoffice/ on your SAP Commerce instance or on SAP Commerce Cloud.
- Log in to SAP Commerce or SAP Commerce Cloud.
- In the Administration Cockpit menu, select Product Cockpit.
- In the bottom-right corner, click the arrow to display the left menu .
- In the left menu, select Products.
The Products page opens.
-
Optional. In the Filter Tree in the left pane, you can select a specific catalog or classification, and price range and/or category to display only products that meet the filter criteria.
-
Locate the translated product. You can view the items in either the Grid view or the List view .
Tip: You can use the search and filter functionality at the top of the page to display only specific products .
-
Click the link in the product.
-
In the Properties tab, click the localization button  to display a property in each of its languages. For example, if the description of the Plier Set (3 Pack) was translated from English into Japanese, the source (English) version is displayed as follows:
While the target translation (Japanese) is displayed as follows:
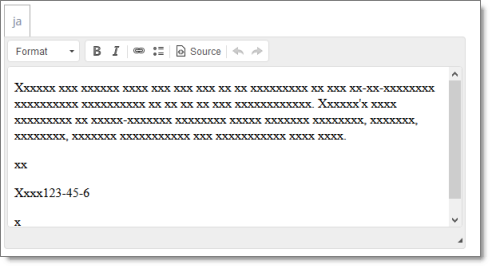
Note: Pseudo-translation is displayed instead of Japanese in the screen capture above.
2.5.2 - Viewing Translated Products in the Hybris Backoffice Product Cockpit
Note: This functionality is supported only for Hybris versions 6.4 and higher.
When a job has Completed status, the products in that job have been translated and returned to the Hybris Product Cockpit. You can view translated products in the Hybris Product Cockpit from the Hybris Backoffice.
To view translated products in the Hybris Backoffice Product Cockpit:
- In your Web browser, navigate to /backoffice/ on your Hybris instance.
- Log in to the Hybris Backoffice.
- In the Administration menu, select Product Cockpit.
The Products page opens.
- Optional. In the Filter Tree in the left pane, you can select a specific catalog or classification, and price range and/or category to display only products that meet the filter criteria.
- Locate the translated product. You can view the items in either the Grid view or the List view .
Tip: You can use the search and filter functionality at the top of the page to display only specific products .
-
Click the link in the product.
-
In the Properties tab, click the localization button to display a property in each of its languages. For example, if the description of the Plier Set (3 Pack) was translated from English into Japanese, the source (English) version is displayed as follows:
While the target translation (Japanese) is displayed as follows:
Note: Pseudo-translation is displayed instead of Japanese in the screen capture above.
2.5.3 - Viewing Translated Products in the Hybris Backoffice Products Page
When a job has Completed status, the products in that job have been translated and returned to the Hybris Product Cockpit. You can view translated products in the Products page in the Hybris Backoffice.
To view translated products in the Hybris Backoffice Products page:
- In your Web browser, navigate to /backoffice/ on your Hybris instance.
- Log in to the Hybris Backoffice.
- Ensure that the Administration menu is selected.
- In the navigation tree on the left, navigate to Catalog > Products.
The Products page opens.
- Optional. In the Filter Tree in the left pane, you can select a specific catalog or classification, and price range and/or category to display only products that meet the filter criteria.
- Locate the translated product. You can view the items in either the Grid view or the List view .
Tip: You can use the search and filter functionality at the top of the page to display only the products to send out for translation.
-
Click the link in the product.
-
In the Properties tab, click the localization button to display a property in each of its languages. For example, if the Identifier field of the P.C. Service Kit was translated from English into Japanese, both language versions are displayed as follows:
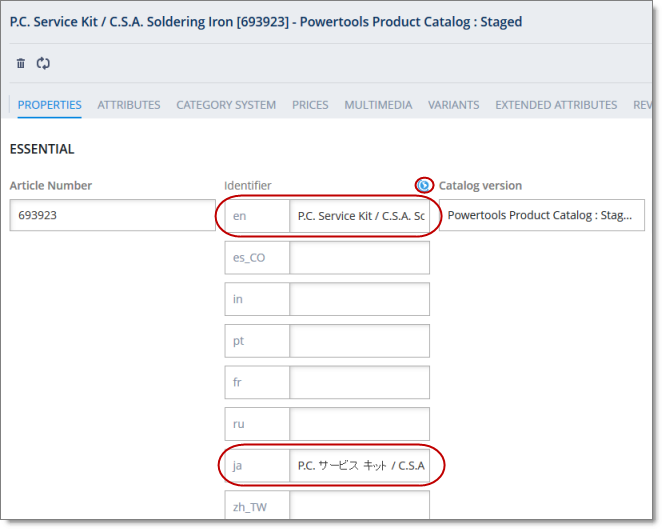
2.5.4 - Viewing Translated Products in the Hybris Product Cockpit (Hybris 6.1 to 6.6)
Note: This functionality is supported only for Hybris versions 6.1 to 6.6.
When a job has Completed status, the products in that job have been translated and returned to the Hybris Product Cockpit. You can view translated products in the Hybris Product Cockpit.
To view a translated product:
-
In your Web browser, navigate to /ctcockpit/ on your Hybris instance.
-
Log in to the Hybris Product Cockpit.
-
In the All Products tab, in either the Grid view or the List view, click the translated product to select it.
-
In the toolbar, click the Open in Edit Area button  .
.
-
In the Edit area, locate an attribute with a Language button  .
.

- Click the Language button beside the field.
The area expands to display all language versions of the attribute.
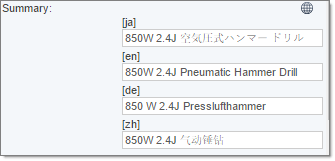
2.5.5 - Viewing Translated Website Pages in SAP Commerce or SAP Commerce Cloud
When a job has Completed status, the website pages in that job have been translated and returned to SAP Commerce or SAP Commerce Cloud, where you can view them.
To view a translated website page:
- In your Web browser, navigate to /backoffice/ on your SAP Commerce instance or on SAP Commerce Cloud.
- Log in to SAP Commerce or SAP Commerce Cloud.
- Ensure that the Administration Cockpit menu is selected. This is the default menu selection.
- In the navigation tree on the left, navigate to WCMS > Page.
The page that opens displays a list of website pages.
- Locate the translated website page. You can view the pages in the List View , Tree View , or the Grid View mode.
Tip: You can use the search and advanced search functionality to display only the website pages to send out for translation.
- Select the translated website page:
The bottom pane opens, displaying the page details. If necessary, click the expand icon  to display more of the bottom pane.
- In the Properties tab, scroll down to an attribute with a localization button .
Click the localization button to display a property in each of its languages. For example, click the localization button for the Page title property of the Returns page.
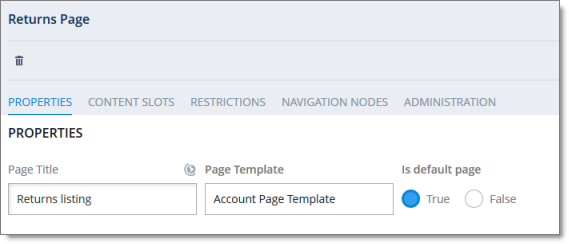
This section expands to display the translations of this property:
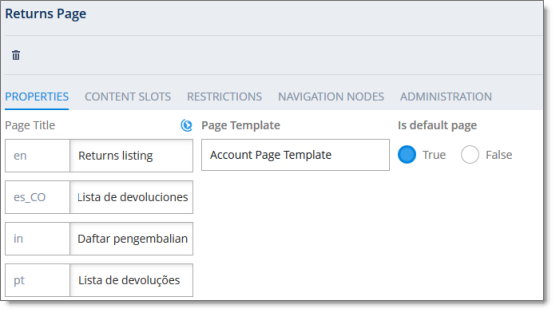
2.5.6 - Viewing Translated Website Pages in the Hybris Backoffice
When a job has Completed status, the website pages in that job have been translated and returned to the Hybris WCMS Cockpit. You can view the translated website pages in the Hybris Backoffice.
To view a translated website page:
- In your Web browser, navigate to /backoffice/ on your Hybris instance.
- Log in to the Hybris Backoffice.
- Ensure that the Administration menu is selected.
- In the navigation tree on the left, navigate to WCMS > Page.
The page that opens displays a list of website pages.
- Locate the translated website page. You can view the pages in the List View , Tree View , or the Grid View mode.
Tip: You can use the search and advanced search functionality to display only the website pages to send out for translation.
- Select the translated website page:
The bottom pane opens, displaying the page details. If necessary, click the expand icon to display more of the bottom pane.
- In the Properties tab, scroll down to an attribute with a localization button .
Click the localization button to display a property in each of its languages. For example, click the localization button for the Page title property of the Returns page.
This section expands to display the translations of this property:
2.5.7 - Viewing Translated Website Pages in the Hybris WCMS Cockpit (Hybris 6.1 to 6.6)
Note: This functionality is supported only for Hybris versions 6.1 to 6.6.
When a job has Completed status, the website pages in that job have been translated and returned to the Hybris WCMS Cockpit. You can view the translated website pages in the Hybris WCMS Cockpit.
To view a translated website page:
- In your Web browser, navigate to /ctwcms/ on your Hybris instance.
- Log in to the Hybris WCMS Cockpit.
- In the navigation area, in the Websites box, click the catalog version of the website whose translated page you want to view.
- In the Filter tab, in either the Grid view or the List view, click the translated website page to select it.
- In the toolbar, click the Edit button .
- In the Edit area, locate an attribute with a Language button .

- Click the Language button beside the field.
The area expands to display all language versions of the attribute.

