This the multi-page printable view of this section. Click here to print.
Cartridge for Salesforce Commerce Cloud
- 1: Installation Guide
- 1.1: Welcome to the Cartridge
- 1.1.1: Terminology
- 1.1.2: About the Clay Tablet Translation Platform
- 1.1.3: How the Cartridge Works with Salesforce Commerce Cloud
- 1.1.4: Using this Guide
- 1.1.5: How to Contact Lionbridge Connector Support
- 1.2: Before You Install
- 1.2.1: System Requirements
- 1.2.2: Set Your System Date and Time Correctly
- 1.3: Installing the Cartridge
- 1.4: Configuring the Cartridge
- 1.4.1: Enabling the Translation Module
- 1.4.2: Importing Metadata
- 1.4.3: Importing Services
- 1.4.4: Importing Job Schedules
- 1.5: Configuring the Business Manager
- 1.5.1: Setting Service Credentials
- 1.5.2: Configuring the Storefront Credentials
- 1.5.3: Mapping Locale Codes
- 1.5.4: Configuring Catalogs
- 1.5.5: Configuring Controller-Action Paths
- 1.5.6: Configuring Retention Days
- 1.5.7: Configuring Open Commerce API Settings
- 1.6: Post-Configuration Tasks
- 1.7: Pre-Production Testing
- 1.8: Appendix Language Codes
- 1.9: Installing the Lionbridge Cartridge
- 2: User Guide
- 2.1: Welcome to the Cartridge
- 2.1.1: The Translation Lifecycle
- 2.1.2: How the Cartridge Helps You Manage Your Translation Lifecycle
- 2.1.3: Using this Guide
- 2.1.4: How to Contact Lionbridge Connector Support
- 2.2: Getting Started with the Cartridge
- 2.2.1: The Cartridge at a Glance
- 2.3: Sending Content for Translation
- 2.3.1: Creating a Translation Job
- 2.3.2: Adding Products and Catalogs to the Job
- 2.3.3: Adding Categories of Products to the Job
- 2.3.4: Adding Static Website Content to the Job
- 2.3.5: Reviewing and Submitting a Job
- 2.4: Monitoring Translation Jobs
- 2.4.1: Translation Statuses
- 2.4.2: Monitoring Translation Job Details
- 2.4.2.1: Translation Job General Details
- 2.4.2.2: Translation Job Item Details
- 2.4.2.3: Request Information Summary
- 2.4.3: Viewing Archived Jobs
1 - Installation Guide
1.1 - Welcome to the Cartridge
Welcome to the Lionbridge Cartridge for Salesforce Commerce Cloud (Cartridge) version 1.1.0. This is Clay Tablet’s connector between Salesforce Commerce Cloud and the Clay Tablet Platform. It enables you to manage the translation of products, catalogs, categories, and static Web content in your Salesforce Commerce Cloud sites.
1.1.1 - Terminology
| Amazon AWS | Amazon Web Services. A suite of web application products developed and sold by Amazon.com. Clay Tablet uses various AWS offerings in order to leverage their infrastructure and build rich, dynamic solutions for its customers, specifically, the Clay Tablet Platform. For details, see http://aws.amazon.com. |
| Amazon S3 | Amazon Simple Storage Service. For details, see: http://aws.amazon.com/s3/. The Cartridge and the Clay Tablet Platform use Amazon S3 to provide temporary storage services for the content sent to and from translation. |
| Amazon SQS | Amazon Simple Queue Service. For details, see: http://aws.amazon.com/sqs/. The Cartridge uses Amazon SQS to provide Message Queue Services. |
| Asset | Any content or document being sent for translation, including metadata. Assets are created by the Cartridge. |
| Clay Tablet (CTT) | Clay Tablet Technologies, the corporate entity that publishes the Lionbridge Cartridge and the Clay Tablet Platform. |
| Clay Tablet Platform | The hosted (IaaS) connectivity platform that receives and routes content from content systems, including content management systems (CMSs), to translation providers and back during implementation. The Lionbridge Connector Team configures the Platform based on the number and nature of systems involved in your system architecture. |
| Freeway | The name of the Lionbridge translation portal for submitting content to and retrieving content from the Lionbridge translation provider. |
| FTP Server | File Transfer Protocol (FTP) is a standard network protocol used to transfer files from one host to another host over a TCP-based network, such as the Internet. Translation providers may receive and send files for translation using an FTP server. |
| IaaS | Infrastructure as a Service. The Clay Tablet Platform is an IaaS, because it is a hosted platform. |
| Keys | The Cartridge uses keys to establish a secure, discrete connection between the Cartridge instance and the Platform. Very important: Do not copy the CMS address keys to multiple instances, because this is a violation of the Clay Tablet License Agreement. Using the same CMS address keys on multiple instances will cause the Cartridge to behave unexpectedly, which can result in lost translation content, orphaned projects, and inaccurate translation status reports. Clay Tablet will support technical issues caused by duplicating or incorrectly installing CMS address keys only on a time and materials basis. |
| Lionbridge | The publisher of the Freeway translation portal and a translation provider. Users connect to the Freeway translation portal to submit content to and retrieve content from the Lionbridge translation provider. |
| Lionbridge Cartridge for Salesforce Commerce Cloud (Cartridge) | The cartridge software that Clay Tablet Technologies has developed and provides, which plugs into your Salesforce Commerce Cloud installation to provide connectivity to our hosted Platform. In this document it is referred to as the Cartridge. This is the software you are installing and configuring as you work through this document. |
| MT | Machine translation. The translation provider can be a machine translation service, such as Google Translate. |
| Producer | CMS or another system that sends content or documents out for translation. In this case, this is your Salesforce Commerce Cloud. |
| Provider | A provider of translation services. The delivery of assets to the provider may be via an FTP server or a TMS connector. |
| Support Asset | Supporting documents and their metadata. Support assets are not translated by the translation provider, but they provide helpful context for the translator. |
| TMS | Translation management system that the translation provider uses. |
1.1.2 - About the Clay Tablet Translation Platform
The Clay Tablet translation-connectivity platform is the easiest, most flexible way to integrate content systems, including content management systems (CMSs) and other content producers, with translation providers and translation technologies.
Clay Tablet Platform is the hosted (IaaS) connectivity platform that receives and routes content from content management systems to translation providers and back, including to Lionbridge via Freeway. It is hosted on Amazon Web Services (AWS). During implementation, the Lionbridge Connector Team configures the Platform for your translation solution, based on the translation providers or systems you use. The Clay Tablet Platform uses the following services on AWS:
-
S3 (Amazon Simple Storage Service), which provides storage services for the content sent to and from translation.
-
SQS (Amazon Simple Queue Service), which provides message queue services.
1.1.3 - How the Cartridge Works with Salesforce Commerce Cloud
The Lionbridge Cartridge (Cartridge) is an important part of the Clay Tablet translation solution.
The Cartridge is installed on your system as an add-in to Salesforce Commerce Cloud. Its functionality is displayed to the users as part of Salesforce Commerce Cloud.

Your translation systems architecture might look like the configuration above. It may have additional content systems or translation providers, but the core concepts remain the same.
During implementation, Lionbridge Connector Support works with you and your translation providers to configure and test the other elements of your translation solution, which are the Clay Tablet Platform’s connections to your translation providers' systems.
1.1.4 - Using this Guide
Purpose of this guide
This guide describes everything you need to know to install and configure the Lionbridge Cartridge (Cartridge) for Salesforce Commerce Cloud. It describes the delivery package contents, system requirements, installation instructions, and configuration procedures.
Recommendation: Review the user guide to fully understand the powerful features of the Cartridge.
Who should use this guide
This guide is intended for Salesforce Commerce Cloud administrators and system integrators.
What you should already know
This document assumes that your company already has an installed instance of Salesforce Commerce Cloud. It assumes that you have a strong working knowledge of Salesforce Commerce Cloud and its features.
How to find out more about the Lionbridge Cartridge for Salesforce Commerce Cloud
For information on using the Lionbridge Cartridge to send and receive content for translation from Salesforce Commerce Cloud, read the Lionbridge Cartridge for Salesforce Commerce Cloud User Guide.
Documentation conventions
This guide uses the following conventions:
| Convention | Description |
|---|---|
| Bold | Highlights screen elements such as buttons, menu items, and fields. |
| Courier | Highlights input, file names, and paths. |
| Italics | Highlights terms for emphasis, variables, or document titles. |
| > | Indicates a menu choice. For example, “Select Admin Tools > Configuration.” |
1.1.5 - How to Contact Lionbridge Connector Support
How to Contact Lionbridge Connector Support
You can submit a support ticket either:
- by emailing connectors@lionbridge.com
- from the Lionbridge Connector Zendesk page https://lionbridge-connectors.zendesk.com/
See also:
1.2 - Before You Install
Before you begin to install the Lionbridge Cartridge (Cartridge) for Salesforce Commerce Cloud, please review the system requirements, described in System Requirements, and perform the following pre-installation procedures:
-
Create a new Zendesk support ticket to notify Lionbridge Connector Support that you need a Clay Tablet account for the Connector. For detailed instructions, see How to Contact Lionbridge Connector Support.
The Lionbridge Connector Support team will notify you when your Content API account is created. This account uses your Zendesk credentials.
- Ensure that at least one translation provider is associated with your account.
- Ensure that you can reference the app, guard, and FormModel scripts.
- If you are not using the controller-based version of the code, you must import the Sitegenesis Storefront Controller Cartridges. It is not necessary to reference the Sitegenesis Storefront Controller cartridge in the cartridge path.
1.2.1 - System Requirements
The Lionbridge Cartridge (Cartridge) for Salesforce Commerce Cloud supports versions 15.5 and higher of Salesforce Commerce Cloud.
The Cartridge runs on the latest versions of Google Chrome, Mozilla Firefox, Apple Safari, and on Microsoft Internet Explorer versions 8 and higher.
The Lionbridge Cartridge for Salesforce Commerce Cloud has no additional hardware or software requirements beyond those of Salesforce Commerce Cloud. For details, refer to the Salesforce Commerce Cloud Infocenter, at https://www.salesforce.com/products/commerce-cloud/overview/ (login required).
1.2.2 - Set Your System Date and Time Correctly
The Lionbridge Cartridge sends content to and receives content from the Clay Tablet Platform, which is hosted in the Amazon Web Services (AWS) environment. AWS requires any machines that connect to its applications to have the correct system time and date settings.
Important: Before proceeding, ensure that the system date, time, and time zone are set correctly on any systems that will run the Lionbridge Cartridge. If these settings are incorrect, the following error message is displayed: Error. The difference between the request time and the current time is too large.
1.3 - Installing the Cartridge
This section describes how to install the Cartridge installation package you downloaded earlier into your Salesforce Commerce Cloud system.
Before you install the Cartridge, verify that you have reviewed the system requirements and followed all the pre-installation procedures described in Before You Install.
To install the Cartridge:
-
Unzip the Cartridge installation package, which includes the int_lionbridge and bm_lionbridge cartridges.
-
In the UX Studio plugin, select File > New > Cartridge to import the int_lionbridge and bm_lionbridge cartridges. For details, refer to the Salesforce Commerce Cloud Infocenter, at https://www.salesforce.com/products/commerce-cloud/overview/ (login required).
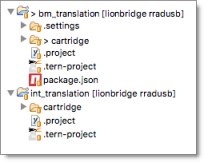
-
In each of the two cartridges you just installed, open the
Translation.jsfile for editing, and replace app_storefront_controllers with the name of your cartridge containing the referenced scripts. -
Activate the Storefront Cartridge. For each storefront from which you want to translate data, add
int_lionbridgeto the cartridge’s path.

- Activate the BM Cartridge. Add bm_lionbridge to the cartridges path of the Business Manager Site.

1.4 - Configuring the Cartridge
You perform the following steps to configure your Cartridge installation:
1.4.1 - Enabling the Translation Module
You must enable the Translation module for specific roles:
- In Salesforce Commerce Cloud, navigate to Administration > Organization > Roles & Permissions.
The Roles page opens.
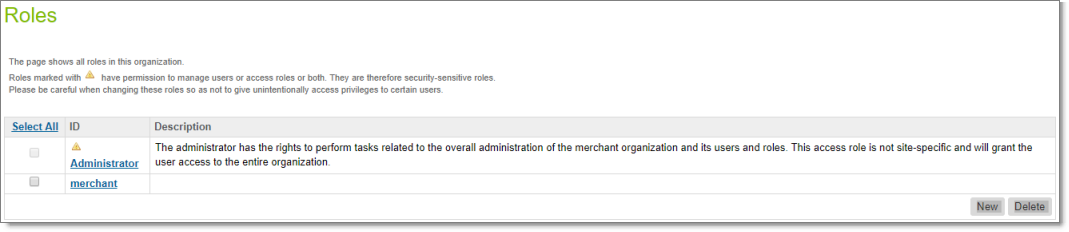
- In the ID column, click the link of a role for which you want to enable the translation module.
The page for that role opens.
- Click the Business Manager Modules tab.
The Select Context dialog box opens.
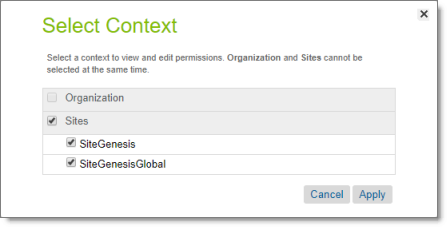
- Select your sites and click Apply.
The Business Manager Modules page opens for this user.
- Locate the Translation module and enable it by selecting the corresponding check box.
![]()
1.4.2 - Importing Metadata
You import the system and custom object attributes for the Cartridge.
- In Salesforce Commerce Cloud, navigate to Administration > Site Development > Import & Export.
The Import & Export page opens.
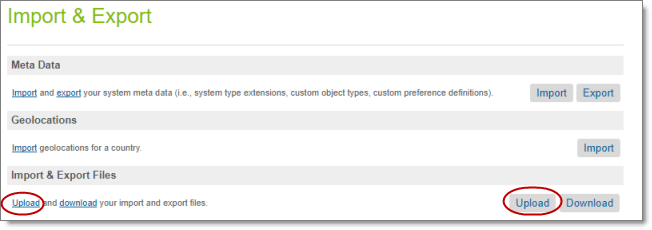
- Click Upload.
The Upload Import Files page opens.
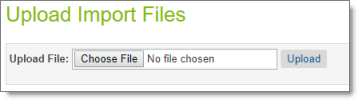
- Click Choose File and navigate to the metadata.xml file in the Cartridge installation package you unzipped earlier. Select this file and click Open in your browser dialog box.
The Upload Import Files page reopens.
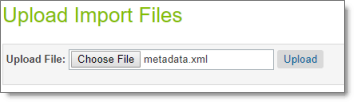
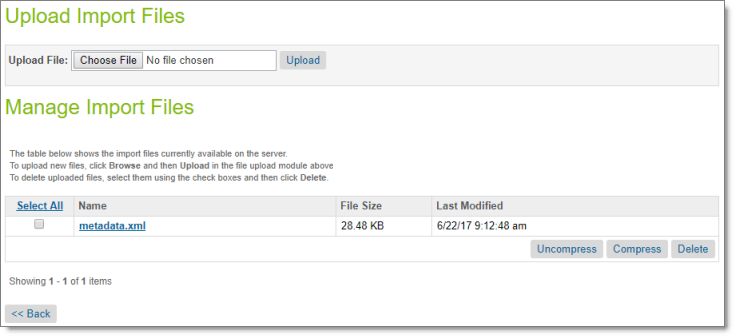
- Click Upload.
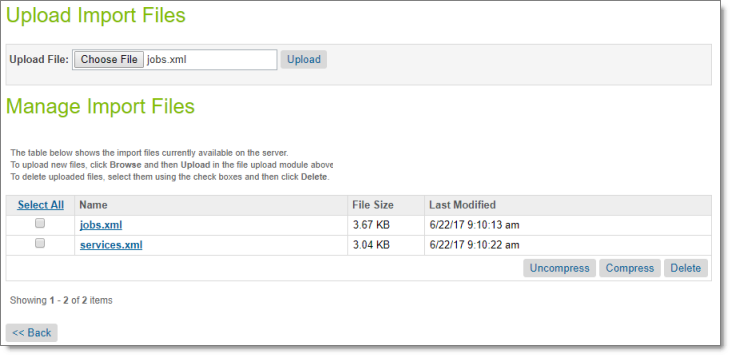
The metadata.xml file is now displayed in the Manage Import Files section of this page.
- Click Back to reopen the Import & Export page.

- In the Meta Data section, click Import.
The System Type Extension Import - Select File page opens.
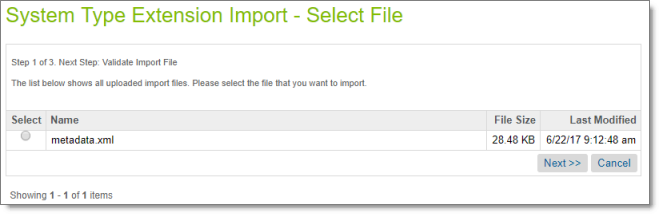
- Select the metadata.xml file, and click Next.
- Wait while the file is validated. After the file is validated, in the System Type Extension Import - Select File page, click Import.
1.4.3 - Importing Services
You import services to communicate with the Clay Tablet APIs.
- In Salesforce Commerce Cloud, navigate to Administration > Operations > Import & Export.
The Import & Export page opens.
- Click Upload.
The Upload Import Files page opens.
- Click Choose File and navigate to the services.xml file in the Cartridge installation package you unzipped earlier. Select this file and click Open in your browser dialog box.
The Upload Import Files page reopens.
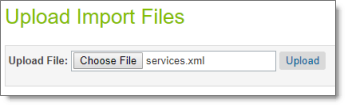
- Click Upload.
The services.xml file is now displayed in the Manage Import Files section of this page.
- Click Back to reopen the Import & Export page.
- In the Meta Data section, click Import.
The System Type Extension Import - Select File page opens.
- Select the services.xml file, and click Next.
- Wait while the file is validated. After the file is validated, in the System Type Extension Import - Select File page, click Import.
1.4.4 - Importing Job Schedules
You import job schedules that are necessary for exporting and importing the catalog XML files.
- In Salesforce Commerce Cloud, navigate to Administration > Operations > Import & Export.
The Import & Export page opens.
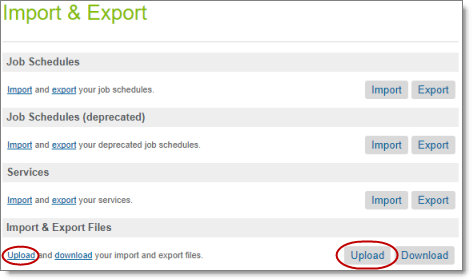
- Click Upload.
The Upload Import Files page opens.
- Click Choose File and navigate to the jobs.xml file in the Cartridge installation package you unzipped earlier. Select this file and click Open in your browser dialog box.
The Upload Import Files page reopens.
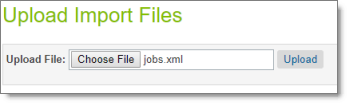
- Click Upload.
The jobs.xml file is now displayed in the Manage Import Files section of this page.
- Click Back to reopen the Import & Export page.
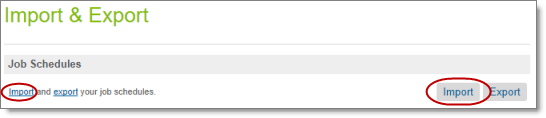
- In the Job Schedules section, click Import.
The Job Schedules Import - Select File page opens.
-
Select the jobs.xml file, and click Next.
-
Wait while the file is validated. After the file is validated, in the Job Schedules Import - Select File page, click Next.
-
In the Job Schedules Import - Start Import page, click Import.
-
After importing the file, navigate to Administration > Operations > Job Schedules.
The Job Schedules page opens.
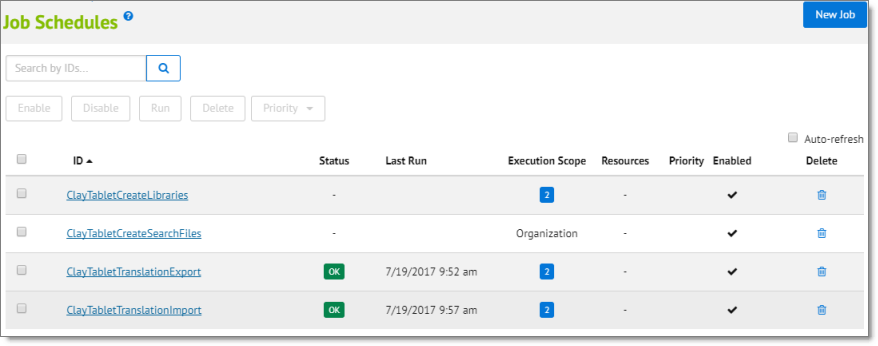
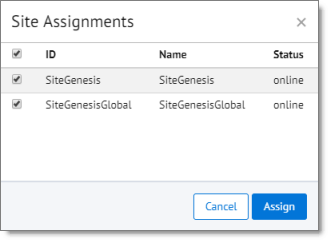
- Click the links for the ClayTabletCreateLibraries, ClayTabletTranslationExport, and ClayTabletTranslationImport jobs, and change the Scope from Organization to Site. Select the same sites for which you activated the storefront cartridge in the Activate the BM Cartridge step in Installing the Lionbridge Cartridge. a Click the Step Configurator tab. b Click the Scope link to open the Site Assignments dialog box. c Select the check boxes for the relevant sites, and click Assign.
For details, refer to the Salesforce Commerce Cloud Infocenter, at https://www.salesforce.com/products/commerce-cloud/overview/ (login required).
Note: Do not change the Organization scope of the ClayTabletCreateSearchFiles job.
1.5 - Configuring the Business Manager
You complete the following steps to configure the Business Manager for the Cartridge:
1.5.1 - Setting Service Credentials
To set service credentials:
-
In Salesforce Commerce Cloud, navigate to Administration > Operations > Services.
-
Click the Credentials tab.
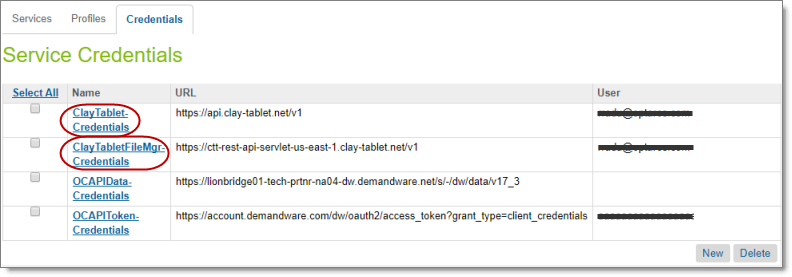
- In the Name column, click the links for the ClayTablet and ClayTabletFileMgr services.
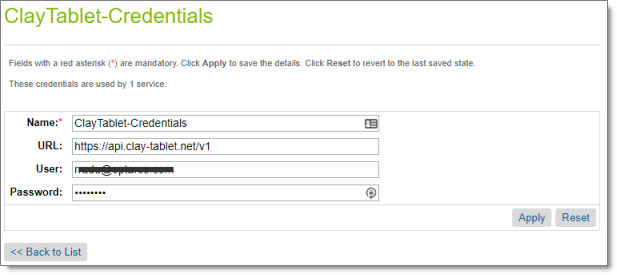
- For each service, update the user and password with the those provided by Clay Tablet, and click Apply.
1.5.2 - Configuring the Storefront Credentials
If you activated the Storefront Cartridge to protect your sites, as described in Installing the Lionbridge Cartridge, you now configure the storefront credentials.
If you activated the Storefront Cartridge to protect your sites, as described in Installing the Lionbridge Cartridge, you now configure the storefront credentials.
Note: If you did not activate the Storefront Cartridge to protect your sites, proceed to Mapping Locale Codes to Clay Tablet Language Codes.
To configure the storefront credentials:
-
Click the Merchant Tools menu and then select your site.
-
In the Merchant Tools menu, navigate to Site Preferences > Custom Preferences.
The Custom Sites Preference Groups page opens.
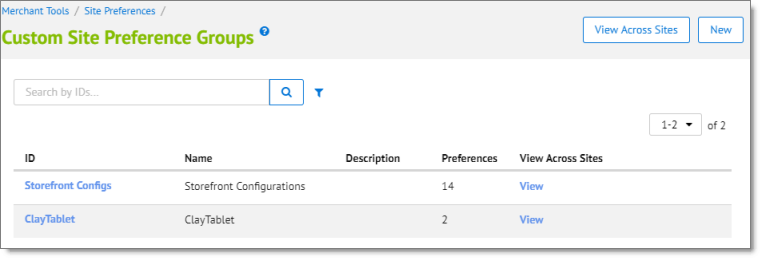
- In the ID column, click the ClayTablet link.
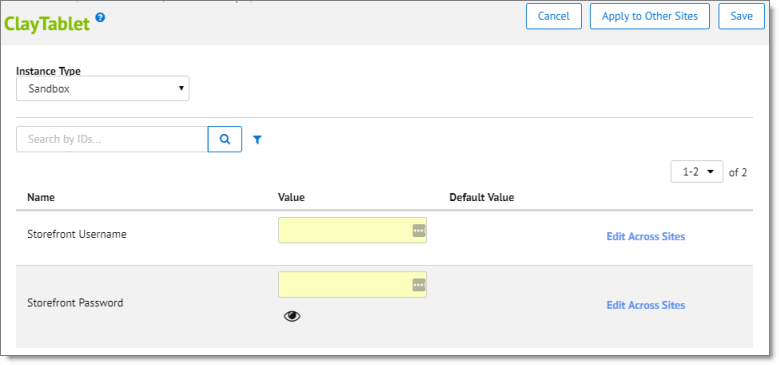
-
In the Storefront Username and Storefront Password fields, enter the base authentication credentials of the storefront.
-
In the top-right corner, click Save.
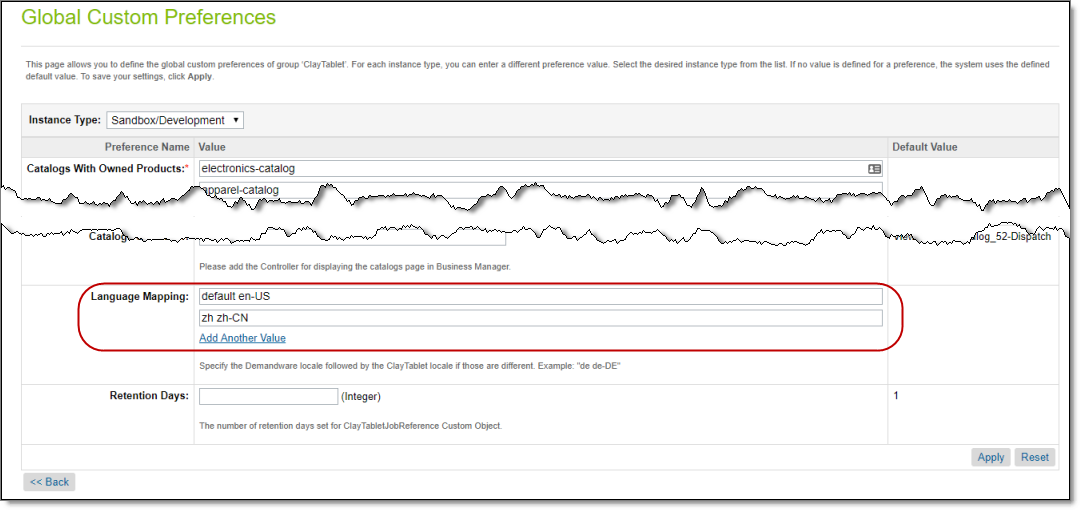
1.5.3 - Mapping Locale Codes
If any Salesforce Commerce Cloud locale codes are different from Clay Tablet language codes, you must map them.
To map locale codes to Clay Tablet Language Codes:
- Navigate to Administration > Global Preferences > Custom Preferences.
The Global Custom Preference Groups page opens.
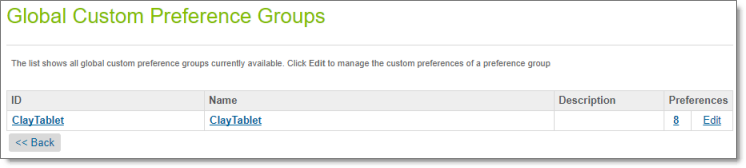
- In the ID column, click the ClayTablet link.
The Global Custom Preferences page opens.
-
If a Salesforce Commerce Cloud locale code is different from the corresponding Clay Tablet language code, you can map them in the Language Mapping section.
- Click Add Another Value to add a new row.
- In the new row, enter the Salesforce Commerce Cloud locale code followed by a space and then the Clay Tablet language code, for example: zh zh-CN. For a list and description of Clay Tablet language codes, see Appendix: Language Codes.
- Repeat the previous steps for each language mapping to add.
-
In the bottom-right corner, click Apply.
1.5.4 - Configuring Catalogs
You configure which catalogs are available for translating products.
To configure catalogs:
- Navigate to Administration > Global Preferences > Custom Preferences.
The Global Custom Preference Groups page opens.
- In the ID column, click the ClayTablet link.
The Global Custom Preferences page opens.
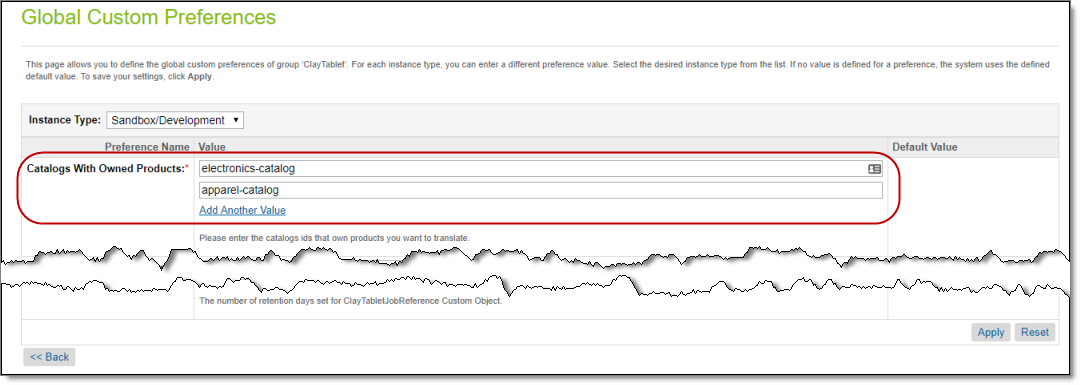
- In the Catalogs With Owned Products section, you specify the catalog IDs of the catalogs that will be available for translating products.
Note: You must specify the catalogs that own the products. These are usually master catalogs.
a. Click Add Another Value to add a new row. b. In the new row, enter the catalog ID of a catalog that will be available for translating products. c. Repeat the previous steps for each catalog ID to add.
- In the bottom-right corner, click Apply.
1.5.5 - Configuring Controller-Action Paths
Your Business Manager must use the default controller-action paths. If it is using other values, you must modify them.
To configure the controller-action paths:
- Navigate to Administration > Global Preferences > Custom Preferences.
The Global Custom Preference Groups page opens.
- In the ID column, click the ClayTablet link.
The Global Custom Preferences page opens.
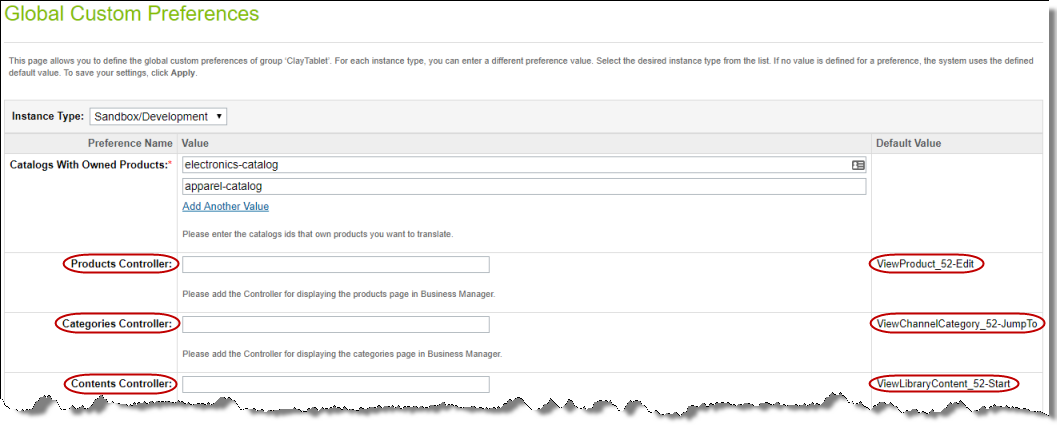
It includes the following fields:
- Products Controller
- Categories Controller
- Contents Controller
- Folders Controller
- Catalogs Controller
-
If any of the controllers do not use the default controller-action paths (displayed on the right), you must modify them.
-
In the bottom-right corner, click Apply.
1.5.6 - Configuring Retention Days
You configure the number of days that Clay Tablet retains your translation data using the ClayTabletJobReference custom object. If you changed that value, you must also change it in the Retention Days field, as described below.
To configure retention days:
- Navigate to Administration > Global Preferences > Custom Preferences.
The Global Custom Preference Groups page opens.
- In the ID column, click the ClayTablet link.
The Global Custom Preferences page opens.
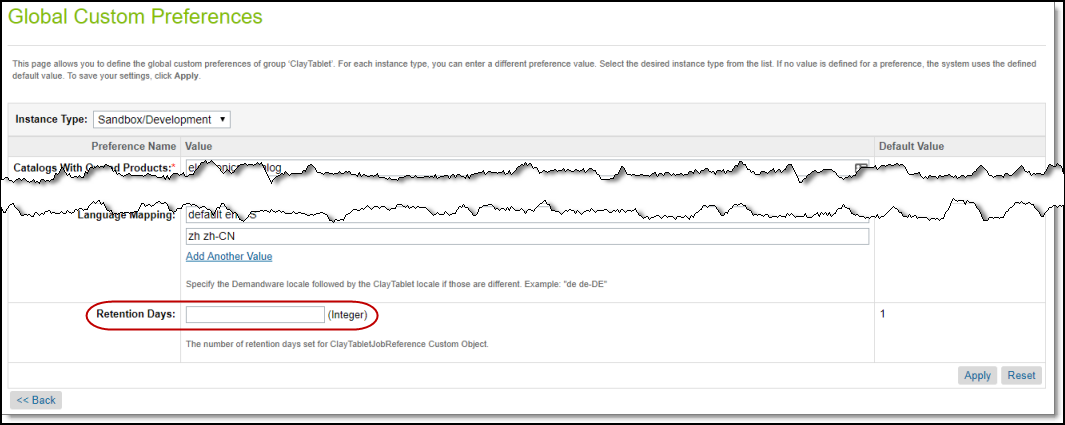
-
In the Retention Days field, enter the value that you specified for the ClayTabletJobReference custom object.
-
In the bottom-right corner, click Apply.
1.5.7 - Configuring Open Commerce API Settings
You must configure Open Commerce API (OCAPI) settings.
To configure Open Commerce API settings:
- Navigate to Administration > Site Development > Open Commerce API Settings.
The Open Commerce API Settings page opens.

- In the Select type dropdown list, select Data.
The page updates.

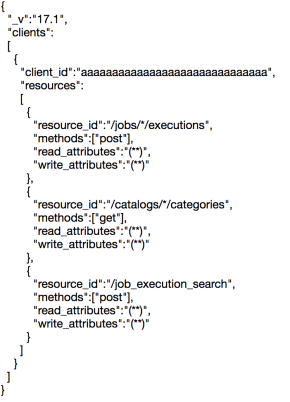
- Add the resource for jobs executions.
Note: For testing purpose, you can use the demo Client ID (aaaaaaaaaaaaaaaaaaaaaaaaaaaaaa), but in a production environment, obtain a Client ID from your Commerce Cloud Account Manager.
Your configuration should be similar to the following:
-
In the bottom-right corner, click Apply.
-
Navigate to Administration > Operations > Services to configure the OCAPI credentials.
-
Click the Credentials tab.
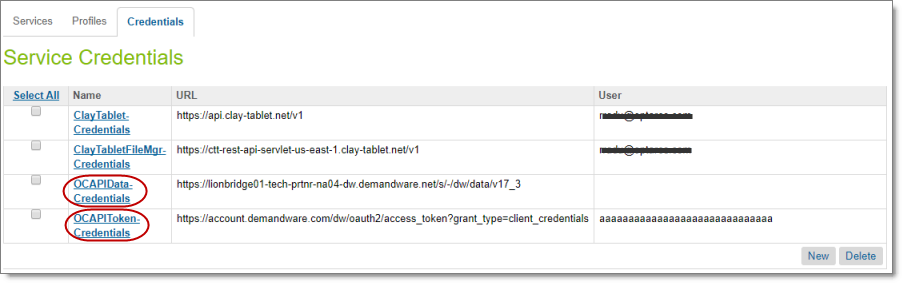
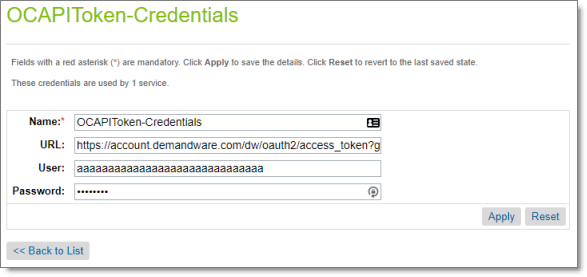
- In the Name column, click the link for the OCAPIToken service.
The OCAPIToken-Credentials page opens.
-
Enter the credentials for the OCAPIData service. a. In the User field, enter the OCAPI client ID. b. In the Password field, enter the OCAPI client password. c. Click Apply.
-
In the Name column, click the link for the OCAPIData service.
The OCAPIData-Credentials page opens.
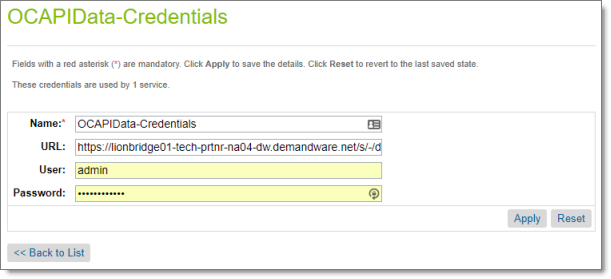
- In the URL field, enter your environment path in the following format: https://hostname/s/-/dw/data/version, where:
- hostname is your base URL.
- version is the OCAPI Data version set up in the Open Commerce API Settings page described in steps 2 and 3, above.
For example: https://myinstance.demandware.net/s/-/dw/data/v17_3.
- Click Apply.
1.6 - Post-Configuration Tasks
You must run the ClayTabletCreateSearchFiles and ClayTabletCreateLibraries jobs before creating the first translation request. This enables users to select products, folders, and content assets.
You should run these jobs whenever you update or create new catalogs and libraries.
1.7 - Pre-Production Testing
After you complete the configuration, your Lionbridge Cartridge for Salesforce Commerce Cloud installation is ready for testing. We recommend sending only a few pages for translation in one language as an initial test. For detailed instructions, refer to the Lionbridge Cartridge for Salesforce Commerce Cloud User Guide. Once successful, you can send as many languages as required.
Please coordinate with your translation provider for this test process.
If you have any concerns or questions, please contact Lionbridge Connector Support. For details, see How to Contact Lionbridge Connector Support.
1.8 - Appendix Language Codes
For detailed instructions on mapping Salesforce Commerce Cloud locale codes to the corresponding Clay Tablet language codes, see Mapping Locale Codes to Clay Tablet Language Codes.
The Lionbridge Cartridge has the following Clay Tablet language codes:
| Type | Language Identifier | Language Code |
|---|---|---|
| String | Afrikaans | “af-ZA” |
| String | Albanian | “sq-AL” |
| String | Amharic | “am-ET” |
| String | Arabic_Algeria | “ar-DZ” |
| String | Arabic_Bahrain | “ar-BH” |
| String | Arabic_Egypt | “ar-EG” |
| String | Arabic_Iraq | “ar-IQ” |
| String | Arabic_Jordan | “ar-JO” |
| String | Arabic_Kuwait | “ar-KW” |
| String | Arabic_Lebanon | “ar-LB” |
| String | Arabic_Libya | “ar-LY” |
| String | Arabic_MiddleEast | “ar-XR” |
| String | Arabic_Morocco | “ar-MA” |
| String | Arabic_Oman | “ar-OM” |
| String | Arabic_Qatar | “ar-QA” |
| String | Arabic_Saudi_Arabia | “ar-SA” |
| String | Arabic_Syria | “ar-SY” |
| String | Arabic_Tunisia | “ar-TM” |
| String | Arabic_UAE | “ar-AE” |
| String | Arabic_Yemen | “ar-YE” |
| String | Armenian | “hy-AM” |
| String | Assamese | “as-IN” |
| String | Basque | “eu-ES” |
| String | Belarusian | “be-BY” |
| String | Bengali_Bangladesh | “bn-BD” |
| String | Bengali_India | “bn-IN” |
| String | Bosnian_Bosnia_Herzegovina | “bs-BA” |
| String | Bulgarian | “bg-BG” |
| String | Burmese | “my-MM” |
| String | Catalan | “ca-ES” |
| String | Chinese_Hong_Kong | “zh-HK” |
| String | Chinese_Macao | “zh-MO” |
| String | Chinese_PRC | “zh-CN” |
| String | Chinese_Singapore | “zh-SG” |
| String | Chinese_Taiwan | “zh-TW” |
| String | Croatian | “hr-HR” |
| String | Croatian_Bosnia_Herzegovina | “hr-BA” |
| String | Czech | “cs-CZ” |
| String | Danish | “da-DK” |
| String | Divehi | “dv-MV” |
| String | Dutch | “nl-NL” |
| String | Dutch_Belgium | “nl-BE” |
| String | English_Australia | “en-AU” |
| String | English_Belize | “en-BZ” |
| String | English_Canada | “en-CA” |
| String | English_HongKong | “en-HK” |
| String | English_India | “en-IN” |
| String | English_Indonesia | “en-ID” |
| String | English_Ireland | “en-IE” |
| String | English_Jamaica | “en-JM” |
| String | English_Malaysia | “en-MY” |
| String | English_New_Zealand | “en-NZ” |
| String | English_Philippines | “en-PH” |
| String | English_Singapore | “en-SG” |
| String | English_South_Africa | “en-ZA” |
| String | English_Trinidad | “en-TT” |
| String | English_UK | “en-GB” |
| String | English_US | “en-US” |
| String | English_Zimbabwe | “en-ZW” |
| String | Estonian | “et-EE” |
| String | Faroese | “fo-FO” |
| String | Farsi | “fa-IR” |
| String | Filipino | “fil-PH” |
| String | Finnish | “fi-FI” |
| String | French | “fr-FR” |
| String | French_Belgium | “fr-BE” |
| String | French_Cameroon | “fr-CM” |
| String | French_Canada | “fr-CA” |
| String | French_Cote_d_Ivoire | “fr-CI” |
| String | French_Democratic_Rep_Congo | “fr-CD” |
| String | French_Haiti | “fr-HT” |
| String | French_Luxembourg | “fr-LU” |
| String | French_Mali | “fr-ML” |
| String | French_Monaco | “fr-MC” |
| String | French_Morocco | “fr-MA” |
| String | French_Reunion | “fr-RE” |
| String | French_Senegal | “fr-SN” |
| String | French_Switzerland | “fr-CH” |
| String | Frisian_Netherlands | “fy-NK” |
| String | Fulfulde_Nigeria | “ff-NG” |
| String | FYRO_Macedonian | “mk-MK” |
| String | Gaelic_Ireland | “gd-IE” |
| String | Gaelic_Scotland | “gd-GB” |
| String | Gallegan | “gl-ES” |
| String | Georgian | “ka-GE” |
| String | German | “de-DE” |
| String | German_Austria | “de-AT” |
| String | German_Liechtenstein | “de-LI” |
| String | German_Luxembourg | “de-LU” |
| String | German_Switzerland | “de-CH” |
| String | Greek | “el-GR” |
| String | Guarani | “gn-PY” |
| String | Gujarati | “gu-IN” |
| String | Hausa | “ha-NE” |
| String | Hawaiian | “haw-US” |
| String | Hebrew | “he-IL” |
| String | Hindi | “hi-IN” |
| String | Hungarian | “hu-HU” |
| String | Icelandic | “is-IS” |
| String | Igbo | “ig-NG” |
| String | Indonesian | “id-ID” |
| String | Inuktitut | “iu-CA” |
| String | Italian | “it-IT” |
| String | Italian_Switzerland | “it-CH” |
| String | Japanese | “ja-JP” |
| String | Kannada | “kn-IN” |
| String | Kanuri | “kr-TD” |
| String | Kashmiri | “ks-IN” |
| String | Kazakh | “kk-KZ” |
| String | Khmer | “km-KH” |
| String | Konkani | “kok-IN” |
| String | Korean | “ko-KR” |
| String | Kyrgyz | “ky-KZ” |
| String | Lao | “lo-LA” |
| String | Latin | “la-XL” |
| String | Latvian | “lv-LV” |
| String | Lithuanian | “lt-LT” |
| String | Malay | “ms-MY” |
| String | Malay_Brunei_Darussalam | “ms-BN” |
| String | Malayalam | “ml-IN” |
| String | Maltese | “mt-MT” |
| String | Maori | “mi-NZ” |
| String | Marathi | “mr-IN” |
| String | Mongolian | “mn-MN” |
| String | Nepali | “ne-NP” |
| String | Nepali_India | “ne-IN” |
| String | Norwegian | “nb-NO” |
| String | Norwegian_Nynorsk | “nn-NO” |
| String | Oriya | “or-IN” |
| String | Oromo | “om-ET” |
| String | Panjabi | “pa-PK” |
| String | Polish | “pl-PL” |
| String | Portuguese | “pt-PT” |
| String | Portuguese_Brazil | “pt-BR” |
| String | Punjabi_Pakistan | “pa-PK” |
| String | Pushto | “ps-AF” |
| String | Quechua_Ecuador | “qu-EC” |
| String | Quechua_Peru | “qu-PE” |
| String | Rhaeto_Romance | “rm-IT” |
| String | Romanian | “ro-RO” |
| String | Romanian_Moldova | “ro-MD” |
| String | Russian | “ru-RU” |
| String | Russian_Moldava | “ru-MD” |
| String | Sami | “se-NO” |
| String | Sanskrit | “sa-IN” |
| String | Serbian_Cyrillic | “sr-RS” |
| String | Serbian_Latin | “sr-SP” |
| String | Sindhi_India | “sd-IN” |
| String | Sindhi_Pakistan | “sd-PK” |
| String | Sinhala | “si-LK” |
| String | Slovak | “sk-SK” |
| String | Slovenian | “sl-SI” |
| String | Somali | “so-ET” |
| String | Sorbian | “wen-DE” |
| String | Spanish | “es-ES” |
| String | Spanish_Argentina | “es-AR” |
| String | Spanish_Bolivia | “es-BO” |
| String | Spanish_Chile | “es-CL” |
| String | Spanish_Colombia | “es-CO” |
| String | Spanish_Costa_Rica | “es-CR” |
| String | Spanish_Dominican_Republic | “es-DO” |
| String | Spanish_Ecuador | “es-EC” |
| String | Spanish_El_Salvador | “es-SV” |
| String | Spanish_Honduras | “es-HN” |
| String | Spanish_LatinAmerica | “es-XL” |
| String | Spanish_Mexico | “es-MX” |
| String | Spanish_Nicaragua | “es-NI” |
| String | Spanish_Panama | “es-PA” |
| String | Spanish_Paraguay | “es-PY” |
| String | Spanish_Peru | “es-PE” |
| String | Spanish_Puerto_Rico | “es-PR” |
| String | Spanish_Uruguay | “es-UY” |
| String | Spanish_US | “es-US” |
| String | Spanish_Venezuela | “es-VE” |
| String | Swahili | “sw-TZ” |
| String | Swedish | “sv-SE” |
| String | Swedish_Finland | “sv-FI” |
| String | Syriac | “syr-SY” |
| String | Tajik | “tg-TJ” |
| String | Tamil | “ta-IN” |
| String | Tatar | “tt-RU” |
| String | Telugu | “te-IN” |
| String | Thai | “th-TH” |
| String | Tibetan | “bo-CN” |
| String | Tigrinya_Eritrea | “ti-ER” |
| String | Tigrinya_Ethiopia | “ti-ET” |
| String | Tsonga | “ts-ZA” |
| String | Tswana | “tn-BW” |
| String | Turkish | “tr-TR” |
| String | Turkmen | “tk-TM” |
| String | Uighur | “ug-CN” |
| String | Ukrainian | “uk-UA” |
| String | Urdu | “ur-PK” |
| String | Urdu_India | “ur-IN” |
| String | Uzbek | “uz-UZ” |
| String | Venda | “ve-ZA” |
| String | Vietnamese | “vi-VN” |
| String | Welsh | “cy-GB” |
| String | Xhosa | “xh-ZA” |
| String | Yi | “ii-CN” |
| String | Yiddish | “yi-MD” |
| String | Yoruba | “yo-NG” |
| String | Zulu | “zu-ZA” |
1.9 - Installing the Lionbridge Cartridge
This section describes how to install the Cartridge installation package you downloaded earlier into your Salesforce Commerce Cloud system.
To install the Cartridge:
-
Unzip the Cartridge installation package, which includes the int_lionbridge and bm_lionbridge cartridges.
-
In the UX Studio plugin, select File > New > Cartridge to import the int_lionbridge and bm_lionbridge cartridges. For details, refer to the Salesforce Commerce Cloud Infocenter, at https://www.salesforce.com/products/commerce-cloud/overview/ (login required).
-
In each of the two cartridges you just installed, open the
Translation.jsfile for editing, and replace app_storefront_controllers with the name of your cartridge containing the referenced scripts. -
Activate the Storefront Cartridge. For each storefront from which you want to translate data, add
int_lionbridgeto the cartridge’s path.
- Activate the BM Cartridge. Add bm_lionbridge to the cartridges path of the Business Manager Site.
2 - User Guide
2.1 - Welcome to the Cartridge
Welcome to the Lionbridge Cartridge for Salesforce Commerce Cloud (Cartridge) version 1.1.0. The Cartridge enables you to automate sending and retrieving content from Salesforce Commerce Cloud, which dramatically reduces the effort required to create, maintain, and publish Web content in multiple languages.
2.1.1 - The Translation Lifecycle
The translation lifecycle is the broad process of selecting content, sending it out for translation, and then receiving the translated content back from translation.
This set of steps usually fits inside a larger, more general process called the content lifecycle, which is the process of creating, reviewing, editing, approving, and publishing content.
When you consider the translation lifecycle and the content lifecycle together, you have the global content value chain, which is the strategy for managing multilingual content.
Remember that localizing content is a subset of steps in the broader content lifecycle. This will improve your focus on key localization considerations, improve processes, and keep all content stakeholders included. Together, this results in better content management.
2.1.2 - How the Cartridge Helps You Manage Your Translation Lifecycle
The Lionbridge Cartridge for Salesforce Commerce Cloud (Cartridge) is a plug-in module for Commerce Cloud. It provides a range of features and user interface enhancements in Commerce Cloud that enable you to select, send, monitor, and retrieve content for translation into any language Commerce Cloud supports.
These features automate the process, which dramatically reduces the effort and time required to export and re-import content that needs to be localized. This is very helpful when translating large volumes of content or ensuring that translated content is quickly re-imported to meet deadlines.
When you use the Cartridge, you manage your translation lifecycle entirely from within Commerce Cloud:
- The Cartridge exports your content from Commerce Cloud in XML format and delivers these content files to the central, hosted Clay Tablet Platform.
- The Clay Tablet Platform delivers your content to your translation providers, based on routing rules that your company chooses and the Lionbridge Connector Team implements.
- When the translated content is ready, the Clay Tablet Platform retrieves it from your translators and delivers it to the Cartridge.
- The Cartridge automatically re-imports the content into the correct location in Commerce Cloud.
You can then review, revise, reject, or publish the translated content as needed.
Note: Neither the Cartridge nor the Clay Tablet Platform performs any translation. Similarly, the Lionbridge Connector Team does not provide any translation services. Your company chooses the translation provider that performs the translation.
2.1.3 - Using this Guide
Purpose of this guide
This guide describes how to use the Lionbridge Cartridge (Cartridge) for Salesforce Commerce Cloud to manage your translation lifecycle. It describes how to send Commerce Cloud components for translation and receive them back from translation.
Who should use this guide
This guide is intended for content editors, project, marketing, localization or translation managers, or others who are responsible for creating, editing, or approving content for translation that resides in your Salesforce Commerce Cloud. This guide is also useful for translation providers who receive content from your Salesforce Commerce Cloud, because it describes your company’s translation management process.
What your company setup should be
This document assumes that:
- Your company already has a functioning instance of Salesforce Commerce Cloud.
- The Lionbridge Cartridge for Salesforce Commerce Cloud has been implemented, configured, and tested on your Salesforce Commerce Cloud.
- The Lionbridge Connector Team has set up the Clay Tablet Platform to send content to your translation providers.
What you should already know
This document assumes that:
- You are familiar with the Cartridge’s configuration for your Salesforce Commerce Cloud, and the reasons for choosing certain configuration options. This is important because your company’s configuration determines which features are available.
- You are familiar with your company’s translation process and requirements.
- You have valid user credentials to log into Salesforce Commerce Cloud.
- You have the required permissions to access the Cartridge functionality described in this guide.
Note: Not all the features described in this guide may be available. Feature availability depends on both your company’s Cartridge setup and the roles to which you are assigned. If you cannot access functionality that you need, contact your company’s Salesforce Commerce Cloud administrator.
How this guide is organized
This guide contains the following chapters:
| Chapter | Description |
|---|---|
| Welcome to the Lionbridge Cartridge for Salesforce Commerce Cloud | A brief description of the Clay Tablet for Salesforce Commerce Cloud solution and how it fits into the translation lifecycle. It also includes information about this guide and Clay Tablet Technologies Support contact information. |
| Getting Started with the Lionbridge Cartridge for Salesforce Commerce Cloud | How to get started and an overview of the Lionbridge Cartridge for Salesforce Commerce Cloud interface and key features. |
| Sending Content for Translation | How to use the Lionbridge Cartridge for Salesforce Commerce Cloud to send out content for translation. |
| Monitoring Translation Jobs | How to monitor the translation status of content that you sent out for translation. |
How to find out more about the Lionbridge Cartridge for Salesforce Commerce Cloud
For information on installing and configuring the Lionbridge Cartridge for Salesforce Commerce Cloud, read the Lionbridge Cartridge for Salesforce Commerce Cloud Installation and Configuration Guide.
Documentation conventions
This guide uses the following conventions:
| Convention | Description |
|---|---|
| Bold | Highlights screen elements such as buttons, menu items, and fields. |
| Courier | Highlights input, file names, and paths. |
| Italics | Highlights terms for emphasis, variables, or document titles. |
| > | Indicates a menu choice. For example, “Select Admin Tools > Configuration.” |
2.1.4 - How to Contact Lionbridge Connector Support
How to Contact Lionbridge Connector Support
You can submit a support ticket either:
- by emailing connectors@lionbridge.com
- from the Lionbridge Connector Zendesk page https://lionbridge-connectors.zendesk.com/
See also:
2.2 - Getting Started with the Cartridge
The Cartridge supports all web browsers that Salesforce Commerce Cloud supports.
It supports Salesforce Commerce Cloud versions 15.5 and higher.
To access the Cartridge:
- Log in to Salesforce Commerce Cloud.
- If you have multiple sites, select your site.
- Do one of the following:
- In the menu, select Merchant Tools > Products and Catalogs > Translation.
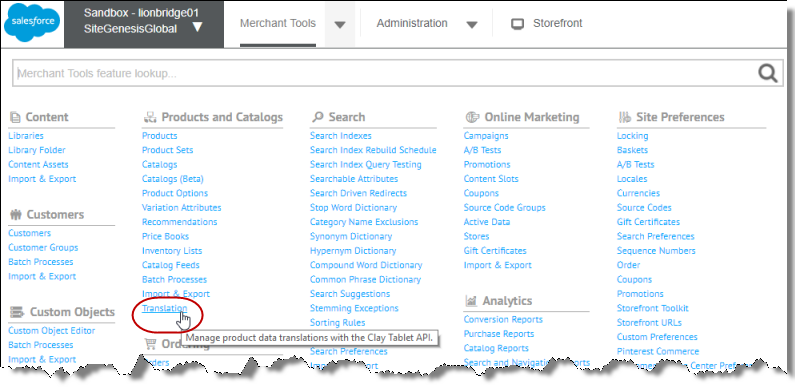
- Complete the following steps:
a. Click the Merchant Tools menu to open the Merchant Tools page. b. Click the Products and Catalogs link to open the Products and Catalogs page. c. Click the Translation link.
The Manage Translation Jobs page opens. This page is the hub of the Cartridge.
![]()
2.2.1 - The Cartridge at a Glance
You access the Lionbridge Cartridge for Salesforce Commerce Cloud (Cartridge) by selecting Merchant Tools > Products and Catalogs > Translation from the menu.
This opens the Manage Translation Jobs page, which is the hub of the Cartridge:
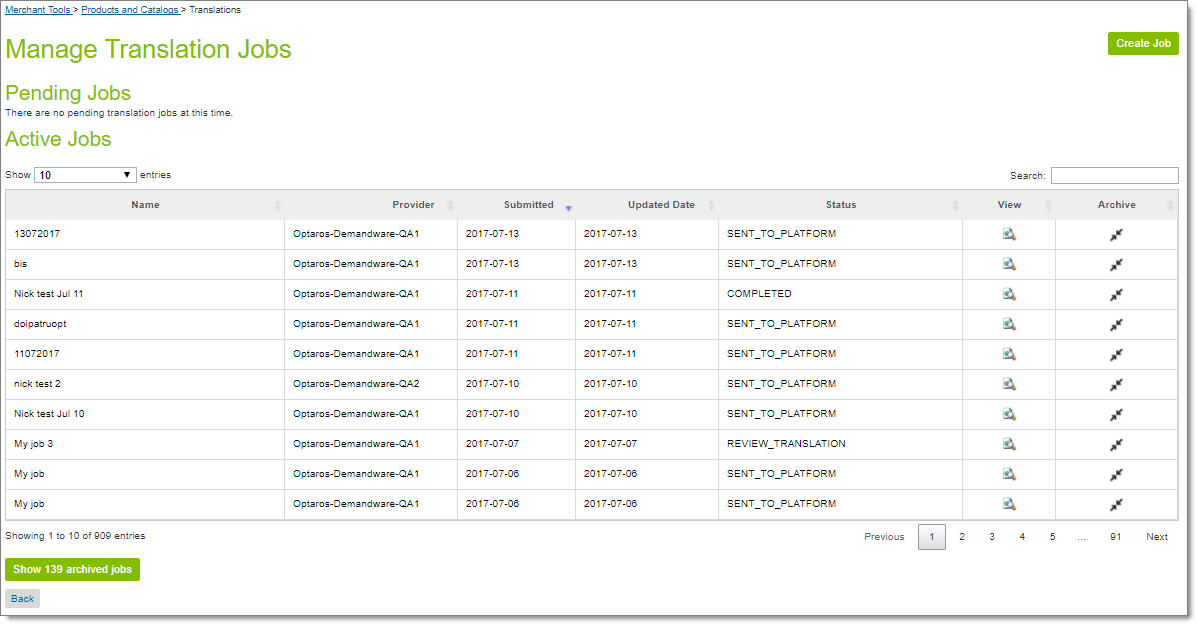
- You click Create job in the top-right corner to create a translation job.
- The Pending Jobs section displays translation jobs that have not yet been submitted for translation.
- The Active Jobs section displays translation jobs that have been submitted for translation and that have not been archived.
- You click Show X archived jobs (where X is the number of archived jobs) to display the Archived Jobs section, which displays the archived jobs.
- In any section of the page, you click the
 icon in the View column to view additional information about the job and the items in the job.
2.3 - Sending Content for Translation
When you send content for translation, you complete the following high-level steps:
-
Create the job. For details, see Creating a Translation Job.
-
Add one or more types of content to the job:
-
products from a catalog or all products in a catalog. For details, see Adding Products and Catalogs to the Job.
-
categories of products. For details, see Adding Categories of Products to the Job.
-
static website content. For details, see Adding Static Website Content to the Job.
- Submit the job for translation. For details, see Reviewing and Submitting a Job.
2.3.1 - Creating a Translation Job
The first step in sending content for translation is creating a translation job.
To create a new translation job:
- Select Merchant Tools > Products and Catalogs > Translation from the menu.
The Manage Translation Jobs page opens.
![]()
- In the top-right corner of the page, click Create Job.
The General tab of the Job Information page opens:
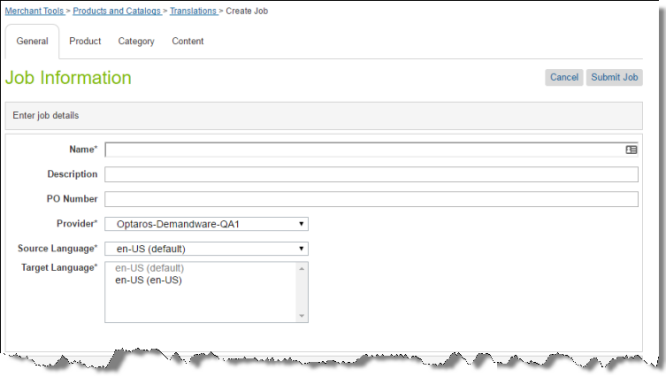
- In the Enter job details section, enter the following information about your job:
| Field | Description |
|---|---|
| Name | Your name for the translation job. |
| Description | Optional. Your description of the translation job. |
| PO Number | Optional. The purchase order reference number associated with this job. |
| Provider | Select the translation provider for this job. |
| Source Language | Select the source language for this job. The Cartridge will send items in this source language for translation. The list displays all locales selected in the Locales page. To open this page, select Merchant Tools > Site Preferences > Locales from the menu. |
| Target Language | Select all the target languages into which you want to translate the source content in this job. The list displays all locales selected in the Locales page. To open this page, select Merchant Tools > Site Preferences > Locales from the menu. Tips: To select a range of adjacent language, press the Shift key. To select multiple non-adjacent languages, press the Ctrl key. |
- Next, you select the type of content to include in the translation job.
- To add products from a catalog or all products in a catalog to the job, click the Product tab. For details, see Adding Products and Catalogs to the Job.
- To add categories of products to the job, click the Category tab. For details, see Adding Categories of Products to the Job.
- To add static website content to the job, click the Content tab. For details, see Adding Static Website Content to the Job.
Note: You can include content from multiple tabs in a single translation job.
2.3.2 - Adding Products and Catalogs to the Job
When you create a translation job, as described on Creating a Translation Job, you can add products and catalogs to it.
To add products and catalogs to a job you are creating:
- Click the Product tab.
The Owned Products Catalog dialog box opens.
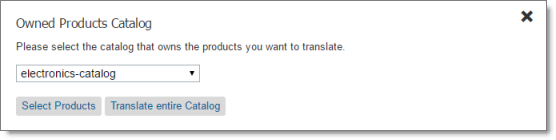
-
In the dropdown list, select the catalog that owns the products you want to translate.
-
Do one of the following:
- To select some but not all products in the catalog for translation, click Select Products.
- To translate the entire selected catalog, click Translate entire Catalog.
The Products selected for job page opens.
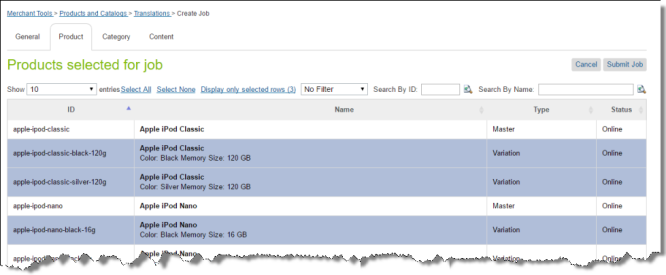
- If you clicked Translate entire catalog, this page displays a message that all products in the specified catalog are selected. Proceed to step 5.
- If you clicked Select Products, this page displays the following information about each product in the selected catalog:
- ID: The product ID in Salesforce Commerce Cloud.
- Name: The product name in Salesforce Commerce Cloud. If the product is a Variation, then the second row displays the variation values. For example, if a product has different sizes and colors the color and the size are displayed for each style..
- Type: The Salesforce Commerce Cloud product type.
- Status: The status of the product in Salesforce Commerce Cloud.
Tips: In the Show dropdown list, you can select how many products to display in this sub-page of the list. By default, 10 products are displayed. You can change this to 25, 50, or 100. You can navigate to other sub-pages using the number buttons below the list, on the right side.
- Do one or more of the following to select the products to send for translation:
- Click one or more rows to select the corresponding products.
- Click the Select All link to select all rows.
- Click the Select None link to clear the selected rows.
- Click the Display only selected rows link to display only the rows you selected. (Link is displayed only when all rows are displayed.)
Note: The text in this link displays the number of selected rows.
- Click the Show All link to display all rows in the list. (Link is displayed when only the selected rows are displayed.)
To locate the items to select, you can do one or more of the following:
-
In the dropdown list above the list of products, you can filter the products in the list by product type. This list displays all product types available in the catalog.
-
In the Search by ID box, enter a product ID and either click the search icon
or press Enter.
The list displays only products that match this ID.
- In the Search by Name box, enter a product name and either click the search icon or press Enter.
The list displays only products that match this name.
- When you are done, do one of the following:
- To add categories of products to the job, click the Category tab. For details, see Adding Categories of Products to the Job.
- To add static website content to the job, click the Content tab. For details, see Adding Static Website Content to the Job.
- If you are finished adding content items for translation, click Submit Job. For details, see Reviewing and Submitting a Job.
The Job Summary - Items selected for translation dialog box opens. For details, see Reviewing and Submitting a Job.
2.3.3 - Adding Categories of Products to the Job
When you create a translation job, as described on Creating a Translation Job, you can add products to it by category.
To add categories of products to a job you are creating:
- Click the Category tab.
The Categories selected for job page opens.
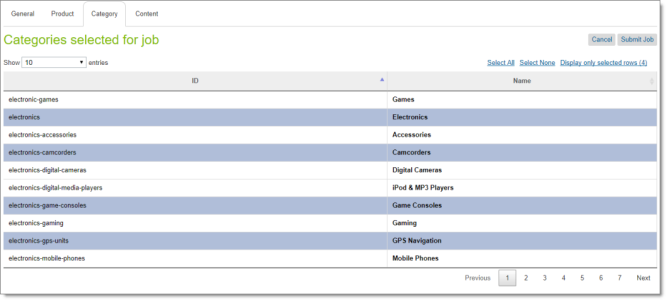
This page displays the following information about each product in the selected catalog:
- ID: The category ID in Salesforce Commerce Cloud.
- Name: The name of the category in Salesforce Commerce Cloud.
Tips: In the Show dropdown list, you can select how many categories to display in this sub-page of the list. By default, 10 categories are displayed. You can change this to 25, 50, or 100. You can navigate to other sub-pages using the number buttons below the list, on the right side.
- Do one or more of the following to select the products to send for translation:
- Click one or more rows to select the corresponding categories.
- Click the Select All link to select all rows.
- Click the Select None link to clear the selected rows.
- Click the Display only selected rows link to display only the rows you selected. (Link is displayed only when all rows are displayed.)
Note: The text in this link displays the number of selected rows.
- Click the Show All link to display all rows in the list. (Link is displayed when only the selected rows are displayed.)
To locate the items to select, in the Search box, you can enter a string and either click the search icon ![]() or press Enter. The list displays only categories that match this string.
or press Enter. The list displays only categories that match this string.
- When you are done, do one of the following:
- To add products from a catalog or all products in a catalog to the job, click the Product tab. For details, see Adding Products and Catalogs to the Job.
- To add static website content to the job, click the Content tab. For details, see Adding Static Website Content to the Job.
- If you are finished adding content items for translation, click Submit Job. For details, see Reviewing and Submitting a Job.
The Job Summary - Items selected for translation dialog box opens. For details, see Reviewing and Submitting a Job.
2.3.4 - Adding Static Website Content to the Job
When you create a translation job, as described on Creating a Translation Job, you can add static website content to it.
To add static website content to a job you are creating:
- Click the Content tab.
The Content selected for job page opens.
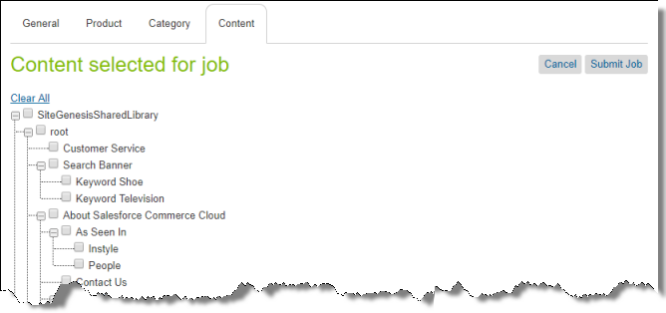
This page displays the static website content in a tree format, with the following hierarchy: Library > Library Folder > Library Subfolder > Library Content Asset.
Note: A library must be assigned to the selected website so that you can send its content for translation.
- Select the check boxes of one or more libraries, library folders, library subfolder, and library content assets to send for translation.
Notes: Selecting the check box for a parent item selects the check boxes for all child items. Text beside the selected parent item displays the number of selected items in the node and the total number of items in the node. Clearing the check box for a parent item does not clear the check boxes for the child items. To clear all selected check boxes, click the Clear All link.
Tips: To collapse a branch, click the collapse icon ![]() . To expand a branch, click the expand icon
. To expand a branch, click the expand icon ![]() .
.
- When you are done, do one of the following:
- To add products from a catalog or all products in a catalog to the job, click the Product tab. For details, see Adding Products and Catalogs to the Job.
- To add categories of products to the job, click the Category tab. For details, see Adding Categories of Products to the Job.
- If you are finished adding content items for translation, click Submit Job. For details, see Reviewing and Submitting a Job.
The Job Summary - Items selected for translation dialog box opens. For details, see Reviewing and Submitting a Job.
2.3.5 - Reviewing and Submitting a Job
After you create and specify general information for your translation job and add items to translate, you review the items in your job before submit the job for translation.
When you click Submit Job in any tab, the Job Summary - Items selected for translation dialog box opens. All the information in the dialog box is read only.
![]()
The information at the top of the dialog box is the information you entered earlier, in the General tab. To modify it, click Cancel and then click the General tab. For details, see Creating a Translation Job.
If items are selected in a particular section, the parentheses in the section header indicate the number of selected items.
- To review the content items for submission in this job, click the expand icon
 to expand the appropriate section.
![]()
- The Selected Catalog section displays the IDs and names of the catalog you selected in the Product tab. To modify your selection, click Cancel and then click the Product tab. For details, see Adding Products and Catalogs to the Job.
- The Selected Products section displays the IDs and names of the products you selected in the Product tab. To modify your selection, click Cancel and then click the Product tab. For details, see Adding Products and Catalogs to the Job.
- The Selected Categories section displays the IDs and names of the products you selected in the Categories tab. To modify your selection, click Cancel and then click the Categories tab. For details, see Adding Categories of Products to the Job.
- The Selected Content section displays the IDs and names of the website content items you selected in the Content tab. To modify your selection, click Cancel and then click the Content tab. For details, see Adding Products and Catalogs to the Job.
- The Selected Folder section displays the IDs and names of the folders you selected in the Content tab. For details, see Adding Products and Catalogs to the Job.
Note: Either the Selected Catalog or the Selected Products section is displayed, depending on your selection earlier.
To submit this job, click Submit Job.
Note: If the general information about the translation job is incomplete, the General tab reopens so that you can complete it.
After submission, the Manage Translation Jobs page reopens, displaying a message that the submission process has started. The submitted job is displayed in the Pending Jobs section of the page. It is in Submitting status.
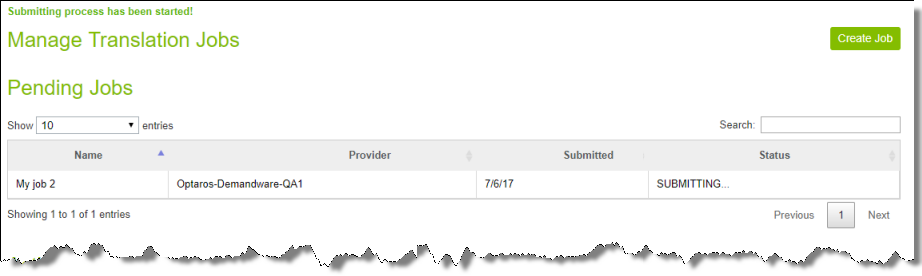
After submission, you can monitor your job from the Active Jobs section of the Manage Translation Jobs page. For detailed instructions, see Monitoring Translation Jobs.
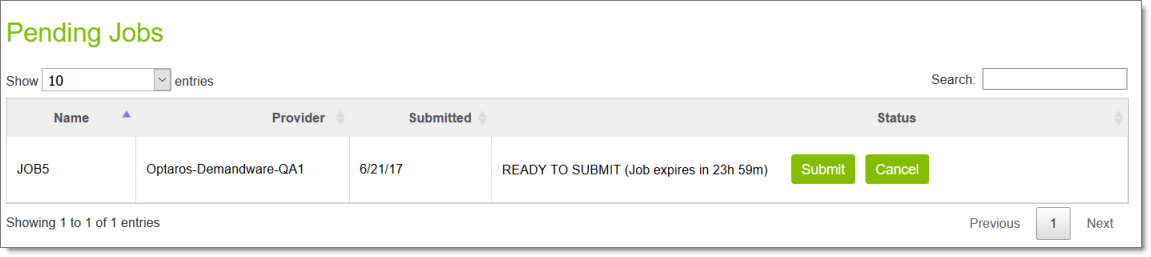
Note about “Cannot submit the job” message: If you submit a job when another user is submitting a job, the Cannot submit the job message is displayed. If you click Continue, the current job is still displayed. Alternatively, if you click Save Job, the job is displayed in the Pending Jobs section, as follows:
The Status column displays Ready to Submit and the time remaining until the job expires. When you are ready to resubmit the job, click the Submit button displayed in the column.
2.4 - Monitoring Translation Jobs
After submitting a translation job, as described in Reviewing and Submitting a Job, you monitor its status from the Active Jobs section of the Manage Translation Jobs page.
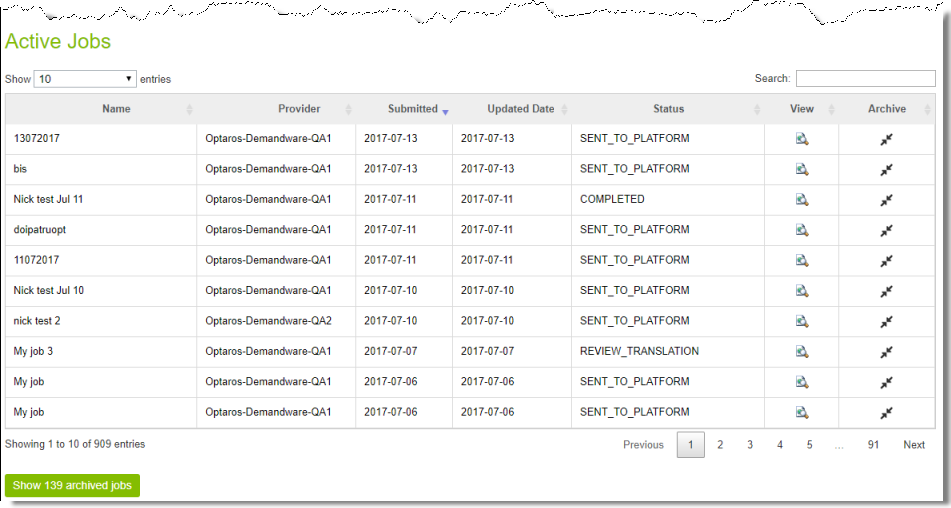
The Active Jobs section displays the following information about submitted jobs that have not been archived:
| Column | Description |
|---|---|
| Name | The name of the submitted translation job. |
| Provider | The translation provider to whom the Clay Tablet Platform sends the translation job. |
| Submitted | The date the translation job was submitted, in the following format: MM/DD/YY. |
| Updated Date | The date the translation job was last updated, in the following format: MM/DD/YY. |
| Status | The translation status of the job. For a list and description of translation statuses, see Translation Statuses. |
The jobs are displayed in reverse chronological order by the date they were submitted.
Actions
You can do one or more of the following to facilitate viewing specific jobs in this section:
-
To specify how many items to display in a sub-page of the section, select the number to display from the Show X entries list in the top-left corner of the section.
-
To search for a string, enter it in the Search box in the top-right corner of the section. The list automatically updates as you type, displaying only jobs that match what you type in one of the columns.
-
To reverse the sort order or to sort the jobs by another column, click the column heading. The triangle on the right side of the column indicates if the column is sorted in ascending or descending order.
-
To navigate to a different sub-page in the section, click the Previous, Next, and sub-page numbers in the bottom-right corner of the section.
Note: The bottom-left corner of the section states the number of jobs displayed in this sub-page and the total number of jobs.
You can perform the following actions on individual jobs:
-
To view additional information about the job, click the Search icon
in the View column. For details, see Monitoring Translation Job Details. -
To archive this job, click the Archive icon in the Archive column.
This job will be moved from the Active Jobs section to the Archived Jobs section.
You can navigate to other pages as follows:
-
To display the Archived Jobs section below this section, in the bottom-left corner, click Show X archived jobs, where X is the number of archived jobs. For details, see Viewing Archived Jobs.
-
To return to the previous page , in the bottom-left corner, click the Back button.
2.4.1 - Translation Statuses
Translation jobs and items can have the following translation statuses:
| Status | Description |
|---|---|
| CREATED | The Cartridge created the job for sending out the translation request to the translation provider. |
| Ready to Submit | The Cartridge is ready to send out the translation request to the translation provider. |
| Submitting | The Cartridge is sending out the translation request to the Clay Tablet Platform for delivery to the translation provider. |
| SENDING | The Cartridge has completed sending out the translation request to the Clay Tablet Platform for delivery to the translation provider. |
| SENDING_TO_COPY_BACK | The Cartridge is preparing to copy the translation request from the source locale to the target locale, without sending them out for translation. |
| SENT_TO_PLATFORM | The Cartridge sent the translation request to the Clay Tablet Platform for delivery to the translation provider. |
| SENT_TO_TRANSLATOR | The Clay Tablet Platform sent the translation request to the translation provider. |
| IN_TRANSLATION | The translation provider has received the translation request and has not yet returned the translated item. |
| REVIEW_TRANSLATION | The Cartridge has received the translated asset back from the translation provider, and it is ready for review. |
| TRANSLATION_REJECTED | A Cartridge user has reviewed and rejected the translated asset. |
| COMPLETED | A Cartridge user has reviewed and approved the translated asset. |
| COMPLETED_NO_NEED_TO_TRANSLATE | There is no translatable content in this translation request. |
| COMPLETED_COPY_BACK | The Cartridge has finished copying the translation request in the job from the source locale to the target locale. |
| CANCELLED | The job was canceled and the assets were not translated. |
| Error |
2.4.2 - Monitoring Translation Job Details
The Requested Translation page opens when you click the Search icon ![]() in the View column for a translation job in the Active Jobs section of the Manage Translation Jobs page.
in the View column for a translation job in the Active Jobs section of the Manage Translation Jobs page.
- The General tab displays detailed information about an active job. When you open the page, this tab opens. For details, see Translation Job General Details.
- The Translations tab displays detailed information about the translation status of the items in the job. For details, see Translation Job Item Details.
From the Translations tab, you can also view additional information about the translation request for a particular item. For details, see Request Information Summary.
2.4.2.1 - Translation Job General Details
Translation Job General Details
The General tab of the Requested Translation page opens when you click the Search icon ![]() in the View column for a translation job in the Active Jobs or Archived Jobs section of the Manage Translation Jobs page. For details, see Monitoring Translation Job Details.
in the View column for a translation job in the Active Jobs or Archived Jobs section of the Manage Translation Jobs page. For details, see Monitoring Translation Job Details.
![]()
It displays the following information about the translation job:
| Field | Description |
|---|---|
| Job ID | Clay Tablet’s unique identifier of the translation job. |
| Submitted | The date and time that the job was submitted for translation, in the following format: E MM DD YYYY HH:MM:SS, for example: Mon Jun 26 21:17:30 GMT 2017. |
| Updated Date | The date and time that the job was last updated, in the following format: E MM DD YYYY HH:MM:SS, for example: Mon Jun 26 21:17:30 GMT 2017. |
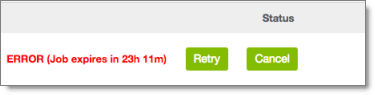
| Status | The status of the translation job. For a list and description of translation statuses, see Translation Statuses. Note: If a job has Error status, see more information inActions. |
| Name | The name of the translation job. |
| Description | The description of the translation job, if entered. |
| Provider | The translation provider to which Clay Tablet sent this translation job. |
| PO Number | The Purchase Order (PO) number of the translation job, if entered. |
Actions
- In the bottom-left corner, you can click Back to return to the Manage Translation Jobs page.
- You can click the Translations tab to view detailed information about the translation status of the items in the job. For details, see Translation Job Item Details.
- If the job status is Error, it indicates that the job submission was not successful. If the job has not expired, you can click Retry to resubmit the job, or Cancel to cancel and delete the job. Resubmitting the job sends it from the Pending Jobs section, and then it is displayed in the Active Jobs section.
Note: You set the job expiration interval in: Administration > Global Preferences > Custom Preferences > Clay Tablet> Retention Days. The default expiration interval is one day. You can enter the number of days for job expiration.
2.4.2.2 - Translation Job Item Details
Translation Job Item Details
The Translations tab of the Requested Translation page opens when you click on the tab after clicking the Search icon ![]() in the View column for a translation job in the Active Jobs or Archived Jobs section of the Manage Translation Jobs page. For details, see Monitoring Translation Job Details.
in the View column for a translation job in the Active Jobs or Archived Jobs section of the Manage Translation Jobs page. For details, see Monitoring Translation Job Details.
![]()
This tab displays the following information about the translation status of the items in the translation job. The items are sorted by item ID:
| Field | Description |
|---|---|
| Item ID | Salesforce Commerce Cloud’s unique identifier of a translated item in a job. |
| Item Type | The type of item, which is one of the following: * catalog: A catalog of products. * category: A category of products. * content: A website content item. * folder: A folder containing website content items. * product: A product in a catalog. |
| Source Language | The language code and locale of the source language of the item sent for translation. * The Clay Tablet language code is on the left. For a list and descriptions of these language codes, refer to the Lionbridge Cartridge for Salesforce Commerce Cloud Installation and Configuration Guide. * The Clay Tablet language code is on the left. For a list and descriptions of these language codes, see Appendix: Language Codes. * The Salesforce Commerce Cloud language code is on the right, in brackets. **Tip**: To view the content item in its source language, click the link. |
| Target Language | The language code of the target language of the item sent for translation. * The Clay Tablet language code is on the left. For a list and descriptions of these language codes, refer to the Lionbridge Cartridge for Salesforce Commerce Cloud Installation and Configuration Guide. * The Clay Tablet language code is on the left. For a list and descriptions of these language codes, see Appendix: Language Codes. * The Salesforce Commerce Cloud language code is on the right, in brackets. **Tip**: To view the content item in its target language, if available, click the link. |
| Submitted | The date the translation job was submitted, in the following format: MM/DD/YY. |
| Updated Date | The date the translation job was last updated, in the following format: MM/DD/YY. |
| Status | The translation status of the item. For a list and description of translation statuses, see Translation Statuses. |
| View More | Click the link to view additional information about the translation request for this item. There is a unique translation request for each item and language pair. For details, see Request Information Summary. |
Actions
- To view additional information about the translation request for an item, click the link in the View More column. For details, see Request Information Summary.
- To reverse the sort order or to sort the items by another column, click the column heading. The triangle on the right side of the column indicates if the column is sorted in ascending or descending order.
- If there are more than 10 items in the job, they are displayed on multiple sub-pages. To navigate to a different sub-page in the section, click the sub-page numbers in the bottom-right corner of the section.
Note: The bottom-left corner of the tab states the number of items displayed in this sub-page and the total number of items in the job.
- In the bottom-left corner, you can click Back to return to the Manage Translation Jobs page.
- You can click the General tab to view information about the translation job. For details, see Translation Job General Details.
2.4.2.3 - Request Information Summary
The Request Information Summary window opens when you click a link in the View More column in the Translations tab of the Requested Translations page. For details, see Translation Job Item Details.
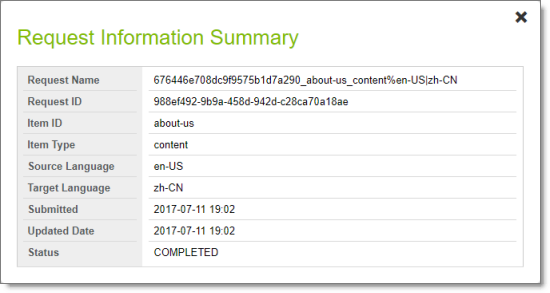
There is a unique translation request for each item and language pair. For example, if you translate an item into three languages, there are three translation requests, one for each pair of source and target languages. This window displays the following information about a translation request:
| Field | Description |
|---|---|
| Request Name | The Cartridge’s user-friendly internal identifier for the translation request, which contains the item ID, the item type, and the source and target language codes (all described below). |
| Request ID | The Cartridge’s internal identifier for the translation request. |
| Item ID | Salesforce Commerce Cloud’s unique identifier of a translated item in a job. |
| Item Type | The type of item, which is one of the following: * catalog: A catalog of products. * category: A category of products. * content: A website content item. * folder: A folder containing website content items. * product: A product in a catalog. |
| Source Language | The language code of the source language of the item sent for translation. |
| Target Language | The language code of the target language of the item sent for translation. |
| Submitted | The date and time the translation job was submitted, in the following format: YYYY-MM-DD kk:mm. |
| Updated Date | The date and time the translation job was last updated, in the following format: YYYY-MM-DD kk:mm. |
| Status | The translation status of the item. For a list and description of translation statuses, see Translation Statuses. |
- When you are done, click the X in the top-right corner to close the window.
2.4.3 - Viewing Archived Jobs
You archive a job so that it will no longer be displayed in the Active Jobs section of the Manage Translation Jobs page. Typically, you archive a job after all its items have been translated and approved, and it has Completed status.
To view archived jobs:
- In the bottom of the Active Jobs section of the Manage Translation Jobs page, click Show X archived jobs, where X is the number of archived jobs.

The Manage Translation Jobs page expands, displaying the Archived Jobs section below the Active Jobs section.
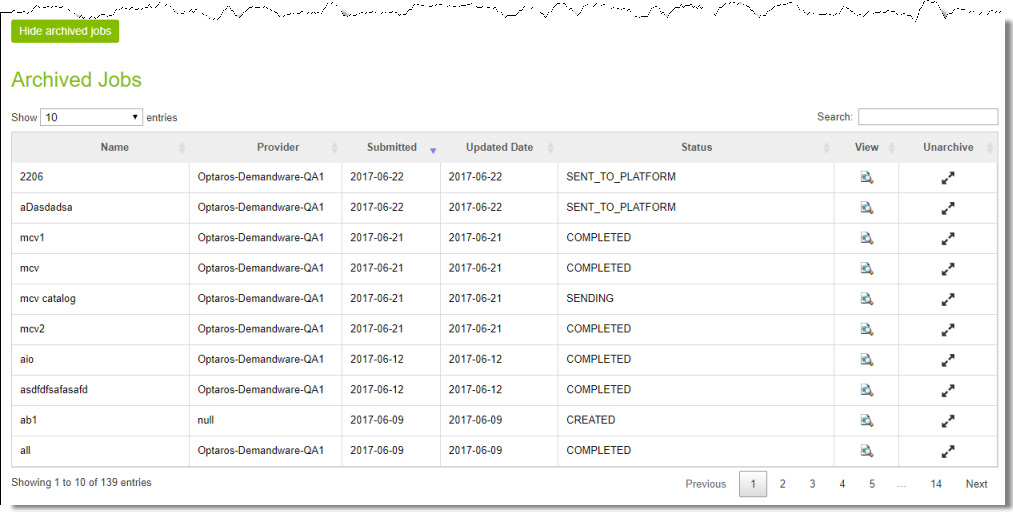
The Archived Jobs section displays the following information about archived jobs:
| Column | Description |
|---|---|
| Name | The name of the archived translation job. |
| Provider | The translation provider to whom the Clay Tablet Platform sends the translation job. |
| Submitted | The date the translation job was submitted, in the following format: MM/DD/YY. |
| Updated Date | The date the translation job was last updated, in the following format: MM/DD/YY. |
| Status | The translation status of the job. For a list and description of translation statuses, see Translation Statuses. |
The jobs are displayed in reverse chronological order by the date they were submitted.
Actions
You can do one or more of the following to facilitate viewing specific jobs in this section:
- To specify how many items to display in a sub-page of the section, select the number to display from the Show X entries list in the top-left corner of the section.
- To search for a string, enter it in the Search box in the top-right corner of the section. The list automatically updates as you type, displaying only jobs that match what you type in one of the columns.
- To reverse the sort order or to sort the jobs by another column, click the column heading. The triangle on the right side of the column indicates if the column is sorted in ascending or descending order.
- To navigate to a different sub-page in the section, click the Previous, Next, and sub-page numbers in the bottom-right corner of the section.
Note: The bottom-left corner of the section states the number of jobs displayed in this sub-page and the total number of jobs.
You can perform the following actions on individual jobs:
- To view additional information about the job, click the Search icon in the View column. For details, see Monitoring Translation Job Details.
- To unarchive this job, click the Unarchive icon in the Unarchive column. This moves the job to the Active Jobs section.
You can navigate to other pages as follows:
- To display the Archived Jobs section below this section, in the bottom-left corner, click Show X archived jobs, where X is the number of archived jobs. For details, see Viewing Archived Jobs.
- To return to the previous page , in the bottom-left corner, click the Back button.