Configuring the Lionbridge App in CloudBroker
A site administrator configures and manages the Lionbridge App’s configuration in CloudBroker, which is a Lionbridge SaaS for configuring apps that are plug-ins to SaaS content systems. The Lionbridge App for Oracle Eloqua is your site.
-
Log in to CloudBroker as a site administrator. For details, see Getting Started with CloudBroker.
-
Perform the following configuration tasks:
- Optional. Configure any of the following advanced settings:
- Configure users, teams, and access, as described in Configuring User Access.
1 - Configuring Language Mappings
You configure language mappings so that:
- The Lionbridge App correctly identifies the source and target languages of your content.
- The Lionbridge App displays languages in the optimal order for your end users.
-
In the Site Administration menu on the left, ensure that My Site is selected, so that the My Site page is open. This is the default selection when you log into CloudBroker as a site administrator. For detailed information about this page, see Viewing Lionbridge App Information and Usage Data.
-
Click Map Languages.
The Language Mapping dialog box opens.
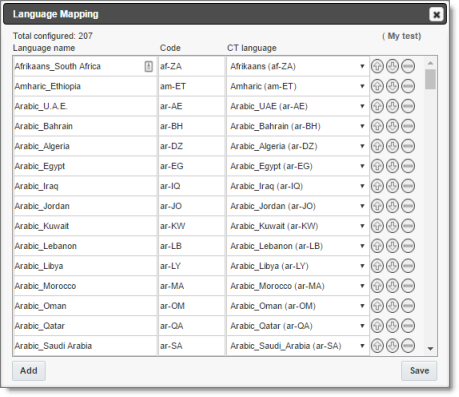
- The top-left corner of the dialog box displays the number of mappings between Eloqua languages and Clay Tablet languages.
- The top-right corner of the dialog box displays the name that Lionbridge Connector personnel assigned to your company’s site.
By default, the Lionbridge App includes predefined mappings between Microsoft locales used by Eloqua, ISO codes, and Clay Tablet language codes.
In CloudBroker, you can modify or delete the current mappings and add new mappings. The following information is displayed about each language mapping:
| Column |
Description |
| Language name |
The name of the language in Eloqua. For a list of Eloqua language names and codes, see Appendix: Eloqua Language Codes. |
| Code |
The Eloqua language’s ISO code. For a list of Eloqua names and codes, see Appendix: Eloqua Language Codes. |
| CT language |
The Clay Tablet language code for the language. |
- You can modify the following aspects of a language mapping:
- To map a language to a different Clay Tablet language code, select a language from the dropdown list in the CT language column.
- To change the order in which a language is displayed to your users when they send out content for translation, use the Move Up
 and Move Down
  buttons.
- To remove a language mapping, click the corresponding Delete button
 .
.
Note: Remove a language mapping does not affect any translation jobs in progress that use that mapping.
-
Optional. To add a new language mapping, click Add. The Lionbridge App adds a blank line at the bottom of the list. Enter the language name and ISO code, and select the corresponding Clay Tablet language code from the list.
-
When you are done, click Save to save your changes.
2 - Configuring Global Translation Settings
The Lionbridge App’s global translation settings determine how it sends out all translation jobs. These settings include:
- the license for the Lionbridge App and its entry point from within Eloqua
- the source and target languages available for translation
- email notification settings
- whether to use a local translation memory
To set the global translation settings:
-
In the Site Administration menu on the left, ensure that My Site is selected, so that the My Site page is open. This is the default selection when you log into CloudBroker as a site administrator. For detailed information about this page, see Viewing Lionbridge App Information and Usage Data.
-
Click Configure Site.
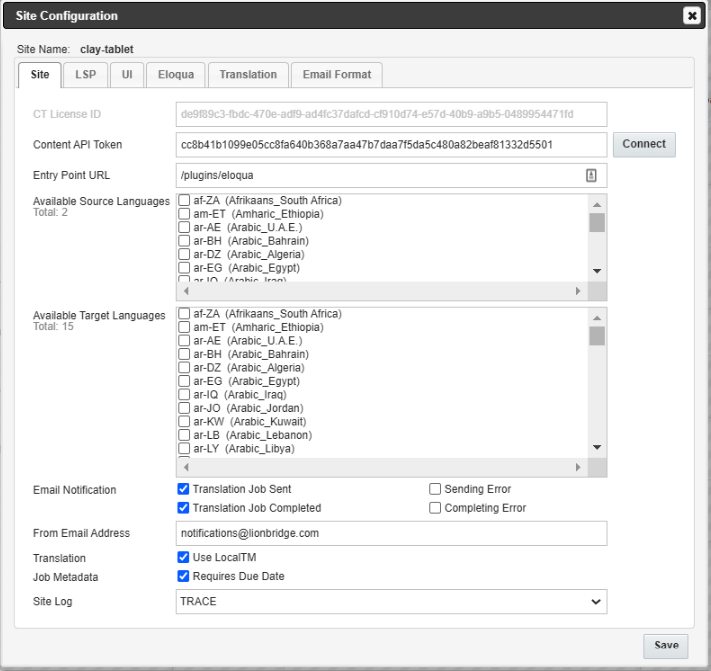
The Site Configuration dialog box opens, and the Site tab is displayed by default. The Site Name field at the top of the dialog box displays the name of your company’s site.
- Specify the following settings:
| Setting |
Description |
| CT License ID |
Your company’s license for all supported Lionbridge App services. Either Lionbridge Connector personnel enters this value or you enter this value for your company after you receive it from the Lionbridge Connector Team. |
| Content API Token |
Enter your access token for the Clay Tablet. The Lionbridge Connector Team provides you with this token.
1. Click the Connect button to verify that the App can access the Content API.
A message box indicates that the test was successful. It lists the translation providers that have been migrated from version 1.x of the App and the Oracle Eloqua sites that use this token.
Note: If the test fails, verify your token. If the test continues to fail, contact Lionbridge Connector Support. For details, see How to Contact Lionbridge Connector Support.
1. Click OK to close the message box. |
| Entry Point URL |
Read only. The URL of the default entry point for the Lionbridge App for Oracle Eloqua in CloudBroker. |
| Available Source Languages |
Select the check boxes for the languages that users can select as the source language when sending out content for translation. The list displays all mapped languages.
* The list displays the Microsoft locale and ISO code for each mapped language.
* Total indicates the number of languages that are currently selected. |
| Available Target Languages |
Select the check boxes for the languages that users can select as a target language when sending out content for translation. The list displays all mapped languages.
* The list displays the Microsoft locale and ISO code for each mapped language.
* Total indicates the number of languages that are currently selected. |
| Email Notification – Translation Job Sent |
Select this check box to send out an email notification when a user sends out a job for translation. The Lionbridge App sends the notification to the user who sent out the job. |
| Email Notification – Translation Job Completed |
Select this check box to send out an email notification when a translation job is completed. The Lionbridge App sends the notification to the user who sent out the job. |
| Email Notification – Sending Error |
Select this check box to send out an email notification when a translation job fails on sending stage. The Lionbridge App sends the notification to the user who sent out the job. |
| Email Notification – Completing Error |
Select this check box to send out an email notification when a translation job fails while completing. The Lionbridge App sends the notification to the user who sent out the job. |
| From Email Address |
The email address from which the Lionbridge App notification emails will be sent. The default email address is noreply.connectors@lionbridge.com. |
| Translation – Use Local TM |
Translated content is stored in a local translation memory (TM). This setting determines whether to check previously translated content in the local TM for any content changes, and send only changed content out for translation. If content was previously translated and it has not changed, then the Lionbridge App does not send it for translation again: Instead, it uses the stored translation. This feature reduces the quantity of content that the Lionbridge App sends to translation providers, which reduces your cost. However, it increases the processing time before sending out the items for translation. |
| Job Metadata – Requires Due Date |
Determines whether to show or hide the Due Date field in the Translation Job tab of the New Translation dialog box and in the Send Out Queued Items dialog box. |
| Site Log |
Select the logging level for your site. There are four levels of logging: Error, Info, Debug, and Trace.
Recommendation: Initially set the log level to Debug, since this level of logging has all the details of the Lionbridge App translation process. This level of detail is required for Lionbridge Connector Support to assist you with any implementation issues. After the end-to-end translation process is running smoothly, you can change this to Error, so that only warnings and errors are logged. |
- Click Save.
3 - Configuring Lionbridge Freeway Authentication
Note: This section is relevant only if Lionbridge Freeway is your translation provider.
If Lionbridge Freeway is your translation provider, you can configure authentication to Lionbridge Freeway from the Lionbridge App. This facilitates delivering your content from the Lionbridge App, via the Clay Tablet, to Lionbridge Freeway.
-
In the Site Administration menu on the left, ensure that My Site is selected, so that the My Site page is open. This is the default selection when you log into CloudBroker as a site administrator. For detailed information about this page, see Viewing Lionbridge App Information and Usage Data.
-
Click Configure Site.
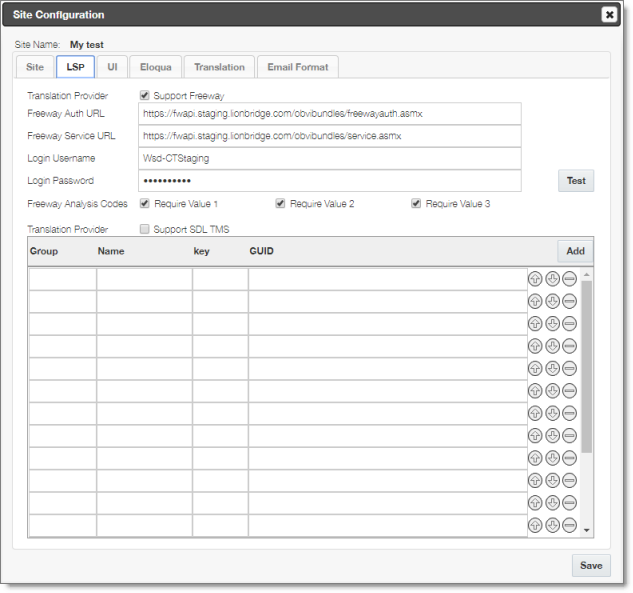
The Site Configuration dialog box opens. The Site Name field at the top of the dialog box displays the name of your company’s site.
- Click the LSP tab.
-
To enable support for the Lionbridge Freeway translation provider, select the Support Freeway check box.
-
Specify the following Lionbridge Freeway settings:
| Setting |
Description |
| Freeway Auth URL |
The URI where the App receives an authentication token for Lionbridge Freeway. |
| Freeway Service URL |
The URI where the App can request a list of Lionbridge Freeway analysis codes. |
| Login Username |
The login name for the Lionbridge Freeway server. |
| Login Password |
The login password for the Lionbridge Freeway server. |
| Freeway Analysis Codes |
Each check box indicates whether to display the corresponding analysis-code field to users when they send out content for translation to Lionbridge Freeway.
* **Require Value 1**: If this check box is selected, the first analysis code configured for your company (for example, region) must be displayed to users when sending content to Freeway.
* **Require Value 2**: If this check box is selected, the second analysis code configured for your company (for example, department) must be displayed to users when sending content to Freeway.
* **Require Value 3**: If this check box is selected, the third analysis code configured for your company (for example, priority) must be displayed to users when sending content to Freeway.
**Warning:** This configuration is required for full integration between the App and Freeway. Otherwise, the App cannot retrieve and display analysis code options, and the user cannot specify analysis codes for projects submitted to Freeway. However, even without this configuration, the App can still send submitted content to Freeway. |
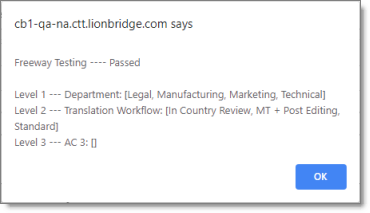
- Optional. Click Test to test your Freeway settings.
A message box opens, displaying your test results and the Freeway analysis codes from the Freeway server.
- Click Save.
4 - Configuring SDL TMS Entries
Note: This section is relevant only if SDL TMS is your translation provider.
If SDL TMS is your translation provider, you can configure SDL TMS configuration entries, which are used for submitting translation jobs, via the Clay Tablet, to SDL TMS.
-
In the Site Administration menu on the left, ensure that My Site is selected, so that the My Site page is open. This is the default selection when you log into CloudBroker as a site administrator. For detailed information about this page, see Viewing Lionbridge App Information and Usage Data.
-
Click Configure Site.
The Site Configuration dialog box opens. The Site Name field at the top of the dialog box displays the name of your company’s site.
- Click the LSP tab.
-
To enable support for the SDL TMS translation provider, select the Support SDL TMS check box.
-
Enter the following information about an SDL TMS configuration entry, which is used for submitting translation jobs to SDL TMS:
| Column |
Description |
| Group |
The Dropbox selection group. |
| Name |
The name to display in the Dropbox selection box. |
| Key |
The key for submitting a job to SDL TMS. |
| GUID |
The key from the Dropbox selection box links to a GUID in SDL TMS. Each GUID is related to a different TM (translation memory), TermBase, and Workflow. |
-
Optional. Modify the order of a configuration entry. To change the order in which an entry is displayed to your users when they send out content for translation, use the Move Up and Move Down buttons.
-
Optional. To remove a configuration entry, click the corresponding Delete button .
-
Click Save.
5 - Configuring the User Interface
In the UI tab of the Site Configuration dialog box, you can configure the user interface of the Lionbridge App. Specifically, you can modify the following aspects of the PO Reference field, which is displayed in the Translation Job tab of the New Translation dialog box and in the Send Out Queued Items dialog box:
- the label of the PO Reference field
- configure this field to be either a dropdown list, with pre-configured entries, or a freeform text box
- If you configure this field to be a dropdown list, you can specify the pre-configured entries available for selection
-
In the Site Administration menu on the left, ensure that My Site is selected, so that the My Site page is open. This is the default selection when you log into CloudBroker as a site administrator. For detailed information about this page, see Viewing Lionbridge App Information and Usage Data.
-
Click Configure Site.
The Site Configuration dialog box opens. The Site Name field at the top of the dialog box displays the name of your company’s site.
- Click the UI tab.
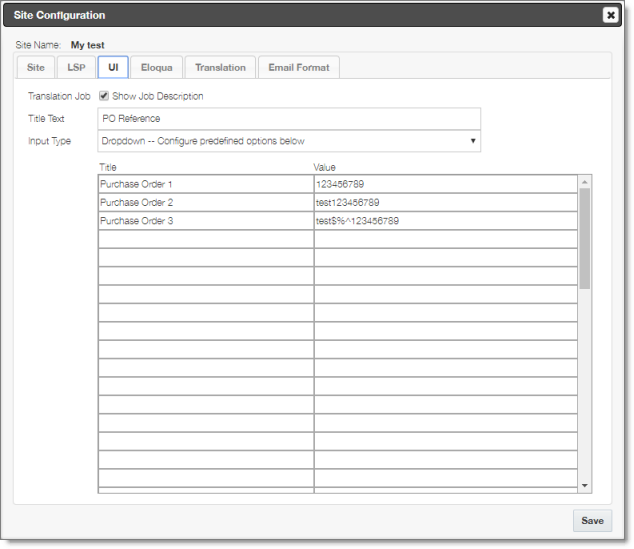
- Optional. To hide the Job Description field when sending out content for translation, you can clear the Show Job Descriptioncheck box. By default, this check box is selected.
Tip: You may want to hide the Job Description field if your translation provider is Lionbridge Freeway, which instead uses the Special Instruction field for this purpose.
-
In the Title Text field, you can specify an alternative label for the PO Reference field, which is displayed in the Translation Job tab of the New Translation dialog box and in the Send Out Queued Items dialog box. Enter your custom label for this field here.
-
In the Input Type dropdown list, select one of the following options:
- Input: This field will be displayed as a freeform text box. This is the default value.
- Dropdown – Configure predefined options below: This field will be displayed as a dropdown list, with pre-configured entries. You specify those entries In the next step.
-
If in the previous step you selected Dropdown – Configure predefined options below as the Input Type, then in the table you specify a title-value pair for each entry that will be available for selection:
- The Title is displayed in the dropdown list and is available for selection.
- The Value is the corresponding input, such as the actual purchase order number.
-
Click Save.
6 - Viewing and Testing Eloqua Authentication Settings
The Lionbridge App must authenticate with Oracle Eloqua. You can view and test the authentication settings in the Authentication section of the Eloqua tab of the Site Configuration dialog box. For a detailed description of the other settings in this tab, see Configuring User Access.
To view and test these settings:
-
In the Site Administration menu on the left, ensure that My Site is selected, so that the My Site page is open. This is the default selection when you log into CloudBroker as a site administrator. For detailed information about this page, see Viewing Lionbridge App Information and Usage Data.
-
Click Configure Site.
The Site Configuration dialog box opens. The Site Name field at the top of the dialog box displays the name of your company’s site.
- Click the Eloqua tab.
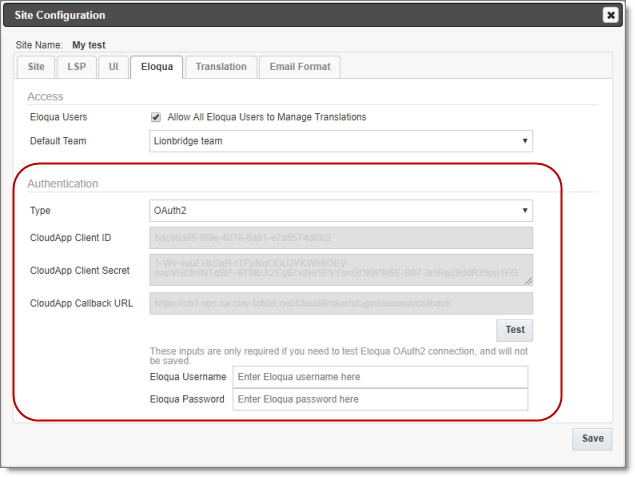
- You can view the following read-only information in the Authentication section:
| Field |
Description |
| Type |
The type of authentication, which is OAuth2. |
| CloudApp Client ID |
The Client ID (App id) for the Lionbridge App. |
| CloudApp Client Secret |
The secret access token that Eloqua generated for the Lionbridge App. |
| CloudApp Callback URL |
The callback URL registered in Eloqua for the Lionbridge App. |
For a detailed description of the other fields in this tab, see Configuring User Access.
- Optional. You can test the authentication settings.
a. Enter values to test. These values are only for testing. They are not saved.
| Field |
Description |
| Eloqua Username |
You can enter an Oracle Eloqua username to test the authentication settings you entered above. |
| Eloqua Password |
You can enter a password for the Oracle Eloqua username to test the authentication settings you entered above. |
b. Click the Test button.
A message box indicates that the test was successful. Click OK to close the message box.
- Close the dialog box.
7 - Configuring Translation Settings
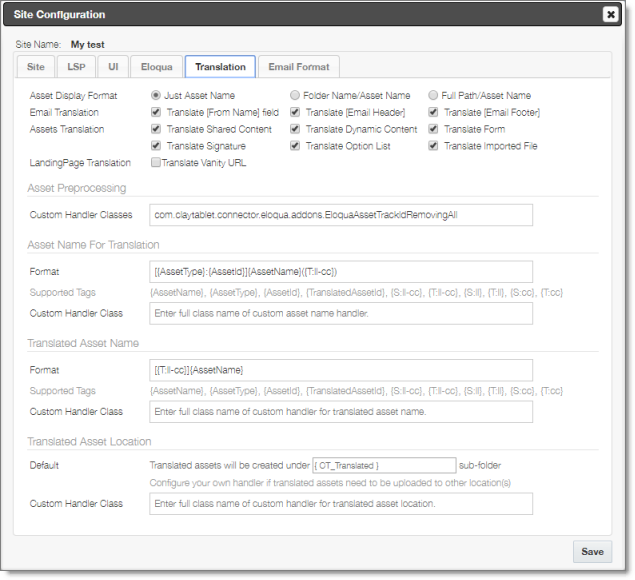
You can configure the following types of translation settings in the Translation tab of the Site Configuration dialog box.
- The format of asset names when they are displayed in the New Translation dialog box, after the corresponding assets have been collected for translation.
- Whether the Lionbridge App includes the From Name field, email header, and/or email footer in Email assets that it sends for translation (in the Email Translation section).
- Which asset types the Lionbridge App sends out for translation.
- A custom Java class for processing assets before the App sends them out for translation, (in the Asset Preprocessing section).
- The filename format of the source assets that the Lionbridge App sends out for translation (in the Asset Name for Translation section) . By default this is [{AssetType}:{AssetId}]{AssetName}({T:ll-cc}), for example: [Email:127]My testmail(fr-CA). The Lionbridge App has a default translation-asset-name handler that supports some predefined building blocks. You can modify the default filename format either by using either the building blocks or a custom handler.
- The filename format of the target assets that the Lionbridge App receives from translation (in the Translated Asset Name section). By default this is [{T:ll-cc}]{AssetName}, for example: [(fr-CA)] My test mail. The Lionbridge App has a default translated-asset-name handler that supports some predefined building blocks. You can modify the default filename format either by using either the building blocks or a custom handler.
- The location of the target assets that the Lionbridge App receives from translation (in the Translated Asset Location section). The Lionbridge App has a default translated-asset-location handler that uploads translated assets to Eloqua under the {CT_Translated} sub-folder of the folder where source assets are located. You can specify another name for this sub-folder. Alternatively: You can use the
com.claytablet.connector.eloqua.addons.SameFolderTranslatedAssetLocationHandler custom handler class to configure the App to place translated assets in the same folder as the source assets; You can use a custom handler to specify a different location.
- Whether the Lionbridge App includes the vanity URL of a landing page in the job that it sends for translation (in the LandingPage Translation section).
-
In the Site Administration menu on the left, ensure that My Site is selected, so that the My Site page is open. This is the default selection when you log into CloudBroker as a site administrator. For detailed information about this page, see Viewing Lionbridge App Information and Usage Data.
-
Click Configure Site.
The Site Configuration dialog box opens. The Site Name field at the top of the dialog box displays the name of your company’s site.
- Click the Translation tab.
- Optional. Depending on what you want to configure, do one or more of the following:
- In the Asset Display Format section, select one of the following radio buttons to indicate how to display asset names in the New Translation page, after assets are collected for translation. This determines how quickly the list of asset names loads in that page.
- Just Asset Name: Only the asset name is displayed. This is the fastest option.
- Folder Name/Asset Name: Only the asset name and the parent folder name are displayed. This is the intermediate option and the default value.
- Full Path/Asset Name: The full path of the asset name is displayed. This is the slowest option.
- In the Email Translation section, you can select or clear the check boxes described below. By default, all these check boxes are selected.
- Select the Translate [From Name] Field check box to configure the Lionbridge App to include the From Name field in Email assets that it sends for translation.
- Select the Translate [Email Header] check box to configure the Lionbridge App to include the email header in Email assets that it sends for translation.
- Select the Translate [Email Footer] check box to configure the Lionbridge App to include the email footer in Email assets that it sends for translation.
- In the Assets Translation section, you can select the following check boxes to configure the Lionbridge App to send additional asset types for translation:
- Select the Translate Shared Content check box to configure the Lionbridge App to send shared content for translation. By default, this check box is selected.
- Select the Translate Dynamic Content check box to configure the Lionbridge App to send dynamic content for translation. By default, this check box is selected.
- Select the Translate Form check box to configure the Lionbridge App to send forms for translation. By default, this check box is selected.
- Select the Translate Signature check box to configure the Lionbridge App to send signatures for translation. By default, this check box is cleared.
- Select the Translate Option List check box to configure the Lionbridge App to send option lists for translation. By default, this check box is selected.
- Select the Translate Imported File check box to configure the Lionbridge App to send files for translation that are in File Storage in Eloqua’s Component Library. By default, this check box is selected.
- In the LandingPage Translation section, you can select the Translate Vanity URL check box to instruct the App to send the vanity URL of a landing page for translation.
- In the Asset Preprocessing section, in the Custom Handler Classes field, you can specify the name of a Java class that you create for processing the asset before the App sends it for translation. For example, you can create and specify the com.claytablet.connector.eloqua.addons.EloquaAssetTrackIdRemovingAll custom Java class to remove the Eloqua tracking ID from the URL of hyperlinks inside the content of an asset before the App sends it for translation. By default, this field is blank.
- In the Asset Name for Translation section, in the Format field, you can use the building blocks in the table below to specify the filename format of asset files sent out for translation. The default format is [{AssetType}:{AssetId}]{AssetName}({T:ll-cc}), for example: [Email:127]My testmail(fr-CA).
- In the Translated Asset Name section, in the Format field, you can use the building blocks in the table below to specify the filename format of translated asset files. The default format is [{T:ll-cc}]{AssetName}, for example: [(fr-CA)] My test mail.
- In the Translated Asset Location section:
- In the Default field, you can specify an alternate name for the location of the target assets that the Lionbridge App receives from translation. The default name of the location is the {CT_Translated} sub-folder of the folder where source assets are located. This is specified by the default translated-asset-location handler.
- In the Custom Handler Class field, you can use the com.claytablet.connector.eloqua.addons.SameFolderTranslatedAssetLocationHandler custom custom handler class to specify a different location for the translated assets.
Note: When the App sends out assets for translation, it creates placeholder assets for the content of the language versions of the specified target languages in ithis location.
| Building Block |
Description |
Example |
| {AssetType} |
A type of asset. |
Email |
| {AssetId} |
The Lionbridge App’s internal identifier for the asset. |
111 |
| {AssetName} |
The name of the asset that is displayed in Eloqua. |
My test mail |
| {S:ll-cc} |
The language code and the country code of the source language, separated by a hyphen. |
en-CA |
| {S:ll} |
The language code only of the source language. |
en |
| {S:cc} |
The country code only of the source language. |
CA |
| {T:ll-cc} |
The language code and the country code of the target language, separated by a hyphen. |
fr-CA |
| {T:ll} |
The language code only of the target language. |
fr |
| {T:cc} |
The country code only of the target language. |
CA |
-
Optional. If you want to configure a custom handler, contact Lionbridge Connector Support. For details, see How to Contact Lionbridge Connector Support.
-
Optional. Enter the full class name of each handler in the Custom Handler Class field of the relevant section. If this field is blank, the App uses the default handler.
Tip: To configure the App to place translated assets in the same folder as the source assets, enter the com.claytablet.connector.eloqua.addons.SameFolderTranslatedAssetLocationHandler custom handler class.
- Click Save.
8 - Configuring Email Notification Formats
In the Email Format tab of the Site Configuration dialog box, you can configure the format of email notifications that the Lionbridge App sends when a translation job is completed.
-
In the Site Administration menu on the left, ensure that My Site is selected, so that the My Site page is open. This is the default selection when you log into CloudBroker as a site administrator. For detailed information about this page, see Viewing Lionbridge App Information and Usage Data.
-
Click Configure Site.
The Site Configuration dialog box opens. The Site Name field at the top of the dialog box displays the name of your company’s site.
- Click the Email Format tab.
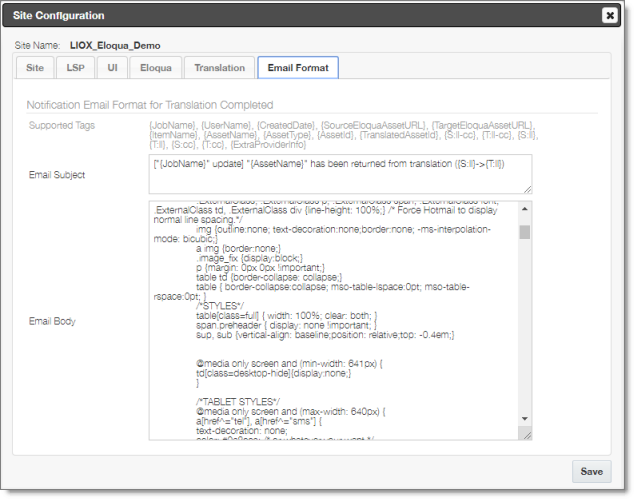
- In the Notification Email Format for Translation Completed section, you can use HTML or the following building blocks to specify the email subject and body, except as specified:
| Building Block |
Description |
Example |
| {AssetType} |
A type of asset. |
Email |
| {AssetId} |
The Lionbridge App’s internal identifier for the asset. |
111 |
| {AssetName} |
The name of the asset that is displayed in Eloqua. |
My test mail |
| {ExtraProviderInfo} |
Detailed information from the translation provider:
* For Lionbridge Freeway, this includes Freeway analysis codes.
* For SDL TMS, this includes GUIDs.
**Note:** This building block is not supported for the email subject. |
Legal |
| {JobName} |
The name of the translation job. |
My job |
| {UserName} |
The Oracle Eloqua username. |
Jen.Smith |
| {CreatedDate} |
The date that the asset was created in Eloqua, in the following format: MM/DD/YYYY hh:mm AM/PM. |
07/05/2017 11:03 AM |
{SourceEloqua
AssetURL} |
The URL of the source asset in Eloqua. |
https://secure.mycompany.eloqua.com/
Main.aspx#forms&id=123 |
{TargetEloqua
AssetURL} |
The URL of the source asset in Eloqua. |
https://secure.mycompany.eloqua.com/
Main.aspx#forms&id=456 |
| {ItemName} |
The full path of the asset. |
Emails/My email message |
{Translated
AssetId} |
The Lionbridge App’s internal identifier for the translated asset. |
222 |
| {S:ll-cc} |
The language code and the country code of the source language, separated by a hyphen. |
en-CA |
| {S:ll} |
The language code only of the source language. |
en |
| {S:cc} |
The country code only of the source language. |
CA |
| {T:ll-cc} |
The language code and the country code of the target language, separated by a hyphen. |
fr-CA |
| {T:ll} |
The language code only of the target language. |
fr |
| {T:cc} |
The country code only of the target language. |
CA |
- Click Save.
9 - Configuring Translation Providers
Very important: Do not copy the license key to multiple instances, because this is a violation of the License Agreement. Using the same license keys on multiple instances will cause the Lionbridge App to behave unexpectedly, which can result in lost translation content, orphaned projects, and inaccurate translation status reports. The Lionbridge Connectors team will support technical issues caused by duplicating or incorrectly installing license keys only on a time and materials basis.
The Lionbridge App uses the license key to move your items for translation from the Lionbridge App to the Clay Tablet, which then forwards the items to translate to your translation provider. If you are using multiple translation providers, there must be one key (file) for each provider.
Note: The Lionbridge App always initiates calls to the Clay Tablet. However, the license keys enable establishing a secure, discrete connection between the Lionbridge App instance and the Clay Tablet. They also support the return of files from translation.
Before you can send assets for translation, you must set up your Clay Tablet license key and your translation providers.
Important: Before starting, ensure you obtain your license key from the Lionbridge Connectors team. Verify that the Lionbridge Connectors team has set up your account license keys for each of your translation providers.
- In the Site Administration menu on the left, click Site Providers.
The Site Providers page opens, displaying the translation providers configured for your Oracle Eloqua site.

- To create a new translation provider, click New Provider.
Notes: To update the account license keys for a current translation provider, click Edit for that translation provider. To delete a translation provider, click Delete for that translation provider. A message box prompt you to confirms that you want to delete this translation provider. Click OK to proceed.
The New Provider dialog box opens.
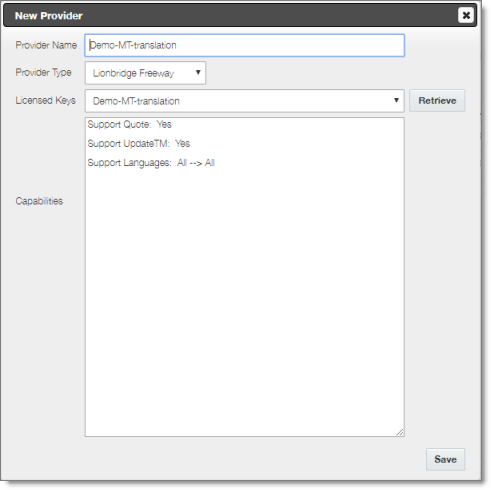
Note: If you clicked Edit, the Edit Provider dialog box opens instead. Aside from the title, it is identical to the dialog box described below.
a. In the Provider Name field, enter the name of the translation provider.
b. In the Provider Type dropdown list, select the type of translation provider. This supports sending translation metadata to specific translation providers. If you do not see your translation provider, select Generic.
c. In the Licensed Keys dropdown list, select the license key for the translation provider. This is the license key that the Lionbridge Connectors Team set up for your company for a particular translation provider on the Lionbridge Connectors License Server. Depending on the number of license keys configured for you on the Lionbridge Connectors license server (and specified by your CT License ID, in the Site tab of the Site Configuration dialog box), multiple license keys may be displayed.
d. Click Retrieve.
This populates the Capabilities box, which displays the configuration settings for this translation provider.
- Click Save.
10 - Configuring Email Notification Groups
An email notification group facilitates sending email notifications about jobs to the same group of users. You can create and edit email notification groups. When sending jobs for translation, you can select an existing group and create or edit a group. For detailed instructions, refer to the Lionbridge App for Oracle Eloqua User Guide.
To create an email notification group:
- In the Site Administration menu on the left, click Notification Groups.
The Site Email Notification Group page opens, displaying any email notification groups configured for your Oracle Eloqua site.
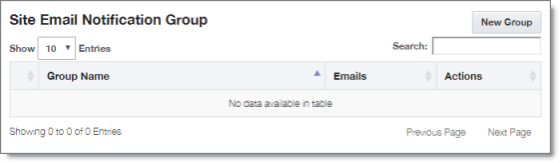
- To create a new email notification group, click New Group.
Notes: To update an existing email notification group, click Edit for that group. To delete an email notification group, click Delete for that group. A message box prompt you to confirms that you want to delete this group. Click OK to proceed.
The New Email Notification Group dialog box opens.
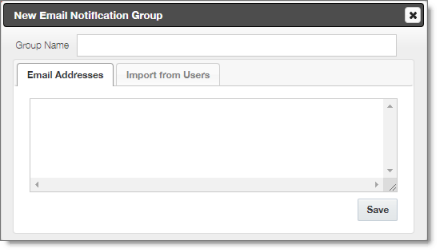
Note: If you clicked Edit, the Edit Email Notification Group dialog box opens instead. Aside from the title, it is identical to the dialog box described below.
-
In the Group Name field, enter the name of the email notification group. This is the name that will be displayed to users when they send out jobs for translation.
-
Do one or both of the following:
- In the Email Addresses tab, enter the email addresses that will receive email notifications about jobs when this email notification group is selected. Enter each email address on a separate line.
- Click the Import from Users tab.
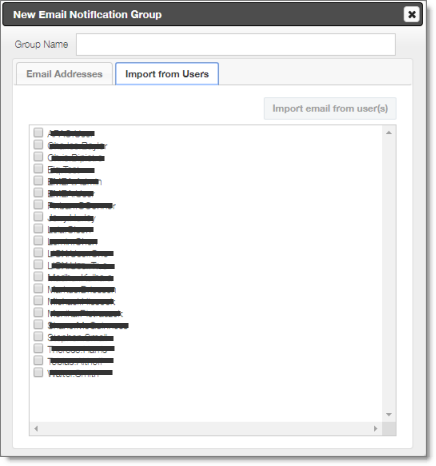
By default, this tab displays the names of any users who were previously either imported from Oracle Eloqua into the Lionbridge App or added manually to the App.
-
Select the check boxes of any users whose email addresses you want to add to this group.
-
Click Import email from user(s).
-
Click Save.
The Lionbridge App imports each selected user’s username and email address.
11 - Configuring Translation Settings for Multilingual Dynamic-Content Assets
In Eloqua, dynamic content is customer-specific content that changes depending on who is viewing it. For more information about this feature, refer to the Oracle Eloqua Marketing Cloud Service User’s Guide, available at https://docs.oracle.com/cloud/latest/marketingcs_gs/docs.htm.
You can use dynamic content assets to manage multiple languages in your assets, including emails, forms, and landing pages. For example, you can create language-specific rules to hold the content for each target language, and set up the workflow for these rules on your campaign canvas to manage all the language versions from a single email. For example, if your email contains only dynamic content assets to populate the email and its subject line, the App can provide a post-translation email in which all its dynamic content assets are translated: the content of each dynamic-content rule is translated into the appropriate language, so that all the assets are multilingual.
Note: In Eloqua, a rule is a content option for the dynamic content.
To configure translation settings for multilingual dynamic-content assets:
-
In the Site Administration menu on the left, ensure that My Site is selected, so that the My Site page is open. This is the default selection when you log into CloudBroker as a site administrator. For detailed information about this page, see Viewing Lionbridge App Information and Usage Data.
-
In the Site Extensions section, click Configure for the Dynamic Content Translation Settings site extension.
The Site Extension dialog box opens, displaying the Multilingual Dynamic Content tab.
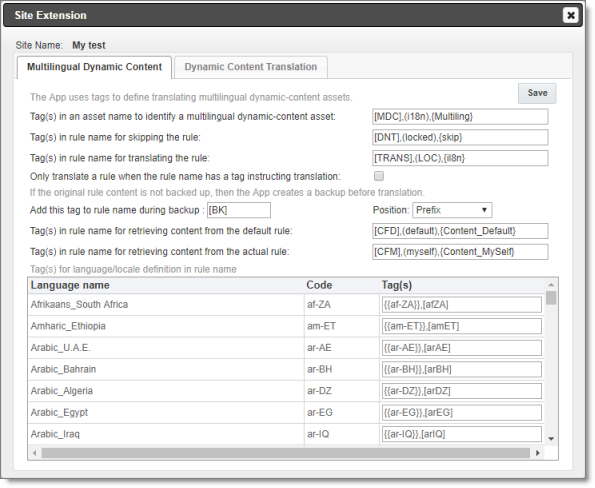
- Specify the following translation settings to specify how the App processes multilingual dynamic-content assets.
| Setting |
Description |
| Tag(s) in an asset name to identify a multilingual dynamic-content asset |
Specify the tag or tags that identify a multilingual dynamic-content asset, or accept the default values of [MDC], (i18n), and {Multiling}. For multiple tags, use a comma ( , ) separator. |
| Tag(s) in rule name for skipping the rule |
Specify the tag or tags in a rule name that instruct the App to skip a rule , so that it is not sent out for translation. Alternatively, you can accept the default values of [DNT], (locked), and {skip}. For multiple tags, use a comma ( , ) separator. |
| Tag(s) in rule name for translating the rule |
Specify the tag or tags in a rule name that instruct the App to send out a rule for translation. Alternatively, you can accept the default values of [TRANS], (LOC), and {i18n}. For multiple tags, use a comma ( , ) separator.
Note: To enable this feature, you must also select the Only translate a rule when the rule name has a tag instructing translation check box, as described below. |
| Only translate a rule when the rule name has a tag instructing translation |
Select this check box to instruct the App to send out a rule for translation only if a tag specified in the Tag(s) in rule name for translating the rule field is present in the rule name. By default, this check box is cleared. |
| Add this tag to rule name during backup |
Specify the tag that the App adds to a rule name during backup, or accept the default value of [BK]. To update the source content, you edit the source content in the backup rule and send it for translation.
Note: The App populates the backup rule with the source content, and it sends that content for translation. |
| Position |
In the dropdown list, select the position in the rule name for this tag. This is either:
* Prefix, which is at the beginning of the rule name (default value)
* Suffix, which is at the end of the rule name |
| Tag(s) in rule name for retrieving content from the default rule |
If the rule content is same for all target languages, you can enter the source content in a default rule, so that the App translates this rule into each target language. Specify the tag or tags in a rule name to identify a default rule and instruct the App to translate it. Alternatively, you can accept the default values of [CFD], (default), and {Content_Default}. For multiple tags, use a comma ( , ) separator. |
| Tag(s) in rule name for retrieving content from the actual rule |
You may not want the App to send content for translation directly from the backup rule, as described above in the note for the Add this tag to the rule name during backup option. If you want to update the source content for translation without updating the backup rule, you can use this option. In this scenario, you modify the previous translation in the target rule with new source content, and then send that out for translation. To do so, specify the tag or tags in a rule name or accept the default values of [CFM], (myself), and {Content_MySelf}. For multiple tags, use a comma ( , ) separator.
Note: If you specify this option, the App does not back up the rule, and it does not add the tag specified in the The App adds this tag to the rule name during backup option. |
-
In the Tag(s) for language/locale definition in rule name list, specify the tags for identifying the language or locale in rule names.
-
Click Save.
12 - Configuring Translation Settings for Eloqua Dynamic Content
In Eloqua, dynamic content is customer-specific content that changes depending on who is viewing it. For more information about this feature, refer to the Oracle Eloqua Marketing Cloud Service User’s Guide, available at:
https://docs.oracle.com/cloud/latest/marketingcs_gs/OMCAA/
Help/DynamicContent/DynamicContent.htm.
When the Lionbridge App collects emails and landing pages to send out for translation, it automatically collects any referenced dynamic content. You can change this behavior, for example, if you do not want to translate some dynamic content, or if you want to translate some dynamic-content rules into specific languages, as described below. Alternatively, you can configure the Lionbridge App never to send dynamic content for translation by clearing the Translate Dynamic Content check box in the Assets Translation section of the Translation tab of the Site Configuration dialog box. For detailed instructions, see Configuring Translation Settings.
To configure translation settings for Eloqua dynamic content:
-
In the Site Administration menu on the left, ensure that My Site is selected, so that the My Site page is open. This is the default selection when you log into CloudBroker as a site administrator. For detailed information about this page, see Viewing Lionbridge App Information and Usage Data.
-
In the Site Extensions section, click Configure for the Dynamic Content Translation Settings site extension.
The Site Extension dialog box opens, displaying the Multilingual Dynamic Content tab.
- Click the Dynamic Content Translation tab.
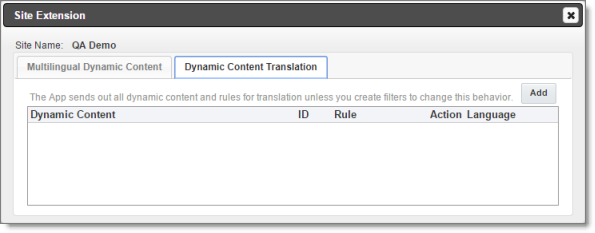
- Click Add.
If you are not currently signed in to Eloqua as an end-user, the Translation Setting tab opens.
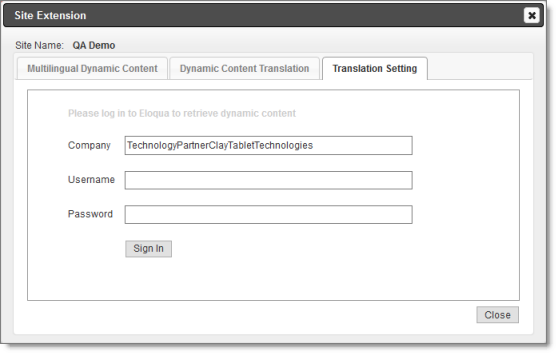
Note: The Eloqua sign-in page is displayed in this tab only if you are not currently signed in to Eloqua as an end-user. This sign-in page is not displayed in the following scenarios: if you signed in to Eloqua, clicked the More Apps button  and opened the Lionbridge App from the Apps area; if you logged into CloudBroker from the Lionbridge App with end-user credentials (not with site administrator credentials).
- If the Eloqua sign-in page is displayed in this tab, then enter your Eloqua credentials, and click Sign In. This enables the Lionbridge App to retrieve all dynamic content and its rules from Eloqua. If the sign-in page is not displayed, proceed to the next step.
The Select Asset tab opens.
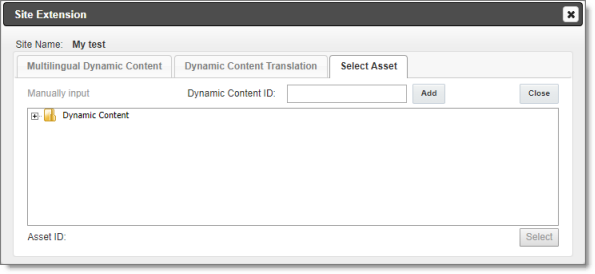
- Do one of the following:
-
In the Dynamic Content ID text box at the top of the tab, enter the asset ID and click Add.
-
Click the expand icons  to expand the tree and view the assets. Then click an asset to highlight it, and click Select.
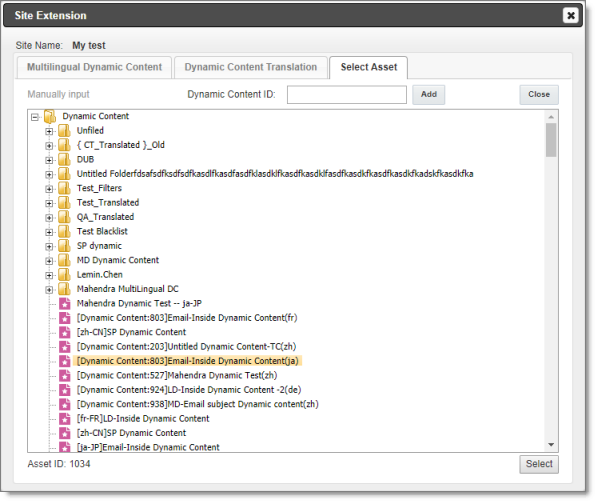
Note: The asset ID of the selected asset is displayed at the bottom of the tab.
The Translation Setting tab opens, updated for the selected dynamic content to display a row for each rule in the dynamic content, plus one additional row.
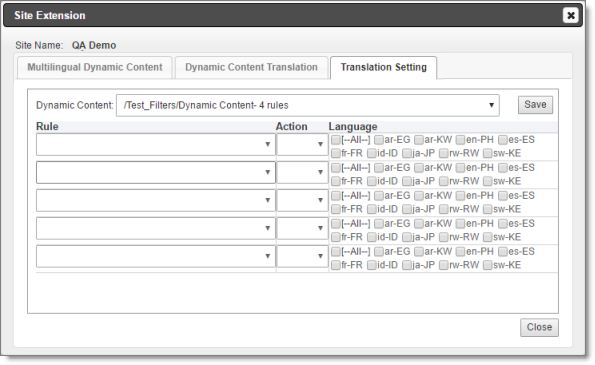
- For each displayed row, create a translation setting for each rule: (In Eloqua, a rule is a content option for the dynamic content.)
-
In the Rule column, select a rule in the dynamic content.
-
In the Action column, specify the Lionbridge App’s action for this rule, either:
- Ignore: The Lionbridge App will not send out this rule for translation for the specified languages.
- Allow: The Lionbridge App will send out this rule for translation for the specified languages.
-
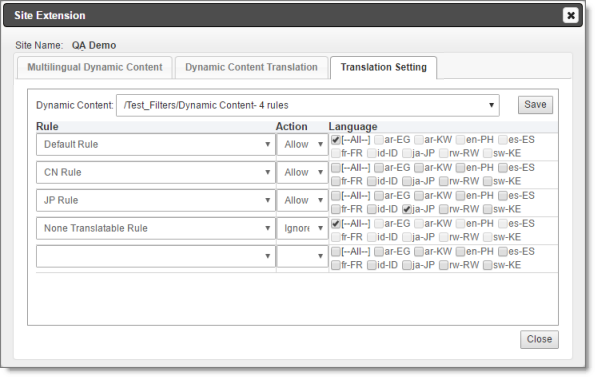
In the Language column, select the check boxes for the language codes for this setting.
- For example, if Ignore is selected, then the Lionbridge App will not send out this rule for translation in the selected languages.
- For example, if Allow is selected, then the Lionbridge App will send out this rule for translation in the selected languages.
This column displays all languages that are set up for your team, as well as an [–All–] check box to facilitate selecting all languages.
Tip: To prevent the Lionbridge App from sending out any rules in dynamic content for translation, in the Rule column, select [–All–], in the Action column, select Ignore, and in the Language column, select the [–All–] check box.

Note: If there are multiple and conflicting settings for the same rules, then the Lionbridge App prioritizes the settings with the Ignore actions over those with the Allow actions. For example, if the CN Rule rule is set to ignore all language but to allow the zh-CN language, then the Lionbridge App ignores all languages and does not send out any dynamic content for translation.
-
Click Save to save the translation settings for the specified dynamic content and its rules.
-
Repeat steps 4 and 6-8 to specify translation setting for each dynamic content and its rules.
Note: You are not prompted to re-enter your Eloqua credentials (step 4) each time.
13 - Configuring Eloqua Assets to Exclude from Translation
You can configure the App to always exclude specific Eloqua assets from translation, even if they are selected for translation by end users.
To exclude specific Eloqua assets from translation:
-
In the Site Administration menu on the left, ensure that My Siteis selected, so that the My Site page is open. This is the default selection when you log into CloudBroker as a site administrator. For detailed information about this page, see Viewing Lionbridge App Information and Usage Data.
-
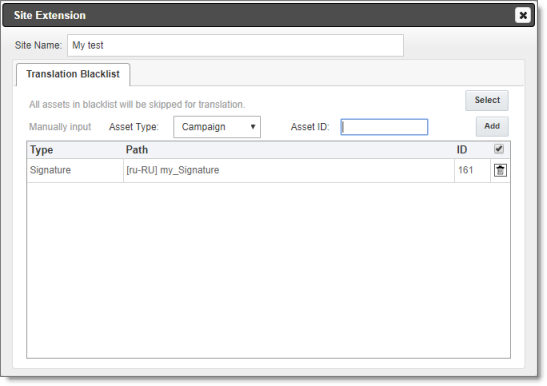
In the Site Extensions section, click Configure for the Asset Translation Blacklist site extension.
The Site Extension dialog box opens, displaying the Translation Blacklist tab.
- Do one of the following:
The Select Assets tab opens.
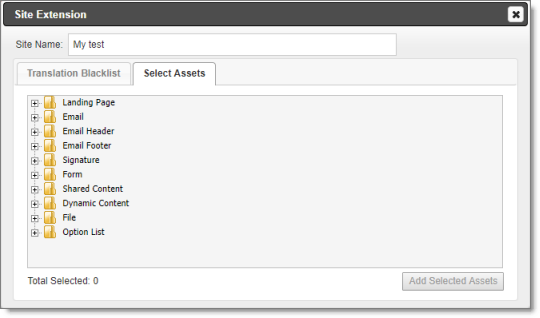
Click the expand icons to view assets, and select the check boxes of assets to exclude from translation.
Note: You can expand and select assets from multiple branches.
- Click Add Selected Assets.
The Translation Blacklist tab reopens, displaying the assets you just added.
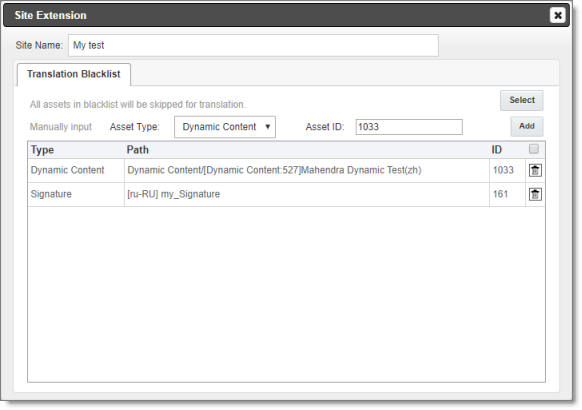
The following information is displayed about the assets you collected and are excluding from translation:
| Column |
Description |
| Type |
The type of asset in Eloqua. |
| Path |
The path of the asset in Eloqua. |
| ID |
The Lionbridge App’s unique identifier for this asset. |
Tips: To delete an asset from the list, click the Delete icon  . By default, a confirmation message is displayed before you can delete an asset. If you do not want to receive a confirmation message, clear the check box in the column header above the Delete icons.
14 - Configuring Automatic URL Link Updates in Translated Content
When there are links in content for translation, by default the Lionbridge App does not update these links. You can change this behavior, for example, if you automatically want to update the links in the translated content to point to either:
- a localized sub-domain (partial replacement)
- a different domain (full replacement)
To configure settings for automatic link updates in translated content:
-
In the Site Administration menu on the left, ensure that My Site is selected, so that the My Site page is open. This is the default selection when you log into CloudBroker as a site administrator. For detailed information about this page, see Viewing Lionbridge App Information and Usage Data.
-
In the Site Extensions section, click Configure for the URL Conversion for Translation site extension.
The Site Extension dialog box opens, displaying the Translation URL Conversion tab.
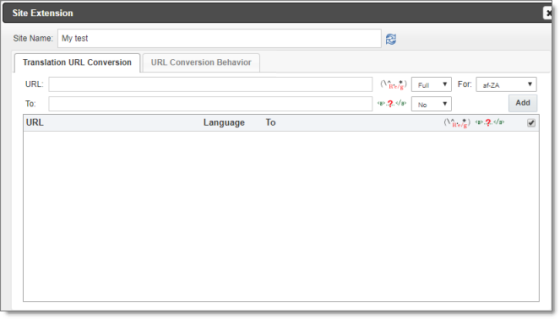
- Specify the URL conversion settings for a target language:
| Field |
Description |
| URL |
Enter the base URL of the links in the source content, for example: http://example.com. |
| To |
Enter the base URL you want for the links in the target (translated) content, for example: http://ja-jp.example.com. |
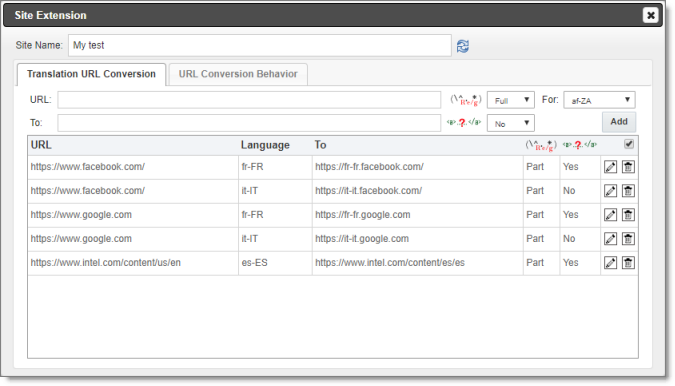
| Matching Type |
Select one of the following matching types for the URL field, described above:
* Full: Convert the URL only if it is identical to the URL specified here.
* Partial: Convert the URL if it includes the URL specified here.
For example, suppose that you want to convert the URL http://www.example.com/content/us/en/products to French, using the fr-fr language code. Suppose that the settings are:
* **URL**: http://www.example.com/content/us/en
* **Language**: fr-fr
* **To**: http://www.example.com/content/fr/fr
Continuing with the example:
* If the **Matching Type** is Full, then the URL conversion setting is not applied, because http://www.example.com/content/us/en/products does not match http://www.example.com/content/us/en.
* If the **Matching Type** is Partial, then the URL conversion setting is applied, because http://www.example.com/content/us/en/products matches http://www.example.com/content/us/en. |
| Convert Link Text? |
Specify whether to convert the text of the link as well as the URL, for example in the link <a href=“http://www.example.com”>My Link</a>, this is the My Link text. Select one of the following:
* No: The App converts the text of the link as well as the URL.
* Yes: The App does not convert the text of the link. |
| For |
Select the language code of the target language for applying this link conversion rule. You can view these language codes in the Language Mapping dialog box. For details, see Configuring Language Mappings. |
- Click Add.
The specified settings are added to the bottom of the tab.
- Repeat steps 3 and 4 for each target language for which you want to specify URL link conversion settings.
Tips: To edit a conversion setting, click the Edit icon  . To delete a conversion setting from the list, click the Delete icon . By default, a confirmation message is displayed before you can delete a setting. If you do not want to receive a confirmation message, clear the check box in the column header above the Delete icons.
- Optional. By default, the App updates the URL when the translated content returns to Eloqua. To configure the App to update the URL when it sends out the source content for translation from Eloqua:
a. Click the URL Conversion Behavior tab.
The tab opens.
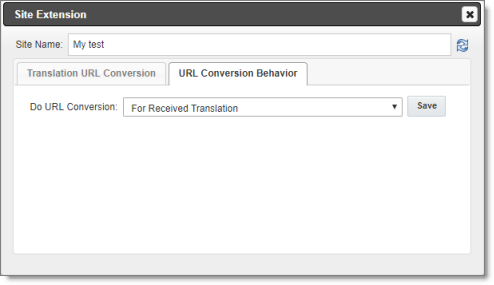
b. In the Do URL Conversion dropdown list, select For Translation File.
Note: The default value, For Received Translation, updates the URL when the translated content returns to Eloqua.
c. Click Save.
15 - Configuring Country and Language Metadata Replacement
You can configure the Lionbridge App to replace the following metadata properties in assets you send out for translation:
- country metadata. For example, you can replace <meta property=“wap:country” content=“us”/> with <meta property=“wap:country” content=“jp”/>.
- language metadata. For example, you can replace <meta property=“wap:language” content=“en”> with <meta property=“wap:language” content=“ja”>.
Note: You can replace the country metadata, the language metadata, or both.
-
In the Site Administration menu on the left, ensure that My Site is selected, so that the My Site page is open. This is the default selection when you log into CloudBroker as a site administrator. For detailed information about this page, see Viewing Lionbridge App Information and Usage Data.
-
In the Site Extensions section, click Configure for the HTML Elements Conversion for Translation site extension.
The Site Extension dialog box opens, displaying the HTML Element Conversion tab.
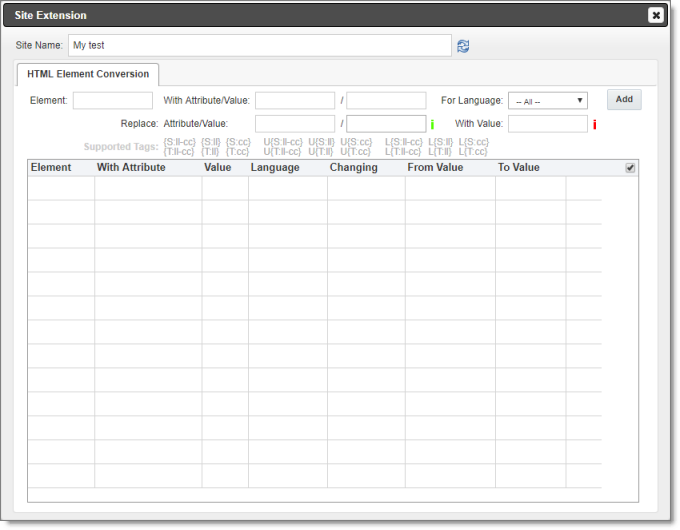
- Enter the following information about the metadata properties to replace:
| Field |
Description |
| Element |
The type of HTML element in which to replace an attribute value, for example, meta. |
| With Attribute/Value |
The attribute/value pair in the source version of the asset. In the first field, enter the attribute and in the second field, enter the value to be replaced. For example:
* In the first field enter property, and in the second field enter wap:country.
* In the first field enter property, and in the second field enter wap:language. |
| For Language |
Select the language code for which the replacement will occur, or accept the default, so that the replacement will occur for all languages. |
| Replace Attribute/Value |
The attribute/value pair in the target version of the asset. In the first field, enter the replacement attribute. In the second field, enter the replacement value. If you leave this blank, then all values of the specified attribute will be replaced. |
| With Value |
Required. Specify the format of the replacement value or values, which is one or both of the country and language metadata. To specify the format of the replacement value or values, enter a building block from the table below. |
| Building Block |
Description |
Example |
| {S:ll-cc} |
The language code and the country code of the source language, separated by a hyphen. |
en-CA |
| {S:ll} |
The language code only of the source language. |
en |
| {S:cc} |
The country code only of the source language. |
CA |
| U{S:ll-cc} |
Upper case of the language code and the country code of the source language, separated by a hyphen. |
EN-CA |
| U{S:ll} |
Upper case of the language code only of the source language. |
EN |
| U{S:cc} |
Upper case of the country code only of the source language. |
CA |
| L{S:ll-cc} |
Lower case of the language code and the country code of the source language, separated by a hyphen. |
en-ca |
| L{S:ll} |
Lower case of the language code only of the source language. |
en |
| l{S:cc} |
Lower case of the country code only of the source language. |
ca |
| {T:ll-cc} |
The language code and the country code of the target language, separated by a hyphen. |
fr-CA |
| {T:ll} |
The language code only of the target language. |
fr |
| {T:cc} |
The country code only of the target language. |
CA |
| U{T:ll-cc} |
Upper case of the language code and the country code of the target language, separated by a hyphen. |
FR-CA |
| U{T:ll} |
Upper case of the language code only of the target language. |
FR |
| U{T:cc} |
Upper case of the country code only of the target language. |
CA |
| L{T:ll-cc} |
Lower case of the language code and the country code of the target language, separated by a hyphen. |
fr-ca |
| L{T:ll} |
Lower case of the language code only of the target language. |
fr |
| L{T:cc} |
Lower case of the country code only of the target language. |
ca |
- Click Add.
The specified metadata-replacement settings are added to the bottom of the tab.
- Repeat steps 3 and 4 for each metadata-replacement setting you want to specifiy.
Tips: To edit a metadata-replacement setting, click the Edit icon . To delete a metadata-replacement from the list, click the Delete icon . By default, a confirmation message is displayed before you can delete a setting. If you do not want to receive a confirmation message, clear the check box in the column header above the Delete icons.
16 - Configuring Email Headers and Footers
You can configure the Lionbridge App to use your own locale-specific default email headers and footers, instead of translating the email headers and footers from the source language.
Note: You can configure the App to use your own email headers, footers, or both.
-
In the Site Administration menu on the left, ensure that My Site is selected, so that the My Site page is open. This is the default selection when you log into CloudBroker as a site administrator. For detailed information about this page, see Viewing Lionbridge App Information and Usage Data.
-
Click Configure Site.
The Site Configuration dialog box opens. The Site Name field at the top of the dialog box displays the name of your company’s site.
-
Click the Translation tab. For a detailed description of this tab, see Configuring Translation Settings.
-
Do one or both of the following:
- To use your own email headers, ensure that the **Translate [Email Header]**check box is cleared.
- To use your own email footers, ensure that the Translate [Email Footer] check box is cleared.
-
Click Save to close the Site Configuration dialog box.
-
In the Site Extensions section of the My Site page, click Configure for the Default Email Header and Footer for Language site extension.
The Site Extension dialog box opens, displaying the Default Header & Footer tab.
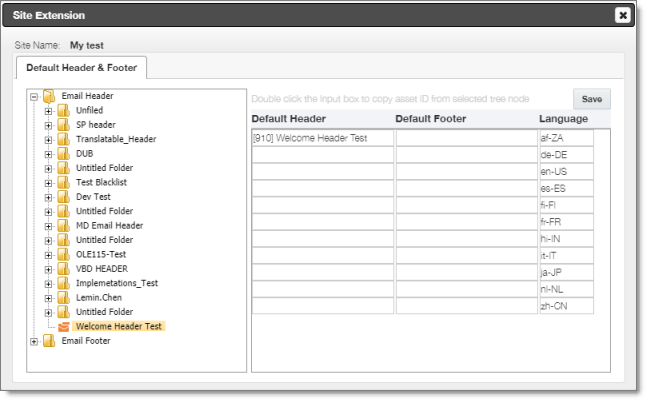
-
In the left pane, navigate to the page of the header or footer to replace.
- Optional. You can prepopulate the header for a target language with the header of the source language.
- Click the page of the header or footer to replace, so that it is highlighted.
-
In the right pane, double-click in the row for the target language, under either or both of the Default Header and Default Footer columns.
-
Edit the header or footer to replace, for the appropriate target language.
-
Repeat the previous three steps for each header or footer to replace.
-
When you are done, click Save.