This the multi-page printable view of this section. Click here to print.
User Guide 12
- 1: Welcome to the Connector
- 1.1: How the Connector Helps You Manage Your Translation Lifecycle
- 1.2: The Translation Lifecycle
- 1.3: How the Connector Works with Optimizely
- 1.4: Using this Guide
- 1.5: How to Contact Lionbridge Connector Support
- 2: Getting Started with the Connector for Optimizely
- 3: Sending Assets for Translation
- 3.1: Creating or Editing a Translation Project
- 3.2: Sending a Project for Translation
- 3.2.1: Sending a Project for Translation from the Gadget
- 3.2.2: Sending a Project for Translation from the Dashboard
- 3.3: Canceling a Translation Project
- 4: Monitoring Translation Status
- 4.1: Translation Statuses
- 4.2: Viewing Your Translation Status Summary
- 4.3: Monitoring Translation Projects
- 4.4: Monitoring Translation Assets
- 5: Assets Log View
- 6: Post-Translation Features
- 6.1: Importing Translated Content
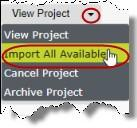
- 6.1.1: Importing All Available Translated Content from the Gadget
- 6.1.2: Importing All Available Translated Content from the Dashboard
- 6.1.3: Importing Translated Content in One Target Language from the Dashboard
- 6.2: Reviewing Translated Assets
- 6.2.1: Viewing Translated Assets
- 6.3: Publishing Translated Assets
- 6.3.1: Publishing All Available Translated Assets from the Gadget
- 6.3.2: Publishing All Available Translated Assets from the Dashboard
- 6.3.3: Publishing Translated Assets in One Target Language from the Dashboard
- 6.4: Archiving and Unarchiving Projects
- 6.5: Removing Translation Projects from the Connector
- 7: Translation Optimizely Form Supports
1 - Welcome to the Connector
Welcome to the Lionbridge Connector for Optimizely
Welcome to the Lionbridge Connector for Optimizely (Connector). The Connector enables you to automate sending and retrieving assets from Optimizely, which dramatically reduces the effort required to create, maintain, and publish Web content in multiple languages.
1.1 - How the Connector Helps You Manage Your Translation Lifecycle
The Lionbridge Connector for Optimizely (Connector) is a plug-in module for Optimizely. It provides a range of features and user interface enhancements in Optimizely that enable you to select, send, monitor, and retrieve assets for translation into any language Optimizely supports.
These features automate the process, which dramatically reduces the effort and time required to export and re-import assets that need to be localized. This is very helpful when translating many assets or ensuring that translated assets are quickly re-imported to meet deadlines.
When you use the Connector, you manage your translation lifecycle entirely from within Optimizely:
- The Connector exports your assets from Optimizely in XML format and delivers these content files to the Lionbridge Content API Platform.
- The Lionbridge Content API Platform delivers your content files to your translation providers, based on routing rules that your company chooses and the Lionbridge Connector Team implements.
- When the translated content is ready, the Lionbridge Content API Platform retrieves it from your translators and delivers it to the Connector.
- The Connector automatically imports the translated assets into the correct location in Optimizely.
You can then review, revise, reject, or publish the translated assets as needed.
1.2 - The Translation Lifecycle
The Translation Lifecycle
The translation lifecycle is the broad process of selecting content, sending it out for translation, and then receiving the translated content back from translation. This set of steps usually fits inside a larger, more general process called the content lifecycle, which is the process of creating, reviewing, editing, approving, and publishing content.
When you consider the translation lifecycle and the content lifecycle together, you have the global content value chain, which is the strategy for managing multilingual content.
Remember that localizing content is a subset of steps in the broader content lifecycle. This will improve your focus on key localization considerations, improve processes, and keep all content stakeholders included. Together, this results in better content management.
1.3 - How the Connector Works with Optimizely
The Lionbridge Connector (“Connector”) is an important part of the Content API translation solution.
The Connector is installed on your system as an add-in to Optimizely, through a NuGet installation package. Its functionality is displayed to the users as part of Optimizely.

Your translation systems architecture might look like the configuration above. It may have additional content systems or translation providers, but the core concepts remain the same. During implementation, the Lionbridge Connectors team works with you and your translation providers to configure and test the other elements of your translation solution, which are the Content API Platform’s connections to your translation providers' systems.
1.4 - Using this Guide
Purpose of this guide
This guide describes everything you need to know to install and configure the Lionbridge Connector (Connector) for Optimizely. It describes the delivery package contents, system requirements, installation instructions, and configuration procedures.
Who should use this guide
This guide is intended for content editors, project, marketing, localization or translation managers, or others who are responsible for creating, editing, or approving assets for translation that reside in your Optimizely instance. This guide is also useful for translation providers who receive assets from your Optimizely instance, because it describes your company’s translation management process.
What your company setup should be
This document assumes that:
- Your company already has a functioning instance of Optimizely.
- The Connector has been installed, configured, and tested on your Optimizely instance.
- The Lionbridge Connectors team has set up the Lionbridge Content API Platform to send assets to your translation providers.
- Lionbridge is your company’s translation provider, and Freeway is already set up for your company.
What you should already know
This document assumes that:
- You are familiar with the Connector’s configuration for your Optimizely instance, and the reasons for choosing certain configuration options. This is important because your company’s configuration determines which features are available.
- You have a strong working knowledge of Optimizely.
- You are familiar with your company’s translation process and requirements.
- You have valid user credentials to log into Optimizely.
- You have the required permissions to access the Connector functionality described in this guide.
Note: Not all the features described in this guide may be available. Feature availability depends on both your company’s Connector setup and the roles to which you are assigned. If you cannot access functionality that you need, contact your company’s Optimizely administrator.
How this guide is organized
| Chapter | Description |
|---|---|
| Welcome to the Lionbridge Connector for Optimizely | A brief description of the Lionbridge for Optimizely solution and how it fits into the translation lifecycle. It also includes information about this guide and the Lionbridge Connector Team Support contact information. |
| Getting Started with the Connector for Optimizely | How to get started and an overview of the Connector interface and key features. |
| Sending Assets for Translation | How to create or edit a translation project, add assets to it, and send it out for translation. How to cancel a translation project in progress. |
| Monitoring Translation Status | How to monitor the status of translation projects and individual assets. |
| Post-Translation Features | How to perform post-translation tasks, including:
|
How to find out more about the Lionbridge Connector for Optimizely
For information on using the Lionbridge Connector to send and receive content for translation from Optimizely, read the Lionbridge Connector for Optimizely User Guide.
Documentation conventions
This guide uses the following conventions:
| Convention | Description |
|---|---|
| Bold | Highlights screen elements such as buttons, menu items, and fields. |
| Courier | Highlights input, file names, and paths. |
| Italics | Highlights terms for emphasis, variables, or document titles. |
| > | Indicates a menu choice. For example, Select Edit > Select All. |
1.5 - How to Contact Lionbridge Connector Support
How to Contact Lionbridge Connector Support
You can submit a support ticket either:
- by emailing connectors@lionbridge.com
- from the Lionbridge Connector Zendesk page https://lionbridge-connectors.zendesk.com/
See also:
2 - Getting Started with the Connector for Optimizely
The Connector supports all web browsers that Optimizely supports. The Connector supports Optimizely version 12.
To access the Connector:
-
Log into Optimizely.
-
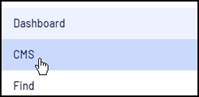
In the top-left corner, click CMS.
-
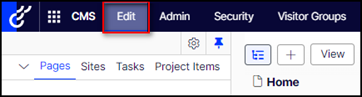
In the menu that opens, click Edit.
-
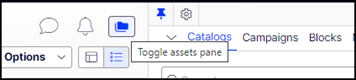
In the top-right corner, click the Toggle assets pane folder icon. The Assets pane opens.
-
If the Lionbridge Connector gadget is collapsed, click it to expand it.
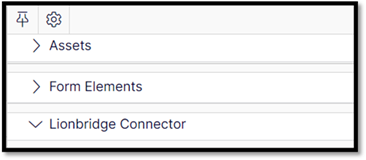
The Lionbridge Connector gadget opens. It contains basic Connector functionality, including creating a translation project. For a detailed description of the gadget, see The Connector at a Glance.
-
Optional. Do one of the following to open the Lionbridge Connector Dashboard (“Dashboard”), which has enhanced Connector functionality:
- Click the Dashboard button near the top of the gadget.
- In the bottom-right corner of the gadget, click the Settings icon , and then select Dashboard from the context menu.
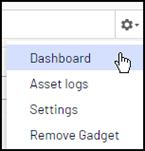
The Lionbridge Connector Dashboard opens in the system workspace. For a detailed description of the Dashboard, see Monitoring Translation Projects.
Tip: Click the Pin icon
to keep the Lionbridge Connector open by by default in future sessions.
2.1 - The Connector at a Glance
The Lionbridge Connector for Optimizely has two main interfaces:
-
Lionbridge Connector gadget:
-
opens in the Assets pane
-
provides a translation-status summary
-
includes basic Connector functionality
-
Lionbridge Connector Dashboard:
-
opens in the System workspace
-
provides detailed translation-status information
-
includes enhanced Connector functionality
Lionbridge Connector Gadget:
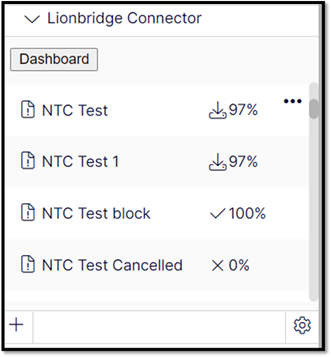
The gadget displays the following information about each translation project:
- name
- status
- percentage complete The gadget also includes the following Connector functionality, which is available from the context menu for each displayed translation project:
- creating a project
- editing a project
- sending out a project for translation
- importing translated content into Optimizely
- publishing translated assets
- canceling a project
- removing a project from the Connector
For detailed information about the gadget, see Viewing Your Translation Status Summary.
Lionbridge Connector Dashboard
The Dashboard includes the following Connector functionality:
- displaying detailed translation-status information about projects
- filtering the projects displayed in the Dashboard
- sending out a project for translation viewing archived projects
- viewing unarchived projects viewing a project
- editing a project canceling a project
- importing all available translated content in the project into Optimizely
- importing translated content in the project into Optimizely for individual target languages viewing translated assets
- publishing all available imported translated assets in the project
- publishing imported translated assets in the project for individual target languages
- archiving a project
- unarchiving a project
- removing a project from the Connector
Note: You can create a new project only in the Lionbridge Connector gadget. For detailed information about the Dashboard, see Monitoring Translation Projects.
3 - Sending Assets for Translation
When you send out assets for translation, they are part of a translation project. You can add assets for translation to a new or an existing project.
Note: You can add assets to an existing project only if it is in
Draftstatus. You cannot add assets to aproject after it has been submitted for translation.
You can send out the following types of assets for translation:
| Asset Type | Description | Additional Notes |
|---|---|---|
| Optimizely Blocks | Blocks that are referenced on a page in a Content Area or ContentReference fields. |
If the same block has multiple references, the Connector sends it out for translation once, in the context of the first page where it is referenced. |
| Optimizely page properties | The following page properties are supported:
|
Unsupported page properties will be blank, so you cannot publish the corresponding pages, as described in Publishing Translated Assets. Tip: Review these pages manually and populate the blank page properties so that you can publish the pages. |
| custom properties | Custom properties created by the customer. | The Connector supports sending for translation only custom properties that inherit from the ProperyLongString and PropertyString classes. |
| Optimizely Form | The connector supports almost Optimizely Form’s Elements except any elements which Optimizely doesn’t support multi language for element’s properties, as described in Form elements supported. | You can reference in Translation Optimizely Form Supports |
CapiV2 with content types supported
| What you want to create | Episerver Type | Supported |
|---|---|---|
| Plain short text | String | Yes |
| Plain long text | String with UIHint.Textarea | Yes |
| Html | XHtmlString | Yes |
| Integer value | Int | Yes |
| Date and time | DateTime | Yes |
| Double | Double | Yes |
| Boolean | Boolean | Yes |
| Link to a page | PageReference | No |
| Link to a media file, image, video | ContentReference | Yes |
| Content area | ContentArea | Yes |
| URL | Url | Yes |
| Link to multiple external and/or internal resources | LinkItemCollection | Yes |
| Link to multiple internal pages, media file or other content type. | ContentReferenceList | Yes |
| Property Value List | IList |
Yes |
| Generic PropertyList | PropertyList |
Yes |
Nested content translation
Nested content is created by this page/block in CMS contain another page/block. Such as:
- Page A have content area page B, Page B have content area page C, Page C have content area page D, Block A have content area block B, Page A have content area block B, …
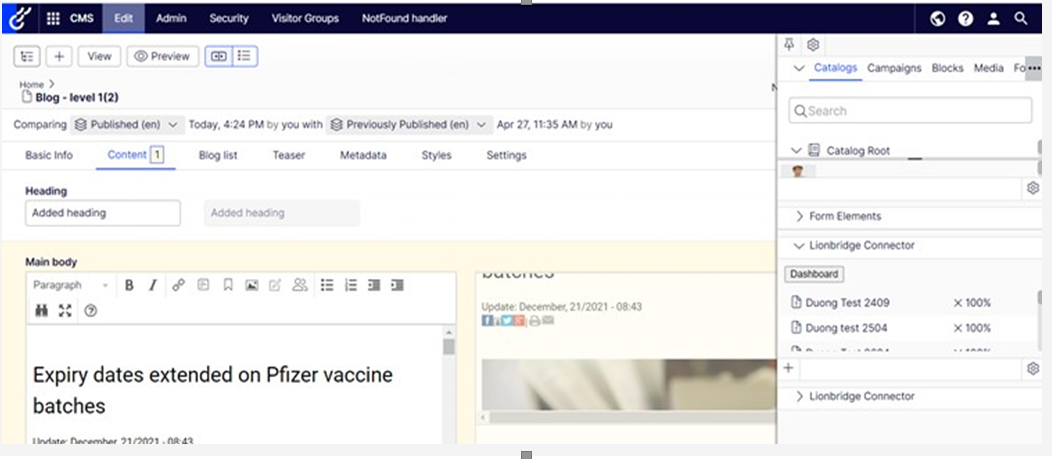
- Translation Nested page/ block by check on checkbox “Include nested pages & blocks” in “Select content” Tab
![]()
Note: Nested page/block only supports translation 7 level.
How the Connector packages the assets for translation
Either:
- The Connector sends each page and block for translation as a separate file.
- The Connector bundles all pages and blocks in the translation project for translation into a single XML file, creating one file for each target language.
You configure this setting using the Use grouped asset handling check box. For detailed instructions, refer to the Lionbridge Connector for Optimizely Installation and Configuration Guide.
Recommendation: If Lionbridge Freeway will translate terms for SEO, select this check box.
When sending assets for translation, there are two basic steps:
- Creating a translation project, including adding the assets to translate. You do this from the Lionbridge Connector gadget. For detailed instructions, see Creating or Editing a Translation Project.
- Sending out the project for translation. You can do this either from the Lionbridge Connector gadget or from the Lionbridge Connector Dashboard. For detailed instructions, see Sending a Project for Translation.
3.1 - Creating or Editing a Translation Project
A translation project has two basic components:
- the project settings
- the collection of the assets to translate You create or edit translation project from the Lionbridge Connector gadget.
To create a translation project:
-
In Optimizely CMS, click Edit.

-
Click the Toggle assets pane icon. The Assets pane is displayed on the right. The Lionbridge Connector gadget is displayed at the bottom of the pane, displaying all the translation projects.
-
Do one of the following:
- To create a new project, click the plus icon
 at the bottom-left corner of the gadget.
 - To edit an existing translation project, click a project in the list to select it.
- To create a new project, click the plus icon
Note: You can edit an existing project only if it is in Draft status. You cannot edit a project after it has been submitted for translation.
The System workspace, on the left, updates for the new or existing project.
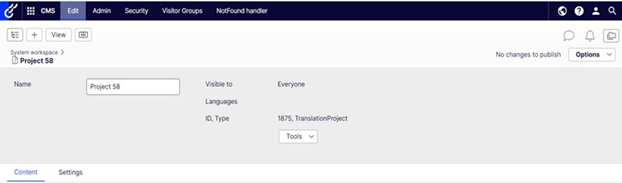
-
In the Name field, you can enter or update the name of your translation project. This will also be the Freeway title of your project.
-
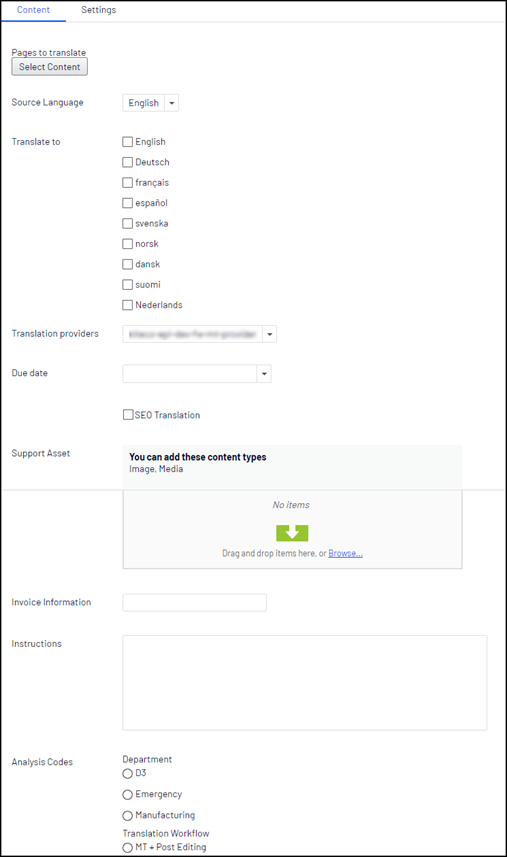
In the Content tab, specify the following settings for your translation project:
| Setting | Description |
|---|---|
| Source Language | Select the source language of the assets in the project. |
| Translate to | Select the check boxes for the target languages for the assets in the project. These are the languages into which the assets will be translated. |
| Translation providers | Select the translation provider to use to submit your translation to Lionbridge. |
| Due date | The requested delivery date. Either: Enter the date and time in the following format: M/D/YYYY H:MM,for example, 3/9/2016, 8:00 PM. Click the arrow and select the date and time in the calendar that opens. |
| SEO Translation | If you want to mark the pages for SEO workflow processing, so that Lionbridge Freeway will translate terms for SEO. select the check box. When this check box is selected, the Connector includes the URLSegment property (name in URL) in pages it sends for translations. Note: Optimizely runs some validations on this property when it isedited in the Optimizely GUI. These validations ensure that there are no characters that are invalid for URL names, and that the name is unique among sibling pages. For example, if you have a folder with the /cars//URL, it cannot contain two pages with the same URL name, such as brandX, because the /cars/brandX address must point to a unique page. |
| Support Asset | Optional. You can add files here that you wish to be sent along with your translatable content. These are reference files that may aid the translators and can be media or doc files etc. Support Assets will not be translated or returned. |
| Invoice information | Optional. You can enter the project’s invoice number or finance related details in this field. |
| Instructions | Optional. You can enter instructions for the translators in this field. |
| Analysis Codes | Optional. May not be displayed. The Freeway analysis codes for the translation. You specify the analysis codes that are relevant to your assets. Your Lionbridge setup determines which analysis codes are available for you to specify, and the values available for selection for each analysis code. For example, the Region, Department, and Priority analysis codes may be available for you to specify. These can be used to direct jobs to specific Freeway accounts or workflows or for Freeway reporting purposes. |
- In the Settings tab, specify the following settings for your translation project:
- Publish option—It can be Published in two options:
- Publish if source is Published: If this is selected then the target assets can only be published if the source assets are published.
- Publish if source is not Published: If this is selected then the target assets will publish even if the source assets are not yet published.
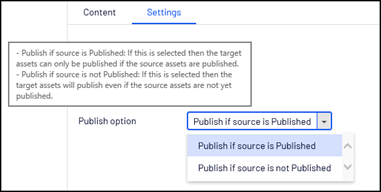
Note: To navigate, In the translation project click Settings and select Publish if source is Published or Publish if source is not Published from the dropdown of Publish option. By default, it is Publish if source is Published.
- Import option—In configure Import Settings to allow target (translated) version specific content to be preserved when it does not exist in source version:
- Keep all from source translation: If this is selected, when importing translation project, all data from the translated version will overwrite the current version.
- Merge source translation and target: If this is selected, when importing translation project, system will:
- Overwrite the blocks that has same ID from the translated version to current version.
- Keep all blocks that available on current version but not in translated version.
- Keep all blocks that available on translated version but not in current version.
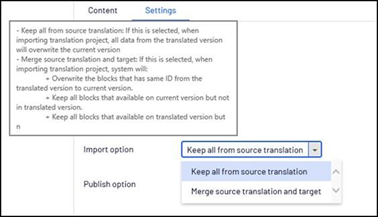
Note: To navigate, in translation project click Settings and select Keep all from source translation or Merge source translation and target from the dropdown of Import option . By default, it is Keep all from source translation.
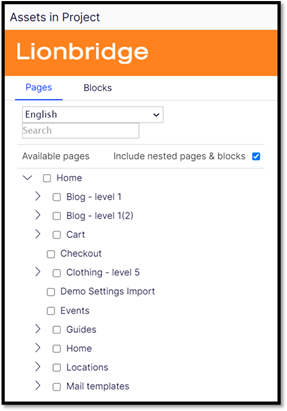
- To select the assets to translate, near the top-left corner of the workspace, under Pages to translate, and click Select Content. The Assets in Project dialog box opens.
The Available pages pane on the left side displays a tree structure.
- At the top of this pane, click the Pages or the Blocks tab to display the corresponding asset in the tree.
- Expand the tree structure and select the check boxes of the assets to add to the translation project.
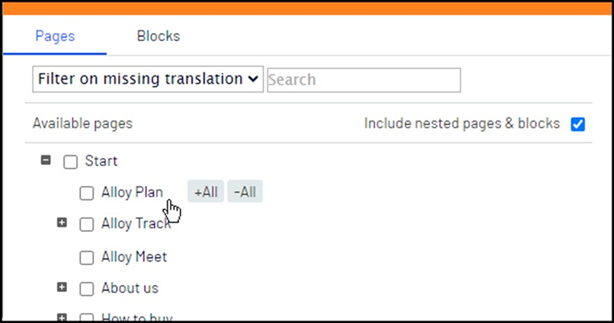
- Optional. Mouseover the page to display the +All and -All buttons. Click these buttons to add or remove all child pages or blocks from the translation project.
- To remove a page or block from your selection, click the corresponding Remove button. This button is displayed after a page or block is selected.
- If your site has the commerce features, you can see the Commerce Nodes display under the Content Pages’ tree
- Optional. In the Pages tab, to automatically include all nested pages & blocks associated with the selected pages in your translation project, select the Include nested pages & blocks check box.
- Optional. To view which pages have not yet been translated, select the desired target language in the Filter on missing translation dropdown list. The tree updates to display any pages that have not yet been translated into that language in Italic font. Pages that have already been translated into that target language are displayed in regular font.
- Click Save to save your changes.
The System workspace reopens. The Connector automatically saves the translation project in Draft status. To undo the auto-save, click the Undo link in the top-center of the workspace.
Now you are ready to send your translation project to Lionbridge Freeway for translation. For detailed instructions, see Sending a Project for Translation
3.2 - Sending a Project for Translation
When a translation project has Draft status, you can send it to Lionbridge Freeway for translation. You can do this either from the Lionbridge Connector gadget or from the Lionbridge Connector Dashboard (“Dashboard”). There are two ways to send a project for translation:
3.2.1 - Sending a Project for Translation from the Gadget
When a translation project has Draft status, you can send it to Lionbridge Freeway for translation.
To send out a project for translation from the Lionbridge Connector gadget:
-
In Optimizely CMS, click Edit.
-
Click the Toggle assets pane icon.
The Assets pane is displayed on the right. The Lionbridge Connector gadget is displayed at the bottom of the pane, displaying all the translation projects.
-
Click a project in the list to select it.
-
Mouseover the right end of the project in the Lionbridge Connector gadget, click the Options icon
 and then select Send to Translation in the project’s context menu.
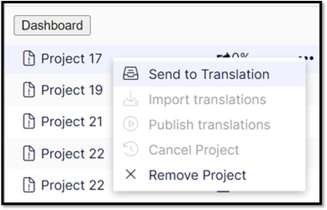
A message box opens, confirming that you want to send the project for translation.
-
Click Yes to proceed.
Another message box opens, stating that the project was sent for translation.
-
Click OK to close the message box.
The Connector sends your translation project as a scheduled job. It displays a clock icon
 next to it, which indicates that it now has
 In Translationstatus.
- When your project displays a status of 10%, it has been delivered to Lionbridge Freeway.
- When your project displays a status of 100%, it is ready to be imported into Optimizely, where you can review it.
3.2.2 - Sending a Project for Translation from the Dashboard
When a translation project has Draft status, you can send it to Lionbridge Freeway for translation.
To send out a project for translation from the Dashboard:
-
In the Dashboard, locate a translation project with Draft status. This is displayed in the Status column. For information on opening the Dashboard, see Getting Started with the Connector for Optimizely.
-
In the Actions column, click the arrow and select Send to Translation from the context menu.

A message box opens, confirming that you want to send the project for translation.
-
Click Yes to proceed.
Another message box opens, stating that the project was sent for translation.
-
Click OK to close the message box.
-
The status of your job will be updated to
Sending.
The Connector sends your translation project as a scheduled job, and when it is delivered to Lionbridge Freeway, it has In Translation status.
3.3 - Canceling a Translation Project
To Cancel a Translation Project/Job , you should reach out to your Lionbridge PM to discuss for each Job that you wish to cancel. They will be able to confirm if any translation work has already started. If the decision to cancel is agreed as the right course of action then the Lionbridge PM will request the Lionbridge Connector Support team Cancels the Job on the Lionbridge Content API platform. Shortly after this the status of the Job in the Connector will update to Cancelled.
If a translation project is in Sending status, you can cancel it within the Connector. This prevents the Connector from completing sending the Job to Lionbridge Content API platform. This functionality is not reversible. For a list and description of translation-project statuses, see Monitoring Translation Status.
There are two ways to cancel a translation project in the Connector:
3.3.1 - Canceling a Translation Project in Gadget
If a translation project is in Sending status, you can cancel it within the Connector.
To cancel a translation project from the Lionbridge Connector gadget:
-
In Optimizely CMS, click Edit.
-
Click the Toggle assets pane icon.
The Assets pane is displayed on the right. The Lionbridge Connector gadget is displayed at the bottom of the pane, displaying all the translation projects.
-
Click a project in the list to select it.
-
Mouse over the right end of the project in the Lionbridge Connector gadget, click the Options icon
, and then select Cancel Project in the project’s context menu. This menu item is available only when the project is in either Sendingstatus.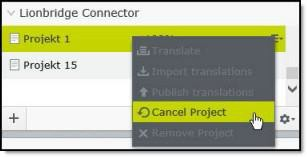
A message box opens, confirming that you want to cancel the project.
-
Click Yes to confirm.
Another message box opens, stating that the project was canceled and removed from the Connector. If the Translation Project /Job has moved beyond Sending status, the Connector will not allow the Cancel action, from within the Connector.
-
Click OK to close the message box.
3.3.2 - Canceling a Translation Project in the Dashboard
If a translation project is in Sending status, you can cancel it within the Connector.
To cancel a translation project from the Dashboard:
-
In the Dashboard, locate a translation project with either
Sendingstatus. This is displayed in the Status column. For information on opening the Dashboard, see Getting Started with the Connector for Optimizely. -
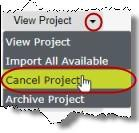
In the Actions column, click the arrow and select Cancel Project from the context menu.
A message box opens, confirming that you want to cancel the project.
-
Click Yes to confirm.
Another message box opens, stating that the project was canceled and removed from the Connector. If the Translation Project /Job has moved beyond Sending status, the Connector will not allow the Cancel action, from within the Connector.
-
Click OK to close the message box.
4 - Monitoring Translation Status
You can monitor the status of your translation projects from within the Connector.
-
In the Lionbridge Connector gadget, you can view the status summary. For details, see Viewing Your Translation Status Summary.
-
In the Lionbridge Connector Dashboard, you can view the detailed translation status of your project by target language and individual assets. For details, see Monitoring Translation Projects.
For a list and description of translation statuses, see Translation Statuses.
4.1 - Translation Statuses
The statuses of translation projects are displayed, as follows:
- The Lionbridge Connector Dashboard (“Dashboard”) displays project statuses in the Status column.
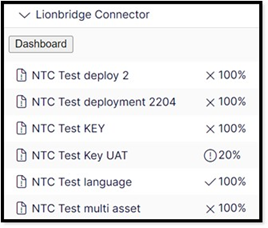
- The Lionbridge Connector gadget displays project statuses as icons and percentages:
Note about percentage values: In addition to the percentage values described in the table above, different percentage values may be displayed in the Lionbridge Connector gadget. For an explanation of those values, See Viewing Your Translation Status Summary.
Note about statuses displayed in italics in the Dashboard: A status displayed in italics in the Dashboard indicates that the translated content of some, but not all target languages is in this status. For a detailed description and illustration, See Monitoring Translation Projects.
4.2 - Viewing Your Translation Status Summary
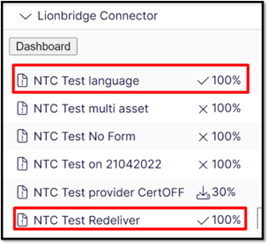
You can view the status and percentage complete of translation projects in the Lionbridge Connector gadget. The gadget is displayed in the Assets pane. For detailed instructions on opening the gadget, see Getting Started with the Connector for Optimizely.
![]()
Tip: If the gadget was previously opened, click the Toggle assets pane
icon in the top-right corner of the system workspace to reopen it.
The following information is displayed about each translation project:
- project name
- project-status icon
- percentage complete
| Project-Status Icon | Percentage | Description |
|---|---|---|
| 0 | Draft status. The Connector created the translation project, but it did not send it for translation yet. |
|
| 5 10 variable, up to 100 |
In Translation status. The Connector sent the translation project to the Lionbridge Content API platform.In Translation status. The Lionbridge Content API platform sent the translation project to Lionbridge Freeway.Ready for Import status. The Connector has delivered the completed translation project, and it is ready to be imported into Optimizely. See note below. |
|
| variable, up to 100 | Imported status. The completed translation project has been imported, but it has not yet been published. See note below. |
|
| variable, up to 100 | Published status. The translation project has been published. See note below. |
Note about other displayed percentage values: If a translation project is being translated into multiple target languages, and the Connector has delivered the translated content in some but not all of those languages, then that is reflected in the percentage complete displayed in the gadget. For example, suppose the translation project is being translated into four target languages, and the percentage complete is 25 percent. This indicates that the translated content has been delivered for one target language.
Actions
You can perform the following actions in the gadget:
- To open the Lionbridge Connector Dashboard, click the Dashboard button near the top-left corner of the gadget. For detailed description of the Dashboard, see Monitoring Translation Projects.
- To create a translation project, click the plus icon
 in the bottom-left corner. For detailed instructions, see Creating or Editing a Translation Project.
 - To send out a project for translation, click the Options icon
 , and then select Translate in the project’s context menu. For detailed instructions, see Sending a Project for Translation from the Gadget. Available only when the project is in
 Draftstatus. - To import translated content into Optimizely, click the Options icon , and then select Import translations in the project’s context menu. For detailed instructions, see Importing All Available Translated Content from the Gadget. Available only when the project is in
Ready for Importstatus. - To publish translated assets, click the Options icon , and then select Publish translations in the project’s context menu. For detailed instructions, see Publishing All Available Translated Assets from the Gadget. Available only when the project is in
Importedstatus. - To cancel a translation project, click the Options icon , and then select Cancel Project in the project’s context menu. For detailed instructions, see Canceling a Translation Project in the Gadget. Available only when the project is in
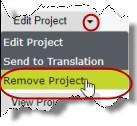
Sendingstatus. - To remove a translation project from the Connector, click the Options icon , and then select Remove Project in the project’s context menu. For detailed instructions, see Removing Translation Projects from the Connector via the Gadget. Available only when the project is in either
Draft,Imported,PublishedorCancelledstatus.
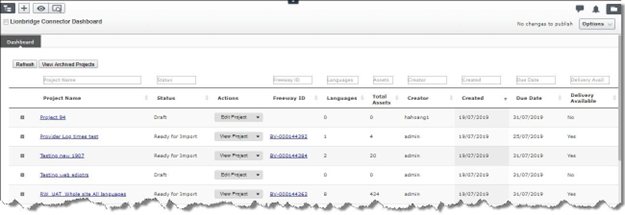
4.3 - Monitoring Translation Projects
The Lionbridge Connector Dashboard (“Dashboard”) opens in the system workspace.
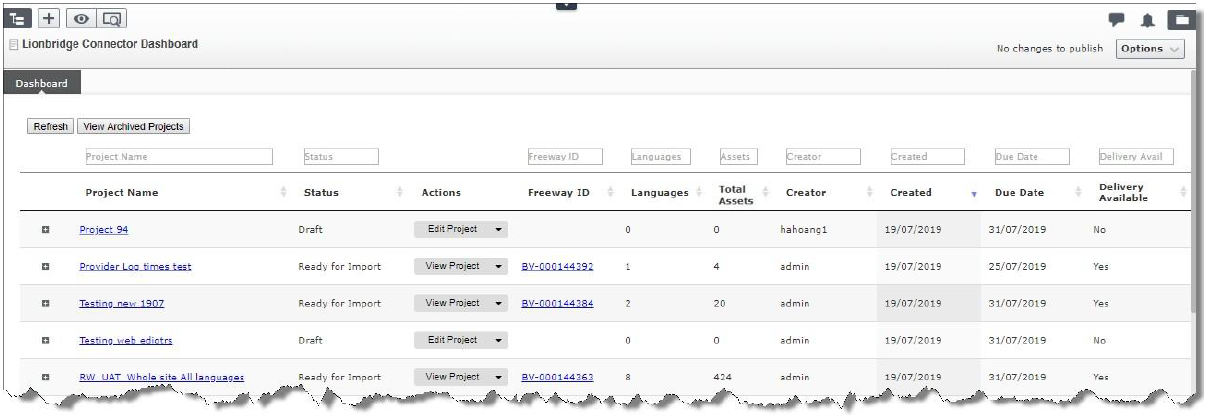
The Dashboard provides detailed translation-status information and it contains enhanced Connector functionality.
- To open the Dashboard, click the Dashboard button in the Lionbridge Connector gadget. For detailed instructions, see Getting Started with the Connector for Optimizely.
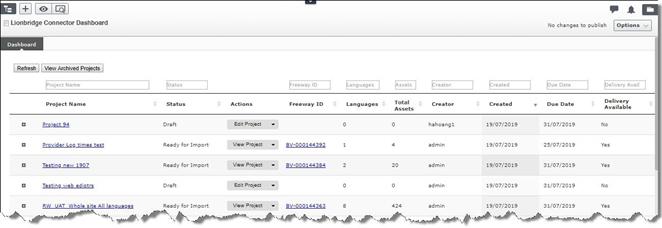
The Dashboard displays the following information about each translation project:
| Column | Description |
|---|---|
| Project Name | The name of the translation project. Click the link or click the plus icon |
| Status | The status of the translation project. For a list and description of statuses, see Translation Statuses. Note about status displayed in italics: A status that is displayed in italics indicates that the translated content of some, but not all target languages is in this status. The least-complete status is displayed. For example, suppose the In Translation status is displayed for a translation project. This indicates that the content for at least one target-language is in this state, and that other target-language content is in a more advanced state. As the screen capture below indicates, the other target-language content is in Imported status. |
| Actions | Click the arrow to display the available context-menu options, and then click an option. The translation project’s status determines which options are displayed:
|
| Freeway ID | If the project has already been sent for translation to Lionbridge Freeway, this is the identifier assigned by Lionbridge. Click the link to open the project in Lionbridge Freeway. You may be prompted for your Freeway credentials before the Freeway page opens. |
| Languages | The number of target languages for this translation project. |
| Total Assets | The number of assets for translation in this translation project. If a translation project is translated into multiple languages, then the asset is “counted” once for each target language. For example, if a project has 4 assets and it is translated into 3 target languages, then there are 12 assets in the project. |
| Creator | The user ID of the account that created this project. |
| Created | The date that the user created this project, in DD/YY/MMMM format. |
| Due Date | The due date specified when the translation project was created or edited, in DD/YY/MMMM format. If the current date is after the due date, the warning icon |
| Delivery Available | Indicates whether translated assets are available to import into Optimizely. This has one of the following values:
|
Additional Actions
In addition to the project-specific actions available from the Actions column, you can perform the following actions in the Dashboard:
- To update the list of displayed translation projects based on newly created projects or updated information about existing projects, click Refresh.
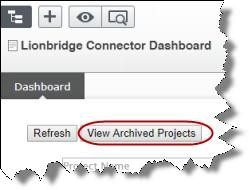
- To view only archived projects, click View Archived Projects. (By default, only unarchived projects are displayed.) Available only in the default view of the Dashboard, where non-archived projects are displayed. For detailed instructions, see Archiving and Unarchiving Projects.
- To view only unarchived projects, click View Unarchived Projects. Available only when archived projects are displayed. For detailed instructions, see Archiving and Unarchiving Projects.
- To filter the list of displayed translation projects, enter text in any of the text boxes above the column headers. The Connector automatically filters the projects to display only those with matching content in that column. For example, to display only translation projects with the
Ready for Importstatus, start typingReady for Importin the text box above the Status column header. The list automatically updates to display only projects with theReady for Import status.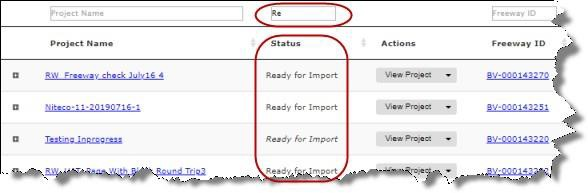
4.4 - Monitoring Translation Assets
You view detailed information about the assets in a translation project by clicking the Expand icon ![]() next to that project in the Lionbridge Connector Dashboard (“Dashboard”). For a detailed description of the Dashboard, see Monitoring Translation Projects.
next to that project in the Lionbridge Connector Dashboard (“Dashboard”). For a detailed description of the Dashboard, see Monitoring Translation Projects.
To view detailed information about the assets in a translation project:
- In the Dashboard, click the Expand icon
 on the left side of the translation project whose assets you want to view. For instructions on opening the Dashboard, see Getting Started with the Connector for Optimizely.
The translation-project row expands, displaying the status of the translation of each target language in the project and any relevant actions.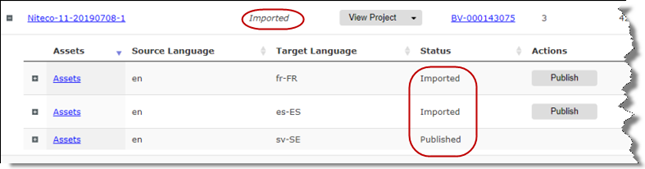
In this example, the screen capture shows that the overall project status is Imported. However, this status is displayed in italics, which indicates that the translated content of some, but not all target languages is in this status: The status of the French and Spanish target languages is Imported, and the Publish action is available; The status of the Swedish target language is Published, which is the final status, so there is no available action.
The following information is displayed about each set of assets, organized by source and target language pair:
| Column | Description |
|---|---|
| Assets | Click the Assets link or click the plus icon |
| Source Language | The language code of the source language of the set of assets sent for translation. |
| Target Language | The language code of the target language into which the set of assets is translated. |
| Status | The status of this set of assets within the translation project. For a list and description of statuses, see Translation Statuses. |
| Actions | The status of this set of assets determines which options, if any, are displayed:
|
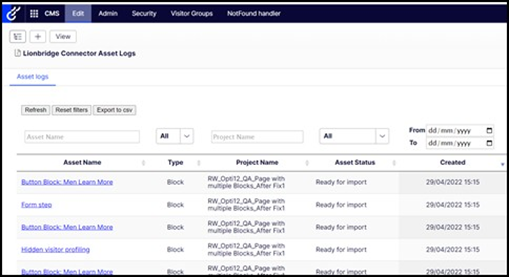
5 - Assets Log View
A new view has been added to the UI. You view the Asset Logs of any translation projects.
You can filter by Asset Name, Asset Type, Project Name, Asset Status, and Date range whether an asset has logs or Log Details.
The results display in a paging table or can be exported out to .CSV file.
You can click on the Asset Name to be taken to the Asset details displaying DownloadedXML file details along with Imported and Published dates.
Asset Log view can be accessed from the Connector Settings cog.
6 - Post-Translation Features
After the translation is complete, you can perform the following tasks:
| Column | Description | Details |
|---|---|---|
| import translated content | When the translation project is complete and has been returned to the Connector, its project status is 100%. It is ready to import into Optimizely, where you can review it. You can import all available translated content, or translated content only in specific target languages. | Importing Translated Content |
| reviewing translated assets | After you import translated content from the Connector into Optimizely, the corresponding translated assets are ready for review. | Reviewing Translated Assets |
| publish translated assets | After you review translated assets, you can publish them via the Connector. You can publish all available imported assets, or imported assets only in specific target languages. | Publishing Translated Assets |
| archiving and unarchiving projects | You can archive projects to remove them from the default view of the Connector. | Archiving and Unarchiving Projects |
| removing projects from the Connector | You can remove a project from the Connector if it is in Draft, Imported, Cancelled or Published status. | Removing Translation Projects from the Connector |
6.1 - Importing Translated Content
When the translation project is complete and has been returned to the Connector, the translated content is ready to import into Optimizely, where you can review it.
You can import a project even if it has not been fully translated. However, to import and publish a page, all its dependent blocks must be translated.
The Connector automatically updates translation projects with redelivered assets. If an imported project has redelivered assets, its status is 100%/Ready for import. There are three ways to import translated content into Optimizely:
- Importing All Available Translated Content from the Gadget
- Importing All Available Translated Content from the Dashboard
- Importing Translated Content in One Target Language from the Dashboard
Recommendation: After importing translated content, you should review the corresponding translated assets before publishing them. For detailed instructions, see Reviewing Translated Assets.
6.1.1 - Importing All Available Translated Content from the Gadget
When the translation project is complete and has been returned to the Connector, the translated content is ready to import into Optimizely, where you can review it.
In the Lionbridge Connector gadget, the clock icon ![]() is displayed and the project-completion status is variable, greater than 10% and up to 100%.
is displayed and the project-completion status is variable, greater than 10% and up to 100%.
For more information about importing translated content into Optimizely, see Importing Translated Content.
To import translated content into Optimizely from the Lionbridge Connector gadget:
-
In Optimizely CMS, click Edit.
-
Click the Toggle assets pane icon.
The Assets pane is displayed on the right. The Lionbridge Connector gadget is displayed at the bottom of the pane, displaying all the translation projects.
-
In the list, click a project whose status is
100%to select it. -
Mouseover the right end of the project in the Lionbridge Connector gadget, click the Options icon
and then select Import translations in the project’s context menu.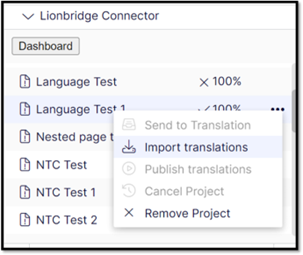
A message box opens, stating that the project has been imported, but that it has not been published. The project is ready for review.
-
Click OK to close the message box.
6.1.2 - Importing All Available Translated Content from the Dashboard
When the translation project is complete and has been returned to the Connector, the translated content is ready to import into Optimizely, where you can review it.
For more information about importing translated content into Optimizely, see Importing Translated Content.
In the Lionbridge Connector Dashboard, either:
- The displayed project status is
Ready for import. - The project status is displayed, in italics, in
In Translationstatus, which indicates that some of the project content may already be ready to import into Optimizely. For more information, see the note about status displayed in italics in Monitoring Translation rojects.
To import all available translated content into Optimizely from the Dashboard:
-
In the Dashboard, locate a translation project with either
Ready for importstatus orIn Translationstatus, displayed in italics. This is displayed in the Status column. For information on opening the Dashboard, see Getting Started with the Connector for Optimizely. -
In the Actions column, click the arrow and select Import All Available from the context menu.
A message box opens, confirming that the project is being imported into Optimizely, and that the project status will update when the import is complete.
-
Click OK to close the message box.
6.1.3 - Importing Translated Content in One Target Language from the Dashboard
When the translation project is complete and has been returned to the Connector, the translated content is ready to import into Optimizely, where you can review it. In the Lionbridge Connector Dashboard, either:
- The displayed project status is
Ready for import. - The project status is displayed, in italics, in
In Translationstatus, which indicates that some of the project content may already be ready to import into Optimizely. For more information, see the note about status displayed in italics in Monitoring Translation Projects.
For more information about importing translated content into Optimizely, see Importing Translated Content.
To import translated content into Optimizely from the Dashboard:
-
In the Dashboard, locate the translation project whose content you want to import. For information on opening the Dashboard, see Getting Started with the Connector for Optimizely.
-
Click the Expand icon
on the left side of the translation project whose assets you want to import.
The translation-project row expands, displaying the status of the translation of each target language in the project and any relevant actions. For a detailed description of this section, see Monitoring Translation Assets.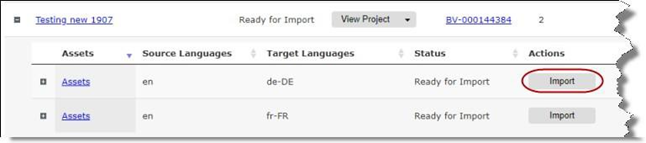
-
Click Import for target-language assets to import.
A message box opens, confirming that you want to import the assets in this target language.
-
Click Yes to proceed.
Another message box opens, stating that the assets were imported. -
Click OK to close the message box.
6.2 - Reviewing Translated Assets
After importing translated content into Optimizely, as described in Importing Translated Content, it is ready for review. This is the recommended step before publishing.
Note: You can also review an individual translated asset by clicking its link from the Dashboard. For detailed instructions, see Viewing Translated Assets.
To review translated assets:
-
In the top-left corner of the system workspace, click the Toggle navigation pane icon
 . The Navigation pane is displayed on the left.
 -
In the Navigation pane, click the Sites tab, and click the language version of the site to review. Alternatively, install the Versions Add-On to display the different language versions you have created.
-
Click the Pages tab, and in the tree structure, navigate to each page to review.
-
Optional. Click the Compare different versions icon
 to compare the source and target language versions of a page side by side and review before publishing or performing further edits.
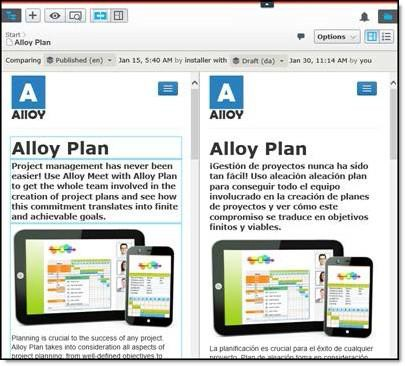
-
Optional. Click in a page to edit it.
Note: Blocks are displayed as translated within a page only after the page is published. To view the translated draft version of blocks for review purposes, in the Assets pane on the right, select the blocks, as shown below.
- When you are done, do one of the following to publish the translated page:
- You can click Publish? in the top-right corner and select Publish changes from the context menu.
- You can publish translated assets from within the Connector. For detailed instructions, see Publishing Translated Assets.
6.2.1 - Viewing Translated Assets
You view detailed information about individual translated assets in a translation project by clicking the Expand icon ![]() next to that project in the Lionbridge Connector Dashboard (“Dashboard”), and then clicking the Expand icon
next to that project in the Lionbridge Connector Dashboard (“Dashboard”), and then clicking the Expand icon ![]() next to an asset set for a source-target language pair. For a detailed description of the entire Dashboard, see Monitoring Translation Projects.
next to an asset set for a source-target language pair. For a detailed description of the entire Dashboard, see Monitoring Translation Projects.
To view a translated asset:
-
In the Dashboard, click the Expand icon
on the left side of the translation project whose assets you want to view. For instructions on opening the Dashboard, see Getting Started with the Connector for Optimizely.
The translation-project row expands, displaying the status of the translation of each target language in the project and any relevant actions. For a detailed description of this section, see Monitoring Translation Assets.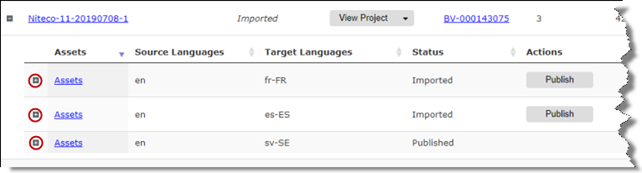
-
Click the Expand icon
on the left side of the asset set whose assets you want to view.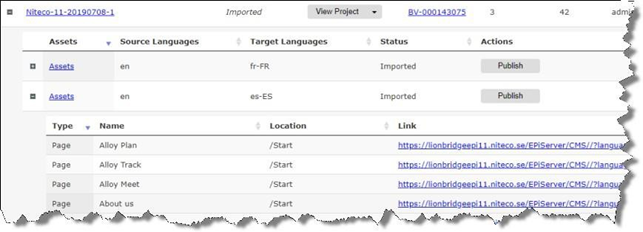
The Assets row expands, displayed the following information about each asset in the asset set:
| Column | Description |
|---|---|
| Type | The type of asset, which is either Page or Block. |
| Name | The name of the asset in Optimizely. |
| Location | The relative path of the translated asset in Optimizely. |
| Link | The absolute path of the translated asset in Optimizely. |
- In the Link column, click the link to open the translated asset in within Optimizely, where you can review and edit it, and publish it if it has not yet been published.
6.3 - Publishing Translated Assets
After you import translated content, you can publish the corresponding assets from the Connector. Alternatively, you can publish assets individually from the regular Optimizely publishing method, as described in the last step of Reviewing Translated Assets.
Publishing translated assets from the Connector is available only when the project is in Imported status, or if it is displayed, in italics, in either In Translation or Ready for Import status, which indicates that some of the project content may already be imported into Optimizely. For more information, see the note about status displayed in italics in Monitoring Translation Projects.
To import and publish a page, all its dependent blocks must be translated.
The Connector automatically updates translation projects with redelivered assets. If a published project has redelivered assets, its status is 100%.
For instructions on importing and reviewing content before publishing it, see Importing Translated Content.
There are three ways to publish translated assets:
6.3.1 - Publishing All Available Translated Assets from the Gadget
After you import translated content, you can publish the corresponding translated assets.
This feature is available only when the project is in Imported status, or if it is displayed, in italics, in either In Translation or Ready for Import status, which indicates that some of the project content may already be imported into Optimizely. For more information, see the note about status displayed in italics in Monitoring Translation rojects.
For more information about publishing translated assets, see Publishing Translated Assets section.
To publish translated assets from the Lionbridge Connector gadget:
-
In Optimizely CMS, click Edit.
-
Click the Toggle assets pane icon.
The Assets pane is displayed on the right. The Lionbridge Connector gadget is displayed at the bottom of the pane, displaying all the translation projects. -
Click a project in the list to select it.
-
Mouseover the right end of the project in the Lionbridge Connector gadget, click the Options icon
and then select Publish translations in the project’s context menu. This menu item is available only when the project is in Importedstatus.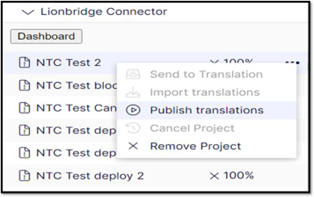
A message box opens, confirming that the pages are being published.
-
Click OK to close the message box.
6.3.2 - Publishing All Available Translated Assets from the Dashboard
After you import translated content, you can publish the corresponding translated assets.
This feature is available only when the project is in Imported status, or if it is displayed, in italics, in either In Translation or Ready for Import status, which indicates that some of the project content may already be imported into Optimizely. For more information, see the note about status displayed in italics in Monitoring Translation rojects.
For more information about publishing translated assets, see Publishing Translated Assets section.
To publish all available translated assets from the Dashboard:
-
In the Dashboard, locate a translation project with
Importedstatus. This is displayed in the Status column. For information on opening the Dashboard, see Getting Started with the Connector for Optimizely. -
In the Actions column, click the arrow and select Publish All Available from the context menu.
A message box opens, confirming that you want to publish all available assets in the project.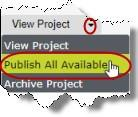
-
Click Yes to proceed.
Another message box opens, stating that the project was published. -
Click OK to close the message box.
6.3.3 - Publishing Translated Assets in One Target Language from the Dashboard
After you import translated content, you can publish the corresponding translated assets. In the Lionbridge Connector Dashboard, either:
- The displayed project status is Imported.
- The project status is displayed, in italics, in either In Translation or Ready for Import status, which indicates that some of the project content may already imported into Optimizely. For more information, see the note about status displayed in italics in Monitoring Translation Projects.
For more information, see Publishing Translated Assets.
To publish translated assets from the Dashboard:
-
In the Dashboard, locate the translation project whose translated assets you want to publish. For information on opening the Dashboard, see Getting Started with the Connector for Optimizely.
-
Click the Expand icon
on the left side of the translation project whose assets you want to publish.
The translation-project row expands, displaying the status of the translation of each target language in the project and any relevant actions. For a detailed description of this section, see Monitoring Translation Assets.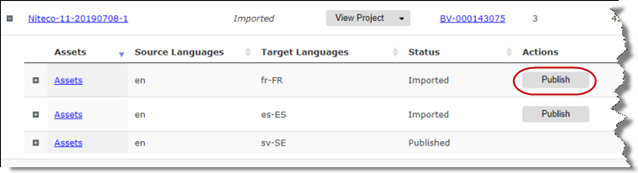
-
Click Publish for target-language assets to publish.
A message box opens, confirming that you want to publish the assets in this target language.
-
Click Yesto proceed.
Another message box opens, stating that the assets were published. -
Click OK to close the message box.
6.4 - Archiving and Unarchiving Projects
You archive a project so that it is no longer displayed by default in the Lionbridge Connector Dashboard (“Dashboard”). Typically, you archive a project when all its assets have been published and it is in Published status. However, you can archive any project that is not in Draft status. In contrast, when you unarchive a project, you move it to the default view of the Dashboard.
Recommendation: Archive completed projects to remove them from the default view.
To archive a project:
-
In the Dashboard, locate the project to archive.
-
In the Actions column, click the arrow for the project, and then click Archive Project.

A message box confirms that you want to archive the project.
-
Click Yes to proceed.
A message box confirms that the project is being archived.
-
Click OK to close the dialog box.
To unarchive a project:
-
In the top-left corner of the Dashboard, click the View Archived Projects button. This ensures that only archived projects are displayed.
The Dashboard updates.
-
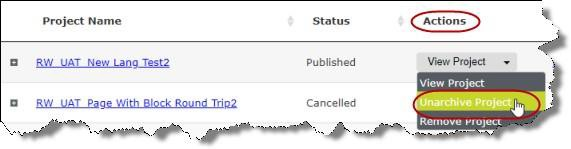
In the Actions column, click the arrow for the project to unarchive, and then click Unarchive Project.
A message box confirms that you want to unarchive the project.
-
Click Yes to proceed.
A message box confirms that the project is being unarchived. -
Click OK to close the dialog box.
6.5 - Removing Translation Projects from the Connector
You can remove a translation project from the Connector. This functionality is not reversible.
This feature is available only when the project is in either Draft, Imported, or Published status. For a list and description of translation statuses, see Translation Statuses.
Notes: If you remove a project in Draft status, you will not be able to send it out for translation. This feature is not available in any other statuses, which occur when the project is actively in translation. To stop a translation project that is already in progress, you cancel the translation project in the Connector. For detailed instructions, see Canceling a Translation Project.
There are two ways to remove a translation project from the Connector:
6.5.1 - Removing Translation Projects from the Connector via the Gadget
You can remove a translation project from the Connector. This functionality is not reversible.
This feature is available only when the project is in either Draft, Imported, or Published status. For more information about removing translation projects from the Connector, see Removing Translation Project
To remove a translation project from the Connector in the Lionbridge Connector gadget:
-
In Optimizely CMS, click Edit.
-
Click the Toggle assets pane icon.
The Assets pane is displayed on the right. The Lionbridge Connector gadget is displayed at the bottom of the pane, displaying all the translation projects.
-
Click a project in the list to select it.
-
Mouseover the right end of the project in the Lionbridge Connector gadget, click the Options icon
and then select Remove Project in the project’s context menu. This menu item is available only when the project is in either Draft,Imported,CancelledorPublishedstatus.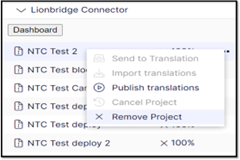
A message box opens, confirming that you want to remove the project.
-
Click Yes to confirm.
The project is removed from the list.
6.5.2 - Removing Translation Projects from the Connector via the Dashboard
You can remove a translation project from the Connector. This functionality is not reversible.
This feature is available only when the project is in either Draft, Imported, or Published status. For more information about removing translation projects from the Connector, see Removing Translation Project.
To remove a translation project from the Connector in the Dashboard:
-
In the Dashboard, locate a translation project with either
Draft,Imported, orPublishedstatus. This is displayed in the Status column. For information on opening the Dashboard, see Getting Started with the Connector for Optimizely. -
In the Actions column, click the arrow and select Remove Project from the context menu. A message box opens, confirming that you want to remove the project.
-
Click Yes to confirm. The project is removed from the list.
Another message box opens, stating that the project was removed.
-
Click OK to close the message box.
7 - Translation Optimizely Form Supports
| No. | Name | property | Type | Support |
|---|---|---|---|---|
| 1 | Form container | |||
| Form title | string | Yes | ||
| Description | string | Yes | ||
| Show a summary confirmation message after submission | bool | No need to translate | ||
| Confirmation message | text | Yes | ||
| Display page after submission | link of page (reference) | No | ||
| Display message after form submission | xhtmlstring | Yes | ||
| Allow anonymous submissions | bool | No need to translate | ||
| Allow multiple submissions from the same IP/cookie | bool | No need to translate | ||
| Show navigation bar if the form has multiple steps | bool | No need to translate | ||
| Allow access to form data through the service API | bool | No need to translate | ||
| Form elements | List of element references | No | ||
| Category | List of group pages’s reference | No | ||
| 2 | Form elements | |||
| 2.1 | Text | |||
| Label text | string | Yes | ||
| Tooltip | string | Yes | ||
| Validators | GenericList | |||
| Required | bool | No need to translate | ||
| Required Error message | string | Yes | ||
| Regular expression | bool | No need to translate | ||
| Regular expression Error message | string | Yes | ||
| bool | No need to translate | |||
| Email Error message | string | Yes | ||
| Date 1 (DD/MM/YYYY) | bool | No need to translate | ||
| Date 1 Error message | string | Yes | ||
| Date 2 (MM/DD/YYYY) | bool | No need to translate | ||
| Date 2 Error message | string | Yes | ||
| Date 3 (YYYY-MM-DD) | bool | No need to translate | ||
| Date 3 Error message | string | Yes | ||
| Placeholder text | string | Yes | ||
| Predefined value | string | No | ||
| 2.2 | Text area | |||
| Label text | string | Yes | ||
| Tooltip | string | Yes | ||
| Validators | GenericList | |||
| Required | bool | No need to translate | ||
| Required Error message | string | Yes | ||
| Regular expression | bool | No need to translate | ||
| Regular expression Error message | string | Yes | ||
| Placeholder text | string | Yes | ||
| 2.3 | Number | |||
| Label text | string | Yes | ||
| Tooltip | string | Yes | ||
| Validators | GenericList | |||
| Required | bool | No need to translate | ||
| Required Error message | string | Yes | ||
| Interger | bool | No need to translate | ||
| Integer expression Error message | string | Yes | ||
| Positive integer | bool | No need to translate | ||
| integer Error message | string | Yes | ||
| Placeholder text | string | Yes | ||
| 2.4 | Address | |||
| Label text | string | Yes | ||
| Tooltip | string | Yes | ||
| Country Label | string | No | ||
| Postal Label | string | No | ||
| State Label | string | No | ||
| City Label | string | No | ||
| Street Label | string | No | ||
| Detail Address | string | No | ||
| Map height | int | No need to translate | ||
| Map width | int | No need to translate | ||
| Validators | string | No | ||
| 2.5 | Datetime | |||
| Label text | string | Yes | ||
| Tooltip | string | Yes | ||
| Picker type | Integer | No | ||
| Validators | string | No | ||
| Placeholder text | string | Yes | ||
| Predefined value | string | No | ||
| Insight property | string | No | ||
| This field will be | string | No | ||
| 2.6 | Datetime ranger | |||
| Label text | string | Yes | ||
| Tooltip | string | Yes | ||
| Picker type | int | No | ||
| Validators | string | No | ||
| Placeholder text | string | Yes | ||
| Predefined value | string | No | ||
| Insight property | string | No | ||
| This field will be | string | No | ||
| 2.7 | Range | |||
| Label text | string | Yes | ||
| Tooltip | string | Yes | ||
| Min | int | No need to translate | ||
| Max | int | No need to translate | ||
| Step | int | No need to translate | ||
| 2.8 | Url | |||
| Label text | string | Yes | ||
| Tooltip | string | Yes | ||
| Validators | GenericList | |||
| Required | bool | No need to translate | ||
| Required Error message | string | Yes | ||
| Regular expression | bool | No need to translate | ||
| Regular expression Error message | string | Yes | ||
| Placeholder text | string | Yes | ||
| Predefined value | string | No | ||
| 2.9 | Selection | |||
| Label text | string | Yes | ||
| Tooltip | string | Yes | ||
| Validators | GenericList | |||
| Required | bool | No need to translate | ||
| Required Error message | string | Yes | ||
| Allow multiple choices | bool | No need to translate | ||
| Choices | string | |||
| Items (OptionList) | OptionList | No | ||
| Choice | string | No | ||
| Value | string | No | ||
| Placeholder text | string | Yes | ||
| 2.10 | Multiple or single choice | |||
| Label text | string | Yes | ||
| Tooltip | string | Yes | ||
| Validators | GenericList | |||
| Required | bool | No need to translate | ||
| Required Error message | string | Yes | ||
| Allow multiple choices | bool | No need to translate | ||
| Choices | string | |||
| Items | OptionList | No | ||
| Choice | string | No | ||
| Value | string | No | ||
| 2.11 | Image choice | |||
| Label text | string | Yes | ||
| Tooltip | string | Yes | ||
| Validators | GenericList | |||
| Required | bool | No need to translate | ||
| Required Error message | string | Yes | ||
| Show the check box or radio button | bool | No need to translate | ||
| Allow multiple choices | bool | No need to translate | ||
| Image choices | List of image reference | No | ||
| 2.12 | File upload | |||
| Label text | string | Yes | ||
| Tooltip | string | Yes | ||
| Max file size (in MB) | int | No need to translate | ||
| Allowed extensions | string | No | ||
| String | Quechua_Ecuador | Validators | GenericList | |
| Required | bool | No need to translate | ||
| Required Error message | string | Yes | ||
| Allow multiple files | bool | No need to translate | ||
| 2.13 | Hidden predefined value | |||
| Predefined value | string | No | ||
| 2.14 | Captcha | |||
| Label text | string | Yes | ||
| Tooltip | string | Yes | ||
| Image width | int | No need to translate | ||
| Image height | int | No need to translate | ||
| Text length | int | No need to translate | ||
| 2.15 | reCAPTCHA | |||
| Validators | string | No | ||
| Site key | string | No | ||
| Secret key | string | No | ||
| 2.16 | Rich text (with placeholders) | |||
| Text | xhtmlstring | Yes | ||
| 2.17 | Form step | |||
| Step title | string | Yes | ||
| Description | string | Yes | ||
| 2.18 | Submit button | |||
| Label text | string | Yes | ||
| Image | Image reference | No | ||
| Tooltip | string | Yes | ||
| 2.19 | Reset button | |||
| Label text | string | Yes | ||
| Tooltip | string | Yes |