This the multi-page printable view of this section. Click here to print.
Installation and Configuration Guide 12
- 1: Welcome to the Connector
- 1.1: Terminology
- 1.2: About the Content API Platform
- 1.3: How the Connector Works with Optimizely
- 1.4: Using this Guide
- 1.5: How to Contact Lionbridge Connector Support
- 2: Before You Install
- 3: Installing the Lionbridge Connector
- 4: Configuring the Connector for Optimizely
- 4.1: Adding the Lionbridge Connector Gadget
- 4.2: Activating the Scheduled Job and Setting the Run Interval
- 4.3: Activating Background Jobs
- 4.4: Configuring Language Mapping and Asset Packaging
- 4.5: Configuring Content API connection information
- 4.6: Content API Job Completion
- 4.7: Configuring CMS Name and Limit number of assets
- 4.8: Configuring Lionbridge Freeway Settings
- 4.9: Configuring Logging when the Connector is Installed Locally
- 4.10: Configuring Logging in DXP Environments
- 4.11: Configuring Graylog
- 4.12: Configuring Multiple Users and Translation Workflows
- 4.13: Configuring Restriction Setting for CMS
- 5: Migrating existing Job or Translation Projects
- 6: Troubleshooting
- 7: Appendix Language Codes
1 - Welcome to the Connector
Welcome to the Lionbridge Connector for Optimizely
Welcome to the Lionbridge Connector for Optimizely (Connector). This is Lionbridge’s connector between Optimizely and the Lionbridge Content API Platform.
1.1 - Terminology
| Asset | Any content or document being sent for translation, including metadata. Assets are created by the Connector. |
| Content API Platform | The hosted connectivity platform that receives and routes content from content systems, including content management systems (CMSs), to translation providers and back during implementation. The Lionbridge Connector Team configures the Platform based on the number and nature of systems involved in your system architecture. |
| Optimizely | The Optimizely CMS (Content Management System). For more information, see Optimizely. |
| Freeway | The name of the Lionbridge translation portal for submitting content to and retrieving content from the Lionbridge translation provider. |
| FTP Server | File Transfer Protocol (FTP) is a standard network protocol used to transfer files from one host to another host over a TCP-based network, such as the Internet. Translation providers may receive and send files for translation using an FTP server. |
| Provider Keys | The Connector uses provider keys to establish a secure, discrete connection between the Connector instance and the Platform. Very important: Do not copy the CMS address keys to multiple Optimizely instances,because this is a violation of the License Agreement. Using the same CMS address keys on multiple Optimizely instances will cause the Lionbridge App or Connector to behave unexpectedly, which can result in lost translation content, orphaned projects, and inaccurate translation status reports. The Lionbridge Connector team will support technical issues caused by duplicating or incorrectly installing CMS address keys only on a time and materials basis. |
| Keys | The Connector uses keys to establish a secure, discrete connection between the Connector instance and the Platform. Very important Do not use the same account keys on multiple instances, because this is a violation of the License Agreement. Using the same account keys on multiple instances will cause the Connector to behave unexpectedly, which can result in lost translation content, orphaned projects, and inaccurate translation status reports. The Lionbridge Connector team will support technical issues caused by duplicating or incorrectly installing CMS address keys only on a time and materials basis.** |
| Lionbridge | The publisher of the Freeway translation portal and a translation provider. Users connect to the Freeway translation portal to submit content to and retrieve content from the Lionbridge translation provider. |
| Lionbridge Connector for Optimizely (Connector) | The connector software that Lionbridge provides, which plugs into your Optimizely installation to provide connectivity to the hosted Platform. In this document it is to as Connector This is the software you are installing and configuring as you work through this document. |
| MT | Machine translation. The translation provider can be a machine translation service, such as Bing. |
| NuGet | Open source package manager for the Microsoft development platform. For more information, see http://www.nuget.org/ |
| Producer | CMS or another content system that sends content or documents out for translation. In this case, this is Optimizely. |
| Provider | provider of translation services. The delivery of assets to the provider may be via an FTP server or a TMS connector. |
| Scheduled Job | Optimizely functionality to run scheduled jobs. These can be run repeatedly with a specified interval or started manually. |
| Support Asset | Supporting documents and their metadata. Support assets are not translated by the translation provider, but they provide helpful context for the translator. |
| TMS | Translation management system that the translation provider uses. |
1.2 - About the Content API Platform
About the Content API Platform
The Content API translation-connectivity platform is the easiest, most flexible way to integrate content systems, including content management systems (CMSs) and other content producers, with translation providers and translation technologies.
Content API Platform is the hosted (IaaS) connectivity platform that receives and routes content from content management systems to translation providers and back, including to Lionbridge via Freeway. It is hosted on Amazon Web Services (AWS). During implementation, the Lionbridge Connector Team configures the Platform for your translation solution, based on the translation providers or systems you use.
1.3 - How the Connector Works with Optimizely
The Lionbridge Connector (“Connector”) is an important part of the Content API translation solution.
The Connector is installed on your system as an add-in to Optimizely, through a NuGet installation package. Its functionality is displayed to the users as part of Optimizely.

Your translation systems architecture might look like the configuration above. It may have additional content systems or translation providers, but the core concepts remain the same. During implementation, the Lionbridge Connectors team works with you and your translation providers to configure and test the other elements of your translation solution, which are the Content API Platform’s connections to your translation providers' systems.
1.4 - Using this Guide
Purpose of this guide
This guide describes everything you need to know to install and configure the Lionbridge Connector (Connector) for Optimizely. It describes the delivery package contents, system requirements, installation instructions, and configuration procedures.
Who should use this guide
This guide is intended for Optimizely administrators and system integrators.
What you should already know
This document assumes that your company already has an installed instance of Optimizely. It also assumes that Lionbridge is your company’s translation provider. It assumes that you have a strong working knowledge of Optimizely.
How to find out more about the Lionbridge Connector for Optimizely
For information on using the Lionbridge Connector to send and receive content for translation from Optimizely, read the Lionbridge Connector for Optimizely User Guide.
Documentation conventions
This guide uses the following conventions:
| Convention | Description |
|---|---|
| Bold | Highlights screen elements such as buttons, menu items, and fields. |
| Courier | Highlights input, file names, and paths. |
| Italics | Highlights terms for emphasis, variables, or document titles. |
| > | Indicates a menu choice. For example, Select Edit > Select All. |
1.5 - How to Contact Lionbridge Connector Support
How to Contact Lionbridge Connector Support
You can submit a support ticket either:
- by emailing connectors@lionbridge.com
- from the Lionbridge Connector Zendesk page https://lionbridge-connectors.zendesk.com/
See also:
2 - Before You Install
Before you begin to install the Lionbridge Connector (Connector) for Optimizely, please review the system requirements, described below, and perform the following pre-installation procedures:
- Back up your Optimizely database.
- If you received the Connector as a NuGet package (with file extension .nupkg) directly from Lionbridge, ensure that it is saved to a location that is accessible during the installation process. Alternatively, you can download the package directly from the Optimizely NuGet feed, using the NuGet Package Manager Console. For details, see Installing the Lionbridge Connector.
2.1 - Configuring Network Settings for a Firewall
Optional step. If you have a firewall, you must configure your ports so that the Connector can communicate with the Content API Platform. The Connector must be able to communicate with the Content API Platform by initiating the following outbound network connections:
| Protocol | Port Number | Description | Locations to Configure |
|---|---|---|---|
| HTTPS | Port 443 | For secure access to the Content API Platform Services | https://contentapi.lionbridge.com/* https://content-api.staging.lionbridge.com/* https://login.lionbridge.com/* https://fms.lionbridge.com/* https://fms-staging.lionbridge.com/* |
If you configured Freeway as a provider type, also configure:
| Protocol | Port Number | Description | Location to Configure |
|---|---|---|---|
| HTTPS | Port 443 | For secure access to Lionbridge Freeway | https://fwapi.lionbridge.com/obvibundles/ freewayauth.asmx |
| HTTPS | Port 443 | For secure access to Lionbridge Freeway | https://fwapi.lionbridge.com/obvibundles/ service.asmx |
2.2 - System Requirements
The Lionbridge Connector for Optimizely supports Optimizely version 12. The Lionbridge Connector for Optimizely has no additional hardware or software requirements beyond those of Optimizely . For detailed requirements, refer to the Optimizely documentation, available at Developer Documentation.
3 - Installing the Lionbridge Connector
Important: Before installing the Connector, back up the Optimizely databases.
You use Visual Studio NuGet to install the Connector package. There are two ways to install the Connector, depending on whether you received the installation package directly from Lionbridge or you will download it from the Optimizely NuGet feed.
Optimizely version numbers in Lionbridge Connector packages
Important: There are different Connector packages for Optimizely 12, Optimizely 11 and Optimizely 10. Ensure that you download and install the correct package for your version of Optimizely.
You can identify the Optimizely version for the Lionbridge Connector from the last four digits of the NuGet package name, as described in the following table below.
| Optimizely Version | Lionbridge Connector Versioning (MajorVersion.MinorVersion.Patch.Optimizely Version) |
Example |
|---|---|---|
| Optimizely 12 | 2.x.x.1200 | 2.0.0.1200 |
To download and install the Connector:
Important: Follow these instructions if you did not receive the Connector as a NuGet package (with file extension .nupkg) directly from Lionbridge.
- In Visual Studio, open the NuGet Package Manager Console.
In the command line, type:
Install-Package LionbridgeConnector.

To install the Connector:
Important: Follow these instructions if you received the Connector as a NuGet package (with file extension .nupkg) directly from Lionbridge.
- In Visual Studio, open the NuGet Package Manager Console.
- Type the following command in the command line, ensuring that you specify the latest Connector version for your CMS version:
Install-PackageLionbridgeConnector -source [.nupkg file path] - version.x.x.1200
For example, to install version 2.0.0 of the Connector on CMS version 112, type:
Install-Package LionbridgeConnector -source C:\LionbridgeConnector -version 2.0.0.1200
Third-Party Libraries required:
The following compatible third-party libraries are required to be installed.
| Name | Description | Minimum Version |
|---|---|---|
| Newtonsoft.Json | Json.NET is a popular high-performance JSON framework for .NET | 13.0.1 |
| Serilog.Sinks.Graylog | The Serilog Graylog Sink project is a sink (basically a writer) for the Serilog logging framework. Structured log events are written to sinks and each sink is responsible for writing it to its own backend, database, store etc. This sink delivers the data to Graylog2, a NoSQL search engine. | 2.3.0 |
| Serilog | Simple .NET logging with fully-structured events | 2.10 |
| Microsoft.Extensions.Logging.Log4Net.AspNetCore | Allows to configure Log4net as Microsoft Extensions Logging handler on any ASP.NET Core application | 6.1 |
| log4net.dll | Log for Net Core | 2.0.13 |
Note: The Serilog libraries will be installed by the Connector package.
Installation location
The Connector is installed in the \modules_protected folder of the Optimizely web root. If you use another folder for add-ons, you must manually move the Connector files to your modules folder.
Important: For debugging in development environment: Copy folder LionbridgeConnector in the
\bin\modules_protectedfolder to project folder as path\modules_protected
3.1 - Updating Your Connector Installation
If the Lionbridge Connector (Connector) is already installed, follow the steps below to update your version of the Connector.
Using the Nuget Site:
- In Visual Studio, open the NuGet Package Manager Console.
- In the command line, type:
Update-Package LionbridgeConnector. Always use the latest available version of the Connector.
Using the NuGet package (with file extension .nupkg) directly from Lionbridge:
- In Visual Studio, open the NuGet Package Manager Console.
- In the command line, type:
Update-Package LionbridgeConnector -source. [.nupkg file path] -version MajorVersion.Minor Version.Patch.OptimizelyVersion.
For example, type: Update-Package LionbridgeConnector -source C:\LionbridgeConnector -version 2.0.0.1200
Optimizely version numbers in Lionbridge Connector packages:
You can identify the Optimizely version for the Lionbridge Connector from the last four digits of the NuGet package name, as described in the following table.
| Optimizely Version | Lionbridge Connector Versioning (MajorVersion.MinorVersion.Patch.Optimizely Version) |
Example |
|---|---|---|
| Optimizely 12 | 2.x.x.1200 | 2.0.0.1200 |
Important: If you are upgrading from Connector version earlier than 1.7.x and you have Jobs still In Translation with Lionbridge, then these will need to be completed before the migration else contact Connector Support.
3.2 - Uninstalling the Connector
Before uninstalling the Connector, ensure that the site is stopped in Visual Studio.
To uninstall the Connector:
- In Visual Studio, open the NuGet Package Manager Console.
- In the command line, type:
Remove-LionbridgeConnector.
4 - Configuring the Connector for Optimizely
After installing the Connector, you configure the following settings::
- Adding the Lionbridge Connector Gadget
- Activating the Scheduled Job and Setting the Run Interval
- Activating Background Jobs
- Configuring Language Mapping and Asset Packaging
- Configuring Content API connection information
- Content API Job Completion
- Configuring Lionbridge Freeway Settings
- Configuring CMS Name and Asset limit
- Configuring Logging when the Connector is Installed Locally
- Configuring Logging in DXP Environments
- Configuring Graylog
- Optional. Configuring Multiple Users and Translation Workflows
- Configuring Restriction Setting for CMS
4.1 - Adding the Lionbridge Connector Gadget
-
In Optimizely CMS, click Edit.
-
Click the Toggle assets pane icon. The Assets pane is displayed on the right.

-
In the Assets pane, click the Settings icon
 , and then select Add Gadgets from the context menu.
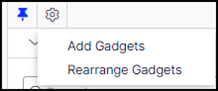
The Gadgets window opens.
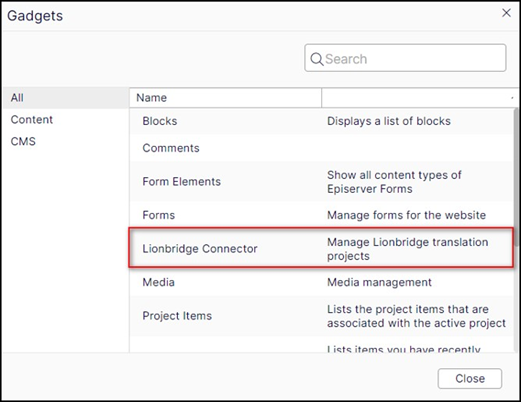
-
Click Lionbridge Connector.
4.2 - Activating the Scheduled Job and Setting the Run Interval
-
In Optimizely CMS, click Admin

-
In the tab panel, select Scheduled Jobs tab and then click Translation projects updater.
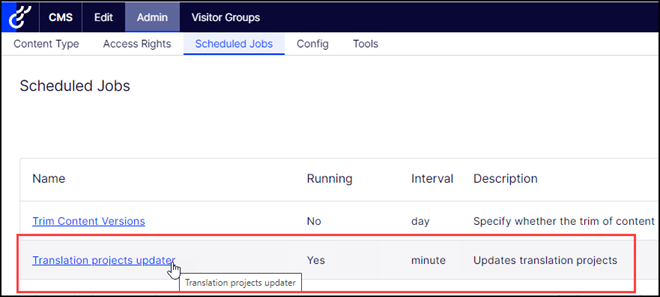
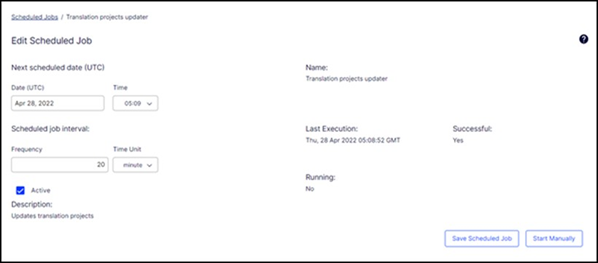
The Translation projects updater page opens, displaying the Connector scheduled job.
-
Select the Active check box to activate the job.
-
Specify the Scheduled job interval.
-
Click Save.
4.3 - Activating Background Jobs
-
In Optimizely CMS, click Admin.

-
In the tab panel, select Scheduled Jobs section and then click Translation backgournd jobs.
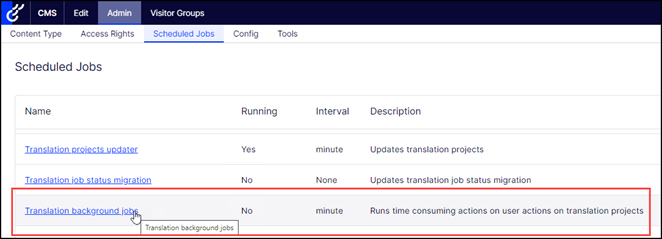
The Translation backgournd jobs page opens.

-
Select the Active check box.
-
Specify the Scheduled job interval, for example, 30 minutes.
-
Click Save.
4.4 - Configuring Language Mapping and Asset Packaging
In the Workspace settings tab:
- You map Optimizely languages to Lionbridge languages in the
language mapping.xmlfile. - You configure how the Connector packages multiple assets in a translation project.
To configure language mappings and grouped-asset handling:
-
In the bottom-right corner of the Lionbridge Connector gadget in the right pane, click the Settings icon
, and then select Settings from the context menu.
-
In the Workspace settings tab, edit the Language Mapping XML field to map each Optimizely language code to the corresponding Clay Tablet language code. For a list and description of Clay Tablet language codes, see Appendix: Language Codes.
Important: if you are not using the Lionbridge 4 digit codes, see Appendix: Language Codes then you must use this Language Mapping to map your language code to the Lionbridge code. If the there is no language mapping for the 2 digit codes then unmapped languages cannot be accepted back for Import.
For example:
     <Languages>
       <Language>
           <Optimizely>sv</Optimizely>
           <CAPI>sv-SE</CAPI>
       </Language>
       <Language>
            <Optimizely>da</Optimizely>
            <CAPI>da-DK</CAPI>
        </Language>
        </Languages>
Note: If you leave this section empty, the Connector will use the default values.
-
In the Workspace settings tab, you can configure how the Connector packages multiple assets in a translation project.

- If you select the Use grouped asset handling check box, then the Connector packages all pages and blocks selected for translation into a single XML file for each target language.
Recommendation: Select this check box, especially if Lionbridge Freeway will translate terms for SEO. - If you clear the Use grouped asset handling check box, then the Connector sends each page and block selected for translation as a separate XML file.
The Optimizely automatically saves your changes.
- If you select the Use grouped asset handling check box, then the Connector packages all pages and blocks selected for translation into a single XML file for each target language.
4.5 - Configuring Content API connection information
Before you can use the Connector with Content API V2 platform, you must configure Content API V2 connection information. These are available with your Lionbridge license. Ensure that you have this information before proceeding.
To configure Content API V2 services connection:
In the bottom-right corner of the Lionbridge Connector gadget in the right pane, click the Settings icon ![]() , and then select Settings from the context menu.
, and then select Settings from the context menu.
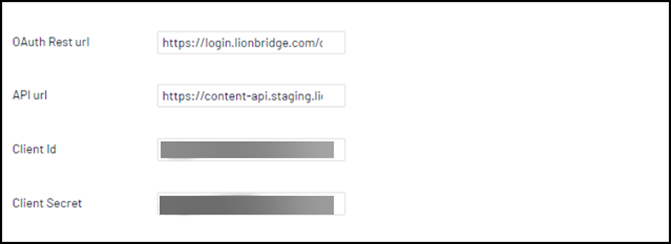
In the Workspace settings tab, edit information below:
- OAuth Rest url: Lionbridge authentication URL
- API Url: Path of Content API V2 services
- Client Id: is a public identifier for Content API services, it is available with your Lionbridge license.
- Client Secret: It is a secret known only to the application and the authorization for Content API services. It is available with your Lionbridge license.
4.6 - Content API Job Completion
In the Workspace settings tab, you can configure how the Connector to send completed confirmation to Content API V2 after a translation project is published.
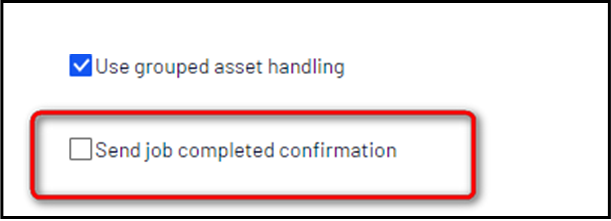
If you select the Send job completed confirmation check box, then the Connector sends completed confirmation to Content API V2 services when a Job is Published.
This means that after Publishing, a Completed status is sent to Lionbridge API and it will not be possible to make re-deliveries.
Recommendation: Do not select this check box, especially if Lionbridge Freeway can re-deliver new translations or correct errors.
4.7 - Configuring CMS Name and Limit number of assets
To configure Configuring CMS Name and Limit number of assets:
- In the bottom-right corner of the Lionbridge Connector gadget in the right pane, click the Settings icon , and then select Settings from the context menu.
- Click the Other settings tab.
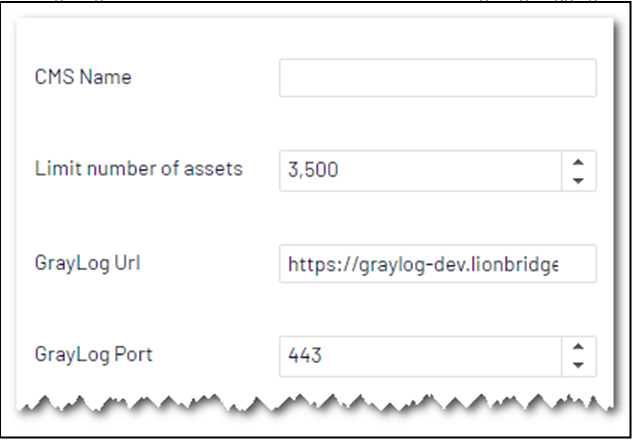
- You can configure the following settings:
| Setting | Description |
|---|---|
| CMS Name | Optional. The name of CMS like website address |
| Limit number of assets | Limits the maximum number of assets in a translation project |
4.8 - Configuring Lionbridge Freeway Settings
In the Other settings tab, you can configure Lionbridge Freeway-specific settings.
To configure settings for integration with Lionbridge Freeway:
-
In the bottom-right corner of the Lionbridge Connector gadget in the right pane, click the Settings icon
, and then select Settings from the context menu. -
Click the Other settings tab.
-
You can configure the following settings:
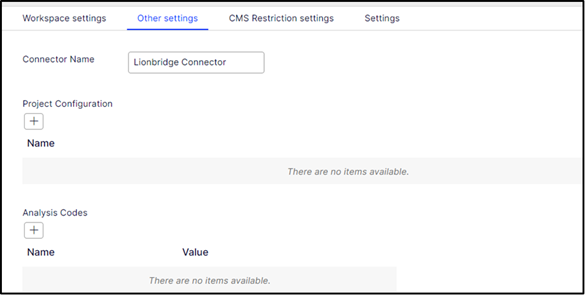
| Setting | Description |
|---|---|
| Analysis Codes | The name of a Lionbridge Freeway analysis code. Click the Important: You must contact your Lionbridge project manager to ensure that these analysis codes are in Freeway. |
| Freeway Link | The link to the Lionbridge Freeway bundle ID. This will be providedby the Lionbridge Connector Team. There will be different links for staging and production environments. |
| Asset Link | Optional. You can customize the links displayed in the Link column in the Lionbridge Connector Dashboard to display a non-default domain. Enter the non-default domain, for example: http://example.com. Recommendation: Configure this if in the Admin tab, on the Manage Websites page, the URL configured for the public website (front-end URL) is different than the domain of the environment (back-end URL). This may cause the Dashboard to display errors when loading, or prevent links from being displayed. |
The Optimizely automatically saves your changes.
4.9 - Configuring Logging when the Connector is Installed Locally
Note: If the Connector is installed in a DXP cloud environment, see Configuring Logging in DXP Environments
In an environment where the Connector is installed locally, you can activate full verbose logging for it. This is useful for identifying errors.
To configure logging:
- Append the following to
log4net.config:
<appender name="lionbridgeFileLogAppender" type="log4net.Appender.RollingFileAppender" >
      <!-- Consider moving the log files to a location outside the web application -->
      <file value="App_Data\LionbridgeErrors.log" />
      <encoding value="utf-8" /> <staticLogFileName value="true"/> <datePattern value=".yyyyMMdd.'log'" /> <rollingStyle value="Date" /> <threshold value="Verbose" />
      <lockingModel type="log4net.Appender.FileAppender+MinimalLock"
/>
<appendToFile value="true" />
<layout type="log4net.Layout.PatternLayout">
  <conversionPattern value="%date [%thread] %level %logger:
  %message%n" />
 </layout>
</appender>
- Add the following logger:
</logger>
<logger name="Lionbridge" additivity="false">
<level value="Verbose" />
<appender-ref ref="lionbridgeFileLogAppender" />
</logger>
The generated log file is:\App_Data\LionbridgeErrors.log.
-
Add the logging setting for Log4Net into appsettings.json.
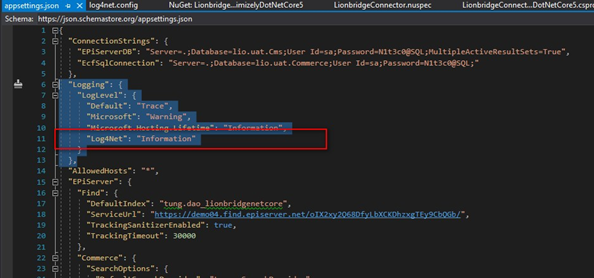
-
Configure Logging for Log4Net: Add the AddLog4Net() call into your
Configuremethod of theProgramclass.
public static IHostBuilder CreateHostBuilder(string[] args) =>
Host.CreateDefaultBuilder(args)
.ConfigureCmsDefaults() .ConfigureLogging(builder => { builder.ClearProviders(); builder.AddLog4Net(); })
.ConfigureWebHostDefaults(webBuilder =>
{
webBuilder.UseStartup<Startup>();
});
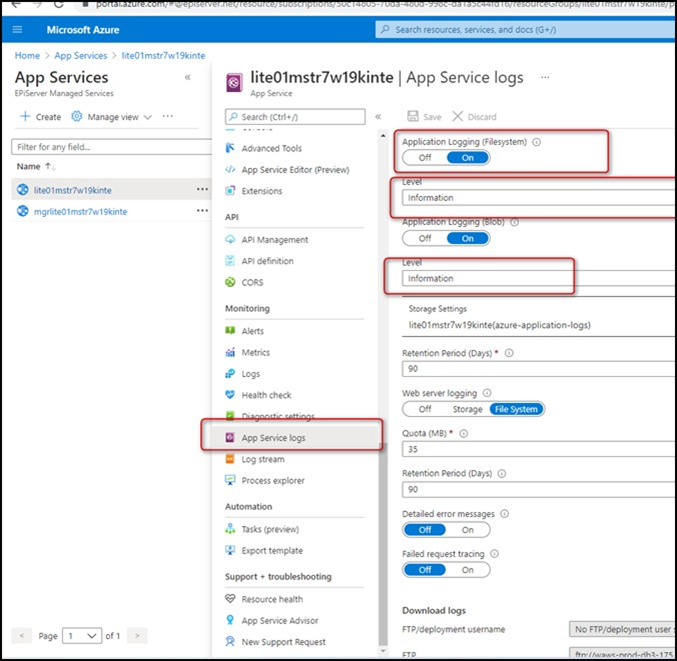
4.10 - Configuring Logging in DXP Environments
Note: If the Connector is installed locally, see Configuring Logging when the Connector is Installed Locally.
To access Connector log files in a DXP environment, turn on App service logs.
4.11 - Configuring Graylog
Graylog is a powerful platform that allows for easy log management of both structured and unstructured data along with debugging applications. From version 1.7.0 of the connector use it as optional local logging output.
To configure Graylog:
-
In the bottom-right corner of the Lionbridge Connector gadget in the right pane, click the Settings icon
, and then select Settings from the context menu.In the Other settings tab, edit information below:
-
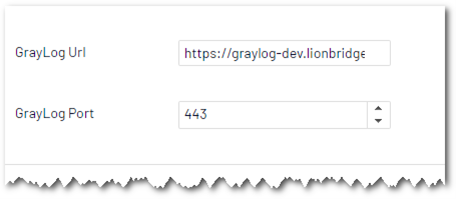
You can configure the following settings:
| Setting | Description |
|---|---|
| GrayLog Url | Path of your graylog website |
| GrayLog Port | Graylog port. This unique value for your site. Each site must have its own dedicated portal to distinguish it from different environments. |
4.12 - Configuring Multiple Users and Translation Workflows
The Connector supports multiple users. This enables configuring the Connector so that the creator of a translation project determines which Lionbridge Freeway account is assigned to that project. This requires setup in Freeway as well. To enable this configuration, contact the Lionbridge Connector Team and your Lionbridge project manager.
4.13 - Configuring Restriction Setting for CMS
This is a new optional setting for CMS feature. This setting allows the user to select the CMS properties which will not be sent out and translated by the translation provider.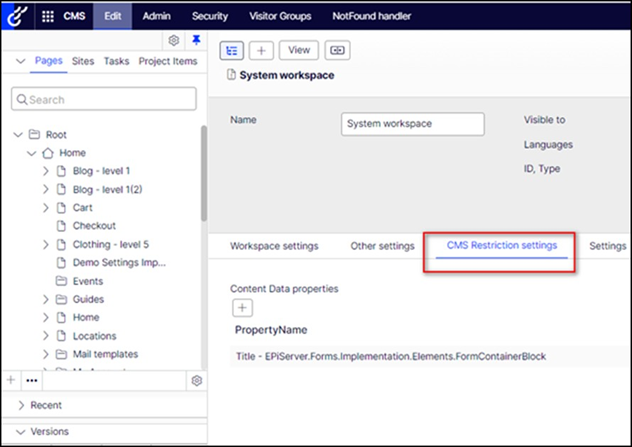
User can do the following actions to add the restriction fields:
-
Click on the
 button under the selected node properties.
 -
Select one of the restricted fields in the Property Name.
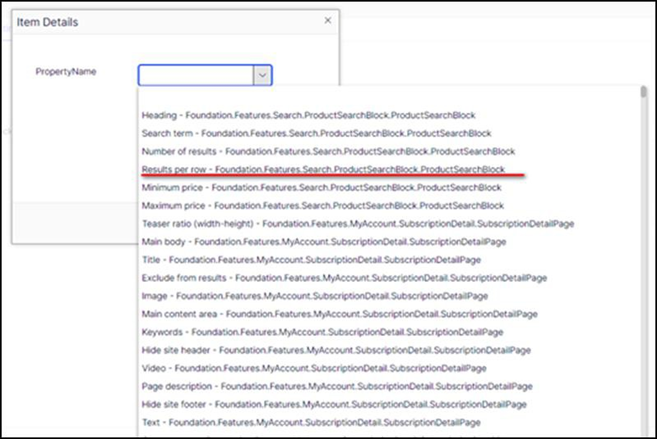
-
Click
 button and the setting will be saved automatically.
5 - Migrating existing Job or Translation Projects
In the version of the connector for Optimizely 12 it requires ALL Job / Translation Projects that are still In Translation with Lionbridge from the previous Clay Tablet platform or Content API V2 must be completed before you upgrade.
6 - Troubleshooting
| Problem | Explanation/Solution |
|---|---|
| Translation projects are stuck at 0% after sending them for translation. | Ensure that the scheduled job has been activated. For detailed instructions, see Activating the Scheduled Job and Setting the Run Interval. |
| The Connector does not send out custom properties for translation. | The Connector supports sending for translation only custom properties that inherit from the ProperyLongString and PropertyString classes. |
| Language Mapping | When adding languages, if you are not using the Lionbridge 4 digit codes, see Appendix: Language Codes then you should use the language mapping feature to map your language code to the Lionbridge code, see Configuring Language Mapping and Asset Packaging. If the there is no language mapping for the 2 digit codes then jobs cannot be accepted back. |
| Lionbridge Freeway analysis codes are specified, but they are not displayed or available for selection when sending out projects for translation. | The URLs where Lionbridge Freeway provides the authentication service and the analysis code service are not correctly configured. If you have a firewall, you must configure your ports so that the Connector can communicate with these services. If you have a firewall, you must configure your ports so that the Connector can communicate with these URLs. For detailed instructions, see Configuring Network Settings for a Firewall. |
7 - Appendix Language Codes
For detailed instructions on mapping Optimizely language codes to Lionbridge language codes for every language your company uses for translation, see Configuring Language Mapping and Asset Packaging.
The Connector has the following language codes:
| Type | Language Identifier | Language Code |
|---|---|---|
| String | Afrikaans | “af-ZA” |
| String | Albanian | “sq-AL” |
| String | Amharic | “am-ET” |
| String | Arabic_Algeria | “ar-DZ” |
| String | Arabic_Bahrain | “ar-BH” |
| String | Arabic_Egypt | “ar-EG” |
| String | Arabic_Iraq | “ar-IQ” |
| String | Arabic_Jordan | “ar-JO” |
| String | Arabic_Kuwait | “ar-KW” |
| String | Arabic_Lebanon | “ar-LB” |
| String | Arabic_Libya | “ar-LY” |
| String | Arabic_Morocco | “ar-MA” |
| String | Arabic_Oman | “ar-OM” |
| String | Arabic_Qatar | “ar-QA” |
| String | Arabic_Saudi_Arabia | “ar-SA” |
| String | Arabic_Syria | “ar-SY” |
| String | Arabic_Tunisia | “ar-TM” |
| String | Arabic_UAE | “ar-AE” |
| String | Arabic_Yemen | “ar-YE” |
| String | Armenian | “hy-AM” |
| String | Assamese | “as-IN” |
| String | Basque | “eu-ES” |
| String | Belarusian | “be-BY” |
| String | Bengali_Bangladesh | “bn-BD” |
| String | Bengali_India | “bn-IN” |
| String | Bosnian_Bosnia_Herzegovina | “bs-BA” |
| String | Bulgarian | “bg-BG” |
| String | Burmese | “my-MM” |
| String | Catalan | “ca-ES” |
| String | Chinese_Hong_Kong | “zh-HK” |
| String | Chinese_Macao | “zh-MO” |
| String | Chinese_PRC | “zh-CN” |
| String | Chinese_Singapore | “zh-SG” |
| String | Chinese_Taiwan | “zh-TW” |
| String | Croatian | “hr-HR” |
| String | Croatian_Bosnia_Herzegovina | “hr-BA” |
| String | Czech | “cs-CZ” |
| String | Danish | “da-DK” |
| String | Divehi | “dv-MV” |
| String | Dutch | “nl-NL” |
| String | Dutch_Belgium | “nl-BE” |
| String | English_Australia | “en-AU” |
| String | English_Belize | “en-BZ” |
| String | English_Canada | “en-CA” |
| String | English_HongKong | “en-HK” |
| String | English_India | “en-IN” |
| String | English_Indonesia | “en-ID” |
| String | English_Ireland | “en-IE” |
| String | English_Jamaica | “en-JM” |
| String | English_Malaysia | “en-MY” |
| String | English_New_Zealand | “en-NZ” |
| String | English_Philippines | “en-PH” |
| String | English_Singapore | “en-SG” |
| String | English_South_Africa | “en-ZA” |
| String | English_Trinidad | “en-TT” |
| String | English_UK | “en-GB” |
| String | English_US | “en-US” |
| String | English_Zimbabwe | “en-ZW” |
| String | Estonian | “et-EE” |
| String | Faroese | “fo-FO” |
| String | Farsi | “fa-IR” |
| String | Filipino | “fil-PH” |
| String | Finnish | “fi-FI” |
| String | French | “fr-FR” |
| String | French_Belgium | “fr-BE” |
| String | French_Cameroon | “fr-CM” |
| String | French_Canada | “fr-CA” |
| String | French_Cote_d_Ivoire | “fr-CI” |
| String | French_Democratic_Rep_Congo | “fr-CD” |
| String | French_Haiti | “fr-HT” |
| String | French_Luxembourg | “fr-LU” |
| String | French_Mali | “fr-ML” |
| String | French_Monaco | “fr-MC” |
| String | French_Morocco | “fr-MA” |
| String | French_Reunion | “fr-RE” |
| String | French_Senegal | “fr-SN” |
| String | French_Switzerland | “fr-CH” |
| String | Frisian_Netherlands | “fy-NK” |
| String | Fulfulde_Nigeria | “ff-NG” |
| String | FYRO_Macedonian | “mk-MK” |
| String | Gaelic_Ireland | “gd-IE” |
| String | Gaelic_Scotland | “gd-GB” |
| String | Gallegan | “gl-ES” |
| String | Georgian | “ka-GE” |
| String | German | “de-DE” |
| String | German_Austria | “de-AT” |
| String | German_Liechtenstein | “de-LI” |
| String | German_Luxembourg | “de-LU” |
| String | German_Switzerland | “de-CH” |
| String | Greek | “el-GR” |
| String | Guarani | “gn-PY” |
| String | Gujarati | “gu-IN” |
| String | Hausa | “ha-NE” |
| String | Hawaiian | “haw-US” |
| String | Hebrew | “he-IL” |
| String | Hindi | “hi-IN” |
| String | Hungarian | “hu-HU” |
| String | Icelandic | “is-IS” |
| String | Igbo | “ig-NG” |
| String | Indonesian | “id-ID” |
| String | Inuktitut | “iu-CA” |
| String | Italian | “it-IT” |
| String | Italian_Switzerland | “it-CH” |
| String | Japanese | “ja-JP” |
| String | Kannada | “kn-IN” |
| String | Kanuri | “kr-TD” |
| String | Kashmiri | “ks-IN” |
| String | Kazakh | “kk-KZ” |
| String | Khmer | “km-KH” |
| String | Konkani | “kok-IN” |
| String | Korean | “ko-KR” |
| String | Kyrgyz | “ky-KZ” |
| String | Lao | “lo-LA” |
| String | Latin | “la-XL” |
| String | Latvian | “lv-LV” |
| String | Lithuanian | “lt-LT” |
| String | Malay | “ms-MY” |
| String | Malay_Brunei_Darussalam | “ms-BN” |
| String | Malayalam | “ml-IN” |
| String | Maltese | “mt-MT” |
| String | Maori | “mi-NZ” |
| String | Marathi | “mr-IN” |
| String | Mongolian | “mn-MN” |
| String | Nepali | “ne-NP” |
| String | Nepali_India | “ne-IN” |
| String | Norwegian | “nb-NO” |
| String | Norwegian_Nynorsk | “nn-NO” |
| String | Oriya | “or-IN” |
| String | Oromo | “om-ET” |
| String | Panjabi | “pa-PK” |
| String | Polish | “pl-PL” |
| String | Portuguese | “pt-PT” |
| String | Portuguese_Brazil | “pt-BR” |
| String | Punjabi_Pakistan | “pa-PK” |
| String | Pushto | “ps-AF” |
| String | Quechua_Ecuador | “qu-EC” |
| String | Quechua_Peru | “qu-PE” |
| String | Rhaeto_Romance | “rm-IT” |
| String | Romanian | “ro-RO” |
| String | Romanian_Moldova | “ro-MD” |
| String | Russian | “ru-RU” |
| String | Russian_Moldava | “ru-MD” |
| String | Sami | “se-NO” |
| String | Sanskrit | “sa-IN” |
| String | Serbian_Cyrillic | “sr-RS” |
| String | Serbian_Latin | “sr-SP” |
| String | Sindhi_India | “sd-IN” |
| String | Sindhi_Pakistan | “sd-PK” |
| String | Sinhala | “si-LK” |
| String | Slovak | “sk-SK” |
| String | Slovenian | “sl-SI” |
| String | Somali | “so-ET” |
| String | Sorbian | “wen-DE” |
| String | Spanish | “es-ES” |
| String | Spanish_Argentina | “es-AR” |
| String | Spanish_Bolivia | “es-BO” |
| String | Spanish_Chile | “es-CL” |
| String | Spanish_Colombia | “es-CO” |
| String | Spanish_Costa_Rica | “es-CR” |
| String | Spanish_Dominican_Republic | “es-DO” |
| String | Spanish_Ecuador | “es-EC” |
| String | Spanish_El_Salvador | “es-SV” |
| String | Spanish_Honduras | “es-HN” |
| String | Spanish_LatinAmerica | “es-XL” |
| String | Spanish_Mexico | “es-MX” |
| String | Spanish_Nicaragua | “es-NI” |
| String | Spanish_Panama | “es-PA” |
| String | Spanish_Paraguay | “es-PY” |
| String | Spanish_Peru | “es-PE” |
| String | Spanish_Puerto_Rico | “es-PR” |
| String | Spanish_Uruguay | “es-UY” |
| String | Spanish_US | “es-US” |
| String | Spanish_Venezuela | “es-VE” |
| String | Swahili | “sw-TZ” |
| String | Swedish | “sv-SE” |
| String | Swedish_Finland | “sv-FI” |
| String | Syriac | “syr-SY” |
| String | Tajik | “tg-TJ” |
| String | Tamil | “ta-IN” |
| String | Tatar | “tt-RU” |
| String | Telugu | “te-IN” |
| String | Thai | “th-TH” |
| String | Tibetan | “bo-CN” |
| String | Tigrinya_Eritrea | “ti-ER” |
| String | Tigrinya_Ethiopia | “ti-ET” |
| String | Tsonga | “ts-ZA” |
| String | Tswana | “tn-BW” |
| String | Turkish | “tr-TR” |
| String | Turkmen | “tk-TM” |
| String | Uighur | “ug-CN” |
| String | Ukrainian | “uk-UA” |
| String | Urdu | “ur-PK” |
| String | Urdu_India | “ur-IN” |
| String | Uzbek | “uz-UZ” |
| String | Venda | “ve-ZA” |
| String | Vietnamese | “vi-VN” |
| String | Welsh | “cy-GB” |
| String | Xhosa | “xh-ZA” |
| String | Yi | “ii-CN” |
| String | Yiddish | “yi-MD” |
| String | Yoruba | “yo-NG” |
| String | Zulu | “zu-ZA” |