This the multi-page printable view of this section. Click here to print.
User Guide
- 1: Welcome to the Lionbridge App for Marketo
- 1.1: The Multilingual Marketing Lifecycle
- 1.2: How the Lionbridge App Helps You Manage Your Multilingual Marketing Lifecycle
- 1.3: Using this Guide
- 1.4: How to Contact Lionbridge Connector Support
- 2: Getting Started with the Lionbridge App
- 3: Preparing Emails for Translation
- 4: Collecting Assets for Translation
- 5: Sending Assets for Translation
- 6: Monitoring Translation Status
- 7: Reviewing Translated Content
1 - Welcome to the Lionbridge App for Marketo
Welcome to the Lionbridge App for Marketo (Lionbridge App) version 2.1.0. The Lionbridge App is a Marketo plug-in, and it runs as a Marketo LaunchPoint Service. It enables you to automate sending and retrieving assets from Marketo for translation, which dramatically reduces the effort required to create, maintain, and publish Web content in multiple languages.
1.1 - The Multilingual Marketing Lifecycle
The multilingual marketing lifecycle is the broad process of selecting marketing content and campaign assets, sending them out for translation, and then receiving the translated content back from the translation provider.
This set of steps usually fits inside a larger, more general process called the content lifecycle, which is the process of creating, reviewing, editing, approving, and publishing content.
Together, this enhances your focus on key localization considerations, improves workflows, and keeps all content stakeholders involved. Combined, this creates your Global Content Marketing strategy, which is used to engage customers in every region you do business.
1.2 - How the Lionbridge App Helps You Manage Your Multilingual Marketing Lifecycle
The Lionbridge App for Marketo (Lionbridge App) is a plug-in module for Marketo. It provides a range of features and user interface enhancements that enable you to select, send, monitor, and retrieve content for translation into any language.
These features automate the process, which dramatically reduces the effort and time required to export and re-import content that needs to be localized. This is very helpful when translating large volumes of content or ensuring that translated content is quickly re-imported to meet deadlines.
You manage your multilingual marketing lifecycle entirely from within the Lionbridge App:
- The Lionbridge App exports your content from Marketo in XML format and delivers these content files to the Clay Tablet.
- The Clay Tablet delivers your content to your translation providers, based on routing rules that your company chooses and the Lionbridge Connector Team implements.
- When the translated content is ready, the Clay Tablet retrieves it from your translators and delivers it to the Lionbridge App.
- The Lionbridge App automatically re-imports the content into the correct location in Marketo.
You can then review, revise, reject, or publish the translated content as needed.
Note: Neither the Lionbridge App nor the Clay Tablet performs any translation. Similarly, the Lionbridge Connector Team does not provide any translation services. Your company chooses the translation provider that performs the translation.
1.3 - Using this Guide
Purpose of this guide
This guide describes how to use the Lionbridge App for Marketo (Lionbridge App) to manage your translation lifecycle. It describes how to send out assets for translation and receive them back from translation.
Who should use this guide
This guide is intended for content editors, project, marketing, localization or translation managers, or others who are responsible for creating, editing, or approving assets for translation that reside in Marketo. This guide is also useful for translation providers who receive content for translation from Marketo, because it describes your company’s translation management process.
What your company setup should be
This document assumes that:
- Your company already is using Marketo.
- The Lionbridge App has been added, configured, and tested in your Marketo environment.
- The Lionbridge Connector Team has set up the Lionbridge CloudBroker for your company to use the Lionbridge App to send out content for translation from Marketo.
- The Lionbridge Connector Team has set up the Clay Tablet Platform to send content to your translation providers.
- Optional. If Lionbridge is your company’s translation provider, then Freeway is already set up for your company.
What you should already know
This document assumes that:
- You are familiar with the Lionbridge App’s configuration for Marketo, and the reasons for choosing certain configuration options. This is important because your company’s configuration determines which features are available.
- You have a strong working knowledge of Marketo.
- You are familiar with your company’s translation process and requirements.
- You have valid user credentials to log into Marketo.
- You have valid user credentials to access the Lionbridge App functionality described in this guide.
Note: Not all the features described in this guide may be available. Feature availability depends on both your company’s Lionbridge App setup and the roles to which you are assigned. If you cannot access functionality that you need, contact your company’s Marketo administrator.
How this guide is organized
This guide contains the following chapters:
| Chapter | Description |
|---|---|
| Welcome to the Lionbridge App for Marketo | A brief description of the Clay Tablet solution for Marketo and how it fits into the translation lifecycle. It also includes information about this guide and Lionbridge Connector Support contact information. |
| Getting Started with the Lionbridge App for Marketo | How to get started and an overview of the Lionbridge App interface. |
| Preparing Emails for Translation | How to add segmentation to emails within Marketo. |
| Collecting Assets for Translation | How to collect Marketo assets for translation. |
| Sending Assets for Translation | How to send out collected Marketo assets for translation. |
| Monitoring Translation Status | How to monitor the translation status of assets and jobs that you sent out for translation, including archiving completed translation jobs. |
| Reviewing Translated Content | How to view translated assets. |
How to find out more about the Lionbridge App for Marketo
For information on setting up the Lionbridge App for Marketo, read the Lionbridge App for Marketo Setup Guide.
Documentation conventions
This guide uses the following conventions:
| Convention | Description |
|---|---|
| Bold | Highlights screen elements such as buttons, menu items, and fields. |
| Courier | Highlights input, file names, and paths. |
| Italics | Highlights terms for emphasis, variables, or document titles. |
| > | Indicates a menu choice. For example, “Select New > New Campaign Folder.” |
1.4 - How to Contact Lionbridge Connector Support
How to Contact Lionbridge Connector Support
You can submit a support ticket either:
- by emailing connectors@lionbridge.com
- from the Lionbridge Connector Zendesk page https://lionbridge-connectors.zendesk.com/
See also:
2 - Getting Started with the Lionbridge App
The Lionbridge App supports all browsers that Marketo supports.
As a SaaS (Software as a Service), Marketo does not support installing the Lionbridge App or any other external applications on its server. Therefore, the Lionbridge App is hosted on the Lionbridge CloudBroker server (CloudBroker).
To access the Lionbridge App:
- Open the CloudBroker login page in your Web browser:
https://cb1-prod-na.ctt.lionbridge.com/CloudBroker/Login.
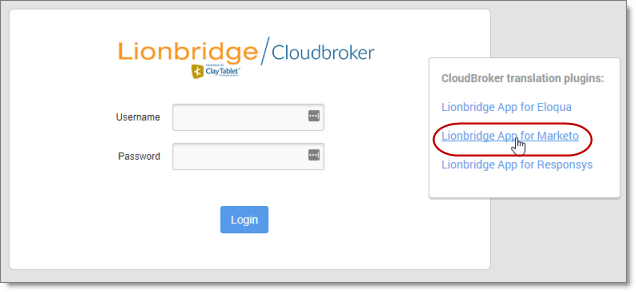
- Click Lionbridge App for Marketo.
The page updates.
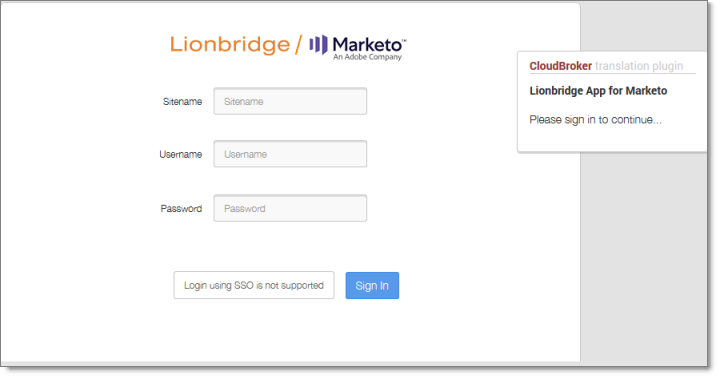
- Enter the following credentials, and then click Sign in.
- Sitename: This identifies your company in CloudBroker.
- Username: The username set up for you to sign into the Lionbridge App. This is the same as your username for logging into Marketo.
- Password: The password set up for you to sign into the Lionbridge App. You can change this password after signing in.
If necessary, contact your Marketo administrator for these credentials.
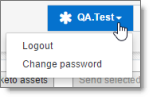
- After signing in, you can:
- change the password by clicking the dropdown menu for your username and selecting Change password.
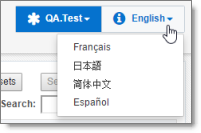
- change the language of the user interface by clicking the dropdown menu for English and selecting a different language.
Note: To sign out of the Lionbridge App, click the dropdown menu for your username and select Logout.
2.1 - The Lionbridge App at a Glance
The Lionbridge App is a LaunchPoint service within Marketo. Its functionality is displayed as a separate Web application.
As a SaaS (Software as a Service), Marketo does not support installing the Lionbridge App or any other external applications on its server. Therefore, the Lionbridge App is hosted on the Lionbridge CloudBroker server.
The Lionbridge App is open in a separate browser tab from Marketo.

User Access
When you use the Lionbridge App to send out assets for translation, you are part of one or more teams. Your team determines the allowed source languages, target languages, and translation providers that its member users can send out for translation. You must be a member of at least one team to send out content for translation. If you have questions about your team setup, contact your Marketo administrator.
3 - Preparing Emails for Translation
Before you can collect and send emails out for translation, you must ensure that they contain dynamic content. This requires that you add a segmentation to each email.
During setup, your Marketo administrator created a segmentation for languages, which supports translation. This segmentation contains segments that map to Clay Tablet languages. You must add this segmentation to each email to translate.
To add the language segmentation to an email:
- Log into Marketo.
- Navigate to the email to translate.
- Open the email for editing. For example, select the email and then right-click and select Edit Draft from the context menu.
- In the Email Content pane on the right, click Segment By.
The Segment By dialog box opens.
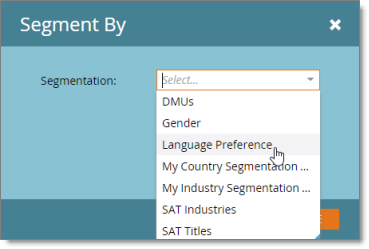
- In the Segmentation dropdown list, select the segmentation that your Marketo administrator created to map languages for translation. For example, if your Marketo administrator created the Language Preference segmentation for this purpose, then select it.
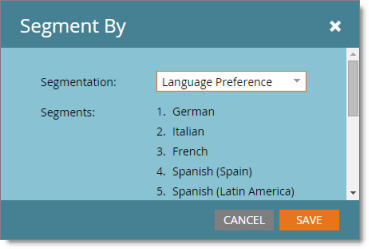
Note: The Segments section lists the segments corresponding to each language you can send for translation.
- Click Save.
4 - Collecting Assets for Translation
The first step in sending assets out for translation is collecting the assets from Marketo.
The Lionbridge App supports sending out the following types of Marketo assets for translation:
- email - dynamic content only
- form - does not support dynamic content with segments
- landing page - supports dynamic content with segments
- snippet
- Marketo token
Note: You can only collect assets that the Lionbridge App supports sending out for translation.
To collect assets for translation:
-
Sign in to the Lionbridge App. For details, see Getting Started with the Lionbridge App for Marketo.
-
In the Lionbridge App for Marketo menu on the left, ensure that New Translation is selected, so that the New Translation page is open. This is the default selection when you open the Lionbridge App. For a detailed description of this page, see Viewing Collected Assets.
![]()
- Click Add Marketo Assets.
The Select Marketo Assets dialog box opens.
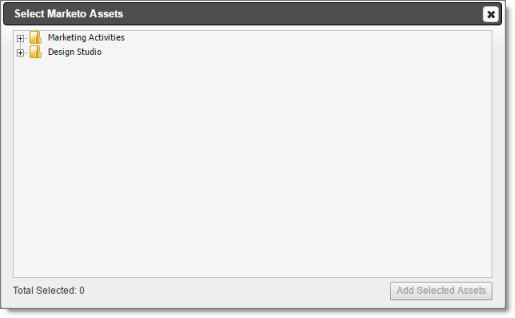
-
Click the expand icons
 to view assets.
 -
Select the check boxes of the assets to send out for translation.
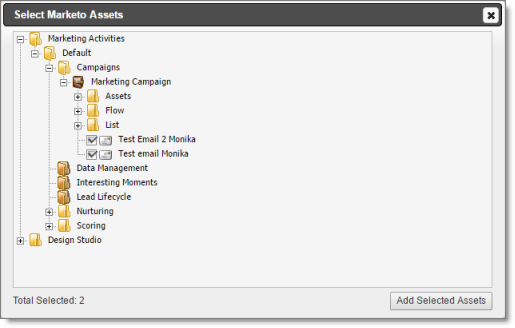
Notes: Only assets that are supported for sending to translation have check boxes. You can expand and select assets from multiple branches.
The Total Selected field at the bottom of the dialog box displays the number of selected assets.
- Click Add Selected Assets.
The dialog box closes, and the New Translation page refreshes, displaying the assets you collected for translation, with their check boxes selected.
![]()
- To send out these assets for translation, click Send Selected for Translation. For detailed instructions, see Sending Assets for Translation.
Note: To change which assets you are sending out to translation, you can clear the check boxes of these assets or select the check boxes of other assets already on this page. However, all the assets must be in the same source language, and you must want to translate them into the same target language.
4.1 - Viewing Collected Assets
In the New translation page, you can view assets that have been collected for translation by you and your team members but that have not yet been sent out for translation or to the Translation Queue.
To view collected assets:
-
Sign in to the Lionbridge App. For details, see Getting Started with the Lionbridge App for Marketo.
-
In the Lionbridge App for Marketo menu on the left, ensure that New Translation is selected, so that the New Translation page is open. This is the default selection when you open the Lionbridge App.
![]()
The bottom-left corner below the list displays the number of collected assets displayed in the current sub-page and the total number of collected assets in this page.
By default, the items are sorted in alphabetical order first by the Type column and then by asset name, in the Asset column.
This page displays the following information about assets that you and your team members collected that have not yet been sent out for translation or added to the Translation Queue.
| Column | Description |
|---|---|
| Type | The type of asset in Marketo. |
| Asset | The name of the asset in Marketo. |
| ID | Marketo’s unique identifier for this asset, for example, the snippet ID or the email ID. |
| Last Modified At | The date and time when this asset was last modified, in the following format: YYYY-MM-DD hh:mm:ss AM/PM. If the asset was not modified after creation, this is the same as the Created On date and time, described below. |
| Created On | The date and time when this asset was created, in the following format: YYYY-MM-DD hh:mm:ss AM/PM. |
- Optional. You can do one or more of the following on this page:
- You can specify how many items to display in a page. Above the top-left corner of the list, select the number to display from the Show X Entries list.
- You can use the Search box above the top-right corner of the list to search for a specific asset in the list or to filter the list. As you type into the Search box, the Lionbridge App automatically searches for matches across all columns and displays only the matching assets.
Note: The search feature filters all items in the page, not only those displayed on the current sub-page.
- If there are many items in this page, it may have multiple sub-pages. The navigation bar below the list helps you navigate through the sub-pages and displays your position in the tab. Click Previous Page, Next Page, or a page number to navigate to the corresponding sub-page.
- To sort the items in the tab by a different column, click the corresponding column header.
- To reverse the sort order of a column, click the column header.
- Optional. You can perform any of the following actions:
- To collect additional Marketo assets and add them to this page, click Add Marketo Assets. For detailed instructions, see Collecting Assets for Translation.
- To send assets on this page out for translation as a single job, select the corresponding check boxes and click Send Selected for Translation. For detailed instructions, see Sending Assets for Translation.
- To send assets on this page to the Translation Queue, so that you can group them into jobs later, select the corresponding check boxes and click Send Selected for Translation. For detailed instructions, see Sending Assets for Translation from the Translation Queue.
5 - Sending Assets for Translation
You send out assets for translation from the New Translation page after you collect them in the Select Marketo Assets dialog box, as described in Collecting Assets for Translation.
When the App sends out assets for translation, it creates placeholder assets for tokens. For asset types that support segmentation, such as email, landing pages, forms, and snippets, the target-language content is stored in a related target-language segment in same asset.
Note: If you accidentally delete the placeholder assets, the App replaces them with the translated assets, once they are available.
When you send out assets for translation, you can either:
- send them out immediately for translation as a single job
- add them to the Translation Queue queue, so that you can group them into jobs and send them out later
Note: Assets in the Translation Queue are actually just pointers to the assets in Marketo. If you modify an asset within Marketo after adding it to the queue, those changes are included in the version sent out for translation.
To send out assets for translation:
-
Sign in to the Lionbridge App. For details, see Getting Started with the Lionbridge App for Marketo.
-
In the Lionbridge App for Marketo menu on the left, ensure that New Translation is selected, so that the New Translation page is open. This is the default selection when you open the Lionbridge App. For a detailed description of this page, see Viewing Collected Assets.
![]()
-
If immediately previously you collected assets for translation, the corresponding check boxes are already selected. You can clear these check boxes or select additional check boxes.
-
Select the check boxes of the assets to send out for translation. If you later choose to send out these assets for translation immediately, then the Lionbridge App will send out these assets together as a single translation job.
The assets you select should have the following in common:
- They are in the same source language.
- You want to translate them into the same target languages.
In addition, if you want to immediately send out the assets you select for translation, they should have the following in common:
- You want to send them to the same translation provider.
- You want to apply the same translation settings to them (described in step 6, below) and you want them to be part of the same translation job.
- Click Send Selected for Translation.
Note: This button is available only when all the selected assets are in the same source language.
The New Translation dialog box opens, displaying the Languages tab.
![]()
- Enter the following preliminary information about your translation job:
| Field | Description |
|---|---|
| Provider | Select the translation provider for this translation job. The dropdown list displays all translation providers configured for your site. Note: If you add the assets to the queue instead of immediately out for translation, you can change the translation provider later. The selected translation provider determines which source and target languages are available for selection below. This prevents you from selecting languages that are not supported for a particular translation provider. |
| Special Instruction | Any additional instructions for Lionbridge Freeway. Displayed only if the provider selected in the Provider box, above is the Lionbridge Freeway Type. |
| Analysis codes | The Freeway analysis codes for the translation. Displayed only if: * In the **Provider** box, above, the provider selected is the Lionbridge Freeway Type. * The App is configured to display these fields. You specify the analysis codes that are relevant to your content. Your Lionbridge setup determines which analysis codes are available for you to specify, and the values available for selection for each analysis code. For example, the Region, Department, and Priority analysis codes may be available for you to specify. |
| Source Language | Select the source language of the selected assets. The Lionbridge App will send assets in this source language for translation. The dropdown list displays all the source languages that your teams are allowed to send out for translation. Note: Languages are available for selection only if they are supported for the translation provider selected in the Provider field, above. |
| Target Languages | Select the check boxes for all the target languages into which to translate the selected assets. The list displays all the target languages for which your teams are allowed to request translation. Tips: To select the check boxes of all available target languages, click the Select All button. To clear all selected check boxes of target languages, click the Clear button. By default, the Lionbridge App uses the default segment as the source content. To specify a different segment as the source content, select the corresponding check box under Segment has source content. Tip: To specify different segments as the source content for all target languages, select the adjacent All check box. Note: Languages are available for selection only if they are supported for the translation provider selected in the Provider field, above and for the selected source language, above. |
- Optional. This step is required only if you will click the Send for Translation button at the bottom of the dialog box to send out the assets directly for translation. Click the Translation Job tab to display it.
![]()
Note: Enter information in this tab only if you are sending out these assets for translation immediately as a single job, by clicking the Send for Translation button below. If you add these assets to the Translation queue, you add the job information later, when you send out the assets for translation from the queue. If you add these assets to the Translation queue, the Lionbridge App ignores any information in this tab.
Enter the following information about this translation job:
| Field | Description |
|---|---|
| Job Name | Your name for this translation job. The Lionbridge App sends this information to your translation provider. |
| Job Description | Your description of this translation job, including any special instructions or requests. The Lionbridge App sends this information to your translation provider. Note: This field will not be displayed if the Lionbridge App is configured to hide it. |
| PO Reference | Optional. The purchase order reference number, if relevant. Note: Depending on your company’s configuration, this field may have another name, and it may be either a freeform text field or a dropdown list with pre-configured entries available for selection. |
| Quote – Send for quote first | Select this check box to inform the translation provider that you want to receive a quote before the translation process starts. |
| LocalTM – Use LocalTM | Select this check box to check whether content was already translated before sending it out for translation. The Lionbridge App sends out only changed content for translation. If content was previously translated and it has not changed, then the Lionbridge App does not send it for translation again: Instead, it uses the stored translation. This feature reduces the quantity of content that the Lionbridge App sends to translation providers, which reduces your cost. However, it increases the processing time before sending out the content for translation. |
| Token – Automatically translate referenced tokens | Select this check box to include all referenced tokens in the translation job. |
| Due Date | The requested translation deadline. This is the date when you expect the translated content to return. By default, it is two weeks from the current date. To select a different date, either type the delivery date in the field in MM/DD/YYYY format, or click in the field and select a different date in the calendar that opens. This information is sent to the translation provider as metadata of the translation package. |
| Team | If you are a member of multiple teams, select your team to use for this job. Note: Your team determines which source and target languages are available for selection in the Languages tab, described in the previous step, and the available translation providers, described below. |
| Notification | Select one of the following to specify which email addresses will receive notifications about this job: * All Users of Selected Team: The email addresses of all the users in the team specified above. This is the default selection. * Just Job Submitter: Your email address. * Specific Email Addresses: The email addresses specified in the **Emails** box, below. * an email notification group. For more information, refer to the Lionbridge App for Marketo Setup Guide. |
| Emails | The list of email addresses that will receive email notifications about this job. The selection in the Notification dropdown list, above, determines default list of email addresses. You can edit this list by adding, editing, and deleting email addresses. Each email address must be on a separate line. Tip: To save the list of email addresses as a new or updated group, click the Save as a new notification group button |
- Do one of the following:
- Click Add to Queue to add the selected assets to the Translation Queue.
You or another user on your team must send it out these assets for translation from the Translation queue. For details, see Sending Assets for Translation from the Translation Queue.
- Click Send for Translation to immediately send out the translation job to the specified translation provider.
You can monitor the job’s status on the Translation Jobs page. For details, see Monitoring Translation Jobs.
5.1 - Sending Assets for Translation from the Translation Queue
The goal of the Translation Queue (queue) is to control translation costs and the translation process. You can send out one, multiple, or all assets from the Translation Queue at one time.
Submitting content to the Translation Queue before sending it out for translation has the following advantages:
- You may not want to send out each asset individually as soon as you finish reviewing it. The Translation Queue facilitates your management of reviewed assets, so that you do not forget about sending individual reviewed assets for translation.
- Your translation provider may prefer receiving fewer but larger batches of items to translate, rather than individual assets, as it facilitates project preparation, resource assignment, and file analysis.
- If you want to translate many assets into multiple languages, but you want to translate into only one target language at a time, this is a good way to manage that process.
- The Translation Queue manager may want to route jobs to certain translation providers.
- The Translation Queue manager may want to add job-specific metadata, such as a purchase order number.
If you or your colleagues have added items to the Translation Queue, you must access it and send out the items from there.
Notes: Assets in the queue are actually just pointers to the assets in Marketo. If you modify an asset within Marketo after adding it to the queue, those changes are included in the version sent out for translation. If you do not send out items from the Translation Queue, the Lionbridge App does not send them out for translation.
To send out assets for translation from the Translation Queue:
-
Sign in to the Lionbridge App. For details, see Getting Started with the Lionbridge App for Marketo.
-
In the Lionbridge App for Marketo menu on the left, select Translation Queue.
![]()
The queue displays all the assets that were collected and added to the Translation Queue that have not yet been sent out for translation. The bottom-left corner below the list displays the number of items displayed on the current page and the total number of items in the queue.
By default, the items are sorted in reverse chronological order by the Creation Date column.
The following information is displayed about each asset in the queue:
| Column | Description |
|---|---|
| Item Name | The Lionbridge App’s name for the asset in Marketo. |
| Source Language | The source language of the asset. |
| Target Language | The target language into which to translate the asset. This was specified when the asset was added to the queue. Note: If you specified translating an asset into multiple target languages, then each instance of a source language-target language pair is displayed in a separate row in the table, as a separate item. |
| Asset Type | The type of asset in Marketo. |
| Asset ID | Marketo’s unique identifier for this asset, for example, the snippet ID or the email ID. |
| Creation Date | The date and time when this asset was added to the queue, in the following format: YYYY-MM-DD hh:mm:ss AM/PM. |
| Created By | The username of the user who added this asset to the queue. |
- Optional. You can do one or more of the following to facilitate displaying the items you want to see in the queue:
- You can specify how many items to display in a page. Above the top-left corner of the list, select the number to display from the Show X Entries list.
- You can use the Search box above the top-right corner of the list to search for a specific item in the list or to filter the list. As you type into the Search box, the Lionbridge App automatically searches for matches across all columns and displays only the matching columns. For example, you can type de-DE to display only assets where the source or target language is German. Alternatively, you can type email to display only Email assets.
Note: The search feature filters all items in the queue, not only those displayed on the current page.
- If there are many items in the queue, it may have multiple pages. The navigation bar below the list helps you navigate through the pages and displays your position in the queue. Click Previous Page, Next Page, or a page number to navigate to the corresponding page.
- To sort the items in the queue by a different column, click the corresponding column header.
- To reverse the sort order of a column, click the column header.
- Select the check boxes of the items that you want to send out for translation as a single translation job.
The assets you select should have the following in common:
- You want to send them to the same translation provider.
- You want to apply the same translation settings to them (described in step 5, below) and you want them to be part of the same translation job.
Note: You can select items with different source-target language pairs. For example, you can include items for translation from English to French along with items for translation from German to Japanese.
Note: The total number of selected items is displayed in the top-right corner of the page.
- Click Send Out Selected Items.
The Send Out Queued Items dialog box opens.

Enter the following information about this translation job:
| Field | Description |
|---|---|
| Job Name | Your name for this translation job. The Lionbridge App sends this information to your translation provider. |
| Job Description | Your description of this translation job, including any special instructions or requests. The Lionbridge App sends this information to your translation provider. Note: This field will not be displayed if the Lionbridge App is configured to hide it. |
| PO Reference | Optional. The purchase order reference number, if relevant. Note: Depending on your company’s configuration, this field may have another name, and it may be either a freeform text field or a dropdown list with pre-configured entries available for selection. |
| Quote – Send for quote first | Select this check box to inform the translation provider that you want to receive a quote before the translation process starts. |
| LocalTM – Use LocalTM | Select this check box to check whether content was already translated before sending it out for translation. The Lionbridge App sends out only changed content for translation. If content was previously translated and it has not changed, then the Lionbridge App does not send it for translation again: Instead, it uses the stored translation. This feature reduces the quantity of content that the Lionbridge App sends to translation providers, which reduces your cost. However, it increases the processing time before sending out the content for translation. |
| Token – Automatically translate referenced tokens | Select this check box to include all referenced tokens in the translation job. |
| Due Date | The requested translation deadline. This is the date when you expect the translated content to return. By default, it is two weeks from the current date. To select a different date, either type the delivery date in the field in MM/DD/YYYY format, or click in the field and select a different date in the calendar that opens. This information is sent to the translation provider as metadata of the translation package. |
| Team | If you are a member of multiple teams, select your team to use for this job. Note: Your team determines which source and target languages are available for selection in the Languages tab, described in the previous step, and the available translation providers, described below. |
| Notification | Select one of the following to specify which email addresses will receive notifications about this job: * All Users of Selected Team: The email addresses of all the users in the team specified above. This is the default selection. * Just Job Submitter: Your email address. * Specific Email Addresses: The email addresses specified in the **Emails** box, below. * an email notification group. For more information, refer to the Lionbridge App for Marketo Setup Guide. |
| Emails | The list of email addresses that will receive email notifications about this job. The selection in the Notification dropdown list, above, determines default list of email addresses. You can edit this list by adding, editing, and deleting email addresses. Each email address must be on a separate line. Tip: To save the list of email addresses as a new or updated group, click the Save as a new notification group button |
- Click Send to immediately send out the translation job to the specified translation provider.
You can monitor the job’s status on the Translation jobs page. For details, see Monitoring Translation Status.
Note: You can delete items from the Translation Queue. This is useful, for example, if you decide not to translate the item into the specified target language. To delete items from the queue, select the corresponding check boxes and click Delete selected items. A message box confirms that you want to delete the selected items from the Translation queue. Click OK to confirm.
5.2 - Resending a Translation Job
You can send previously sent jobs for translation from the Translation Jobs tab. You can modify the selected assets, source and target languages, translation provider, translation options, and job options before resending the job.
When the App sends out assets for translation, it creates placeholder assets for tokens. For asset types that support segmentation, such as email, landing pages, forms, and snippets, the target-language content is stored in a related target-language segment in same asset.
Notes: If you accidentally delete the placeholder assets, the App replaces them with the translated assets, once they are available. Assets in a job are actually just pointers to the assets in Marketo. If you modify an asset within Marketo before resending it, those changes are included in the job resent for translation.
To resend out assets for translation:
-
Sign in to the Lionbridge App. For details, see Getting Started with the Lionbridge App for Marketo.
-
In the Lionbridge App for Marketo menu on the left, click Translation Jobs.
The Translation Jobs tab opens. For a detailed description of this tab, see Monitoring Translation Jobs.
- In the Creation Date column for the job to resend for translation, click the
 Resend the job button.
The Resend Translation dialog box opens, displaying the Assets tab.
![]()
The Assets tab displays the assets in the previously sent job, including the previously specified target language. The corresponding check boxes are already selected.
-
Optional. To remove any assets from the job, clear the corresponding check boxes.
-
Optional. If you do not want to make any other changes to the job, click Send for Translation.
You can monitor the job’s status on the Translation Jobs page. For details, see Monitoring Translation Jobs.
- Optional. To modify the translation provider, source language, target languages, the Segment has source content settings, and any Lionbridge Freeway-specific settings (if relevant), click the Languages & LSP tab to open it.
![]()
a. To select a different translation provider, select it from the Provider dropdown list.
b. To modify the source language, target languages, Segment has source content settings, and any Lionbridge Freeway-specific settings (if relevant), click the Reset check box. This enables the rest of the user interface in this tab.
| Field | Description |
|---|---|
| Special Instruction | Any additional instructions for Lionbridge Freeway. Displayed only if the provider selected in the Provider box, above is the Lionbridge Freeway Type. |
| Analysis codes | The Freeway analysis codes for the translation. Displayed only if: * In the **Provider** box, above, the provider selected is the Lionbridge Freeway Type. * The App is configured to display these fields. You specify the analysis codes that are relevant to your content. Your Lionbridge setup determines which analysis codes are available for you to specify, and the values available for selection for each analysis code. For example, the Region, Department, and Priority analysis codes may be available for you to specify. |
| Source Language | Select the source language of the selected assets. The Lionbridge App will send assets in this source language for translation. The dropdown list displays all the source languages that your teams are allowed to send out for translation. Note: Languages are available for selection only if they are supported for the translation provider selected in the Provider field, above. |
| Target Languages | Select the check boxes for all the target languages into which to translate the selected assets. The list displays all the target languages for which your teams are allowed to request translation. Tips: To select the check boxes of all available target languages, click the Select All button. To clear all selected check boxes of target languages, click the Clear button. By default, the Lionbridge App uses the default segment as the source content. To specify a different segment as the source content, select the corresponding check box under Segment has source content. Tip: To specify different segments as the source content for all target languages, select the adjacent All check box. Note: Languages are available for selection only if they are supported for the translation provider selected in the Provider field, above and for the selected source language, above. |
- Optional. If you do not want to make any other changes to the job, click Send for Translation.
You can monitor the job’s status on the Translation Jobs page. For details, see Monitoring Translation Jobs.
- Optional. If you want to change the job parameters, click the Translation Job tab to display it.
![]()
Note: By default, the Job Name changes, and - Resend is appended to the previous job name.
Update any of the following information about the translation job to resend:
| Field | Description |
|---|---|
| Job Name | Your name for this translation job. The Lionbridge App sends this information to your translation provider. |
| Job Description | Your description of this translation job, including any special instructions or requests. The Lionbridge App sends this information to your translation provider. Note: This field will not be displayed if the Lionbridge App is configured to hide it. |
| PO Reference | Optional. The purchase order reference number, if relevant. Note: Depending on your company’s configuration, this field may have another name, and it may be either a freeform text field or a dropdown list with pre-configured entries available for selection. |
| Quote – Send for quote first | Select this check box to inform the translation provider that you want to receive a quote before the translation process starts. |
| LocalTM – Use LocalTM | Select this check box to check whether content was already translated before sending it out for translation. The Lionbridge App sends out only changed content for translation. If content was previously translated and it has not changed, then the Lionbridge App does not send it for translation again: Instead, it uses the stored translation. This feature reduces the quantity of content that the Lionbridge App sends to translation providers, which reduces your cost. However, it increases the processing time before sending out the content for translation. |
| Token – Automatically translate referenced tokens | Select this check box to include all referenced tokens in the translation job. |
| Due Date | The requested translation deadline. This is the date when you expect the translated content to return. By default, it is two weeks from the current date. To select a different date, either type the delivery date in the field in MM/DD/YYYY format, or click in the field and select a different date in the calendar that opens. This information is sent to the translation provider as metadata of the translation package. |
| Team | If you are a member of multiple teams, select your team to use for this job. Note: Your team determines which source and target languages are available for selection in the Languages tab, described in the previous step, and the available translation providers, described below. |
| Notification | Select one of the following to specify which email addresses will receive notifications about this job: * All Users of Selected Team: The email addresses of all the users in the team specified above. This is the default selection. * Just Job Submitter: Your email address. * Specific Email Addresses: The email addresses specified in the **Emails** box, below. * an email notification group. For more information, refer to the Lionbridge App for Marketo Setup Guide. |
| Emails | The list of email addresses that will receive email notifications about this job. The selection in the Notification dropdown list, above, determines default list of email addresses. You can edit this list by adding, editing, and deleting email addresses. Each email address must be on a separate line. Tip: To save the list of email addresses as a new or updated group, click the Save as a new notification group button |
- Click Send for Translation to immediately resend the translation job to the specified translation provider.
You can monitor the job’s status on the Translation Jobs page. For details, see Monitoring Translation Jobs.
6 - Monitoring Translation Status
After you send out jobs for translation, you can monitor their status. The Lionbridge App updates the status at different milestones in the translation process.
-
You can view the translation status of all translation jobs together, resend a job, archive or delete completed jobs, un-archive previously archived jobs, in the Translation Jobs tab, as described on Monitoring Translation Jobs.
-
You can view the translation status of individual items within a translation job, and view source and translated assets, in the Job Details tab, as described on Monitoring Translation Job Details.
For a list and description of translation statuses, see Translation Statuses.
6.1 - Translation Statuses
After you send out Marketo assets for translation, they are referred to as items.
An item is an asset that is being translated into a specific target language. For example, if you are translating 100 assets from one source language into three target languages, then there are 300 items.
The Lionbridge App sends out one or more items for translation as a single translation job. Items can have the following translation statuses:
| Status | Icon | Description |
|---|---|---|
| Created |  |
The App created the job for sending out the item to the translation provider. |
| Preparing |  |
The App is preparing the item for translation. |
| Preparing (error) |  |
An error occurred while the App prepared the item for translation. |
| Packing |  |
The App is packaging this item for the job. |
| Packing (error) |  |
An error occurred while the App packaged this item for translation. |
| Ready to Send |  |
The item is ready to send out to the Clay Tablet for delivery to the translation provider. |
| Sending |  |
The App is sending out the item to the Clay Tablet for delivery to the translation provider. |
| Sending failed |  |
The App failed while trying to send out the item to the Clay Tablet for delivery to the translation provider. |
| Sent to CT Platform |  |
The App sent the item to the Clay Tablet for delivery to the translation provider. |
| Sent to translation provider | The Clay Tablet sent the item to the translation provider. | |
| In translation | The translation provider has received the item for translation and has not yet returned the translated item. | |
| Completed (translation received) |  |
The App has received the translated item back from the translation provider and imported it into the SaaS content system. It is ready for review. Tip: Click the green checkmark icon  to accept the translation, or click the red X icon to accept the translation, or click the red X icon  to reject it. to reject it. |
| Completed (translation approved) | A user has reviewed the completed translation and approved it. | |
| Completed (nothing to translate) |  |
There is no translatable content in this item. |
| Completed (with LocalTM) | |
The App translated this content item using information in the local translation memory and imported it into the SaaS content system. |
| Completing with error (will try more times) |  |
The App has received the translated item back from the translation provider. However, errors occurred while importing it into the SaaS content system. App will retry importing the translated item into the SaaS content system. |
| Translation rejected | A user has reviewed the completed translation and rejected it. | |
| Failed |  |
The App failed to manage the translation of this item. Tip: In the Job details tab, you can mouseover the Error icon |
6.2 - Monitoring Translation Jobs
You monitor translation jobs in the Translation Jobs tab.
To monitor translation status:
-
Sign in to the Lionbridge App. For details, see Getting Started with the Lionbridge App for Marketo.
-
In the Lionbridge App for Marketo menu on the left, click Translation Jobs.
The Translation Jobs tab opens.
![]()
The bottom-left corner below the list displays the number of items displayed in the current tab and the total number of jobs in this tab.
By default, the jobs are sorted in reverse chronological order by the Creation Date column.
The tab displays the following information about all the jobs you and other team members sent for translation that have not been archived or deleted:
| Column | Description |
|---|---|
| Job Name | The job name, created when you or another team member sent out the job for translation. |
| Creation Date | The date and time when you or another team member sent out the job for translation, in the following format: YYYY-MM-DD hh:mm:ss AM/PM. * To resend a job, click the |
| Created By | The username of the user who sent out the job for translation. |
| Team | The team for this translation job, specified when you or another team member sent out the job for translation. |
| Provider | The translation provider to which the Lionbridge App sends this translation job. |
| LTM | Local TM (translation memory). If the LocalTM – Use LocalTM check box was selected for this job, then this column displays Yes. Otherwise, this column is blank. |
| ATRT | Auto Translate Referenced Tokens. If the Automatically translate referenced tokens check box was selected for this job, then this column displays Yes. Otherwise, this column is blank. |
| Total | The total number of assets in this translation job. |
| Sent Out | The number of items in this translation job that the Lionbridge App sent out for translation. Note: There is a separate item for each source and target language pair. For example, if you created a job that sends out a single asset for translation from English to both French and German, then these are two separate items in this tab: English to French, and English to German. |
| Received | The number of items in this translation job that the Lionbridge App received back from translation. |
| Completed | The number of items in this translation job for which the translation is complete. Note: If there are items in the job with errors, including Failed status, you can hover over the Error icon |
- Optional. You can do one or more of the following to facilitate displaying the items you want to see in this tab:
-
You can specify how many items to display in a page. Above the top-left corner of the list, select the number to display from the Show X Entries list.
-
You can specify which type of jobs to view in the Job Type dropdown list:
- Select Live to view all jobs that have not been archived. This is the default view.
- Select Archived to view all archived jobs.
Then click Refresh.
- You can use the Search box above the top-right corner of the list to search for a specific item in the list or to filter the list. As you type into the Search box, the Lionbridge App automatically searches for matches across all columns and displays only the matching items.
Note: The search feature filters all items in the tab, not only those displayed on the current page.
-
If there are many items in this tab, it may have multiple pages. The navigation bar below the list helps you navigate through the pages and displays your position in the tab. Click Previous Page, Next Page, or a page number to navigate to the corresponding page.
-
To sort the items in the tab by a different column, click the corresponding column header.
-
To reverse the sort order of a column, click the column header.
-
To update the list of displayed jobs, click Refresh.
- Optional. You can perform the following actions on jobs:
-
You can view additional information about the job, including asset information, source and target languages, and links to the source and target versions. To view job details, click the link in the Job Name column. The Job Details tab opens for this job. For details, see Monitoring Translation Job Details.
-
You can resend a job. In the Creation Date column, click the
Resend the job button. For detailed instructions, see Resending a Translation Job. -
You can archive jobs so that they will no longer be displayed by default in this tab. Select the check boxes for the jobs to archive, and click Archive Selected Jobs.
Note: You cannot archive a job if it has incomplete items. This means that if a job has items that the Lionbridge App sent out for translation and that did not yet return from translation, you cannot archive the job.
Tip: To view jobs after archiving them, in the Job Type list, select Archived, and then click Refresh.
-
You can un-archive previously archived jobs, so that they will be displayed by default in this tab.
- In the Job Type list, select Archived, and then click Refresh.
Only archived jobs are displayed.
- Select the check boxes for the jobs to un-archive, and then click Un-Archive Selected Jobs.
-
You can delete jobs, so that you can no longer view information about them anywhere. Select the check boxes for the jobs to delete, and then click Delete Selected Jobs.
6.3 - Monitoring Translation Job Details
You monitor the status of individual items within a translation job in the Translation Jobs tab.
To monitor translation status:
-
Sign in to the Lionbridge App. For details, see Getting Started with the Lionbridge App for Marketo.
-
In the Lionbridge App for Marketo menu on the left, click Translation Jobs.
The Translation Jobs tab opens. For detailed information about this tab, see Monitoring Translation Jobs.
- In the Job Name column, click the name link for the job whose details you want to view.
The Job Details tab opens.
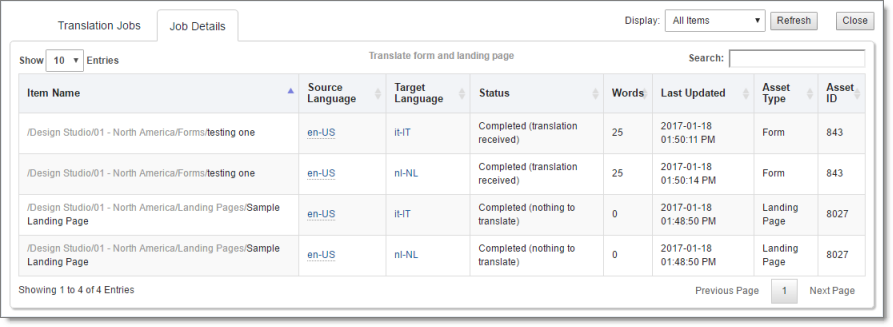
You use this tab to view detailed information about the assets in a translation job.
The bottom-left corner below the list displays the number of items displayed on the current page and the total number of items in the job.
Note: There is a separate item for each source and target language pair. For example, if you created a job that sends out a single asset for translation from English to both French and German, then these are two separate items in this tab: English to French, and English to German.
By default, the items are sorted in alphabetical order by the Item Name column.
The tab displays the following information about all the assets in this job:
| Column | Description |
|---|---|
| Item Name | The Lionbridge App’s name for the asset in Marketo. |
| Source Language | The language code of the source language of the asset sent for translation. Tip: To view the source asset in Marketo, click the link. |
| Target Language | The language code of the target language into which to translate the asset. Tip: To view the translated asset in Marketo, click the link. This link is available only if the asset was translated. |
| Status | The translation status of the item. For a list and description of translation statuses, see Translation Statuses. Notes: If the status is Failed, you can click the Reload icon |
| Words | The number of words in the asset. |
| Last Updated | The date and time when this job was last updated, in the following format: YYYY-MM-DD hh:mm:ss AM/PM. Updates include activities such as preparing to send out the job for translation and status changes. |
| Asset Type | The type of asset in Marketo. |
| Asset ID | Marketo’s unique identifier for this asset, for example, the snippet ID or the email ID. |
- Optional. You can do one or more of the following to facilitate displaying the items you want to see in this tab:
- You can specify how many items to display in a page. Above the top-left corner of the list, select the number to display from the Show X Entries list.
- In the Display dropdown list, you can specify which type of items to view:
- Select Failed items to view only assets for which the Lionbridge App failed to complete a step after 10 attempts. The Lionbridge App does not retry the failed step unless you click the Reload icon
 in the Status column, described above.
 - Select Completed items to view all translated items that the Lionbridge App has re-imported into Marketo.
- Select Incomplete items to view only assets that the Lionbridge App has not yet re-imported into Marketo. Usually these are assets that are currently in translation, or that were just recently received back from translation and that the Lionbridge App is trying to re-import into Marketo.
- Select Failed items to view only assets for which the Lionbridge App failed to complete a step after 10 attempts. The Lionbridge App does not retry the failed step unless you click the Reload icon
Then click Refresh. (By default, all types of items are displayed.)
- To update the displayed jobs, click Refresh.
- You can use the Search box above the top-right corner of the list to search for a specific item in the list or to filter the list. As you type into the Search box, the Lionbridge App automatically searches for matches across all columns and displays only the matching columns.
Note: The search feature filters all items in the tab, not only those displayed on the current page.
- If there are many items in this tab, it may have multiple pages. The navigation bar below the list helps you navigate through the pages and displays your position in the tab. Click Previous Page, Next Page, or a page number to navigate to the corresponding page.
- To sort the items in the tab by a different column, click the corresponding column header.
- To reverse the sort order of a column, click the column header.
- Optional. You can perform the following actions on items in a job:
- To view the source version of the asset in Marketo, click the link for an asset in the Source Language column.
Marketo opens in a new browser tab, displaying the asset in its source language.
- If the asset has Completed status, you can view the target (translated) version in Marketo. Click the link for an asset in the Target Language column.
Marketo opens in a new browser tab, displaying the translated asset.
- To close the Job Details tab and return to the Translation Jobs tab, click Close.
7 - Reviewing Translated Content
You view translated content in Marketo. You can access this content either from the Lionbridge App or directly from Marketo.
To review translated content from the Lionbridge App:
-
Sign in to the Lionbridge App. For details, see Getting Started with the Lionbridge App for Marketo.
-
In the Lionbridge App for Marketo menu on the left, click Translation Jobs.
The Translation Jobs tab opens. For detailed information about this tab, see Monitoring Translation Jobs.
- In the Job Name column, click the name link for the job whose details you want to view.
The Job Details tab opens.
- In the Target Language column, click the link for an asset.
Marketo opens in a new browser tab, displaying the translated asset. For details, see Monitoring Translation Job Details.
For instructions on viewing translated content directly from Marketo, see:
7.1 - Reviewing Translated Emails
You view translated emails in Marketo.
To review a translated email:
- Log in to Marketo.
- Navigate to the translated email.
- Preview the email. For example, select the email and then right-click and select Preview from the context menu.
The preview opens in a new browser tab.

The segmentation is displayed in the top-right corner of the page. In this example, the segmentation is Language Preference.
![]()
- Select the segment corresponding to the translation from the segmentation dropdown list.
![]()
The translated asset is displayed.
![]()
Note: The screen capture displays pseudo-translation instead of actual translated text.
7.2 - Reviewing Translated Snippets, Landing Pages, Forms, and Tokens
You view translated snippets, landing pages, forms, and tokens in Marketo.
To review a translated snippet, landing page, form, or token:
-
Log in to Marketo.
-
Navigate to the translated snippet, landing page, form, or token.
-
Preview the snippet, landing page or form. For example, select the snippet and then right-click and select Preview from the context menu.
The preview opens in a new browser tab.