Managing Users
Marketo users can access the Lionbridge App to send, monitor, and review translation jobs.
To manage users:
- In the Site Administration menu on the left, click Site Users.
The Site Users page opens, displaying the users set up for your Marketo site.
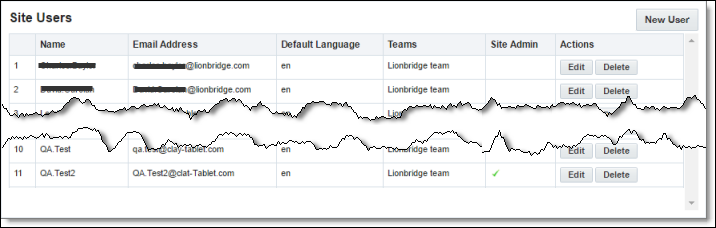
This page displays the following information about each user:
| Column |
Description |
| Name |
The name of the user. |
| Email Address |
The email address of the user. |
| Default Language |
The default language in which the Lionbridge App interface is displayed for the user. If the user is a site administrator, who can access the functionality described in this guide, then this is also the language in which the CloudBroker interface is displayed for this user. |
| Teams |
The teams to which this user belongs. A team determines which source and target languages the user can send out for translation and the translation providers to which the user can send the content. |
| Site Admin |
A checkmark indicates whether this user is a site administrator. Site administrators can access CloudBroker to set up the Lionbridge App, as described in this guide. |
- Do one of the following:
- To create a new user, click New User. For detailed instructions, see Adding a User.
- To edit a user, in the Actions column, click Edit in the corresponding row. For detailed instructions, see Editing a User.
- To delete a user, in the Actions column, click Delete in the corresponding row. For detailed instructions, see Deleting a User.
1 - Adding a User
You can add a user to the Lionbridge App so that you can add the user to one or more teams. This enables the user to send assets for translation from and to specified languages and to specified translation providers.
To add a user:
- In the Site Administration menu on the left, click Site Users.
The Site Users page opens, displaying the users set up for your Marketo site. For detailed information about this page, see Managing Users.
- Click New User.
The New User dialog box opens.
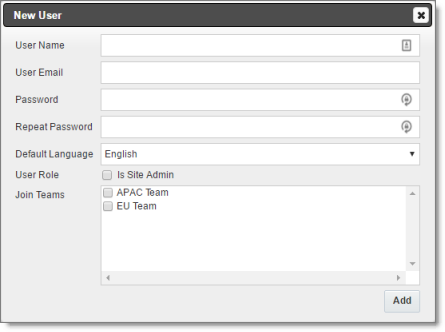
- Enter the following information about the new user:
| Field |
Description |
| User Name |
Enter the user’s username for accessing the Lionbridge App. |
| User Email |
Enter the user’s email address. |
| Password |
Enter the password for this user. The user can change this after logging in. |
| Repeat Password |
Re-enter the password for this user. |
| Default Language |
In the dropdown list, select the default language in which the Lionbridge App interface is displayed for the user. If the user is a site administrator, who can access the functionality described in this guide, then this is also the language in which the CloudBroker interface is displayed for this user. Languages are configured in CloudBroker by the Lionbridge Connector team. For more information, please contact Lionbridge Connector Support, as described in How to Contact Lionbridge Connector Support. |
| User Role – Is Site Admin |
If this user will have access to the configuration functionality described in this section, select this check box. |
| Join Teams |
Select the check boxes of the teams the user is joining. A user must belong to at least one team to be able to send out content for translation. The team determines which source and target languages the user can send out for translation and the translation providers to which the user can send the content.
You can view the settings for all teams on the Site Teams page. For details, see Managing Teams. |
- Click Add.
2 - Editing a User
In general you edit a user that you previously added, either by importing or automatically, to specify the following information:
- the default language for displaying the Lionbridge App for the user
- whether the user is a site administrator, who can access CloudBroker to set up the Lionbridge App, as described in this guide
- the teams that the user joins
You can also change a user’s username or email address.
To edit a user:
- In the Site Administration menu on the left, click Site Users.
The Site Users page opens, displaying the users set up for your Marketo site. For detailed information about this page, see Managing Users.
- Click Edit for the user to edit.
The Edit User dialog box opens.
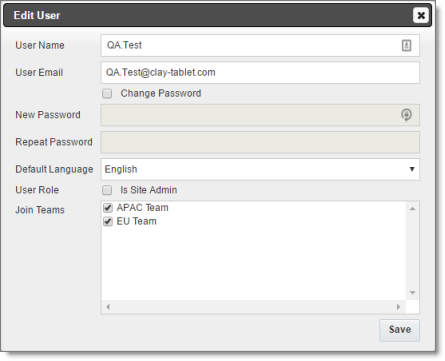
- You can modify the following information:
| Field |
Description |
| User Name |
The user’s username. |
| User Email |
The user’s email address. |
| Change Password |
Select this check box to change this user’s password. |
| New Password |
Enter the new password for this user. The user can change this after logging in. Available only if the Change password check box, above, is selected. |
| Repeat Password |
Re-enter the new password for this user. Available only if the Change password check box, above, is selected. |
| Default Language |
In the dropdown list, select the default language in which the Lionbridge App interface is displayed for the user. If the user is a site administrator, who can access the functionality described in this guide, then this is also the language in which the CloudBroker interface is displayed for this user. Languages are configured in CloudBroker by the Lionbridge Connector team. For more information, please contact Lionbridge Connector Support, as described in How to Contact Lionbridge Connector Support. |
| User Role |
Indicates whether this user is a site administrator, who can access CloudBroker to set up the Lionbridge App, as described in this guide.
* If the user is a site administrator, select the **Is site admin** check box.
* If the user is not a site administrator, clear the **Is site admin** check box. |
| Join Teams |
The teams to which this user belongs. A user must belong to at least one team to be able to send out content for translation. The team determines which source and target languages the user can send out for translation and the translation providers to which the user can send the content.
You can view the settings for all teams on the Site Teams page. For details, see Managing Teams.
* To join a team, select the corresponding check box.
* To leave a team, clear the corresponding check box. |
- Click Save to save your changes.
3 - Deleting a User
You can delete a user from the Lionbridge App so that the user will no longer have access. Deleting a user from the Lionbridge App also deletes all the jobs and items sent by this user from the Lionbridge App.
Important: Deleting a user from the Lionbridge App does not delete the user in Marketo.
To delete a user from the Lionbridge App:
- In the Site Administration menu on the left, click Site Users.
The Site Users page opens, displaying the users set up for your Marketo site. For detailed information about this page, see Managing Users.
- In the Actions column, click Delete for the user to delete.
The Delete User dialog box opens.
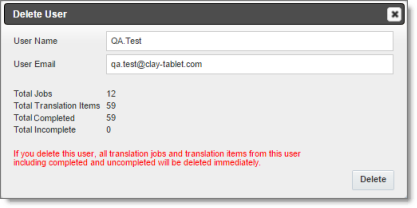
The page displays the username and email address of the user to delete. It also displays the following information about the jobs and items this user sent for translation:
| Field |
Description |
| Total Jobs |
The total number of jobs this user sent out for translation. |
| Total Translation Items |
The total number of items this user sent out for translation. |
| Total Completed |
The total number of translated items that the Lionbridge App has re-imported into Marketo. |
| Total Incomplete |
The total number of assets that the Lionbridge App has not yet re-imported into Marketo. Usually these are assets that are currently in translation, or were just recently received back from translation and that the Lionbridge App is trying to re-import into Marketo.
Warning: If you delete this user, these items will be deleted. They will not be re-imported into Marketo. |
- Click Delete to remove the user and all the jobs and items sent out for translation by this user from the Lionbridge App.