Configuring Other Marketo Settings
2 minute read
You can configure the following Marketo-specific settings:
- the filename format of translated assets
- the URL of the Marketo instance with the source and target assets
Note: The Lionbridge App requires this to generate the preview links from the Job Details tab to the source and target assets.
To configure these settings:
-
In the Site Administration menu on the left, ensure that My Site is selected, so that the My Site page is open. This is the default selection when you log into CloudBroker as a site administrator. For detailed information about this page, see Viewing Lionbridge App Information and Usage Data.
-
Click Configure Site.
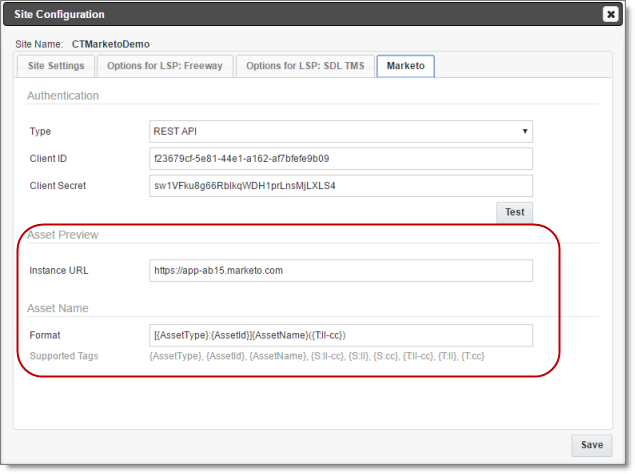
The Site Configuration dialog box opens. The Site Name field at the top of the dialog box displays the name of your company’s site.
- Click the Marketo tab.
-
In the Asset Preview section, in the Instance URL field, you enter URL of your Marketo instance. The Lionbridge App requires this to generate the preview links from the Job Details tab to the source and target assets.
-
In the Asset Name section, in the Format field, you can use the following building blocks to specify the filename format of translated asset files. The default format is [{AssetType}:{AssetId}]{AssetName}({T:ll-cc}), for example: [Email:127]My test email1(fr-CA).
| Building Block | Description | Example |
|---|---|---|
| {AssetType} | A type of asset. | |
| {AssetId} | The Lionbridge App’s internal identfier for the asset. | 127 |
| {AssetName} | The name of the asset that is displayed in Marketo | My test mail |
| {S:ll-cc} | The language code and the country code of the source language, separated by a hyphen. | en-CA |
| {S:ll} | The language code only of the source language. | en |
| {S:cc} | The country code only of the source language. | CA |
| {T:ll-cc} | The language code and the country code of the target language, separated by a hyphen. | fr-CA |
| {T:ll} | The language code only of the target language. | fr |
| {T:cc} | The country code only of the target language. | CA |
For a detailed description of the other fields in this tab, see Configuring Marketo Authentication Settings.
-
Optional. Click the Test button to test the authentication settings. A message box indicates that the test was successful. Click OK to close the message box.
-
Click Save.