Configuring the Lionbridge App in CloudBroker
A site administrator configures and manages the Lionbridge App’s configuration in CloudBroker, which is a Lionbridge SaaS for configuring apps that are plug-ins to SaaS content systems. The Lionbridge App for Marketo (Lionbridge App) is your site.
-
Log in to CloudBroker as a site administrator. For details, see Getting Started with CloudBroker.
-
Perform the following language-mapping tasks:
- Perform the following configuration tasks:
Note: This is relevant only if Lionbridge Freeway is your translation provider.
Note: This is relevant only if SDL TMS is your translation provider.
-
Configure users, teams, and access, as described in Configuring User Access.
-
Optional. Configure email notification groups, as described in Configuring Email Notification Groups.
1 - Configuring Language Mappings
You configure language mappings so that:
- The Lionbridge App correctly identifies the source and target languages of your content.
- The Lionbridge App displays languages in the optimal order for your end users.
Important: After you configure language mappings, you create a Marketo segmentation so that you can map Marketo segments to Clay Tablet languages and language codes. For detailed instructions, see Configuring Language Segmentation.
-
In the Site Administration menu on the left, ensure that My Site is selected, so that the My Site page is open. This is the default selection when you log into CloudBroker as a site administrator. For detailed information about this page, see Viewing Lionbridge App Information and Usage Data.
-
Click Map Languages.
The Language Mapping dialog box opens.
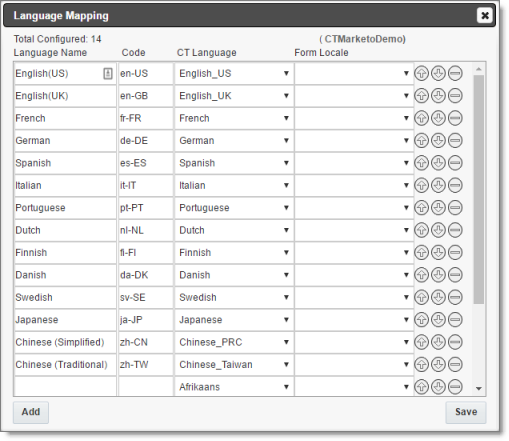
- The top-left corner of the dialog box displays the number of mappings between Marketo languages and Clay Tablet languages.
- The top-right corner of the dialog box displays the name that Lionbridge Connector personnel assigned to your company’s site.
By default, CloudBroker includes predefined mappings between language names and codes, and Clay Tablet language codes.
You can modify or delete the current mappings and add new mappings. The following information is displayed about each language mapping:
| Column |
Description |
| Language Name |
The name for the language. |
| Code |
The language’s code. |
| CT Language |
The Clay Tablet language code for the language. For a list and description of Clay Tablet language codes, see Appendix: Language Codes. |
| Form Locale |
The form locale specified for the language in Marketo in the Marketing Activities area, under Form Settings > Settings. For more information refer to the Marketo Product Docs, available at http://docs.marketo.com/. |
- You can modify the following aspects of a language mapping:
- To map a language to a different Clay Tablet language code, select a language from the dropdown list in the CT Language column.
- To change the order in which a language is displayed to your users when they send out content for translation, use the up
 and down
  buttons.
- To remove a language mapping, click the corresponding delete button
 .
.
Note: Remove a language mapping does not affect any translation jobs in progress that use that mapping.
-
Optional. To add a new language mapping, click Add. The Lionbridge App adds a blank line at the bottom of the list. Enter the language name and ISO code, and select the corresponding Clay Tablet language code from the list.
-
When you are done, click Save to save your changes.
Next, you configure language segmentation to map language segments to these languages and language codes. For details, see Configuring Language Segmentation.
2 - Configuring Language Segmentation
You create a Marketo segmentation so that you can map individual Marketo segments to the Clay Tablet languages and language codes you configured, as described in Configuring Language Mappings. For detailed information on Marketo segmentation and segments, see the Marketo Product Docs at https://docs.marketo.com/display/public/DOCS/Segmentation+and+Snippets.
-
In Marketo, create a segmentation for mapping languages for translation, and add a segment for each Clay Tablet language you want to map. In general, you want to create a segment for each source language from which you will translated assets, and for each target language into which you will translate assets. For detailed instructions, see “Create a Segmentation” in the Marketo Product Docs at https://docs.marketo.com/display/public/DOCS/Create+a+Segmentation.
-
In the Site Administration menu on the left, ensure that My Site is selected, so that the My Site page is open. This is the default selection when you log into CloudBroker as a site administrator. For detailed information about this page, see Viewing Lionbridge App Information and Usage Data.
-
In the Site Extensions section, click Configure.
The Site Extension dialog box opens, displaying the Segmentation Language Mappings tab.
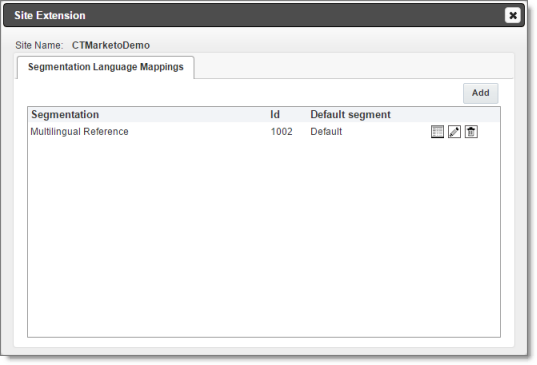
- Click Add.
The Mapping Details tab opens.
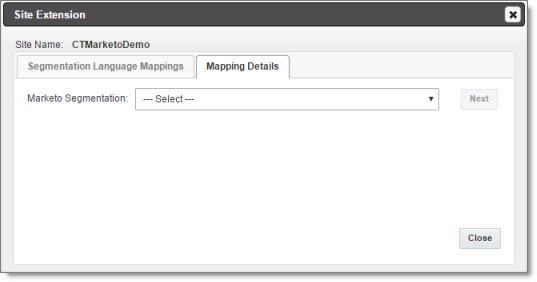
- In the Marketo Segmentation dropdown list, select the Marketo segmentation you created in step 1, above, and then click Next.
The tab refreshes.
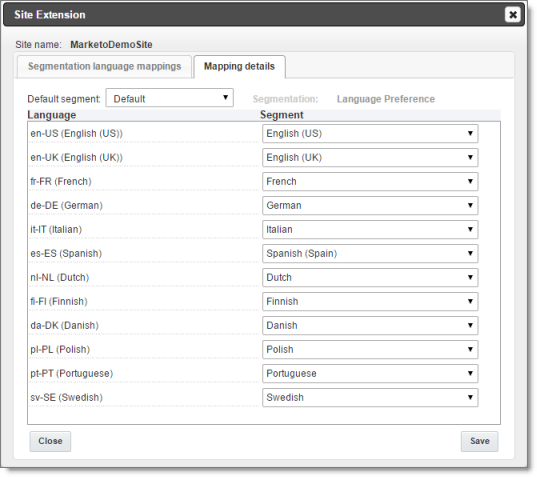
-
In the Default segment dropdown list, select the default segment to use if another segment is not specified.
-
For each Clay Tablet language code and language displayed in the Language column, select the corresponding segment from the dropdown list in the Segment column. This maps the selected Marketo segment to the Clay Tablet language code and language.
-
Click Save to save your changes and close the dialog box.
3 - Configuring Global Translation Settings
The Lionbridge App’s global translation settings determine how it sends out all translation jobs. These settings include:
- the license for the Lionbridge App and its entry point from within Marketo
- the source and target languages available for translation
- email notification settings
- whether to use a local translation memory
To set the global translation settings:
-
In the Site Administration menu on the left, ensure that My Site is selected, so that the My Site page is open. This is the default selection when you log into CloudBroker as a site administrator. For detailed information about this page, see Viewing Lionbridge App Information and Usage Data.
-
Click Configure Site.
The Site Configuration dialog box opens, and the Site Settings tab is displayed by default. The Site Name field at the top of the dialog box displays the name of your company’s site.
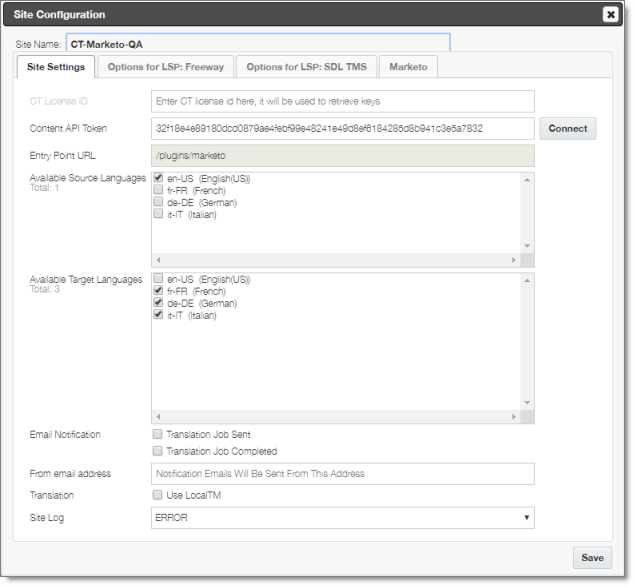
Important: Make a note of the Site name. Users will require this to log in to your site.
- Specify the following settings:
| Setting |
Description |
| CT License ID |
Your company’s license for all supported Lionbridge App services. Either Lionbridge Connector personnel enters this value or you enter this value for your company after you receive it from the Lionbridge Connector Team. |
| Content API Token |
Enter your access token for the Clay Tablet. The Lionbridge Connector Team provides you with this token.
1. Click the Connect button to verify that the App can access the Content API.
A message box indicates that the test was successful. It lists the translation providers that have been migrated from version 1.x of the App and the Marketo sites that use this token.
Note: If the test fails, verify your token. If the test continues to fail, contact Lionbridge Connector Support. For details, see How to Contact Lionbridge Connector Support.
2. Click OK to close the message box. |
| Entry Point URL |
The URL of the default entry point for the Lionbridge App within Marketo. By default, this is /plugins/marketo. Edit this if your site has different entry point URL. |
| Available Source Languages |
Select the check boxes for the languages that users can select as the source language when sending out content for translation. The list displays all mapped languages.
* The list displays the name and code for each mapped language.
* Total indicates the number of languages that are currently selected. |
| Available Target Languages |
Select the check boxes for the languages that users can select as a target language when sending out content for translation. The list displays all mapped languages.
* The list displays the name and code for each mapped language.
* Total indicates the number of languages that are currently selected. |
| Email Notification – Translation Job Sent |
Select this check box to send out an email notification when a user sends out a job for translation. The Lionbridge App sends the notification to the user who sent out the job. |
| Email notification – Translation Job Completed |
Select this check box to send out an email notification when a translation job is completed. The Lionbridge App sends the notification to the user who sent out the job. |
| Email Notification – Send to Team Members as Well |
Select this check box to send out an email notification to all users in the team when:
* A user in the team sends out a job for translation.
* A translation job that was sent out by a user in the team is completed. |
| From email address |
The email address from which the Lionbridge App notification emails will be sent. The default email address is notify@clay-tablet.com. |
| Translation – Use local TM |
Translated content is stored in a local translation memory (TM). This setting determines whether to check previously translated content in the local TM for any content changes, and send only changed content out for translation. If content was previously translated and it has not changed, then the Lionbridge App does not send it for translation again: Instead, it uses the stored translation. This feature reduces the quantity of content that the Lionbridge App sends to translation providers, which reduces your cost. However, it increases the processing time before sending out the items for translation. |
- Click Save.
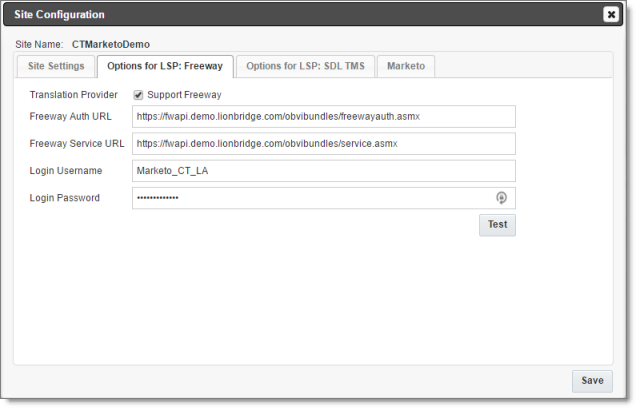
4 - Configuring Lionbridge Freeway Authentication
Note: This section is relevant only if Lionbridge Freeway is your translation provider.
If Lionbridge Freeway is your translation provider, you can configure authentication to Lionbridge Freeway from the Lionbridge App. This facilitates delivering your content from the Lionbridge App, via the Clay Tablet, to Lionbridge Freeway.
-
In the Site Administration menu on the left, ensure that My Site is selected, so that the My Site page is open. This is the default selection when you log into CloudBroker as a site administrator. For detailed information about this page, see Viewing Lionbridge App Information and Usage Data.
-
Click Configure Site.
The Site Configuration dialog box opens. The Site Name field at the top of the dialog box displays the name of your company’s site.
- Click the Options for LSP: Freeway tab.
-
To enable support for the Lionbridge Freeway translation provider, select the Support Freeway check box.
-
Specify the following Lionbridge Freeway settings:
| Setting |
Description |
| Freeway Auth URL |
The URI where the App receives an authentication token for Lionbridge Freeway. |
| Freeway Service URL |
The URI where the App can request a list of Lionbridge Freeway analysis codes. |
| Login Username |
The login name for the Lionbridge Freeway server. |
| Login Password |
The login password for the Lionbridge Freeway server. |
- Click Save.
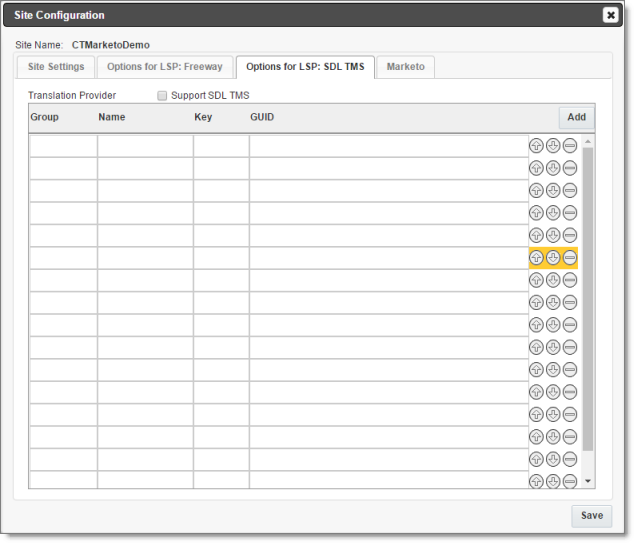
5 - Configuring SDL TMS Entries
Note: This section is relevant only if SDL TMS is your translation provider.
If SDL TMS is your translation provider, you can configure SDL TMS configuration entries, which are used for submitting translation jobs, via the Clay Tablet, to SDL TMS.
-
In the Site Administration menu on the left, ensure that My Site is selected, so that the My Site page is open. This is the default selection when you log into CloudBroker as a site administrator. For detailed information about this page, see Viewing Lionbridge App Information and Usage Data.
-
Click Configure Site.
The Site Configuration dialog box opens. The Site Name field at the top of the dialog box displays the name of your company’s site.
- Click the Options for LSP: SDL TMS tab.
-
To enable support for the SDL TMS translation provider, select the Support SDL TMS check box.
-
Enter the following information about an SDL TMS configuration entry, which is used for submitting translation jobs to SDL TMS:
| Column |
Description |
| Group |
The Dropbox selection group. |
| Name |
The name to display in the Dropbox selection box. |
| Key |
The key for submitting a job to SDL TMS. |
| GUID |
The key from the Dropbox selection box links to a GUID in SDL TMS. Each GUID is related to a different TM (translation memory), TermBase, and Workflow. |
-
Optional. Modify the order of a configuration entry. To change the order in which an entry is displayed to your users when they send out content for translation, use the up and down buttons.
-
Optional. To remove a configuration entry, click the corresponding delete button .
-
Click Save.
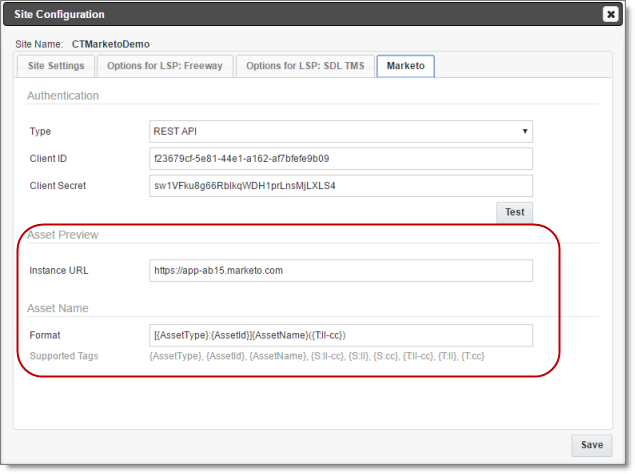
6 - Configuring Marketo Authentication Settings
The Lionbridge App must authenticate with Marketo. You manage the authentication settings in the Marketo tab of the Site Configuration dialog box.
-
In the Site Administration menu on the left, ensure that My Site is selected, so that the My Site page is open. This is the default selection when you log into CloudBroker as a site administrator. For detailed information about this page, see Viewing Lionbridge App Information and Usage Data.
-
Click Configure Site.
The Site Configuration dialog box opens. The Site Name field at the top of the dialog box displays the name of your company’s site.
- Click the Marketo tab.

- Enter the following information:
| Field |
Description |
| Type |
In the dropdown list, select REST API. |
| Client ID |
The Client ID (App id) that Marketo created and assigned when you added the Lionbridge App as a LaunchPoint Service in Marketo.
Note: This is generally configured by Lionbridge Connector personnel. To view this value in Marketo, in the Admin area select LaunchPoint. Then, in the Installed Services tab, click View Details for the service you created. |
| Client Secret |
The secret access token that Marketo generated when you added the Lionbridge App as a LaunchPoint Service in Marketo.
Note: This is generally configured by Lionbridge Connector personnel. To view this value in Marketo, in the Admin area select LaunchPoint. Then, in the Installed Services tab, click View Details for the service you created. |
For a detailed description of the other fields in this tab, see Configuring Other Marketo Settings.
-
Optional. Click the Test button to test the authentication settings. A message box indicates that the test was successful. Click OK to close the message box.
-
Click Save.
7 - Configuring Other Marketo Settings
You can configure the following Marketo-specific settings:
- the filename format of translated assets
- the URL of the Marketo instance with the source and target assets
Note: The Lionbridge App requires this to generate the preview links from the Job Details tab to the source and target assets.
-
In the Site Administration menu on the left, ensure that My Site is selected, so that the My Site page is open. This is the default selection when you log into CloudBroker as a site administrator. For detailed information about this page, see Viewing Lionbridge App Information and Usage Data.
-
Click Configure Site.
The Site Configuration dialog box opens. The Site Name field at the top of the dialog box displays the name of your company’s site.
- Click the Marketo tab.
-
In the Asset Preview section, in the Instance URL field, you enter URL of your Marketo instance. The Lionbridge App requires this to generate the preview links from the Job Details tab to the source and target assets.
-
In the Asset Name section, in the Format field, you can use the following building blocks to specify the filename format of translated asset files. The default format is [{AssetType}:{AssetId}]{AssetName}({T:ll-cc}), for example: [Email:127]My test email1(fr-CA).
| Building Block |
Description |
Example |
| {AssetType} |
A type of asset. |
Email |
| {AssetId} |
The Lionbridge App’s internal identfier for the asset. |
127 |
| {AssetName} |
The name of the asset that is displayed in Marketo |
My test mail |
| {S:ll-cc} |
The language code and the country code of the source language, separated by a hyphen. |
en-CA |
| {S:ll} |
The language code only of the source language. |
en |
| {S:cc} |
The country code only of the source language. |
CA |
| {T:ll-cc} |
The language code and the country code of the target language, separated by a hyphen. |
fr-CA |
| {T:ll} |
The language code only of the target language. |
fr |
| {T:cc} |
The country code only of the target language. |
CA |
For a detailed description of the other fields in this tab, see Configuring Marketo Authentication Settings.
-
Optional. Click the Test button to test the authentication settings. A message box indicates that the test was successful. Click OK to close the message box.
-
Click Save.
8 - Configuring Translation Providers
Very important: Do not copy the license key to multiple instances, because this is a violation of the License Agreement. Using the same license keys on multiple instances will cause the Lionbridge App to behave unexpectedly, which can result in lost translation content, orphaned projects, and inaccurate translation status reports. The Lionbridge Connector team will support technical issues caused by duplicating or incorrectly installing license keys only on a time and materials basis.
The Lionbridge App uses the license key to move your items for translation from the Lionbridge App to the Clay Tablet, which then forwards the items to translate to your translation provider. If you are using multiple translation providers, there must be one key (file) for each provider.
Note: The Lionbridge App always initiates calls to the Clay Tablet. However, the license keys enable establishing a secure, discrete connection between the Lionbridge App instance and the Clay Tablet. They also support the return of files from translation.
Before you can send assets for translation, you must set up your Clay Tablet license key and your translation providers.
Important: Before starting, ensure you obtain your license key from the Lionbridge Connectors team. Verify that the Lionbridge Connectors team has set up your account license keys for each of your translation providers.
- In the Site Administration menu on the left, click Site Providers.
The Site Providers page opens, displaying the translation providers configured for your Marketo site.

- To create a new translation provider, click New Provider.
Notes: To update the account license keys for a current translation provider, click Edit for that translation provider. To delete a translation provider, click Delete for that translation provider. A message box prompt you to confirms that you want to delete this translation provider. Click OK to proceed.
The New Provider dialog box opens.

Note: If you clicked Edit, the Edit Provider dialog box opens instead. Aside from the title, it is identical to the dialog box described below.
a. In the Provider name field, enter the name of the translation provider.
b. In the Provider type dropdown list, select the type of translation provider. This supports sending translation metadata to specific translation providers. If you do not see your translation provider, select Generic.
c. In the Licensed Keys dropdown list, select the license key for the translation provider. This is the license key that the Lionbridge Connectors Team set up for your company for a particular translation provider on the Lionbridge Connectors License Server. Depending on the number of license keys configured for you on the Lionbridge Connectors license server (and specified by your CT License ID, in the Site tab of the Site Configuration dialog box), multiple license keys may be displayed.
d. Click Retrieve.
This populates the Capabilities box, which displays the configuration settings for this translation provider.
- Click Save.
9 - Configuring Email Notification Groups
An email notification group facilitates sending email notifications about jobs to the same group of users. You can create and edit email notification groups. When sending jobs for translation, you can select an existing group and create or edit a group. For detailed instructions, refer to the Lionbridge App for MarketonUser Guide.
To create an email notification group:
- In the Site Administration menu on the left, click Notification Groups.
The Site Email Notification Group page opens, displaying any email notification groups configured for your Marketo site.
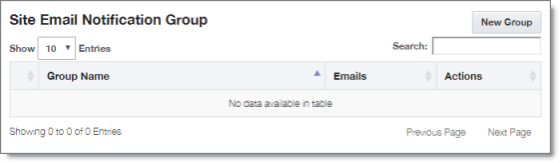
- To create a new email notification group, click New Group.
Notes: To update an existing email notification group, click Edit for that group. To delete an email notification group, click Delete for that group. A message box prompt you to confirms that you want to delete this group. Click OK to proceed.
The New Email Notification Group dialog box opens.
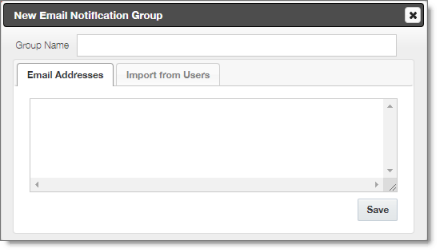
Note: If you clicked Edit, the Edit Email Notification Group dialog box opens instead. Aside from the title, it is identical to the dialog box described below.
-
In the Group Name field, enter the name of the email notification group. This is the name that will be displayed to users when they send out jobs for translation.
-
Do one or both of the following:
- In the Email Addresses tab, enter the email addresses that will receive email notifications about jobs when this email notification group is selected. Enter each email address on a separate line.
- Click the Import from Users tab.
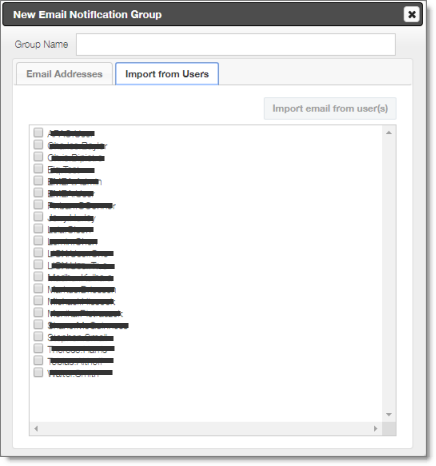
By default, this tab displays the names of any users who were previously manually created in the Lionbridge App.
-
Select the check boxes of any users whose email addresses you want to add to this group.
-
Click Import email from user(s).
-
Click Save.
The Lionbridge App adds the email addresses of any selected users to the group.