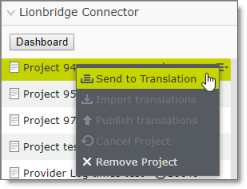
When a translation project has Draft status, you can send it to Lionbridge Freeway for translation. You can do this either from the Lionbridge Connector gadget or from the Lionbridge Connector Dashboard (“Dashboard”). There are two ways to send a project for translation:
This the multi-page printable view of this section. Click here to print.
Sending a Project for Translation
- 1: Sending a Project for Translation from the Gadget
- 2: Sending a Project for Translation from the Dashboard
1 - Sending a Project for Translation from the Gadget
Sending a Project for Translation from the Gadget
When a translation project has Draft status, you can send it to Lionbridge Freeway for translation.
To send out a project for translation from the Lionbridge Connector gadget:
- In Episerver CMS, click Edit.

- Click the Toggle assets pane icon.
![]()
The Assets pane is displayed on the right. The Lionbridge Connector gadget is displayed at the bottom of the pane, displaying all the translation projects.
-
Click a project in the list to select it.
-
Mouseover the right end of the project in the Lionbridge Connector gadget, click the Options icon
 and then select Send to Translation in the project’s context menu.

A message box opens, confirming that you want to send the project for translation.
- Click Yes to proceed.
Another message box opens, stating that the project was sent for translation.
- Click OK to close the message box.
The Connector sends your translation project as a scheduled job. It displays a clock icon ![]() next to it, which indicates that it now has In Translation status.
next to it, which indicates that it now has In Translation status.
- When your project displays a status of 10%, it has been delivered to Lionbridge Freeway.
- When your project displays a status of 100%, it is ready to be imported into Episerver, where you can review it.
2 - Sending a Project for Translation from the Dashboard
When a translation project has Draft status, you can send it to Lionbridge Freeway for translation.
To send out a project for translation from the Dashboard:
-
In the Dashboard, locate a translation project with Draft status. This is displayed in the Status column. For information on opening the Dashboard, see Getting Started with the Connector for Episerver.
-
In the Actions column, click the arrow and select Send to Translation](#) from the context menu.

A message box opens, confirming that you want to send the project for translation.
- Click Yes to proceed.
Another message box opens, stating that the project was sent for translation.
- Click OK to close the message box.
The Connector sends your translation project as a scheduled job, and when it is delivered to Lionbridge Freeway, it has In Translation status.