This the multi-page printable view of this section. Click here to print.

Return to the regular view of this page.

Installing the Connector

Important: Before installing the Connector, back up the Episerver databases.

You use Visual Studio NuGet to install the Connector package. There are two ways to install the Connector, depending on whether you received the installation package directly from Lionbridge or you will download it from the Episerver NuGet feed.

Episerver version numbers in Lionbridge Connector packages

Important: There are different Connector packages for Episerver 10 and Episerver 11. Ensure that you download and install the correct package for your version of Episerver.

You can identify the Episerver version for the Lionbridge Connector from the last four digits of the NuGet package name, as described in the following table below.

Episerver Version Lionbridge Connector Versioning
(MajorVersion.MinorVersion.Patch.Episerver Version)
Example
Episerver 10 1.x.x.1000 1.5.0.1000
Episerver 11 1.x.x.1100 1.5.0.1100
To download and install the Connector:

Important: Follow these instructions if you did not receive the Connector as a NuGet package (with file extension .nupkg) directly from Lionbridge.

  1. In Visual Studio, open the NuGet Package Manager Console.
  2. Do one of the following:
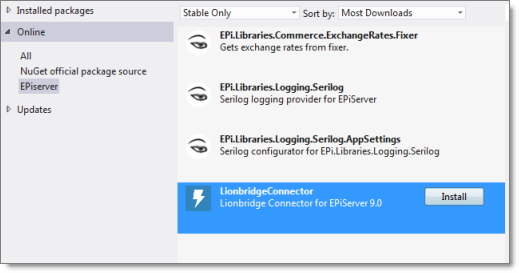
  • In the left pane, select Online > Episerver. Then select the LionbridgeConnector package, and click Install.

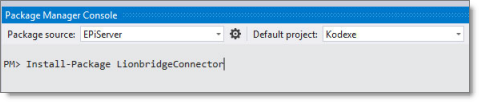
  • In the command line, type: Install-Package LionbridgeConnector.

To install the Connector:

Important: Follow these instructions if you received the Connector as a NuGet package (with file extension .nupkg) directly from Lionbridge.

  1. In Visual Studio, open the NuGet Package Manager Console.
  2. Type the following command in the command line, ensuring that you specify the latest Connector version for your CMS version:

Install-Package LionbridgeConnector -source [.nupkg file path] -version.x.x.1100

For example, to install version 1.5.0 of the Connector on CMS version 11, type:

Install-Package LionbridgeConnector -source C:\LionbridgeConnector -version 1.5.0.1100

Installation location

The Connector is installed in the \modules\_protected folder of the Episerver web root. If you use another folder for add-ons, you must manually move the Connector files to your modules folder.

1 - Updating Your Connector Installation

If the Lionbridge Connector (Connector) is already installed, follow the steps below to update your version of the Connector. The method and commands for updating your Connector depend on:

  • your current Connector version
  • your Episerver version
  • whether you are updating your Episerver version
  • whether you are using the Nuget site or the Nuget package to perform the updates

Refer to the tables below, and use the appropriate procedure for your particular scenario.

Using the Nuget site:
  1. In Visual Studio, open the NuGet Package Manager Console.
  2. In the command line, type: Update-Package LionbridgeConnector -version MajorVersion.MinorVersion.Patch.EpiserverVersion.

For example, type: Update-Package LionbridgeConnector -version 1.5.0.1100

For detailed instructions, refer to the table below. Always use the latest available version of the Connector.

Using the NuGet package (with file extension .nupkg) directly from Lionbridge:
  1. In Visual Studio, open the NuGet Package Manager Console.
  2. In the command line, type: Update-Package LionbridgeConnector -source. [.nupkg file path] -version MajorVersion.Minor Version.Patch.EpiserverVersion.

For example, type: Update-Package LionbridgeConnector -source. [c:\LionbridgeConnector] -version 1.5.0.1100

For detailed information about version numbers, refer to the following table. Always use the latest version.

Episerver version numbers in Lionbridge Connector packages

You can identify the Episerver version for the Lionbridge Connector from the last four digits of the NuGet package name, as described in the following table below.

Episerver Version Lionbridge Connector Versioning
(MajorVersion.MinorVersion.Patch.Episerver Version)
Example
Episerver 10 1.x.x.1000 1.5.0.1000
Episerver 11 1.x.x.1100 1.5.0.1100
When updating the Connector from Episerver 9
Episerver 9 Scenarios From To Instructions
Updating CMS and Connector from Episerver 9 to Episerver 10 1.2.4.0900 1.5.0.1000 or higher 1. Update Episerver CMS to version 10.
2. Update to the latest version of the Connector supporting Episerver 10.
3. Specify the exact name of the latest version of the Connector, for example:

* NuGet Site Package: PM> Update-Package LionbridgeConnector -version 1.5.0.1000
* NuGet file Package: PM> Update-Package LionbridgeConnector -source C:\…\ - version 1.5.0.1000

1. Run a .sql script that you obtain from the Lionbridge Connector Team.
Updating CMS and Connector from Episerver 9 to Episerver 11 1.2.4.0900 1.5.0.1100 or higher 1. Update Episerver CMS to version 11.
2. Update to the latest version of the Connector supporting Episerver 11.
3. Specify the exact name of the latest version of the Connector, for example:

* NuGet Site Package: PM> Update-Package LionbridgeConnector -version 1.5.0.1100
* NuGet file Package: PM> Update-Package LionbridgeConnector -source C:\…\ - version 1.5.0.1100

1. Run a .sql script that you obtain from the Lionbridge Connector Team.
When updating the Connector from Episerver 10
Episerver 10 Scenarios From To Instructions
Updating Connector on Episerver 10 1.3.x.1000 1.5.0.1000 or higher 1. Update to the latest version of the Connector supporting Episerver 10.
2. Specify the exact name of the latest version of the Connector, for example:

* NuGet Site Package: PM> Update-Package LionbridgeConnector -version 1.5.0.1000
* NuGet file Package: PM> Update-Package LionbridgeConnector -source C:\…\ - version 1.5.0.1000

1. Run a .sql script that you obtain from the Lionbridge Connector Team.
Updating Connector on Episerver 10 1.3.9.1000 1.5.0.1000 or higher 1. Update to the latest version of the Connector supporting Episerver 10.
2. Specify the exact name of the latest version of the Connector, for example:

* NuGet Site Package: PM> Update-Package LionbridgeConnector -version 1.5.0.1000
* NuGet file Package: PM> Update-Package LionbridgeConnector -source C:\…\ - version 1.5.0.1000
Updating CMS and Connector from Episerver 10 to Episerver 11 1.3.x.1000 1.5.0.1100 or higher 1. Update the Episerver CMS packages to version 11.
2. Update to the latest version of the Connector supporting Episerver 11.
3. Specify the exact name of the latest version of the Connector, for example:

* NuGet Site Package: PM> Update-Package LionbridgeConnector -version 1.5.0.1100
* NuGet file Package: PM> Update-Package LionbridgeConnector -source C:\…\ - version 1.5.0.1100

1. Run a .sql script that you obtain from the Lionbridge Connector Team.
Updating CMS and Connector from Episerver 10 to Episerver 11 1.3.9.1000 or higher 1.5.0.1100 or higher 1. Update the Episerver CMS packages to version 11.
2. Update to the latest version of the Connector supporting Episerver 11.
3. Specify the exact name of the latest version of the Connector, for example:

* NuGet Site Package: PM> Update-Package LionbridgeConnector -version 1.5.0.1100
* NuGet file Package: PM> Update-Package LionbridgeConnector -source C:\…\ - version 1.5.0.1100
When updating the Connector from Episerver 11
Episerver 11 Scenarios From To Instructions
Updating Connector on Episerver 11 1.4.2.1100 1.5.0.1100 or higher 1. Update the Connector.
2. Specify the exact name of the latest version of the Connector, for example:

* NuGet Site Package: PM> Update-Package LionbridgeConnector -version 1.5.0.1100
* NuGet file Package: PM> Update-Package LionbridgeConnector -source C:\…\ - version 1.5.0.1100

2 - Uninstalling the Connector

Before uninstalling the Connector, ensure that the site is stopped in Visual Studio.

To uninstall the Connector:
  • In Visual Studio, open the NuGet Package Manager Console.
  • In the command line, type: Remove-LionbridgeConnector.