This the multi-page printable view of this section. Click here to print.
Episerver
- 1: Installation and Configuration Guide
- 1.1: Welcome to the Lionbridge Connector for Episerver
- 1.1.1: Terminology
- 1.1.2: About the Clay Tablet Translation Platform
- 1.1.3: How the Connector Works with Episerver
- 1.1.4: Using this Guide
- 1.1.5: How to Contact Lionbridge Connector Support
- 1.2: Before You Install
- 1.2.1: System Requirements
- 1.2.2: Setting Your System Date, Time, and Time Zone Correctly
- 1.2.3: Configuring Network Settings for a Firewall
- 1.3: Installing the Connector
- 1.4: Configuring the Connector
- 1.4.1: Adding the Lionbridge Connector Gadget
- 1.4.2: Activating the Scheduled Job and Setting the Run Interval
- 1.4.3: Activating the Translation Heartbeat Job
- 1.4.4: Activating Background Jobs
- 1.4.5: Configuring Target XML and Source XML
- 1.4.6: Configuring Language Mapping and Asset Packaging
- 1.4.7: Configuring Lionbridge Freeway Settings
- 1.4.8: Configuring Logging when the Connector is Installed Locally
- 1.4.9: Configuring Logging in DXC Environments
- 1.4.10: Configuring Multiple Users and Translation Workflows
- 1.5: Troubleshooting
- 1.6: Appendix Language Codes
- 2: User Guide
- 2.1: Welcome to the Lionbridge Connector for Episerver
- 2.1.1: The Translation Lifecycle
- 2.1.2: How the Connector Helps You Manage Your Translation Lifecycle
- 2.1.3: Using this Guide
- 2.1.4: How to Contact Lionbridge Connector Support
- 2.2: Getting Started with the Connector for Episerver
- 2.2.1: The Connector at a Glance
- 2.3: Sending Assets for Translation
- 2.3.1: Creating or Editing a Translation Project
- 2.3.2: Sending a Project for Translation
- 2.3.2.1: Sending a Project for Translation from the Gadget
- 2.3.2.2: Sending a Project for Translation from the Dashboard
- 2.3.3: Canceling a Translation Project
- 2.4: Monitoring Translation Status
- 2.4.1: Translation Statuses
- 2.4.2: Viewing Your Translation Status Summary
- 2.4.3: Monitoring Translation Projects
- 2.4.4: Monitoring Translation Assets
- 2.5: Added Assets Log view
- 2.6: Post-Translation Features
- 2.6.1: Importing Translated Content
- 2.6.1.1: Importing All Available Translated Content from the Gadget
- 2.6.1.2: Importing All Available Translated Content from the Dashboard
- 2.6.1.3: Importing Translated Content in One Target Language from the Dashboard
- 2.6.2: Reviewing Translated Assets
- 2.6.2.1: Viewing Translated Assets
- 2.6.3: Publishing Translated Assets
- 2.6.3.1: Publishing All Available Translated Assets from the Gadget
- 2.6.3.2: Publishing All Available Translated Assets from the Dashboard
- 2.6.3.3: Publishing Translated Assets in One Target Language from the Dashboard
- 2.6.4: Archiving and Unarchiving Projects
- 2.6.5: Removing Translation Projects from the Connector
1 - Installation and Configuration Guide
1.1 - Welcome to the Lionbridge Connector for Episerver
Welcome to the Lionbridge Connector for Episerver (Connector) version 1.6.3. This is Lionbridge’s connector between Episerver and the Clay Tablet Platform.
1.1.1 - Terminology
| Amazon AWS | Amazon Web Services. A suite of web application products developed and sold by Amazon.com. Clay Tablet uses various AWS offerings in order to leverage their infrastructure and build rich, dynamic solutions for its customers, specifically, the Clay Tablet Platform. For details, see http://aws.amazon.com. |
| Amazon S3 | Amazon Simple Storage Service. For details, see: http://aws.amazon.com/s3/. The Connector and the Clay Tablet Platform use Amazon S3 to provide temporary storage services for the content sent to and from translation. |
| Amazon SQS | Amazon Simple Queue Service. For details, see: http://aws.amazon.com/sqs/. The Connector uses Amazon SQS to provide Message Queue Services. |
| Asset | Any content or document being sent for translation, including metadata. Assets are created by the Connector. |
| Clay Tablet (CTT) | Clay Tablet Technologies, a Lionbridge company, and the corporate entity that publishes the Connector and the Clay Tablet Platform. |
| Clay Tablet Platform | The hosted (IaaS) connectivity platform that receives and routes content from content systems, including content management systems (CMSs), to translation providers and back during implementation. The Lionbridge Connector Team configures the Platform based on the number and nature of systems involved in your system architecture. |
| Episerver | The Episerver CMS (Content Management System). For more information, see: http://www.episerver.com/ |
| Freeway | The name of the Lionbridge translation portal for submitting content to and retrieving content from the Lionbridge translation provider. |
| FTP Server | File Transfer Protocol (FTP) is a standard network protocol used to transfer files from one host to another host over a TCP-based network, such as the Internet. Translation providers may receive and send files for translation using an FTP server. |
| IaaS | Infrastructure as a Service. The Clay Tablet Platform is an IaaS, because it is a hosted platform. |
| Keys | The Connector uses keys to establish a secure, discrete connection between the Connector instance and the Platform. Very important: Do not copy the CMS address keys to multiple instances, because this is a violation of the License Agreement. Using the same CMS address keys on multiple instances will cause the Lionbridge App or Connector to behave unexpectedly, which can result in lost translation content, orphaned projects, and inaccurate translation status reports. The Lionbridge Connector team will support technical issues caused by duplicating or incorrectly installing CMS address keys only on a time and materials basis. |
| Lionbridge | The publisher of the connector, the Freeway translation portal and a translation provider. Users connect to the Freeway translation portal to submit content to and retrieve content from the Lionbridge translation provider. |
| Lionbridge Connector for Episerver(Connector) | The connector software that Lionbridge provides, which plugs into your Episerver installation to provide connectivity to the hosted Platform. In this document it is referred to as the Connector. This is the software you are installing and configuring as you work through this document. |
| MT | Machine translation. The translation provider can be a machine translation service, such as Google Translate. |
| NuGet | Open source package manager for the Microsoft development platform. For more information, see: http://www.nuget.org/ |
| Producer | CMS or another content system that sends content or documents out for translation. In this case, this is Episerver. |
| Provider | A provider of translation services. The delivery of assets to the provider may be via an FTP server or a TMS connector. |
| Scheduled Job | Episerver functionality to run scheduled jobs. These can be run repeatedly with a specified interval or started manually. |
| Support Asset | Supporting documents and their metadata. Support assets are not translated by the translation provider, but they provide helpful context for the translator. |
| TMS | Translation management system that the translation provider uses. |
1.1.2 - About the Clay Tablet Translation Platform
The Clay Tablet translation-connectivity platform is the easiest, most flexible way to integrate content systems, including content management systems (CMSs) and other content producers, with translation providers and translation technologies.
Clay Tablet Platform is the hosted (IaaS) connectivity platform that receives and routes content from content management systems to translation providers and back, including to Lionbridge via Freeway. It is hosted on Amazon Web Services (AWS). During implementation, the Lionbridge Connector Team configures the Platform for your translation solution, based on the translation providers or systems you use. The Clay Tablet Platform uses the following services on AWS:
-
S3 (Amazon Simple Storage Service), which provides storage services for the content sent to and from translation.
-
SQS (Amazon Simple Queue Service), which provides message queue services.
1.1.3 - How the Connector Works with Episerver
The Lionbridge Connector (Connector) is an important part of the Clay Tablet translation solution.
The Connector is installed on your system as an add-in to Episerver, through a NuGet installation package. Its functionality is displayed to the users as part of Episerver.

Your translation systems architecture might look like the configuration above. It may have additional content systems or translation providers, but the core concepts remain the same.
During implementation, the Lionbridge Connectors team works with you and your translation providers to configure and test the other elements of your translation solution, which are the Clay Tablet Platform’s connections to your translation providers' systems.
1.1.4 - Using this Guide
Purpose of this guide
This guide describes everything you need to know to install and configure the Lionbridge Connector (Connector) for Episerver. It describes the delivery package contents, system requirements, installation instructions, and configuration procedures.
Recommendation: Review the user guide to fully understand the powerful features of the Connector.
Who should use this guide
This guide is intended for Episerver administrators and system integrators.
What you should already know
This document assumes that your company already has an installed instance of Episerver. It also assumes that Lionbridge is your company’s translation provider, and the Clay Tablet Platform is already set up for your company. It assumes that you have a strong working knowledge of Episerver.
How to find out more about the Lionbridge Connector for Episerver
For information on using the Lionbridge Connector to send and receive content for translation from Episerver, read the Lionbridge Connector for Episerver User Guide.
Documentation conventions
This guide uses the following conventions:
| Convention | Description |
|---|---|
| Bold** | Highlights screen elements such as buttons, menu items, and fields. |
| Courier | Highlights input, file names, and paths. |
| Italics | Highlights terms for emphasis, variables, or document titles. |
| > | Indicates a menu choice. For example, “Select Edit> Select All.” |
1.1.5 - How to Contact Lionbridge Connector Support
How to Contact Lionbridge Connector Support
You can submit a support ticket either:
- by emailing connectors@lionbridge.com
- from the Lionbridge Connector Zendesk page https://lionbridge-connectors.zendesk.com/
See also:
1.2 - Before You Install
Before you begin to install the Lionbridge Connector (Connector) for Episerver, please review the system requirements, described in System Requirements, and perform the following pre-installation procedures:
- Back up your Episerver database.
- If you received the Connector as a NuGet package (with file extension .nupkg) directly from Lionbridge, ensure that it is saved to a location that is accessible during the installation process. Alternatively, you can download the package directly from the Episerver NuGet feed, using the NuGet Package Manager Console. For details, see Installing the Lionbridge Connector.
1.2.1 - System Requirements
The Lionbridge Connector for Episerver supports Episerver versions 10 and 11.
The Lionbridge Connector for Episerver has no additional hardware or software requirements beyond those of Episerver. For detailed requirements, refer to the Episerver documentation, available at: http://world.episerver.com/documentation.
1.2.2 - Setting Your System Date, Time, and Time Zone Correctly
The Connector sends content to and receives content from the Clay Tablet Platform, which is hosted in the Amazon Web Services (AWS) environment. AWS requires any machines that connect to its applications to have the correct system time and date settings.
Important: Before proceeding, ensure that the system date, time, and time zone are set correctly on any systems that will run the Connector. If these settings are incorrect, the following error message is displayed: Error. The difference between the request time and the current time is too large.
1.2.3 - Configuring Network Settings for a Firewall
Optional step. If you have a firewall, you must configure your ports so that the Connector can communicate with the Clay Tablet Platform. The Connector must be able to communicate with the Clay Tablet Platform by initiating the following outbound network connections:
| Protocol | Port Number | Description | Location to Configure |
|---|---|---|---|
| HTTPS | Port 443 | For secure access to Amazon’s AWS S3 service | .s3.amazonaws.com/ |
| HTTPS | Port 443 | For secure access to Amazon’s AWS SQS service | https://queue.amazonaws.com/* |
| HTTPS | Port 443 | For secure access to Amazon’s AWS SQS service | https://sqs.us-east-1.amazonaws.com/* |
To send content for translation to Lionbridge Freeway, also configure:
| Protocol | Port Number | Description | Location to Configure |
|---|---|---|---|
| HTTPS | Port 443 | For secure access to Lionbridge Freeway | https://fwapi.lionbridge.com/obvibundles/ freewayauth.asmx |
| HTTPS | Port 443 | For secure access to Lionbridge Freeway | https://fwapi.lionbridge.com/obvibundles/ service.asmx |
1.3 - Installing the Connector
Important: Before installing the Connector, back up the Episerver databases.
You use Visual Studio NuGet to install the Connector package. There are two ways to install the Connector, depending on whether you received the installation package directly from Lionbridge or you will download it from the Episerver NuGet feed.
Episerver version numbers in Lionbridge Connector packages
Important: There are different Connector packages for Episerver 10 and Episerver 11. Ensure that you download and install the correct package for your version of Episerver.
You can identify the Episerver version for the Lionbridge Connector from the last four digits of the NuGet package name, as described in the following table below.
| Episerver Version | Lionbridge Connector Versioning (MajorVersion.MinorVersion.Patch.Episerver Version) |
Example |
|---|---|---|
| Episerver 10 | 1.x.x.1000 | 1.5.0.1000 |
| Episerver 11 | 1.x.x.1100 | 1.5.0.1100 |
To download and install the Connector:
Important: Follow these instructions if you did not receive the Connector as a NuGet package (with file extension .nupkg) directly from Lionbridge.
- In Visual Studio, open the NuGet Package Manager Console.
- Do one of the following:
- In the left pane, select Online > Episerver. Then select the LionbridgeConnector package, and click Install.
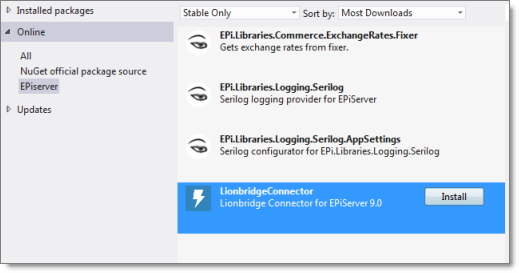
- In the command line, type: Install-Package LionbridgeConnector.
To install the Connector:
Important: Follow these instructions if you received the Connector as a NuGet package (with file extension .nupkg) directly from Lionbridge.
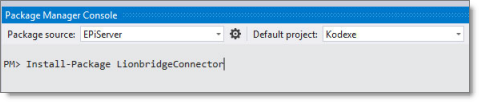
- In Visual Studio, open the NuGet Package Manager Console.
- Type the following command in the command line, ensuring that you specify the latest Connector version for your CMS version:
Install-Package LionbridgeConnector -source [.nupkg file path] -version.x.x.1100
For example, to install version 1.5.0 of the Connector on CMS version 11, type:
Install-Package LionbridgeConnector -source C:\LionbridgeConnector -version 1.5.0.1100
Installation location
The Connector is installed in the \modules\_protected folder of the Episerver web root. If you use another folder for add-ons, you must manually move the Connector files to your modules folder.
1.3.1 - Updating Your Connector Installation
If the Lionbridge Connector (Connector) is already installed, follow the steps below to update your version of the Connector. The method and commands for updating your Connector depend on:
- your current Connector version
- your Episerver version
- whether you are updating your Episerver version
- whether you are using the Nuget site or the Nuget package to perform the updates
Refer to the tables below, and use the appropriate procedure for your particular scenario.
Using the Nuget site:
- In Visual Studio, open the NuGet Package Manager Console.
- In the command line, type: Update-Package LionbridgeConnector -version MajorVersion.MinorVersion.Patch.EpiserverVersion.
For example, type: Update-Package LionbridgeConnector -version 1.5.0.1100
For detailed instructions, refer to the table below. Always use the latest available version of the Connector.
Using the NuGet package (with file extension .nupkg) directly from Lionbridge:
- In Visual Studio, open the NuGet Package Manager Console.
- In the command line, type: Update-Package LionbridgeConnector -source. [.nupkg file path] -version MajorVersion.Minor Version.Patch.EpiserverVersion.
For example, type: Update-Package LionbridgeConnector -source. [c:\LionbridgeConnector] -version 1.5.0.1100
For detailed information about version numbers, refer to the following table. Always use the latest version.
Episerver version numbers in Lionbridge Connector packages
You can identify the Episerver version for the Lionbridge Connector from the last four digits of the NuGet package name, as described in the following table below.
| Episerver Version | Lionbridge Connector Versioning (MajorVersion.MinorVersion.Patch.Episerver Version) |
Example |
|---|---|---|
| Episerver 10 | 1.x.x.1000 | 1.5.0.1000 |
| Episerver 11 | 1.x.x.1100 | 1.5.0.1100 |
When updating the Connector from Episerver 9
| Episerver 9 Scenarios | From | To | Instructions |
|---|---|---|---|
| Updating CMS and Connector from Episerver 9 to Episerver 10 | 1.2.4.0900 | 1.5.0.1000 or higher | 1. Update Episerver CMS to version 10. 2. Update to the latest version of the Connector supporting Episerver 10. 3. Specify the exact name of the latest version of the Connector, for example: * NuGet Site Package: PM> Update-Package LionbridgeConnector -version 1.5.0.1000 * NuGet file Package: PM> Update-Package LionbridgeConnector -source C:\…\ - version 1.5.0.1000 1. Run a .sql script that you obtain from the Lionbridge Connector Team. |
| Updating CMS and Connector from Episerver 9 to Episerver 11 | 1.2.4.0900 | 1.5.0.1100 or higher | 1. Update Episerver CMS to version 11. 2. Update to the latest version of the Connector supporting Episerver 11. 3. Specify the exact name of the latest version of the Connector, for example: * NuGet Site Package: PM> Update-Package LionbridgeConnector -version 1.5.0.1100 * NuGet file Package: PM> Update-Package LionbridgeConnector -source C:\…\ - version 1.5.0.1100 1. Run a .sql script that you obtain from the Lionbridge Connector Team. |
When updating the Connector from Episerver 10
| Episerver 10 Scenarios | From | To | Instructions |
|---|---|---|---|
| Updating Connector on Episerver 10 | 1.3.x.1000 | 1.5.0.1000 or higher | 1. Update to the latest version of the Connector supporting Episerver 10. 2. Specify the exact name of the latest version of the Connector, for example: * NuGet Site Package: PM> Update-Package LionbridgeConnector -version 1.5.0.1000 * NuGet file Package: PM> Update-Package LionbridgeConnector -source C:\…\ - version 1.5.0.1000 1. Run a .sql script that you obtain from the Lionbridge Connector Team. |
| Updating Connector on Episerver 10 | 1.3.9.1000 | 1.5.0.1000 or higher | 1. Update to the latest version of the Connector supporting Episerver 10. 2. Specify the exact name of the latest version of the Connector, for example: * NuGet Site Package: PM> Update-Package LionbridgeConnector -version 1.5.0.1000 * NuGet file Package: PM> Update-Package LionbridgeConnector -source C:\…\ - version 1.5.0.1000 |
| Updating CMS and Connector from Episerver 10 to Episerver 11 | 1.3.x.1000 | 1.5.0.1100 or higher | 1. Update the Episerver CMS packages to version 11. 2. Update to the latest version of the Connector supporting Episerver 11. 3. Specify the exact name of the latest version of the Connector, for example: * NuGet Site Package: PM> Update-Package LionbridgeConnector -version 1.5.0.1100 * NuGet file Package: PM> Update-Package LionbridgeConnector -source C:\…\ - version 1.5.0.1100 1. Run a .sql script that you obtain from the Lionbridge Connector Team. |
| Updating CMS and Connector from Episerver 10 to Episerver 11 | 1.3.9.1000 or higher | 1.5.0.1100 or higher | 1. Update the Episerver CMS packages to version 11. 2. Update to the latest version of the Connector supporting Episerver 11. 3. Specify the exact name of the latest version of the Connector, for example: * NuGet Site Package: PM> Update-Package LionbridgeConnector -version 1.5.0.1100 * NuGet file Package: PM> Update-Package LionbridgeConnector -source C:\…\ - version 1.5.0.1100 |
When updating the Connector from Episerver 11
| Episerver 11 Scenarios | From | To | Instructions |
|---|---|---|---|
| Updating Connector on Episerver 11 | 1.4.2.1100 | 1.5.0.1100 or higher | 1. Update the Connector. 2. Specify the exact name of the latest version of the Connector, for example: * NuGet Site Package: PM> Update-Package LionbridgeConnector -version 1.5.0.1100 * NuGet file Package: PM> Update-Package LionbridgeConnector -source C:\…\ - version 1.5.0.1100 |
1.3.2 - Uninstalling the Connector
Before uninstalling the Connector, ensure that the site is stopped in Visual Studio.
To uninstall the Connector:
- In Visual Studio, open the NuGet Package Manager Console.
- In the command line, type:
Remove-LionbridgeConnector.
1.4 - Configuring the Connector
After installing the Connector, you configure the following settings:
- Adding the Lionbridge Connector Gadget.
- Activating the Scheduled Job and Setting the Run Interval.
- Activating the Translation Heartbeat Job. Optional.
- Activating Background Jobs.
- Configuring Target XML and Source XML.
- Configuring Language Mapping and Asset Packaging.
- Configuring Lionbridge Freeway Settings.
- Logging settings. See either:
- Optional. Configuring Multiple Users and Translation Workflows.
Important: While testing your installation, back up the Episerver database before sending out a project for translation. After confirming that your installation is stable, back up the database daily.
1.4.1 - Adding the Lionbridge Connector Gadget
- In Episerver CMS, click Edit.
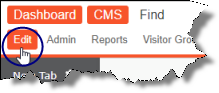
- Click the Toggle assets pane icon.
![]()
The Assets pane is displayed on the right.
- In the Assets pane, click the Settings icon
 , and then select Add Gadgets from the context menu.
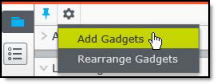
The Gadgets window opens.
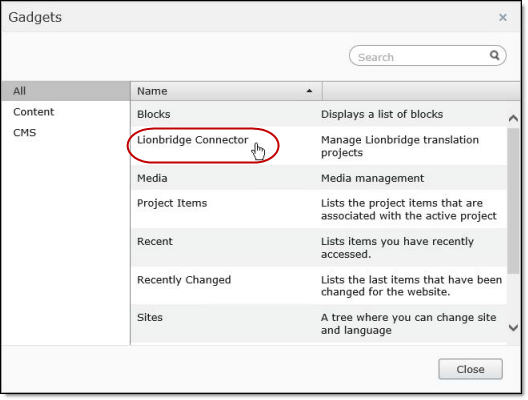
- Click Lionbridge Connector.
1.4.2 - Activating the Scheduled Job and Setting the Run Interval
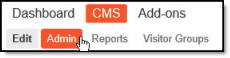
- In Episerver CMS, click Admin.
- In the left pane, in the Scheduled Jobs section, click Translation projects updater.
![]()
The Translation projects updater page opens, displaying the Connector scheduled job.
![]()
-
Select the Active check box to activate the job.
-
Specify the Scheduled job interval.
-
Click Save.
1.4.3 - Activating the Translation Heartbeat Job
You can send a heartbeat message to the Clay Tablet Platform. This enables it to monitor the health of the Connector. To send this heartbeat message you activate and configure the Translation heartbeat job.
To activate the Translation heartbeat job:
- In Episerver CMS, click Admin.
- In the left pane, in the Scheduled Jobs section, click Translation heartbeat job.
![]()
The Translation heartbeat job page opens.
![]()
-
Select the Active check box to activate the job.
-
Specify the Scheduled job interval.
-
Click Save.
Tip: To view a list of heartbeat messages sent to the Clay Tablet Platform, including dates, times, and status, click the History tab.
1.4.4 - Activating Background Jobs
- In Episerver CMS, click Admin.
- In the left pane, in the Scheduled Jobs section, click Translation background jobs.
![]()
The Translation background jobs page opens.
![]()
-
Select the Active check box.
-
Specify the Scheduled job interval, for example, 30 minutes.
-
Click Save.
1.4.5 - Configuring Target XML and Source XML
Before you can use the Connector, you must configure source.xml and target.xml. These are available with your Lionbridge license. Ensure that you have this information before proceeding.
- The Connector uses the CMS address key, which is in source.xml, to move the files your company exports from Episerver to the Clay Tablet Platform. The Platform then forwards your exported files to your translation provider. If you have multiple Episerver installations, there must be one key (file) for each environment. Very important: Do not copy the CMS address keys to multiple instances, because this is a violation of the License Agreement. Using the same CMS address keys on multiple instances will cause the Lionbridge App or Connector to behave unexpectedly, which can result in lost translation content, orphaned projects, and inaccurate translation status reports. The Lionbridge Connector team will support technical issues caused by duplicating or incorrectly installing CMS address keys only on a time and materials basis.
Note: The Connector always initiates calls to the Clay Tablet Platform. However, the CMS address keys enable establishing a secure, discrete connection between the Connector instance and the Platform. They also support the return of files from translation.
- Your company’s platform key is in target.xml. This is your company’s license for the Clay Tablet Platform.
To configure source.xml and target.xml:
- In the bottom-right corner of the Lionbridge Connector gadget in the right pane, click the Settings icon , and then select Settings from the context menu.

- In the Workspace settings tab, edit the Target XML and Source XML fields.
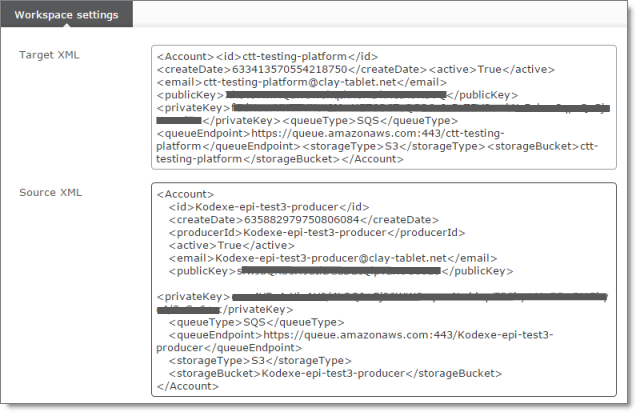
Episerver automatically saves your changes.
1.4.6 - Configuring Language Mapping and Asset Packaging
In the Workspace settings tab:
- You map Episerver languages to Clay Tablet languages in the language mapping.xml file.
- You configure how the Connector packages multiple assets in a translation project.
To configure language mappings and grouped-asset handling:
- In the bottom-right corner of the Lionbridge Connector gadget in the right pane, click the Settings icon , and then select Settings from the context menu.
- In the Workspace settings tab, edit the Language Mapping XML field to map each Episerver language code to the corresponding Clay Tablet language code. For a list and description of Clay Tablet language codes, see Appendix: Language Codes.
For example:
<Languages>
<Language>
<EPiServer>sv</EPiServer>
<ClayTablet>sv-SE</ClayTablet>
</Language>
<Language>
<EPiServer>da</EPiServer>
<ClayTablet>da-DK</ClayTablet>
</Language>
</Languages>
Note: If you leave this section empty, the Connector will use the default values.
- In the Workspace settings tab, you can configure how the Connector packages multiple assets in a translation project.
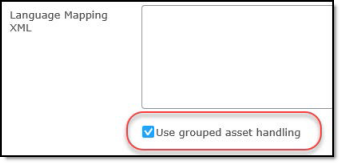
- If you select the Use grouped asset handling check box, then the Connector packages all pages and blocks selected for translation into a single XML file for each target language.
Recommendation: Select this check box, especially if Lionbridge Freeway will translate terms for SEO.
- If you clear the Use grouped asset handling check box, then the Connector sends each page and block selected for translation as a separate XML file.
Episerver automatically saves your changes.
1.4.7 - Configuring Lionbridge Freeway Settings
In the Other settings tab, you can configure Lionbridge Freeway-specific settings.
To configure settings for integration with Lionbridge Freeway:
- In the bottom-right corner of the Lionbridge Connector gadget in the right pane, click the Settings icon , and then select Settings](#) from the context menu.
- Click the Other settings](#) tab.
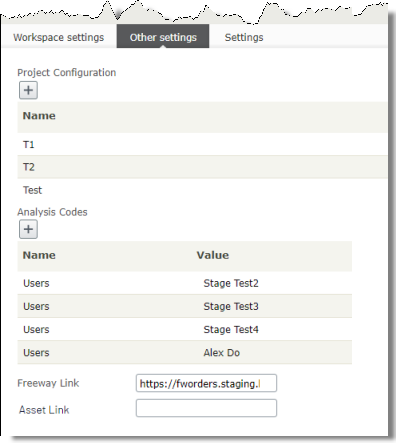
- You can configure the following settings:
| Setting | Description |
|---|---|
| Project Configuration | The name of a workflow configuration. There may be multiple workflow configurations for your translation provider (Lionbridge Freeway) that are set up by the Lionbridge Connector Team. For example, there may be one workflow for human translation and another configuration for machine translation. * Click the After setup by the Lionbridge Connector Team, this configuration will be available for selection in the **Project Configuration** dropdown list, which is displayed when creating or editing a translation project. |
| Analysis Codes | The name of a Lionbridge Freeway analysis code. * Click the These analysis codes will be available for selection in the **Analysis Codes** section that is displayed when creating or editing a translation project. **Important:** You must contact your Lionbridge project manager to ensure that these analysis codes are in Freeway. |
| Freeway Link | The link to the Lionbridge Freeway bundle ID. This will be provided by the Lionbridge Connector Team. There will be different links for staging and production environments. |
| Asset Link | Optional. You can customize the links displayed in the Link column in the Lionbridge Connector Dashboard to display a non-default domain. Enter the non-default domain, for example: http://example.com. Recommendation: Configure this if in the Admin tab, on the Manage Websites page, the URL configured for the public website (front-end URL) is different than the domain of the environment (back-end URL). This may cause the Dashboard to display errors when loading, or prevent links from being displayed. |
Episerver automatically saves your changes.
1.4.8 - Configuring Logging when the Connector is Installed Locally
Note: If the Connector is installed in a DXC cloud environment, see Configuring Logging in DXC Environments.
In an environment where the Connector is installed locally, you can activate full verbose logging for it. This is useful for identifying errors.
To configure logging:
- Append the following to EPiServerLog.config:
<appender name=“lionbridgeFileLogAppender” type=“log4net.Appender.RollingFileAppender” >
<!-- Consider moving the log files to a location outside the web application –>
<file value=“App_Data\LionbridgeErrors.log” />
<encoding value=“utf-8” />
<staticLogFileName value=“true”/>
<datePattern value=".yyyyMMdd.‘log’" />
<rollingStyle value=“Date” />
<threshold value=“Verbose” />
<lockingModel type=“log4net.Appender.FileAppender+MinimalLock” />
<appendToFile value=“true” />
<layout type=“log4net.Layout.PatternLayout”>
<conversionPattern value="%date [%thread] %level %logger: %message%n" />
</layout>
</appender>
- Add the following logger:
</logger>
<logger name=“Lionbridge” additivity=“false”>
<level value=“Verbose” />
<appender-ref ref=“lionbridgeFileLogAppender” />
</logger>
The generated log file is: \App_Data\LionbridgeErrors.log.
1.4.9 - Configuring Logging in DXC Environments
Note: If the Connector is installed locally, see Configuring Logging when the Connector is Installed Locally.
If the Connector is installed in a DXC cloud environment, you must make some changes to access your Connector log files.
To access Connector log files in a DXC environment:
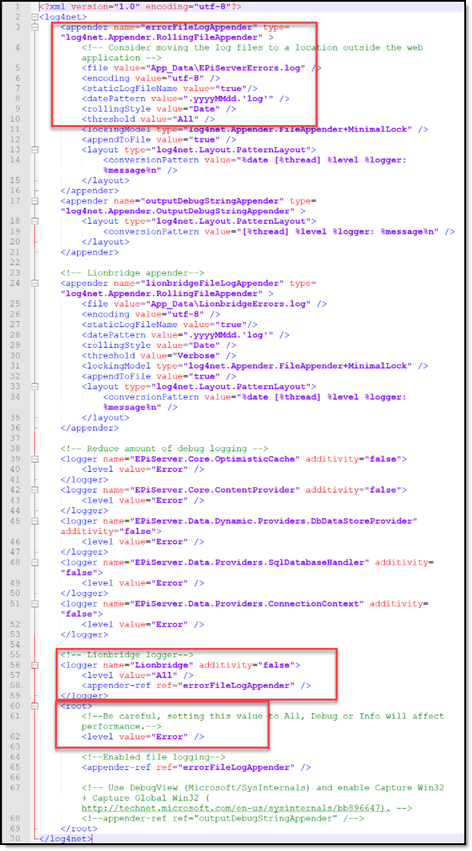
- Open
EPiServerLog.configfor editing.
Under the <appender name=“errorFileLogAppender” section, change the threshold value to “All”.
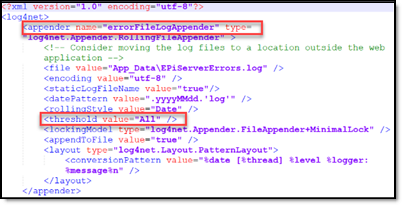
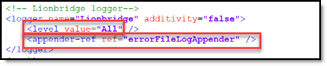
- Under the <!-- Lionbridge logger–> section:
-
Change level value to “All”.
-
Change appender-ref ref to “errorFileLogAppender”.
- Under the<root>section, change level value to “Error”.

This will retrieve all the Connector log messages, while retrieving only error-level log messages for Episerver. If you require a different level of Episerver log messages, then revert your changes after producing the Connector log files required for troubleshooting.
Tip: To obtain an
EPiServerLog.configfile with these changes already implemented, contact Lionbridge Connector Support.
View this sample modified file
1.4.10 - Configuring Multiple Users and Translation Workflows
The Connector supports multiple users. This enables configuring the Connector so that the creator of a translation project determines which Lionbridge Freeway account is assigned to that project. This requires setup in Freeway as well. To enable this configuration, contact the Lionbridge Connector Team and your Lionbridge project manager.
1.5 - Troubleshooting
| Problem | Explanation/Solution |
|---|---|
| Translation projects are stuck at 0% after sending them for translation. | Ensure that the scheduled job has been activated. For detailed instructions, see Activating the Scheduled Job and Setting the Run Interval. |
| The Connector does not send out custom properties for translation. | The Connector supports sending for translation only custom properties that inherit from the ProperyLongString and PropertyString classes. |
| Lionbridge Freeway analysis codes are specified, but they are not displayed or available for selection when sending out projects for translation. | The URLs where Lionbridge Freeway provides the authentication service and the analysis code service are not correctly configured. If you have a firewall, you must configure your ports so that the Connector can communicate with these services. If you have a firewall, you must configure your ports so that the Connector can communicate with these URLs. For detailed instructions, see Configuring Network Settings for a Firewall. |
1.6 - Appendix Language Codes
For detailed instructions on mapping Episerver language codes to Clay Tablet language codes for every language your company uses for translation, see Configuring Language Mapping and Asset Packaging.
The Connector has the following language codes:
| Type | Language Identifier | Language Code |
|---|---|---|
| String | Afrikaans | “af-ZA” |
| String | Albanian | “sq-AL” |
| String | Amharic | “am-ET” |
| String | Arabic_Algeria | “ar-DZ” |
| String | Arabic_Bahrain | “ar-BH” |
| String | Arabic_Egypt | “ar-EG” |
| String | Arabic_Iraq | “ar-IQ” |
| String | Arabic_Jordan | “ar-JO” |
| String | Arabic_Kuwait | “ar-KW” |
| String | Arabic_Lebanon | “ar-LB” |
| String | Arabic_Libya | “ar-LY” |
| String | Arabic_MiddleEast | “ar-XR” |
| String | Arabic_Morocco | “ar-MA” |
| String | Arabic_Oman | “ar-OM” |
| String | Arabic_Qatar | “ar-QA” |
| String | Arabic_Saudi_Arabia | “ar-SA” |
| String | Arabic_Syria | “ar-SY” |
| String | Arabic_Tunisia | “ar-TM” |
| String | Arabic_UAE | “ar-AE” |
| String | Arabic_Yemen | “ar-YE” |
| String | Armenian | “hy-AM” |
| String | Assamese | “as-IN” |
| String | Basque | “eu-ES” |
| String | Belarusian | “be-BY” |
| String | Bengali_Bangladesh | “bn-BD” |
| String | Bengali_India | “bn-IN” |
| String | Bosnian_Bosnia_Herzegovina | “bs-BA” |
| String | Bulgarian | “bg-BG” |
| String | Burmese | “my-MM” |
| String | Catalan | “ca-ES” |
| String | Chinese_Hong_Kong | “zh-HK” |
| String | Chinese_Macao | “zh-MO” |
| String | Chinese_PRC | “zh-CN” |
| String | Chinese_Singapore | “zh-SG” |
| String | Chinese_Taiwan | “zh-TW” |
| String | Croatian | “hr-HR” |
| String | Croatian_Bosnia_Herzegovina | “hr-BA” |
| String | Czech | “cs-CZ” |
| String | Danish | “da-DK” |
| String | Divehi | “dv-MV” |
| String | Dutch | “nl-NL” |
| String | Dutch_Belgium | “nl-BE” |
| String | English_Australia | “en-AU” |
| String | English_Belize | “en-BZ” |
| String | English_Canada | “en-CA” |
| String | English_HongKong | “en-HK” |
| String | English_India | “en-IN” |
| String | English_Indonesia | “en-ID” |
| String | English_Ireland | “en-IE” |
| String | English_Jamaica | “en-JM” |
| String | English_Malaysia | “en-MY” |
| String | English_New_Zealand | “en-NZ” |
| String | English_Philippines | “en-PH” |
| String | English_Singapore | “en-SG” |
| String | English_South_Africa | “en-ZA” |
| String | English_Trinidad | “en-TT” |
| String | English_UK | “en-GB” |
| String | English_US | “en-US” |
| String | English_Zimbabwe | “en-ZW” |
| String | Estonian | “et-EE” |
| String | Faroese | “fo-FO” |
| String | Farsi | “fa-IR” |
| String | Filipino | “fil-PH” |
| String | Finnish | “fi-FI” |
| String | French | “fr-FR” |
| String | French_Belgium | “fr-BE” |
| String | French_Cameroon | “fr-CM” |
| String | French_Canada | “fr-CA” |
| String | French_Cote_d_Ivoire | “fr-CI” |
| String | French_Democratic_Rep_Congo | “fr-CD” |
| String | French_Haiti | “fr-HT” |
| String | French_Luxembourg | “fr-LU” |
| String | French_Mali | “fr-ML” |
| String | French_Monaco | “fr-MC” |
| String | French_Morocco | “fr-MA” |
| String | French_Reunion | “fr-RE” |
| String | French_Senegal | “fr-SN” |
| String | French_Switzerland | “fr-CH” |
| String | Frisian_Netherlands | “fy-NK” |
| String | Fulfulde_Nigeria | “ff-NG” |
| String | FYRO_Macedonian | “mk-MK” |
| String | Gaelic_Ireland | “gd-IE” |
| String | Gaelic_Scotland | “gd-GB” |
| String | Gallegan | “gl-ES” |
| String | Georgian | “ka-GE” |
| String | German | “de-DE” |
| String | German_Austria | “de-AT” |
| String | German_Liechtenstein | “de-LI” |
| String | German_Luxembourg | “de-LU” |
| String | German_Switzerland | “de-CH” |
| String | Greek | “el-GR” |
| String | Guarani | “gn-PY” |
| String | Gujarati | “gu-IN” |
| String | Hausa | “ha-NE” |
| String | Hawaiian | “haw-US” |
| String | Hebrew | “he-IL” |
| String | Hindi | “hi-IN” |
| String | Hungarian | “hu-HU” |
| String | Icelandic | “is-IS” |
| String | Igbo | “ig-NG” |
| String | Indonesian | “id-ID” |
| String | Inuktitut | “iu-CA” |
| String | Italian | “it-IT” |
| String | Italian_Switzerland | “it-CH” |
| String | Japanese | “ja-JP” |
| String | Kannada | “kn-IN” |
| String | Kanuri | “kr-TD” |
| String | Kashmiri | “ks-IN” |
| String | Kazakh | “kk-KZ” |
| String | Khmer | “km-KH” |
| String | Konkani | “kok-IN” |
| String | Korean | “ko-KR” |
| String | Kyrgyz | “ky-KZ” |
| String | Lao | “lo-LA” |
| String | Latin | “la-XL” |
| String | Latvian | “lv-LV” |
| String | Lithuanian | “lt-LT” |
| String | Malay | “ms-MY” |
| String | Malay_Brunei_Darussalam | “ms-BN” |
| String | Malayalam | “ml-IN” |
| String | Maltese | “mt-MT” |
| String | Maori | “mi-NZ” |
| String | Marathi | “mr-IN” |
| String | Mongolian | “mn-MN” |
| String | Nepali | “ne-NP” |
| String | Nepali_India | “ne-IN” |
| String | Norwegian | “nb-NO” |
| String | Norwegian_Nynorsk | “nn-NO” |
| String | Oriya | “or-IN” |
| String | Oromo | “om-ET” |
| String | Panjabi | “pa-PK” |
| String | Polish | “pl-PL” |
| String | Portuguese | “pt-PT” |
| String | Portuguese_Brazil | “pt-BR” |
| String | Punjabi_Pakistan | “pa-PK” |
| String | Pushto | “ps-AF” |
| String | Quechua_Ecuador | “qu-EC” |
| String | Quechua_Peru | “qu-PE” |
| String | Rhaeto_Romance | “rm-IT” |
| String | Romanian | “ro-RO” |
| String | Romanian_Moldova | “ro-MD” |
| String | Russian | “ru-RU” |
| String | Russian_Moldava | “ru-MD” |
| String | Sami | “se-NO” |
| String | Sanskrit | “sa-IN” |
| String | Serbian_Cyrillic | “sr-RS” |
| String | Serbian_Latin | “sr-SP” |
| String | Sindhi_India | “sd-IN” |
| String | Sindhi_Pakistan | “sd-PK” |
| String | Sinhala | “si-LK” |
| String | Slovak | “sk-SK” |
| String | Slovenian | “sl-SI” |
| String | Somali | “so-ET” |
| String | Sorbian | “wen-DE” |
| String | Spanish | “es-ES” |
| String | Spanish_Argentina | “es-AR” |
| String | Spanish_Bolivia | “es-BO” |
| String | Spanish_Chile | “es-CL” |
| String | Spanish_Colombia | “es-CO” |
| String | Spanish_Costa_Rica | “es-CR” |
| String | Spanish_Dominican_Republic | “es-DO” |
| String | Spanish_Ecuador | “es-EC” |
| String | Spanish_El_Salvador | “es-SV” |
| String | Spanish_Honduras | “es-HN” |
| String | Spanish_LatinAmerica | “es-XL” |
| String | Spanish_Mexico | “es-MX” |
| String | Spanish_Nicaragua | “es-NI” |
| String | Spanish_Panama | “es-PA” |
| String | Spanish_Paraguay | “es-PY” |
| String | Spanish_Peru | “es-PE” |
| String | Spanish_Puerto_Rico | “es-PR” |
| String | Spanish_Uruguay | “es-UY” |
| String | Spanish_US | “es-US” |
| String | Spanish_Venezuela | “es-VE” |
| String | Swahili | “sw-TZ” |
| String | Swedish | “sv-SE” |
| String | Swedish_Finland | “sv-FI” |
| String | Syriac | “syr-SY” |
| String | Tajik | “tg-TJ” |
| String | Tamil | “ta-IN” |
| String | Tatar | “tt-RU” |
| String | Telugu | “te-IN” |
| String | Thai | “th-TH” |
| String | Tibetan | “bo-CN” |
| String | Tigrinya_Eritrea | “ti-ER” |
| String | Tigrinya_Ethiopia | “ti-ET” |
| String | Tsonga | “ts-ZA” |
| String | Tswana | “tn-BW” |
| String | Turkish | “tr-TR” |
| String | Turkmen | “tk-TM” |
| String | Uighur | “ug-CN” |
| String | Ukrainian | “uk-UA” |
| String | Urdu | “ur-PK” |
| String | Urdu_India | “ur-IN” |
| String | Uzbek | “uz-UZ” |
| String | Venda | “ve-ZA” |
| String | Vietnamese | “vi-VN” |
| String | Welsh | “cy-GB” |
| String | Xhosa | “xh-ZA” |
| String | Yi | “ii-CN” |
| String | Yiddish | “yi-MD” |
| String | Yoruba | “yo-NG” |
| String | Zulu | “zu-ZA” |
2 - User Guide
2.1 - Welcome to the Lionbridge Connector for Episerver
Welcome to the Lionbridge Connector for Episerver (Connector) version 1.5.1. The Connector enables you to automate sending and retrieving assets from Episerver, which dramatically reduces the effort required to create, maintain, and publish Web content in multiple languages.
2.1.1 - The Translation Lifecycle
The translation lifecycle is the broad process of selecting content, sending it out for translation, and then receiving the translated content back from translation.
This set of steps usually fits inside a larger, more general process called the content lifecycle, which is the process of creating, reviewing, editing, approving, and publishing content.
When you consider the translation lifecycle and the content lifecycle together, you have the global content value chain, which is the strategy for managing multilingual content.
Remember that localizing content is a subset of steps in the broader content lifecycle. This will improve your focus on key localization considerations, improve processes, and keep all content stakeholders included. Together, this results in better content management.
2.1.2 - How the Connector Helps You Manage Your Translation Lifecycle
The Lionbridge Connector for Episerver (Connector) is a plug-in module for Episerver. It provides a range of features and user interface enhancements in Episerver that enable you to select, send, monitor, and retrieve assets for translation into any language Episerver supports.
These features automate the process, which dramatically reduces the effort and time required to export and re-import assets that need to be localized. This is very helpful when translating many assets or ensuring that translated assets are quickly re-imported to meet deadlines.
When you use the Connector, you manage your translation lifecycle entirely from within Episerver:
- The Connector exports your assets from Episerver in XML format and delivers these content files to the central, hosted Clay Tablet Platform.
- The Clay Tablet Platform delivers your content files to your translation providers, based on routing rules that your company chooses and the Lionbridge Connector Team implements.
- When the translated content is ready, the Clay Tablet Platform retrieves it from your translators and delivers it to the Connector.
- The Connector automatically imports the translated assets into the correct location in Episerver.
You can then review, revise, reject, or publish the translated assets as needed.
Note: Neither the Connector nor the Clay Tablet Platform performs any translation. Similarly, the Lionbridge Connector Team does not provide any translation services. Your company chooses the translation provider that performs the translation.
2.1.3 - Using this Guide
Purpose of this guide
This guide describes how to use the Lionbridge Connector (Connector) for Episerver to manage your translation lifecycle. It describes how to send out assets from Episerver for translation and receive them back from translation.
Who should use this guide
This guide is intended for content editors, project, marketing, localization or translation managers, or others who are responsible for creating, editing, or approving assets for translation that reside in your Episerver instance. This guide is also useful for translation providers who receive assets from your Episerver instance, because it describes your company’s translation management process.
What your company setup should be
This document assumes that:
- Your company already has a functioning instance of Episerver.
- The Connector has been installed, configured, and tested on your Episerver instance.
- The Lionbridge Connectors team has set up the Clay Tablet Platform to send assets to your translation providers.
- Lionbridge is your company’s translation provider, and Freeway is already set up for your company.
What you should already know
This document assumes that:
- You are familiar with the Connector’s configuration for your Episerver instance, and the reasons for choosing certain configuration options. This is important because your company’s configuration determines which features are available.
- You have a strong working knowledge of Episerver.
- You are familiar with your company’s translation process and requirements.
- You have valid user credentials to log into Episerver.
- You have the required permissions to access the Connector functionality described in this guide.
Note: Not all the features described in this guide may be available. Feature availability depends on both your company’s Connector setup and the roles to which you are assigned. If you cannot access functionality that you need, contact your company’s Episerver administrator.
How this guide is organized
This guide contains the following chapters:
| Chapter | Description |
|---|---|
| Welcome to the Lionbridge Connector for Episerver | A brief description of the Lionbridge for Episerver solution and how it fits into the translation lifecycle. It also includes information about this guide and the Lionbridge Connector Team Support contact information. |
| Getting Started with the Connector for Episerver | How to get started and an overview of the Connector interface and key features. |
| Sending Assets for Translation | How to create or edit a translation project, add assets to it, and send it out for translation. How to cancel a translation project in progress. |
| Monitoring Translation Status | How to monitor the status of translation projects and individual assets. |
| Post-Translation Features | How to perform post-translation tasks, including: * importing translated assets into Episerver * review translated assets * publishing translated assets * archiving and unarchiving translation projects * removing translation projects from the Connector |
How to find out more about the Lionbridge Connector for Episerver
For information on installing and configuring the Lionbridge Connector for Episerver, read the Lionbridge Connector for Episerver Installation and Configuration Guide.
Documentation conventions
This guide uses the following conventions:
| Convention | Description |
|---|---|
| Bold | Highlights screen elements such as buttons, menu items, and fields. |
| Courier | Highlights input, file names, and paths. |
| Italics | Highlights terms for emphasis, variables, or document titles. |
| > | Indicates a menu choice. For example, “Select Edit> Select All.” |
2.1.4 - How to Contact Lionbridge Connector Support
How to Contact Lionbridge Connector Support
You can submit a support ticket either:
- by emailing connectors@lionbridge.com
- from the Lionbridge Connector Zendesk page https://lionbridge-connectors.zendesk.com/
See also:
2.2 - Getting Started with the Connector for Episerver
The Connector supports all web browsers that Episerver supports. The Connector supports Episerver versions 10 and 11.
To access the Connector:
-
Log into Episerver.
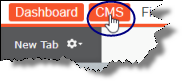
-
In the top-left corner, click CMS.
- In the menu that opens, click Edit.
- In the top-right corner, click the Toggle assets pane folder icon.
![]()
The Assets pane opens.
- If the Lionbridge Connector gadget is collapsed, click it to expand it.
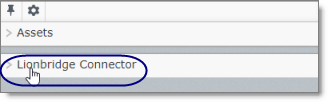
The Lionbridge Connector gadget opens. It contains basic Connector functionality, including creating a translation project. For a detailed description of the gadget, see The Connector at a Glance.
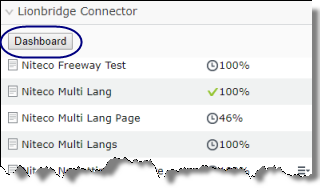
- Optional. Do one of the following to open the Lionbridge Connector Dashboard (“Dashboard”), which has enhanced Connector functionality:
-
Click the Dashboard button near the top of the gadget.
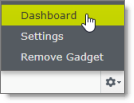
-
In the bottom-right corner of the gadget, click the Settings icon
, and then select Dashboard from the context menu.
The Lionbridge Connector Dashboard opens in the system workspace. For a detailed description of the Dashboard, see Monitoring Translation Projects.
Tip: Click the Pin icon
to keep the Lionbridge Connector open by default in future sessions.
2.2.1 - The Connector at a Glance
The Lionbridge Connector for Episerver has two main interfaces:
-
Lionbridge Connector gadget:
- opens in the Assets pane
- provides a translation-status summary
- includes basic Connector functionality
-
Lionbridge Connector Dashboard:
- opens in the System workspace
- provides detailed translation-status information
- includes enhanced Connector functionality
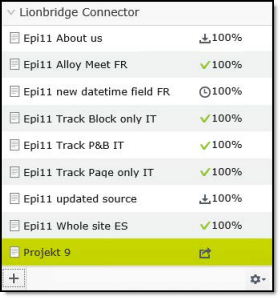
Lionbridge Connector Gadget
View screen capture
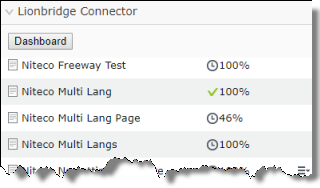
The gadget displays the following information about each translation project:
- name
- status
- percentage complete
The gadget also includes the following Connector functionality, which is available from the context menu for each displayed translation project:
- creating a project
- editing a project
- sending out a project for translation
- importing translated content into Episerver
- publishing translated assets
- canceling a project
- removing a project from the Connector
For detailed information about the gadget, see Viewing Your Translation Status Summary.
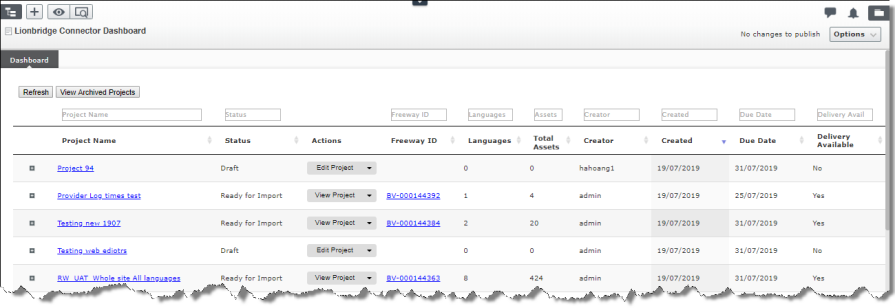
Lionbridge Connector Dashboard
View screen capture
The Dashboard includes the following Connector functionality:
- displaying detailed translation-status information about projects
- filtering the projects displayed in the Dashboard
- sending out a project for translation
- viewing archived projects
- viewing unarchived projects
- viewing a project
- editing a project
- canceling a project
- importing all available translated content in the project into Episerver
- importing translated content in the project into Episerver for individual target languages
- viewing translated assets
- publishing all available imported translated assets in the project
- publishing imported translated assets in the project for individual target languages
- archiving a project
- unarchiving a project
- removing a project from the Connector
Note: You can create a new project only in the Lionbridge Connector gadget.
For detailed information about the Dashboard, see Monitoring Translation Projects.
2.3 - Sending Assets for Translation
When you send out assets for translation, they are part of a translation project.
You can add assets for translation to a new or an existing project.
Note: You can add assets to an existing project only if it is in Draft status. You cannot add assets to a project after it has been submitted for translation.
You can send out the following types of assets for translation:
| Asset Type | Description | Additional Notes |
|---|---|---|
| Episerver Blocks | Blocks that are referenced on a page in a Content Area or ContentReference fields. | If the same block has multiple references, the Connector sends it out for translation once, in the context of the first page where it is referenced. |
| Episerver page properties | The following page properties are supported: * String * XHtmlString * ContentArea * ContentReference |
Unsupported page properties will be blank, so you cannot publish the corresponding pages, as described in Publishing Translated Assets. Tip: Review these pages manually and populate the blank page properties so that you can publish the pages. |
| custom properties | Custom properties created by the customer. | The Connector supports sending for translation only custom properties that inherit from the ProperyLongString and PropertyString classes. |
How the Connector packages the assets for translation
Either:
- The Connector sends each page and block for translation as a separate file.
- The Connector bundles all pages and blocks in the translation project for translation into a single XML file, creating one file for each target language.
You configure this setting using the Use grouped asset handling check box. For detailed instructions, refer to the Lionbridge Connector for Episerver Installation and Configuration Guide.
Recommendation: If Lionbridge Freeway will translate terms for SEO, select this check box.
When sending assets for translation, there are two basic steps:
-
Creating a translation project, including adding the assets to translate. You do this from the Lionbridge Connector gadget. For detailed instructions, see Creating or Editing a Translation Project.
-
Sending out the project for translation. You can do this either from the Lionbridge Connector gadget or from the Lionbridge Connector Dashboard. For detailed instructions, see Sending a Project for Translation.
2.3.1 - Creating or Editing a Translation Project
A translation project has two basic components:
- the project settings
- the collection of the assets to translate
You create or edit translation project from the Lionbridge Connector gadget.
To create a translation project:
-
In Episerver CMS, click Edit.
-
Click the Toggle assets pane icon.
The Assets pane is displayed on the right. The Lionbridge Connector gadget is displayed at the bottom of the pane, displaying all the translation projects.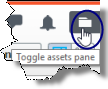
-
Do one of the following:
-
To create a new project, click the plus icon
 at the bottom-left corner of the gadget.
 -
To edit an existing translation project, click a project in the list to select it.
Note: You can edit an existing project only if it is in Draft status. You cannot edit a project after it has been submitted for translation.
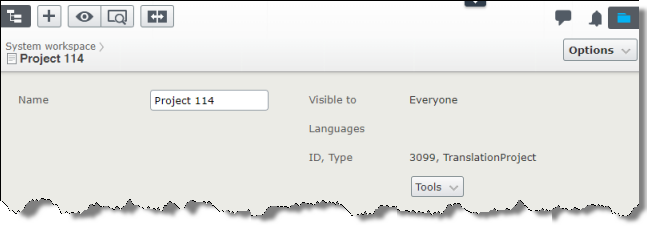
The System workspace, on the left, updates for the new or existing project.
-
-
In the Name field, you can enter or update the name of your translation project. This will also be the Freeway title of your project.
-
In the Content tab, specify the following settings for your translation project:
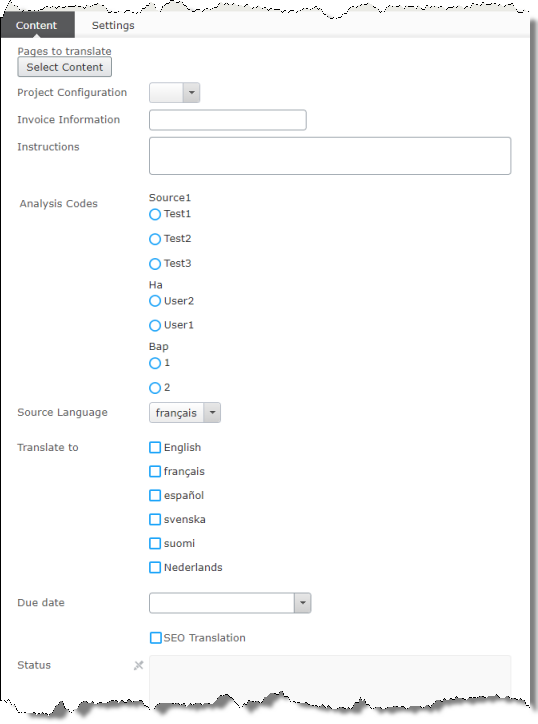
Setting Description Project Configuration Optional. In the dropdown list, select a workflow configuration for this project. There may be multiple workflow configurations for your translation provider that are configured by the Lionbridge Connector Team. For example, there may be one workflow for human translation and another configuration for machine translation. Invoice information Optional. You can enter the project’s invoice number in this field. Instructions Optional. You can enter instructions for the translators in this field. Analysis Codes Optional. May not be displayed. The Freeway analysis codes for the translation.
You specify the analysis codes that are relevant to your assets. Your Lionbridge setup determines which analysis codes are available for you to specify, and the values available for selection for each analysis code. For example, the Region, Department, and Priority analysis codes may be available for you to specify.Source Language Select the source language of the assets in the project. Translate to Select the check boxes for the target languages for the assets in the project. These are the languages into which the assets will be translated. Due date The requested delivery date. Either:
* Enter the date and time in the following format: M/D/YYYY H:MM,for example, 3/9/2016, 8:00 PM.
* Click the arrow and select the date and time in the calendar that opens.SEO Translation If you want to mark the pages for SEO workflow processing, so that Lionbridge Freeway will translate terms for SEO. select the check box. When this check box is selected, the Connector includes the URLSegment property (name in URL) in pages it sends for translations.
Note: Episerver runs some validations on this property when it is edited in the Episerver GUI. These validations ensure that there are no characters that are invalid for URL names, and that the name is unique among sibling pages. For example, if you have a folder with the /cars/ URL, it cannot contain two pages with the same URL name, such asbrandX, because the /cars/brandX address must point to a unique page. -
In the Settings tab, specify the following settings for your translation project:
-
Publish option—It can be Published in two options:
-
Publish if source is Published: If this is selected then the target assets can only be published if the source assets are published.
-
Publish if source is not Published: If this is selected then the target assets will publish even if the source assets are not yet published.
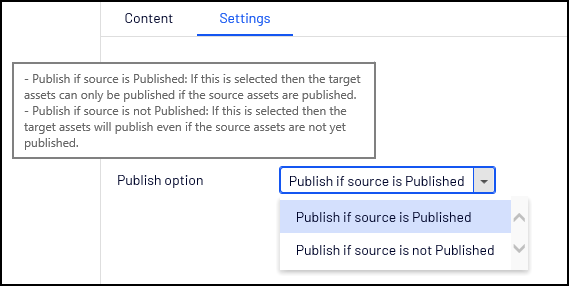
Note: To navigate, In the translation project click Settings and select Publish if source is Published or Publish if source is not Published from the dropdown of Publish option. By default, it is Publish if source is Published.
-
-
Import option—In configure Import Settings to allow target (translated) version specific content to be preserved when it does not exist in source version:
-
Keep all from source translation: If this is selected, when importing translation project, all data from the translated version will overwrite the current version.
-
Merge source translation and target: If this is selected, when importing translation project, system will:
-
+ Overwrite the blocks that has same ID from the translated version to current version.
-
+ Keep all blocks that available on current version but not in translated version.
-
+ Keep all blocks that available on translated version but not in current version.
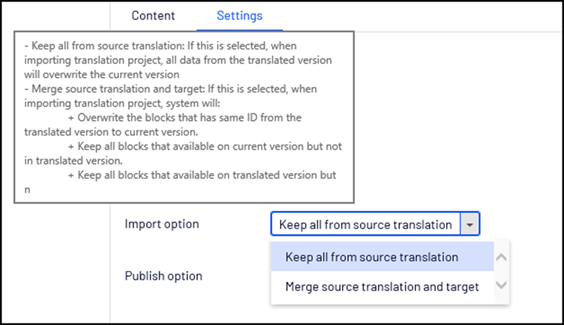
Note: To navigate, In translation project click Settings and select Keep all from source translation or Merge source translation and target from the dropdown of Import option. By default, it is Keep all from source translation.
-
-
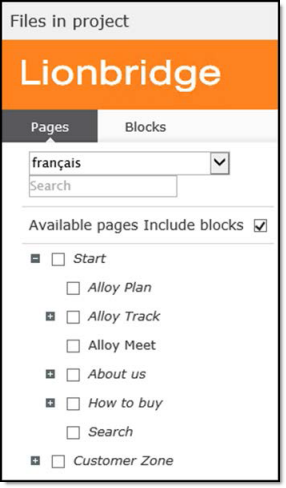
To select the assets to translate, near the top-left corner of the workspace, under Pages to translate, and click Select Content.
The Assets in Project dialog box opens.
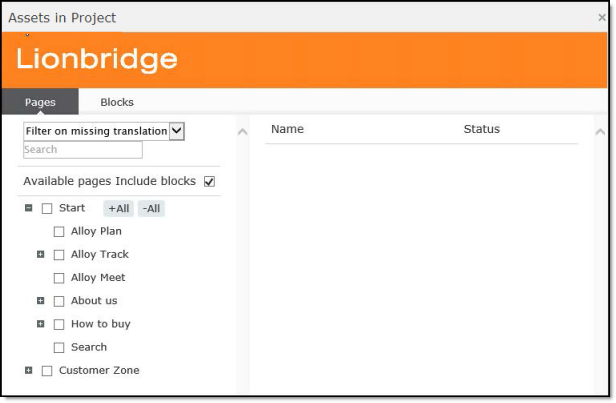
The Available pages pane on the left side displays a tree structure.
a. At the top of this pane, click the Pages or the Blocks tab to display the corresponding asset in the tree. b. Expand the tree structure and select the check boxes of the assets to add to the translation project. c. Optional. Mouseover the page to display the +All and -All buttons. Click these buttons to add or remove all child pages or blocks from the translation project. d. To remove a page or block from your selection, click the corresponding Remove button. This button is displayed after a page or block is selected. e. Optional. In the Pages tab, to automatically include all blocks associated with the selected pages in your translation project, select the Include blocks check box.
f. Optional. To view which pages have not yet been translated, select the desired target language in the Filter on missing translation dropdown list. The tree updates to display any pages that have not yet been translated into that language in Italic font. Pages that have already been translated into that target language are displayed in regular font.
g. Click Save to save your changes.
The System workspace reopens. The Connector automatically saves the translation project in Draft status. To undo the auto-save, click the Undo link in the top-center of the workspace.
Now you are ready to send your translation project to Lionbridge Freeway for translation. For detailed instructions, see Sending a Project for Translation.
2.3.2 - Sending a Project for Translation
When a translation project has Draft status, you can send it to Lionbridge Freeway for translation. You can do this either from the Lionbridge Connector gadget or from the Lionbridge Connector Dashboard (“Dashboard”). There are two ways to send a project for translation:
2.3.2.1 - Sending a Project for Translation from the Gadget
Sending a Project for Translation from the Gadget
When a translation project has Draft status, you can send it to Lionbridge Freeway for translation.
To send out a project for translation from the Lionbridge Connector gadget:
- In Episerver CMS, click Edit.
- Click the Toggle assets pane icon.
![]()
The Assets pane is displayed on the right. The Lionbridge Connector gadget is displayed at the bottom of the pane, displaying all the translation projects.
-
Click a project in the list to select it.
-
Mouseover the right end of the project in the Lionbridge Connector gadget, click the Options icon
 and then select Send to Translation in the project’s context menu.
![]()
A message box opens, confirming that you want to send the project for translation.
- Click Yes to proceed.
Another message box opens, stating that the project was sent for translation.
- Click OK to close the message box.
The Connector sends your translation project as a scheduled job. It displays a clock icon ![]() next to it, which indicates that it now has In Translation status.
next to it, which indicates that it now has In Translation status.
- When your project displays a status of 10%, it has been delivered to Lionbridge Freeway.
- When your project displays a status of 100%, it is ready to be imported into Episerver, where you can review it.
2.3.2.2 - Sending a Project for Translation from the Dashboard
When a translation project has Draft status, you can send it to Lionbridge Freeway for translation.
To send out a project for translation from the Dashboard:
-
In the Dashboard, locate a translation project with Draft status. This is displayed in the Status column. For information on opening the Dashboard, see Getting Started with the Connector for Episerver.
-
In the Actions column, click the arrow and select Send to Translation](#) from the context menu.
![]()
A message box opens, confirming that you want to send the project for translation.
- Click Yes to proceed.
Another message box opens, stating that the project was sent for translation.
- Click OK to close the message box.
The Connector sends your translation project as a scheduled job, and when it is delivered to Lionbridge Freeway, it has In Translation status.
2.3.3 - Canceling a Translation Project
If a translation project is in either In Translation or Ready for Import status, you can cancel it. This prevents the Connector from checking whether the translation is complete and removes it from the Connector. This functionality is not reversible. For a list and description of translation-project statuses, see Monitoring Translation Status.
Important: This step does not cancel the translation process in Lionbridge Freeway. If your translation project has In Translation status, you must also contact your Lionbridge project manager immediately to cancel the project in Lionbridge Freeway.
There are two ways to cancel a translation project in the Connector:
2.3.3.1 - Canceling a Translation Project in the Gadget
If a translation project is in either In Translation or Ready for Import status, you can cancel it to prevent the Connector from checking whether the translation is complete and to remove it from the Connector. This functionality is not reversible.
Important: This step does not cancel the translation process in Lionbridge Freeway. If your translation project has In Translation status, you must also contact your Lionbridge project manager immediately to cancel the project in Lionbridge Freeway.
To cancel a translation project from the Lionbridge Connector gadget:
- In Episerver CMS, click Edit.
- Click the Toggle assets pane icon.
![]()
The Assets pane is displayed on the right. The Lionbridge Connector gadget is displayed at the bottom of the pane, displaying all the translation projects.
-
Click a project in the list to select it.
-
Mouseover the right end of the project in the Lionbridge Connector gadget, click the Options icon
, and then select Cancel Project in the project’s context menu. This menu item is available only when the project is in either In Translation or Ready for Import status.
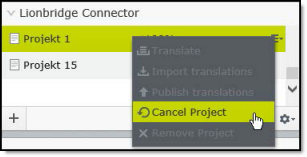
A message box opens, confirming that you want to cancel the project.
- Click Yes to confirm.
Another message box opens, stating that the project was canceled and removed from the Connector. It instructs you to contact your Lionbridge project manager immediately to stop the translation process in Lionbridge Freeway.
- Click OK to close the message box.
2.3.3.2 - Canceling a Translation Project in the Dashboard
If a translation project is in either In Translation or Ready for Import status, you can cancel it to prevent the Connector from checking whether the translation is complete and to remove it from the Connector. This functionality is not reversible.
Important: This step does not cancel the translation process in Lionbridge Freeway. If your translation project has In Translation status, you must also contact your Lionbridge project manager immediately to cancel the project in Lionbridge Freeway.
To cancel a translation project from the Dashboard:
-
In the Dashboard, locate a translation project with either In Translation or Ready for Import status. This is displayed in the Status column. For information on opening the Dashboard, see Getting Started with the Connector for Episerver.
-
In the Actions column, click the arrow and select Cancel Project from the context menu.

A message box opens, confirming that you want to cancel the project.
- Click Yes to confirm.
Another message box opens, stating that the project was canceled and removed from the Connector. It instructs you to contact your Lionbridge project manager immediately to stop the translation process in Lionbridge Freeway.
- Click OK to close the message box.
2.4 - Monitoring Translation Status
You can monitor the status of your translation projects from within the Connector.
-
In the Lionbridge Connector gadget, you can view the status summary. For details, see Viewing Your Translation Status Summary.
-
In the Lionbridge Connector Dashboard, you can view the detailed translation status of your project by target language and individual assets. For details, see Monitoring Translation Projects.
For a list and description of translation statuses, see Translation Statuses.
2.4.1 - Translation Statuses
The statuses of translation projects are displayed, as follows:
-
The Lionbridge Connector Dashboard (“Dashboard”) displays project statuses in the Status column.
-
The Lionbridge Connector gadget displays project statuses as icons and percentages:
| Translation Project Status (in Dashboard) | Icon (in Gadget) | Percentage (in Gadget) | Description |
|---|---|---|---|
| Draft | N/A | The Connector created the translation project, but it did not send it for translation yet. | |
| In Translation | 5 | The Connector sent the translation project to the Clay Tablet Platform. | |
| 10 | The Clay Tablet Platform sent the translation project to Lionbridge Freeway. | ||
| Ready for Import | variable, up to 100 | The Connector has delivered the completed translation project, and it is ready to be imported into Episerver. | |
| Imported | variable, up to 100 | The completed translation project has been imported into Episerver, but it has not yet been published. | |
| Published | variable, up to 100 | The translation project has been published. |
Note about percentage values: In addition to the percentage values described in the table above, different percentage values may be displayed in the Lionbridge Connector gadget. For an explanation of those values, see Viewing Your Translation Status Summary.
Note about statuses displayed in italics in the Dashboard: A status displayed in italics in the Dashboard indicates that the translated content of some, but not all target languages is in this status. For a detailed description and illustration, see Monitoring Translation Projects.
2.4.2 - Viewing Your Translation Status Summary
You can view the status and percentage complete of translation projects in the Lionbridge Connector gadget. The gadget is displayed in the Assets pane. For detailed instructions on opening the gadget, see Getting Started with the Connector for Episerver.
Tip: If the gadget was previously opened, click the Toggle assets pane icon
in the top-right corner of the system workspace to reopen it.
The following information is displayed about each translation project:
- project name
- project-status icon
- percentage complete
| Project-Status Icon | Percentage | Description |
|---|---|---|
| 0 | Draft status. The Connector created the translation project, but it did not send it for translation yet. | |
| 5 | In Translation status. The Connector sent the translation project to the Clay Tablet Platform. | |
| 10 | In Translation status. The Clay Tablet Platform sent the translation project to Lionbridge Freeway. | |
| variable, up to 100 | Ready for Import status. The Connector has delivered the completed translation project, and it is ready to be imported into Episerver. See note below. | |
| variable, up to 100 | Imported status. The completed translation project has been imported, but it has not yet been published. See note below. | |
| variable, up to 100 | Published status. The translation project has been published. See note below. |
Note about other displayed percentage values: If a translation project is being translated into multiple target languages, and the Connector has delivered the translated content in some but not all of those languages, then that is reflected in the percentage complete displayed in the gadget. For example, suppose the translation project is being translated into four target languages, and the percentage complete is 25 percent. This indicates that the translated content has been delivered for one target language.
Actions
You can perform the following actions in the gadget:
- To open the Lionbridge Connector Dashboard, click the Dashboard button near the top-left corner of the gadget. For detailed description of the Dashboard, see Monitoring Translation Projects.
- To create a translation project, click the plus icon in the bottom-left corner. For detailed instructions, see Creating or Editing a Translation Project.
- To send out a project for translation, click the Options icon , and then select Translate in the project’s context menu. For detailed instructions, see Sending a Project for Translation from the Gadget. Available only when the project is in Draft status.
- To import translated content into Episerver, click the Options icon , and then select Import translations in the project’s context menu. For detailed instructions, see Importing All Available Translated Content from the Gadget. Available only when the project is in Ready for Import status.
- To publish translated assets, click the Options icon , and then select Publish translations in the project’s context menu. For detailed instructions, see Publishing All Available Translated Assets from the Gadget. Available only when the project is in Imported status.
- To cancel a translation project, click the Options icon , and then select Cancel Project in the project’s context menu. For detailed instructions, see Canceling a Translation Project in the Gadget. Available only when the project is in either In Translation or Ready for Import status.
- To remove a translation project from the Connector, click the Options icon , and then select Remove Project in the project’s context menu. For detailed instructions, see Removing Translation Projects from the Connector via the Gadget. Available only when the project is in either Draft, Imported, or Published status.
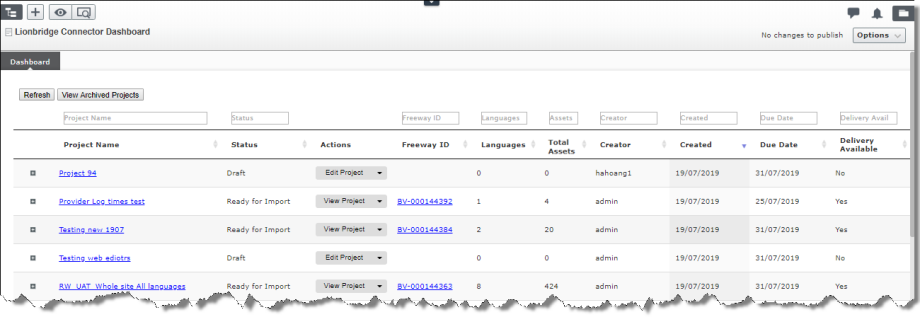
2.4.3 - Monitoring Translation Projects
The Lionbridge Connector Dashboard (“Dashboard”) opens in the system workspace.
The Dashboard provides detailed translation-status information and it contains enhanced Connector functionality.
- To open the Dashboard, click the Dashboard button in the Lionbridge Connector gadget. For detailed instructions, see Getting Started with the Connector for Episerver.
The Dashboard displays the following information about each translation project:
| Column | Description |
|---|---|
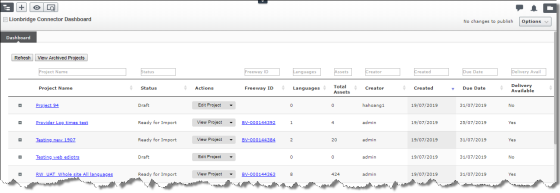
| Project Name | The name of the translation project. * Click the link or click the plus icon ( |
| Status | The status of the translation project. For a list and description of statuses, see Translation Statuses. Note about status displayed in italics: A status that is displayed in italics indicates that the translated content of some, but not all target languages is in this status. The least-complete status is displayed. For example, suppose the In Translation status is displayed for a translation project. This indicates that the content for at least one target-language is in this state, and that other target-language content is in a more advanced state. As the screen capture below indicates, the other target-language content is in Imported status. 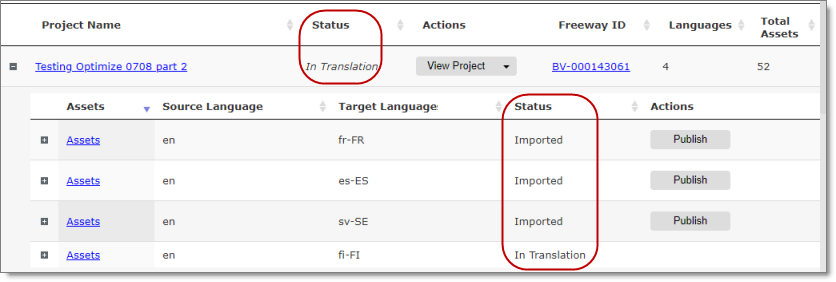 |
| Actions | Click the arrow to display the available context-menu options, and then click an option. The translation project’s status determines which options are displayed: * **View Project:** Opens the project for in read-only mode in a new browser tab. Not available if the project’s status is Draft. For detailed descriptions of the fields in this view, see Creating or Editing a Translation Project. * **Edit Project:** Opens the project for editing. Displayed only when the project is in Draft status. For detailed instructions, see Creating or Editing a Translation Project. * **Send to Translation:** Sends out the project for translation. Displayed only when the project is in Draft status. For detailed instructions, see Sending a Project for Translation from the Dashboard. * **Import All Available:** Imports all available translated content into Episerver. For example, translated content may be available in some but not all target languages, if some content is still either in translation or has already been imported into Episerver. Displayed only when the project is in Ready for Import status, or if it is in In Translation status in italics, which indicates that some of the project content may already be ready to be imported into Episerver. See the note, above, about the status in italics. For detailed instructions, see Importing All Available Translated Content from the Dashboard. **Note:** If translated content is available for import in multiple languages, but you do not want to import the content in all available languages, you can import the content for only some of those languages. For detailed instructions, see Importing Translated Content in One Target Language from the Dashboard. * **Publish All Available**: Publishes all translated assets in the project that have been imported into Episerver. Displayed only when the project is in Imported status, or if it is in In Translation or Ready for Imported status in italics, which indicates that some of the project content may already be imported into Episerver. See the note, above, about the status in italics. For detailed instructions, see Publishing All Available Translated Assets from the Dashboard. **Note:** If translated assets are available for publishing in multiple languages, but you do not want to publish the assets in all available languages, you can publish the assets for only some of those languages. For detailed instructions, see Publishing Translated Assets in One Target Language from the Dashboard. * **Cancel Project:** Cancels the translation project. Displayed only when the project is in either In Translation or Ready for Import status. For detailed instructions, see Canceling a Translation Project in the Dashboard. * **Remove Project:** Removes the translation project from the Connector. Displayed only when the project is in either Draft, Imported, or Published status. For detailed instructions, see Removing Translation Projects from the Connector via the Dashboard. * **Archive Project:** Archives the translation project, which removes it from the list of active projects. Not available if the project’s status is Draft. Available only in the default view, where only non-archived projects are displayed. For detailed instructions, see Archiving and Unarchiving Projects. * **Unarchive Project** Removes the translation project from the archived view, and displays it in the list of active projects, which is displayed by default. Available only in the archived view, where only archived projects are displayed. For detailed instructions, see Archiving and Unarchiving Projects. |
| Freeway ID | If the project has already been sent for translation to Lionbridge Freeway, this is the identifier assigned by Lionbridge. * Click the link to open the project in Lionbridge Freeway. You may be prompted for your Freeway credentials before the Freeway page opens. |
| Languages | The number of target languages for this translation project. |
| Total Assets | The number of assets for translation in this translation project. If a translation project is translated into multiple languages, then the asset is “counted” once for each target language. For example, if a project has 4 assets and it is translated into 3 target languages, then there are 12 assets in the project. |
| Creator | The user ID of the account that created this project. |
| Created | The date that the user created this project, in DD/YY/MMMM format. |
| Due Date | The due date specified when the translation project was created or edited, in DD/YY/MMMM format. If the current date is after the due date, the warning icon |
| Delivery Available | Indicates whether translated assets are available to import into Episerver. This has one of the following values: * Yes: Files are ready to import into Episerver. In general, the corresponding translation project is in Ready for Import status. * No: Files are not available for import. Either the assets are still in translation, or they have already been imported into Episerver. |
Additional Actions
In addition to the project-specific actions available from the Actions column, you can perform the following actions in the Dashboard:
-
To update the list of displayed translation projects based on newly created projects or updated information about existing projects, click Refresh.
-
To view only archived projects, click View Archived Projects. (By default, only unarchived projects are displayed.) Available only in the default view of the Dashboard, where non-archived projects are displayed. For detailed instructions, see Archiving and Unarchiving Projects.
-
To view only unarchived projects, click View Unarchived Projects. Available only when archived projects are displayed. For detailed instructions, see Archiving and Unarchiving Projects.
-
To filter the list of displayed translation projects, enter text in any of the text boxes above the column headers. The Connector automatically filters the projects to display only those with matching content in that column. For example, to display only translation projects with the Ready for Import status, start typing Ready for Import in the text box above the Status column header. The list automatically updates to display only projects with the Ready for Import status.
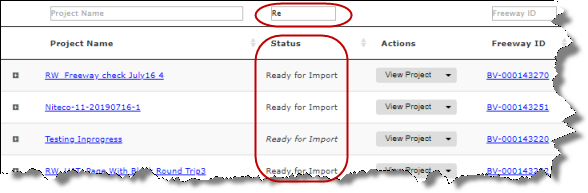
2.4.4 - Monitoring Translation Assets
You view detailed information about the assets in a translation project by clicking the Expand icon ![]() next to that project in the Lionbridge Connector Dashboard (“Dashboard”). For a detailed description of the Dashboard, see Monitoring Translation Projects.
next to that project in the Lionbridge Connector Dashboard (“Dashboard”). For a detailed description of the Dashboard, see Monitoring Translation Projects.
To view detailed information about the assets in a translation project:
- In the Dashboard, click the Expand icon
 on the left side of the translation project whose assets you want to view. For instructions on opening the Dashboard, see Getting Started with the Connector for Episerver.
The translation-project row expands, displaying the status of the translation of each target language in the project and any relevant actions.
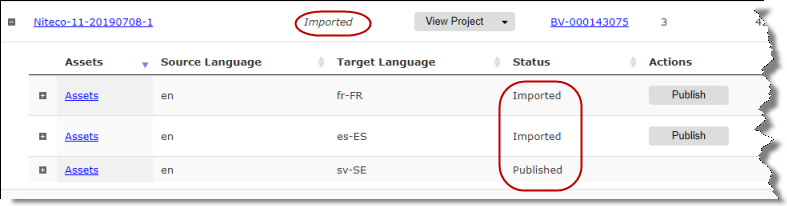
In this example, the screen capture shows that the overall project status is Imported. However, this status is displayed in italics, which indicates that the translated content of some, but not all target languages is in this status: The status of the French and Spanish target languages is Imported, and the Publish action is available; The status of the Swedish target language is Published, which is the final status, so there is no available action.
The following information is displayed about each set of assets, organized by source and target language pair:
| Column | Description |
|---|---|
| Assets | Click the Assets link or click the plus icon ( |
| Source Language | The language code of the source language of the set of assets sent for translation. |
| Target Language | The language code of the target language into which the set of assets is translated. |
| Status | The status of this set of assets within the translation project. For a list and description of statuses, see Translation Statuses. |
| Actions | The status of this set of assets determines which options, if any, are displayed: * **Import:** Imports all translated content in this target language into Episerver. Displayed only when this set of assets is in Ready for Import status. For detailed instructions, see Importing Translated Content in One Target Language from the Dashboard. * **Publish:** Publishes all imported translated assets in this target language. Displayed only when this set of assets is in Imported status. For detailed instructions, see Publishing Translated Assets in One Target Language from the Dashboard. |
2.5 - Added Assets Log view
A new view has been added to the UI. You view the Asset Logs of any translation projects.
You can filter by Asset Name, Asset Type, Project Name, Asset Status, and Date range whether an asset has logs or Log Details.
The results display in a paging table or can be exported out to .CSV file.
You can click on the Asset Name to be taken to the Asset details displaying DownloadedXML file details along with Imported and Published dates.
Asset Log view can be accessed from the Connector Settings cog.
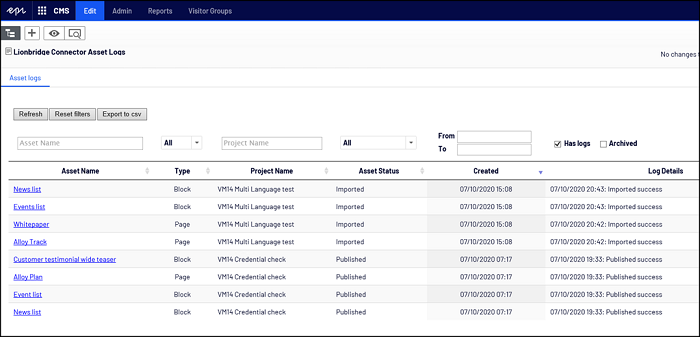
2.6 - Post-Translation Features
After the translation is complete, you can perform the following tasks:
| Task | Description | Details |
|---|---|---|
| import translated content | When the translation project is complete and has been returned to the Connector, its project status is 100%. It is ready to import into Episerver, where you can review it. You can import all available translated content, or translated content only in specific target languages. | Importing Translated Content |
| reviewing translated assets | After you import translated content from the Connector into Episerver, the corresponding translated assets are ready for review. | Reviewing Translated Assets |
| publish translated assets | After you review translated assets, you can publish them via the Connector. You can publish all available imported assets, or imported assets only in specific target languages. | Publishing Translated Assets |
| archiving and unarchiving projects | You can archive projects to remove them from the default view of the Connector. | Archiving and Unarchiving Projects |
| removing projects from the Connector | You can remove a project from the Connector if it is in Draft, Imported, or Published status. | Removing Translation Projects from the Connector |
2.6.1 - Importing Translated Content
When the translation project is complete and has been returned to the Connector, the translated content is ready to import into Episerver, where you can review it. You can import a project even if it has not been fully translated. However, to import and publish a page, all its dependent blocks must be translated. The Connector automatically updates translation projects with redelivered assets. If an imported project has redelivered assets, its status is 100%/Ready for import. There are three ways to import translated content into Episerver:
-
Importing All Available Translated Content from the Dashboard
-
Importing Translated Content in One Target Language from the Dashboard
Recommendation: After importing translated content, you should review the corresponding translated assets before publishing them. For detailed instructions, see Reviewing Translated Assets.
2.6.1.1 - Importing All Available Translated Content from the Gadget
When the translation project is complete and has been returned to the Connector, the translated content is ready to import into Episerver, where you can review it.
In the Lionbridge Connector gadget, the clock icon ![]() is displayed and the project-completion status is variable, greater than 10% and up to 100%.
is displayed and the project-completion status is variable, greater than 10% and up to 100%.
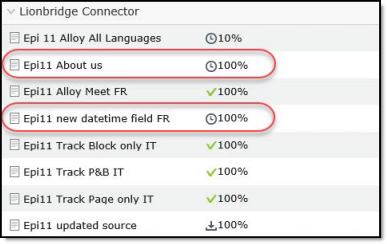
For more information about importing translated content into Episerver, see Importing Translated Content.
To import translated content into Episerver from the Lionbridge Connector gadget:
- In Episerver CMS, click Edit.
- Click the Toggle assets pane icon.
![]()
The Assets pane is displayed on the right. The Lionbridge Connector gadget is displayed at the bottom of the pane, displaying all the translation projects.
-
In the list, click a project whose status is 100% to select it.
-
Mouseover the right end of the project in the Lionbridge Connector gadget, click the Options icon
and then select Import translations in the project’s context menu.
![]()
A message box opens, stating that the project has been imported, but that it has not been published. The project is ready for review.
- Click OK to close the message box.
2.6.1.2 - Importing All Available Translated Content from the Dashboard
When the translation project is complete and has been returned to the Connector, the translated content is ready to import into Episerver, where you can review it.
For more information about importing translated content into Episerver, see Importing Translated Content.
In the Lionbridge Connector Dashboard, either:
- The displayed project status is Ready for import.
- The project status is displayed, in italics, in In Translation status, which indicates that some of the project content may already be ready to import into Episerver. For more information, see the note about status displayed in italics in Monitoring Translation Projects.
To import all available translated content into Episerver from the Dashboard:
-
In the Dashboard, locate a translation project with either Ready for import status or In Translation status, displayed in italics. This is displayed in the Status column. For information on opening the Dashboard, see Getting Started with the Connector for Episerver.
-
In the Actions column, click the arrow and select Import All Available from the context menu.
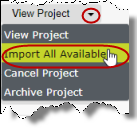
A message box opens, confirming that the project is being imported into Episerver, and that the project status will update when the import is complete.
- Click OK to close the message box.
2.6.1.3 - Importing Translated Content in One Target Language from the Dashboard
When the translation project is complete and has been returned to the Connector, the translated content is ready to import into Episerver, where you can review it.
In the Lionbridge Connector Dashboard, either:
- The displayed project status is Ready for import.
- The project status is displayed, in italics, in In Translation status, which indicates that some of the project content may already be ready to import into Episerver. For more information, see the note about status displayed in italics in Monitoring Translation Projects.
For more information about importing translated content into Episerver, see Importing Translated Content.
To import translated content into Episerver from the Dashboard:
-
In the Dashboard, locate the translation project whose content you want to import. For information on opening the Dashboard, see Getting Started with the Connector for Episerver.
-
Click the Expand icon
on the left side of the translation project whose assets you want to import.
The translation-project row expands, displaying the status of the translation of each target language in the project and any relevant actions. For a detailed description of this section, see Monitoring Translation Assets.
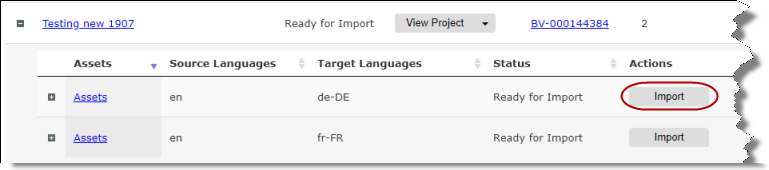
- Click Import for target-language assets to import.
A message box opens, confirming that you want to import the assets in this target language.
- Click Yes to proceed.
Another message box opens, stating that the assets were imported.
- Click OK to close the message box.
2.6.2 - Reviewing Translated Assets
After importing translated content into Episerver, as described in Importing Translated Content, it is ready for review. This is the recommended step before publishing.
Note: You can also review an individual translated asset by clicking its link from the Dashboard. For detailed instructions, see Viewing Translated Assets.
To review translated assets:
- In the top-left corner of the system workspace, click the Toggle navigation pane icon
 .
.
The Navigation pane is displayed on the left.
-
In the Navigation pane, click the Sites tab, and click the language version of the site to review. Alternatively, install the Versions Add-On to display the different language versions you have created.
-
Click the Pages tab, and in the tree structure, navigate to each page to review.
-
Optional. Click the Compare different versions icon
 to compare the source and target language versions of a page side by side and review before publishing or performing further edits.
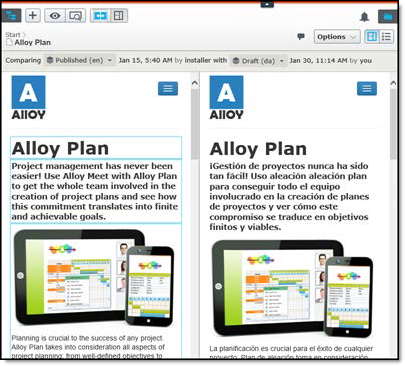
- Optional. Click in a page to edit it.
Note: Blocks are displayed as translated within a page only after the page is published. To view the translated draft version of blocks for review purposes, in the Assets pane on the right, select the blocks, as shown below.
View screen capture

- When you are done, do one of the following to publish the translated page:
- You can click Publish? in the top-right corner and select Publish changes from the context menu.
- You can publish translated assets from within the Connector. For detailed instructions, see Publishing Translated Assets.
2.6.2.1 - Viewing Translated Assets
You view detailed information about individual translated assets in a translation project by clicking the Expand icon ![]() next to that project in the Lionbridge Connector Dashboard (“Dashboard”), and then clicking the Expand icon
next to that project in the Lionbridge Connector Dashboard (“Dashboard”), and then clicking the Expand icon ![]() next to an asset set for a source-target language pair. For a detailed description of the entire Dashboard, see Monitoring Translation Projects.
next to an asset set for a source-target language pair. For a detailed description of the entire Dashboard, see Monitoring Translation Projects.
To view a translated asset:
- In the Dashboard, click the Expand icon on the left side of the translation project whose assets you want to view. For instructions on opening the Dashboard, see Getting Started with the Connector for Episerver.
The translation-project row expands, displaying the status of the translation of each target language in the project and any relevant actions. For a detailed description of this section, see Monitoring Translation Assets.
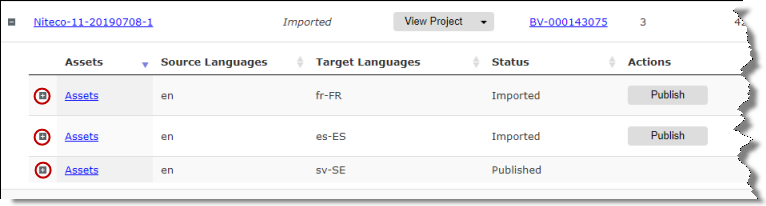
- Click the Expand icon on the left side of the asset set whose assets you want to view.
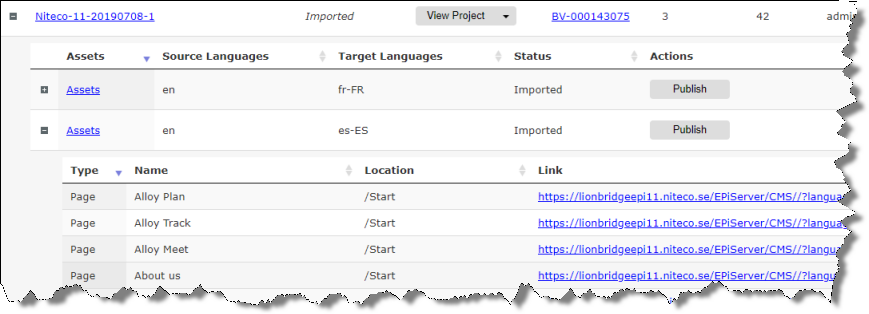
The Assets row expands, displayed the following information about each asset in the asset set:
| Column | Description |
|---|---|
| Type | The type of asset, which is either Page or Block. |
| Name | The name of the asset in Episerver. |
| Location | The relative path of the translated asset in Episerver. |
| Link | The absolute path of the translated asset in Episerver. |
- In the Link column, click the link to open the translated asset in within Episerver, where you can review and edit it, and publish it if it has not yet been published.
2.6.3 - Publishing Translated Assets
After you import translated content, you can publish the corresponding assets from the Connector. Alternatively, you can publish assets individually from the regular Episerver publishing method, as described in the last step of Reviewing Translated Assets.
Publishing translated assets from the Connector is available only when the project is in Imported status, or if it is displayed, in italics, in either In Translation or Ready for Import status, which indicates that some of the project content may already be imported into Episerver. For more information, see the note about status displayed in italics in Monitoring Translation Projects.
To import and publish a page, all its dependent blocks must be translated.
The Connector automatically updates translation projects with redelivered assets. If a published project has redelivered assets, its status is 100%.
For instructions on importing and reviewing content before publishing it, see Importing Translated Content.
There are three ways to publish translated assets:
2.6.3.1 - Publishing All Available Translated Assets from the Gadget
After you import translated content, you can publish the corresponding translated assets.
This feature is available only when the project is in Imported status, or if it is displayed, in italics, in either In Translation or Ready for Import status, which indicates that some of the project content may already be imported into Episerver. For more information, see the note about status displayed in italics in Monitoring Translation Projects.
For more information about publishing translated assets, see Publishing Translated Assets.
To publish translated assets from the Lionbridge Connector gadget:
- In Episerver CMS, click Edit.
- Click the Toggle assets pane icon.
![]()
The Assets pane is displayed on the right. The Lionbridge Connector gadget is displayed at the bottom of the pane, displaying all the translation projects.
-
Click a project in the list to select it.
-
Mouseover the right end of the project in the Lionbridge Connector gadget, click the Options icon
and then select Publish translations in the project’s context menu. This menu item is available only when the project is in Imported status.
![]()
A message box opens, confirming that the pages are being published.
- Click OK to close the message box.
2.6.3.2 - Publishing All Available Translated Assets from the Dashboard
After you import translated content, you can publish the corresponding translated assets.
This feature is available only when the project is in Imported status, or if it is displayed, in italics, in either In Translation or Ready for Import status, which indicates that some of the project content may already be imported into Episerver. For more information, see the note about status displayed in italics in Monitoring Translation Projects.
For more information about publishing translated assets, see Publishing Translated Assets.
To publish all available translated assets from the Dashboard:
-
In the Dashboard, locate a translation project with Imported status. This is displayed in the Status column. For information on opening the Dashboard, see Getting Started with the Connector for Episerver.
-
In the Actions column, click the arrow and select Publish All Available from the context menu.
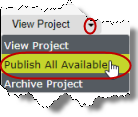
A message box opens, confirming that you want to publish all available assets in the project.
- Click Yes to proceed.
Another message box opens, stating that the project was published.
- Click OK to close the message box.
2.6.3.3 - Publishing Translated Assets in One Target Language from the Dashboard
Publishing Translated Assets in One Target Language from the Dashboard
After you import translated content, you can publish the corresponding translated assets.
In the Lionbridge Connector Dashboard, either:
- The displayed project status is Imported.
- The project status is displayed, in italics, in either In Translation or Ready for Import status, which indicates that some of the project content may already imported into Episerver. For more information, see the note about status displayed in italics in Monitoring Translation Projects.
For more information about publishing translated assets, see Publishing Translated Assets.
To publish translated assets from the Dashboard:
-
In the Dashboard, locate the translation project whose translated assets you want to publish. For information on opening the Dashboard, see Getting Started with the Connector for Episerver.
-
Click the Expand icon
on the left side of the translation project whose assets you want to publish.
The translation-project row expands, displaying the status of the translation of each target language in the project and any relevant actions. For a detailed description of this section, see Monitoring Translation Assets.
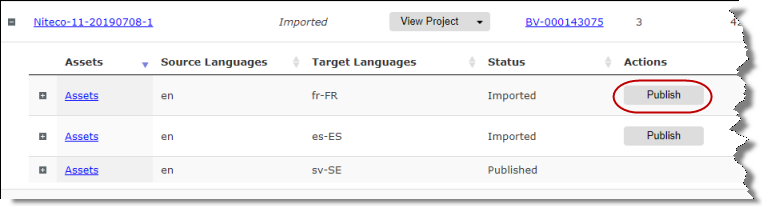
- Click Publish for target-language assets to publish.
A message box opens, confirming that you want to publish the assets in this target language.
- Click Yes to proceed.
Another message box opens, stating that the assets were published.
- Click OK to close the message box.
2.6.4 - Archiving and Unarchiving Projects
You archive a project so that it is no longer displayed by default in the Lionbridge Connector Dashboard (“Dashboard”). Typically, you archive a project when all its assets have been published and it is in Published status. However, you can archive any project that is not in Draft status. In contrast, when you unarchive a project, you move it to the default view of the Dashboard.
Recommendation: Archive completed projects to remove them from the default view.
To archive a project:
-
In the Dashboard, locate the project to archive.
-
In the Actions column, click the arrow for the project, and then click Archive Project.
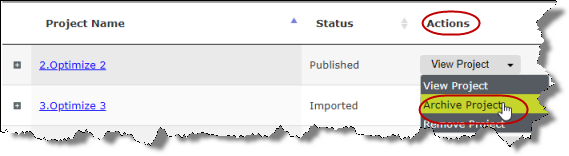
A message box confirms that you want to archive the project.
- Click Yes to proceed.
A message box confirms that the project is being archived.
- Click OK to close the dialog box.
To unarchive a project:
- In the top-left corner of the Dashboard, click the View Archived Projects button. This ensures that only archived projects are displayed.
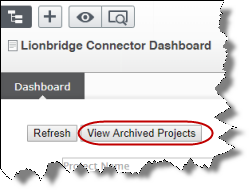
The Dashboard updates.
- In the Actions column, click the arrow for the project to unarchive, and then click Unarchive Project.
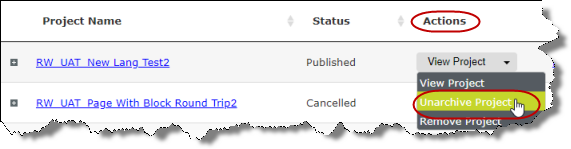
A message box confirms that you want to unarchive the project.
- Click Yes to proceed.
A message box confirms that the project is being unarchived.
- Click OK to close the dialog box.
2.6.5 - Removing Translation Projects from the Connector
You can remove a translation project from the Connector. This functionality is not reversible. This feature is available only when the project is in either Draft, Imported, or Published status. For a list and description of translation statuses, see Translation Statuses.
Notes: If you remove a project in Draft status, you will not be able to send it out for translation. This feature is not available in any other statuses, which occur when the project is actively in translation. To stop a translation project that is already in progress, you cancel the translation project in the Connector. For detailed instructions, see Canceling a Translation Project.
There are two ways to remove a translation project from the Connector:
2.6.5.1 - Removing Translation Projects from the Connector via the Gadget
You can remove a translation project from the Connector. This functionality is not reversible.
This feature is available only when the project is in either Draft, Imported, or Published status. For more information about removing translation projects from the Connector, see Removing Translation Projects from the Connector.
To remove a translation project from the Connector in the Lionbridge Connector gadget:
- In Episerver CMS, click Edit.
- Click the Toggle assets pane icon.
![]()
The Assets pane is displayed on the right. The Lionbridge Connector gadget is displayed at the bottom of the pane, displaying all the translation projects.
-
Click a project in the list to select it.
-
Mouseover the right end of the project in the Lionbridge Connector gadget, click the Options icon
and then select Remove Project in the project’s context menu. This menu item is available only when the project is in either Draft, Imported, or Published status.

A message box opens, confirming that you want to remove the project.
- Click Yes to confirm.
The project is removed from the list.
2.6.5.2 - Removing Translation Projects from the Connector via the Dashboard
You can remove a translation project from the Connector. This functionality is not reversible.
This feature is available only when the project is in either Draft, Imported, or Published status. For more information about removing translation projects from the Connector, see Removing Translation Projects from the Connector.
To remove a translation project from the Connector in the Dashboard:
-
In the Dashboard, locate a translation project with either Draft, Imported, or Published status. This is displayed in the Status column. For information on opening the Dashboard, see Getting Started with the Connector for Episerver.
-
In the Actions column, click the arrow and select Remove Project from the context menu.
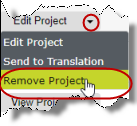
A message box opens, confirming that you want to remove the project.
- Click Yes to confirm.
The project is removed from the list.
Another message box opens, stating that the project was removed.
- Click OK to close the message box.