Getting Started
The Lionbridge Connector for Drupal TMGMT is a plug-in to Drupal’s Translation Management Tool (TMGMT) module. Its functionality is displayed to the users as part of Drupal TMGMT. The Lionbridge Connector supports all browsers that Drupal TMGMT supports.
The Connector supports Drupal 10 and 11. The version of the Connector described in this document supports Drupal 10 and Drupal 11.
To get started with the Lionbridge Connector:
- Install and configure the TMGMT module, including adding the languages you require and configuring specific content types for translation. For detailed instructions, refer to the Drupal TMGMT documentation, at https://www.drupal.org/node/1489984.
- Download the package for the latest version of the Lionbridge Connector from the following link: https://www.drupal.org/project/lionbridge_translation_provider.
- In Drupal, select Modules from the menu and then click Install new module to install the Lionbridge Connector package you downloaded in the previous step.
- Add the Lionbridge Connector as a provider to Drupal. For detailed instructions, see Adding Lionbridge as a Provider in Drupal TMGMT.
- Enable multilingual support for content types on your website. For detailed instructions, see Enabling Multilingual Support for Content Types on your Site.
- Enable multilingual support for individual fields of each supported content type. For detailed instructions, see Enabling Multilingual Support for Individual Fields.
Note: By default, enabling multilingual support for content types automatically enables multilingual support for all the fields of that content type.
1 - Adding Lionbridge as a Provider
Before you can send content directly from Drupal TMGMT to Lionbridge, you must add the Lionbridge Connector for Drupal TMGMT as a provider in Drupal TMGMT.
You may want to add Lionbridge as multiple providers in Drupal TMGMT, for example, if you want to use multiple Content API credentials or different provider configurations.
Adding Lionbridge as a translator in Drupal TMGMT requires the following three general steps:
- Send an email to connectors@lionbridge.com requesting access to the Content API v2.
- The Lionbridge Connector Support team creates a Content API V2 account for you.
- In Drupal TMGMT, you configure the connection to your Content API V2 account.
Detailed instructions follow below.
Note: The default configuration settings are appropriate for most users.
To add Lionbridge as a provider in Drupal TMGMT:
-
Download the package for the latest version of the Lionbridge Connector using the link provided.
-
In Drupal, select Modules from the menu and then click Install new module to install the Lionbridge Connector package you downloaded in the previous step.
-
After you receive a notification from the Lionbridge Connector Support team that your Content API V2 account has been created, log in to Drupal to complete the process.
-
In Drupal, select Translation > Providers from the menu.
The Providers page opens.
-
Click Add provider.
The Add Provider page opens.
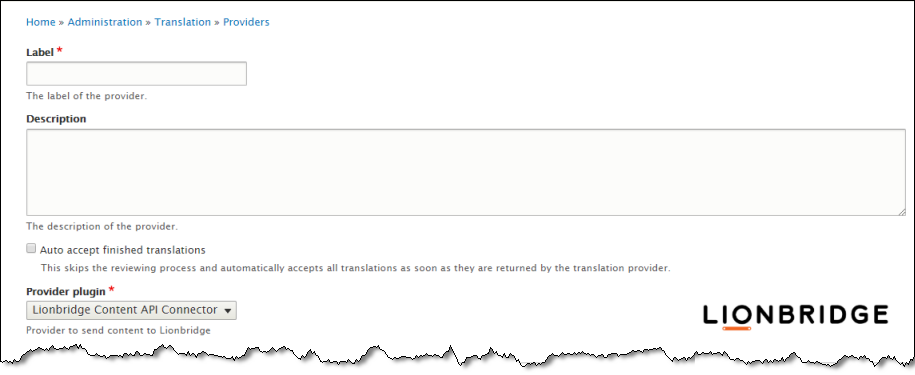
- Enter the following information:
Note: An asterisk (*) indicates a required field.
| Field |
Description |
| Label |
Your name for the Lionbridge Connector in Drupal TMGMT. This is what is displayed to users who select a translation provider (“provider”) when sending out content for translation. |
| Description |
Your description of the provider. |
| Auto accept finished translations |
Indicates whether to automatically accept all completed translations.- To automatically accept all translations without reviewing them first, select this check box.
- To review translations before accepting them, clear this check box.
|
-
In the Provider plugin dropdown list, select Lionbridge Content API. This is the Drupal TMGMT plug-in for Lionbridge translation services.
-
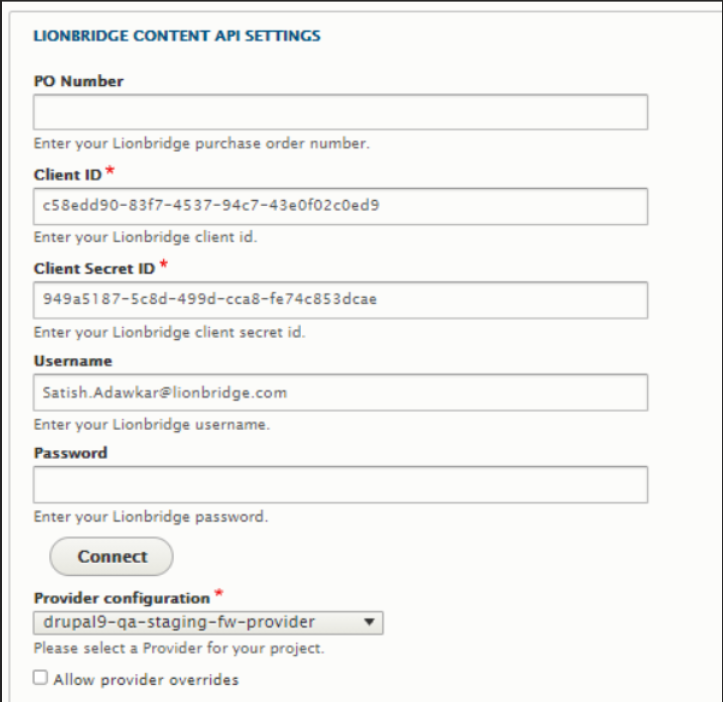
In the Lionbridge Content API Settings section, enter the following information:
| Field |
Description |
| Export to |
Your content is always exported in XLIFF format, which is the standard XML-based format for exchanging localizable data between applications. |
| XLIFF CDATA |
Select this check box to wrap the content in CData tags. This prevents the Connector from escaping special characters, and avoids the scenario of double-escaped characters.
Note: If you select this check box, the Connector ignores the Extended XLIFF processing setting, described next. |
| Extended XLIFF processing |
Select this check box to further process content semantics and mask HTML tags instead of escaping them:- The Connector wraps the text in CDATA tags.
- The Connector converts entity references for special characters, such as <, >, &, ‘, and “.
- The Connector wraps other HTML elements, such as <img> tags, in <bpt> xliff tags, outside CDATA).
Note: The Connector ignores this setting if the XLIFF CDATA check box, described above, is selected.
|
| Allow export-format overrides |
Select this check box to enable users to override the export-format settings when sending out content items for translation. |
| Use one export file for all items in job |
Select this check box to export all content items to one file. Clear this check box to export content items to multiple files. |
| Download method |
You can choose where to store exported files. Depending on your Drupal configuration, additional download methods and locations may be displayed in addition to Public local files served by the webserver.
Recommendation: Use a secure location to prevent unauthorized access. |
Lionbridge Content API
To obtain credentials for the Content API, you can contact
How to Contact Lionbridge Connector Support. |
|
| PO Number |
Optional. Enter a valid purchase order number that you set up in Lionbridge Freeway. |
| Client ID |
The Lionbridge Client ID for accessing the Content API, which enables you to use the Connector to send Drupal content items to Lionbridge for translation. |
| Client Secret ID |
The Lionbridge Client Secret ID for accessing the Content API, which enables you to use the Connector to send Drupal content items to Lionbridge for translation. |
| Username |
The Lionbridge Zendesk username for accessing the Lionbridge Content API V1, which enables you to see the translation jobs sent to Lionbridge Content API V1. |
| Password |
The Lionbridge Zendesk username for accessing the Lionbridge Content API V1, which enables you to see the translation jobs sent to Lionbridge Content API V1. |
- Click Connect. The Connector sends the credentials (Client ID and Client Secret ID) to the Content API. The Connector stores the returned token for future sessions.
Notes: The Connector does not save your Client ID or Client Secret ID. You must click Connect, at least once, to generate the access token required to use the Connector.
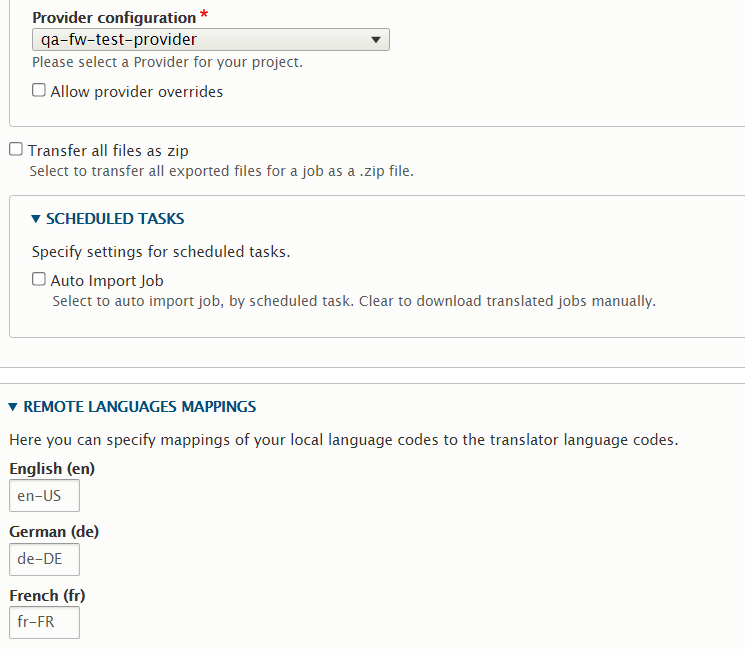
- Enter the following information in the bottom part of the page.
| Field |
Description |
| Provider configuration |
The default translation provider configuration. This translation provider will be displayed by default when users send content out for translation. |
| Allow provider overrides |
Optional. This option determines whether users can change the translation provider when submitting jobs.- Select this check box to enable users to change the translation provider when submitting jobs.
- Clear this check box to prevent users from changing the translation provider when submitting jobs. This is the default value.
|
| Transfer all files as zip |
Optional. Select this check box to instruct the Connector to deliver all files for translation in a single .zip file. |
| Scheduled Tasks |
|
| Auto Import Job |
Optional. In the sub-section, select the check box. This instructs the Connector to deliver all translated content automatically, as soon as it is ready. |
- Optional. In the Remote Languages Mappings section, you can update the default mapping between each language in Drupal TMGMT and the corresponding Lionbridge Freeway language code.
Each text box in this section has a label with the language name and code of each language set up in the Drupal TMGMT Languages page. (To open this page, select Configuration > Regional and language > Languages from the menu.)
- Click Save.
The Providers page reopens, displaying the provider you just created.

If you want to add another provider to support different Content API credentials or different provider configurations, repeat the steps above.
2 - Enabling Multilingual Support for Content Types
Before you can send content directly from Drupal TMGMT to Lionbridge, you must enable multilingual support on your Drupal website for each content type that you want to be able to send to Lionbridge for translation.
By default, the Connector supports sending out the following default content types for translation:
- article
- basic page
- translatable node
You can configure other, custom content types for translation.
Note: Lionbridge does not guarantee that other, custom content types are supported.
To enable multilingual support on your site:
- In Drupal, select Structure > Content types from the menu.
- Either click Add content type to add a new content type, or in the Operations column, click Edit to edit an existing content type.
- At the bottom left, click the Language settings tab.
The page updates.
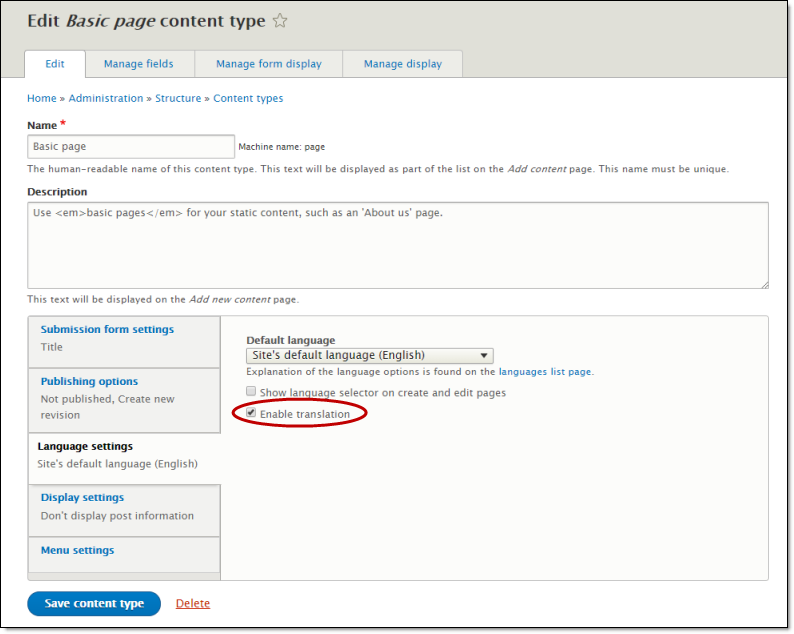
- Select the Enable translation check box.
- Click Save content type.
Important: Repeat steps 2-5 for each content type that you want to be able to send out for translation.
3 - Enabling Multilingual Support for Individual Fields
Before you can send content directly from Drupal TMGMT to Lionbridge, you must enable multilingual support for each field in each content type that you want to be able to send to Lionbridge for translation.
Note: By default, enabling multilingual support for content types automatically enables multilingual support for all the fields of that content type.
By default, the Connector supports sending out all the fields in the following default content types for translation:
- article
- basic page
- translatable node
You can configure other, custom fields for translation.
Note: Lionbridge does not guarantee that other, custom fields are supported.
To enable multilingual support for a field:
- In Drupal, select Structure > Content types from the menu.
The Content types page opens.
- In the Operations column, click Manage fields for a content type, for example for Article.
The Manage fields page opens, listing all the fields in that content type.
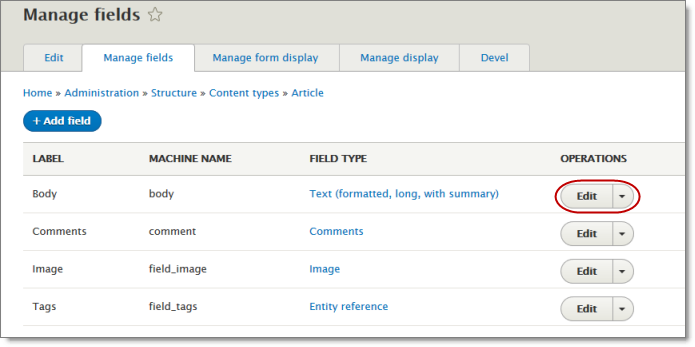
- In the Operations column, click Edit for the field to configure, for example for Body.
The page for the field settings opens.
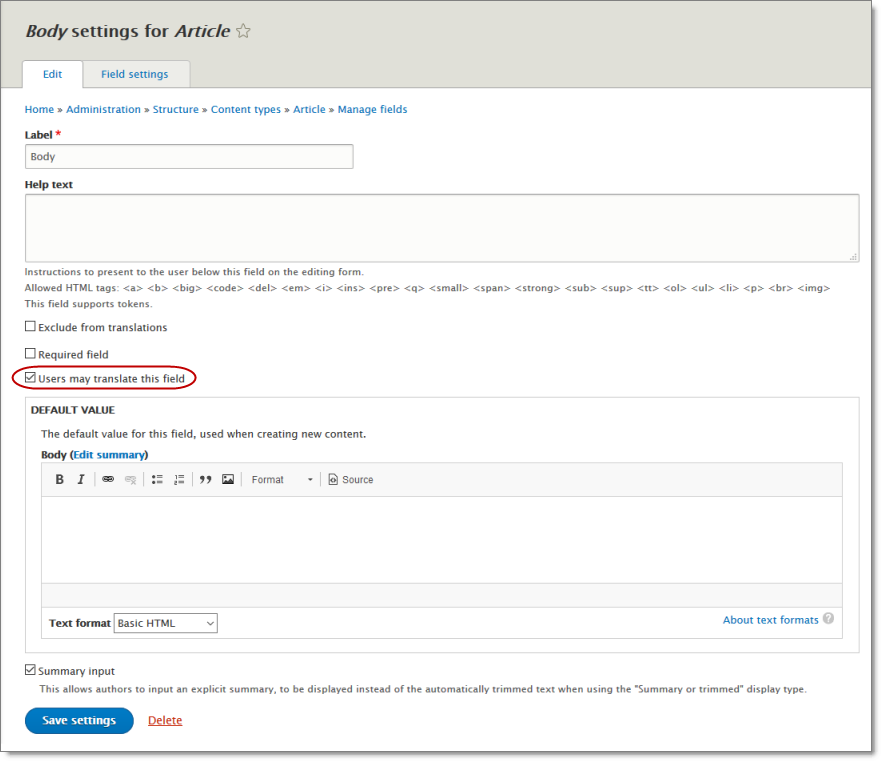
-
Select the Users may translate this field check box.
-
Click Save settings.
Important: Repeat the previous steps for each field in each content type that you want to be able to send out for translation.
4 - The Lionbridge Connector at a Glance
The Connector uses the Drupal TMGMT module’s user interface for managing your translations with Lionbridge. You use the following pages to view manage your translations:
| Page |
How to Open |
What It Displays |
What You Can Do Here |
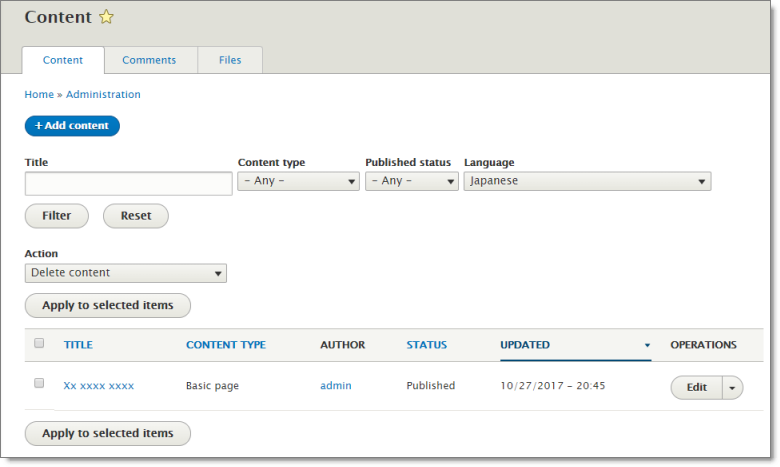
| Content page |
Click the Content menu. |
all content items, including those without an assigned language |
view a list of items |
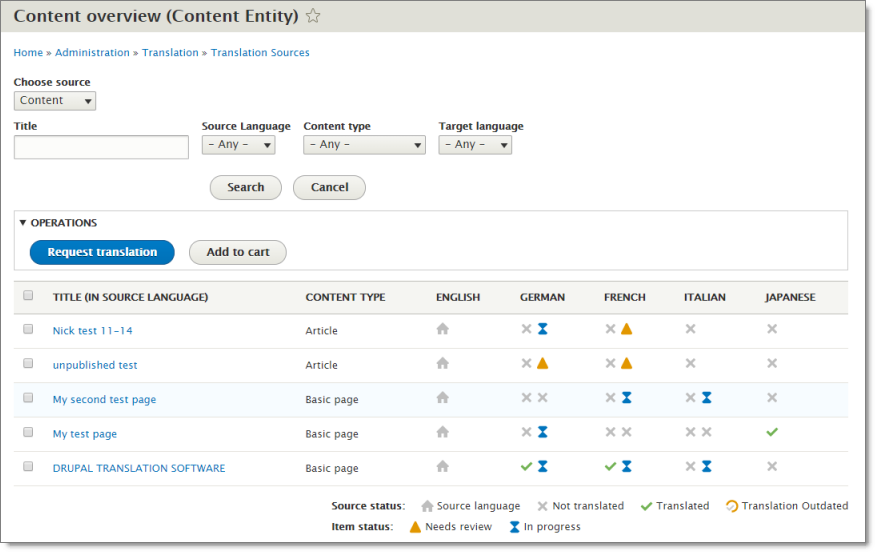
| Content overview page / Sources tab |
Select Translation > Sources from the menu. |
all items with an assigned language, both submitted and non submitted |
view a list of items that have languages assigned |
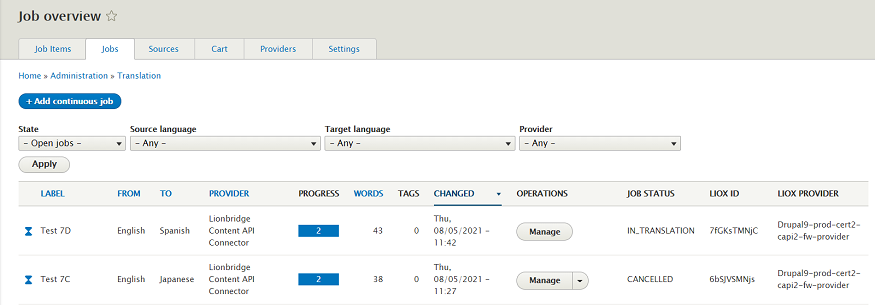
| Job overview page / Jobs tab |
Select Translation > Jobs from the menu. |
all submitted jobs, including jobs that have finished |
abort jobs, delete jobs, accept translations, open the Job page |
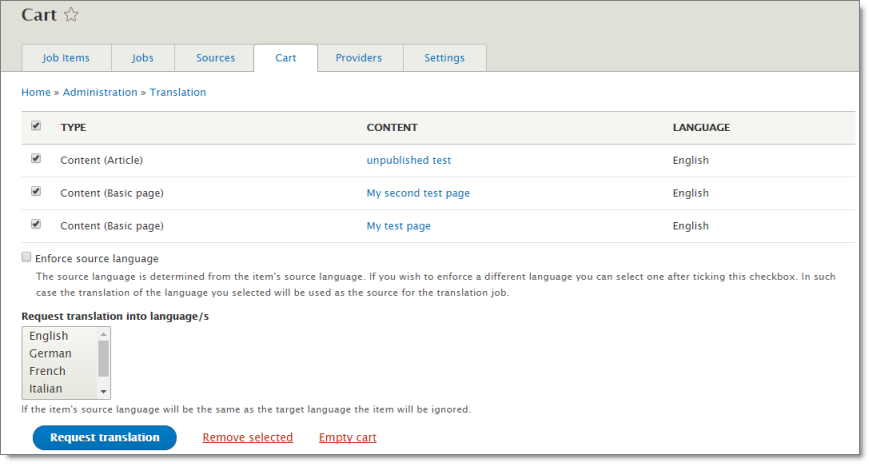
| Translation page / Cart tab |
Select Translation > Cart from the menu. |
all items that were added to the cart |
select the target languages for a job and request translation, which opens the Job overview page |
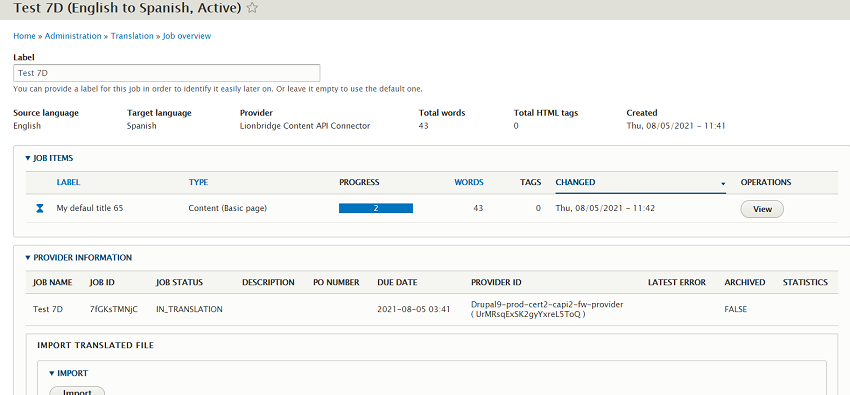
| Job overview page (no displayed page name) |
Click Request translation or Request translations in the following pages:- Translations of page for an item
- Content overview page / Sources tab
|
a list of all items in a job, including word count, and fields for specifying the job settings |
specify the job settings for the translation job for the specified target language |
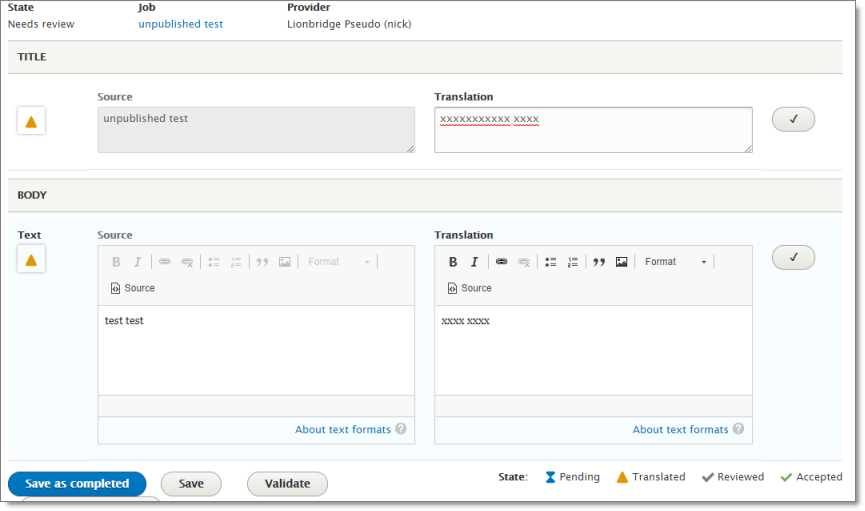
| Review Translation page (no displayed page name) |
In the Job page, when the job is in Translated state, click Review. |
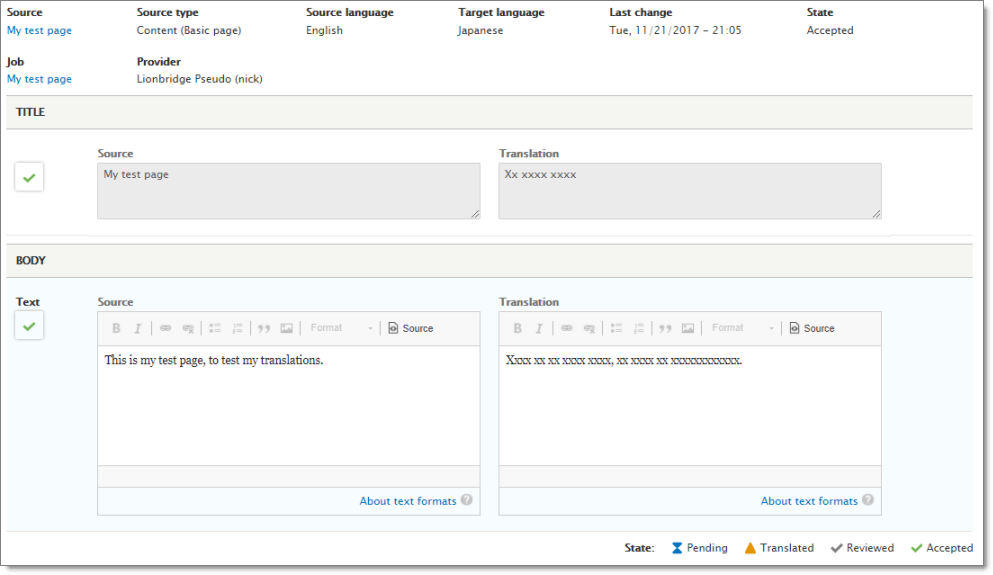
source and target (translated) content |
compare and update source content and its translation |
| View Translation page (no displayed page name) |
In the Job page, when the job is in Accepted state, click View. |
source and target (translated) content |
compare source content and its translation |
Screen captures of pages
Content page
Content overview page / Sources tab
Job overview page / Jobs tab
Translation page / Cart tab
Job overview page (no displayed page name)

Job page (no displayed page name)
[Review Translation page (no displayed page name)
View Translation page (no displayed page name)
Important concepts in Drupal TMGMT
|
|
| Request translation |
Opens the Job overview page, where you group items into a translation job and add job parameters. |
| Submit to provider |
Drupal TMGMT creates a job to translate specified items into specified target language and sends it to a provider (the Connector). |
| Add to cart |
Adds selected items to the Cart. |
5 - Drupal TMGMT Icon Legend
Drupal TMGMT uses icons to indicate the translation state/status of source- and target-language items.
Source state/status icons in Drupal TMGMT
The following icons indicate the translation state/status of source-language items.
| Icon |
Description |
 |
Indicates the source language of an item. |
 |
Source item has not been translated. |
 |
Source item has been translated. |
Target state/status icons in Drupal TMGMT
The following icons indicate the translation state/status of target-language items.
| Icon |
Description |
 |
Translation has not been processed. |
 |
Translation is in progress, or pending. |
 |
Translation is ready for review. |
 |
Translation has been reviewed. |
 |
Translation has been auto-accepted. |
Job Status, Liox ID and Provider Name in Drupal TMGMT
These are optional columns that can be bring to the view by clicking the Edit view option, from the  view edit icon and then adding.
Then adding the fields by clicking “Add”.
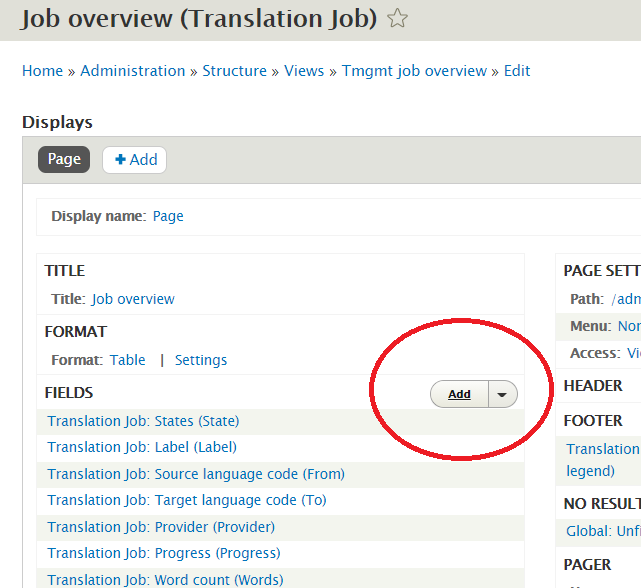
And selecting the Lionbridge provider fields.
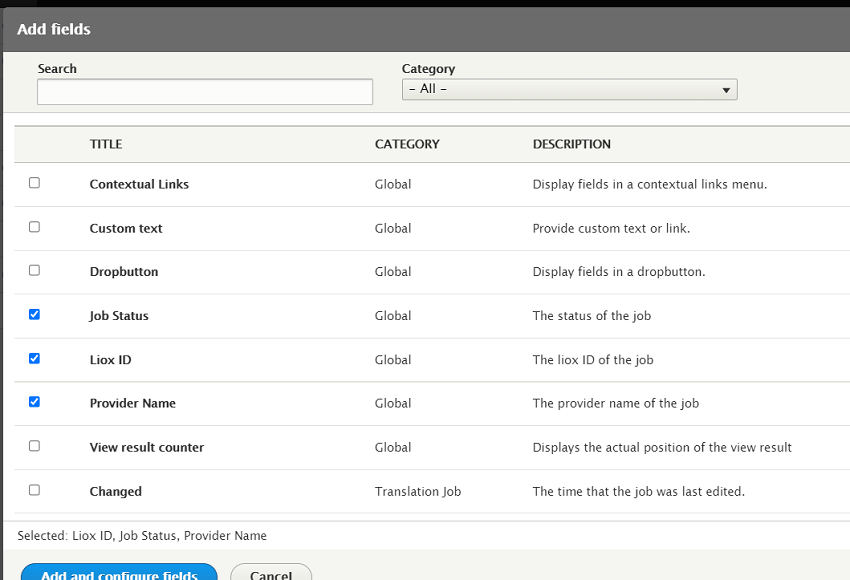
|
|
| Field |
Description |
| Job Status |
Status of the job within Lionbridge systems |
| Liox ID |
Job ID within Lionbridge systems |
| Provider Name |
Name of selected workflow/provider used by the job |
6 - Pre-Production Testing
After you complete the configuration, your Lionbridge Connector for Drupal TMGMT installation is ready for testing.
Once you have installed TMGMT and configured the Connector, we recommend contacting Lionbridge Connector Support to obtain the endpoint and credentials for testing. For details, see How to Contact Lionbridge Connector Support.
The testing environment enables you to test translations either using machine translation (MT) or by automatically replacing every character in submitted content with the letter x (pseudo-translation). This enables you to test that the Connector is communicating correctly between Drupal TMGMT and Lionbridge, and it ensures that all the content you want translated is correctly extracted and handled by Lionbridge services. You set up this environment as a separate provider.
To add the testing environment as a provider in Drupal TMGMT:
- In Drupal, select Translation > Providers from the menu.
The Providers page opens.
- Click Add provider.
The Add Provider page opens.

- Enter the following information:
Note: An asterisk (*) indicates a required field.
| Field |
Description |
| Label |
Your name for the Lionbridge Connector in Drupal TMGMT. This is what is displayed to users who select a translation provider (“provider”) when sending out content for translation. |
| Description |
Your description of the provider, for example: Test Environment. |
| Auto accept finished translations |
Indicates whether to automatically accept all completed translations.- To automatically accept all translations without reviewing them first, select this check box.
- To review translations before accepting them, clear this check box.
|
-
In the Provider plugin dropdown list, select Lionbridge Content API Connector. This is the Drupal TMGMT plug-in for Lionbridge translation services.
-
In the Lionbridge Content API Connector Plugin Settings section, enter the following information:

| Field |
Description |
| Export to |
Your content is always exported in XLIFF format, which is the standard XML-based format for exchanging localizable data between applications. |
| XLIFF CDATA |
Select this check box to wrap the content in CData tags. This prevents the Connector from escaping special characters, and avoids the scenario of double-escaped characters.
Note: If you select this check box, the Connector ignores the Extended XLIFF processing setting, described next. |
| Extended XLIFF processing |
Select this check box to further process content semantics and mask HTML tags instead of escaping them:- The Connector wraps the text in CDATA tags.
- The Connector converts entity references for special characters, such as <, >, &, ‘, and “.
- The Connector wraps other HTML elements, such as <img> tags, in <bpt> xliff tags, outside CDATA).
Note: The Connector ignores this setting if the XLIFF CDATA check box, described above, is selected. |
| Allow export-format overrides |
Select this check box to enable users to override the export-format settings when sending out content items for translation. |
| Use one export file for all items in job |
Select this check box to export all content items to one file. Clear this check box to export content items to multiple files. |
| Download method |
You can choose where to store exported files. Depending on your Drupal configuration, additional download methods and locations may be displayed in addition to Public local files served by the webserver.
Recommendation: Use a secure location to prevent unauthorized access. |
Lionbridge Content API Settings
To obtain Freeway-test-environment credentials for the Content API V2, create create a support ticket at Zendesk. The Lionbridge Connector Support team will provision an account for you. For detailed instructions, see How to Contact Lionbridge Connector Support. |
|
| PO Number |
Optional. Enter a valid purchase order number that you set up in Lionbridge Freeway. |
| Client ID |
The Lionbridge Client ID for accessing the Content API, which enables you to use the Connector to send Drupal content items to Lionbridge for translation. |
| Client Secret ID |
The Lionbridge Client Secret ID for accessing the Content API, which enables you to use the Connector to send Drupal content items to Lionbridge for translation. |
| Username |
The Lionbridge Zendesk username for accessing the Lionbridge Content API V1, which enables you to see the translation jobs sent to Lionbridge Content API V1. |
| Password |
The Lionbridge Zendesk username for accessing the Lionbridge Content API V1, which enables you to see the translation jobs sent to Lionbridge Content API V1. |
- Click Connect. The Connector sends the credentials (Client ID and Client Secret ID) to the Content API. The Connector stores the returned token for future sessions.
Notes: The Connector does not save your Client ID and Client Secret ID. You must click Connect, at least once, to generate the access token required to use the Connector.
- Enter the following information in the bottom part of the page.

| Field |
Description |
| Transfer all files as zip |
Optional. Select this check box to instruct the Connector to deliver all files for translation in a single .zip file. |
| Scheduled Tasks |
|
| Auto Import Job |
Optional. In the sub-section, select the check box. This instructs the Connector to deliver all translated content automatically as soon as it is ready. |
- Optional. In the Remote Languages Mappings section, you can update the default mapping between each language in Drupal TMGMT and the corresponding Lionbridge Freeway language code.
Each text box in this section has a label with the language name and code of each language set up in the Drupal TMGMT Languages page. (To open this page, select Configuration > Regional and language > Languages from the menu.)
- Click Save.
The Providers page opens, displaying the provider you just created.
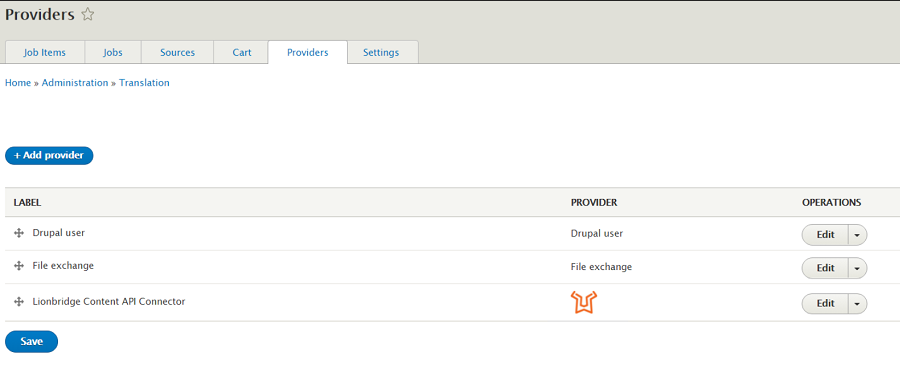
- If you want to add another provider to test different Content API credentials or different provider configurations, repeat the steps above.
We recommend sending only a few pages for translation in one language as an initial test. For detailed instructions, see Sending Content to Lionbridge. Once successful, you can send as many languages as required.
If you have any concerns or questions, please contact Lionbridge Connector Support. For details, see How to Contact Lionbridge Connector Support.


