This the multi-page printable view of this section. Click here to print.
Drupal TMGMT
- 1: Drupal 7 TMGMT Setup and User Guide
- 1.1: Welcome to the Lionbridge Connector for Drupal 7 TMGMT
- 1.1.1: The Translation Lifecycle
- 1.1.2: Using this Guide
- 1.1.3: Terminology
- 1.1.4: How to Contact Lionbridge Connector Support
- 1.1.5:
- 1.2: Getting Started
- 1.2.1: Adding Lionbridge as a Translator
- 1.2.2: Enabling Multilingual Support for Content Types
- 1.2.3: Enabling Multilingual Support for Individual Fields
- 1.2.4: The Lionbridge Connector at a Glance
- 1.2.5: Pre-Production Testing
- 1.3: Sending Content to Lionbridge
- 1.3.1: Specifying a Language for Content
- 1.3.1.1: Specifying a Language while Adding an Item
- 1.3.1.2: Specifying a Language while Editing an Item
- 1.3.2: Submitting Content Directly to the Connector
- 1.3.2.1: Submitting One Item Directly to the Connector
- 1.3.2.2: Submitting Multiple Items Directly to the Connector
- 1.3.3: Submitting Content to the Connector via the Cart
- 1.3.3.1: Adding One Item to the Cart
- 1.3.3.2: Adding Multiple Items to the Cart
- 1.3.3.3: Removing Items from the Cart
- 1.3.3.4: Submitting Items in the Cart to the Connector
- 1.4: Tracking Your Translation Job
- 1.5: Importing Your Translated Content
- 1.6: Other Tasks
- 1.6.1: Aborting Translation Jobs
- 1.6.2: Resubmitting Aborted Translation Jobs
- 1.6.3: Deleting Jobs
- 1.6.4: Editing Translated Items
- 1.6.5: Redelivering Translated Content to Drupal TMGMT
- 1.7: Viewing and Reviewing Translated Jobs
- 1.7.1: Viewing All Translated Jobs
- 1.7.2: Viewing One Translated Job
- 1.7.3: Reviewing One Translated Job
- 2: Drupal TMGMT Setup and User Guide
- 2.1: Welcome to the Lionbridge Connector for Drupal TMGMT
- 2.1.1: The Translation Lifecycle
- 2.1.2: Using this Guide
- 2.1.3: Terminology
- 2.1.4: How to Contact Lionbridge Connector Support
- 2.2: Getting Started
- 2.2.1: Adding Lionbridge as a Provider
- 2.2.2: Enabling Multilingual Support for Content Types
- 2.2.3: Enabling Multilingual Support for Individual Fields
- 2.2.4: The Lionbridge Connector at a Glance
- 2.2.5: Drupal TMGMT Icon Legend
- 2.2.6: Pre-Production Testing
- 2.3: Sending Content to Lionbridge
- 2.3.1: Specifying a Language for Content
- 2.3.1.1: Specifying a Language while Adding an Item
- 2.3.1.2: Specifying a Language while Editing an Item
- 2.3.2: Submitting Content Directly to the Connector
- 2.3.2.1: Submitting One Item Directly to the Connector
- 2.3.2.2: Submitting Multiple Items Directly to the Connector
- 2.3.3: Submitting Content to the Connector via the Cart
- 2.3.3.1: Adding One Item to the Cart
- 2.3.3.2: Adding Multiple Items to the Cart
- 2.3.3.3: Removing Items from the Cart
- 2.3.3.4: Submitting Items in the Cart to the Connector
- 2.4: Tracking Your Translation Job
- 2.5: Importing Your Translated Content
- 2.6: Viewing and Reviewing Translated Jobs
- 2.6.1: Viewing One Translated Job
- 2.6.2: Reviewing One Translated Job
- 2.7: Other Tasks
- 2.7.1: Aborting Translation Jobs
- 2.7.2: Resubmitting Aborted Translation Jobs
- 2.7.3: Deleting Jobs
- 2.7.4: Editing Translated Items
- 2.7.5: Redelivering Translated Content to Drupal TMGMT
1 - Drupal 7 TMGMT Setup and User Guide
1.1 - Welcome to the Lionbridge Connector for Drupal 7 TMGMT
Welcome to the Lionbridge Connector for Drupal 7 TMGMT
Welcome to the Lionbridge Connector for Drupal 7 TMGMT (Connector)] version 2.4. This Connector enables you to automate sending and retrieving content from Drupal TMGMT to Lionbridge for translation, which dramatically reduces the effort required to create, maintain, and publish Web content in multiple languages.
1.1.1 - The Translation Lifecycle
The Translation Lifecycle
The translation lifecycle is the broad process of selecting content, sending it out for translation, and then receiving the translated content back from translation. This set of steps usually fits inside a larger, more general process called the content lifecycle, which is the process of creating, reviewing, editing, approving, and publishing content. When you consider the translation lifecycle and the content lifecycle together, you have the global content value chain, which is the strategy for managing multilingual content. Remember that localizing content is a subset of steps in the broader content lifecycle. This will improve your focus on key localization considerations, improve processes, and keep all content stakeholders included. Together, this results in better content management.
1.1.2 - Using this Guide
Using this Guide
Purpose of this guide
This guide describes how to use the Lionbridge Connector for Drupal TMGMT (Connector) to manage your translation lifecycle. It describes how to send out content for translation and receive it back from translation.
Who should use this guide
This guide is intended for content editors, project, marketing, localization or translation managers, or others who are responsible for creating, editing, or approving content for translation that resides in Drupal.
What your company setup should be
This document assumes that:
- Your company already uses Drupal and has installed the TMGMT module.
- Your company has created a Lionbridge Freeway account, at https://freeway.lionbridge.com.
What you should already know
This document assumes that:
- You have a strong working knowledge of Drupal.
- You are familiar with your company’s translation process and requirements.
- You have valid user credentials to log into Drupal.
Note: Not all the features described in this guide may be available. Feature availability depends on both your company’s Drupal, TMGMT and Lionbridge Connector setup and the roles to which you are assigned. If you cannot access functionality that you need, contact your company’s Drupal administrator.
How this guide is organized
This guide contains the following chapters:
Chapter | Description |
Welcome to the Lionbridge Connector for Drupal 7 TMGMT | A brief description of the Lionbridge solution for Drupal TMGMT and how it fits into the translation lifecycle. It also includes information about this guide and Lionbridge Connector Support contact information. |
Getting Started with the Lionbridge Connector for Drupal TMGMT |
How to get started and an overview of the Lionbridge Connector interface. |
Sending Content to Lionbridge |
How to send out Drupal content for translation. |
Tracking Your Translation Job |
How to monitor the translation status of content and jobs that you sent out for translation. |
Importing Your Translated Content into Drupal TMGMT |
How to import your translated content. Relevant only if the Receive translated jobs automatically feature is not configured. |
Viewing and Reviewing Translated Jobs |
How to view and review translated content. |
| How to perform other translation tasks, such as:
- aborting jobs
- resubmitting aborted jobs
- deleting jobs
- editing translated content
- redelivering translated content to Drupal TMGMT
Documentation conventions
This guide uses the following conventions:
| Convention
| Description
Bold |
| Highlights screen elements such as buttons, menu items, and fields.
Courier |
| Highlights input, file names, and paths.
Italics |
| Highlights terms for emphasis, variables, or document titles.
| >
| Indicates a menu choice. For example, “Select Translation > Sources.”
1.1.3 - Terminology
Terminology
Content type | | The content type of an item defines the fields it includes. For example, a basic Page content type has title and body fields. In Drupal, you can create custom content types.
Drupal | A free and open source content-management framework for building websites. |
Freeway | A Lionbridge translation portal and a translation provider. |
Job | | One or more items that Drupal TMGMT groups together into a single translation job. All items in the job have the same target language. If you request a quote for your translation job, you must log into Lionbridge Freeway to authorize the quote before the translation process starts.
Lionbridge | The publisher of the Freeway translation portal and a translation provider. Users connect to the Freeway translation portal to submit content to and retrieve content from the Lionbridge translation provider. |
Lionbridge Connector for Drupal TMGMT (Connector) | The connector software that Lionbridge has developed and provides that plugs into your Drupal TMGMT installation to provide connectivity to the Lionbridge translation services. In this document it is referred to as the Connector. This is the software you are installing and configuring as you work through this document. |
Source language | The original language of the content. Content is translated from the source language. |
Target language | The translated language of the content. Content is translated into the target language. |
TMGMT | The Translation Management Tool (TMGMT) module in Drupal provides a tool set for translating content from Drupal. It supports plug-ins from various translation providers, which it calls translators. |
Translator | The term in the Drupal TMGMT module that describes a connector between the module and a translation provider. In the context of this help, the Lionbridge Connector for Drupal TMGMT is a translator in Drupal. It provides a direct connection to the Lionbridge translation services. |
1.1.4 - How to Contact Lionbridge Connector Support
How to Contact Lionbridge Connector Support
You can submit a support ticket either:
- by emailing connectors@lionbridge.com
- from the Lionbridge Connector Zendesk page https://lionbridge-connectors.zendesk.com/
See also:
1.1.5 -
1.2 - Getting Started
Getting Started with the Lionbridge Connector for Drupal TMGMT
The Lionbridge Connector for Drupal TMGMT is a plug-in to Drupal’s Translation Management Tool (TMGMT) module. Its functionality is displayed to the users as part of Drupal TMGMT. The Lionbridge Connector supports all browsers that Drupal TMGMT supports. The Connector supports Drupal 7 and 8. The version of the Connector described in this document supports Drupal 7. For information about Drupal 8 support, please contact Lionbridge Connector Support. For details, see How to Contact Lionbridge Connector Support.
Upgrading from version 1.x of the Connector
When upgrading from version 1.x of the Connector to the current version:
- You can use the older Connector version to finish processing jobs submitted with that version.
Recommendation: When all jobs submitted with the older Connector version are complete, uninstall the older version.
- You must use the newer Connector version to submit and process all new jobs.
Upgrading from version 2.0 of the Connector
When upgrading from version 2.0 of the Connector to the current version:
- Complete the processing of all jobs sent with the older version of the Connector.
Warning: If you proceed to the next step without completing all jobs, any jobs that are in progress will be aborted.
-
From the Drupal user interface, uninstall the older version of the Connector.
-
On the server, delete the connector folder.
-
From the Drupal user interface, install the newer Connector version.
To get started with the Lionbridge Connector:
- Install and configure the TMGMT module, including adding the languages you require and configuring specific content types for translation. For detailed instructions, refer to the Drupal TMGMT documentation, at https://www.drupal.org/node/1489984.
- Download the package for the latest version of the Lionbridge Connector from the following link: https://www.drupal.org/project/lionbridge_translation_provider.
- In Drupal, select Modules from the menu and then click Install new module to install the Lionbridge Connector package you downloaded in the previous step.
- Add the Lionbridge Connector as a translator to Drupal. For detailed instructions, see Adding Lionbridge as a Translator in Drupal TMGMT.
- Enable multilingual support for content types on your website. For detailed instructions, see Enabling Multilingual Support for Content Types on your Site.
- Enable multilingual support for individual fields of each supported content type. For detailed instructions, see Enabling Multilingual Support for Individual Fields.
Note: By default, enabling multilingual support for content types automatically enables multilingual support for all the fields of that content type.
1.2.1 - Adding Lionbridge as a Translator
Adding Lionbridge as a Translator in Drupal TMGMT
Before you can send content directly from Drupal TMGMT to Lionbridge, you must add the Lionbridge Connector for Drupal TMGMT as a translator in Drupal TMGMT. You may want to add Lionbridge as multiple translators in Drupal TMGMT, for example, if you want to use multiple Content API credentials or different translator configurations. Adding Lionbridge as a translator in Drupal TMGMT requires the following three general steps:
- You create a Zendesk account and ticket on the Lionbridge Connectors site.
- The Lionbridge Connector Support team creates a Clay Tablet account for you.
- In Drupal TMGMT, you configure the connection to your Clay Tablet account.
Detailed instructions follow below. Note: The default configuration settings are appropriate for most users.
To add Lionbridge as a translator in Drupal TMGMT:
- Create a Zendesk account and password at https://connectors.zendesk.com. For detailed instructions, see How to Contact Lionbridge Connector Support.
- Create a new Zendesk support ticket to notify Lionbridge Connector Support that you need a Clay Tablet account for the Connector. For detailed instructions, see How to Contact Lionbridge Connector Support.
The Lionbridge Connector Support team will notify you when your Content API account has been created. This account uses your Zendesk credentials.
- After you receive a notification from the Lionbridge Connector Support team that your Content API account has been created, log in to Drupal to complete the process.
- In Drupal, select Configuration > Regional and language > Translation Management Translators > Add Translator from the menu.
The  Add Translator page opens.
![]()
- Enter the following information:
Note: An asterisk (*) indicates a required field.
Field | Description |
Label | Your name for the Lionbridge Connector in Drupal TMGMT. This is what is displayed to users who select a translator when sending out content for translation. |
Description | Your description of the translator. |
Translator Settings - Auto accept finished translations | | Indicates whether to automatically accept all completed translations.
-
To automatically accept all translations without reviewing them first, select this check box.
-
To review translations before accepting them, clear this check box.
-
In the Translator plugin dropdown list, select Clay Tablet Connector. This is the Drupal TMGMT plug-in for Lionbridge translation services.
- In the Clay Tablet Connector Plugin Settings section, enter the following information:
![]()
Field | Description |
Export to | Your content is always exported in XLIFF format, which is the standard XML-based format for exchanging localizable data between applications. |
XLIFF CDATA | | Select this check box to wrap the content in CData tags. This prevents the Connector from escaping special characters, and avoids the scenario of double-escaped characters. Note: If you select this check box, the Connector ignores the Extended XLIFF processing setting, described next.
Extended XLIFF processing | | Select this check box to further process content semantics and mask HTML tags instead of escaping them:
- The Connector wraps the text in CDATA tags.
- The Connector converts entity references for special characters, such as <, >, &, ‘, and “.
- The Connector wraps other HTML elements, such as <img> tags, in <bpt> xliff tags, outside CDATA).
Note: The Connector ignores this setting if the XLIFF CDATA check box, described above, is selected.
Allow export-format overrides | Select this check box to enable users to override the export-format settings when sending out content items for translation. |
Use one export file for all items in job | Select this check box to export all content items to one file. Clear this check box to export content items to multiple files. |
Download method | | You can choose where to store exported files. Depending on your Drupal configuration, additional download methods and locations may be displayed in addition to Public local files served by the webserver. Recommendation: Use a secure location to prevent unauthorized access.
| Clay Tablet Settings
To obtain credentials for the Clay Tablet, create a Zendesk account at https://connectors.zendesk.com and create a support ticket. The Lionbridge Connector Support team will provision an account for you. For detailed instructions, see How to Contact Lionbridge Connector Support.
PO number | | Optional. Enter a valid purchase order number that you set up in Lionbridge Freeway.
Username | The Lionbridge Zendesk username for accessing the Clay Tablet, which enables you to use the Connector to send Drupal content items to Lionbridge for translation. |
Password | The Lionbridge Zendesk password for accessing the Clay Tablet, which enables you to use the Connector to send Drupal content items to Lionbridge for translation. |
- Click Connect. The Connector sends the credentials (username and password) to the Clay Tablet. The Connector stores the returned token for future sessions.
Notes: The Connector does not save your username or password. You must click Connect, at least once, to generate the access token required to use the Connector.
- Enter the following information in the bottom part of the page.
![]()
Field | Description |
Provider configuration | The default translation provider configuration. This translation provider will be displayed by default when users send content out for translation. |
Allow provider overrides | | Optional. This option determines whether users can change the translation provider when submitting jobs.
- Select this check box to enable users to change the translation provider when submitting jobs.
- Clear this check box to prevent users from changing the translation provider when submitting jobs. This is the default value.
Transfer all files as zip | Optional. Select this check box to instruct the Connector to deliver all files for translation in a single .zip file. |
Scheduled Tasks |
Receive translated jobs automatically | Optional. In the sub-section, select the check box. This instructs the Connector to deliver all translated content automatically, as soon as it is ready. |
- Optional. Click Remote Languages Mappings to expand this section. You can update the default mapping between each language in Drupal TMGMT and the corresponding Lionbridge Freeway language code.
![]()
Each text box in this section has a label with the language name and code of each language set up in the Drupal TMGMT Languages page. (To open this page, select Configuration > Regional and language > Languages from the menu.)
-
For each language, select the Lionbridge Freeway language code corresponding to the Drupal language.
-
Click Save translator.
The Translation Management Translators page opens, displaying the translator you just created.
![]()
If you want to add another translator to support different Content API credentials or different translator configurations, repeat the steps above.
1.2.2 - Enabling Multilingual Support for Content Types
Enabling Multilingual Support for Content Types on your Site
Before you can send content directly from Drupal TMGMT to Lionbridge, you must enable multilingual support on your Drupal website for each content type that you want to be able to send to Lionbridge for translation.
To enable multilingual support on your site:
- In the Structure menu, select content types.
- Either click Add content type to add a new content type or click edit to edit an existing content type.
- In the menu on the left, click Publishing options.
The page updates.
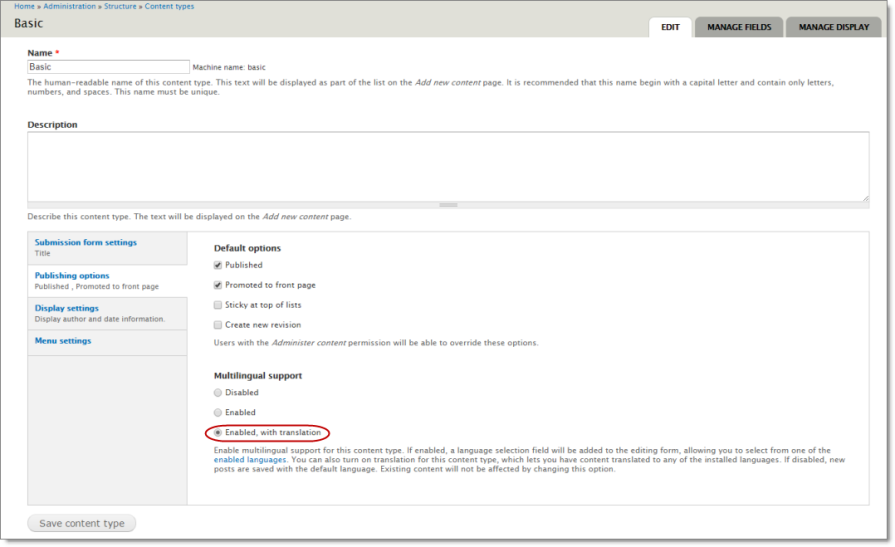
- In the Multilingual support section, select the Enabled, with translation radio button.
- Click Save content type.
Important: Repeat steps 2-5 for each content type that you want to be able to send out for translation.
1.2.3 - Enabling Multilingual Support for Individual Fields
Enabling Multilingual Support for Individual Fields
Before you can send content directly from Drupal TMGMT to Lionbridge, you must enable multilingual support for each field in each content type that you want to be able to send to Lionbridge for translation. Note: By default, enabling multilingual support for content types automatically enables multilingual support for all the fields of that content type. By default, the Connector supports sending out all the fields in the following default content types for translation:
- article
- basic page
- translatable node
You can configure other, custom fields for translation. Note: Lionbridge does not guarantee that other, custom fields are supported.
To enable multilingual support for a field:
- In Drupal, select Structure > Content types from the menu.
The Content types page opens.
- In the Operations column, click Manage fields for a content type, for example for Translatable Content.
The Manage fields page opens, listing all the fields in that content type.
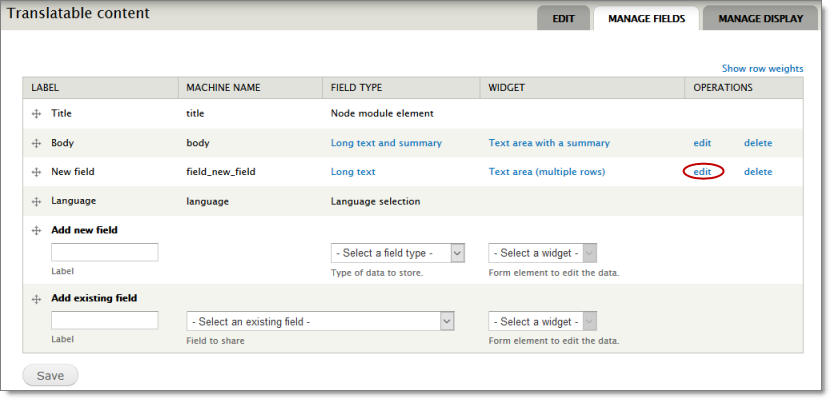
- In the Operations column, click Edit for the field to configure, for example for New Field.
The page for the field settings opens.
![]()
- Select the Users may translate all occurrences of this field check box.
- Click Save settings.
Important: Repeat the previous steps for each field in each content type that you want to be able to send out for translation.
1.2.4 - The Lionbridge Connector at a Glance
The Lionbridge Connector for Drupal TMGMT at a Glance
The Connector uses the Drupal TMGMT module’s user interface for managing your translations with Lionbridge. You use the following pages to view manage your translations:
Page | How to Open | What It Displays | What You Can Do Here |
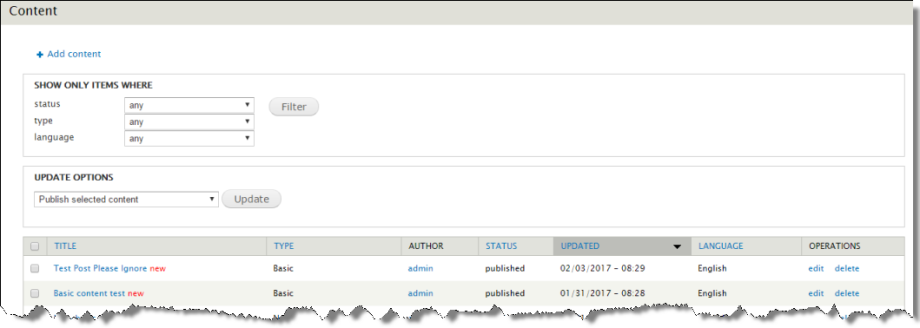
Content page | Click the Content menu. | all content items, including those without an assigned language | view a list of items |
Content overview page / Sources tab | Select Translation > Sources from the menu. | all items with an assigned language, both submitted and non submitted | view a list of items that have languages assigned |
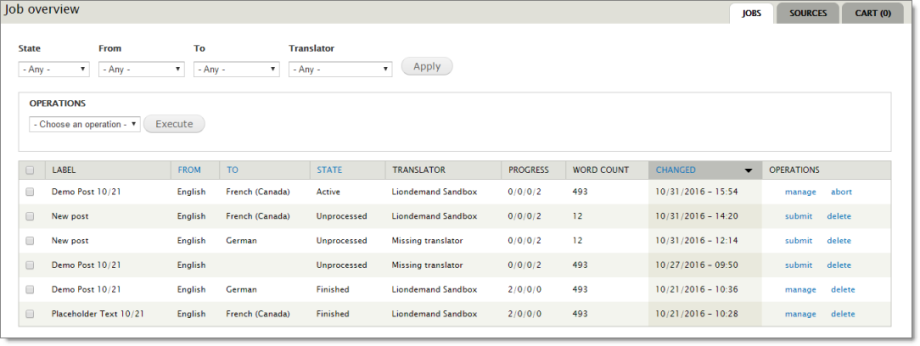
Job overview page / Jobs tab | Click the Translation menu. | all submitted jobs, including jobs that have finished | abort jobs, delete jobs, accept translations, open the Job page |
Translation page / Cart tab | Select Translation > Cart from the menu. | all items that were added to the cart | select the target languages for a job and request translation, which opens the Checkout page |
Checkout page (no displayed page name) | | Click Request translation or Request translations in the following pages:
- Translations of page for an item
- Content overview page / Sources tab
a list of all items in a job, including word count, and fields for specifying the job settings | specify the job settings for the translation job for the specified target language |
Review Translation page (no displayed page name) | In the Job page, when the job is in Finished state, click review. | source and target (translated) content | compare and update source content and its translation |
View Translation page (no displayed page name) | In the Job page, when the job is in Finished state, click view. | source and target (translated) content | compare source content and its translation |
Screen captures of pages
Content page
Content overview page / Sources tab
![]()
Job overview page / Jobs tab
Translation page / Cart tab
![]()
Checkout page (no displayed page name)
Job page (no displayed page name)
Review Translation page (no displayed page name)
![]()
View Translation page (no displayed page name)
![]()
Important concepts in Drupal TMGMT
Request translation | Opens the Checkout page, where you group items into a translation job and add job parameters. |
Submit to translator | Drupal TMGMT creates a job to translate specified items into specified target language and sends it to a translator (the Connector). |
Add to cart | Adds selected items to the Cart. |
1.2.5 - Pre-Production Testing
Pre-Production Testing
After you complete the configuration, your Lionbridge Connector for Drupal TMGMT installation is ready for testing. Once you have installed TMGMT and configured the Connector, we recommend contacting Lionbridge Connector Support to obtain the endpoint and credentials for testing. For details, see How to Contact Lionbridge Connector Support. The testing environment enables you to test translations either using machine translation (MT) or by automatically replacing every character in submitted content with the letter x (pseudo-translation). This enables you to test that the Connector is communicating correctly between Drupal TMGMT and Lionbridge, and it ensures that all the content you want translated is correctly extracted and handled by Lionbridge services. You set up this environment as a separate provider.
To add the testing environment as a provider in Drupal TMGMT:
- In Drupal, select Configuration > Regional and language > Translation Management Translators > Add Translator from the menu.
The  Add Translator page opens.
![]()
- Enter the following information:
Note: An asterisk (*) indicates a required field.
Field | Description |
Label | Your name for the Lionbridge Connector in Drupal TMGMT. This is what is displayed to users who select a translator when sending out content for translation. |
Description | A description of the translator. |
Translator Settings - Auto accept finished translations | | Indicates whether to automatically accept all completed translations.
-
To automatically accept all translations without reviewing them first, select this check box.
-
To review translations before accepting them, clear this check box.
-
In the Translator plugin dropdown list, select Clay Tablet Connector. This is the Drupal TMGMT plug-in for Lionbridge translation services.
- In the Clay Tablet Connector Plugin Settings section, enter the following information:
![]()
Field | Description |
Export to | Your content is always exported in XLIFF format, which is the standard XML-based format for exchanging localizable data between applications. |
XLIFF CDATA | | Select this check box to wrap the content in CData tags. This prevents the Connector from escaping special characters, and avoids the scenario of double-escaped characters. Note: If you select this check box, the Connector ignores the Extended XLIFF processing setting, described next.
Extended XLIFF processing | | Select this check box to further process content semantics and mask HTML tags instead of escaping them:
- The Connector wraps the text in CDATA tags.
- The Connector converts entity references for special characters, such as <, >, &, ‘, and “.
- The Connector wraps other HTML elements, such as <img> tags, in <bpt> xliff tags, outside CDATA).
Note: The Connector ignores this setting if the XLIFF CDATA check box, described above, is selected.
Allow export-format overrides | Select this check box to enable users to override the export-format settings when sending out content items for translation. |
Use one export file for all items in job | Select this check box to export all content items to one file. Clear this check box to export content items to multiple files. |
Download method | | You can choose where to store exported files. Depending on your Drupal configuration, additional download methods and locations may be displayed in addition to Public local files served by the webserver. Recommendation: Use a secure location to prevent unauthorized access.
| Clay Tablet Settings
To obtain credentials for the Clay Tablet, create a Zendesk account at https://connectors.zendesk.com and create a support ticket. The Lionbridge Connector Support team will provision an account for you. For detailed instructions, see How to Contact Lionbridge Connector Support.
PO number | | Optional. Enter a valid purchase order number that you set up in Lionbridge Freeway.
Username | The username for accessing the Clay Tablet, which enables you to use the Connector to send Drupal content items to Lionbridge for translation. |
Password | The password for accessing the Clay Tablet, which enables you to use the Connector to send Drupal content items to Lionbridge for translation. |
- Click Connect. The Connector sends the credentials (username and password) to the Clay Tablet. The Connector stores the returned token for future sessions.
Notes: The Connector does not save your username or password. You must click Connect, at least once, to generate the access token required to use the Connector.
- Optional. In the next part of the page, you can specify the Transfer all files as zip setting. Select this check box to instruct the Connector to deliver all files for translation in a single .zip file.
![]()
- Optional. Click Scheduled Tasks to expand this section. You can select the Receive translated jobs automatically check box to instruct the Connector to deliver all translated content automatically, as soon as it is ready.
![]()
- Click Remote Languages Mappings to expand this section. You can update the default mapping between each language in Drupal TMGMT and the corresponding Lionbridge Freeway language code.
![]()
Each text box in this section has a label with the language name and code of each language set up in the Drupal TMGMT Languages page. (To open this page, select Configuration > Regional and language > Languages from the menu.)
-
For each language, select the Lionbridge Freeway language code corresponding to the Drupal language.
-
If you want to add another translator to support different Content API credentials or different translator configurations, repeat the steps above.
-
Click Save translator.
The Translation Management Translators page opens, displaying the translator you just created.
![]()
- If you want to add another provider to test different Content API credentials or different provider configurations, repeat the steps above.
We recommend sending only a few pages for translation in one language as an initial test. For detailed instructions, see Sending Content to Lionbridge. Once successful, you can send as many languages as required. If you have any concerns or questions, please contact Lionbridge Connector Support. For details, see How to Contact Lionbridge Connector Support.
1.3 - Sending Content to Lionbridge
Sending Content to Lionbridge
Before you start sending content to Lionbridge for translation, make sure you have completed the following tasks:
- Lionbridge has been added as a translator in Drupal TMGMT. For detailed instructions, see Adding Lionbridge as a Translator in Drupal TMGMT.
- All relevant content types are configured for translation. For detailed instructions, see Enabling Multilingual Support for Content Types on your Site.
- All relevant fields are configured for translation. For detailed instructions, see Enabling Multilingual Support for Individual Fields.
- You have specified the language of the content to translate. You can do this while creating the content or afterward. For detailed instructions, see Specifying a Language for Content.
Which content?
When you send out content for translation, you send out one or more items of the following default content types for translation:
- article
- basic page
- translatable node
Note: Lionbridge does not guarantee that other, custom content types are supported. You can send out both published and unpublished items for translation.
How to send?
There are different ways to approach sending out content for translation:
- You can send out one item or multiple items for translation.
- You can send out items for translation into one target language or into multiple target languages.
- You can send items either directly to Lionbridge or send them first to the Cart.
When you send out content for translation from Drupal TMGMT to Lionbridge, you complete the following general steps:
- Optional. Send content to the Cart.
Important: The Cart facilitates collecting multiple items and grouping them for translation into jobs. This optimizes the translation process, and it is the recommended method for translating multiple items efficiently.
-
Submit content to the Connector.
-
For instructions on submitting items directly to the Connector, see Submitting Content Directly to the Connector.
-
For instructions on using the Cart to collect items before submitting them to the Connector, see Submitting Content to the Connector via the Cart.
When you submit items to the Connector, Drupal TMGMT automatically creates a separate translation job for each target language. For example, if you want to translate an item into three different languages, Drupal TMGMT will create three separate translation jobs.
- Optional. If you request a quote for the translation job, you must log into Lionbridge Freeway to authorize the quote and start the translation process.
Recommendation: Do not explicitly use Drupal TMGMT’s built-in Save Job functionality, because it adds additional steps without adding any value when using the Lionbridge Connector. Instead, use the Cart to group multiple items together before sending them out for translation. Drupal TMGMT automatically creates a job for each group of items that it sends together for translation into the same target language. Best practice: Optimize sending out content for translation. For large sites, do not send out translation by individual item. Instead, add items to the Cart and then send out multiple items for translation as a single job.
1.3.1 - Specifying a Language for Content
Specifying a Language for Content
You must specify a language for content before you submit to Lionbridge, because Lionbridge must know the source and target languages for all translation jobs. The language you specify is the source language for the translation job. The translators translate this content into the target languages.
- You can specify a language for an individual item:
- while creating the item, as described in Specifying a Language while Adding an Item.
- after creating the item, by editing it, as described in Specifying a Language while Editing an Item.
- You can specify the language for multiple items in the Cart, when you submit them to the Connector, by selecting the Enforce source language check box. For detailed instructions, see Submitting Items in the Cart to the Connector.
Important: To specify a language for content, your site must be set up for multiple languages. If you cannot specify a language, contact your Drupal administrator.
1.3.1.1 - Specifying a Language while Adding an Item
Specifying a Language while Adding an Item
You can specify a language while adding an item to your site.
To specify a language while adding an item:
- Select Content > Add content > <content type> from the menu to create a new item. For examples, select Content > Add content > Basic from the menu.
The Create <content type> page opens. For example, the Create Basic page opens:
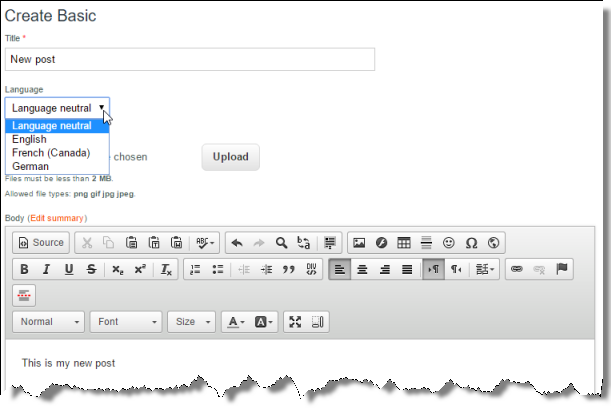
- In the Language dropdown list, select the language of the content.
- Create your content and click Save.
1.3.1.2 - Specifying a Language while Editing an Item
Specifying a Language while Editing an Item
You can specify a language while editing an item.
To specify a language while editing an item:
-
Do one of the following:
-
Click the Content menu to open the
Content page, and then in the Operations column, click the edit link for the item to edit. If necessary, you can filter the list of content items by status, type (content type) and language and then click Filter.

- In the location for the item, click Edit.
The Edit <content type> page opens. For example, the Edit Basic page opens.
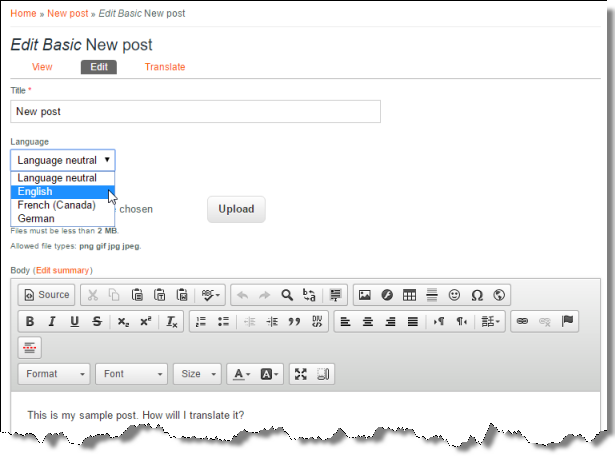
- In the Language dropdown list, select the language of the content.
- Click Save.
1.3.2 - Submitting Content Directly to the Connector
Submitting Content Directly to the Connector
You can submit content from Drupal TMGMT directly to the Connector. This creates one job for each target language. You must then authorize the quote for each job so that the Connector sends it out to Lionbridge for translation.
When you submit content directly to the Connector, you complete the following general steps:
-
You submit one or multiple items to a translator (Drupal TMGMT’s term for the Connector, or a connector to another translation provider). This creates one translation job for each target language. For detailed instructions, see:
-
If you request a quote for the translation job, you must log into Lionbridge Freeway to authorize the quote and start the translation process.
1.3.2.1 - Submitting One Item Directly to the Connector
Submitting One Item Directly to the Connector
You can submit one item directly to the Connector. Drupal TMGMT creates a separate translation job for each target language. Afterward, you must authorize the quote for each job before the Connector sends it out to Lionbridge.
To submit one item immediately to the Connector:
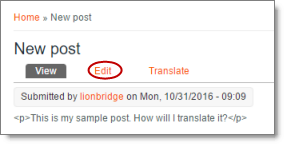
- In the location for the item, click Translate.
![]()
The Translations of page opens.
![]()
This page displays all the languages set up for your site. In the example above, the source language of the content is English. The French and German languages are also set up for your site.
- Select the check boxes for the languages into which you want to translate the item.
Tip: To select all available languages, select the check box in the column header. Note: Do not click the add translation link for a language, because this opens the Create <content type> page, where you can enter the translation manually, instead of sending out the content for translation.
- Click Request translation.
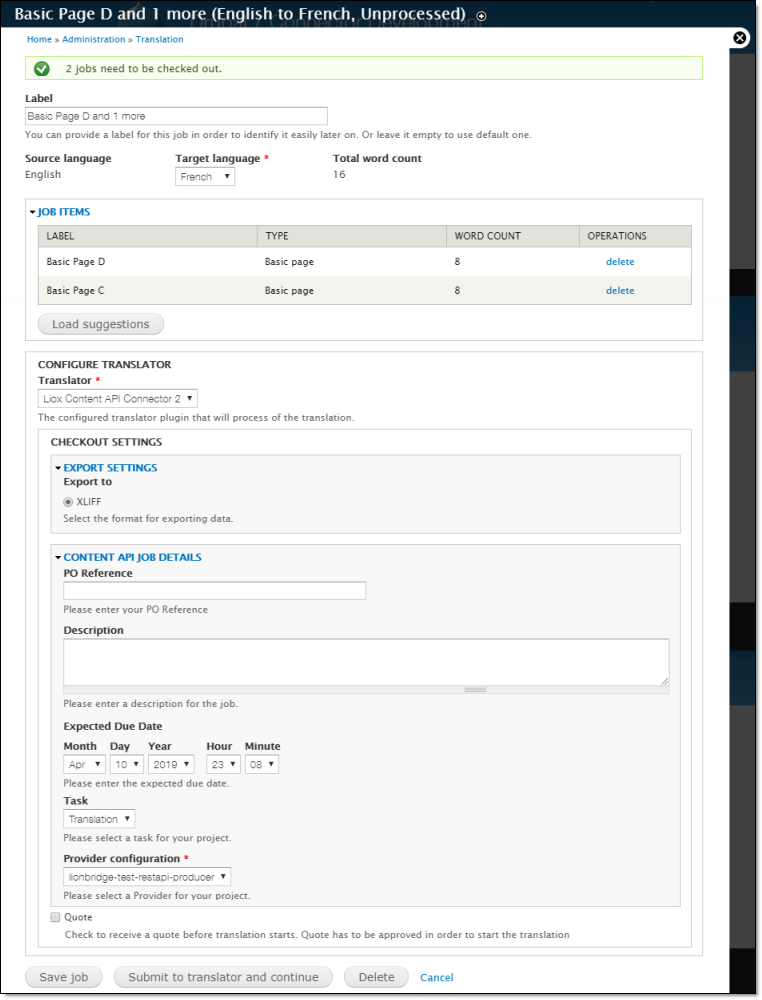
The Checkout page opens. A message at the top states that you need to check out the jobs. The number of jobs you need to check out is the same as the number of target languages you selected earlier. Recall that Drupal TMGMT creates a separate job for each target language.
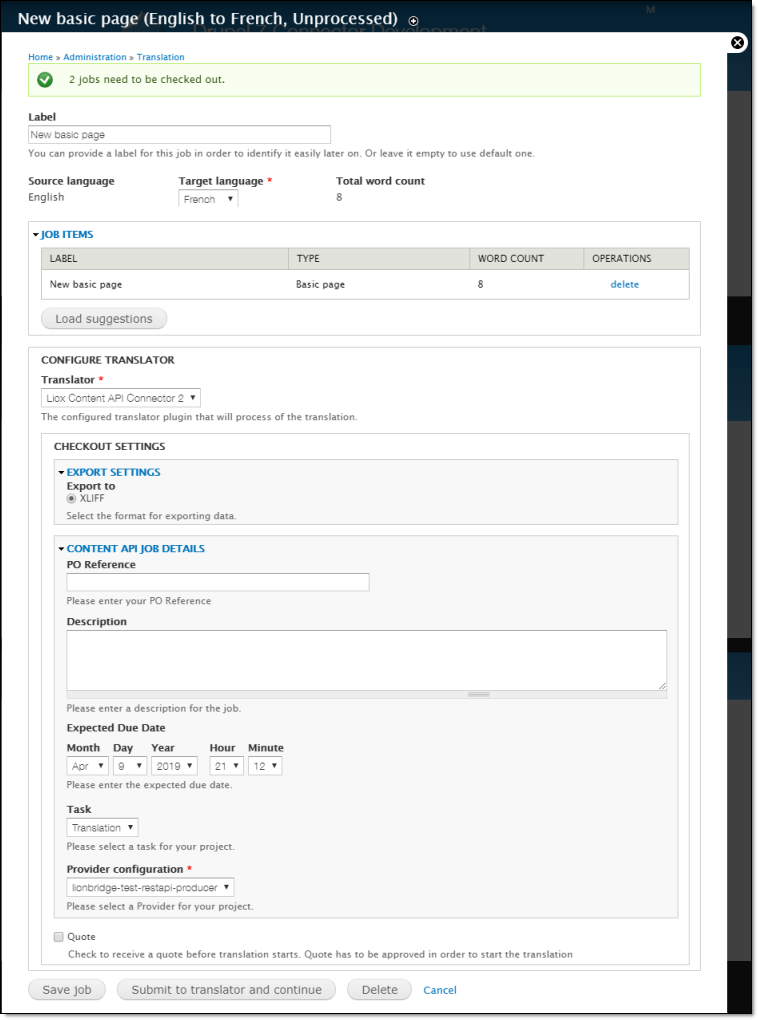
- Use this page to specify the job settings for the translation job for the specified target language.
Field | Description |
Label | Optional. You can enter a name for the translation job. This is the name that is displayed in Drupal. If you leave this blank, the default job name is the name of the item. This becomes the order name in Freeway. |
Source language | Read only. The source language of the content. |
Target language | Select the target language for the job. You can select any of the target languages you specified earlier, in step 2. |
Total word count | Read only. The number of words in the item. |
- Optional. Click Load suggestions to display the Suggestions section, where Drupal TMGMT lists any similar items that you can send out for translation.
- In the Configure Translator section, in the Translator list, select the translator you added for Lionbridge in Adding Lionbridge as a Translator in Drupal TMGMT.
Tip: There may be multiple translators if your company has multiple Content API credentials or different provider configurations.
- Optional. In the Checkout Settings section, specify the following information:
Field | Description |
Export Settings sub-section |
XLIFF | | Your content is always exported in XLIFF format, which is the standard XML-based format for exchanging localizable data between applications.
Content API Job Details sub-section |
PO Reference | Optional. The purchase order number is delivered to your translation provider to facilitate payment. |
Description | Your description for this translation job. This description will be delivered to Freeway. |
Expected Due Date | | The requested date and time for receiving the translation. You can select a different date and time. This date will be delivered to Freeway.
Task | | By default, this is Translation, which sends out the job for translation.
Provider configuration | The translation-provider workflow configured by the Lionbridge Connector Team. |
main section |
Quote | If you want to receive a quote before the translation process starts, select this check box. You must log into Lionbridge Freeway to authorize the quote before the translation process starts. |
- Do one of the following:
- If you selected multiple target languages for this item in step 2, and this is not the last one to submit, then click Submit to translator and continue.
- If you selected one target language for this item in step 2, or if you selected multiple target languages but this is the last one to submit, then click Submit to translator.
Drupal TMGMT creates a job to translate this item into this target language.
- If you clicked Submit to translator and continue, then this page reopens for the next target language to process. Repeat steps 4-8 for each target language.
A message at the top of the page states that the job has been submitted. If you selected the Quote check box, you must log into Lionbridge Freeway to authorize the quote and start the translation process. The message includes a link to download or view the file. However, downloading the file is optional, because the Connector already submitted it to Lionbridge Freeway.

- If you clicked Submit to translator, then the Translations of page re-opens, displaying a message at the top of the page that the job has been submitted.
![]()
You can now view the jobs you submitted on the Job overview page (Jobs tab). If you selected the Quote check box, you must log into Lionbridge Freeway to authorize the quote for each job before the translation process starts.
1.3.2.2 - Submitting Multiple Items Directly to the Connector
Submitting Multiple Items Directly to the Connector
You can submit multiple items directly to the Connector. Drupal TMGMT creates a separate translation job for each target language. Afterward, you must authorize the quote for each job before the Connector sends it out to Lionbridge.
To submit multiple items immediately to the Connector:
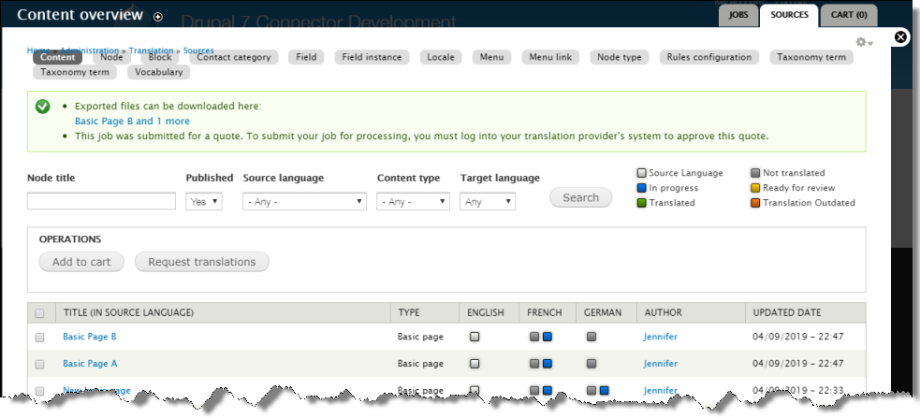
- Select Translation > Sources on the menu to open the Content overview page (Sources tab). Optional. If your environment is configured to display tags, click the Content tag.
![]()
Tip: Items are displayed in this page only if they have a language assigned. If the item you want to translate is not displayed here, click the Content menu to open the Content overview page. Then click the edit link beside the item and assign a language. For detailed instructions, see Specifying a Language while Editing an Item. In this example, there are two items that have not yet been translated.
- Optional. Use the filter bar at the top of the page to locate the items to send to the Connector and then click Search.
- Select the check boxes of the items to send for translation.
- Click Request translations.
The Checkout page opens for the items you selected. If you selected multiple target languages, then only the first one is displayed. A message at the top states that you need to check out the jobs. The number of jobs you need to check out is the same as the number of target languages you selected earlier. Recall that Drupal TMGMT creates a separate job for each target language.
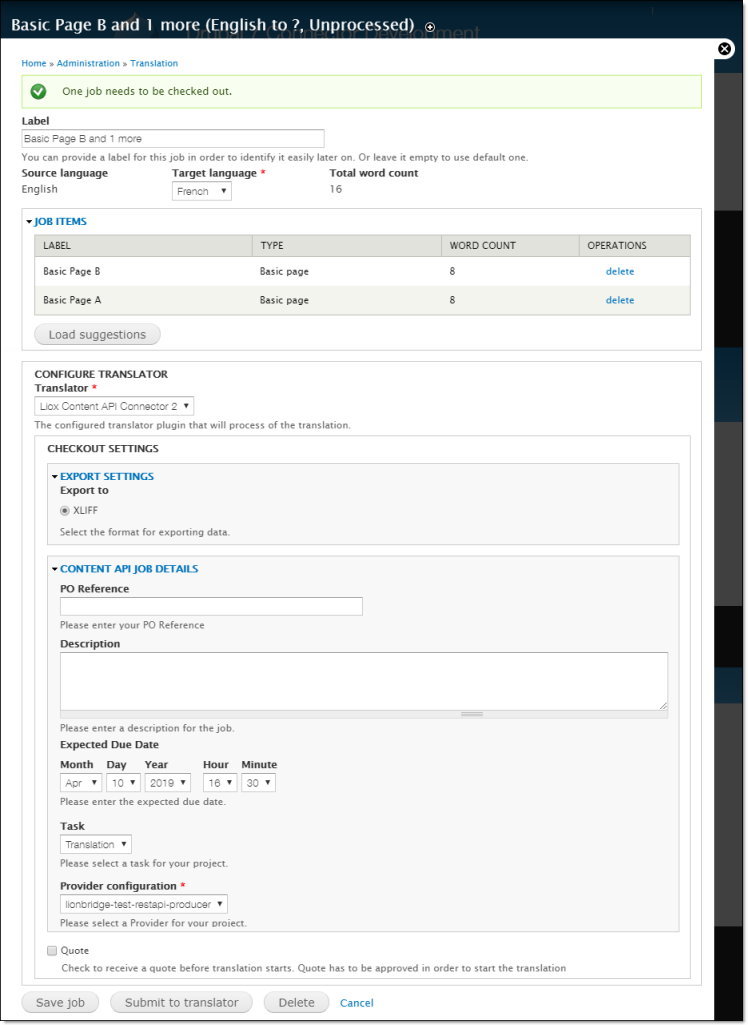
- Use this page to specify the job settings for the translation job for the specified target language.
Field | Description |
Label | Optional. You can enter the job name. This is the name that is displayed in Drupal. If you leave this blank, the default job name starts with the name of the first item. This becomes the order name in Freeway. |
Source language | Read only. The source language of the content. |
Target language | Select the target language for the job. You can select any of the target languages set up for your site. |
Total word count | Read only. The number of words in the selected items. |
- In the Configure Translator section, in the Translator list, select the translator you added for Lionbridge in Adding Lionbridge as a Translator in Drupal TMGMT.
Tip: There may be multiple translators if your company has multiple Content API credentials or different provider configurations.
- Optional. In the Checkout Settings section, specify the following information:
Field | Description |
Export Settings sub-section |
XLIFF | | Your content is always exported in XLIFF format, which is the standard XML-based format for exchanging localizable data between applications.
Content API Job Details sub-section |
PO Reference | Optional. The purchase order number is delivered to your translation provider to facilitate payment. |
Description | Your description for this translation job. This description will be delivered to Freeway. |
Expected Due Date | | The requested date and time for receiving the translation. You can select a different date and time. This date will be delivered to Freeway.
Task | | By default, this is Translation, which sends out the job for translation.
Provider configuration | The translation-provider workflow configured by the Lionbridge Connector Team. |
main section |
Quote | If you want to receive a quote before the translation process starts, select this check box. You must log into Lionbridge Freeway to authorize the quote before the translation process starts. |
- Click Submit to translator.
Drupal TMGMT creates a job to translate these items into this target language.
The Content overview page reopens. A message at the top of the page states that the job has been submitted. If you selected the Quote check box, you must log into Lionbridge Freeway to authorize the quote and start the translation process. The message includes a link to download or view the files. However, downloading the files is optional, because the Connector already submitted the job to Lionbridge Freeway.
- If you want to submit these items for translation to another target language, repeat steps 3-8 for that language.
You can now view the job or jobs you submitted/checked out on the Job overview page (Jobs tab). If you selected the Quote check box, you must log into Lionbridge Freeway to authorize the quote for each job so that the Connector will send it out for translation.
1.3.3 - Submitting Content to the Connector via the Cart
Submitting Content to the Connector via the Cart
The Cart is a place to collect items for translation before sending them to the Connector, which automatically groups them into jobs. Using the Cart has the following advantages:
- If the person with the authority to send content for translation from the Cart manages your organization’s translation budget, it can help control translation costs and the translation process.
- You may not want to send out each item individually as soon as you finish reviewing it. The Cart facilitates your management of reviewed content, so that you do not forget about sending individual reviewed items for translation.
- Lionbridge prefers receiving fewer but larger batches of content to translate, rather than individual items, as this facilitates project preparation, resource assignment, and file analysis.
- If you want to translate many items into multiple languages, but you want to translate into only one target language at a time, this is a good way to manage that process.
If you or your colleagues have added items to the Cart, you must access it to submit the items to the Connector. Note: If you do not send out items from the Cart to the Connector and authorize the quotes for the corresponding jobs, then the Connector does not send out the translation jobs to Lionbridge.
When you use the Cart to manage your translation process, you complete the following general steps:
-
You add items to the Cart, as described in:
Optional. You can also remove items from the Cart, if you decide not to translate them. For detailed instructions, see Removing Items from the Cart.
- You submit items from the Cart to the Connector, as described in Submitting Items in the Cart to the Connector. You can send out one, multiple, or all items from the Cart at one time. This step creates one job for each target language.
- If you requested a quote for the translation job, you must log into Lionbridge Freeway to authorize the quote for each translation job and start the translation process.
1.3.3.1 - Adding One Item to the Cart
Adding One Item to the Cart
You can add one item to the Cart, so that later you can submit it to the Connector. For an explanation of using the Cart to submit content to the Connector, see Submitting Content to the Connector via the Cart.
To add one item to the Cart:
- In the location for the item, click Translate.
![]()
The Translations of page opens.
![]()
This page displays all the languages set up for your site. In the example above, the source language of the content is English. French (Canada) and German are also set up for your site.
- Select the check boxes for the languages to translate, and click Add to cart.
A message at the top of the page states that the content source was added to the Cart.
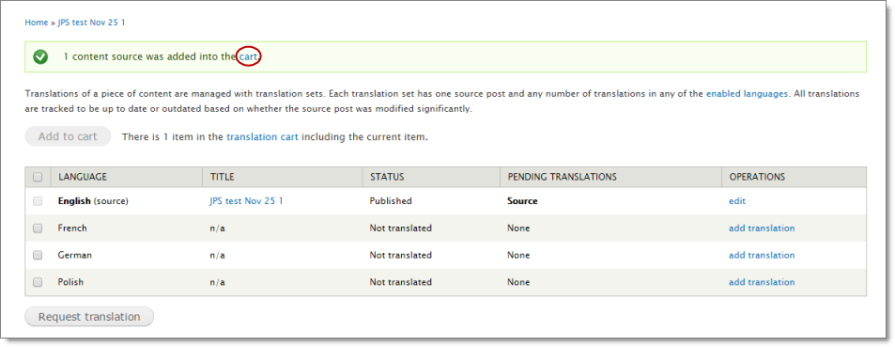
You can click the cart link in the message to open the Cart and view the contents. For detailed instructions on viewing and sending out items from the Cart, see Submitting Items in the Cart to the Connector.
1.3.3.2 - Adding Multiple Items to the Cart
Adding Multiple Items to the Cart
You can add multiple items to the Cart, so that later you can submit them to the Connector. For an explanation of using the Cart to submit content to the Connector, see Submitting Content to the Connector via the Cart.
To add multiple items to the Cart:
- Select Translation > Sources from the menu or click the Sources tab (if it is displayed) to open the Content overview page / Sources tab.
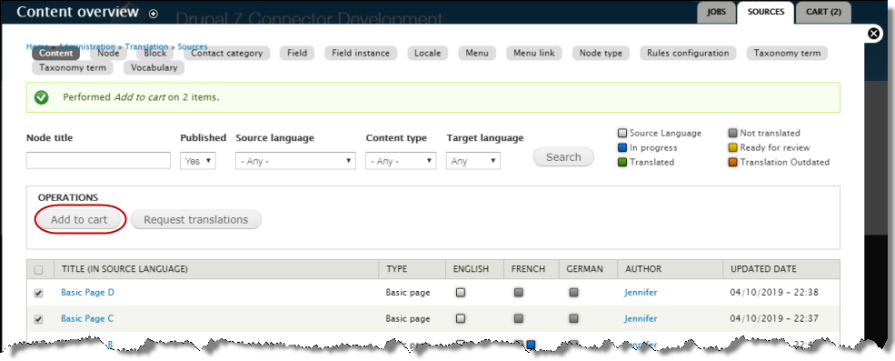
- Select the check boxes for the items and click Add to cart.
A message box at the top of the page states that the selected items were added to the Cart. For detailed instructions on viewing and sending out items from the Cart, see Submitting Items in the Cart to the Connector.
1.3.3.3 - Removing Items from the Cart
Removing Items from the Cart
If there are items in the Cart that you do not want to send out for translation, you can remove them from the Cart. This removes all jobs based on those items from the Cart.

To remove some, but not all, items from the Cart:
- If the Cart is not already open, select Translation > Cart from the menu to open it.
- Select the check boxes for the items to remove from the Cart.
- Click Remove selected.
A message at the top of the page confirms that the selected jobs were removed from the Cart.
To remove all items from the Cart:
- If the Cart is not already open, select Translation > Cart from the menu to open it.
- Click Empty cart.
A message at the top of the page confirms that all the jobs were removed from the Cart.
1.3.3.4 - Submitting Items in the Cart to the Connector
Submitting Items in the Cart to the Connector
After you add items to the Cart, you can submit them to the Connector. For instructions on adding items to the Cart, see Adding One Item to the Cart and Adding Multiple Items to the Cart. Tip: The Cart tab displays the number of items in the Cart that have not yet been sent out for translation.
To submit items that are in the Cart to the Connector:
- If the Cart is not already open, then select Translation > Cart from the menu or click the Cart tab to open it.
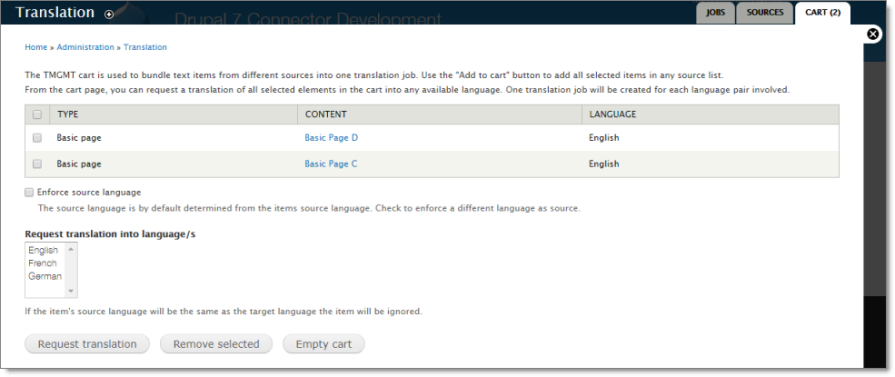
The following information is displayed about items in your cart:
Column | Description |
Type | The content type of the item. |
Content | The title of the item. |
Language | The source language of the item. |
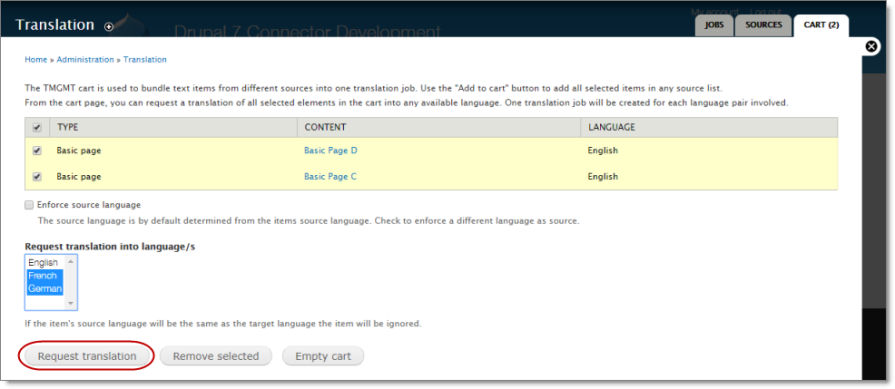
- Select the check boxes of items in your cart to send out for translation.
Tip: To select all the items in your cart, select the check box in the column heading.
- Optional. Select the Enforce source language check box. This enables you to change the language specified for an item before sending it out for translation. It displays the Source Language dropdown list, where you can change the source language specified for an item.
![]()
Best practice: In general, you should specify the language while creating or editing the item, as described in Specifying a Language for Content. Therefore, selecting this check box should not be necessary.
- In the Request translation into language/s list, select the target languages, into which to translate the content.
- Click Request translation.
This creates one job for each specified target language. If there are multiple items in the cart, they are combined into a single job. For example, suppose there are two items (Item A and Item B) in the cart that you want to translated into three target languages (French, German, Polish). In this scenario, Drupal TMGMT creates three jobs, one for each language. Each job contains two items.
The Checkout page opens. A message at the top states that you need to check out the jobs. The number of jobs you need to check out is the same as the number of target languages you selected earlier. Recall that Drupal TMGMT creates a separate job for each target language.
- Use this page to specify the job settings for the translation job for the specified target language.
Field | Description |
Label | Optional. You can modify the job name. By default, the job name starts with the name of the first item selected from the cart. This is the name that is displayed in Drupal. |
Source language | Read only. The source language of the content. |
Target language | | Select the target language for the job. You can select any of the target languages you specified earlier, in step 4, in the Translation page. Reminder: There is only one target language for a job.
Total word count | Read only. The number of words in the selected items. |
The Job Items section displays all the items in your job.
- Optional. In the Job Items section, you can delete any items from your job.
- Optional. Click Load suggestions to view any other items that may be suitable to include in this job. The Suggestions sub-section opens, displaying any suggested items to check out with these items. To add suggested items, select the corresponding check boxes.
- In the Configure Translator section, in the Translator dropdown list, select the translator you added for Lionbridge in Adding Lionbridge as a Translator in Drupal TMGMT.
Tip: There may be multiple translators if your company has multiple Content API credentials or different provider configurations.
- Optional. In the Checkout Settings section, specify the following information:
Field | Description |
Export Settings sub-section |
XLIFF | | Your content is always exported in XLIFF format, which is the standard XML-based format for exchanging localizable data between applications.
Content API Job Details sub-section |
PO Reference | Optional. The purchase order number is delivered to your translation provider to facilitate payment. |
Description | Your description for this translation job. This description will be delivered to Freeway. |
Expected Due Date | | The requested date and time for receiving the translation. You can select a different date and time. This date will be delivered to Freeway.
Task | | By default, this is Translation, which sends out the job for translation.
Provider configuration | The translation-provider workflow configured by the Lionbridge Connector Team. |
main section |
Quote | If you want to receive a quote before the translation process starts, select this check box. You must log into Lionbridge Freeway to authorize the quote before the translation process starts. |
Tip: If you modified the Label field or modified which items are in the job, you can click Save job to save a draft of the job before submitting it.
- Do one of the following:
- If you selected multiple target languages for items in the Cart in step 4, and this is not the last one to submit, then click Submit to translator and continue.
- If you selected one target language for items in the Cart in step 4, or if you selected multiple target languages but this is the last one to submit, then click Submit to translator.
The page updates, and a message at the top of the page states that the job has been submitted. If you selected the Quote check box, you must log into Lionbridge Freeway to authorize the quote for the job to start the translation process. AThe message includes a link to download or view the files. However, downloading the files is optional, because the Connector already submitted the job to Lionbridge Freeway.
- If you specified additional target languages for translation, complete steps 6-11 for each target language, which corresponds to a separate job.
After you submit jobs for each target language you specified earlier, the checkout page reopens. After you check out the last job for the last target languague, you can view the job or jobs you submitted/checked out on the Job overview page (Jobs tab). If you requested quotes for the translation jobs, you must log into Lionbridge Freeway to authorize the quotes and start the translation process.
1.4 - Tracking Your Translation Job
Tracking Your Translation Job
After you authorize the quote for your translation job, the Connector sends the job to Lionbridge for translation. You can track the progress of this job on the Job overview page (Jobs tab).
To track your translation job:
- Click the Translation menu.
The Job overview page (Jobs tab) opens.
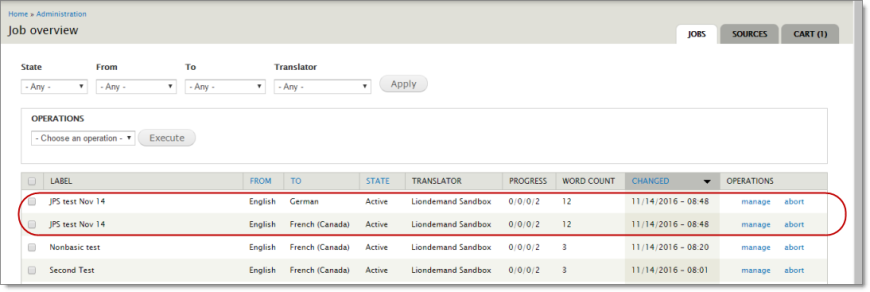
There is a separate job for each target language.
- Optional. Use the filter bar at the top of the page to locate the jobs to send out for translation.

Dropdown List | Description |
State | | The state of the translation job. This is one of the following:
- Unprocessed: The job has not been submitted to the Connector. It may be in the Cart.
- Active: The job has been submitted to the Connector. The quote may have been approved.
- Rejected: The job has been submitted to the Connector, but it was rejected. This occurs if the payment information is incorrect, for example if there is an insufficient balance in the purchase order (PO) after you try to authorize the quote.
- Aborted: The job was aborted when it was in Active state.
- Finished: The job was accepted (or auto-accepted) and the translated item was created in Drupal. If the Receive translated jobs automatically feature is not configured, then you must import the translated content. For detailed instructions, see Importing Your Translated Content into Drupal TMGMT.
From | The source language of the content. |
To | The target language into which the content is translated. |
Translator | The translator set up in Drupal TMGMT for translating the content. In this case, it is your company’s name for Lionbridge, set up in Adding Lionbridge as a Translator in Drupal TMGMT. |
- To view additional information about a job, in the Operations column, click manage.
The page for that job opens.
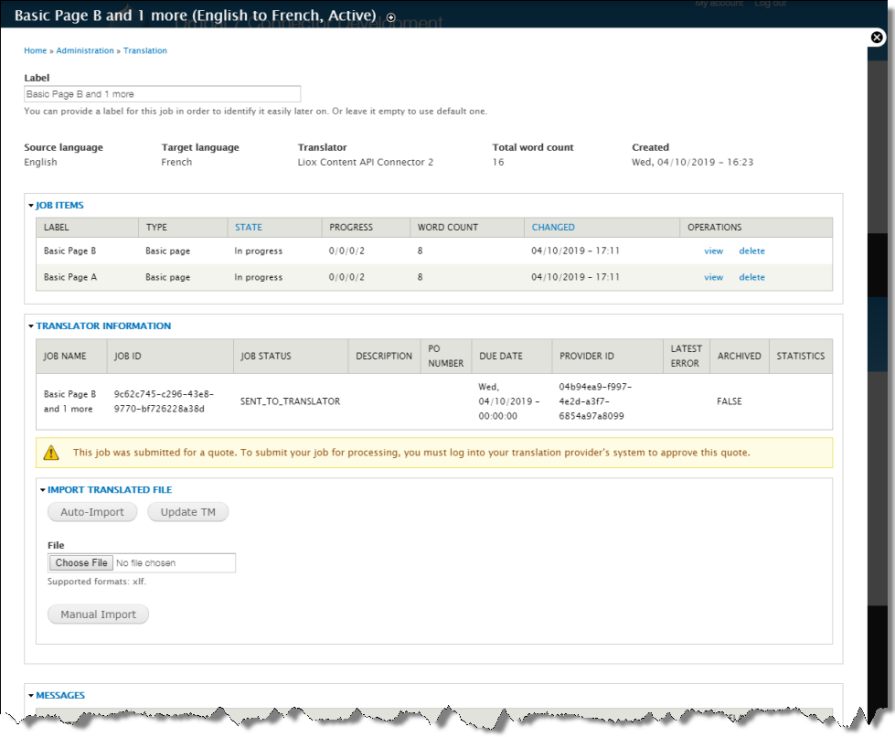
When this page is reloaded, the content updates automatically with new messages.
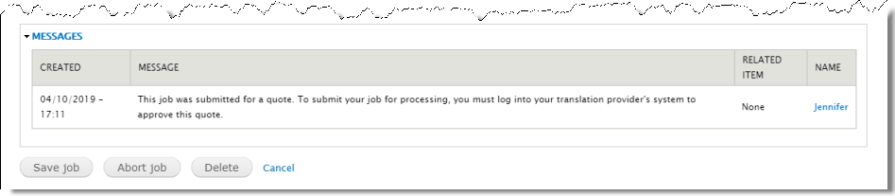
The following table describes the updates you can receive:
State in “Job Items” section | Status in “Translator Information” section | Message in Message section | Description |
In progress | Pending | Job has been submitted. | Job was submitted to Connector, but quote has not been authorized. |
In progress | Authorized | Translation in progress. | Quote for job has been authorized. |
Needs review (review scenario) | Complete | The translation of job-name is finished and can now be reviewed. | The translation is ready for review. |
Accepted (review scenario) | Complete | The translation for job-name has been accepted. | The translation has been reviewed. |
Accepted (non-review scenario) | Complete | The translation job has been finished. | The translation is complete, and it does not require review. |
The translation for job-name has been accepted. |
- Once the Status is Complete, in the Operations column, you can click the view link to view the translated content. For detailed instructions, see Viewing and Reviewing Translated Jobs.
1.5 - Importing Your Translated Content
Importing Your Translated Content into Drupal TMGMT
If the Receive translated jobs automatically feature was not configured, as described in Adding Lionbridge as a Translator in Drupal TMGMT, then after your translated content returns to the Connector, you must import it into Drupal TMGMT.
To import your translated content:
- Click the Translation menu.
The Job overview page (Jobs tab) opens.
Note: There is a separate job for each target language.
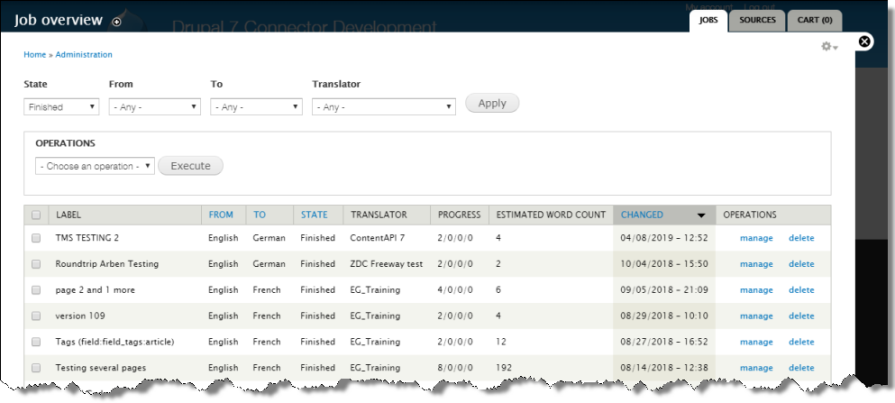
- Locate the finished job that you want to import to Drupal TMGMT. In the State column, this job displays Finished.
Tip: To view only finished jobs, in the State column in the filter at the top of the list, select Finished from the dropdown list, and then click Apply.
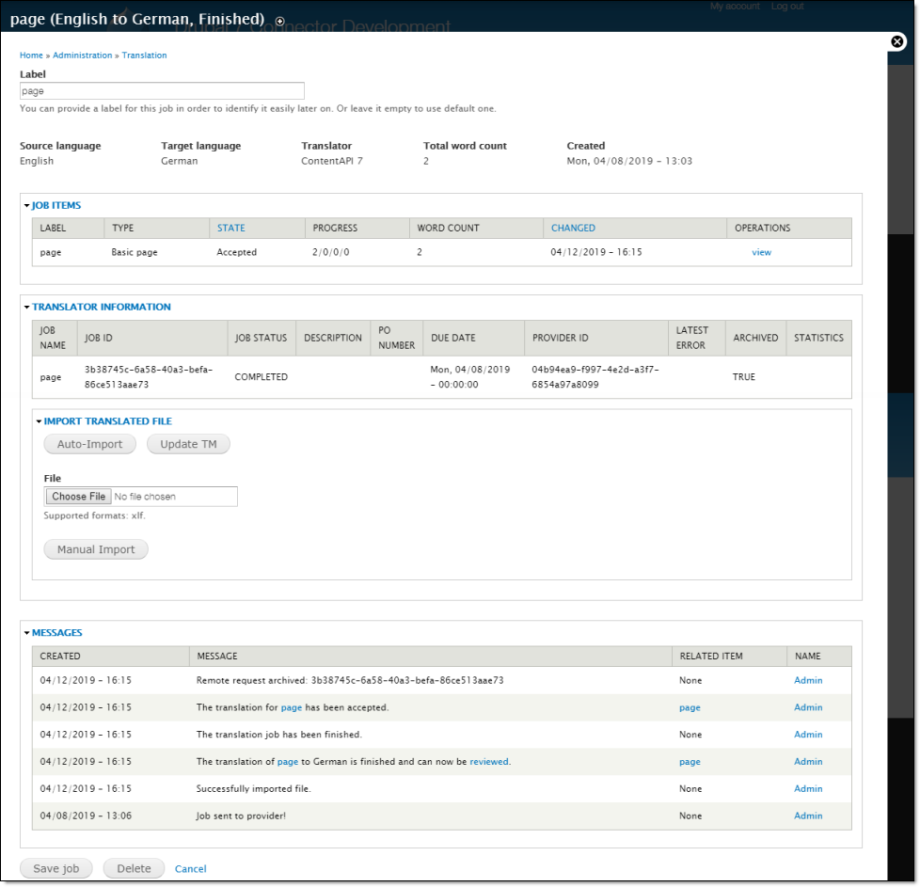
- In the row of the job to import, in Operations column, click manage.
The page for that job opens.
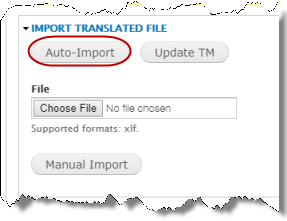
- In the Import Translated File section, do one of the following:
![]()
- In the Import Automatically | Update TM sub-section, click Auto-Import.
- In the Manual Import sub-section, click Choose File, then browse to the file to import to Drupal TMGMT, and then click Manual Import.
A message box at the top of the page states that the job was imported, and the page updates.
- If the Auto accept finished translations check box is selected for the translator, the imported job is ready for you to view. For detailed instructions, see Viewing One Translated Job.
- If the Auto accept finished translations check box is cleared for the translator, the imported job is ready for you to review. In this scenario, you must review the translations and then accept or reject them. In the Job Items section, in the Operations column, click Review, and then in the page that opens, review the translated content, and when you are done, click either Save or Save as completed. For detailed instructions, see Reviewing One Translated Job.
1.6 - Other Tasks
Other Translation Tasks
You can perform the following additional optional tasks:
1.6.1 - Aborting Translation Jobs
Aborting Translation Jobs
To stop a translation job that is already in progress, contact Lionbridge Connector Support. For details, see How to Contact Lionbridge Connector Support.
1.6.2 - Resubmitting Aborted Translation Jobs
Resubmitting Aborted Translation Jobs
You can resubmit a previously aborted translation job.
To resubmit a previously aborted translation job:
-
Ensure that the Job page is open. If necessary, open the Job overview page / Jobs tab, as described above, and in the Operations column, click manage to open this page for a job in Aborted state.
-
Scroll down to the bottom of the page and click Resubmit.
A message confirms that you want to resubmit this job.
- Click Confirm.
A message at the top of the page states that the aborted job was duplicated, and that you can resubmit it now.
- Optional. Modify any values on this page. For description of the values you can modify, see the description of the Checkout page in Submitting One Item Directly to the Connector.
- Click Submit to translator.
1.6.3 - Deleting Jobs
Deleting Jobs
You can click the Delete button to delete translation jobs in the following states from Drupal TMGMT:
-
Unprocessed
-
Finished
This functionality is not reversible. Note: The Delete button is not available in any of the other states, which occur when the job is actively in translation. To delete a translation job that is already in progress, contact Lionbridge Connector Support. For details, see How to Contact Lionbridge Connector Support. You can delete a translation job from the Job overview page / Jobs tab or from the Job page. Note: Deleting translation jobs does not delete translated items that have been auto accepted or reviewed and accepted.
1.6.4 - Editing Translated Items
Editing Translated Items
After a translation has been accepted, including auto accepted, you can still make changes to it. You edit a translated item the same way that you edit the source item, by editing the target language version of the item.
To edit a translated item:
- Click the Content menu to open the Content page, and then in the Operations column, click the edit link for the item to edit. If necessary, you can filter the list of content items by status, type (content type) and language and then click Filter.
The item is displayed in the source language, for example, English.
![]()
- In the Languages list, click the link for the target language, for example, German (Deutsch).
The item is now displayed in the target language.
![]()
- To edit this version, click Edit.
The Edit page opens.
- You can now edit the translation of the item. When you are done, click Save to save your changes.
1.6.5 - Redelivering Translated Content to Drupal TMGMT
Redelivering a Translation Job to Drupal TMGMT
You can redeliver all the translated content in a translation job from Lionbridge to Drupal TMGMT. This is useful in the following scenarios:
- The translations were updated or corrected after the initial delivery.
- You want to overwrite any changes that you made in Drupal to the translated content.
Note: Redelivering a translation job from Lionbridge to Drupal TMGMT overwrites any post-translation edits to the translated content.
To redeliver a translation job to Drupal TMGMT:
- Click the Translation menu.
The Job overview page (Jobs tab) opens.
Note: There is a separate job for each target language.
- Locate the finished job that you want to redeliver to Drupal TMGMT. In the State column, this job displays Finished.
Tip: To view only finished jobs, in the State column in the filter at the top of the list, select Finished from the dropdown list, and then click Apply.
- In the row of the job to redeliver, in Operations column, click manage.
The page for that job opens.
- In the Import Translated File section, do one of the following:
![]()
- In the Import Automatically | Update TM sub-section, click Auto-Import.
- In the Manual Import sub-section, click Choose File, then browse to the file to redeliver to Drupal TMGMT, and then click Manual Import.
A message box at the top of the page states that the job was submitted for redelivery, and the page updates.
- If the Auto accept finished translations check box is selected for the translator, the redelivered job is ready for you to view. For detailed instructions, see Viewing One Translated Job.
- If the Auto accept finished translations check box is cleared for the translator, the redelivered job is ready for you to review. In this scenario, you must review the translations and then accept or reject them. In the Job Items section, in the Operations column, click Review, and then in the page that opens, review the translated content, and when you are done, click either Save or Save as completed. For detailed instructions, see Reviewing One Translated Job.
1.7 - Viewing and Reviewing Translated Jobs
Viewing and Reviewing Translated Jobs
When you monitor translation jobs, as described in Tracking Your Translation Job, reloading the Job page retrieves status updates and automatically retrieves translated content from Lionbridge, once it is available. After the Connector retrieves the translated content and saves it in Drupal, it is ready for review. Depending on the Connector setup in Drupal TMGMT, you may need to approve translated content before it can be published. This is determined by the Auto accept finished translations setting in the Translator Settings section of the Edit Translator page, as described in Adding Lionbridge as a Translator in Drupal TMGMT: As soon as the translation job is finished, then the translator status changes from Authorized to Complete, because Lionbridge has completed the translation job. In addition:
- If the Auto accept finished translations check box is selected for the translator, the job state changes from In progress to Accepted. You can view these translations. For detailed instructions, see Viewing One Translated Job.
- If the Auto accept finished translations check box is cleared for the translator, the job state changes from In progress to Needs review. In this scenario, you must review the translations and then accept or reject them. For detailed instructions, see Reviewing One Translated Job.
You can view and review all translated jobs from the Deliveries section in the Job overview page. For detailed instructions, see Viewing and Reviewing All Translated Jobs.
1.7.1 - Viewing All Translated Jobs
Viewing and Reviewing All Translated Jobs
You can view all translated jobs from the Deliveries section of the Job overview page.
- Click the Translation menu and then the Jobs tab to open the Job overview page.
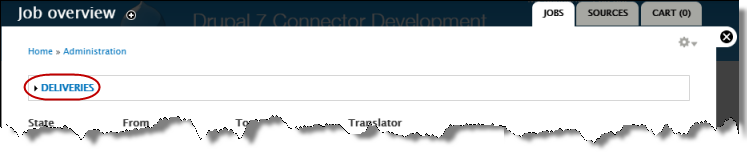
- Click Deliveries to expand this section.
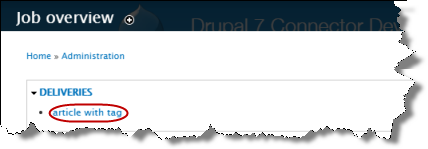
This section displays all the translated jobs.
- Click a link in the Deliveries section to open the corresponding Job page.

- If the Auto accept finished translations check box is cleared for the translator, the review link is displayed.
- If the Auto accept finished translations check box is selected for the translator, the view link is displayed.
- Optional. To review the content, in the Job Items section, click the review link to open the Review Translation page. This step is relevant only if the Auto accept finished translations check box is cleared for the translator.
![]()
- The Source fields on the left side display the source content.
- The Translation fields on the right side display the translated content. In these examples, pseudo-translation is displayed instead of actual translated content.
The fields displayed here depend on the fields in the content type.
-
You can click in any field to modify the content.
-
When you are done, click either Save or Save as completed:
-
Click Save to save your changes without completing your review of the translation.
-
Click Save as completed to save your changes and mark the translation as reviewed. This accepts the translation.
If you clicked Save as completed, then the job state changes to Accepted, and in the Message box, there is a new message: The translation for <job-name> has been accepted. The translated items are saved in Drupal. Important: If you do not want to accept the translation, do not click Save as completed. The translation is not saved in Drupal. Drupal TMGMT does not support rejecting a translation job and sending it back to Lionbridge. You must sign into Freeway to reject the translation.
- Optional. To import the translated content, scroll down to the Imported Translated File section, and click Auto-Import. This step is relevant only if the Auto accept finished translations check box is cleared for the translator.
This imports the translated files into Drupal TMGMT.
- Optional. To view the content, in the Job Items section, click the view link to open the View Translation page. This step is relevant only if the Auto accept finished translations check box is selected for the translator.
![]()
- The Source fields on the left side display the source content.
- The Translation fields on the right side display the translated content. In these examples, pseudo-translation is displayed instead of actual translated content.
The fields displayed here depend on the fields in the content type. When you are done, click Cancel to return to the Job page.
1.7.2 - Viewing One Translated Job
Viewing One Translated Job
If the Auto accept finished translations check box is selected for the translator (the Connector), you can view translated content. However, you cannot modify it here, because it has been automatically accepted. For instructions on editing translated content, see Editing Translated Items.
To view the translation of one job:
- If the Job page is not already open:
- Click the Translation menu to open the Job overview page (Jobs tab) .
- Optional. Use the filter bar at the top of the page to locate the job to review. The job is in Finished state.
- In the row of the job to view, click the manage link to open the Job page.
- In the Job Information section, in the Operations column, click the view link.
The View Translation page opens.
![]()
- The Source fields on the left side display the source content.
- The Translation fields on the right side display the translated content. In these examples, pseudo-translation is displayed instead of actual translated content.
The fields displayed here depend on the fields in the content type.
- When you are done, click Cancel to return to the Job page.
1.7.3 - Reviewing One Translated Job
Reviewing One Translated Job
If the Auto accept finished translations check box is cleared for the translator (the Lionbridge Connector), the translation requires review as part of the translation-management process.
To review the translation of one job:
- If the Job page is not already open:
- Click the Translation menu to open the Job overview page (Jobs tab) .
- Optional. Use the filter bar at the top of the page to locate the job to review. The job is in Finished state.
- In the row of the job to review, click the manage link to open the Job page.
- In the Job Information section, in the Operations column, click the review link.
The Review Translation page opens.
![]()
- The Source fields on the left side display the source content.
- The Translation fields on the right side display the translated content. In these examples, pseudo-translation is displayed instead of actual translated content.
The fields displayed here depend on the fields in the content type.
-
You can click in any field to modify the content.
-
When you are done, click either Save or Save as completed:
-
Click Save to save your changes without completing your review of the translation.
-
Click Save as completed to save your changes and mark the translation as reviewed. This accepts the translation.
-
If you clicked Save as completed, then the job state changes to Accepted, and in the Message box, there is a new message: The translation for <job-name> has been accepted. The translated items are saved in Drupal.
Important: If you do not want to accept the translation, do not click Save as completed. The translation is not saved in Drupal. Drupal TMGMT does not support rejecting a translation job and sending it back to Lionbridge. You must sign into Freeway to reject the translation.
2 - Drupal TMGMT Setup and User Guide
2.1 - Welcome to the Lionbridge Connector for Drupal TMGMT
Welcome to the Lionbridge Connector for Drupal TMGMT (Connector). This Connector enables you to automate sending and retrieving content from Drupal TMGMT to Lionbridge for translation, which dramatically reduces the effort required to create, maintain, and publish Web content in multiple languages.
To know more about the latest versions of Drupal TMGMT (Connector), see https://www.drupal.org/project/lionbridge_translation_provider.
2.1.1 - The Translation Lifecycle
The translation lifecycle is the broad process of selecting content, sending it out for translation, and then receiving the translated content back from translation.
This set of steps usually fits inside a larger, more general process called the content lifecycle, which is the process of creating, reviewing, editing, approving, and publishing content.
When you consider the translation lifecycle and the content lifecycle together, you have the global content value chain, which is the strategy for managing multilingual content.
Remember that localizing content is a subset of steps in the broader content lifecycle. This will improve your focus on key localization considerations, improve processes, and keep all content stakeholders included. Together, this results in better content management.
2.1.2 - Using this Guide
Purpose of this guide
This guide describes how to use the Lionbridge Connector for Drupal TMGMT (Connector) to manage your translation lifecycle. It describes how to send out content for translation and receive it back from translation.
Who should use this guide?
This guide is intended for content editors, project, marketing, localization or translation managers, or others who are responsible for creating, editing, or approving content for translation that resides in Drupal.
What your company setup should be
This document assumes that:
- Your company already uses Drupal and has installed the TMGMT module.
- Your company has created a Lionbridge Freeway account, at https://freeway.lionbridge.com.
What you should already know
This document assumes that:
- You have a strong working knowledge of Drupal.
- You are familiar with your company’s translation process and requirements.
- You have valid user credentials to log into Drupal.
Note: Not all the features described in this guide may be available. Feature availability depends on both your company’s Drupal, TMGMT and Lionbridge Connector setup and the roles to which you are assigned. If you cannot access functionality that you need, contact your company’s Drupal administrator.
How this guide is organized
This guide contains the following chapters:
| Chapter | Description |
|---|---|
| Welcome to the Lionbridge Connector for Drupal TMGMT | A brief description of the Lionbridge solution for Drupal TMGMT and how it fits into the translation lifecycle. It also includes information about this guide and Lionbridge Connector Support contact information. |
| Getting Started with the Lionbridge Connector for Drupal TMGMT | How to get started and an overview of the Lionbridge Connector interface. |
| Sending Content to Lionbridge | How to send out Drupal content for translation. |
| Importing Your Translated Content into Drupal TMGMT | How to import your translated content. Relevant only if the Receive translated jobs automatically feature is not configured. |
| Tracking Your Translation Job | How to monitor the translation status of content and jobs that you sent out for translation. |
| Viewing and Reviewing Translated Jobs | How to view and review translated content. |
| Other Translation Tasks | How to perform other translation tasks, such as: * aborting jobs * resubmitting aborted jobs * deleting jobs * editing translated content * redelivering translated content to Drupal TMGMT |
Documentation conventions
This guide uses the following conventions:
| Convention | Description |
|---|---|
| Bold | Highlights screen elements such as buttons, menu items, and fields. |
| Courier | Highlights input, file names, and paths. |
| Italics | Highlights terms for emphasis, variables, or document titles. |
| > | Indicates a menu choice. For example, “Select Translation > Sources.” |
2.1.3 - Terminology
| Content type | The content type of an item defines the fields it includes. For example, a basic Page content type has title and body fields. In Drupal, you can create custom content types. |
| Drupal | A free and open-source content-management framework for building websites. |
| Content API V1 and Content API V2 | A Lionbridge translation tracking portal. |
| Freeway | A Lionbridge translation portal and a translation provider. |
| Job | One or more items that Drupal TMGMT groups together into a single translation job. All items in the job have the same target language. If you request a quote for your translation job, you must log into Lionbridge Freeway to authorize the quote before the translation process starts. |
| Lionbridge | The publisher of the Freeway translation portal and a translation provider. Users connect to the Freeway translation and Content API V2 tracking portals to submit content to and retrieve content from the Lionbridge translation provider. |
| Lionbridge Connector for Drupal TMGMT (Connector) | The connector software that Lionbridge has developed and provides that plugs into your Drupal TMGMT installation to provide connectivity to the Lionbridge translation services. In this document it is referred to as the Connector. This is the software you are installing and configuring as you work through this document. |
| Source language | The original language of the content. Content is translated from the source language. |
| Target language | The translated language of the content. Content is translated into the target language. |
| TMGMT | The Translation Management Tool (TMGMT) module in Drupal provides a tool set for translating content from Drupal. It supports plug-ins from various translation providers, which it calls translators. |
| Translator | The term in the Drupal TMGMT module that describes a connector between the module and a translation provider. In the context of this help, the Lionbridge Connector for Drupal TMGMT is a translator in Drupal. It provides a direct connection to the Lionbridge translation services. |
2.1.4 - How to Contact Lionbridge Connector Support
How to Contact Lionbridge Connector Support
You can submit a support ticket either:
- by emailing connectors@lionbridge.com
- from the Lionbridge Connector Zendesk page https://lionbridge-connectors.zendesk.com/
See also:
2.2 - Getting Started
The Lionbridge Connector for Drupal TMGMT is a plug-in to Drupal’s Translation Management Tool (TMGMT) module. Its functionality is displayed to the users as part of Drupal TMGMT. The Lionbridge Connector supports all browsers that Drupal TMGMT supports.
The Connector supports Drupal 10 and 11. The version of the Connector described in this document supports Drupal 10 and Drupal 11.
To get started with the Lionbridge Connector:
- Install and configure the TMGMT module, including adding the languages you require and configuring specific content types for translation. For detailed instructions, refer to the Drupal TMGMT documentation, at https://www.drupal.org/node/1489984.
- Download the package for the latest version of the Lionbridge Connector from the following link: https://www.drupal.org/project/lionbridge_translation_provider.
- In Drupal, select Modules from the menu and then click Install new module to install the Lionbridge Connector package you downloaded in the previous step.
- Add the Lionbridge Connector as a provider to Drupal. For detailed instructions, see Adding Lionbridge as a Provider in Drupal TMGMT.
- Enable multilingual support for content types on your website. For detailed instructions, see Enabling Multilingual Support for Content Types on your Site.
- Enable multilingual support for individual fields of each supported content type. For detailed instructions, see Enabling Multilingual Support for Individual Fields.
Note: By default, enabling multilingual support for content types automatically enables multilingual support for all the fields of that content type.
2.2.1 - Adding Lionbridge as a Provider
Before you can send content directly from Drupal TMGMT to Lionbridge, you must add the Lionbridge Connector for Drupal TMGMT as a provider in Drupal TMGMT.
You may want to add Lionbridge as multiple providers in Drupal TMGMT, for example, if you want to use multiple Content API credentials or different provider configurations.
Adding Lionbridge as a translator in Drupal TMGMT requires the following three general steps:
- Send an email to connectors@lionbridge.com requesting access to the Content API v2.
- The Lionbridge Connector Support team creates a Content API V2 account for you.
- In Drupal TMGMT, you configure the connection to your Content API V2 account.
Detailed instructions follow below.
Note: The default configuration settings are appropriate for most users.
To add Lionbridge as a provider in Drupal TMGMT:
-
Download the package for the latest version of the Lionbridge Connector using the link provided.
-
In Drupal, select Modules from the menu and then click Install new module to install the Lionbridge Connector package you downloaded in the previous step.
-
After you receive a notification from the Lionbridge Connector Support team that your Content API V2 account has been created, log in to Drupal to complete the process.
-
In Drupal, select Translation > Providers from the menu.
The Providers page opens.
-
Click Add provider.
The Add Provider page opens.
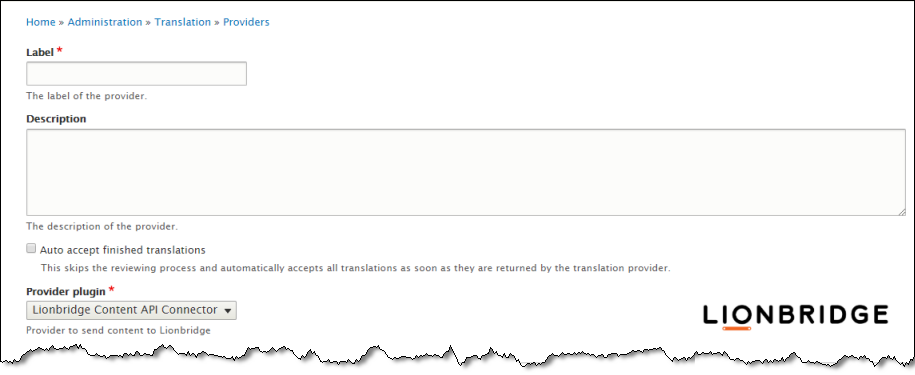
- Enter the following information:
Note: An asterisk (*) indicates a required field.
| Field | Description |
|---|---|
| Label | Your name for the Lionbridge Connector in Drupal TMGMT. This is what is displayed to users who select a translation provider (“provider”) when sending out content for translation. |
| Description | Your description of the provider. |
| Auto accept finished translations | Indicates whether to automatically accept all completed translations.
|
-
In the Provider plugin dropdown list, select Lionbridge Content API. This is the Drupal TMGMT plug-in for Lionbridge translation services.
-
In the Lionbridge Content API Settings section, enter the following information:
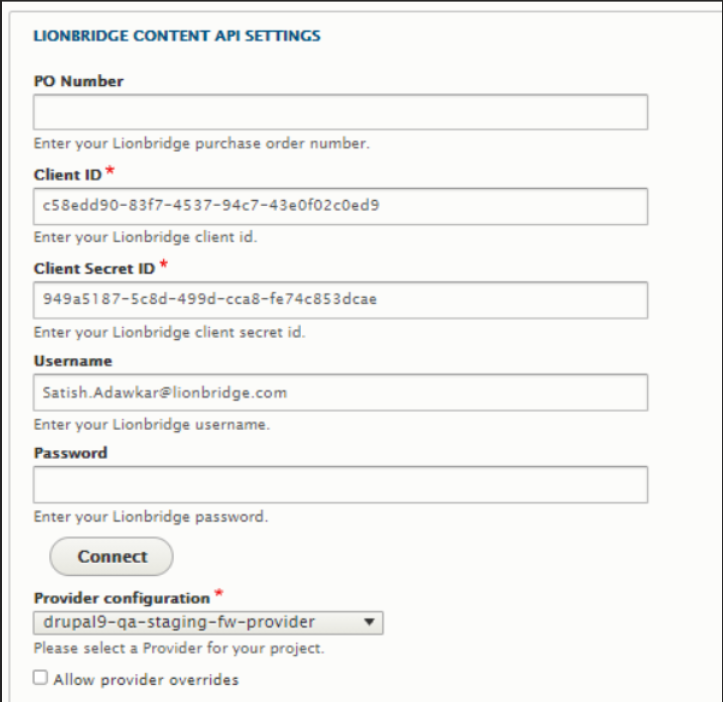
| Field | Description |
|---|---|
| Export to | Your content is always exported in XLIFF format, which is the standard XML-based format for exchanging localizable data between applications. |
| XLIFF CDATA | Select this check box to wrap the content in CData tags. This prevents the Connector from escaping special characters, and avoids the scenario of double-escaped characters. Note: If you select this check box, the Connector ignores the Extended XLIFF processing setting, described next. |
| Extended XLIFF processing | Select this check box to further process content semantics and mask HTML tags instead of escaping them:
|
| Allow export-format overrides | Select this check box to enable users to override the export-format settings when sending out content items for translation. |
| Use one export file for all items in job | Select this check box to export all content items to one file. Clear this check box to export content items to multiple files. |
| Download method | You can choose where to store exported files. Depending on your Drupal configuration, additional download methods and locations may be displayed in addition to Public local files served by the webserver. Recommendation: Use a secure location to prevent unauthorized access. |
| Lionbridge Content API To obtain credentials for the Content API, you can contact How to Contact Lionbridge Connector Support. |
|
| PO Number | Optional. Enter a valid purchase order number that you set up in Lionbridge Freeway. |
| Client ID | The Lionbridge Client ID for accessing the Content API, which enables you to use the Connector to send Drupal content items to Lionbridge for translation. |
| Client Secret ID | The Lionbridge Client Secret ID for accessing the Content API, which enables you to use the Connector to send Drupal content items to Lionbridge for translation. |
| Username | The Lionbridge Zendesk username for accessing the Lionbridge Content API V1, which enables you to see the translation jobs sent to Lionbridge Content API V1. |
| Password | The Lionbridge Zendesk username for accessing the Lionbridge Content API V1, which enables you to see the translation jobs sent to Lionbridge Content API V1. |
- Click Connect. The Connector sends the credentials (Client ID and Client Secret ID) to the Content API. The Connector stores the returned token for future sessions.
Notes: The Connector does not save your Client ID or Client Secret ID. You must click Connect, at least once, to generate the access token required to use the Connector.
- Enter the following information in the bottom part of the page.
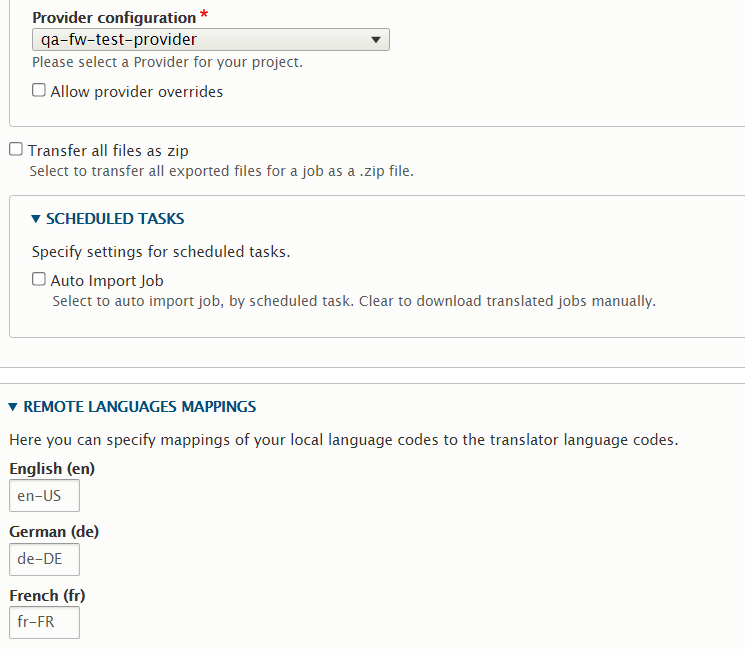
| Field | Description |
|---|---|
| Provider configuration | The default translation provider configuration. This translation provider will be displayed by default when users send content out for translation. |
| Allow provider overrides | Optional. This option determines whether users can change the translation provider when submitting jobs.
|
| Transfer all files as zip | Optional. Select this check box to instruct the Connector to deliver all files for translation in a single .zip file. |
| Scheduled Tasks | |
| Auto Import Job | Optional. In the sub-section, select the check box. This instructs the Connector to deliver all translated content automatically, as soon as it is ready. |
- Optional. In the Remote Languages Mappings section, you can update the default mapping between each language in Drupal TMGMT and the corresponding Lionbridge Freeway language code.
Each text box in this section has a label with the language name and code of each language set up in the Drupal TMGMT Languages page. (To open this page, select Configuration > Regional and language > Languages from the menu.)
- Click Save.
The Providers page reopens, displaying the provider you just created.

If you want to add another provider to support different Content API credentials or different provider configurations, repeat the steps above.
2.2.2 - Enabling Multilingual Support for Content Types
Before you can send content directly from Drupal TMGMT to Lionbridge, you must enable multilingual support on your Drupal website for each content type that you want to be able to send to Lionbridge for translation.
By default, the Connector supports sending out the following default content types for translation:
- article
- basic page
- translatable node
You can configure other, custom content types for translation.
Note: Lionbridge does not guarantee that other, custom content types are supported.
To enable multilingual support on your site:
- In Drupal, select Structure > Content types from the menu.
- Either click Add content type to add a new content type, or in the Operations column, click Edit to edit an existing content type.
- At the bottom left, click the Language settings tab.
The page updates.
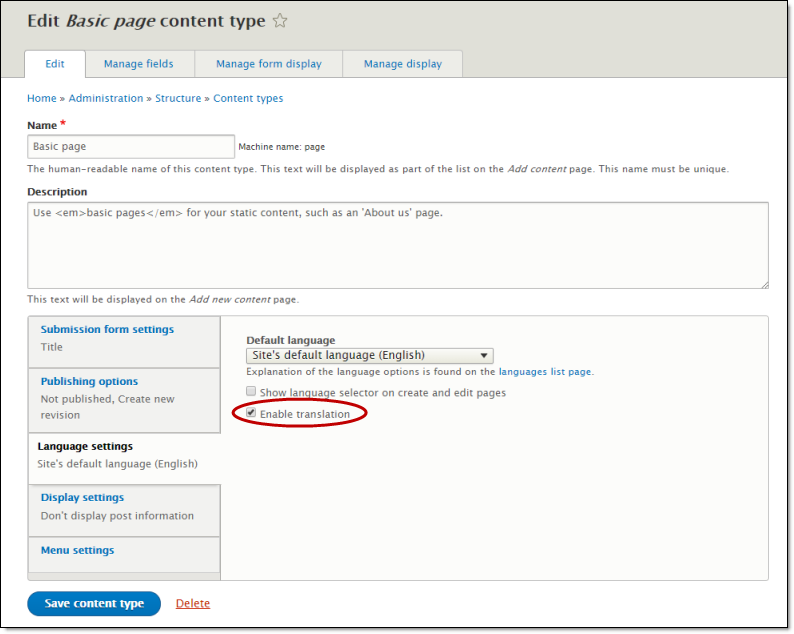
- Select the Enable translation check box.
- Click Save content type.
Important: Repeat steps 2-5 for each content type that you want to be able to send out for translation.
2.2.3 - Enabling Multilingual Support for Individual Fields
Before you can send content directly from Drupal TMGMT to Lionbridge, you must enable multilingual support for each field in each content type that you want to be able to send to Lionbridge for translation.
Note: By default, enabling multilingual support for content types automatically enables multilingual support for all the fields of that content type.
By default, the Connector supports sending out all the fields in the following default content types for translation:
- article
- basic page
- translatable node
You can configure other, custom fields for translation.
Note: Lionbridge does not guarantee that other, custom fields are supported.
To enable multilingual support for a field:
- In Drupal, select Structure > Content types from the menu.
The Content types page opens.
- In the Operations column, click Manage fields for a content type, for example for Article.
The Manage fields page opens, listing all the fields in that content type.
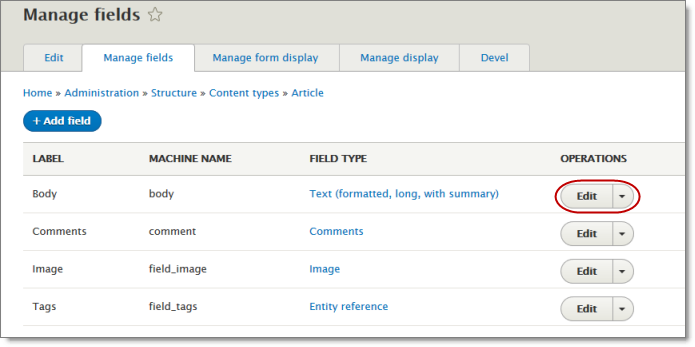
- In the Operations column, click Edit for the field to configure, for example for Body.
The page for the field settings opens.
![]()
-
Select the Users may translate this field check box.
-
Click Save settings.
Important: Repeat the previous steps for each field in each content type that you want to be able to send out for translation.
2.2.4 - The Lionbridge Connector at a Glance
The Connector uses the Drupal TMGMT module’s user interface for managing your translations with Lionbridge. You use the following pages to view manage your translations:
| Page | How to Open | What It Displays | What You Can Do Here |
|---|---|---|---|
| Content page | Click the Content menu. | all content items, including those without an assigned language | view a list of items |
| Content overview page / Sources tab | Select Translation > Sources from the menu. | all items with an assigned language, both submitted and non submitted | view a list of items that have languages assigned |
| Job overview page / Jobs tab | Select Translation > Jobs from the menu. | all submitted jobs, including jobs that have finished | abort jobs, delete jobs, accept translations, open the Job page |
| Translation page / Cart tab | Select Translation > Cart from the menu. | all items that were added to the cart | select the target languages for a job and request translation, which opens the Job overview page |
| Job overview page (no displayed page name) | Click Request translation or Request translations in the following pages:
|
a list of all items in a job, including word count, and fields for specifying the job settings | specify the job settings for the translation job for the specified target language |
| Review Translation page (no displayed page name) | In the Job page, when the job is in Translated state, click Review. | source and target (translated) content | compare and update source content and its translation |
| View Translation page (no displayed page name) | In the Job page, when the job is in Accepted state, click View. | source and target (translated) content | compare source content and its translation |
Screen captures of pages
Content page
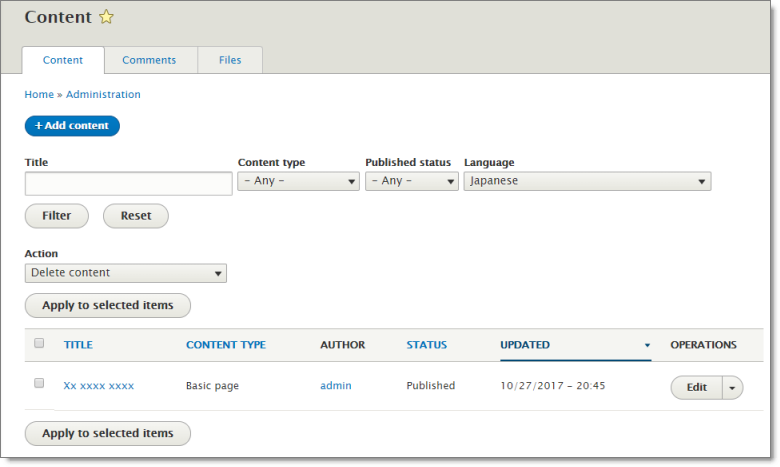
Content overview page / Sources tab
![]()
Job overview page / Jobs tab
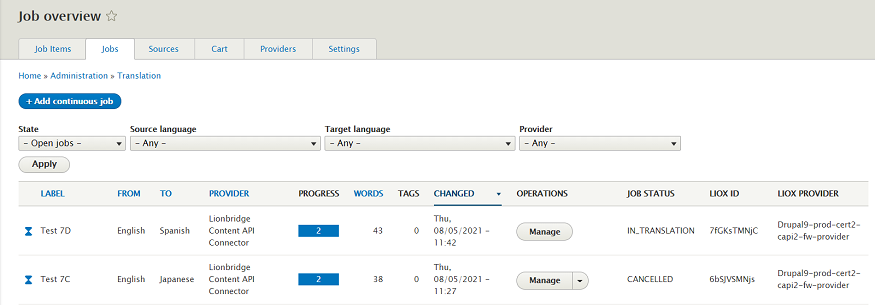
Translation page / Cart tab
![]()
Job overview page (no displayed page name)
Job page (no displayed page name)
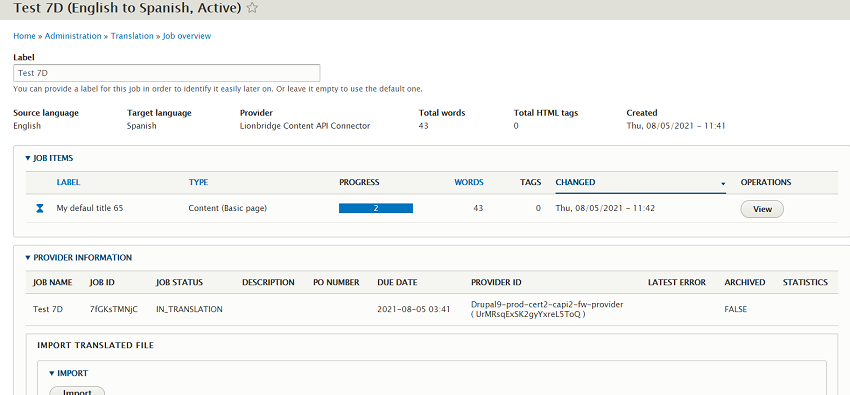
[Review Translation page (no displayed page name)
![]()
View Translation page (no displayed page name)
![]()
Important concepts in Drupal TMGMT
| Request translation | Opens the Job overview page, where you group items into a translation job and add job parameters. |
| Submit to provider | Drupal TMGMT creates a job to translate specified items into specified target language and sends it to a provider (the Connector). |
| Add to cart | Adds selected items to the Cart. |
2.2.5 - Drupal TMGMT Icon Legend
Drupal TMGMT uses icons to indicate the translation state/status of source- and target-language items.
Source state/status icons in Drupal TMGMT
The following icons indicate the translation state/status of source-language items.
| Icon | Description |
|---|---|
| Indicates the source language of an item. | |
| Source item has not been translated. | |
| Source item has been translated. |
Target state/status icons in Drupal TMGMT
The following icons indicate the translation state/status of target-language items.
| Icon | Description |
|---|---|
| Translation has not been processed. | |
| Translation is in progress, or pending. | |
| Translation is ready for review. | |
| Translation has been reviewed. | |
| Translation has been auto-accepted. |
Job Status, Liox ID and Provider Name in Drupal TMGMT
These are optional columns that can be bring to the view by clicking the Edit view option, from the ![]() view edit icon and then adding.
view edit icon and then adding.
Then adding the fields by clicking “Add”.
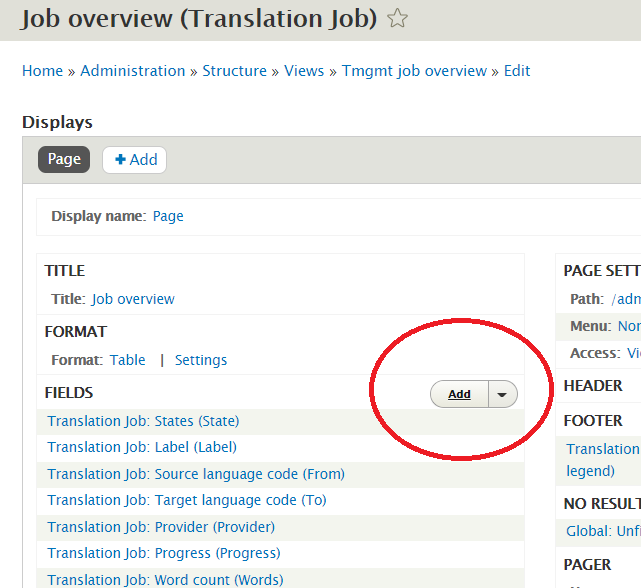
And selecting the Lionbridge provider fields.
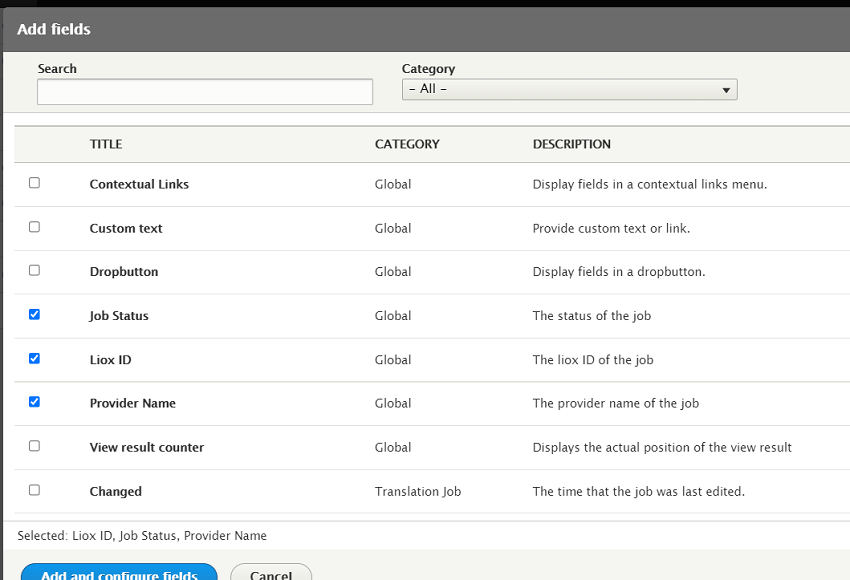
| Field | Description |
| Job Status | Status of the job within Lionbridge systems |
| Liox ID | Job ID within Lionbridge systems |
| Provider Name | Name of selected workflow/provider used by the job |
2.2.6 - Pre-Production Testing
After you complete the configuration, your Lionbridge Connector for Drupal TMGMT installation is ready for testing.
Once you have installed TMGMT and configured the Connector, we recommend contacting Lionbridge Connector Support to obtain the endpoint and credentials for testing. For details, see How to Contact Lionbridge Connector Support.
The testing environment enables you to test translations either using machine translation (MT) or by automatically replacing every character in submitted content with the letter x (pseudo-translation). This enables you to test that the Connector is communicating correctly between Drupal TMGMT and Lionbridge, and it ensures that all the content you want translated is correctly extracted and handled by Lionbridge services. You set up this environment as a separate provider.
To add the testing environment as a provider in Drupal TMGMT:
- In Drupal, select Translation > Providers from the menu.
The Providers page opens.
- Click Add provider.
The Add Provider page opens.
- Enter the following information:
Note: An asterisk (*) indicates a required field.
| Field | Description |
|---|---|
| Label | Your name for the Lionbridge Connector in Drupal TMGMT. This is what is displayed to users who select a translation provider (“provider”) when sending out content for translation. |
| Description | Your description of the provider, for example: Test Environment. |
| Auto accept finished translations | Indicates whether to automatically accept all completed translations.
|
-
In the Provider plugin dropdown list, select Lionbridge Content API Connector. This is the Drupal TMGMT plug-in for Lionbridge translation services.
-
In the Lionbridge Content API Connector Plugin Settings section, enter the following information:
| Field | Description |
|---|---|
| Export to | Your content is always exported in XLIFF format, which is the standard XML-based format for exchanging localizable data between applications. |
| XLIFF CDATA | Select this check box to wrap the content in CData tags. This prevents the Connector from escaping special characters, and avoids the scenario of double-escaped characters. Note: If you select this check box, the Connector ignores the Extended XLIFF processing setting, described next. |
| Extended XLIFF processing | Select this check box to further process content semantics and mask HTML tags instead of escaping them:
Note: The Connector ignores this setting if the XLIFF CDATA check box, described above, is selected. |
| Allow export-format overrides | Select this check box to enable users to override the export-format settings when sending out content items for translation. |
| Use one export file for all items in job | Select this check box to export all content items to one file. Clear this check box to export content items to multiple files. |
| Download method | You can choose where to store exported files. Depending on your Drupal configuration, additional download methods and locations may be displayed in addition to Public local files served by the webserver. Recommendation: Use a secure location to prevent unauthorized access. |
| Lionbridge Content API Settings To obtain Freeway-test-environment credentials for the Content API V2, create create a support ticket at Zendesk. The Lionbridge Connector Support team will provision an account for you. For detailed instructions, see How to Contact Lionbridge Connector Support. |
|
| PO Number | Optional. Enter a valid purchase order number that you set up in Lionbridge Freeway. |
| Client ID | The Lionbridge Client ID for accessing the Content API, which enables you to use the Connector to send Drupal content items to Lionbridge for translation. |
| Client Secret ID | The Lionbridge Client Secret ID for accessing the Content API, which enables you to use the Connector to send Drupal content items to Lionbridge for translation. |
| Username | The Lionbridge Zendesk username for accessing the Lionbridge Content API V1, which enables you to see the translation jobs sent to Lionbridge Content API V1. |
| Password | The Lionbridge Zendesk username for accessing the Lionbridge Content API V1, which enables you to see the translation jobs sent to Lionbridge Content API V1. |
- Click Connect. The Connector sends the credentials (Client ID and Client Secret ID) to the Content API. The Connector stores the returned token for future sessions.
Notes: The Connector does not save your Client ID and Client Secret ID. You must click Connect, at least once, to generate the access token required to use the Connector.
- Enter the following information in the bottom part of the page.
| Field | Description |
|---|---|
| Transfer all files as zip | Optional. Select this check box to instruct the Connector to deliver all files for translation in a single .zip file. |
| Scheduled Tasks | |
| Auto Import Job | Optional. In the sub-section, select the check box. This instructs the Connector to deliver all translated content automatically as soon as it is ready. |
- Optional. In the Remote Languages Mappings section, you can update the default mapping between each language in Drupal TMGMT and the corresponding Lionbridge Freeway language code.
Each text box in this section has a label with the language name and code of each language set up in the Drupal TMGMT Languages page. (To open this page, select Configuration > Regional and language > Languages from the menu.)
- Click Save.
The Providers page opens, displaying the provider you just created.
![]()
- If you want to add another provider to test different Content API credentials or different provider configurations, repeat the steps above.
We recommend sending only a few pages for translation in one language as an initial test. For detailed instructions, see Sending Content to Lionbridge. Once successful, you can send as many languages as required.
If you have any concerns or questions, please contact Lionbridge Connector Support. For details, see How to Contact Lionbridge Connector Support.
2.3 - Sending Content to Lionbridge
Before you start sending content to Lionbridge for translation, make sure you have completed the following tasks:
- Lionbridge has been added as a provider in Drupal TMGMT. For detailed instructions, see Adding Lionbridge as a Provider in Drupal TMGMT.
- All relevant content types are configured for translation. For detailed instructions, see Enabling Multilingual Support for Content Types on your Site.
- All relevant fields are configured for translation. For detailed instructions, see Enabling Multilingual Support for Individual Fields.
- You have specified the language of the content to translate. You can do this while creating the content or afterward. For detailed instructions, see Specifying a Language for Content.
Which content?
When you send out content for translation, you send out one or more items of the following default content types for translation:
- article
- basic page
- translatable node
Note: Lionbridge does not guarantee that other, custom content types are supported.
You can send out both published and unpublished items for translation.
How to send?
There are different ways to approach sending out content for translation:
- You can send out one item or multiple items for translation.
- You can send out items for translation into one target language or into multiple target languages.
- You can send items either directly to Lionbridge or send them first to the Cart.
When you send out content for translation from Drupal TMGMT to Lionbridge, you complete the following general steps:
- Optional. Send content to the Cart.
Important: The Cart facilitates collecting multiple items and grouping them for translation into jobs. This optimizes the translation process, and it is the recommended method for translating multiple items efficiently.
- Submit content to the Connector.
- For instructions on submitting items directly to the Connector, see Submitting Content Directly to the Connector.
- For instructions on using the Cart to collect items before submitting them to the Connector, see Submitting Content to the Connector via the Cart.
When you submit items to the Connector, Drupal TMGMT automatically creates a separate translation job for each target language. For example, if you want to translate an item into three different languages, Drupal TMGMT will create three separate translation jobs.
- Optional. If you request a quote for the translation job, you must log into Lionbridge Freeway to authorize the quote and start the translation process.
Recommendation: Do not explicitly use Drupal TMGMT’s built-in Save Job functionality, because it adds additional steps without adding any value when using the Lionbridge Connector. Instead, use the Cart to group multiple items together before sending them out for translation. Drupal TMGMT automatically creates a job for each group of items that it sends together for translation into the same target language.
Best practice: Optimize sending out content for translation. For large sites, do not send out translation by individual item. Instead, add items to the Cart and then send out multiple items for translation as a single job.
2.3.1 - Specifying a Language for Content
You must specify a language for content before you submit to Lionbridge, because Lionbridge must know the source and target languages for all translation jobs. The language you specify is the source language for the translation job. The translators translate this content into the target languages.
-
You can specify a language for an individual item:
-
while creating the item, as described in Specifying a Language while Adding an Item.
-
after creating the item, by editing it, as described in Specifying a Language while Editing an Item.
-
-
You can specify the language for multiple items in the Cart, when you submit them to the Connector, by selecting the Enforce source language check box. For detailed instructions, see Submitting Items in the Cart to the Connector.
Important: To specify a language for content, your site must be set up for multiple languages. If you cannot specify a language, contact your Drupal administrator.
2.3.1.1 - Specifying a Language while Adding an Item
Specifying a Language while Adding an Item
You can specify a language while adding an item to your site.
To specify a language while adding an item:
- Select Content > Add content from the menu to create a new item.
The Add Content page opens.
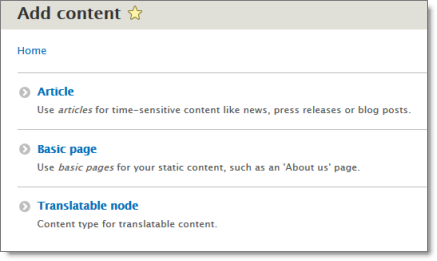
- Click the link for the content type to create. For example, click the Basic page link.
The Create <content type> page opens. For example, the Create Basic page page opens.
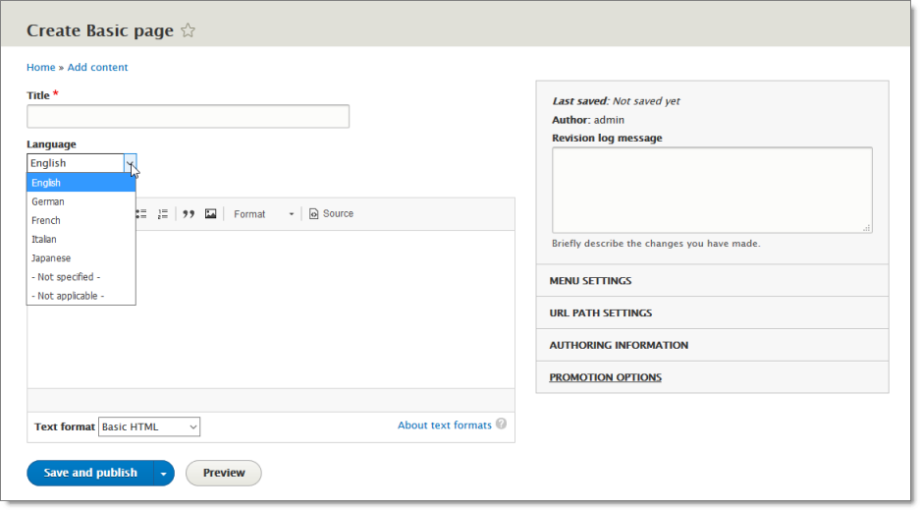
-
In the Language dropdown list, select the language of the content.
-
Create your content and click Save.
2.3.1.2 - Specifying a Language while Editing an Item
You can specify a language while editing an item.
To specify a language while editing an item:
- Do one of the following:
- Click the Content menu to open the Content page, and then in the Operations column, click Edit for the item to edit. If necessary, you can filter the list of content items by title, content type, published status, and language, and then click Filter.
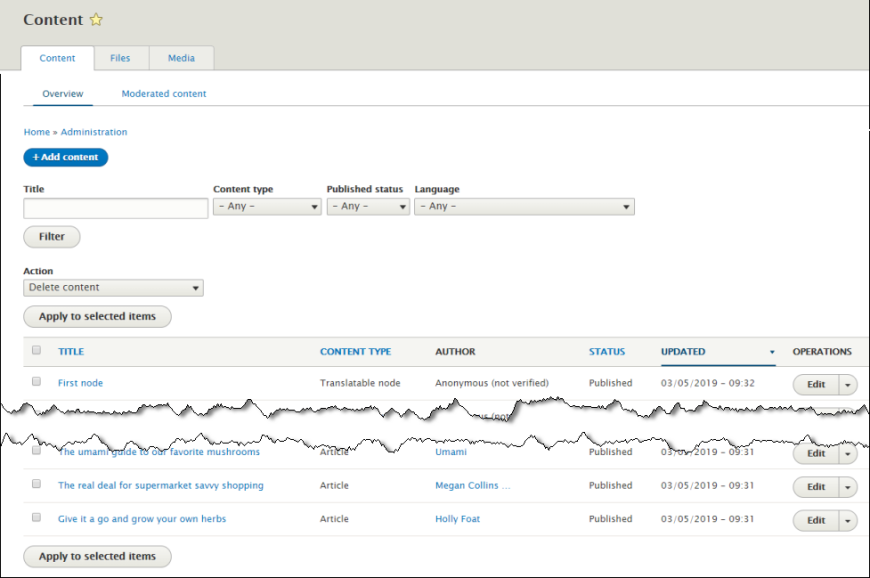
- In the location for the item, click the Edit tab.
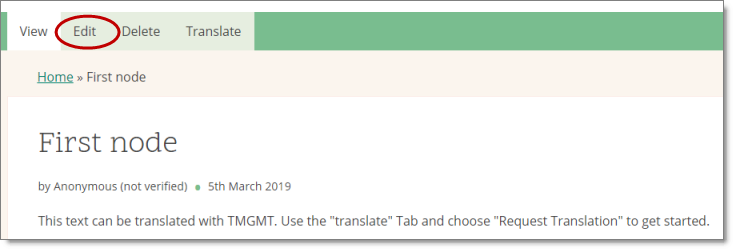
The Edit <content type> page opens. For example, the Edit Translatable node page opens.
![]()
-
In the Language dropdown list, select the language of the content.
-
Click the appropriate Save button, depending on whether the item is published or unpublished.
2.3.2 - Submitting Content Directly to the Connector
You can submit content from Drupal TMGMT directly to the Connector. This creates one job for each target language. If you request a quote for the translation job, you must log into Lionbridge Freeway to authorize the quote and start the translation process.
When you submit content directly to the Connector, you complete the following general steps:
- You submit one or multiple items to a provider (Drupal TMGMT’s term for the Connector, or a connector to another translation provider). This creates one translation job for each target language. For detailed instructions, see:
- If you request a quote for the translation job, you must log into Lionbridge Freeway to authorize the quote and start the translation process.
2.3.2.1 - Submitting One Item Directly to the Connector
You can submit one item directly to the Connector. Drupal TMGMT creates a separate translation job for each target language. If you request a quote for the translation job, you must log into Lionbridge Freeway to authorize the quote and start the translation process.
To submit one item immediately to the Connector:
- In the location for the item, click the Translate tab.
![]()
The Translations of page opens.
![]()
This page displays all the languages set up for your site.
In the example above, the source language of the content is English. The German language is also set up for your site.
- Select the check boxes for the languages into which you want to translate the item.
Tip: To select all available languages, select the check box in the column header.
Note: Do not click the add link for a language, because this opens the Create <content type> page, where you can enter the translation manually, instead of sending out the content for translation.
- Click Request translation.
The Checkout page opens. A message at the top states that you must check out the jobs. You must check out one job for each target language you selected earlier, because Drupal TMGMT creates a separate job for each target language.
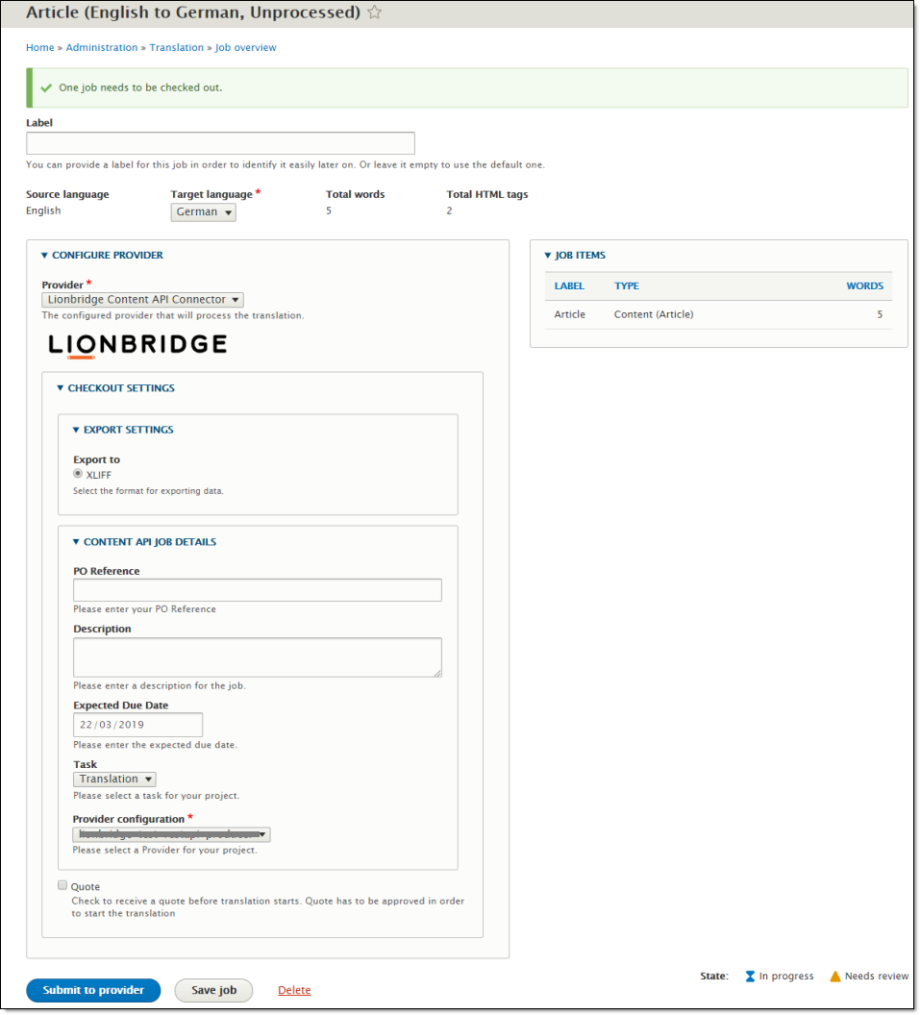
- Use this page to specify the job settings for the translation job for the specified target language.
| Field | Description |
|---|---|
| Label | Optional. You can enter a name for the translation job. This is the name that is displayed in Drupal. If you leave this blank, the default job name is the name of the item. This becomes the order name in Freeway. |
| Source language | Read only. The source language of the content. |
| Target language | Select the target language for the job. You can select any of the target languages you specified earlier, in step 2. |
| Total words | Read only. The number of words in the item. |
| Total HTML tags | Read only. The number of HTML tags in the item. |
-
Optional. Click Load suggestions to display the Suggestions section, where Drupal TMGMT lists any similar items that you can send out for translation.
-
In the Configure Provider section, in the Provider list, select the provider you added for Lionbridge in Adding Lionbridge as a Provider in Drupal TMGMT.
Tip: There may be multiple providers if your company has multiple Content API credentials or different provider configurations.
- Optional. In the Checkout Settings section, specify the following information:
| Field | Description |
|---|---|
| Export Settings sub-section | |
| XLIFF | Your content is always exported in XLIFF format, which is the standard XML-based format for exchanging localizable data between applications. |
| Content API Job Details sub-section | |
| PO Reference | Optional. The purchase order number is delivered to your translation provider to facilitate payment. |
| Description | Your description for this translation job. This description will be delivered to Freeway. |
| Expected Due Date | The requested date for receiving the translation, in DD/MM/YYYY format and time in 24-hour format. To enter a different date, either enter it in this field or click the arrow to select it. This date will be delivered to Freeway. |
| Task | By default, this is Translation, which sends out the job for translation. |
| Provider configuration | The translation-provider workflow configured by the Lionbridge Connector Team. |
| main section | |
| Quote | If you want to receive a quote before the translation process starts, select this check box. You must log into Lionbridge Freeway to authorize the quote before the translation process starts. |
- Do one of the following:
-
If you selected multiple target languages for this item in step 2, and this is not the last one to submit, then click Submit to provider and continue.
-
If you selected one target language for this item in step 2, or if you selected multiple target languages but this is the last one to submit, then click Submit to provider.
-
Drupal TMGMT creates a job to translate this item into this target language.
- If you clicked Submit to provider and continue, then this page reopens for the next target language to process. Repeat steps 4-8 for each target language.
A message at the top of the page states that the job has been submitted. If you selected the Quote check box, you must log into Lionbridge Freeway to authorize the quote and start the translation process. The message includes a link to download or view the file. However, downloading the file is optional, because the Connector already submitted it to Lionbridge Freeway.

- If you clicked Submit to provider, then the Translations of page re-opens, displaying a message at the top of the page that the job is being processed and you can download the files. If you selected the Quote check box, you must log into Freeway to authorize it before the translation process starts.
![]()
You can now view the jobs you submitted on the Job overview page (Jobs tab). If you selected the Quote check box, you must log into Lionbridge Freeway to authorize the quote for each job before the translation process starts.
2.3.2.2 - Submitting Multiple Items Directly to the Connector
You can submit multiple items directly to the Connector. Drupal TMGMT creates a separate translation job for each target language. If you request a quote for the translation job, you must log into Lionbridge Freeway to authorize the quote and start the translation process.
To submit multiple items immediately to the Connector:
- Select Translation > Sources on the menu to open the Content overview page (Sources tab).
![]()
Tip: Items are displayed in this page only if they have a language assigned. If the item you want to translate is not displayed here, click the Content menu to open the Content overview page. Then click the edit link beside the item and assign a language. For detailed instructions, see Specifying a Language while Editing an Item.
In this example, there are two untranslated items.
-
Optional. Use the filter bar at the top of the page to locate the items to send to the Connector and then click Search.
-
Select the check boxes of the items to send for translation.
-
Click Request translation.
The Checkout page opens for the items you selected. If you selected multiple target languages, then only the first one is displayed. A message at the top states that you need to check out the jobs. The number of jobs you need to check out is the same as the number of target languages you selected earlier. Recall that Drupal TMGMT creates a separate job for each target language.
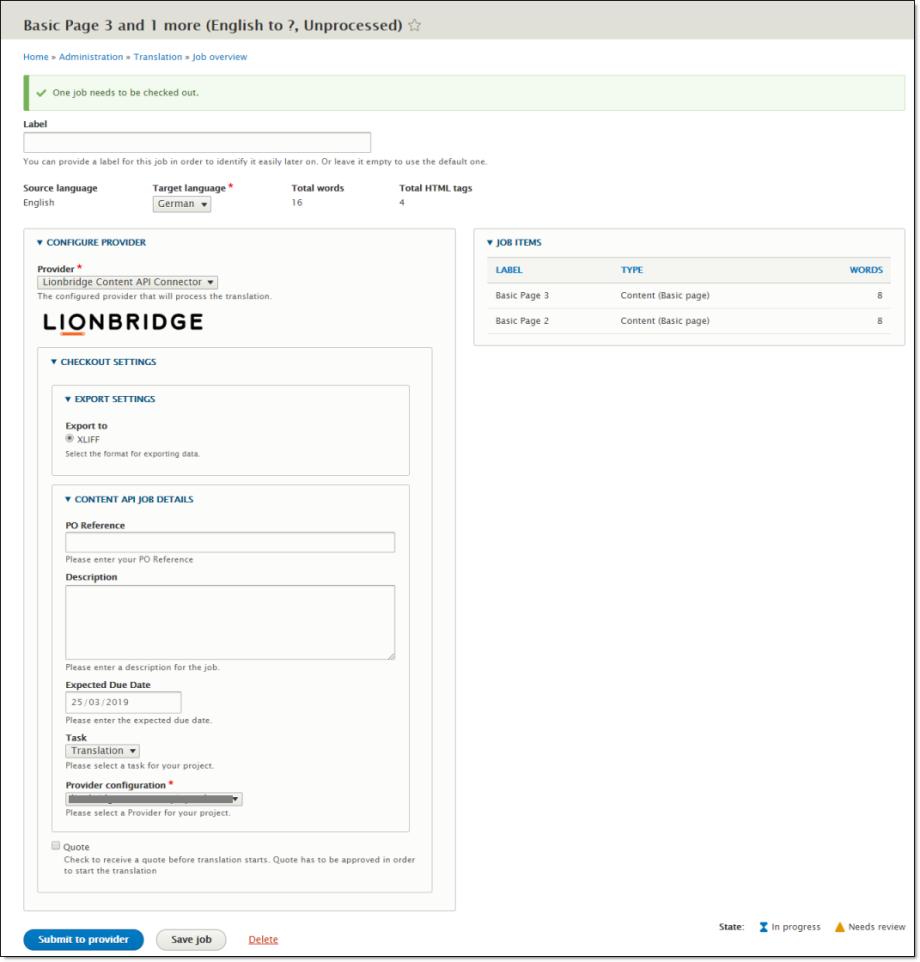
- Use this page to specify the job settings for the translation job for the specified target language.
| Field | Description |
|---|---|
| Label | Optional. You can enter the job name. This is the name that is displayed in Drupal. If you leave this blank, the default job name starts with the name of the first item. This becomes the order name in Freeway. |
| Source language | Read only. The source language of the content. |
| Target language | Select the target language for the job. You can select any of the target languages set up for your site. |
| Total words | Read only. The number of words in the selected items. |
| Total HTML tags | Read only. The number of HTML tags in the selected items. |
- In the Configure Provider section, in the Provider list, select the provider you added for Lionbridge in Adding Lionbridge as a Provider in Drupal TMGMT.
Tip: There may be multiple providers if your company has multiple Content API credentials or different provider configurations.
- Optional. In the Checkout Settings section, specify the following information:
| Field | Description |
|---|---|
| Export Settings sub-section | |
| XLIFF | Your content is always exported in XLIFF format, which is the standard XML-based format for exchanging localizable data between applications. |
| Content API Job Details sub-section | |
| PO Reference | Optional. The purchase order number is delivered to your translation provider to facilitate payment. |
| Description | Your description for this translation job. This description will be delivered to Freeway. |
| Expected Due Date | The requested date for receiving the translation, in DD/MM/YYYY format and time in 24-hour format. To enter a different date, either enter it in this field or click the arrow to select it. This date will be delivered to Freeway. |
| Task | By default, this is Translation, which sends out the job for translation. |
| Provider configuration | The translation-provider workflow configured by the Lionbridge Connector Team. |
| main section | |
| Quote | If you want to receive a quote before the translation process starts, select this check box. You must log into Lionbridge Freeway to authorize the quote before the translation process starts. |
- Click Submit to provider.
Drupal TMGMT creates a job to translate these items into this target language.
The Content overview page reopens. A message at the top of the page states that the job has been submitted. If you selected the Quote check box, you must log into Lionbridge Freeway to authorize the quote and start the translation process. The message includes a link to download or view the files. However, downloading the files is optional, because the Connector already submitted the job to Lionbridge Freeway.
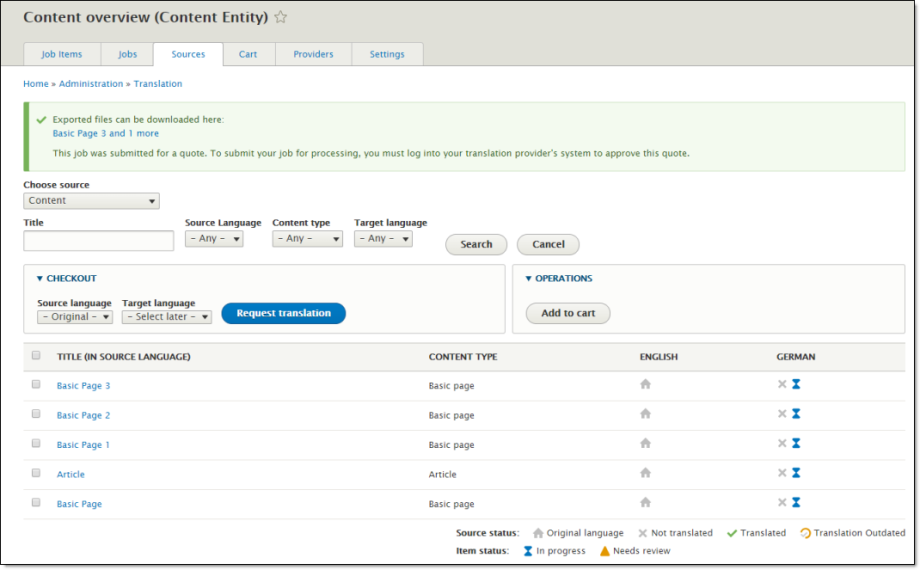
- If you want to submit these items for translation to another target language, repeat steps 3-8 for that language.
You can now view the job or jobs you submitted/checked out on the Job overview page (Jobs tab). If you selected the Quote check box, you must log into Lionbridge Freeway to authorize the quote for each job so that the Connector will send it out for translation.
2.3.3 - Submitting Content to the Connector via the Cart
The Cart is a place to collect items for translation before sending them to the Connector, which automatically groups them into jobs.
Using the Cart has the following advantages:
- If the person with the authority to send content for translation from the Cart manages your organization’s translation budget, it can help control translation costs and the translation process.
- You may not want to send out each item individually as soon as you finish reviewing it. The Cart facilitates your management of reviewed content, so that you do not forget about sending individual reviewed items for translation.
- Lionbridge prefers receiving fewer but larger batches of content to translate, rather than individual items, as this facilitates project preparation, resource assignment, and file analysis.
- If you want to translate many items into multiple languages, but you want to translate into only one target language at a time, this is a good way to manage that process.
If you or your colleagues have added items to the Cart, you must access it to submit the items to the Connector.
Note: If you do not send out items from the Cart to the Connector, then the Connector does not send out the translation jobs to Lionbridge.
When you use the Cart to manage your translation process, you complete the following general steps:
- You add items to the Cart, as described in:
Optional. You can also remove items from the Cart, if you decide not to translate them. For detailed instructions, see Removing Items from the Cart.
-
You submit items from the Cart to the Connector, as described in Submitting Items in the Cart to the Connector. You can send out one, multiple, or all items from the Cart at one time. This step creates one job for each target language.
-
If you requested a quote for the translation job, you must log into Lionbridge Freeway to authorize the quote for each translation job and start the translation process.
2.3.3.1 - Adding One Item to the Cart
Adding One Item to the Cart
You can add one item to the Cart, so that later you can submit it to the Connector. For an explanation of using the Cart to submit content to the Connector, see Submitting Content to the Connector via the Cart.
To add one item to the Cart:
- In the location for the item, click the Translate tab.
![]()
The Translation of page opens.
![]()
This page displays all the languages set up for your site.
In the example above, the source language of the content is English. German is also set up for your site, but there is no German language version.
- Select the check boxes for the languages to translate, and click Add to cart.
A message at the top of the page states that the content source was added to the Cart.
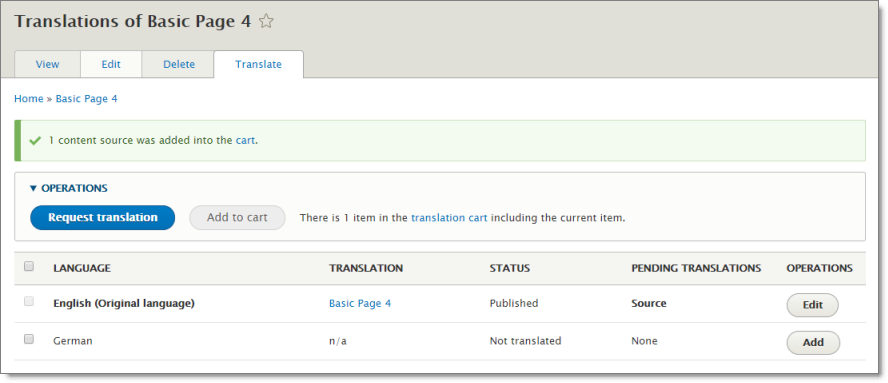
You can click the cart link in the message to open the Cart and view the contents.
For detailed instructions on viewing and sending out items from the Cart, see Submitting Items in the Cart to the Connector.
2.3.3.2 - Adding Multiple Items to the Cart
You can add multiple items to the Cart, so that later you can submit them to the Connector. For an explanation of using the Cart to submit content to the Connector, see Submitting Content to the Connector via the Cart.
To add multiple items to the Cart:
- Select Translation > Sources from the menu or click the Sources tab (if it is displayed) to open the Content overview page / Sources tab.
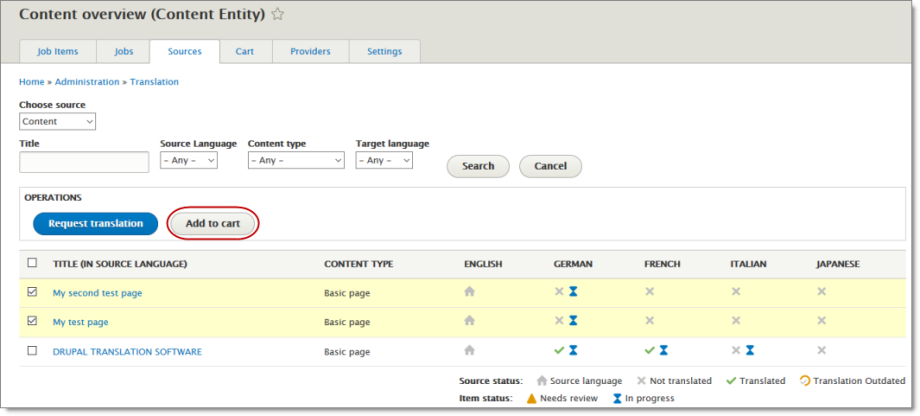
- Select the check boxes for the items and click Add to cart.
A message box at the top of the page states that the selected items were added to the Cart.
For detailed instructions on viewing and sending out items from the Cart, see Submitting Items in the Cart to the Connector.
2.3.3.3 - Removing Items from the Cart
If there are items in the Cart that you do not want to send out for translation, you can remove them from the Cart. This removes all jobs based on those items from the Cart.
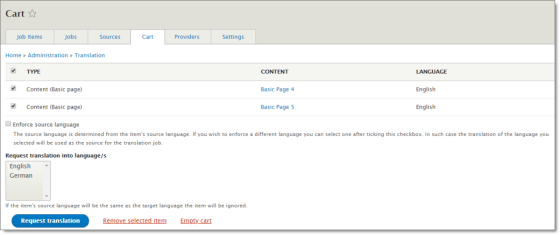
To remove some, but not all, items from the Cart:
-
If the Cart is not already open, select Translation > Cart from the menu to open it.
-
Select the check boxes for the items to remove from the Cart.
-
Click Remove selected.
A message at the top of the page confirms that the selected jobs were removed from the Cart.
To remove all items from the Cart:
-
If the Cart is not already open, select Translation > Cart from the menu to open it.
-
Click Empty cart.
A message at the top of the page confirms that all the jobs were removed from the Cart.
2.3.3.4 - Submitting Items in the Cart to the Connector
After you add items to the Cart, you can submit them to the Connector. For instructions on adding items to the Cart, see Adding One Item to the Cart and Adding Multiple Items to the Cart.
Tip: The Cart tab displays the number of items in the Cart that have not yet been sent out for translation.
To submit items that are in the Cart to the Connector:
- If the Cart is not already open, then select Translation > Cart from the menu or click the Cart tab to open it.
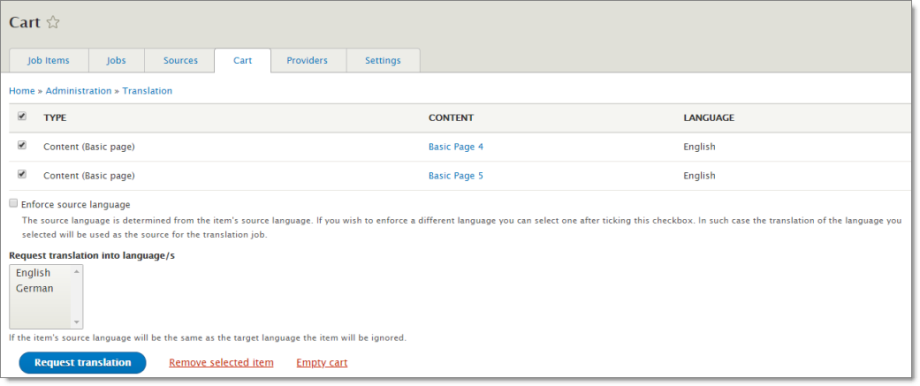
The following information is displayed about items in your cart:
| Column | Description |
|---|---|
| Type | The content type of the item. |
| Content | The title of the item. |
| Language | The source language of the item. |
- Select the check boxes of items in your cart to send out for translation.
Tip: To select all the items in your cart, select the check box in the column heading.
- Optional. Select the Enforce source language check box. This enables you to change the language specified for an item before sending it out for translation. It displays the Source Language dropdown list, where you can change the source language specified for an item.
![]()
Best practice: In general, you should specify the language while creating or editing the item, as described in Specifying a Language for Content. Therefore, selecting this check box should not be necessary.
-
In the Request translation into language/s list, select the target languages, into which to translate the content.
-
Click Request translation.
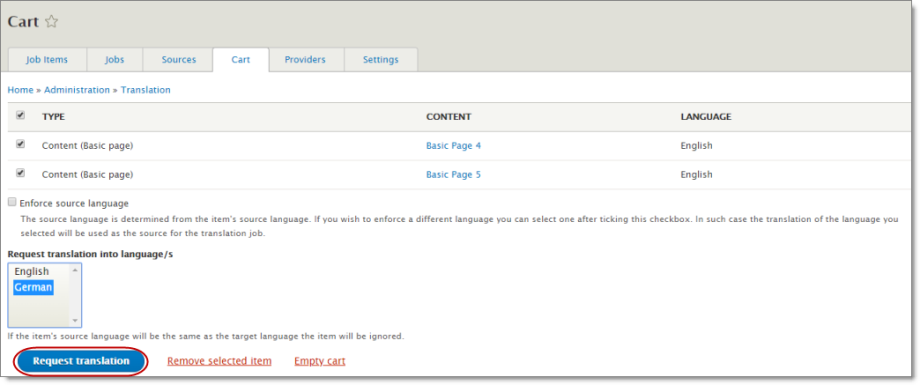
This creates one job for each specified target language. If there are multiple items in the cart, they are combined into a single job. For example, suppose there are two items (Item A and Item B) in the cart that you want to translate into three target languages (French, German, Polish). In this scenario, Drupal TMGMT creates three jobs, one for each language. Each job contains two items.
The Job overview page opens. A message at the top states that you need to check out the jobs. The number of jobs you need to check out is the same as the number of target languages you selected earlier. Recall that Drupal TMGMT creates a separate job for each target language.
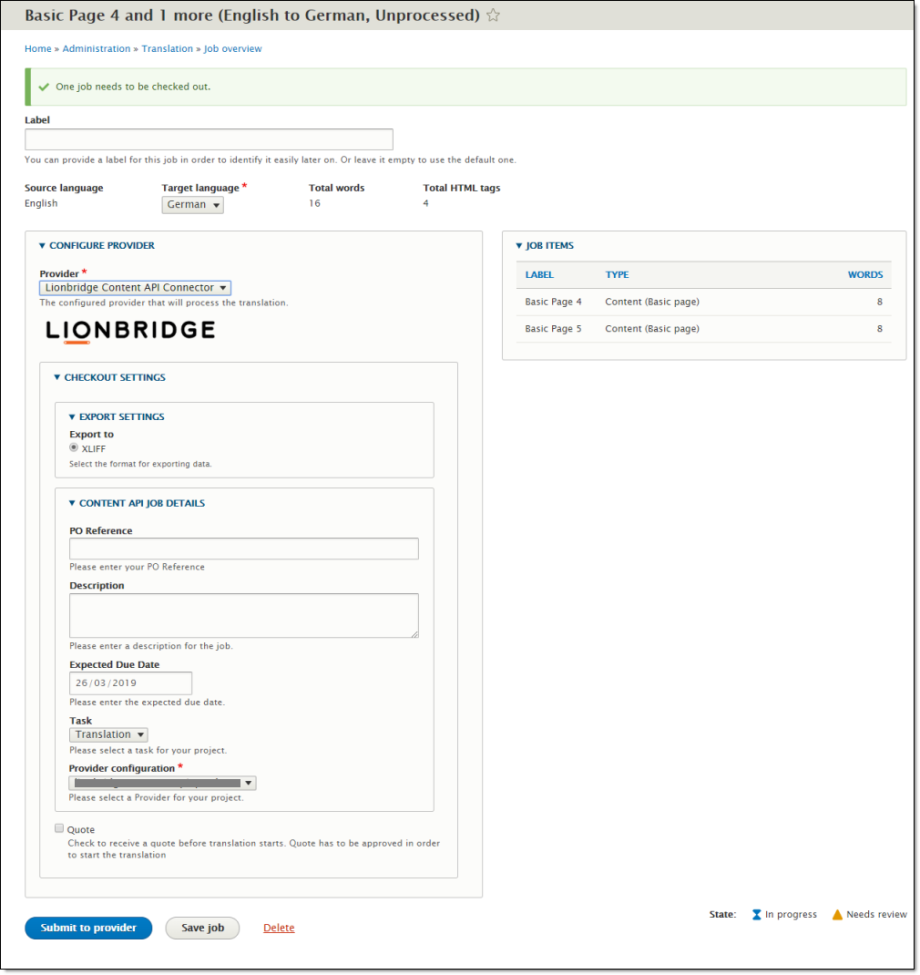
- Use this page to specify the job settings for the translation job for the specified target language.
| Field | Description |
|---|---|
| Label | Optional. You can modify the job name. By default, the job name starts with the name of the first item selected from the cart. This becomes the order name in Freeway. |
| Source language | Read only. The source language of the content. |
| Target language | Select the target language for the job. You can select any of the target languages you specified earlier, in step 4, in the Translation page. Reminder: There is only one target language per job. |
| Total words | Read only. The number of words in the selected items. |
| Total HTML tags | Read only. The number of HTML tags in the selected items. |
The Job Items section displays all the items in your job.
-
Optional. Click Load suggestions to view any other items that may be suitable to include in this job. The Suggestions sub-section opens, displaying any suggested items to check out with these items. To add suggested items, select the corresponding check boxes.
-
In the Configure Provider section, in the Provider dropdown list, select the provider you added for Lionbridge in Adding Lionbridge as a Provider in Drupal TMGMT.
Tip: There may be multiple providers if your company has multiple Content API credentials or different provider configurations.
- Optional. In the Checkout Settings section, specify the following information:
| Field | Description |
|---|---|
| Export Settings sub-section | |
| XLIFF | Your content is always exported in XLIFF format, which is the standard XML-based format for exchanging localizable data between applications. |
| Content API Job Details sub-section | |
| PO Reference | Optional. The purchase order number is delivered to your translation provider to facilitate payment. |
| Description | Your description for this translation job. This description will be delivered to Freeway. |
| Expected Due Date | The requested date for receiving the translation, in DD/MM/YYYY format and time in 24-hour format. To enter a different date, either enter it in this field or click the arrow to select it. This date will be delivered to Freeway. |
| Task | By default, this is Translation, which sends out the job for translation. |
| Provider configuration | The translation-provider workflow configured by the Lionbridge Connector Team. |
| main section | |
| Quote | If you want to receive a quote before the translation process starts, select this check box. You must log into Lionbridge Freeway to authorize the quote before the translation process starts. |
Tip: If you modified the Label field or modified which items are in the job, you can click Save job to save a draft of the job before submitting it.
-
Do one of the following:
-
If you selected multiple target languages for items in the Cart in step 4, and this is not the last one to submit, then click Submit to provider and continue.
-
If you selected one target language for items in the Cart in step 4, or if you selected multiple target languages but this is the last one to submit, then click Submit to provider.
-
The page updates, and a message at the top of the page states that the job has been submitted. If you selected the Quote check box, you must log into Lionbridge Freeway to authorize the quote for the job to start the translation process. The message includes a link to download or view the files. However, downloading the files is optional, because the Connector already submitted the job to Lionbridge Freeway.
- If you specified additional target languages for translation, complete steps 6-10 for each target language, which corresponds to a separate job.
After you submit jobs for each target language you specified earlier, the Job overview page reopens.
After you check out the last job for the last target language, you can view the job or jobs you submitted/checked out on the Job overview page (Jobs tab). If you requested quotes for the translation jobs, you must log into Lionbridge Freeway to authorize the quotes and start the translation process.
2.4 - Tracking Your Translation Job
After you send the job to Lionbridge for translation, you can track the progress of this job on the Job overview page (Jobs tab).
Note: If you requested a quote for the translation job, you must log into Lionbridge Freeway to authorize the quote and start the translation process.
Tip: Drupal TMGMT provides icons that indicate the translation state/status of source- and target-language items. For a list and descriptions of these icons, see Drupal TMGMT Icon Legend.
To track your translation job:
- Select Translation > Jobs from the menu.
The Job overview page (Jobs tab) opens.
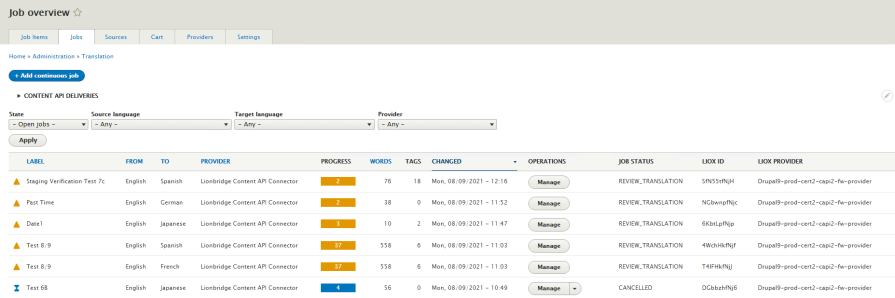
There is a separate job for each target language. For detail see Job Status, Liox ID and Provider Name in Drupal TMGMT.
- Optional. Use the filter bar at the top of the page to locate the jobs to send out for translation.

| Dropdown List | Description |
|---|---|
| State | The state of the translation job. This is one of the following: * Unprocessed: The job has not been submitted to the Connector. It may be in the Cart. * Pending: The job has been submitted to the Connector. The quote may have been authorized. * Translated: The job was accepted, and the translated item was created in Drupal. If the **Receive translated jobs automatically** feature is not configured, then you must import the translated content. For detailed instructions, see Importing Your Translated Content into Drupal TMGMT.
|
| Source language | The source language of the content. |
| Target language | The target language into which the content is translated. |
| Provider | The provider set up in Drupal TMGMT for translating the content. In this case, it is your company’s name for Lionbridge, set up in Adding Lionbridge as a Provider in Drupal TMGMT. |
- To view additional information about a job, in the Operations column, click Manage.
The page for that job opens.
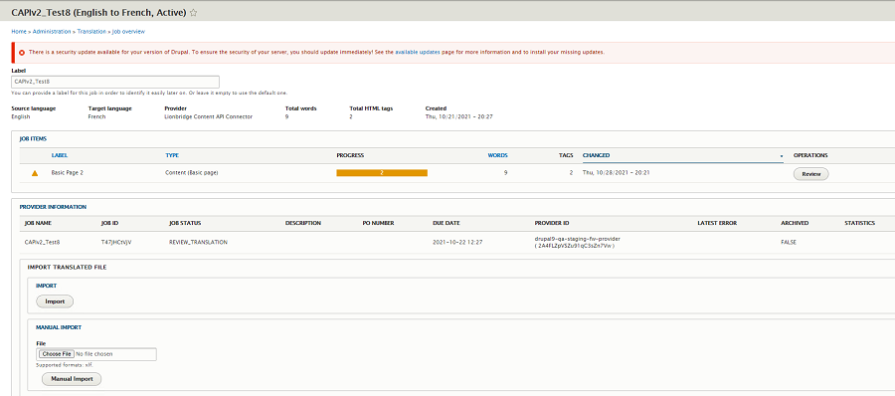
When this page is reloaded, the content updates automatically with new messages.
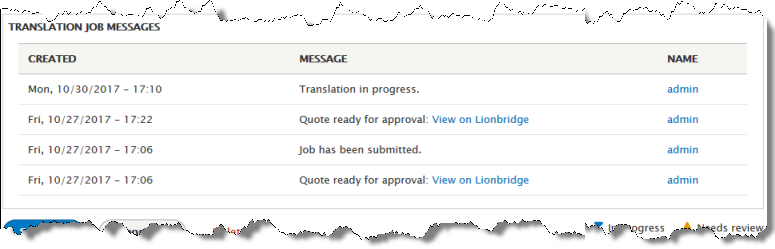
The following table describes the updates you can receive:
| State in “Job Items” section | Status in “Provider Information” section | Message in Message section | Description |
|---|---|---|---|
| In progress | Pending | Job has been submitted. | Job was submitted to Connector, but quote has not been authorized. |
| In progress | Authorized | Translation in progress. | Quote for job has been authorized. |
| Needs review (review scenario) | Translated | The translation of job-name is finished and can now be reviewed. | The translation is ready for review. |
| Accepted (review scenario) | Reviewed | The translation for job-name has been accepted. | The translation has been reviewed. |
| Accepted (non-review scenario) | Accepted | The translation job has been finished. | The translation is complete, and it does not require review. |
| The translation for job-name has been accepted. |
- Once the Status is Translated, in the Operations column, you can click Review to view the translated content. For detailed instructions, see Viewing and Reviewing Translated Jobs.
2.5 - Importing Your Translated Content
If the Receive translated jobs automatically feature was not configured, as described in Adding Lionbridge as a Provider in Drupal TMGMT, then after your translated content returns to the Connector, you must import it into Drupal TMGMT.
To import your translated content:
- Select Translation > Jobs from the menu.
The Job overview page (Jobs tab) opens.
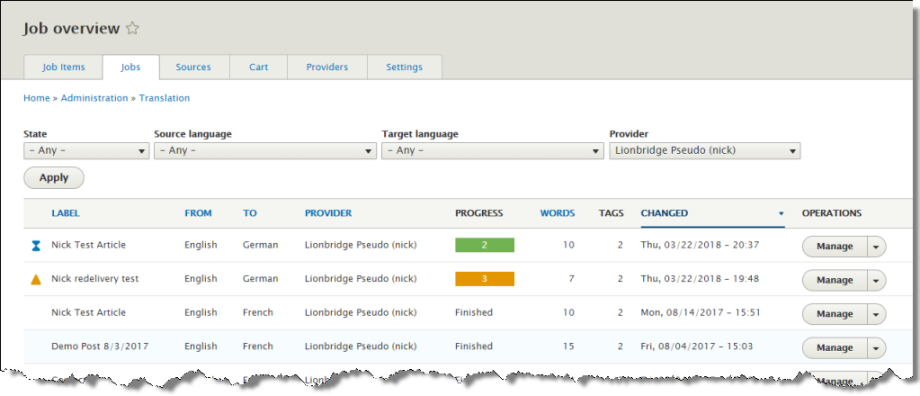
Note: There is a separate job for each target language.
- Locate the finished job that you want to import to Drupal TMGMT. In the Progress column, this job displays Finished.
Tip: To view only finished jobs, in the State column in the filter at the top of the list, select Finished from the dropdown list, and then click Apply.
- In the row of the job to import, in Operations column, click Manage.
The page for that job opens.
- In the Import Translated File section, do one of the following:
![]()
- In the Import Automatically | Update TM sub-section, click Auto-Import.
- In the Manual Import sub-section, click Choose File, then browse to the file to import to Drupal TMGMT, and then click Manual Import.
A message box at the top of the page states that the job was imported, and the page updates.
- Do one of the following:
-
If the Auto accept finished translations check box is selected for the provider, the imported job is ready for you to view. For detailed instructions, see Viewing One Translated Job.
-
If the Auto accept finished translations check box is cleared for the provider, the imported job is ready for you to review. In this scenario, you must review the translations and then accept or reject them. In the Job Items section, in the Operations column, click Review, and then in the page that opens, review the translated content, and when you are done, click either Save or Save as completed. For detailed instructions, see Reviewing One Translated Job.
2.6 - Viewing and Reviewing Translated Jobs
When you monitor translation jobs, as described in Tracking Your Translation Job, you reload the page to retrieve status updates. This also automatically retrieves translated content from Lionbridge, once it is available.
After the Connector retrieves the translated content and saves it in Drupal, it is ready for review.
Depending on the Connector setup in Drupal TMGMT, you may need to approve translated content before it can be published. This is determined by the Auto accept finished translations setting in the Edit Provider page, as described in Adding Lionbridge as a Provider in Drupal TMGMT:
As soon as the translation job is finished, the provider status changes from Authorized to Translated, because Lionbridge has completed the translation job. In addition:
-
If the Auto accept finished translations check box is selected for the provider, the job state changes from In progress to Accepted. You can view these translations. For detailed instructions, see Viewing One Translated Job.
-
If the Auto accept finished translations check box is cleared for the provider, the job state changes from In progress to Needs review. In this scenario, you must review the translations and then accept or reject them. For detailed instructions, see Reviewing One Translated Job.
2.6.1 - Viewing One Translated Job
If the Auto accept finished translations check box is selected for the provider (the Connector), you can view translated content. However, you cannot modify it here, because it has been automatically accepted. For instructions on editing translated content, see Editing Translated Items.
To view the translation of one job:
-
If the Job page is not already open: a. Select Translation > Jobs from the menu to open the Job overview page (Jobs tab) . b. Optional. Use the filter bar at the top of the page to locate the job to review. The job is in Accepted state. c. In the Operations column of the job to review, click Manage to open the Job page.
-
In the Job Items section, in the Operations column, click View.
The View Translation page opens.
![]()
-
The Source fields on the left side display the source content.
-
The Translation fields on the right side display the translated content. In these examples, pseudo-translation is displayed instead of actual translated content.
The fields displayed here depend on the fields in the content type.
- When you are done, click Cancel to return to the Job page.
2.6.2 - Reviewing One Translated Job
If the Auto accept finished translations check box is cleared for the provider (the Connector), the translation requires review as part of the translation-management process.
To review the translation of one job:
-
If the Job page is not already open: a. Select Translation > Jobs from the menu to open the Job overview page (Jobs tab) . b. Optional. Use the filter bar at the top of the page to locate the job to review. The job is in Translated state. c. In the Operations column of the job to review, click Manage to open the Job page.
-
In the Job Items section, in the Operations column, click Review.
The Review Translation page opens.
![]()
- The Source fields on the left side display the source content.
- The Translation fields on the right side display the translated content. In these examples, pseudo-translation is displayed instead of actual translated content.
The fields displayed here depend on the fields in the content type.
-
You can click in any field to modify the content.
-
When you are done, click either Save or Save as completed:
-
Click Save to save your changes without completing your review of the translation.
-
Click Save as completed to save your changes and mark the translation as reviewed. This accepts the translation.
-
-
If you clicked Save as completed, then the job state changes to Accepted, and in the Message box, there is a new message: The translation for <job-name> has been accepted as X. where X is an abbreviation of the translated content and a link to the translated content as a separate page. The translated items are saved in Drupal.
Tip: You can click the link to view the translated content in its own page.
Important: If you do not want to accept the translation, do not click Save as completed. The translation is not saved in Drupal. Drupal TMGMT does not support rejecting a translation job and sending it back to Lionbridge. You must sign into Freeway to reject the translation.
2.7 - Other Tasks
You can perform the following additional optional tasks:
2.7.1 - Aborting Translation Jobs
To stop a translation job that is already in progress, contact Lionbridge Connector Support. For details, see How to Contact Lionbridge Connector Support.
2.7.2 - Resubmitting Aborted Translation Jobs
You can resubmit a previously aborted translation job.
To resubmit a previously aborted translation job:
-
Select Translation > Jobs from the menu to open the Job overview page (Jobs tab) .
-
Optional. Use the filter bar at the top of the page to locate the job to resubmit. The job is in Aborted state.
-
In the Operations column, click Manage to open the page for a job in Aborted state.
-
Scroll down to the bottom of the page and click Resubmit.
A message confirms that you want to resubmit this job.
- Click Confirm.
A message at the top of the page states that the aborted job was duplicated, and that you can resubmit it now.
-
Optional. Modify any values on this page. For description of the values you can modify, see the description of the Checkout page in Submitting One Item Directly to the Connector.
-
Click Submit to provider.
2.7.3 - Deleting Jobs
You can click the Delete button to delete translation jobs in the following states from Drupal TMGMT:
- Unprocessed
- Finished
This functionality is not reversible.
Note: The Delete button is not available in any of the other states, which occur when the job is actively in translation. To delete a translation job that is already in progress, contact Lionbridge Connector Support. For details, see How to Contact Lionbridge Connector Support.
You can delete a translation job from the Job overview page / Jobs tab or from the Job page.
Note: Deleting translation jobs does not delete translated items that have been auto accepted or reviewed and accepted.
To delete multiple translation jobs:
- Click the Translation menu to open the Job overview page / Jobs tab.
- Optional. To filter the jobs in the list, select the state, language, and provider, and click Apply.
- Select the check boxes for the jobs to delete.
- In the Operations dropdown list at the top of the page, select Delete Job.
- Click Execute.
A message at the top of the page confirms that you want to delete the jobs.
- Click Confirm.
A message at the top of the page confirms that the jobs were deleted.
To delete a translation job from the Job overview page / Jobs tab:
- Select Translation > Jobs from the menu to open the Job overview page / Jobs tab.
- Optional. To filter the jobs in the list, select the state, language, and provider, and click Apply.
- In the Operations column, click Delete.
A message confirms that you want to delete this job.
- Click Confirm.
A message at the top of the page confirms that the job was deleted.
To delete a translation job from the Job page:
-
Ensure that the Job page is open. If necessary, open the Job overview page / Jobs tab, as described above, and in the Operations column, click Manage to open this page.
-
Scroll down to the bottom of the page and click Delete.
A message confirms that you want to delete this job.
- Click Confirm.
A message at the top of the page confirms that the job was deleted.
2.7.4 - Editing Translated Items
After a translation has been accepted, including auto accepted, you can still make changes to it. You edit a translated item the same way that you edit the source item, by editing the target language version of the item.
To edit a translated item:
- Click the Content menu to open the Content page, and then in the Operations column, click Edit for the item to edit. If necessary, you can filter the list of content items by status, type (content type) and language and then click Filter.
The item is displayed in the source language, for example, English.
![]()
- Click the Translate tab.
The Translations of page displays the translation status of each available target language for this item.
![]()
- To edit a target-language version, click Edit, or click the link in the Translation column.
The target-language version of the page opens.
![]()
- You can now edit the translation of the item. When you are done, click the appropriate Save button to save your changes.
2.7.5 - Redelivering Translated Content to Drupal TMGMT
You can redeliver all the translated content in a translation job from Lionbridge to Drupal TMGMT. This is useful in the following scenarios:
- The translations were updated or corrected after the initial delivery.
- You want to overwrite any changes that you made in Drupal to the translated content.
Note: Redelivering a translation job from Lionbridge to Drupal TMGMT overwrites any post-translation edits to the translated content.
To redeliver a translation job to Drupal TMGMT:
- Select Translation > Jobs from the menu.
The Job overview page (Jobs tab) opens.
Note: There is a separate job for each target language.
- Locate the finished job that you want to redeliver to Drupal TMGMT. In the Progress column, this job displays Finished.
Tip: To view only finished jobs, in the State column in the filter at the top of the list, select Finished from the dropdown list, and then click Apply.
- In the row of the job to redeliver, in Operations column, click Manage.
The page for that job opens.
- In the Import Translated File section, do one of the following:
![]()
- In the Import Automatically | Update TM sub-section, click Auto-Import.
- In the Manual Import sub-section, click Choose File, then browse to the file to redeliver to Drupal TMGMT, and then click Manual Import.
A message box at the top of the page states that the job was submitted for redelivery, and the page updates.
- Do one of the following:
-
If the Auto accept finished translations check box is selected for the provider, the redelivered job is ready for you to view. For detailed instructions, see Viewing One Translated Job.
-
If the Auto accept finished translations check box is cleared for the provider, the redelivered job is ready for you to review. In this scenario, you must review the translations and then accept or reject them. In the Job Items section, in the Operations column, click Review, and then in the page that opens, review the translated content, and when you are done, click either Save or Save as completed. For detailed instructions, see Reviewing One Translated Job.