Post-Translation Tasks
In general, you use the Adobe Experience Manager workflow to review, approve and publish translated content.
After the translation is complete, you can perform the following additional optional tasks:
1 - Relocking Unlocked Components
If you set your translation setting to unlock translated components after they return from translation, you can use the CTCRestoreOriginalSync workflow to restore the components' original inheritance. This translation setting is one of the following:
| Option Name |
User Interface |
| Unlock When Done |
Sidekick (simple UI with options and wizard with options) |
| Unlock the component after translated content come back |
Sidekick workflow |
| Leave Unlock |
Translation Queue (columns) |
| Leave component unlock after putting back translated content |
Translation Queue (Overwrite section) |
| Unlock the component after translated content come back |
Bulk Translation wizard, Options page |
| Unlock the component after translated content come back |
I and Default Settings section of the Configuration page (used for rollout) |
In general you set this option when you use roll out a site, Adobe Experience Manager copies the Blueprint (source) to the (target), as described in Adobe Experience Manager’s MSM and the Rollout Process.
To relock unlocked components and restore their inheritance relationship:
-
Ensure that you are using the Adobe Experience Manager Classic UI.
-
Double-click a page to open it with Sidekick, which is a floating toolbar.
-
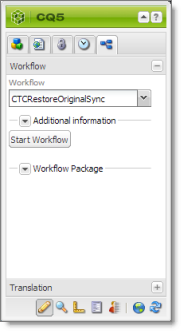
In Sidekick, click the Workflow tab  .
.
-
In the Workflow tab, select the CTCRestoreOriginalSync workflow from the Workflow list, and then click Start Workflow.
2 - Updating a Remote Translation Memory (TM)
After the Connector returns translated content from the translation provider to Adobe Experience Manager, in-country marketers or reviewers can review the translation and update it in Adobe Experience Manager. These reviewers can then send their post-translation updates to their translation technology or provider. The translation provider can then update the translation memory (TM) with these content updates. This means that the updates will be available to the translation provider for subsequent translations. This makes the translation process more efficient.
To send updates to the translation provider’s translation memory:
The Connectors sends a TMX file to the translation technology or provider with the updates. This file includes:
- the original source content
- the original translated content
- the updated translated content
- the name of the translation job
- the page path and the property name
Tip: When you send an update for a single page, you can add a comment for your translator about why you are updating the translation for that page.
Best practices for updating a remote translation memory (TM):
-
Make only small post- translation updates in the Adobe Experience Manager authoring environment, and then use this feature to send those updates to the translation provider. If you require large updates or rewrites, discuss this directly with your translation provider to ensure that all changes are captured efficiently. In this scenario, the translation provider can redo the translations and redeliver the updates via the Connector.
-
Create a primary review process for translation that captures most changes to translated content, so that the translation provider can update its TM directly. The secondary review process in Adobe Experience Manager then captures only small and minor post-translation updates.
-
Review your remote TM updates on the TM Update page in the Connector. For detailed instructions, see Viewing Updates to a Translation Memory. If you have any changes that you do not want to send to the remote TM, you can delete them on the TM Update page.
-
A project manager at the translation provider should review the suggested updates and ensure that the translation memory is updated with these changes.
Important: Updating the remote TM is not an automatic process. The translation provider must review all the changes and transform them into a format to update the TM. The translation provider may charge a service fee for this work.
2.1 - Updating a Translation Memory for a Single Page from the Adobe Experience Manager Sidekick
After translated content returns from the translation provider to Adobe Experience Manager, you can review the translation and update it. You can then send these updates to the translation memory, so that they will be available to the translation provider for subsequent translations.
If you are using the Adobe Experience Manager Classic UI, you can update translated content and send these changes to the translation memory using Sidekick.
Tips: If you update translated content in multiple pages of a translation job, you can send all the updates to the translation memory in a single action using the Update TM button in the Status tab of the Translation Status page. For details, see Updating a Translation Memory for Multiple Pages. In Adobe Experience Manager version 6.3 and higher, you can update translated content and send these changes to the translation memory from the Touch-Optimized UI. For details, see Updating a Translation Memory for a Single Page from the Touch-Optimized UI (Adobe Experience Manager version 6.3 and higher only).
To update the translation memory for a single page from the Sidekick:
-
In Adobe Experience Manager, click the open icon  to open a translated page with Sidekick, which is a floating toolbar.
-
Update the translated content.
-
Reload the page in your browser window.
-
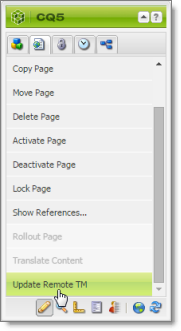
In Sidekick, click the Page tab  .
.
-
In the Page tab, scroll down and click the Update Remote TM option.
Note: This option is available only from a source language page, and only when the Use Local TM check box is not selected on the Configuration page. This option is described in detail in the Lionbridge Connector for Adobe Experience Manager Installation and Configuration Guide.
The Update Remote TM dialog box opens, displaying the paragraph you edited.
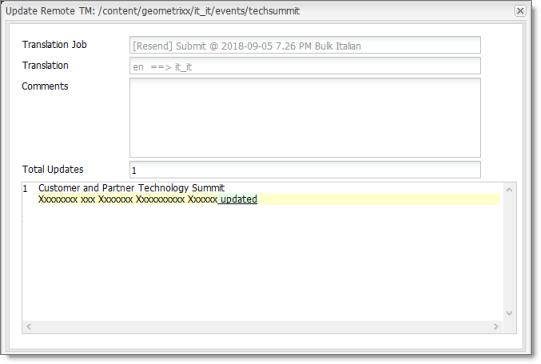
The following information about the translation is displayed in read-only fields at the top of the dialog box:
| Field |
Description |
| Translation Job |
The name of the translation job in which this page was sent out for translation. |
| Translation |
The language code of the source language that was translated, followed by an arrow, followed by the language code of the target language of the translation, for example: en ==> it_it. This indicates that the page was translated from English to Italian. |
| Total Updates |
The number of times that this content has been updated. |
- Optional. In the Comments field, you can add a comment for your translator about why you are updating the translation of this page.
The large text box below these fields displays the content:
- The source-language content is displayed on top, with no background.
- The translated content is displayed on a yellow background.
- Your changes to the translated content are displayed on a green background.
- Click Submit.
A message box opens, confirming that the content has been sent to the translation memory.
- Click OK to close the message box and the dialog box.
2.2 - Updating a Translation Memory for a Single Page from the Touch-Optimized UI (Adobe Experience Manager version 6.3 and higher only)
After translated content returns from the translation provider to Adobe Experience Manager, you can review the translation and update it. You can then send these updates to the translation memory, so that they will be available to the translation provider for subsequent translations.
In Adobe Experience Manager version 6.3 and higher, you can update translated content and send these changes to the translation memory from the Touch-Optimized UI.
Tips: If you update translated content in multiple pages of a translation job, you can send all the updates to the translation memory in a single action using the Update TM button in the Status tab of the Translation Status page. For details, see Updating a Translation Memory for Multiple Pages. In the Adobe Experience Manager Classic UI, you can also update translated content and send these changes to the translation memory from the Sidekick. For details, see Updating a Translation Memory for a Single Page from the Adobe Experience Manager Sidekick.
To update the translation memory for a single page from the Touch-Optimized UI:
-
In the Adobe Experience Manager Touch-Optimized UI, navigate to the page you want to update.
-
Hover over the page to update, and then click the Edit button  to open the page for editing.
The page opens for editing in a new browser tab.
-
Click the component to edit, and then click the Edit button  in the floating toolbar.
-
Update the translated content.
-
In the top-left corner, click the Page Information icon  .
.
-
In the menu that opens, click Update Remote TM, which is the last menu option.
Note: This option is available only from a target language page, and only when the Use Local TM check box is not selected on the Configuration page. This option is described in detail in the Lionbridge Connector for Adobe Experience Manager Installation and Configuration Guide.
The Update Remote TM dialog box opens, displaying the paragraph you edited.
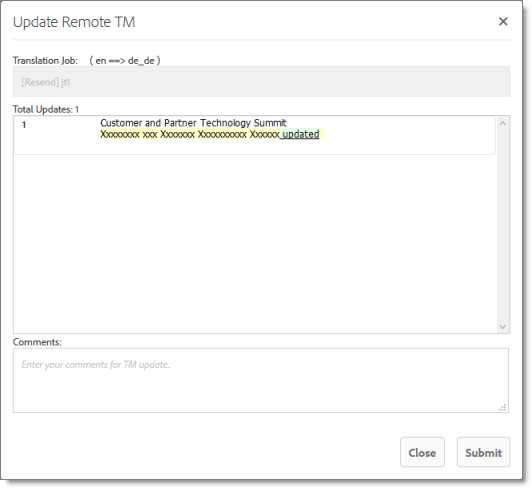
The following information about the translation is displayed in read-only fields at the top of the dialog box:
| Field |
Description |
| Translation Job |
The name of the translation job in which this page was sent out for translation. The text above the field displays the language code of the source language that was translated, followed by an arrow, followed by the language code of the target language of the translation, for example: en ==> de_de. This indicates that the page was translated from English to German. |
| Total Updates |
The number of times that this content has been updated. |
- Optional. In the Comments field, you can add a comment for your translator about why you are updating the translation of this page.
The large text box below these fields displays the updated content:
- The source-language content is displayed on top, with no background.
- The translated content is displayed on a pink background, with strikethrough.
- Your changes to the translated content are displayed on a green background, underlined.
- Click Submit.
A message box at the top of the page indicates that the content was sent to the translation memory.
2.3 - Updating a Translation Memory for Multiple Pages
After translated content returns from the translation provider to Adobe Experience Manager, you can review the translation and update it. You can then send these updates to the translation memory, so that they will be available to the translation provider for subsequent translations.
You can send updates for multiple translated pages from the Status tab of Translation Status page.
To update the translation memory for multiple pages in a single job:
-
In Adobe Experience Manager, update one or more translated pages that were part of a single translation job.
-
Do one of the following to open the Status tab of Translation Status page:

-
In the Touch-Optimized UI of Adobe Experience Manager, click the Tools icon  and then click Lionbridge Connector in the Adobe Experience Manager rail. (This opens the Connector in a new browser tab.) Then, click Translation Status in the Lionbridge Connector rail.
-
In the Classic UI of Adobe Experience Manager, scroll down and click Lionbridge Connector in the right pane. Then, click Translation Status in the Lionbridge Connector rail.
-
In your Web browser, navigate to /content/ctctranslation/status.html on your Adobe Experience Manager instance.
For a detailed description of this page, see Monitoring Jobs.
- In the Job column, locate the translation job with the updated translation, and click the Update TM button
 .
.
The Update TM] dialog box opens, displaying all the languages in which the translation has been modified.
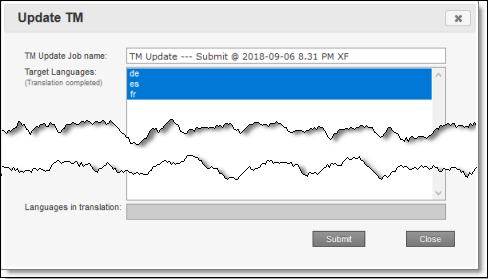
- Click Submit to submit the updates to the specified target languages to the translation memory.
A message box opens, confirming that you want to send the updates to the translation memory.
- Click OK to proceed.
2.4 - Viewing Updates to a Translation Memory
You can view your in-country reviewers' updates to your translated content that are sent to the translation memory.
To view a list of these updates:
-
Do one of the following to open the TM Update page:
-
In the Touch-Optimized UI of Adobe Experience Manager, click the Tools icon and then click Lionbridge Connector in the Adobe Experience Manager rail. (This opens the Connector in a new browser tab.) Then, click TM Update in the Lionbridge Connector rail.
-
In the Classic UI of Adobe Experience Manager, scroll down and click Lionbridge Connector in the right pane. Then, click TM Update in the Lionbridge Connector rail.
-
In your Web browser, navigate to /content/ctctranslation/updatetm.html on your Adobe Experience Manager instance.
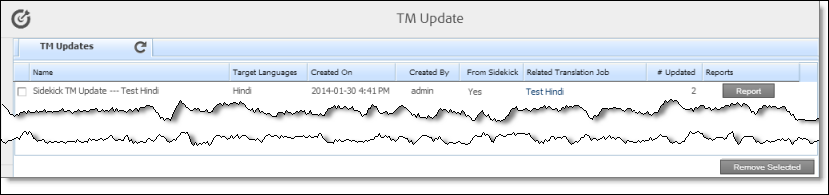
The TM Updates tab of the TM Update page opens.
Tip: This page also opens when you click the TM icon  in the Status tab of the Translation Status page. For details, see Monitoring Jobs.
This page displays a list of updates to the translation memory. The page displays the following information about each update:
| Column |
Description |
| Name |
The name of this update.
* For updates sent from the **Translation Status** page, this is a concatenation of TM Update and the name of the translation job.
* For updates sent from **Sidekick**, this is a concatenation of Sidekick, TM Update, and the name of the translation job. |
| Target Languages |
The language code of the target language of the page that was updated. |
| Created On |
The date and time when the page was last updated, in the following format: MM/DD/YYYY h:mm AA, where AA is two upper-case characters reflecting a.m. (after midnight) or p.m. (after noon). |
| Created By |
The username of the user who updated the page and sent the update to the translation memory. |
| From Sidekick |
Indicates whether or not the user sent the update to the translation memory from the Sidekick. It has the following values:
* Yes: The user sent the update from the **Sidekick**.
* No: The user did not send the update from the **Sidekick**. The user sent the update from the **Translation Status** page or from the Touch-Optimized UI. |
| Related Translation Job |
The name of the translation job in which this page was originally translated. |
| # Updated |
The number of updates to this page after the initial translation. |
- To view the update, click Report in the Reports column.
The Update TM Details](#) tab opens.
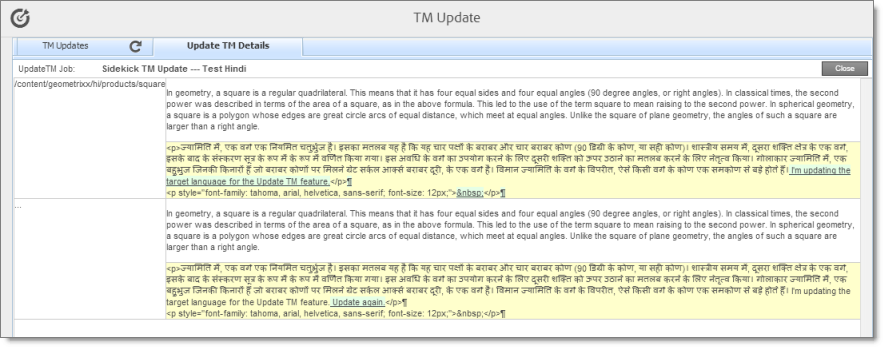
- The left column displays the path of the page that was updated.
- Each row displays a separate update.
- In the right column:
- The source-language content is displayed on top, with no background.
- The translated content is displayed on a yellow background.
- Updates to the translated content are displayed on a green background.
-
Click Close to close this tab and return to the TM Updates tab.
-
Optional. To refresh the list of updates, click the Refresh icon  in the TM Updates tab.
-
Optional. To remove updates from this list, select the corresponding check boxes and click Remove Selected at the bottom of the page.
3 - Viewing Adobe Experience Manager Reports
The Connector provides a quick link to the Reports folder in the Tools console.
To access this folder, do one of the following:
-
In the Touch-Optimized UI of Adobe Experience Manager, click the Tools icon and then click Lionbridge Connector in the Adobe Experience Manager rail. (This opens the Connector in a new browser tab.) Then, click Reports in the Lionbridge Connector rail.
-
In the Classic UI of Adobe Experience Manager, scroll down and click Lionbridge Connector in the right pane. Then, click Reports in the Lionbridge Connector rail.
For information about Adobe Experience Manager reports, refer to the Adobe Experience Manager documentation, available at: https://helpx.adobe.com/ca/experience-manager/6-5/sites/administering/using/reporting.html.
4 - Viewing Log Files
You can view log files to troubleshoot and to optimize your installation.
To view log files:
-
Do one of the following to open the Translation Log page:
-
In the Touch-Optimized UI of Adobe Experience Manager, click the Tools icon and then click Lionbridge Connector in the Adobe Experience Manager rail. (This opens the Connector in a new browser tab.) Then, click Logs in the Lionbridge Connector rail.
-
In the Classic UI of Adobe Experience Manager, scroll down and click Lionbridge Connector in the right pane. Then, click Logs in the Lionbridge Connector rail.
-
In your Web browser, navigate to /content/ctctranslation/ctclog.html on your Adobe Experience Manager instance.
The Log Files tab of the Translation Log page opens.
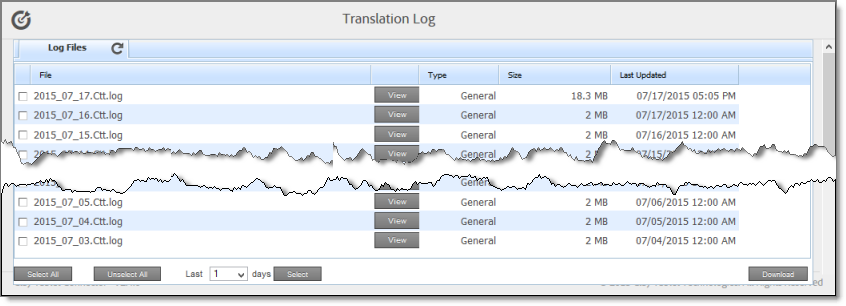
This page displays a list of log files. There is a different log file for each day and type of file. The page displays the following information about each file:
| Column |
Description |
| File |
The name of the log file. This is made up of the date and the type of log file, in the following format: YYYY_MM_DD.Type.log, for example: 2014_01_24.Update.log. |
| Type |
The type of log file. Each type describes a different type of activities. This is one of the following:
* AlarmFields: The Connector checks the specified paths for new components and sends relevant email notifications.
* CTT: Captures events that are not captured in other log files, such as workflow messages. The maximum size of this log file is 10 MB. When a log file reaches this size, it is renamed from YYYY_MM_DD.Ctt.log, for example, 2015_06_24.Ctt.log, to YYYY_MM_DD.Ctt.log.1, for example, 2015_05_24.Ctt.log.1. The next time this log file reaches 10 MB, it is renamed to YYYY_MM_DD.Ctt.log.2. These files are stored in the ctcdata/logs folder.
* Download: The Connector receives translated files to return to Adobe Experience Manager.
* General (type not specified in the file name): General activities, such as connecting to the database and configuring CRX access, which do not fit into other types of log files.
* Status: The Connector checks for updates about translation status.
* UpdateTM: The Connector updates the translation memory.
* Upload: The Connector is preparing to send files for translation.
* Web: User actions, such as submitting a new translation job, removing translation files from the queue, creating translation requests based on user actions, such as in the Sidekick UI. |
| Size |
The size of the file. |
| Last Updated |
The date and time when the file was last updated, in the following format: MM/DD/YYYY h:mm AA, where AA is two upper-case characters reflecting a.m. (after midnight) or p.m. (after noon). |
By default, the list of jobs are displayed in reverse chronological order by the value in the Last Updated column.
-
Optional. To download log files, select the corresponding check boxes and click Download.
-
Click View to view a log file.
The log file opens in a new tab.
- To refresh the information displayed, click the Refresh icon .
- To close the tab displaying the log file, click Close.
- To return to the main page and refresh the list of log files, click the Log Files tab.
Note: You can change the type of information in the log files and the number of days that the Connector maintains logs. For detailed instructions, refer to the Lionbridge Connector for Adobe Experience Manager Installation and Configuration Guide.