This the multi-page printable view of this section. Click here to print.
User Guide
- 1: Welcome to the Connector
- 1.1: The Translation Lifecycle
- 1.2: How the Connector Helps You Manage Your Translation Lifecycle
- 1.3: Using this Guide
- 1.4: How to Contact Lionbridge Connector Support
- 2: Getting Started with the Connector
- 2.1: Key Features
- 2.1.1: Multiple Ways to Send Content for Translation
- 2.1.2: Optimizing Translation
- 2.1.3: Selecting a Translation Provider
- 2.1.4: Using the Adobe Experience Manager Translation Integration Framework with the Connector
- 2.2: The Connector at a Glance
- 3: Encrypting and Decrypting Content
- 4: Sending Content for Translation
- 4.1: Sending Content for Translation Using the Bulk Translation Wizard
- 4.1.1: Specifying Initial Settings in the Bulk Translation Wizard
- 4.1.2: Selecting Content Items to Translate
- 4.1.3: Specifying Translation Options
- 4.1.4: Selecting Your Translation Provider
- 4.1.5: Specifying Job Options and Submitting Your Job
- 4.2: Sending Pages for Translation Using the Globalization Tool
- 4.3: Sending Files to the Translation Queue When You Roll Out Files
- 4.3.1: Adobe Experience Manager's MSM and the Rollout Process
- 4.3.2: Why Integrate the Connector with Rollout
- 4.3.3: How the Connector Fits into MSM and Rollouts
- 4.4: Sending Pages for Translation from the Touch-Optimized UI (Adobe Experience Manager version 6.3 and higher only)
- 4.5: Submitting Content for Translation from the Translation Queue
- 4.6: Preparing to Send Content for Translation from Adobe Experience Manager Translation Integration
- 4.7: Resending a Translation Job
- 4.8: Sending Content for Translation from Adobe Experience Manager Translation Integration
- 4.9: Sending Pages for Translation from Adobe Experience Manager Sidekick
- 4.9.1: Sidekick - Simple UI
- 4.9.2: Sidekick - Simple UI with Options
- 4.9.3: Sidekick - Wizard
- 4.9.4: Sidekick - Wizard with Options
- 4.10: Sending Content to the Translation Queue Using Workflow
- 5: Monitoring Translation Status and Viewing Translations
- 5.1: Translation Statuses
- 5.2: Monitoring Jobs
- 5.3: Monitoring Pages in a Translation Job and Viewing Translated Content
- 5.4: Monitoring Translation Jobs Created in Adobe Experience Manager Translation Integration
- 5.5: Viewing Translated Content from Jobs Created in Adobe Experience Manager Translation Integration
- 6: Post-Translation Tasks
- 6.1: Relocking Unlocked Components
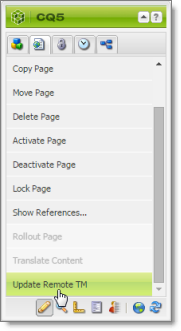
- 6.2: Updating a Remote Translation Memory (TM)
- 6.2.1: Updating a Translation Memory for a Single Page from the Adobe Experience Manager Sidekick
- 6.2.2: Updating a Translation Memory for a Single Page from the Touch-Optimized UI (Adobe Experience Manager version 6.3 and higher only)
- 6.2.3: Updating a Translation Memory for Multiple Pages
- 6.2.4: Viewing Updates to a Translation Memory
- 6.3: Viewing Adobe Experience Manager Reports
- 6.4: Viewing Log Files
- 7: Performing Actions on Multiple Pages and Digital Assets
- 7.1: Generating Reports about Multiple Pages
- 7.1.1: Field Report
- 7.1.2: Lock Report
- 7.1.3: Content Report
- 7.1.4: Sitemap Report
- 7.1.5: Translation Report
- 7.2: Updating Page Properties for Multiple Pages
- 7.3: Updating Metadata of Multiple Digital Assets
- 7.4: Activating Multiple Pages
- 7.5: Copying Metadata to Multiple Pages
- 7.6: Running Workflows on Multiple Pages
- 7.7: Performing Rollout Tasks on Multiple Pages
- 8: Managing Tasks and Accessing Reports
1 - Welcome to the Connector
Welcome to the Lionbridge Connector for Adobe Experience Manager (“Connector”). This is the connector between Adobe Experience Manager and the Lionbridge Translation Services. The Connector enables you to automate sending and retrieving content from Adobe Experience Manager, which dramatically reduces the effort required to create, maintain, and publish Web content in multiple languages. If the Connector’s add-on for Lionbridge is enabled, you can automate sending and retrieving content from Adobe Experience Manager directly to and from the Lionbridge Translation Services. The connector supports installation into AEM On Premise (including Adobe Managed Service) and AEM as a Cloud Service (AEMaaCS or “AEM Cloud”).
1.1 - The Translation Lifecycle
The Translation Lifecycle
The translation lifecycle is the broad process of selecting content, sending it out for translation, and then receiving the translated content back from translation.
This set of steps usually fits inside a larger, more general process called the content lifecycle, which is the process of creating, reviewing, editing, approving, and publishing content.
When you consider the translation lifecycle and the content lifecycle together, you have the global content value chain, which is the strategy for managing multilingual content.
Remember that localizing content is a subset of steps in the broader content lifecycle. This will improve your focus on key localization considerations, improve processes, and keep all content stakeholders included. Together, this results in better content management.
1.2 - How the Connector Helps You Manage Your Translation Lifecycle
The Lionbridge Connector for Adobe Experience Manager (Connector) is a plug-in module for Adobe Experience Manager. It provides a range of features and user interface enhancements in Adobe Experience Manager that enable you to select, send, monitor, and retrieve content for translation into any language Adobe Experience Manager supports.
These features automate the process, which dramatically reduces the effort and time required to export and re-import content that needs to be localized. This is very helpful when translating large volumes of content or ensuring that translated content is quickly re-imported to meet deadlines.
When you use the Connector, you manage your translation lifecycle entirely from within Adobe Experience Manager:
-
The Connector exports your content from Adobe Experience Manager in XML format and delivers these content files to the central, hosted Content API Platform.
-
The Content API Platform delivers your content to your translation providers, based on routing rules that your company chooses and the Lionbridge Connector Team implements.
-
When the translated content is ready, the Content API Platform retrieves it from your translators and delivers it to the Connector.
-
The Connector automatically re-imports the content into the correct location in Adobe Experience Manager.
You can then review, revise, reject, or publish the translated content as needed.
Note: Neither the Connector nor the Content API Platform performs any translation. Similarly, the Lionbridge Connector Team does not provide any translation services. Your company chooses the translation provider that performs the translation.
1.3 - Using this Guide
Purpose of this guide
This guide describes how to use the Lionbridge Connector (Connector) for Adobe Experience Manager to manage your translation lifecycle. It describes how to send Adobe Experience Manager components for translation and receive them back from translation.
Note: This guide describes using both the Adobe Experience Manager Touch-Optimized UI and the Classic UI. The terminology in this guide is for classic devices, such desktops and laptops, although it is also relevant to mobile devices, such as tablets. For detailed information about the UIs and views, as well as differences in terminology depending on device types, refer to the Adobe Experience Manager documentation, available at http://helpx.adobe.com/marketing-cloud/experience-manager.html?t2.
Who should use this guide
This guide is intended for content editors, project, marketing, localization or translation managers, or others who are responsible for creating, editing, or approving content for translation that resides in your Adobe Experience Manager CMS. This guide is also useful for translation providers who receive content from your Adobe Experience Manager CMS, because it describes your company’s translation management process.
What your company setup should be
This document assumes that:
- Your company already has a functioning instance of Adobe Experience Manager.
- The Lionbridge Connector for Adobe Experience Manager (Connector) has been implemented, configured, and tested on your Adobe Experience Manager CMS.
- The Lionbridge Connector Team has set up the Content API Platform to send content to your translation providers.
If Lionbridge is your company’s translation provider, it assumes that Freeway is already set up for your company.
What you should already know
This document assumes that:
- You are familiar with the Connector’s configuration for your Adobe Experience Manager CMS, and the reasons for choosing certain configuration options. This is important because your company’s configuration determines which features are available.
- You have a strong working knowledge of the Adobe Experience Manager Content Editor.
- You are familiar with your company’s translation process and requirements.
- You have valid user credentials to log into Adobe Experience Manager.
- You have the required permissions to access the Connector functionality described in this guide.
Note: Not all the features described in this guide may be available. Feature availability depends on both your company’s Connector setup and the roles to which you are assigned. If you cannot access functionality that you need, contact your company’s Adobe Experience Manager administrator.
How this guide is organized
This guide contains the following chapters:
| Chapter | Description |
|---|---|
| Welcome to the Lionbridge Connector for Adobe Experience Manager | A brief description of the Lionbridge for Adobe Experience Manager solution and how it fits into the translation lifecycle. It also includes information about this guide and Lionbridge Connector Support contact information. |
| Getting Started with the Lionbridge Connector for Adobe Experience Manager | How to get started and an overview of the Lionbridge Connector for Adobe Experience Manager interface and key features. |
| Sending Content for Translation | How to use the Lionbridge Connector for Adobe Experience Manager to send out content for translation. |
| Monitoring Translation Status and Jobs and Viewing Translated Content | How to monitor the translation status of content that you sent out for translation. |
| Post-Translation Tasks | How to perform post-translation tasks, including relocking unlocked components, updating the translation memory, and viewing log files and reports. |
How to find out more about the Lionbridge Connector for Adobe Experience Manager
For information on installing and configuring the Lionbridge Connector for Adobe Experience Manager, read the Lionbridge Connector for Adobe Experience Manager Installation and Configuration Guide.
To access all Lionbridge Connector for Adobe Experience Manager documentation:
-
Log into Adobe Experience Manager.
-
Do one of the following:
- In the Touch-Optimized UI of Adobe Experience Manager, click the Tools icon
 and then click Lionbridge Connector in the Adobe Experience Manager rail. (This opens the Connector in a new browser tab.)
 - In the Classic UI of Adobe Experience Manager, scroll down and click Lionbridge Connector in the right pane.
- In your Web browser, navigate to /content/ctctranslation/status.html on your Adobe Experience Manager instance.
- In the Lionbridge Connector rail, click Admin Tools.
This displays the Admin Tools menu options.
- Click Help.
A new Web page opens, displaying links to the Lionbridge Connector for Adobe Experience Manager documentation.
Documentation conventions
This guide uses the following conventions:
| Convention | Description |
|---|---|
| Bold | Highlights screen elements such as buttons, menu items, and fields. |
| Courier | Highlights input, file names, and paths. |
| Italics | Highlights terms for emphasis, variables, or document titles. |
| > | Indicates a menu choice. For example, “Select Admin Tools > Configuration.” |
1.4 - How to Contact Lionbridge Connector Support
How to Contact Lionbridge Connector Support
You can submit a support ticket either:
- by emailing connectors@lionbridge.com
- from the Lionbridge Connector Zendesk page https://lionbridge-connectors.zendesk.com/
See also:
2 - Getting Started with the Connector
The Connector supports all web browsers that Adobe Experience Manager supports.
It supports Adobe Experience Manager versions 6.2 and higher.
To access the Connector:
-
Log into Adobe Experience Manager.
-
Do one of the following:
- In the Touch-Optimized UI of Adobe Experience Manager, click the Tools icon and then click Lionbridge Connector in the Adobe Experience Manager rail. (This opens the Connector in a new browser tab.)
- In the Classic UI of Adobe Experience Manager, scroll down and click Lionbridge Connector in the right pane.
- In your Web browser, navigate to /content/ctctranslation/status.html on your Adobe Experience Manager instance.
- In the Touch-Optimized UI of Adobe Experience Manager, click the Tools icon
2.1 - Key Features
The Lionbridge Connector for Adobe Experience Manager (Connector) has the following key features:
2.1.1 - Multiple Ways to Send Content for Translation
There are six ways to collect and send content for translation using the Connector:
-
There are the following multiple ways to send pages out for translation:
-
Send multiple content items, including pages, tags, dictionaries (i18n items), Content Fragments, Experience Fragments, adaptive forms, and digital assets (such as JPG and PDF files) using the Bulk Translation wizard. You can filter to exclude content, and send out requests for translations of one target language at a time as a separate translation job with its own requested-by date. For details, see Sending Content for Translation Using the Bulk Translation Wizard.
-
In Adobe Experience Manager version 6.3 and higher, you can send pages to translation directly from the Touch-Optimized UI of Adobe Experience Manager using the Translate Content page. For details, see Sending Pages for Translation from the Touch-Optimized UI (Adobe Experience Manager version 6.3 and higher only).
-
Send multiple pages, Content Fragments, Experience Fragments, adaptive forms, and digital assets (such as JPG and PDF files) using the Globalization Tool. You can add pages from multiple site paths, and/or upload page paths stored in CSV or XLS files. You can filter these pages by publication date, on time, off time, activation state, and page template. For details, see Sending Pages and Assets for Translation Using the Globalization Tool.
-
If you roll out files, the Connector can automatically send them to the Translation Queue, using the default translation settings configured for your company. For details, see Sending Files to the Translation Queue When You Roll Out Files.
-
If you use Adobe Experience Manager’s Classic UI, you can send one or more pages for translation from the Adobe Experience Manager Sidekick. Depending on your company’s configuration, you can send pages only to the Translation Queue, or you can choose whether to send them to the queue or directly out for translation. Your company’s configuration also determines which translation settings you can edit from the Sidekick. For details, see Sending Pages for Translation from the Adobe Experience Manager Sidekick.
-
If you are using Adobe Experience Manager’s translation workflow feature to automatically create new pages in the language branches of your site, the Connector can automatically send these new pages to the Translation Queue. For details, see Sending Content to the Translation Queue Using Workflow.
-
You can send previously sent jobs for translation from the Status tab of the Translation Status page. You can modify the content items, source and target languages, translation provider, translation options, and job options before resending the job. You can also specify an LSP-specific configuration for the job to resend. For details, see Resending a Translation Job.
-
Note: You can send digital assets, such as JPG and PDF files, for translation from the Bulk Translation wizard and the Globalization Tool.
-
Depending on your company’s Connector configuration, you may be able to send content out for translation either immediately or via a queue.
-
Send content immediately to the translation provider.
-
Send content via the Translation Queue, which enables you to group items together by project, priority, target language, and require additional approval. For details, see Submitting Content for Translation from the Translation Queue.
-
Note: Your company can create schedules that automatically send out translation jobs from the Translation Queue. For details, refer to the Lionbridge Connector for Adobe Experience Manager Installation and Configuration Guide.
2.1.2 - Optimizing Translation
The Optimize Translation feature helps you reduce translation costs, by reducing the quantity of content that Connector sends to translation providers. It sends only changed content fields out for translation. To do this, it checks each component in the source version of the page for any content changes, and it sends only changed components out for translation. If a component was previously translated and it has not changed, then the Connector does not send it for translation again: Instead, it uses the stored translation.
However, this feature needs Connector translation backup data, and it increases the Connector processing time before sending out the items for translation.
This feature can be configured for your company and separately for the Bulk Translation wizard. You can also specify it by selecting the Use Local TM check box when you send individual pages to the Translation Queue or when you send out pages out directly for translation.
2.1.3 - Selecting a Translation Provider
If your company has multiple translation providers, your company’s Connector setup may enable you to select which one to use when you send out items for translation.
This feature is available in all user interfaces where you send out content for translation.
2.1.4 - Using the Adobe Experience Manager Translation Integration Framework with the Connector
This section describes how to use Adobe Experience Manager’s translation integration feature with the Connector. For detailed information about this feature, refer to the Adobe Experience Manager documentation, “Translating Content for Multilingual Sites” which is available at:
-
version 6.2: http://docs.adobe.com/docs/en/aem/6-2/administer/sites/translation.html.
-
version 6.3: http://docs.adobe.com/docs/en/aem/6-3/administer/sites/translation.html.
-
version 6.4: https://docs.adobe.com/content/help/en/experience-manager-64/administering/introduction/translation.html.
-
version 6.5: https://helpx.adobe.com/experience-manager/6-5/sites/administering/using/translation.html.
Note: For information on integrating the Connector with this feature, refer to steps 1-3 in the Adobe documentation at the above link and “Integrating the Connector with the Adobe Experience Manager’s Translation Integration Framework” in the Lionbridge Connector for Adobe Experience Manager Installation and Configuration Guide.
The Connector integrates with Adobe Experience Manager’s translation integration framework feature. This feature enables you to create translation projects and start translation jobs from within Adobe Experience Manager. When you use this integration, you create translation projects and start translation jobs in Adobe Experience Manager, but otherwise you can manage the projects and jobs in the same way that you manage them for jobs that you send directly from the Connector. With this integration, you can:
-
use Connector’s comprehensive settings in translation jobs sent from Adobe Experience Manager
-
send translation jobs to the Translation Queue or directly to translation providers
-
monitor translation jobs from the Connector
-
view translated content from the Connector
-
perform post-translation tasks from the Connector
Important: When using the Connector with the Translation Integration Framework, the Connector’s component-mapping, team-profiles, and language-mapping features are not available.
When using Adobe Experience Manager’s translation integration framework feature to send out content for translation, you complete the following general steps:
- You create the root page of a language branch of the site to site to translate, which is called a language copy. For detailed instructions, refer to “Preparing Content for Translation” in the Adobe Experience Manager documentation at: http://docs.adobe.com/docs/en/aem/6-1/administer/sites/translation/tc-prep.html.
Note: In the Connector, this step happens automatically when you send out content for translation. Additional user action is not required.
-
Specify the translation integration configuration and the Connector cloud configuration for the site to translate.
-
The translation integration configuration contains the Adobe Experience Manager settings for how to translate your content.
-
The Connector cloud configuration contains a set of Connector settings.
-
For detailed instructions, see Preparing to Send Content for Translation from Adobe Experience Manager Translation Integration.
-
You create a translation project from Adobe Experience Manager’s Sites console. For detailed instructions, see Preparing to Send Content for Translation from Adobe Experience Manager Translation Integration.
-
You send out the content for translation as a translation job from a translation project in Adobe Experience Manager’s Projects console. For detailed instructions, see Sending Content for Translation from Adobe Experience Manager Translation Integration.
-
You can monitor the progress of translation jobs started in Adobe Experience Manager’s translation integration feature. For detailed instructions, see Monitoring Translation Jobs Created in the Adobe Experience Manager Translation Integration.
-
You can view translated content of translation jobs started in Adobe Experience Manager’s translation integration feature. For details, see Viewing Translated Content from Jobs Started in the Adobe Experience Manager Translation Integration.
2.2 - The Connector at a Glance
You access the Lionbridge Connector for Adobe Experience Manager (Connector) from the Lionbridge Connector rail.
-
Do one of the following to open the rail:
-
In the Touch-Optimized UI of Adobe Experience Manager, click the Tools icon
 and then click Lionbridge Connector in the Adobe Experience Manager rail. (This opens the Connector in a new browser tab.)
 -
In the Classic UI of Adobe Experience Manager, scroll down and click Lionbridge Connector in the right pane.
-
In your Web browser, navigate to /content/ctctranslation/status.html on your Adobe Experience Manager instance.
-
You access Connector features from the Navigation tab on the left.
![]()
Note: The Admin Tools console is described in the Lionbridge Connector for Adobe Experience Manager Installation and Configuration Guide.
The Connector has additional features that you access from within Adobe Experience Manager. For example:
-
Connector functionality in the Touch-Optimized UI of Adobe Experience Manger version 6.3 and higher supports sending pages directly for translation or to the Translation Queue.
-
Connector functionality on the Page tab of the Adobe Experience Manager Sidekick supports sending pages for translation and sending updated translated content to a translation memory.

![]()
-
Connector functionality can be integrated with the rollout feature, which is accessible either from the Blueprint Control Center or the Rollout button on the Pages tab of the Sidekick.
-
There are custom Connector workflows you can use within Adobe Experience Manager with the following functionality:
-
to lock components after translation and restore their original inheritance
-
to send out files for translation while rolling out files
-
to extend Adobe Experience Manager’s translation workflow feature, which automatically creates new pages in the language branches of your site, by automatically sending out these pages for translation
-
These workflows are available in the Workflow tab of the Adobe Experience Manager Sidekick.
3 - Encrypting and Decrypting Content
Note:
- This section is not applicable for the AEM Cloud Connector.
- This feature is available only when using the Content API Translation Connector for SDL TMS or the Content API Translation Connector for Lionbridge Freeway.
You can generate your own keys to encrypt and decrypt content you send for translation from the Lionbridge Connector for Adobe Experience Manager (“Connector for Adobe Experience Manager”) to either:
-
the Content API Translation Connector for SDL TMS (“Connector for SDL TMS”)
-
the Content API Translation Connector for Lionbridge Freeway (“Connector for Freeway”)
Before translation:
-
The Connector for Adobe Experience Manager uses the generated keys to encrypt the content once it is ready for translation.
-
The Connector for Adobe Experience Manager sends the encrypted content via the Content API Platform to the Connector for SDL TMS or to the Connector for Freeway.
-
Either:
-
The Connector for SDL TMS uses the generated keys to decrypt the content before sending it to SDL TMS.
-
The Connector for Freeway delivers encrypted content to Freeway.
-
After translation:
-
Relevant to SDL TMS only. The Connector for SDL TMS uses the generated keys to encrypt the translated content once it is ready to send back to Adobe Experience Manager.
-
The Connector for SDL TMS or the Connector for Freeway sends the encrypted content via the Content API Platform to the Connector for Adobe Experience Manager.
-
The Connector for Adobe Experience Manager uses the generated keys to decrypt the content before sending it to Adobe Experience Manager.
For instructions on configuring the Connector this feature, refer to the Lionbridge Connector for Adobe Experience Manager Installation and Configuration Guide.
Which encryption standards does the Connector support?
-
The Connector supports Java Cryptography Extension (JCE), which is an officially released Standard Extension to the Java Platform. This is described here: https://docs.oracle.com/javase/7/docs/technotes/guides/security/SunProviders.html#SunJCEProvider.
-
The Connector supports the following Advanced Encryption Standards (AES):
Other requirements
-
Cipher: AES/CBC/PKCS5Padding
-
Initialization vector: 16 bytes, as required by AES (Advanced Encryption Standards), from a cryptographically strong random number generator.
How to set up your keystore
Use the following commands and options to set up your keystore.
keytool -genseckey -keystore C:\work\aem\6.5\ctc_data\ctctranslation_data\crypt\cttkeystore -storetype jceks -storepass mystorepass -keyalg DES -keysize 256 -alias cttkey -keypass secretpassword
Important: The keystore should be on a file system that is readable by the Connectors.
| Command and Options | Description |
|---|---|
| -genseckey | Generates a secret key and stores it in a new KeyStore.SecretKeyEntry identified by alias. |
| -keystore ctt-keystore -storepass mystorepass |
The location and filename of the keystore, and a password to protect it from unauthorized access. |
| -storetype jceks | The keystore type for storing AES (Advanced Encryption Standards) keys. Important: When generating keys, do not enter other values. Other values are not supported. |
| -keyalg AES | The algorithm for generating the key pair. Important: When generating keys, do not enter other values. Other values are not supported. |
| -keysize 256 | The size of the key. |
| -alias cttkey -keypass secretpassword | The key alias/password pair for retrieving the key entry from the keystore. The Connectors use this pair. |
You can use the above commands to add additional keys to an existing keystore.
For detailed instructions, refer to: https://docs.oracle.com/javase/6/docs/technotes/tools/solaris/keytool.html.
How to encrypt and decrypt content
Use the Java keytool utility to generate, store, and retrieve keys. For detailed instructions, refer to: https://docs.oracle.com/javase/6/docs/technotes/tools/solaris/keytool.html.
4 - Sending Content for Translation
When the Connector sends out a page for translation, it actually sends out the components in that page for translation. There are several possible component configurations:
-
a component may be synchronized to a Blueprint page
-
a component may be in a live copy page
-
a component may exist on a page that has no relationship to MSM (Multi Site Manager)
Determine how your components are configured before deciding how to send out pages for translation. The Connector supports multiple ways of sending out pages for translation.
Recommendation: Consult the Adobe Experience Manager documentation to learn about the MSM, Rollout, and translation workflow features. Learn how pages and their components are locked and synchronized. The Connector uses many of these features, and extends them to enable sending pages and their components for translation.
Your system may be configured to use these features in very specific ways. You must be aware of these page relationships and processes before sending content for translation. Otherwise, unexpected outcomes may occur.
There are multiple ways to collect and send content for translation using the Connector:
- Sending Content for Translation Using the Bulk Translation Wizard
- Sending Pages and Assets for Translation Using the Globalization Tool
- Sending Files to the Translation Queue When You Roll Out Files
- Sending Pages for Translation from the Touch-Optimized UI (Adobe Experience Manager version 6.3 and higher only)
- Sending Pages for Translation from the Adobe Experience Manager Sidekick
- Sending Content to the Translation Queue Using Workflow
- Resending a Translation Job
For an overview and comparison of these methods, see Multiple Ways to Send Content for Translation.
Note about team profiles: If one or more paths are configured for your team profile, you can select only pages and fragments that are in these paths for translation. The path configuration does not restrict your selection of digital assets, tags, and dictionaries (i18n items).
| Content Type | Method of Sending for Translation |
|---|---|
| pages | all supported methods |
| tags | Bulk Translation wizard only |
| dictionaries (i18n items) | Bulk Translation wizard only |
| Content Fragments and Experience Fragments | Bulk Translation wizard and Globalization Tool only |
| adaptive forms | Bulk Translation wizard and Globalization Tool only |
| digital assets, such as JPG and PDF files | Bulk Translation wizard and Globalization Tool only |
The owner of the translation budget can review and approve the content that has been identified as requiring translation, and can send it out for translation. For details, see Submitting Content for Translation from the Translation Queue.
Note: Your company may be configured to automatically send content items for translation to the Translation Queue. Your company may have created schedules that automatically send out translation jobs from the Translation Queue. For details, refer to the Lionbridge Connector for Adobe Experience Manager Installation and Configuration Guide or contact your Adobe Experience Manager administrator.
Adobe Experience Manager’s Translation Integration feature
You can also send out content either directly to translation or to the Translation Queue using Adobe Experience Manager’s translation integration feature (TIF).
- For an overview of this feature, see Using the Adobe Experience Manager Translation Integration Framework with the Connector.
- For instructions on preparing to send out content for translation from Adobe Experience Manager, see Preparing to Send Content for Translation from Adobe Experience Manager Translation Integration.
- For instructions on sending out content for translation from Adobe Experience Manager, see Sending Content for Translation from Adobe Experience Manager Translation Integration.
4.1 - Sending Content for Translation Using the Bulk Translation Wizard
The Bulk Translation wizard enables you to select, send, and receive large quantities of content for translation in only a few clicks.
This is useful for quickly sending out entire sections, sites, or content trees for translation into one or more languages. Each group of pages you send out for translation is a separate job. You can specify different settings and create a different requested-by date for each job.
You access the Bulk Translation wizard from the Lionbridge Connector rail or directly from your Web browser address bar.
When you use the Bulk Translation wizard, you can submit content either to the Translation Queue or directly to translation.
Notes: You can submit tags and dictionaries (i18n items) for translation only using the Bulk Translation wizard. You can submit Content Fragments, Experience Fragments, and adaptive forms for translation only using the Bulk Translation wizard or the Globalization Tool. You can configure the Connector to submit for translation Content Fragments that are referenced in pages, Experience Fragments, and adaptive forms by selecting the Translate Dependent CF check box in the Translation Settings section of the Configuration page. For detailed instructions, refer to the Lionbridge Connector for Adobe Experience Manager Installation and Configuration Guide.
Note: Depending on your company configuration, you can submit digital assets, such as PDF and JPG files, for translation, including asset metadata.
Note: Depending on your user permissions or your company configuration, you may not be able to send out content directly for translation.
To send out content for translation via the Bulk Translation wizard, you complete the following steps:
-
Open the Bulk Translation wizard and specify initial settings in the Settings page of the wizard. For detailed instructions, see Specifying Initial Settings in the Bulk Translation Wizard.
-
In the Item Type page of the wizard, you specify which content items to send for translation. For detailed instructions, see Selecting Content Items to Translate.
-
In the Options page of the wizard, you can specify the following options:
- whether to check the local TM (translation memory) to determine if previously translated source content has been updated
- if the target pages are MSM (Multi Site Manager) live copy pages, whether to prevent the Connector from overwriting unique source content that already exists in the target pages
- whether to translate content only from locked components
- whether to automatically unlock a component after translated content returns
- whether to send non-synchronized components (without a relationship to a Blueprint page) for translation
- whether to translate regular content fields in pages
- whether to send out for translation metadata fields, for pages, that are defined in the Page Metadata Configuration section of the Advanced Settings page
- whether to save any target content that has already been translated to the local translation memory (TM) instead of sending it out for translation
- whether to select the Level-2 Queue Metadata analysis code for content items to send for translation
For detailed instructions and descriptions of these options, see Specifying Translation Options.
-
Optional. If you are sending content directly out for translation (not to the Translation Queue) and If multiple translation providers are configured for your team profile, then in the LSP page of the wizard, you select your translation provider (LSP). If your translation provider is Lionbridge Freeway, you select Freeway-specific options. For detailed instructions, see Selecting Your Translation Provider.
-
Optional. If you are sending content directly out for translation (not to the Translation Queue), then in the Translation Job page of the wizard, you can specify the following parameters for your translation job:
- deadline
- notes for the translation provider
- reference files (support assets) that provide helpful context for the translator
- the content type of the content in the translation job
- request a quote from the translation provider before the translation process starts
- job name
- job description
- purchase order reference number
- email addresses that will receive notification emails about the status of the translation job
- localization reviewer
In this wizard page, you also send the translation job to the translation provider you specified earlier.
For detailed instructions, see Specifying Job Options and Submitting Your Job.
For information about the events that occur when the Connector sends out content for translation, see Sending Content for Translation.
4.1.1 - Specifying Initial Settings in the Bulk Translation Wizard
To get started, you open the Bulk Translation wizard and specify the source and target languages for the job. If you are a member of multiple teams, you also select the team profile to use in this job.
To send out content for translation via the Bulk Translation wizard:
-
Do one of the following to open the Bulk Translation wizard:
- In the Touch-Optimized UI of Adobe Experience Manager, click the Tools icon and then click Lionbridge Connector in the Adobe Experience Manager rail. (This opens the Connector in a new browser tab.) Then, click Bulk Translation in the Lionbridge Connector rail.
- In the Classic UI of Adobe Experience Manager, scroll down and click Lionbridge Connector in the right pane. Then, click Bulk Translation in the Lionbridge Connector rail.
- In your Web browser, navigate to /content/ctctranslation/bulktrans.html on your Adobe Experience Manager instance.
- In the Touch-Optimized UI of Adobe Experience Manager, click the Tools icon
The Settings(#) page of the Bulk Translation wizard opens.
![]()
- In the Settings page, you choose the following settings:
| Setting | Description |
|---|---|
| Profile | If you are a member of multiple teams, then in the Profile dropdown list, select the team profile to use with the Bulk Translation wizard. This displays the source and target languages and the translation providers specified for the team profile. |
| Source Language | Select the source language for translation. The Connector will send pages in this source language for translation. |
| Target Language | Select the check boxes for all the target languages into which you want to translate the source content. The list displays all the languages that are set up in Adobe Experience Manager for your team. To select all available languages, select the All check box. |
| Translate/Copy source to target only | For each language you select, choose one of the following options:
Note: The Connector creates these pages in the target structure. If pages already exist in the target structure, including previously translated content, the Connector overwrites these pages with the source content. |
- Click Next.
The Item Type page of the wizard opens. For detailed instructions, see Selecting Content Items to Translate.
4.1.2 - Selecting Content Items to Translate
After clicking Next in the Settings page of the Bulk Translation wizard, the Item Type page opens.
![]()
To select which items to translate:
-
At the top of the Item Type page, select one of the following item types:
-
Pages: Web pages, Content Fragments, Experience Fragments, adaptive forms, or digital assets.
-
Tags: Metadata assigned to a content item within Adobe Experience Manager (usually a page), which act as keywords or labels attached to that content item.
-
i18n dictionaries: Texts and their translations in a CQ5 Translator dictionary.
-
-
In the Search from Site Path field, specify the highest root folder of all source pages, tags, or dictionaries to send for translation. Either:
- Click the arrow at the end of the field
 , navigate to that path, select it, and click Select.
- Click the arrow at the end of the field
Note: By default, the dialog box opens to the path of the root folder for the source language you selected in step 2, above.
- Type the path in the following format: /content/geometrixx/en. For Content Fragments, or Experience Fragments, type the path in the following format: /content/dam/en. For adaptive forms, type the path in the following format: /content/forms/af.
Tip: Alternatively, you can click Load Saved to load the last set of previously saved page paths to the list.
Note about team profiles: If one or more paths are configured for your team profile, you can select only pages that are in these paths for translation. The path configuration does not restrict your selection of digital assets, tags, and dictionaries (i18n items).
Note: To send digital assets, including their metadata, for translation, the path is under the language root under /content/dam, for example: /content/dam/geometrixx/en/icons.
-
Optional. In the Modification Filter From field, enter the earliest modification date for which to include items. Enter the date in the YYYY-MM-DD format. In the To field, enter the latest modification date for which to include pages. To apply this filter to the items that the search agent will collect, select the Apply Modification Filter check box. If you use this option, only items that were changed in the specified date range are included.
-
In the Search Using Agent field, select an agent to collect items to send for translation. Select a custom agent or one of the following pre-configured agents from the list:
-
Page agents, which are available only if Pages is selected in Item Type, at the top of the page:
-
Get current page: Default. The agent collects the root page of the path specified in the Search from Site Path box, above.
-
Get all children pages: The agent collects all children pages of the path specified in the Search from Site Path box, above. It does not collect any pages in the root path.
-
Get current page and all children pages: The agent collects the root page and all children pages of the path specified in the Search from Site Path box, above.
-
-
The Get current and child tags agent, which is available only if Tags is selected in Item Type, at the top of the page.
-
The Get i18n agent, which is available only if i18n dictionaries is selected in Item Type, at the top of the page.
-
Note: For information on creating a custom agent, refer to the Lionbridge Connector for Adobe Experience Manager Installation and Configuration Guide.
- Click Add.
The specified agent collects all items that match the search criteria and displays them in the list. By default, the check box for each page you add is selected, and the check box for each tag or i18n dictionary is cleared.
The following summary information is displayed:
-
Total Displayed: The total number of items available for selection.
-
Total Selected (for translation): The number of items selected to send out for translation.
The following information is displayed about each item:
| Column | Description |
|---|---|
| Path | The path to the item to send out for translation. Tip: Click the link to open the page, fragment, or form in a new browser tab. The page opens in either the Touch UI or the Classic UI, depending on your company’s configuration. |
| Content | The type of content to send out for translation. Supported values are all the types of nodes included in your company’s website. - dam:Asset [CF] is displayed for Content Fragments. - cq:Page [XF] is displayed for Experience Fragments. - cq:Page [AF] is displayed for adaptive forms. |
| Template | The Adobe Experience Manager template used to create the item. |
| Modification | - The date and time when the item was last modified, in the following format: YYYY-MM-DD kk:mm:ss, where kk is the hour represented by a 24-hour clock. - The (m) following the date and time indicates that the item was modified. The username of the user who last modified the item is displayed in parentheses, for example, [admin]. |
Note: You can repeat steps 5 to 8 to perform multiple searches and add multiple sets of items with different root folders to the list of items to translate. However, all sets of items must be of the same type, such as page items.
Note: You can select one dictionary item at a time for translation. To select another dictionary item for translation, run the Bulk Translation wizard again.
-
Optional. You can click the Toggle Filter link to display a text box at the top of the list. As you type into the this text box, the Connector automatically filters the list of page and asset paths and names and displays only the matching items.
-
Clear the check boxes of any items you do not want to send out for translation. Ensure that the check boxes are selected for any items you want to send out for translation.
-
Use the following features to modify the list of items to send out for translation:
-
To select the check boxes for all the items in the list, click Select All.
-
To clear the check boxes for all the items in the list, click Unselect All.
-
To remove all the items from the list, even if the corresponding check boxes are selected, click Clear.
-
-
Optional. To save the page paths displayed in the list, so that you can reload them later, click Save.
-
Optional. To update the Total Selected (for translation) field above with the number of items with selected check boxes, click Update.
-
Click Next.
The Options page of the wizard opens. For detailed instructions, see Specifying Translation Options.
4.1.3 - Specifying Translation Options
Specifying Translation Options
After clicking Next in the Item Type page of the Bulk Translation wizard, the Options page opens. You use this page to specify translation options for the content items you selected in the previous page of the wizard.
The Options page of the wizard is displayed differently, depending on which Item Type you selected in the previous page of the wizard, because some translation options are relevant only for pages, and not for tags or I18N dictionaries.
- Version displayed if Pages is selected in the Item Type page of the wizard.
![]()
- Version displayed if Tags or I18N dictionaries is selected in the Item Type page of the wizard.
![]()
To specify translation options for the content items to send for translation:
- Enter the following information about the translation options:
Note: Your company’s configuration determines the default value of each option.
| Option | Description |
|---|---|
| Use Local TM | This feature determines whether to check each component in the source version of the item for any content changes, and send only changed components out for translation. If a component was previously translated and it has not changed, then the Connector does not send it for translation again: Instead, it uses the stored translation. This feature reduces the quantity of content that the Connector sends to translation providers, which reduces your cost. However, it needs the Connector translation backup data, and it increases the Connector processing time before sending out the items for translation. * If this check box is selected, the Connector checks whether content was already translated before sending it out for translation. * If this check box is cleared, the Connector sends out content for translation without checking whether it has already been translated. **Note about i18n dictionary items:** If this check box is selected, the Connector sends only previously untranslated i18n dictionary items for translation. If this check box is cleared, the Connector sends all i18n items for translation. |
| Select if using Blueprint/Live-copy | This option is relevant when the target pages are MSM (Multi Site Manager) live copy pages, which means that Adobe Experience Manager automatically updates a target page when the corresponding source page changes. It prevents the Connector from overwriting unique source content that already exists in the target pages. This is useful when you are sending a page for translation that has been used in the past to push content to other pages, and includes target page content which has been changed, for example, regionalized. In this scenario you do not want to overwrite the regionalized content as the translation process occurs. Select this option when you do not want the Connector to overwrite components in the target pages that include regionalized content with the newly translated content. * If this check box is selected, the Connector does not overwrite unique source content that already exists in the target pages. * If this check box is cleared, the Connector does overwrite unique source content that already exists in the target pages. **Recommendation:** Select this check box if you are using the live-copy feature. **Note:** This option is available only if **Pages** is selected in the **Item Type** page of the wizard. |
| Only translate content from locked components | This option enables users to send out only content from locked components for translation. * If this check box is selected, users can send out content for translation only if it is from a locked component. * If this check box is cleared, users can send out content for translation whether or not it is from a locked component. **Note:** Locked components have an inheritance relationship between a source Blueprint page and the connected live copy page. When sending content for translation using Sidekick, users can choose whether to send for translation the content from locked components, which is inherited from a Blueprint component. This is useful if, for example, the page has both global and regional information and you only want to translate (replace) the global content that is created via a Blueprint page. In this scenario, suppose that the regional content on the page is manually translated in house, and that it has not changed. You would not want to tamper with it. However, using the same scenario, the global content from head office has changed and needs translation. You would select this check box to separate the content and localize only the new, inherited content. **Note about Blueprint pages:** If the Pickup Content From Blueprint Pages setting is specified, then the Connector always acts as though this option is selected, even if it is not selected. This occurs because only content from locked components are rolled out from Blueprint pages to Livecopy pages. For more information, refer to the Lionbridge Connector for Adobe Experience Manager Installation and Configuration Guide. **Note:** This option is available only if **Pages** is selected in the **Item Type** page of the wizard. |
| Unlock the component after translated content come back | This option automatically unlocks a component after translated content returns. This option is relevant only when the Select if using Blueprint/Live-copy is been selected. After translated content returns, it automatically unlocks a component, which breaks the MSM inheritance. Warning: This breaks the inheritance between the component and its Blueprint page, so that it no longer inherits new content. However, you can use the CTCRestoreOriginalSync workflow to relock the component and recreate the inheritance. For details, see Relocking Unlocked Components. * If this check box is selected, the Connector automatically unlocks a component after translated content returns. * If this check box is cleared, the Connector does not automatically unlock a component after translated content returns. **Note:** This option is available only if **Pages** is selected in the **Item Type** page of the wizard. |
| Allow translate content from Not-Sync’d components | This option enables users to send content for translation even if it is not synchronized. This means it does not have a relationship to a Blueprint page, so it cannot be synchronized with it. This can happen if you are not using the MSM (Multi Site Manager) feature of Adobe Experience Manager, or if this is a page with regionalized content that does not inherit content from a Blueprint page. * If this check box is selected, users can send out content for translation if it does not have a relationship to a Blueprint page. * If this check box is cleared, users cannot send out content for translation if it does not have a relationship to a Blueprint page. **Important:** The Connector treats certain page properties ( jcr:content, jcr:title, jcr:description) as unlocked page properties. Therefore, if you want the Connector to send these page properties for translation, you must select this check box.**Recommendation:** Select this check box if you are using either the live-copy or the language-copy features. **Note about Blueprint pages:** If the Pickup Content From Blueprint Pages setting is specified, then the Connector always acts as though this option is selected, even when it is not. This occurs because only content from locked components is rolled out from Blueprint pages to Livecopy pages. For more information, refer to the Lionbridge Connector for Adobe Experience Manager Installation and Configuration Guide. **Note:** This option is available only if **Pages** is selected in the **Item Type** page of the wizard. |
| Translate page content | Indicates whether to translate regular content fields in this content item. Important: To send out words on pages for translation, you must select this check box. Note: This option is available only if Pages is selected in the Item Type page of the wizard. |
| Translate Metadata | Select this check box to send out for translation metadata fields that are defined in the Page Metadata Configuration section of the Advanced Settings page. These are properties under the /jcr:content node. Note: This option is available only if Pages is selected in the Item Type page of the wizard. |
| Load existing translation to LocalTM first | This option saves any target content that has already been translated to the local translation memory (TM) instead of sending it out for translation: * When this option is selected: * The Connector does not send out for translation entries that already have translations. Instead, it stores these translations in the local TM. * The Connector sends out for translation only entries that do not have corresponding translations. * When this option is not selected, the Connector overwrites any existing translated content. **Tip:** Select the **Use Local TM** check box, described above, to instruct the Connector to check whether content was already translated before sending it out for translation. **Note:** This option is available only if **Tags** or **i18n dictionaries** is selected in the **Item Type** page of the wizard. |
| Queue Metadata | You can select the Level-2 Queue Metadata analysis code for these content items. If you add these items to the Translation Queue, you can filter and sort items there by this analysis code. Note: Available only when using the Content API Translation Connector for Lionbridge Freeway. Displayed only when the Use Analysis Codes as Queue Metadata check box is selected in the Freeway Config section of the Configuration page. For details, refer to the Lionbridge Connector for Adobe Experience Manager Installation and Configuration Guide. |
-
Do one of the following:
-
If you want to send the selected items to the Translation Queue instead of sending them out directly for translation, click Add to queue. The Translation Queue opens. For details, see Submitting Content for Translation from the Translation Queue.
-
To immediately send out the selected items for translation, click Next.
-
If multiple translation providers are configured for your team profile, the LSP page of the wizard opens. For detailed instructions, see Selecting Your Translation Provider.
-
Otherwise, the Translation Job page of the wizard opens. For detailed instructions, see Specifying Job Options and Submitting Your Job.
-
-
4.1.4 - Selecting Your Translation Provider
After clicking Next in the Options page of the Bulk Translation wizard, if multiple translation providers are configured for your team profile, the LSP page of the wizard opens. In this page, you select your translation provider (LSP) and configure any LSP-specific options.
To select your translation provider:
- In the Choose LSP list, select the translation provider for this translation job from the list.
![]()
- If you selected Lionbridge Freeway in the previous step, complete the following additional fields:
| Field | Description |
|---|---|
| Special Instruction | Any additional instructions for Freeway, which are sent as metadata. Available only if the selected translation provider in the Choose LSP box, above, is the Lionbridge Freeway Type. |
| Analysis Code | The Freeway analysis codes for the translation. Displayed only if: - In the Choose LSP box, above, the selected provider is the Lionbridge Freeway Type. - The Connector is configured to display these fields. You specify the analysis codes that are relevant to your content. Your Lionbridge setup determines which analysis codes are available for you to specify, and the values available for selection for each analysis code. For example, the Region, Department, and Priority analysis codes may be available for you to specify. |
- Click Next.
The Translation Job page of the wizard opens. For detailed instructions, see Specifying Job Options and Submitting Your Job.
4.1.5 - Specifying Job Options and Submitting Your Job
Specifying Job Options and Submitting Your Job
The Translation Job page of the Bulk Translation wizard opens when:
- You click Next in the Options page of the wizard, if multiple translation providers are not configured for your team profile.
- You click Next in the LSP page of the wizard, if multiple translation providers are configured for your team profile.
To specify job options and submit your job for translation:
- In the Translation Job page of the wizard, enter the following information about the files to send out for translation:
![]()
| Option | Description |
|---|---|
| Deadline | The date you are requesting for the translated content to return. Click in the field and select a date in the calendar that opens. This information is sent to the translation provider as metadata of the translation package. Recommendation: Discuss whether to use this feature with your translation provider(s). |
| Translation Notes | Enter any additional information about this translation job. This information is sent to the translation provider as a comment in the metadata of the translation package. |
| Reference Files | You can send reference files (support assets) to your translation provider as part of a translation job. This provides helpful context for the translator. For instructions on adding reference files in Adobe Experience Manager, refer to the Adobe Experience Manager documentation for uploading digital assets: * version 6.2: https://helpx.adobe.com/experience-manager/6-2/assets/using/managing-assets-touch-ui.html * version 6.3: https://helpx.adobe.com/experience-manager/6-3/assets/using/managing-assets-touch-ui.html * version 6.4: https://helpx.adobe.com/experience-manager/6-4/assets/using/managing-assets-touch-ui.html * version 6.5: https://helpx.adobe.com/experience-manager/6-5/assets/using/managing-assets-touch-ui.html **Note:** This feature is available only if the **Allow Reference Files for Translation Job** check box is selected in the **UI and Default Settings** section of the **Configuration** page. For detailed instructions, refer to the Lionbridge Connector for Adobe Experience Manager Installation and Configuration Guide. ##### To add a reference file to the Connector: 1. Click the down arrow 2. Select the reference file or folder containing reference files and click **Select.** 3. Repeat the previous steps for each reference file or folder containing reference files that you want to include. The Connector will send all specified files and all files in the specified folders to the translation provider. |
| Content Type | You can tag the content in a translation job as a specific content type. Depending on your company’s configuration, the Content API Platform may send the content to a specific translation provider based on the content type. Select one of the following content types: * Marketing * Technical * Legal **Note:** You may see different content types if your company has configured custom content types. |
| Quote | Select this check box to inform the translation provider that you want to receive a quote before the translation process starts. Note: This check box is displayed only if the selected translation provider is configured to support providing a quote before the translation process starts. |
| Job Name | Your name for this translation job. By default this includes the username, date, and time when you created the job, for example: Submit by [admin] @ 2016-12-20 6.57 PM. This is stored in the CQJobName attribute in the XML that the Connector sends to the translation provider. |
| PO Reference | Enter the purchase order reference number. |
| Job Description | Additional information about this job. This is stored in the CQJobDescription attribute in the XML that the Connector sends to the translation provider. |
| Notification Emails | Enter one or more email addresses that will receive notification when the content leaves Adobe Experience Manager and when it returns to Adobe Experience Manager. Use a comma to separate multiple email addresses. |
| In-country Reviewer | Optional. This is generally the name of the localization reviewer, which is stored in the InCountryReviewer attribute in the XML sent to the translation provider. By default, this field is hidden. |
Note: If you want to send the selected items to the Translation Queue instead of sending them out directly for translation, click Add to queue. The Translation Queue opens. For details, see Submitting Content for Translation from the Translation Queue.
- Click Start Translation.
The Connector sends the translation job to the translation provider you specified.
The Job Details tab of the Translation Status page opens, where you can monitor the progress of your translation job. For details, see Monitoring Pages in a Translation Job and Viewing Translated Content.
For information about the events that occur when the Connector sends out content for translation, see Sending Content for Translation.
4.2 - Sending Pages for Translation Using the Globalization Tool
The Globalization Tool enables you to send multiple pages, digital assets, Content Fragments, Experience Fragments, and adaptive forms directly out for translation or to the Translation Queue. You can add pages from multiple site paths, and/or upload paths stored in CSV or XLS files. You can filter pages and assets by publication date, on time, off time, activation state, and page template.
Important: By default, this feature is hidden. To use the Globalization Tool, you must select the Show Globalization Tool check box in the UI and Default Settings section of the Configuration page. For detailed instructions, refer to the Lionbridge Connector for Adobe Experience Manager Installation and Configuration Guide.
Notes: You can submit Content Fragments, Experience Fragments, and adaptive forms for translation only using the Bulk Translation wizard or the Globalization Tool. You can configure the Connector to submit for translation Content Fragments that are referenced in pages, Experience Fragments, and adaptive forms by selecting the Translate Dependent CF check box in the Translation Settings section of the Configuration page. For detailed instructions, refer to the Lionbridge Connector for Adobe Experience Manager Installation and Configuration Guide.
Note: Depending on your company configuration, you can submit digital assets, such as PDF and JPG files, for translation, including asset metadata.
You can also use the Globalization Tool to perform Adobe Experience Manager actions on multiple pages and digital assets simultaneously. For detailed instructions, see Performing Actions on Multiple Pages and Digital Assets.
To send out pages and assets for translation via the Globalization Tool:
-
Do one of the following to open the Globalization Tool:
-
In the Touch-Optimized UI of Adobe Experience Manager, click the Tools icon
and then click Lionbridge Connector in the Adobe Experience Manager rail. (This opens the Connector in a new browser tab.) Then, click Globalization Tool in the Lionbridge Connector rail. -
In the Classic UI of Adobe Experience Manager, scroll down and click Lionbridge Connector in the right pane. Then, click Globalization Tool in the Lionbridge Connector rail.
-
In your Web browser, navigate to /content/ctctranslation/advbulk.html on your Adobe Experience Manager instance.
-
The Globalization Tool opens.

-
Optional. If you are a member of multiple teams, then in the Profile dropdown list, select the team profile to use with the Globalization Tool. This displays the source and target languages and the translation providers specified for the team profile. To always use the selected profile with the Globalization Tool, click Set as default.
-
In the Select Pages section, you either set the parent path of one or more files to upload, apply filters, and then use an agent to upload the files, or you upload one or more files containing the paths of pages. You repeat this step until you have added all the paths and files to add. Do one of the following to select pages:
- To set the parent path of one or more files to upload, apply filters, and then use an agent to upload the files:
Note about team profiles: If one or more paths are configured for your team profile, you can select only pages that are in these paths for translation. The path configuration does not restrict your selection of digital assets.
a. In the Search from Site Path field, specify the highest root folder of all source pages or the full path of a page of a website. Either:
-
Click the arrow at the end of the field
, navigate to that path, select it, and click Select. -
Type the path in one of the following formats: /content/geometrixx/en or
http://localhost:4502/content/geometrixx/en/company.html. For Content Fragments, or Experience Fragments, type the path in the following format: /content/dam/en. For adaptive forms, type the path in the following format: /content/forms/af.
Note: To send digital assets, including their metadata, for translation, the path is under the language root under /content/dam, for example: /content/dam/geometrixx/en/icons.
Tips: You can select a previously entered path. Alternatively, you can click Load Saved to load the last set of previously saved page paths to the list.
b. Optional. Specify any of the following filters:
| Filter | Description | How To Specify… |
|---|---|---|
| Modification Filter | The range of dates when the page was modified. | * In the From and To boxes, enter the dates in YYYY-MM-DD format. * Select the **Apply modification filter** check box. |
| Publishing Filter | The range of dates when the page was published. | * In the From and To boxes, enter the dates in YYYY-MM-DD format. * Select the **Apply publishing filter** check box. |
| Off time (expiration) | The range of dates when the page was off time, or unpublished. | * In the From and To boxes, enter the dates in YYYY-MM-DD format. * Select the **Apply offtime filter** check box. |
| On time | The range of dates when the page was on time. | * In the From and To boxes, enter the dates in YYYY-MM-DD format. * Select the **Apply ontime filter** check box. |
| Page template filter | The Adobe Experience Manager template used to create the page. | Select the check boxes for the templates to include, or select the check box in the list header to include all templates. |
Tip: For precise descriptions of some of these terms, refer to the Adobe Experience Manager documentation, available at: https://docs.adobe.com/docs/en/aem/6-2/author/page-authoring/publishing-pages.html.
c. Optional. In the Page activation state section, select one or more of the following activation states for the pages to include:
- Activated: The page has been activated (published).
- DeActivated: The page was activated (published) and then deactivated (unpublished).
- Never Activated: The page has never been activated (published).
d. In the Search Using Agent field, select an agent to collect items to send for translation. Select a custom agent or one of the following pre-configured agents from the list:
- Get current page: Default. The agent collects the root page of the path specified in the Search from Site Path box, above.
- Get all children pages: The agent collects all children pages of the path specified in the Search from Site Path box, above. It does not collect any pages in the root path.
- Get current page and all children pages: The agent collects the root page and all children pages of the path specified in the Search from Site Path box, above.
e. Click Add.
You can repeat these steps to add multiple sets of pages with different root folders to the list of pages.
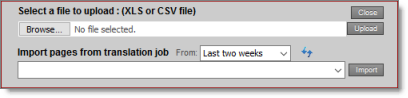
- To upload a file with the paths of the source content or import pages from a previously sent translation job, click the Load pages button:
Note: If an optional package is installed, you can upload an Excel file with the target languages for a translation job. For a description of the required formatting in the Excel file, see Importing Target Languages in the Globalization Tool. To obtain this optional package, contact Lionbridge Connector Support.
The Select a file to upload dialog box opens.
Do one of the following:
-
To upload a file with the paths of the source content:
a. Click Choose File.
f. In the browser dialog box that opens, navigate to the XLS or CSV file containing the paths of the source files, select it, and click Open, or similar, to close the browser dialog box.
The Select a file to upload dialog box displays the path of the file you selected.
g. Click Upload to upload the file.
A message box confirms that the file is added.
h. Click OK to close the message box.
The specified agent collects all items that match the search criteria and adds them to the list. You can repeat these steps to add additional files containing paths of pages to the list.
- To import pages from a previously sent translation job:
a. In the Import pages from translation job – From dropdown list, select the time range of previous translation jobs to display. The default value is Last two weeks.
b. Click the Refresh icon ![]() to populate the list of previous translation jobs in the list below.
to populate the list of previous translation jobs in the list below.
c. Select the previous translation job to import from the dropdown list at the bottom of the dialog box.
d. Click Import.
The Connectors adds the content items from the selected job to the list.
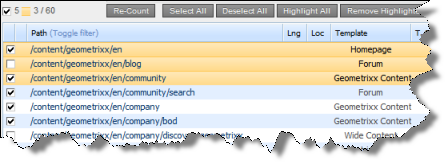
The following summary information is displayed in the Pages x/y field, where:
- X is the total number of pages available for selection.
- Y is the number of pages selected to send out for translation.
The following information is displayed about each page:
| Column | Description |
|---|---|
| blank | A locked padlock icon indicates if the page is locked. |
| Path | The path to the page. Tip: Click the link to open the page, fragment, or form in a new browser tab. The page opens in either the Touch UI or the Classic UI, depending on your company’s configuration. |
| Lng | The Adobe Experience Manager language of the page. |
| Loc | The Adobe Experience Manager locale of the page. |
| Template | The Adobe Experience Manager template used to create the page. * dam:Asset [CF] for Content Fragments * cq:Page for Experience Fragments * cq:Page [AF] for adaptive forms |
| T. Status | Optional. The custom translation status configured for the translation provider (LSP) that translated the page. Note: This column is displayed only if custom translation-status values are configured. For instructions, refer to the Lionbridge Connector for Adobe Experience Manager Installation and Configuration Guide. |
| Activation | Whether the page is activated or deactivated. |
| Activation/De-Activation Date | * The date and time when the page was last activated or de-activated, in the following format: YYYY-MM-DD kk:mm:ss, where kk is the hour represented by a 24-hour clock. * The username of the user who activated or deactivated the page. * One of the following codes, indicating whether the page was last activated or de-activated: * CTA: Activated * CTD: Deactivated. |
| Modification | * The date and time when the item was last modified, in the following format: YYYY-MM-DD kk:mm:ss, where kk is the hour represented by a 24-hour clock. * The (m) following the date and time indicates that the item was modified. The username of the user who last modified the item is displayed in parentheses, for example, [admin]. * One of the following codes, indicating how the page was last modified: * CTT: Translation * CTU: Update * CTI: Import* CTR: Rollout |
-
Select the check boxes for any pages you want to send out for translation. Ensure that the check boxes are cleared for any pages you do not want to send out for translation.
-
To update the numbers of selected pages, highlighted pages, and total pages at the top-left corner of the list, click Re-Count.
-
The number after the check box displays the number of selected pages.
-
The number after the highlight displays the number of highlighted pages.
-
The number after the slash ( / ) displays the total number of pages.
-
For example:
- To select the check boxes for all the pages in the list, click Select All.
- To clear the check boxes for all the pages in the list, click De-Select all.
-
Optional. Use the following features to update the list:
-
To remove all the pages from the list, even if the corresponding check boxes are selected, click Clear.
-
To update information about pages displayed in list, such as modification date, click Refresh.
-
-
Optional. To save the page paths displayed in the list, so that you can reload them later, click Save.
-
Optional. To view a page, click the path in the Path column. The page opens in a new browser tab.
-
In the Translation tab, specify the translation settings for the selected pages in the list.
![]()
Note: For a description of all other tabs, see Performing Actions on Multiple Pages and Digital Assets.
| Setting | Description |
|---|---|
| Source language | Select the source language for translation. The Connector will send pages in this source language for translation. |
| Target language | Select the check boxes for all the target languages into which you want to translate the source content. The list displays all the languages that are set up in Adobe Experience Manager for your team. * To select the check boxes for all available languages, click **All**. * To clear all selected check boxes, click **Clear**. |
| Deadline | The date you are requesting for the translated content to return. Click in the field and select a date in the calendar that opens. This information is sent to the translation provider as metadata of the translation package. Recommendation: Discuss whether to use this feature with your translation provider(s). |
| Translate Page Content? | Indicates whether to translate regular content fields in this content item. Important: To send out words on pages for translation, you must select this check box. |
| Translate Metadata? | Select this check box to send out for translation metadata fields that are defined in the Page Metadata Configuration section of the Advanced Settings page. These are properties under the /jcr:content node. |
| Use local TM? | This feature determines whether to check each component in the source version of the item for any content changes, and send only changed components out for translation. If a component was previously translated and it has not changed, then the Connector does not send it for translation again: Instead, it uses the stored translation. This feature reduces the quantity of content that the Connector sends to translation providers, which reduces your cost. However, it needs the Connector translation backup data, and it increases the Connector processing time before sending out the items for translation. * If this check box is selected, the Connector checks whether content was already translated before sending it out for translation. * If this check box is cleared, the Connector sends out content for translation without checking whether it has already been translated. |
| Notes | Enter any additional information about this translation job. This information is sent to the translation provider as a comment in the metadata of the translation package. |
| MSM Options | |
| Select if using Blueprint/Live-copy | This option is relevant when the target pages are MSM (Multi Site Manager) live copy pages, which means that Adobe Experience Manager automatically updates a target page when the corresponding source page changes. It prevents the Connector from overwriting unique source content that already exists in the target pages. This is useful when you are sending a page for translation that has been used in the past to push content to other pages, and includes target page content which has been changed, for example, regionalized. In this scenario you do not want to overwrite the regionalized content as the translation process occurs. Select this option when you do not want the Connector to overwrite components in the target pages that include regionalized content with the newly translated content. * If this check box is selected, the Connector does not overwrite unique source content that already exists in the target pages. * If this check box is cleared, the Connector does overwrite unique source content that already exists in the target pages. **Recommendation:** Select this check box if you are using the live-copy feature. |
| Only translate content from locked components | This option enables users to send out only content from locked components for translation. * If this check box is selected, users can send out content for translation only if it is from a locked component. * If this check box is cleared, users can send out content for translation whether or not it is from a locked component. **Note:** Locked components have an inheritance relationship between a source Blueprint page and the connected live copy page. When sending content for translation using Sidekick, users can choose whether to send for translation the content from locked components, which is inherited from a Blueprint component. This is useful if, for example, the page has both global and regional information and you only want to translate (replace) the global content that is created via a Blueprint page. In this scenario, suppose that the regional content on the page is manually translated in house, and that it has not changed. You would not want to tamper with it. However, using the same scenario, the global content from head office has changed and needs translation. You would select this check box to separate the content and localize only the new, inherited content. **Note about Blueprint pages:** If the **Pickup Content From Blueprint Pages** setting is specified, then the Connector always acts as though this option is selected, even if it is not selected. This occurs because only content from locked components are rolled out from Blueprint pages to Livecopy pages. For more information, refer to the Lionbridge Connector for Adobe Experience Manager Installation and Configuration Guide. |
| Unlock the component after translated content come back | This option automatically unlocks a component after translated content returns. This option is relevant only when the Select if using Blueprint/Live-copy is been selected. After translated content returns, it automatically unlocks a component, which breaks the MSM inheritance. Warning: This breaks the inheritance between the component and its Blueprint page, so that it no longer inherits new content. However, you can use the CTCRestoreOriginalSync workflow to relock the component and recreate the inheritance. For details, see Relocking Unlocked Components. * If this check box is selected, the Connector automatically unlocks a component after translated content returns. * If this check box is cleared, the Connector does not automatically unlock a component after translated content returns. |
| Allow translate content from Not-Sync components | This option enables users to send content for translation even if it is not synchronized. This means it does not have a relationship to a Blueprint page, so it cannot be synchronized with it. This can happen if you are not using the MSM (Multi Site Manager) feature of Adobe Experience Manager, or if this is a page with regionalized content that does not inherit content from a Blueprint page. * If this check box is selected, users can send out content for translation if it does not have a relationship to a Blueprint page. * If this check box is cleared, users cannot send out content for translation if it does not have a relationship to a Blueprint page. **Important:** The Connector treats certain page properties ( jcr:content, jcr:title, jcr:description) as unlocked page properties. Therefore, if you want the Connector to send these page properties for translation, you must select this check box.**Recommendation:** Select this check box if you are using either the live-copy or the language-copy features. **Note about Blueprint pages:** If the **Pickup Content From Blueprint Pages** setting is specified, then the Connector always acts as though this option is selected, even when it is not. This occurs because only content from locked components is rolled out from Blueprint pages to Livecopy pages. For more information, refer to the Lionbridge Connector for Adobe Experience Manager Installation and Configuration Guide. |
-
Do one of the following:
-
If you want to send the selected items to the Translation Queue instead of sending them out directly for translation, click Add to Queue. The Translation Queue opens. For details, see Submitting Content for Translation from the Translation Queue.
-
To immediately send out the selected items for translation as a single translation job, you must enter the following information in the Send for Translation Now section:
-
![]()
a. In the Choose LSP dropdown list, select your translation provider (LSP). If you select Lionbridge Freeway, the section expands to display additional fields.
![]()
b. Enter the following information about your translation job:
| Setting | Description |
|---|---|
| Special Instruction | Any additional instructions for Freeway, which are sent as metadata. Available only if the selected translation provider in the Choose LSP box, above, is the Lionbridge Freeway Type. |
| Analysis Code | The analysis codes for the translation. Displayed only if Lionbridge Freeway is selected in the Choose LSP box, above. You specify the analysis codes that are relevant to your content. Your Lionbridge setup determines which analysis codes are available for you to specify, and the values available for selection for each analysis code. In this example, the Color, Direction, and Sense analysis codes are available for you to specify. |
| Translation job name | Your name for this translation job. By default this includes the username, date, and time when you created the job, for example: Submit by [admin] @ 2016-12-20 6.57 PM. This is stored in the CQJobName attribute in the XML that the Connector sends to the translation provider. |
| Job description | Additional information about this job. This is stored in the CQJobDescription attribute in the XML that the Connector sends to the translation provider. |
| Reference Files | You can send reference files (support assets) to your translation provider as part of a translation job. This provides helpful context for the translator. For instructions on adding reference files in Adobe Experience Manager, refer to the Adobe Experience Manager documentation for uploading digital assets: * version 6.2: https://helpx.adobe.com/experience-manager/6-2/assets/using/managing-assets-touch-ui.html * version 6.3: https://helpx.adobe.com/experience-manager/6-3/assets/using/managing-assets-touch-ui.html * version 6.4: https://helpx.adobe.com/experience-manager/6-4/assets/using/managing-assets-touch-ui.html * version 6.5: https://helpx.adobe.com/experience-manager/6-5/assets/using/managing-assets-touch-ui.html **Note:** This feature is available only if the **Allow Reference Files for Translation Job** check box is selected in the **UI and Default Settings** section of the **Configuration** page. For detailed instructions, refer to the Lionbridge Connector for Adobe Experience Manager Installation and Configuration Guide. ##### To add a reference file to the Connector: 1. Click the down arrow 2. Select the reference file or folder containing reference files and click **Select**. 3. Repeat the previous steps for each reference file or folder containing reference files that you want to include. The Connector will send all specified files and all files in the specified folders to the translation provider. |
| PO Reference | The purchase order reference number for this translation job. |
| Content Type | You can tag the content in a translation job as a specific content type. Depending on your company’s configuration, the Content API Platform may send the content to a specific translation provider based on the content type. Select one of the following content types: * Marketing * Technical * Legal **Note:** You may see different content types if your company has configured custom content types. |
| Quote | Select this check box to inform the translation provider that you want to receive a quote before the translation process starts. Note: This check box is displayed only if the selected translation provider is configured to support providing a quote before the translation process starts. |
| Notification emails | Enter one or more email addresses that will receive notification when the content leaves Adobe Experience Manager and when it returns to Adobe Experience Manager. Use a comma to separate multiple email addresses. |
- Click Start translation.
The Connector sends the translation job to the translation provider you specified.
The Job Details tab of the Translation Status page opens, where you can monitor the progress of your translation job. For details, see Monitoring Pages in a Translation Job and Viewing Translated Content.
For information about the events that occur when the Connector sends out content for translation, see Sending Content for Translation.
4.2.1 - Importing Target Languages in the Globalization Tool
You can upload a Microsoft Excel file with a list of target languages when sending out files for translation from the Globalization Tool, as described in Sending Pages and Assets for Translation Using the Globalization Tool.
Microsoft Excel file format
The Microsoft Excel file must have the following format:
| Excel Column | Column Header | Notes |
|---|---|---|
| A | GEP | |
| B | Project Name | |
| C | Channel | |
| D | Sub Channel | |
| E | Assets | |
| F | Cycle Name | |
| G | Production Status | |
| H | Source Word Count | |
| I | Translated Word Count | |
| J | Total Cost | |
| K | Total Project Cost | |
| L | Markets | Target languages and codes, comma separated, for example: English(EN-GB), French(FR-CA) |
| M | HODate | |
| N | HBDate | |
| O | Actual Final HB | |
| P | Desired HBDate | |
| Q | Actual Localization Complete Date | |
| R | Daily Comments | |
| S | Field Review Start Date | |
| T | Field Review Complete Date | |
| U | Total Number of Language | |
| V | Delayed Language | |
| W | Total Number of delayed Days | |
| X | Total Number of delayed Language | |
| Y | Average Delay | |
| Z | Query | |
| AA | File Location |
To upload the Excel file:
-
Click the Load pages button to open the Select a file to upload dialog box.
-
In the dialog box, browse to and select the Excel file, and click Open, or similar, to close the browser dialog box. The Select a file to upload dialog box displays the path of the file you selected.
4.3 - Sending Files to the Translation Queue When You Roll Out Files
If your Connector is appropriately configured, then when you roll out files, the Connector automatically sends them to the Translation Queue using your company’s default translation settings.
For more information about this feature, read:
- Adobe Experience Manager’s MSM and the Rollout Process
- Why Integrate the Connector with Rollout
- How the Connector Fits into MSM and Rollouts
This feature is available only if either the CTCRolloutTranslation workflow is part of your rollout configuration, or the Catch rollout pages to [Rollout] Queue check box in the Translation Settings section of the Configuration page is selected. For more information on configuring this feature, refer to the Lionbridge Connector for Adobe Experience Manager Installation and Configuration Guide.
4.3.1 - Adobe Experience Manager's MSM and the Rollout Process
Adobe Experience Manager includes the powerful Multi Site Manager (MSM), which facilitates managing multiple versions of web sites. The versions may be region specific, for example, a car company may have a different English version of its web site for each English-speaking country where it sells cars. Typically, one version of the site is considered the “source” site. Content in each target website may have different kinds of relationships to the version in the “source” site:
- Some content may be common to all web sites, such as the car company’s history.
- Some content may be a mix of common and specific. For example, the company may sell the same cars in many countries, but the cars may have slightly different features in some countries, depending on local regulations.
- Some content may be specific to a specific version of the site, such as information about car dealerships in a particular country.
Rollout is a process that propagates the changes made from the source (Blueprint) to the target (live copy). When you roll out a site, Adobe Experience Manager copies the Blueprint (source) to the live copy (target). If the components are locked, then whenever the source content changes, Adobe Experience Manager automatically updates the target content.
The following Adobe Experience Manager concepts are helpful to understanding MSM and rollout, and how to configure and use the Connector accordingly:
| Concept | Description |
|---|---|
| Blueprint | A source template for multiple pages, which can be rolled out. |
| Live copy | A copy of an existing page or Blueprint, which is the target. Adobe Experience Manager can automatically update the live copy when changes occur to the source. Important: If you use this feature, you must select the Select if using Blueprint/Live-copy option. The Allow translate content from Not-Sync components setting is optional. |
| Locked | Specifies the inheritance relationship between the target and the source. When the source changes, Adobe Experience Manager automatically updates a locked component in the target. In the car company example, this is useful for pages that have the same content in all versions, such as information about the history of the company. |
| Unlocked | Specifies the inheritance relationship between the target and the source. When the source changes, Adobe Experience Manager does not update an unlocked component in the target. In the car company example, this is useful for regionalized pages that should not be updated, such as a list of local car dealerships. |
For more information about these features and the rollout process, refer to the Adobe Experience Manager user documentation, available at: https://helpx.adobe.com/experience-manager/6-4/sites/administering/using/msm-sync.html
4.3.2 - Why Integrate the Connector with Rollout
The Connector extends the MSM functionality by adding the translation component to the rollout feature. This facilitates using rollout not only to manage multiple region-specific sites, but also to manage multiple language-specific sites. The following table describes the advantages of using the Connector with rollout:
| Using Rollout | Not Using Rollout | |
|---|---|---|
| Process | Roll out pages, which automatically sends them to the Translation Queue. | 1. Roll out a same-language version. 2. Translate copied version. |
| Number of steps | One step. | Two steps. |
| link between source and content | Source and target can be linked, so when source is updated, changes are automatically sent to the Translation Queue. | No linkage between source and target. |
4.3.3 - How the Connector Fits into MSM and Rollouts
The Connector does not have its own user interface during rollout: when you roll out content, you use Adobe Experience Manager’s rollout interface. The Connector manages the translation during the rollout based on your company’s settings for the following options:
- Only translate content from locked components
- Select if using Blueprint/Live-copy
- Unlock the component after translated content come back
- Allow translated content from Not-Sync’d components
For information on configuring these options, refer to the Lionbridge Connector for Adobe Experience Manager Installation and Configuration Guide.
-
Access the Rollout feature in one of the following ways:
-
To roll out one or more pages, in the Blueprint Control Center, navigate to the top-level page in the source language to roll out, and select Rollout from the context menu.
-
To roll out specific components on a page, in Sidekick, in the Page tab, click the Rollout Page button.
-
- Specify which pages or components to roll out.
Select the check boxes corresponding to the live copy path for the target languages to roll out.
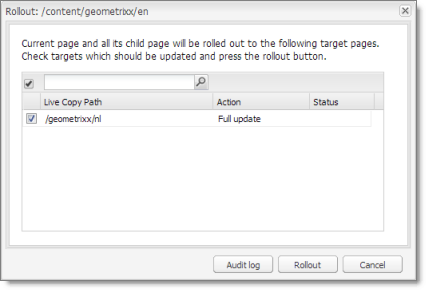
- Click Rollout.
The Connector automatically sends the specified content to the Translation Queue. After translation, the translated content will be the target content.
After the content is in the Translation Queue, either:
- You must access the Translation Queue and approve the pages you want to send out for translation. For detailed instructions, see Submitting Content for Translation from the Translation Queue.
- Your company has schedules that automatically send out translation jobs from the Translation Queue. For details, refer to the Lionbridge Connector for Adobe Experience Manager Installation and Configuration Guide.
For detailed instructions on using the rollout feature and accessing the Blueprint Control Center, refer to the Adobe Experience Manager user documentation, available at: https://helpx.adobe.com/experience-manager/6-5/sites/administering/using/msm.html.
4.4 - Sending Pages for Translation from the Touch-Optimized UI (Adobe Experience Manager version 6.3 and higher only)
If you are using Adobe Experience Manager version 6.3 or higher, you can send pages for translation or to the Translation Queue directly from the Touch-Optimized UI.
Tip: This method is ideal for ad-hoc translations or for sending small amounts of content for translation.
Note: Depending on your user permissions or your company configuration, you may not be able to send out content directly for translation.
Note: If one or more paths are configured for your team profile, you can send only pages that are in those paths for translation.
To send pages for translation from the Touch-Optimized UI:
-
In the Adobe Experience Manager Touch-Optimized UI, navigate to one of the following pages:
- the page you want to send for translation
- the parent page of sub pages you want to send for translation
-
Select the Edit mode. For detailed instructions, refer to the Adobe Experience Manager documentation, “Editing Page Content” which is available at: https://docs.adobe.com/docs/en/aem/6-3/author/page-authoring/editing-content.html.
-
In the top-left corner, click the Page Information icon
 .
. -
In the menu that opens, click Translate Content, which is the second-to-last menu option.
The Pages and languages tab of the Translate Content wizard opens.
![]()
- In this tab, you choose the following settings:
| Setting | Description |
|---|---|
| which pages to translate | By default, Current page is selected, which sends only the current page for translation. Alternatively, you can select one of the following options from the dropdown menu: * All sub pages: The Connector sends all sub pages of the current page for translation. It does not send the current page for translation. * Current page and all sub pages: The Connector sends the current page and all sub pages of the current page for translation. |
| Source language | Select the source language for translation. The Connector will send pages in this source language for translation. |
| Select all target language(s) | Select the check boxes for all the target languages into which you want to translate the source content. The list displays all the languages that are set up in Adobe Experience Manager for your team. To select all available languages, select the Select all target language(s) check box, above the list of languages. |
- Click the Translation Options tab.
![]()
In this tab, you specify the following translation options:
Note: Your company’s configuration determines the default value of each option.
| Option | Description |
|---|---|
| Use Local TM | This feature determines whether to check each component in the source version of the item for any content changes, and send only changed components out for translation. If a component was previously translated and it has not changed, then the Connector does not send it for translation again: Instead, it uses the stored translation. This feature reduces the quantity of content that the Connector sends to translation providers, which reduces your cost. However, it needs the Connector translation backup data, and it increases the Connector processing time before sending out the items for translation. If this check box is selected, the Connector checks whether content was already translated before sending it out for translation. If this check box is cleared, the Connector sends out content for translation without checking whether it has already been translated. |
| Select if using Blueprint/Live-copy | This option is relevant when the target pages are MSM (Multi Site Manager) live copy pages, which means that Adobe Experience Manager automatically updates a target page when the corresponding source page changes. It prevents the Connector from overwriting unique source content that already exists in the target pages. This is useful when you are sending a page for translation that has been used in the past to push content to other pages, and includes target page content which has been changed, for example, regionalized. In this scenario you do not want to overwrite the regionalized content as the translation process occurs. Select this option when you do not want the Connector to overwrite components in the target pages that include regionalized content with the newly translated content. If this check box is selected, the Connector does not overwrite unique source content that already exists in the target pages. If this check box is cleared, the Connector does overwrite unique source content that already exists in the target pages. Recommendation: Select this check box if you are using the live-copy feature. |
| Only translate content from locked components | This option enables users to send out only content from locked components for translation. * If this check box is selected, users can send out content for translation only if it is from a locked component. * If this check box is cleared, users can send out content for translation whether or not it is from a locked component. **Note:** Locked components have an inheritance relationship between a source Blueprint page and the connected live copy page. When sending content for translation using Sidekick, users can choose whether to send for translation the content from locked components, which is inherited from a Blueprint component. This is useful if, for example, the page has both global and regional information and you only want to translate (replace) the global content that is created via a Blueprint page. In this scenario, suppose that the regional content on the page is manually translated in house, and that it has not changed. You would not want to tamper with it. However, using the same scenario, the global content from head office has changed and needs translation. You would select this check box to separate the content and localize only the new, inherited content. **Note about Blueprint pages:** If the **Pickup Content From Blueprint Pages** setting is specified, then the Connector always acts as though this option is selected, even if it is not selected. This occurs because only content from locked components are rolled out from Blueprint pages to Livecopy pages. For more information, refer to the Lionbridge Connector for Adobe Experience Manager Installation and Configuration Guide. |
| Unlock the component after translated content come back | This option automatically unlocks a component after translated content returns. This option is relevant only when the Select if using Blueprint/Live-copy is been selected. After translated content returns, it automatically unlocks a component, which breaks the MSM inheritance. Warning: This breaks the inheritance between the component and its Blueprint page, so that it no longer inherits new content. However, you can use the CTCRestoreOriginalSync workflow to relock the component and recreate the inheritance. For details, see Relocking Unlocked Components. * If this check box is selected, the Connector automatically unlocks a component after translated content returns. * If this check box is cleared, the Connector does not automatically unlock a component after translated content returns. |
| Allow translate content from Not-Sync’d components | This option enables users to send content for translation even if it is not synchronized. This means it does not have a relationship to a Blueprint page, so it cannot be synchronized with it. This can happen if you are not using the MSM (Multi Site Manager) feature of Adobe Experience Manager, or if this is a page with regionalized content that does not inherit content from a Blueprint page. * If this check box is selected, users can send out content for translation if it does not have a relationship to a Blueprint page. * If this check box is cleared, users cannot send out content for translation if it does not have a relationship to a Blueprint page. **Important:** The Connector treats certain page properties ( jcr:content, jcr:title, jcr:description) as unlocked page properties. Therefore, if you want the Connector to send these page properties for translation, you must select this check box.**Recommendation:** Select this check box if you are using either the live-copy or the language-copy features. **Note about Blueprint pages:** If the **Pickup Content From Blueprint Pages** setting is specified, then the Connector always acts as though this option is selected, even when it is not. This occurs because only content from locked components is rolled out from Blueprint pages to Livecopy pages. For more information, refer to the Lionbridge Connector for Adobe Experience Manager Installation and Configuration Guide. |
| Translate page content | Indicates whether to translate regular content fields in this content item. Important: To send out words on pages for translation, you must select this check box. |
| Translate Metadata | Select this check box to send out for translation metadata fields that are defined in the Page Metadata Configuration section of the Advanced Settings page. These are properties under the /jcr:content node. |
- If multiple translation providers (LSPs) are defined for your team profile, and if you want to send the specified pages immediately out for translation (rather than to the Translation Queue), then click the LSP tab.
![]()
Note: The LSP tab is displayed only if multiple translation providers (LSPs) are configured for your team profile.
In the dropdown list, select the translation provider for this translation job.
- Click the Translation tab.
![]()
In this tab, you decide to either send the selected pages to the Translation Queue, or to send them out directly for translation as a single translation job.
-
If multiple translation providers are configured for your team profile, then you selected the translation provider in the LSP tab of this page, as described in the previous step.
-
If one translation provider is configured for your team profile, then that is the translation provider to whom the Connector sends your translation job.
Select one of the following options:
-
Add to queue: The Connector adds the specified pages to the Translation Queue. After the pages are in the Translation Queue, either:
- You must access the Translation Queue and approve the pages you want to send out for translation. For detailed instructions, see Submitting Content for Translation from the Translation Queue.
- Your company has schedules that automatically send out translation jobs from the Translation Queue. For details, refer to the Lionbridge Connector for Adobe Experience Manager Installation and Configuration Guide.
-
Send as a new job: The Connector immediately sends out the specified pages for translation as a new translation job, according to your company’s routing rules and the options you specify below.
Note: This option is available only to users with permission to send pages directly out for translation.
If you decide to send the pages out for translation, then you also specify the translation job options.
Note: The following settings are relevant and available only if you select Send as a new job, above.
| Setting | Description |
|---|---|
| how to process pages | Select one of the following methods for the Connector to process the selected pages: * Add to queue: The Connector sends the selected pages to the Translation Queue. This is the default value. * Send as a new job: The Connector sends the selected pages to the translation provider specified in the **LSP** tab. |
| Content Type | You can tag the content in a translation job as a specific content type. Depending on your company’s configuration, the Content API Platform may send the content to a specific translation provider based on the content type. Select one of the following content types: * Marketing * Technical * Legal Note: You may see different content types if your company has configured custom content types. |
| Send for quote first | Select this check box to inform the translation provider that you want to receive a quote before the translation process starts. Note: This check box is displayed only if the selected translation provider is configured to support providing a quote before the translation process starts. |
| Job Name | Your name for this translation job. By default this includes the username, date, and time when you created the job, for example: Submit by [admin] @ 2016-12-20 6.57 PM. This is stored in the CQJobName attribute in the XML that the Connector sends to the translation provider. |
| PO Reference | Enter the purchase order reference number. |
| Job Description | Additional information about this job. This is stored in the CQJobDescription attribute in the XML that the Connector sends to the translation provider. |
| Notification Emails | Enter one or more email addresses that will receive notification when the content leaves Adobe Experience Manager and when it returns to Adobe Experience Manager. Use a comma to separate multiple email addresses. |
- Click Submit.
The Connector sends the translation job to the translation provider you specified. A message box at the top of the page indicates that the pages were sent to the translation provider or the Translation Queue.
For information about the events that occur when the Connector sends out content for translation, see Sending Content for Translation.
Tip: You can monitor the progress of your translation job in the Job Details tab of the Translation Status page. For details, see Monitoring Pages in a Translation Job and Viewing Translated Content.
4.5 - Submitting Content for Translation from the Translation Queue
The goal of the Translation Queue is to control translation costs and the translation process. This design assumes that the person with the authority to send content for translation from the Translation Queue manages the translation budget of the organization.
You can send out one, multiple, or all items from the Translation Queue at one time.
Note: Your company can create schedules that automatically send out translation jobs from the Translation Queue. For details, refer to the Lionbridge Connector for Adobe Experience Manager Installation and Configuration Guide.
You submit content for translation from the Translation Queue in the following scenarios:
- You click Add to queue in the Options page of the Bulk Translation wizard. For details, see Specifying Translation Options.
Note: You can send out pages, tags, and dictionaries (i18n items) for translation using the Bulk Translation wizard. This is the only way to send out tags and dictionaries (i18n items) for translation.
-
You use workflow to send content for translation. For details, see Sending Content to the Translation Queue Using Workflow).
-
You roll out pages in Adobe Experience Manager and your Connector is configured to “catch” these pages and send them to the Translation Queue. For details, see Sending Files to the Translation Queue When You Roll Out Files.
-
You click Add to Queue in the Translation tab of the Globalization Tool. For details, see Sending Pages and Assets for Translation Using the Globalization Tool.
-
You select Add to queue from the dropdown list at the top of the Translation tab in the Translate Content page, which opens from the Touch-Optimized UI in Adobe Experience Manager version 6.3 and higher. For details, see Sending Pages for Translation from the Touch-Optimized UI (Adobe Experience Manager version 6.3 and higher only).
-
You submit content from the Sidekick, either if you are using the Simple UI, or if in the Submit translation option you select Add to queue when using the wizard. For details, see Sending Pages for Translation from the Adobe Experience Manager Sidekick.
-
You submit content from Adobe Experience Manager’s Translation Integration Framework. For details, see Sending Content for Translation from Adobe Experience Manager Translation Integration.
-
Users belong to a group where they are allowed to submit content only to the Translation Queue. They are not allowed to send out content directly for translation.
-
The Connector is configured to automatically add published pages to the Translation Queue. For more information, refer to the Lionbridge Connector for Adobe Experience Manager Installation and Configuration Guide.
Submitting content to the Translation Queue before sending it out for translation has the following advantages:
-
You may not want to send out each page individually as soon as you finish reviewing it. The Translation Queue facilitates your management of reviewed pages, so that you do not forget about sending individual reviewed pages for translation.
-
Your translation provider may prefer receiving fewer but larger batches of items to translate, rather than individual pages, as it facilitates project preparation, resource assignment, and file analysis.
-
If you want to translate many items into multiple languages, but you want to translate into only one target language at a time, this is a good way to manage that process.
-
The Translation Queue manager may want to route jobs to certain translation providers.
-
The Translation Queue manager may want to add job-specific metadata, such as a purchase order number.
If you or your colleagues have added items to the Translation Queue, you must access it and approve the items you want to send out.
Note: If you do not approve items in the Translation Queue, the Connector does not send them out for translation.
To submit one or more pages from the Translation Queue for translation:
- Do one of the following to open the Translation Queue:
-
In the Touch-Optimized UI of Adobe Experience Manager, click the Tools icon
and then click Lionbridge Connector in the Adobe Experience Manager rail. (This opens the Connector in a new browser tab.) Then, click Translation Queue in the Lionbridge Connector rail. -
In the Classic UI of Adobe Experience Manager, scroll down and click Lionbridge Connector in the right pane. Then, click Translation Queuein the Lionbridge Connector rail.
-
In your Web browser, navigate to /content/ctctranslation/queue.html on your Adobe Experience Manager instance.
The Translation Queue displays all the items that were sent to the queue and that have not yet been sent out for translation.
![]()
- Optional. In the dropdown list boxes above the list of content items, you can filter which items are displayed in the list:
- Metadata: When selected, the list displays only items with the selected Level-2 Queue Metadata analysis code. This analysis code was specified when the items were submitted to the queue from the Bulk Translation wizard.
Note: Available only when using the Content API Translation Connector for Lionbridge Freeway.
-
From: In the dropdown list, select how the items were submitted to the Translation Queue. The submission type is one of the following:
-
Bulk Wizard: The items (including pages, i18n dictionaries, and tags) were submitted to the queue from the Bulk Translation wizard.
-
Globalization Tool: The pages were submitted to the queue from the Translation tab of the Globalization Tool.
-
Bulk Wizard + Globalization Tool: The items were submitted to the queue from the Bulk Translation wizard or from the Translation tab of the Globalization Tool.
-
Sidekick: The pages were submitted to the queue from the Sidekick.
-
Touch-Optimized UI: The pages were submitted to the queue from the Translate Content page in Adobe Experience Manager’s Touch-Optimized UI.
-
Experience Manager TIF: The pages were submitted to the queue from Adobe’s Translation Integration Framework (TIF).
-
Rollout Workflow Process: The pages were submitted to the queue by the CTCRolloutTranslation workflow, which is part of your company’s rollout configuration.
-
Rollout Event: The pages were submitted to the queue from a rollout event, based on your company’s rollout configuration.
-
Rollout (Workflow + Event): The pages were submitted to the queue by the CTCRolloutTranslation workflow, which is part of your company’s rollout configuration, or from a rollout event, based on your company’s rollout configuration.
-
Publish Workflow Process: The pages were submitted to the queue by the Add Published Page to Translation Queue step in your workflow, based on your company’s Connector configuration.
-
Publish Events: The pages were submitted to the queue from a publish event, based on your company’s Connector configuration.
-
Publish (Workflow + Event): The pages were submitted to the queue by the Add Published Page to Translation Queue step in your workflow, based on your company’s Connector configuration, or from a publish event, based on your company’s Connector configuration.
-
The list automatically updates and displays only the specified items submitted to the queue with the specified method.
-
Type: In the dropdown list, select the type of items to display. This is one of the following:
-
Pages: Web pages, Content Fragments, Experience Fragments, adaptive forms, or digital assets.
-
Tags: Metadata assigned to a content item within Adobe Experience Manager (usually a page), which act as keywords or labels attached to that content item.
-
i18n Dictionaries: Texts and their translations in a CQ5 Translator dictionary.
-
TIF Assets: Translation files packaged and sent to the Translation Queue by Adobe’s Translation Integration Framework (TIF). These files are packaged in Adobe Experience Manager TIF’s own format.
-
-
Target: In the dropdown list, select the target language specified in the translation request. In the dropdown list, target languages for translations in the queue are displayed in black. Target languages that are set up in the system, but that are not specified in translations currently in the queue, are displayed in grey, and they are not available for selection. The list automatically updates and displays only items with the specified requested target language.
Tip: This is useful if you want to send out only items for translation to a specific target language.
The following information is displayed about items in the Translation Queue:
| Column | Description |
|---|---|
| Page | The path and name of the item or fragment to send for translation. Tip: Click the link to open the page, fragment, or form in a new browser tab. The page opens in either the Touch UI or the Classic UI, depending on your company’s configuration. |
| Source | The language code of the source language of the item to send for translation. |
| Target(s) | The language codes of the target languages into which to translate the content item. |
| Created On | The date and time when the item was created, in the following format: MM/DD/YYYY h:mm AA, where AA is two upper-case characters reflecting a.m. (after midnight) or p.m. (after noon). |
| User | The username of the user who submitted this item to the Translation Queue. |
| Deadline | The requested date for receiving the translated item back from the translation provider, in the following format: MM/DD/YYYY. |
| Metadata | The Level-2 Queue Metadata analysis code specified for this item when it was added to the Translation Queue. Note: Displayed only when using the Content API Translation Connector for Lionbridge Freeway. |
| Content In Target | Indicates whether the Select if using Blueprint/Live-copy option is specified for this item (relevant only to page items). This option is relevant when the target pages are MSM (Multi Site Manager) live copy pages, which means that Adobe Experience Manager automatically updates a target page when the corresponding source page changes. It prevents the Connector from overwriting unique source content that already exists in the target pages.
|
| Translate Locked | Indicates whether the Translate Locked Content/Only translate content from locked components option is specified for this item (relevant only to page items). This option enables users to send out only content from locked components for translation.
|
| Translate Not-Sync’d | Indicates whether the Translate Non-Sync’d Components/Allow translated content from not-sync’d components option is specified for this item (relevant only to page items). This option enables users to send content for translation even if it is not synchronized. This means it does not have a relationship to a Blueprint page, so it cannot be synchronized with it. This can happen if you are not using the MSM (Multi Site Manager) feature of Adobe Experience Manager, or if this is a page with regionalized content that does not inherit content from a Blueprint page.
|
| Leave Unlocked | Indicates whether the Unlock When Done/Unlock the component after translated content come back option is specified for this item (relevant only to page items). This option automatically unlocks a component after translated content returns.
|
| Translate Page Content | Indicates whether to translate regular content fields in this content item. Important: To send out words on pages for translation, this column must display Yes. |
| Translate Metadata | Indicates whether to translate metadata fields in this content item. The metadata fields are configured in the Page Metadata Configuration section of the Advanced Settings page. For details, refer to the Lionbridge Connector for Adobe Experience Manager Installation and Configuration Guide. |
| Use Local TM | Indicates whether the Use Local TM option is specified for this item. This feature determines whether to check each component in the source version of the item for any content changes, and send only changed components out for translation. If a component was previously translated and it has not changed, then the Connector does not send it for translation again: Instead, it uses the stored translation. This feature reduces the quantity of content that the Connector sends to translation providers, which reduces your cost. However, it needs the Connector translation backup data, and it increases the Connector processing time before sending out the items for translation.
|
| Words | The number of words in the file to translate. This does not include any words that were already translated if the Use Local TM check box is selected. That word count is displayed in the Use Local TM column, described above. Note: The number of words in digital assets, such as JPG or PDF files, is not displayed. |
| Counted | Indicates whether the Connector counted the words in this content item. This is one of the following:
|
Tip: To filter items by the values in the Page, Source, Target(s), Created On, or User columns, enter text in the text boxes at the top of the columns. The queue automatically displays only items that match the values in the text boxes.
- Optional. Select the check boxes of the items to send out for translation. The Connector will send out these items for translation as a single translation job. This step is required only if you do not want to send out all the items for translation.
Note about team profiles: If one or more paths are configured for your team profile, you can select only pages that are in these paths for translation. The path configuration does not restrict your selection of digital assets, tags, and dictionaries (i18n items).
- Below the list of content items, in the Translation Job tab, enter the following settings:
![]()
| Setting | Description |
|---|---|
| Content Type | You can tag the content in a translation job as a specific content type. Depending on your company’s configuration, the Content API Platform may send the content to a specific translation provider based on the content type. Select one of the following content types:
|
| Choose LSP | If multiple translation providers are configured for your team profile, select the translation provider to whom you want to send this translation job. If you select Lionbridge Freeway, the following additional Freeway-specific fields are displayed: |
| Special Instruction | Any additional instructions for Freeway, which are sent as metadata. Available only if the selected translation provider in the Choose LSP box, above, is the Lionbridge Freeway Type. |
| Analysis Code | The Freeway analysis codes for the translation. Displayed only if:
|
| Translation Quote | Select this check box to inform the translation provider that you want to receive a quote before the translation process starts. Note: This check box is displayed only if the selected translation provider is configured to support providing a quote before the translation process starts. |
| Job Name | Your name for this translation job. By default this includes the username, date, and time when you created the job, for example: Submit by [admin] @ 2016-12-20 6.57 PM. This is stored in the CQJobName attribute in the XML that the Connector sends to the translation provider. |
| PO Reference | Enter the purchase order reference number. |
| Job Description | Additional information about this job. This is stored in the CQJobDescription attribute in the XML that the Connector sends to the translation provider. |
| Notification Emails | Enter one or more email addresses that will receive notification when the content leaves Adobe Experience Manager and when it returns to Adobe Experience Manager. Use a comma to separate multiple email addresses. |
| In-country Reviewer | Optional. This is generally the name of the localization reviewer, which is stored in the InCountryReviewer attribute in the XML sent to the translation provider. By default, this field is hidden. |
- Optional. Click the Reference Files tab to open it. You can send reference files (support assets) to your translation provider as part of a translation job. This provides helpful context for the translator.
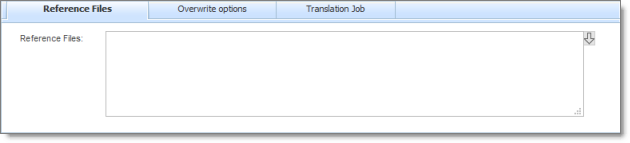
For instructions on adding reference files in Adobe Experience Manager, refer to the Adobe Experience Manager documentation for uploading digital assets:
- version 6.2: https://helpx.adobe.com/experience-manager/6-2/assets/using/managing-assets-touch-ui.html
- version 6.3: https://helpx.adobe.com/experience-manager/6-3/assets/using/managing-assets-touch-ui.html
- version 6.4: https://helpx.adobe.com/experience-manager/6-4/assets/using/managing-assets-touch-ui.html
- version 6.5: https://helpx.adobe.com/experience-manager/6-5/assets/using/managing-assets-touch-ui.html
Note: This feature is available only if the Allow Reference Files for Translation Job check box is selected in the UI and Default Settings section of the Configuration page. For detailed instructions, refer to the Lionbridge Connector for Adobe Experience Manager Installation and Configuration Guide.
a. Click the down arrow ![]() and navigate to the reference file or folder containing reference files.
b. Select the reference file or folder containing reference files and click Select.
c. Repeat the previous steps for each reference file or folder containing reference files that you want to include.
and navigate to the reference file or folder containing reference files.
b. Select the reference file or folder containing reference files and click Select.
c. Repeat the previous steps for each reference file or folder containing reference files that you want to include.
The Connector will send all specified files and all files in the specified folders to the translation provider.
- Optional. Click the Overwrite options tab to open it. You can overwrite translation settings that were specified when the items were originally submitted to the Translation Queue. Some of the settings described below may not be available, depending on your company’s configuration.
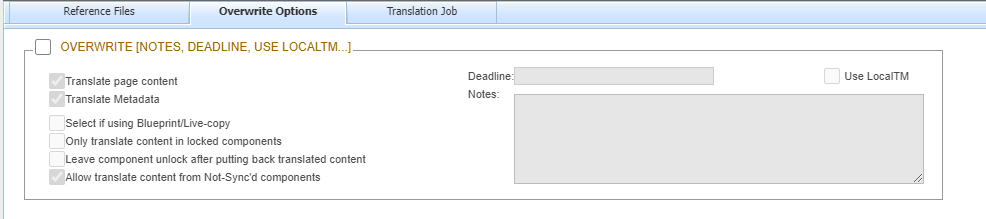
a. In the Overwrite section, if you want to overwrite any translation settings for the items to send out for translation, select this check box. b. In the Overwrite section, select or clear the check boxes for the individual settings, as described below.
| Translation Setting | Description |
|---|---|
| Translate field | Indicates whether to translate regular content fields in this content item. Important: To send out words on pages for translation, you must select this check box. |
| Translate metadata | Select this check box to send out for translation metadata fields that are defined in the Page Metadata Configuration section of the Advanced Settings page. These are properties under the /jcr:content node. |
| Select if using Blueprint/Live-copy | This option is relevant when the target pages are MSM (Multi Site Manager) live copy pages, which means that Adobe Experience Manager automatically updates a target page when the corresponding source page changes. It prevents the Connector from overwriting unique source content that already exists in the target pages.
|
| Only translate content in locked components | See the description of Translate Locked, above. Relevant only to page items. |
| Leave component unlock after putting back translated content | See the description of Leave Unlock, above. Relevant only to page items. |
| Allow translate content from Not-Sync’d components | See the description of Translate Not-Sync’d, above. Relevant only to page items. |
| Deadline | The requested date for receiving the translated content back from the translation provider. Click in the field and select a date in the calendar that opens. |
| Use Local TM | See the description of Use Local TM, above. |
| Notes | Enter any additional information about this translation job. This information is sent to the translation provider as a comment in the metadata of the translation package. |
- Send out the items to the translation provider from the Translation Job tab. If necessary, click that tab again to open it. Do one of the following:
- To send all items in the Translation Queue to the translation provider, click Send out all pages for translation.
- To send the selected items in the Translation Queue to the translation provider, click Send out checked pages for translation.
A message box opens, confirming that you want to send the files for translation.
- Click OK.
The Connector starts preparing to send the files for translation. The Job Details tab of the Translation Status page opens, where you can monitor the progress. For details, see Monitoring Pages in a Translation Job and Viewing Translated Content.
For information about the events that occur when the Connector sends out content for translation, see Sending Content for Translation.
4.6 - Preparing to Send Content for Translation from Adobe Experience Manager Translation Integration
Before you can send content for translation from the Adobe Experience Manager translation integration, you must specify the following configurations for the site to translate:
- The translation integration configuration contains the Adobe Experience Manager settings for how to translate your content.
- The Connector cloud configuration contains a set of Connector settings.
You must also create a translation project within Adobe Experience Manager.
To prepare the site for translation:
-
In the Adobe Experience Manager rail, click Sites, and navigate to the site to translate.
-
Select the site, and then select More > View Properties from the menu.
-
In the top-left corner, click Edit.
-
Click the Cloud Services tab.
-
In the Translation Integration section, select the appropriate translation integration configuration for the Connector. These are the Adobe Experience Manager settings for how to translate your content. For more information, contact your system administrator or refer to “Creating a Translation Integration Configuration for the Connector” in the Lionbridge Connector for Adobe Experience Manager Installation and Configuration Guide.
-
In the Lionbridge section, select the appropriate Connector cloud configuration. Each configuration contains a set of Connector settings. For more information, contact your system administrator or refer to “Creating an Adobe Experience Manager Cloud Configuration for the Connector” and “Editing Connector Cloud Configuration Settings” in the Lionbridge Connector for Adobe Experience Manager Installation and Configuration Guide.
Note: If the Lionbridge section does not exist, you can create it by clicking Add Configuration and then selecting Lionbridge from the list.
-
Click Done.
-
You create a translation project from Adobe Experience Manager’s Sites console. You can create a project either for a new language copy or to update an existing language copy. For detailed instructions, refer to “Creating Translation Projects Using the References Panel” in the Adobe Experience Manager documentation:
- version 6.2: https://helpx.adobe.com/experience-manager/6-2/sites/administering/using/tc-manage.html
- version 6.3: https://helpx.adobe.com/experience-manager/6-3/sites/administering/using/tc-manage.html
- version 6.4: https://helpx.adobe.com/experience-manager/6-4/sites/administering/using/tc-manage.html
- version 6.5: https://helpx.adobe.com/experience-manager/6-5/sites/administering/using/tc-manage.html
4.7 - Resending a Translation Job
You can send previously sent jobs for translation from the Status tab of the Translation Status page. You can modify the content items, source and target languages, translation provider, translation options, and job options before resending the job. You can also specify an LSP-specific configuration for the job to resend.
To resend a translation job:
- Do one of the following to open the Status tab of Translation Status page:
![]()
- In the Touch-Optimized UI of Adobe Experience Manager, click the Tools icon and then click Lionbridge Connector in the Adobe Experience Manager rail. (This opens the Connector in a new browser tab.) Then, click Translation Status in the Lionbridge Connector rail.
- In the Classic UI of Adobe Experience Manager, scroll down and click Lionbridge Connector in the right pane. Then, click Translation Status in the Lionbridge Connector rail.
- In your Web browser, navigate to /content/ctctranslation/status.html on your Adobe Experience Manager instance.
For a detailed description of this page, see Monitoring Jobs.
- In the Job column, locate the translation job to resend, and click the Re-Send button
 .
.
The Content and Languages tab of the Re-send translation job dialog box opens.
![]()
This tab displays a list of all content items that were sent for translation in the previous job, including the corresponding source and target languages. By default, all content items are selected for inclusion in the new job.
-
Optional. Clear the check box boxes of any content items to exclude from the new translation job.
-
Optional. Click the Re-Select Languages tab to open it.
![]()
This tab enables you to change the source and target languages of the translation job.
a If you want to change the source and/or target languages of the job, select the Reset source and target languages check box. b Optional. If you want to change the source language of the content items to send out for translation, then in the Select source language dropdown list, select the new source language. c Optional. If you want to change the target languages into which the content items are translated, then in Translate into the following target languages section, select the check boxes of the new target languages.
- Optional. Click the LSP and Options tab to open it.
![]()
This tab displays the translation provider (LSP) and translation options from the previously sent job. Modify any of the following translation options:
| Option | Description |
|---|---|
| Use Local TM | This feature determines whether to check each component in the source version of the item for any content changes, and send only changed components out for translation. If a component was previously translated and it has not changed, then the Connector does not send it for translation again: Instead, it uses the stored translation. This feature reduces the quantity of content that the Connector sends to translation providers, which reduces your cost. However, it needs the Connector translation backup data, and it increases the Connector processing time before sending out the items for translation. * If this check box is selected, the Connector checks whether content was already translated before sending it out for translation. * If this check box is cleared, the Connector sends out content for translation without checking whether it has already been translated. **Note about i18n dictionary items:** If this check box is selected, the Connector sends only previously untranslated i18n dictionary items for translation. If this check box is cleared, the Connector sends all i18n items for translation. |
| Select if using Blueprint/Live-copy | This option is relevant when the target pages are MSM (Multi Site Manager) live copy pages, which means that Adobe Experience Manager automatically updates a target page when the corresponding source page changes. It prevents the Connector from overwriting unique source content that already exists in the target pages. This is useful when you are sending a page for translation that has been used in the past to push content to other pages, and includes target page content which has been changed, for example, regionalized. In this scenario you do not want to overwrite the regionalized content as the translation process occurs. Select this option when you do not want the Connector to overwrite components in the target pages that include regionalized content with the newly translated content. * If this check box is selected, the Connector does not overwrite unique source content that already exists in the target pages. * If this check box is cleared, the Connector does overwrite unique source content that already exists in the target pages. **Recommendation:** Select this check box if you are using the live-copy feature. **Note:** This option is available only if **Pages** is selected in the **Item Type** page of the wizard. |
| Only translate content from locked components | This option enables users to send out only content from locked components for translation. * If this check box is selected, users can send out content for translation only if it is from a locked component. * If this check box is cleared, users can send out content for translation whether or not it is from a locked component. **Note:** Locked components have an inheritance relationship between a source Blueprint page and the connected live copy page. When sending content for translation using Sidekick, users can choose whether to send for translation the content from locked components, which is inherited from a Blueprint component. This is useful if, for example, the page has both global and regional information and you only want to translate (replace) the global content that is created via a Blueprint page. In this scenario, suppose that the regional content on the page is manually translated in house, and that it has not changed. You would not want to tamper with it. However, using the same scenario, the global content from head office has changed and needs translation. You would select this check box to separate the content and localize only the new, inherited content. **Note about Blueprint pages**: If the **Pickup Content From Blueprint Pages** setting is specified, then the Connector always acts as though this option is selected, even if it is not selected. This occurs because only content from locked components are rolled out from Blueprint pages to Livecopy pages. For more information, refer to the Lionbridge Connector for Adobe Experience Manager Installation and Configuration Guide. **Note**: This option is available only if **Pages** is selected in the **Item Type** page of the wizard. |
| Unlock the component after translated content come back | This option automatically unlocks a component after translated content returns. This option is relevant only when the Select if using Blueprint/Live-copy is been selected. After translated content returns, it automatically unlocks a component, which breaks the MSM inheritance. Warning: This breaks the inheritance between the component and its Blueprint page, so that it no longer inherits new content. However, you can use the CTCRestoreOriginalSync workflow to relock the component and recreate the inheritance. For details, see Relocking Unlocked Components. * If this check box is selected, the Connector automatically unlocks a component after translated content returns. * If this check box is cleared, the Connector does not automatically unlock a component after translated content returns. **Note:** This option is available only if **Pages** is selected in the **Item Type** page of the wizard. |
| Allow translate content from Not-Sync components | This option enables users to send content for translation even if it is not synchronized. This means it does not have a relationship to a Blueprint page, so it cannot be synchronized with it. This can happen if you are not using the MSM (Multi Site Manager) feature of Adobe Experience Manager, or if this is a page with regionalized content that does not inherit content from a Blueprint page. * If this check box is selected, users can send out content for translation if it does not have a relationship to a Blueprint page. * If this check box is cleared, users cannot send out content for translation if it does not have a relationship to a Blueprint page. **Important:** The Connector treats certain page properties ( jcr:content, jcr:title, jcr:description) as unlocked page properties. Therefore, if you want the Connector to send these page properties for translation, you must select this check box.**Recommendation:** Select this check box if you are using either the live-copy or the language-copy features. **Note about Blueprint pages:** If the Pickup Content From Blueprint Pages setting is specified, then the Connector always acts as though this option is selected, even when it is not. This occurs because only content from locked components is rolled out from Blueprint pages to Livecopy pages. For more information, refer to the Lionbridge Connector for Adobe Experience Manager Installation and Configuration Guide. **Note**: This option is available only if **Pages** is selected in the **Item Type** page of the wizard. |
| Translate page content | Indicates whether to translate regular content fields in this content item. Important: To send out words on pages for translation, you must select this check box. Note: This option is available only if Pages is selected in the Item Type page of the wizard. |
| Translate Metadata | Select this check box to send out for translation metadata fields that are defined in the Page Metadata Configuration section of the Advanced Settings page. These are properties under the /jcr:content node. Note: This option is available only if Pages is selected in the Item Type page of the wizard. |
| Queue Metadata | You can select the Level-2 Queue Metadata analysis code for these content items. If you add these items to the Translation Queue, you can filter and sort items there by this analysis code. Note: Available only when using the Content API Translation Connector for Lionbridge Freeway. Displayed only when the Use Analysis Codes as Queue Metadata check box is selected in the Freeway Config section of the Configuration page. For details, refer to the Lionbridge Connector for Adobe Experience Manager Installation and Configuration Guide. |
- Optional. To change the translation provider (LSP), select it in the Choose LSP dropdown list. Depending on the translation provider you select, additional fields may be displayed. For example:
- If you select the SDL TMS translation provider, then the TMS Config field is displayed. Select an SDL TMS configuration that was defined in the TMS GUID Config page. For details, refer to the Lionbridge Connector for Adobe Experience Manager Installation and Configuration Guide. In the second dropdown list, select your SDL TMS profile.
- If you select the Lionbridge Freeway translation provider, the following additional fields are displayed:
| Field | Description |
|---|---|
| Special Instruction | Any additional instructions for Freeway, which are sent as metadata. Available only if the selected translation provider in the Choose LSP box, above, is the Lionbridge Freeway Type. |
| Analysis Code | The Freeway analysis codes for the translation. Displayed only if: * In the **Choose LSP** box, above, the selected provider is the Lionbridge Freeway Type. * The Connector is configured to display these fields. You specify the analysis codes that are relevant to your content. Your Lionbridge setup determines which analysis codes are available for you to specify, and the values available for selection for each analysis code. For example, the Region, Department, and Priority analysis codes may be available for you to specify. |
- Click the Translation Job tab to open it.
![]()
You use this tab to specify the following job settings:
| Option | Description |
|---|---|
| Job name | Your name for this translation job. By default this is [Resend] and the name of the previously sent translation job. This is stored in the CQJobName attribute in the XML that the Connector sends to the translation provider. |
| Job description | Additional information about this job. This is stored in the CQJobDescription attribute in the XML that the Connector sends to the translation provider. |
| PO Reference | Enter the purchase order reference number. |
| Content Type | You can tag the content in a translation job as a specific content type. Depending on your company’s configuration, the Content API Platform may send the content to a specific translation provider based on the content type. Select one of the following content types: * Marketing * Technical * Legal **Note:** You may see different content types if your company has configured custom content types. |
| Deadline | The date you are requesting for the translated content to return. Click in the field and select a date in the calendar that opens. This information is sent to the translation provider as metadata of the translation package. Recommendation: Discuss whether to use this feature with your translation provider(s). |
| Quote | Select this check box to inform the translation provider that you want to receive a quote before the translation process starts. Note: This check box is displayed only if the selected translation provider is configured to support providing a quote before the translation process starts. |
| Reference Files | You can send reference files (support assets) to your translation provider as part of a translation job. This provides helpful context for the translator. For instructions on adding reference files in Adobe Experience Manager, refer to the Adobe Experience Manager documentation for uploading digital assets: * version 6.2: https://helpx.adobe.com/experience-manager/6-2/assets/using/managing-assets-touch-ui.html * version 6.3: https://helpx.adobe.com/experience-manager/6-3/assets/using/managing-assets-touch-ui.html * version 6.4: https://helpx.adobe.com/experience-manager/6-4/assets/using/managing-assets-touch-ui.html * version 6.5: https://helpx.adobe.com/experience-manager/6-5/assets/using/managing-assets-touch-ui.html **Note:** This feature is available only if the **Allow Reference Files for Translation Job** check box is selected in the **UI and Default Settings** section of the **Configuration** page. For detailed instructions, refer to the Lionbridge Connector for Adobe Experience Manager Installation and Configuration Guide. ##### To add a reference file to the Connector: 1. Click the down arrow 2. Select the reference file or folder containing reference files and click Select. 3. Repeat the previous steps for each reference file or folder containing reference files that you want to include. The Connector will send all specified files and all files in the specified folders to the translation provider. |
| Translation Notes | Enter any additional information about this translation job. This information is sent to the translation provider as a comment in the metadata of the translation package. |
| Notification Emails | Enter one or more email addresses that will receive notification when the content leaves Adobe Experience Manager and when it returns to Adobe Experience Manager. Use a comma to separate multiple email addresses. |
| In-country Reviewer | Optional. This is generally the name of the localization reviewer, which is stored in the InCountryReviewer attribute in the XML sent to the translation provider. By default, this field is hidden. |
- Click Send.
The Connector submits the job.
4.8 - Sending Content for Translation from Adobe Experience Manager Translation Integration
When you use the Adobe Experience Manager Translation Integration feature, you send out the content for translation as a translation job from a translation project in Adobe Experience Manager’s Projects console.
- From the Adobe Experience Manager rail, click Projects.
- Click the translation project.
- On the project’s Translation Job tile, click the commands menu in the top-right corner, and then Start to start the translation job.
If the Connector cloud configuration for the translation project sends content to the Translation Queue, then after the content is in the queue, either:
- You must access the Translation Queue and approve the pages you want to send out for translation. For detailed instructions, see Submitting Content for Translation from the Translation Queue.
- Your company has schedules that automatically send out translation jobs from the Translation Queue. For details, refer to the Lionbridge Connector for Adobe Experience Manager Installation and Configuration Guide.
For more information, refer to “Starting a Translation Job” in the Adobe Experience Manager documentation:
- version 6.2: https://helpx.adobe.com/experience-manager/6-2/sites/administering/using/tc-manage.html
- version 6.3: https://helpx.adobe.com/experience-manager/6-3/sites/administering/using/tc-manage.html
- version 6.4: https://helpx.adobe.com/experience-manager/6-4/sites/administering/using/tc-manage.html
- version 6.5: https://helpx.adobe.com/experience-manager/6-5/sites/administering/using/tc-manage.html
Note: When sending out content for translation from Adobe Experience Manager’s translation integration feature, the Connector does not support Adobe Experience Manager’s Request Scope feature, which is described in the “Scoping a Translation Job” section of the Adobe Experience Manager documentation at the above link.
Note about canceling translation jobs from Adobe Experience Manager’s translation integration feature: If you cancel a job that you sent to the Translation Queue, then the Connector deletes it from the queue. If you cancel a job that you sent directly out for translation, then Adobe Experience Manager attempts to cancel the job. The job’s status changes to Cancel.
4.9 - Sending Pages for Translation from Adobe Experience Manager Sidekick
Note: This section is only applicable for the users who are using AEM on-premise version older than AEM 6.4.
If you are using the Adobe Experience Manager Classic UI, you can send individual pages of content for translation directly from the Adobe Experience Manager Sidekick.
Tip: This method is ideal for ad-hoc translations or for sending small amounts of content for translation.
Note: If one or more paths are configured for your team profile, you can send only pages that are in those paths for translation.
To sending pages for translation from Sidekick:
-
Double-click a page to open it with Sidekick, which is a floating toolbar.
-
In Sidekick, click the Page tab
 .
. -
In the Page tab, scroll down and click the Translate Content option.
![]()
The Connector’s Sidekick translation request interface opens. One of four possible Sidekick user interfaces is displayed, depending on your company’s configuration: there are two single-page (simple) interfaces and two multiple-page (wizard) interfaces.
- Use the following table to determine which user interface is displayed for your company:
| Submit button/Next button | Multiple Check Boxes Are Displayed for Advanced Translation Options | For detailed instructions, see… |
|---|---|---|
| Submit button | no | Sidekick - Simple UI |
| Submit button | yes | Sidekick - Simple UI with Options |
| Next button | no | Sidekick - Wizard |
| Next button | yes | Sidekick - Wizard with Options |
4.9.1 - Sidekick - Simple UI
You use this interface to submit content to the Translation Queue only.
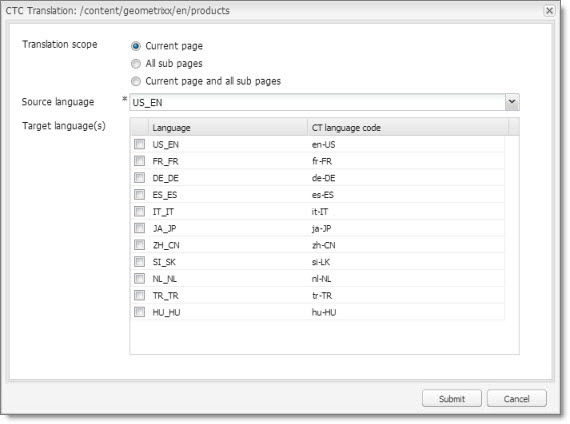
- Enter the following information about the translation options:
| Option | Description |
|---|---|
| Translation scope | Determine the scope of the pages to send for translation. This is one of the following: * **Current page:** The Connector sends the current page for translation. * **All sub pages:** The Connector sends all the sub-pages for translation. It does not send the current page. * **Current page and all sub pages:** The Connector sends the current page and all its sub-pages for translation. |
| Source language | Select the source language to send for translation. |
| Target language(s) | Select one or more target languages to send for translation. The list displays all the languages that are set up in Adobe Experience Manager for your team. |
- Click Submit to send the content to the Translation Queue.
A message box opens, confirming that the page or pages have been added to the queue.
- Click OK to close the message box.
After the content is in the Translation Queue, either:
-
You must access the Translation Queue and approve the pages you want to send out for translation. For detailed instructions, see Submitting Content for Translation from the Translation Queue.
-
Your company has schedules that automatically send out translation jobs from the Translation Queue. For details, refer to the Lionbridge Connector for Adobe Experience Manager Installation and Configuration Guide.
4.9.2 - Sidekick - Simple UI with Options
Sidekick - Simple UI with Options
You use this interface to submit content to the Translation Queue only.
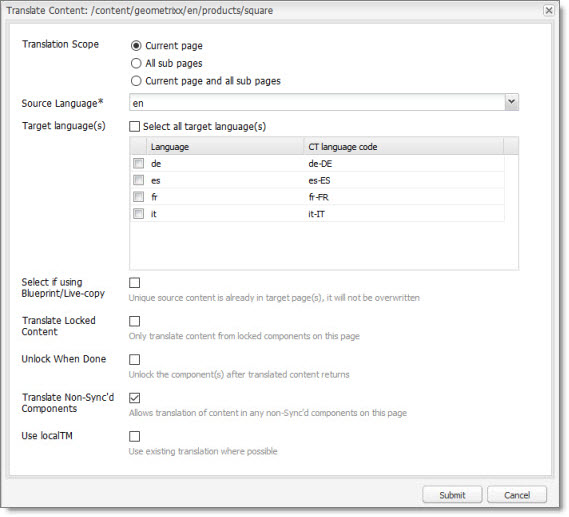
- Enter the following information about the translation options:
| Option | Description |
|---|---|
| Translation scope | Determine the scope of the pages to send for translation. This is one of the following: * **Current page:** The Connector sends the current page for translation. * **All sub pages:** The Connector sends all the sub-pages for translation. It does not send the current page. * **Current page and all sub pages:** The Connector sends the current page and all its sub-pages for translation. |
| Source language | Select the source language to send for translation. |
| Target language(s) | Select one or more target languages to send for translation. The list displays all the languages that are set up in Adobe Experience Manager for your team. |
| Select if using Blueprint/Live-copy | This option is relevant when the target pages are MSM (Multi Site Manager) live copy pages, which means that Adobe Experience Manager automatically updates a target page when the corresponding source page changes. It prevents the Connector from overwriting unique source content that already exists in the target pages. This is useful when you are sending a page for translation that has been used in the past to push content to other pages, and includes target page content which has been changed, for example, regionalized. In this scenario you do not want to overwrite the regionalized content as the translation process occurs. Select this option when you do not want the Connector to overwrite components in the target pages that include regionalized content with the newly translated content. * If this check box is selected, the Connector does not overwrite unique source content that already exists in the target pages. * If this check box is cleared, the Connector does overwrite unique source content that already exists in the target pages. **Recommendation:** Select this check box if you are using the live-copy feature. |
| Translate Locked Content | This option enables users to send out only content from locked components for translation. * If this check box is selected, users can send out content for translation only if it is from a locked component. * If this check box is cleared, users can send out content for translation whether or not it is from a locked component. **Note:** Locked components have an inheritance relationship between a source Blueprint page and the connected live copy page. When sending content for translation using Sidekick, users can choose whether to send for translation the content from locked components, which is inherited from a Blueprint component. This is useful if, for example, the page has both global and regional information and you only want to translate (replace) the global content that is created via a Blueprint page. In this scenario, suppose that the regional content on the page is manually translated in house, and that it has not changed. You would not want to tamper with it. However, using the same scenario, the global content from head office has changed and needs translation. You would select this check box to separate the content and localize only the new, inherited content. **Note about Blueprint pages:** If the **Pickup Content From Blueprint Pages** setting is specified, then the Connector always acts as though this option is selected, even if it is not selected. This occurs because only content from locked components are rolled out from Blueprint pages to Livecopy pages. For more information, refer to the Lionbridge Connector for Adobe Experience Manager Installation and Configuration Guide. |
| Unlock When Done | This option automatically unlocks a component after translated content returns. This option is relevant only when the Select if using Blueprint/Live-copy is been selected. After translated content returns, it automatically unlocks a component, which breaks the MSM inheritance. Warning: This breaks the inheritance between the component and its Blueprint page, so that it no longer inherits new content. However, you can use the CTCRestoreOriginalSync workflow to relock the component and recreate the inheritance. For details, see Relocking Unlocked Components. * If this check box is selected, the Connector automatically unlocks a component after translated content returns. * If this check box is cleared, the Connector does not automatically unlock a component after translated content returns. |
| Translate Non-Sync’d Components on this page | This option enables users to send content for translation even if it is not synchronized. This means it does not have a relationship to a Blueprint page, so it cannot be synchronized with it. This can happen if you are not using the MSM (Multi Site Manager) feature of Adobe Experience Manager, or if this is a page with regionalized content that does not inherit content from a Blueprint page. * If this check box is selected, users can send out content for translation if it does not have a relationship to a Blueprint page. * If this check box is cleared, users cannot send out content for translation if it does not have a relationship to a Blueprint page. **Important:** The Connector treats certain page properties ( jcr:content, jcr:title, jcr:description) as unlocked page properties. Therefore, if you want the Connector to send these page properties for translation, you must select this check box.**Recommendation:** Select this check box if you are using either the live-copy or the language-copy features. **Note about Blueprint pages:** If the **Pickup Content From Blueprint Pages** setting is specified, then the Connector always acts as though this option is selected, even when it is not. This occurs because only content from locked components is rolled out from Blueprint pages to Livecopy pages. For more information, refer to the Lionbridge Connector for Adobe Experience Manager Installation and Configuration Guide. |
| Use local TM | This feature determines whether to check each component in the source version of the item for any content changes, and send only changed components out for translation. If a component was previously translated and it has not changed, then the Connector does not send it for translation again: Instead, it uses the stored translation. This feature reduces the quantity of content that the Connector sends to translation providers, which reduces your cost. However, it needs the Connector translation backup data, and it increases the Connector processing time before sending out the items for translation. * If this check box is selected, the Connector checks whether content was already translated before sending it out for translation. * If this check box is cleared, the Connector sends out content for translation without checking whether it has already been translated. |
Note: Your company’s Connector configuration determines the default settings of these last five options. For more information, refer to the Lionbridge Connector for Adobe Experience Manager Installation and Configuration Guide.
- Click Submit to send the content to the Translation Queue.
A message box opens, confirming that the page or pages have been added to the queue.
- Click OK to close the message box.
After the content is in the Translation Queue, either:
-
You must access the Translation Queue and approve the pages you want to send out for translation. For detailed instructions, see Submitting Content for Translation from the Translation Queue.
-
Your company has schedules that automatically send out translation jobs from the Translation Queue. For details, refer to the Lionbridge Connector for Adobe Experience Manager Installation and Configuration Guide.
4.9.3 - Sidekick - Wizard
You use this interface to submit content to the Translation Queue or directly for translation.
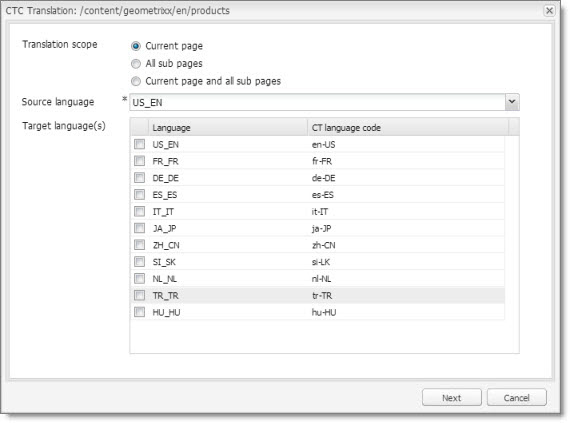
Note: Depending on your user permissions or your company configuration, you may not be able to send out content directly for translation.
- Enter the following information about the translation options:
| Option | Description |
|---|---|
| Translation scope | Determine the scope of the pages to send for translation. This is one of the following: * **Current page:** The Connector sends the current page for translation. * **All sub pages:** The Connector sends all the sub-pages for translation. It does not send the current page. * **Current page and all sub pages:** The Connector sends the current page and all its sub-pages for translation. |
| Source language | Select the source language to send for translation. |
| Target language(s) | Select one or more target languages to send for translation. The list displays all the languages that are set up in Adobe Experience Manager for your team. |
- Click Next.
The second page of the wizard opens.
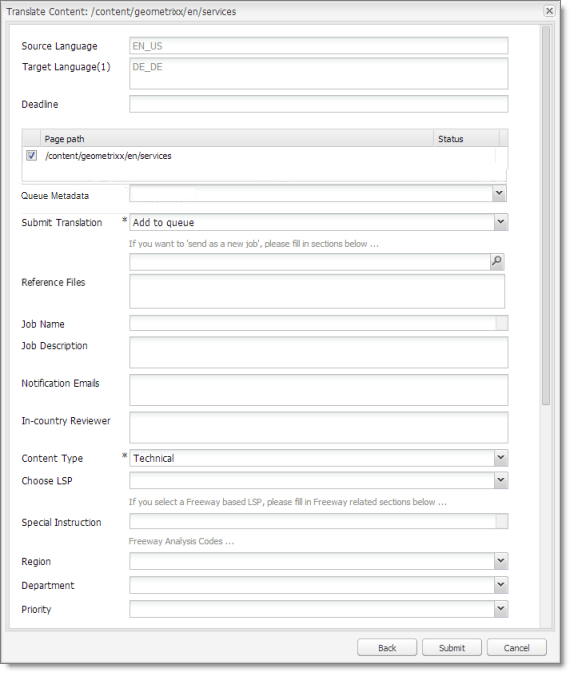
The following options are available:
| Option | Description |
|---|---|
| Source language | The source language you selected in the previous page of the wizard. Read-only. To change this value, click Back. |
| Target languages | The target languages, including the number of target languages, you selected in the previous page of the wizard. Read-only. To change this value, click Back. |
| Deadline | The requested translation deadline. This is the date when you expect the translated content to return. Click in the field and select a date in the calendar that opens. This information is sent to the translation provider as metadata of the translation package. Recommendation: Discuss with your translation provider whether to use the information in this field. |
| Page Path/Status | This list displays the path and the name of all pages you are sending for translation. |
| Queue Metadata | You can select the Level-2 Queue Metadata analysis code for these content items. If you add these items to the Translation Queue, you can filter and sort items there by this analysis code. Note: Available only when using the Content API Translation Connector for Lionbridge Freeway. Displayed only when the Use Analysis Codes as Queue Metadata check box is selected in the Freeway Config section of the Configuration page. For details, refer to the Lionbridge Connector for Adobe Experience Manager Installation and Configuration Guide. |
| Submit Translation | Indicate where to submit the specified pages for translation. This is one of the following: * **Add to queue:** The Connector adds the specified pages to the Translation Queue. After the content is in the Translation Queue, either: * You must access the Translation Queue and approve the pages you want to send out for translation. For detailed instructions, see Submitting Content for Translation from the Translation Queue. * Your company has schedules that automatically send out translation jobs from the Translation Queue. For details, refer to the Lionbridge Connector for Adobe Experience Manager Installation and Configuration Guide. * **Send as a new job:** The Connector immediately sends out the specified pages for translation as a new translation job, according to your company’s routing rules and the options you specify below. **Note:** This option is available only to users with permission to send pages directly out for translation. |
| Reference Files | You can send reference files (support assets) to your translation provider as part of a translation job. This provides helpful context for the translator. For instructions on adding reference files in Adobe Experience Manager, refer to the Adobe Experience Manager documentation for uploading digital assets: * version 6.2: https://helpx.adobe.com/experience-manager/6-2/assets/using/managing-assets-touch-ui.html * version 6.3: https://helpx.adobe.com/experience-manager/6-3/assets/using/managing-assets-touch-ui.html * version 6.4: https://helpx.adobe.com/experience-manager/6-4/assets/using/managing-assets-touch-ui.html * version 6.5: https://helpx.adobe.com/experience-manager/6-5/assets/using/managing-assets-touch-ui.html **Note:** This feature is available only if the **Allow Reference Files for Translation Job** check box is selected in the **UI and Default Settings** section of the **Configuration** page. For detailed instructions, refer to the Lionbridge Connector for Adobe Experience Manager Installation and Configuration Guide. ##### To add a reference file to the Connector: 1. Click the Search icon 2. Select the reference file or folder and click **OK**. The path you selected is displayed in the text box below. 1. Repeat the previous steps for each reference file or folder containing reference files that you want to send to Freeway. The Connector will send all files in the specified paths to Freeway. **Note:** Displayed only if you select Lionbridge Freeway as the translation provider (LSP) in the **Choose LSP** field below. |
| Job Name | Your name for this translation job. This information is sent to your translation provider. Required and relevant only when Send as a new job is selected in the Submit Translation field, above. |
| Job Description | Your description for the translation job. This information is sent to your translation provider. Required and relevant only when Send as a new job is selected in the Submit Translation field, above. |
| Notification Emails | Enter one or more email addresses that will receive notification when the content leaves Adobe Experience Manager and when it returns to Adobe Experience Manager. Use a comma to separate multiple email addresses. Required and relevant only when Send as a new job is selected in the Submit Translation field, above. |
| In-country Reviewer | Optional. This is generally the name of the localization reviewer, which is stored in the InCountryReviewer attribute in the XML sent to the translation provider. By default, this field is hidden. Required and relevant only when Send as a new job is selected in the Submit Translation field, above. |
| Content Type | You can tag the content in a translation job as a specific content type. Depending on your company’s configuration, the Content API Platform may send the content to a specific translation provider based on the content type. Select one of the following content types: * Marketing * Technical * Legal **Note:** You may see different content types if your company has configured custom content types. Required and relevant only when Send as a new job is selected in the **Submit Translation** field, above. |
| Choose LSP | Select the translation provider for your translation job. Your Connector administrator specifies the default translation provider. Required and relevant only when Send as a new job is selected in the Submit Translation field, above. |
| Special Instruction | Any additional instructions for Freeway. Note: Displayed only if the selected translation provider in the Choose LSP box, above, is the Lionbridge Freeway Type. |
| Freeway Analysis Codes | The Freeway analysis codes for the translation. Displayed only if: * In the Choose LSP box, above, the selected provider is the Lionbridge Freeway Type. * The Connector is configured to display these fields. You specify the analysis codes that are relevant to your content. Your Lionbridge setup determines which analysis codes are available for you to specify, and the values available for selection for each analysis code. For example, the Region, Department, and Priority analysis codes may be available for you to specify. |
- Click Submit to submit the specified pages either to the Translation Queue or directly to translation, as you indicated above.
- If you submitted the pages directly for translation, a message box opens, confirming that you want to send out the translation job. Click OK to proceed.
- The wizard page displays a green box in the Status column, indicating that the translation submission was successful.
- Click Close to close the wizard.
For information about the events that occur when the Connector sends out content for translation, see Sending Content for Translation.
Tip: You can monitor the translation progress from within the Connector. For detailed instructions, see Monitoring Translation Status and Jobs and Viewing Translated Content.
4.9.4 - Sidekick - Wizard with Options
You use this interface to submit content to the Translation Queue or directly for translation.
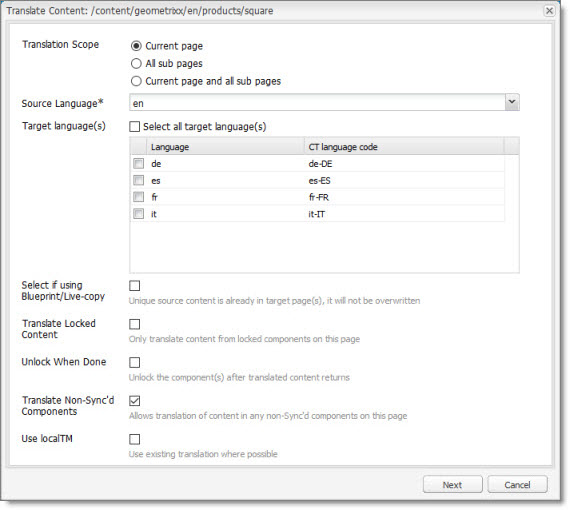
Note: Depending on your user permissions or your company configuration, you may not be able to send out content directly for translation.
- Enter the following information about the translation options:
| Option | Description |
|---|---|
| Translation scope | Determine the scope of the pages to send for translation. This is one of the following: * **Current page:** The Connector sends the current page for translation. * **All sub pages:** The Connector sends all the sub-pages for translation. It does not send the current page. * **Current page and all sub pages:** The Connector sends the current page and all its sub-pages for translation. |
| Source language | Select the source language to send for translation. |
| Target language(s) | Select one or more target languages to send for translation. The list displays all the languages that are set up in Adobe Experience Manager for your team. |
| Select if using Blueprint/Live-copy | This option is relevant when the target pages are MSM (Multi Site Manager) live copy pages, which means that Adobe Experience Manager automatically updates a target page when the corresponding source page changes. It prevents the Connector from overwriting unique source content that already exists in the target pages. This is useful when you are sending a page for translation that has been used in the past to push content to other pages, and includes target page content which has been changed, for example, regionalized. In this scenario you do not want to overwrite the regionalized content as the translation process occurs. Select this option when you do not want the Connector to overwrite components in the target pages that include regionalized content with the newly translated content. * If this check box is selected, the Connector does not overwrite unique source content that already exists in the target pages. * If this check box is cleared, the Connector does overwrite unique source content that already exists in the target pages. **Recommendation:** Select this check box if you are using the live-copy feature. |
| Translate Locked Content | This option enables users to send out only content from locked components for translation. * If this check box is selected, users can send out content for translation only if it is from a locked component. * If this check box is cleared, users can send out content for translation whether or not it is from a locked component. **Note:** Locked components have an inheritance relationship between a source Blueprint page and the connected live copy page. When sending content for translation using Sidekick, users can choose whether to send for translation the content from locked components, which is inherited from a Blueprint component. This is useful if, for example, the page has both global and regional information and you only want to translate (replace) the global content that is created via a Blueprint page. In this scenario, suppose that the regional content on the page is manually translated in house, and that it has not changed. You would not want to tamper with it. However, using the same scenario, the global content from head office has changed and needs translation. You would select this check box to separate the content and localize only the new, inherited content. **Note about Blueprint pages:** If the **Pickup Content From Blueprint Pages** setting is specified, then the Connector always acts as though this option is selected, even if it is not selected. This occurs because only content from locked components are rolled out from Blueprint pages to Livecopy pages. For more information, refer to the Lionbridge Connector for Adobe Experience Manager Installation and Configuration Guide. |
| Unlock When Done | This option automatically unlocks a component after translated content returns. This option is relevant only when the Select if using Blueprint/Live-copy is been selected. After translated content returns, it automatically unlocks a component, which breaks the MSM inheritance. Warning: This breaks the inheritance between the component and its Blueprint page, so that it no longer inherits new content. However, you can use the CTCRestoreOriginalSync workflow to relock the component and recreate the inheritance. For details, see Relocking Unlocked Components. * If this check box is selected, the Connector automatically unlocks a component after translated content returns. * If this check box is cleared, the Connector does not automatically unlock a component after translated content returns. |
| Translate Non-Sync’d Components on this page | This option enables users to send content for translation even if it is not synchronized. This means it does not have a relationship to a Blueprint page, so it cannot be synchronized with it. This can happen if you are not using the MSM (Multi Site Manager) feature of Adobe Experience Manager, or if this is a page with regionalized content that does not inherit content from a Blueprint page. * If this check box is selected, users can send out content for translation if it does not have a relationship to a Blueprint page. * If this check box is cleared, users cannot send out content for translation if it does not have a relationship to a Blueprint page. **Important:** The Connector treats certain page properties ( jcr:content, jcr:title, jcr:description) as unlocked page properties. Therefore, if you want the Connector to send these page properties for translation, you must select this check box.**Recommendation:** Select this check box if you are using either the live-copy or the language-copy features. **Note about Blueprint pages**: If the **Pickup Content From Blueprint Pages** setting is specified, then the Connector always acts as though this option is selected, even when it is not. This occurs because only content from locked components is rolled out from Blueprint pages to Livecopy pages. For more information, refer to the Lionbridge Connector for Adobe Experience Manager Installation and Configuration Guide. |
| Use local TM | This feature determines whether to check each component in the source version of the item for any content changes, and send only changed components out for translation. If a component was previously translated and it has not changed, then the Connector does not send it for translation again: Instead, it uses the stored translation. This feature reduces the quantity of content that the Connector sends to translation providers, which reduces your cost. However, it needs the Connector translation backup data, and it increases the Connector processing time before sending out the items for translation. * If this check box is selected, the Connector checks whether content was already translated before sending it out for translation. * If this check box is cleared, the Connector sends out content for translation without checking whether it has already been translated. |
Note: Your company’s Connector configuration determines the default settings of these last five options. For more information, refer to the Lionbridge Connector for Adobe Experience Manager Installation and Configuration Guide.
- Click Next.
The second page) of the wizard opens.
The following options are available:
| Option | Description |
|---|---|
| Source language | The source language you selected in the previous page of the wizard. Read-only. To change this value, click Back. |
| Target languages | The target languages, including the number of target languages, you selected in the previous page of the wizard. Read-only. To change this value, click Back. |
| Deadline | The requested translation deadline. This is the date when you expect the translated content to return. Click in the field and select a date in the calendar that opens. This information is sent to the translation provider as metadata of the translation package. Recommendation: Discuss with your translation provider whether to use the information in this field. |
| Page Path/Status | This list displays the path and the name of all pages you are sending for translation. |
| Queue Metadata | You can select the Level-2 Queue Metadata analysis code for these content items. If you add these items to the Translation Queue, you can filter and sort items there by this analysis code. Note: Available only when using the Content API Translation Connector for Lionbridge Freeway. Displayed only when the Use Analysis Codes as Queue Metadata check box is selected in the Freeway Config section of the Configuration page. For details, refer to the Lionbridge Connector for Adobe Experience Manager Installation and Configuration Guide. |
| Submit Translation | Indicate where to submit the specified pages for translation. This is one of the following: * **Add to queue:** The Connector adds the specified pages to the Translation Queue. After the content is in the Translation Queue, either: * You must access the Translation Queue and approve the pages you want to send out for translation. For detailed instructions, see Submitting Content for Translation from the Translation Queue. * Your company has schedules that automatically send out translation jobs from the Translation Queue. For details, refer to the Lionbridge Connector for Adobe Experience Manager Installation and Configuration Guide. * **Send as a new job:** The Connector immediately sends out the specified pages for translation as a new translation job, according to your company’s routing rules and the options you specify below. **Note:** This option is available only to users with permission to send pages directly out for translation. |
| Reference Files | You can send reference files (support assets) to your translation provider as part of a translation job. This provides helpful context for the translator. For instructions on adding reference files in Adobe Experience Manager, refer to the Adobe Experience Manager documentation for uploading digital assets: * version 6.2: https://helpx.adobe.com/experience-manager/6-2/assets/using/managing-assets-touch-ui.html * version 6.3: https://helpx.adobe.com/experience-manager/6-3/assets/using/managing-assets-touch-ui.html * version 6.4: https://helpx.adobe.com/experience-manager/6-4/assets/using/managing-assets-touch-ui.html * version 6.5: https://helpx.adobe.com/experience-manager/6-5/assets/using/managing-assets-touch-ui.html **Note:** This feature is available only if the **Allow Reference Files for Translation Job** check box is selected in the **UI and Default Settings** section of the **Configuration** page. For detailed instructions, refer to the Lionbridge Connector for Adobe Experience Manager Installation and Configuration Guide. ##### To add a reference file to the Connector: 1. Click the Search icon 2. Select the reference file or folder and click **OK**. The path you selected is displayed in the text box below. 1. Repeat the previous steps for each reference file or folder containing reference files that you want to send to Freeway. The Connector will send all files in the specified paths to Freeway. **Note:** Displayed only if you select Lionbridge Freeway as the translation provider (LSP) in the **Choose LSP** field below. |
| Job Name | Your name for this translation job. This information is sent to your translation provider. Required and relevant only when Send as a new job is selected in the Submit Translation field, above. |
| Job Description | Your description for the translation job. This information is sent to your translation provider. Required and relevant only when Send as a new job is selected in the Submit Translation field, above. |
| Notification Emails | Enter one or more email addresses that will receive notification when the content leaves Adobe Experience Manager and when it returns to Adobe Experience Manager. Use a comma to separate multiple email addresses. Required and relevant only when Send as a new job is selected in the Submit Translation field, above. |
| In-country Reviewer | Optional. This is generally the name of the localization reviewer, which is stored in the InCountryReviewer attribute in the XML sent to the translation provider. By default, this field is hidden. Required and relevant only when Send as a new job is selected in the Submit Translation field, above. |
| Content Type | You can tag the content in a translation job as a specific content type. Depending on your company’s configuration, the Content API Platform may send the content to a specific translation provider based on the content type. Select one of the following content types: * Marketing * Technical * Legal **Note:** You may see different content types if your company has configured custom content types. Required and relevant only when Send as a new job is selected in the **Submit Translation** field, above. |
| Choose LSP | Select the translation provider for your translation job. Your Connector administrator specifies the default translation provider. Required and relevant only when Send as a new job is selected in the Submit Translation field, above. |
| Special Instruction | Any additional instructions for Freeway. Note: Displayed only if the selected translation provider in the Choose LSP box, above, is the Lionbridge Freeway Type. |
| Freeway Analysis Codes | The Freeway analysis codes for the translation. Displayed only if: * In the **Choose LSP** box, above, the selected provider is the Lionbridge Freeway Type. * The Connector is configured to display these fields. You specify the analysis codes that are relevant to your content. Your Lionbridge setup determines which analysis codes are available for you to specify, and the values available for selection for each analysis code. For example, the Region, Department, and Priority analysis codes may be available for you to specify. |
- Click Submit to submit the specified pages either to the Translation Queue or directly to translation, as you indicated above.
- If you submitted the pages directly for translation, a message box opens, confirming that you want to send out the translation job. Click OK to proceed.
- The wizard page displays a green box in the Status column, indicating that the translation submission was successful.
- Click Close to close the wizard.
For information about the events that occur when the Connector sends out content for translation, see Sending Content for Translation.
Tip: You can monitor the translation progress from within the Connector. For detailed instructions, see Monitoring Translation Status and Jobs and Viewing Translated Content.
4.10 - Sending Content to the Translation Queue Using Workflow
Note: This section is not applicable for the the AEM Cloud Connector. You can send content to the Translation Queue using the Sample_CT_Workflow_Translation workflow. For detailed integration instructions, refer to the Lionbridge Connector for Adobe Experience Manager Installation and Configuration Guide.
You can send content to the Translation Queue using workflow:
- from the Inbox, as described on Sending Content to the Translation Queue Using Workflow from the Inbox
After the content is in the Translation Queue, either:
-
You must access the Translation Queue and approve the pages you want to send out for translation. For detailed instructions, see Submitting Content for Translation from the Translation Queue.
-
Your company has schedules that automatically send out translation jobs from the Translation Queue. For details, refer to the Lionbridge Connector for Adobe Experience Manager Installation and Configuration Guide.
4.10.1 - Sending Content to the Translation Queue Using Workflow from the Inbox
Note about team profiles: If one or more paths are configured for your team profile, you can select only pages that are in these paths for translation. The path configuration does not restrict your selection of digital assets, tags, and dictionaries (i18n items).
To send content to the Translation Queue while using workflow from the Inbox:
- Do one of the following to open the Inbox:
- In the Touch-Optimized UI of Adobe Experience Manager, click Tools in the Adobe Experience Manager rail. Then, in the Tasks section, click Inbox.
- In the Classic UI of Adobe Experience Manager, click Inbox.
- In your Web browser, navigate to /inbox.html on your Adobe Experience Manager instance.
The Inbox opens and displays workflow items.
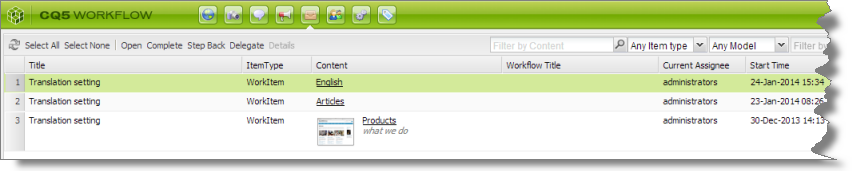
- Select a workflow item, right-click, and select Complete from the context menu.
The Complete Work Item dialog box opens.
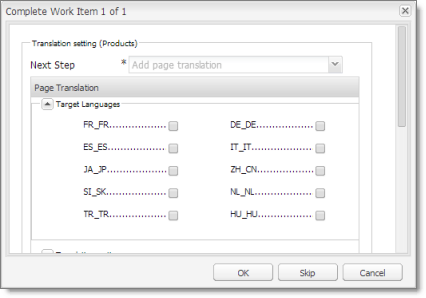
The Next Step is Add page translation.
-
In the Target Languages section, select the check boxes for the target languages into which to translate the content. The list displays all the languages that are set up in Adobe Experience Manager for your team.
-
Click the Collapse icon
 to hide the Target Languages section. Alternatively, you can scroll down in the dialog box.
The Translation Options section is displayed.
![]()
Notes: The default settings for these options are specified in the Translation Default Settings section in the Configuration page. For details, refer to the Lionbridge Connector for Adobe Experience Manager Installation and Configuration Guide. Depending on your company’s configuration, some of the options described below may not be available:
| Option | Description |
|---|---|
| Use Local TM | This feature determines whether to check each component in the source version of the item for any content changes, and send only changed components out for translation. If a component was previously translated and it has not changed, then the Connector does not send it for translation again: Instead, it uses the stored translation. This feature reduces the quantity of content that the Connector sends to translation providers, which reduces your cost. However, it needs the Connector translation backup data, and it increases the Connector processing time before sending out the items for translation. * If this check box is selected, the Connector checks whether content was already translated before sending it out for translation. * If this check box is cleared, the Connector sends out content for translation without checking whether it has already been translated. |
| Target pages have content in source language | This option is relevant when the target pages are MSM (Multi Site Manager) live copy pages, which means that Adobe Experience Manager automatically updates a target page when the corresponding source page changes. It prevents the Connector from overwriting unique source content that already exists in the target pages. This is useful when you are sending a page for translation that has been used in the past to push content to other pages, and includes target page content which has been changed, for example, regionalized. In this scenario you do not want to overwrite the regionalized content as the translation process occurs. Select this option when you do not want the Connector to overwrite components in the target pages that include regionalized content with the newly translated content. * If this check box is selected, the Connector does not overwrite unique source content that already exists in the target pages. * If this check box is cleared, the Connector does overwrite unique source content that already exists in the target pages. **Recommendation:** Select this check box if you are using the live-copy feature. |
| Only translate content from locked components | This option enables users to send out only content from locked components for translation. * If this check box is selected, users can send out content for translation only if it is from a locked component. * If this check box is cleared, users can send out content for translation whether or not it is from a locked component. **Note:** Locked components have an inheritance relationship between a source Blueprint page and the connected live copy page. When sending content for translation using Sidekick, users can choose whether to send for translation the content from locked components, which is inherited from a Blueprint component. This is useful if, for example, the page has both global and regional information and you only want to translate (replace) the global content that is created via a Blueprint page. In this scenario, suppose that the regional content on the page is manually translated in house, and that it has not changed. You would not want to tamper with it. However, using the same scenario, the global content from head office has changed and needs translation. You would select this check box to separate the content and localize only the new, inherited content. **Note about Blueprint pages:** If the **Pickup Content From Blueprint Pages** setting is specified, then the Connector always acts as though this option is selected, even if it is not selected. This occurs because only content from locked components are rolled out from Blueprint pages to Livecopy pages. For more information, refer to the Lionbridge Connector for Adobe Experience Manager Installation and Configuration Guide. |
| Unlock the component after translated content come back | This option automatically unlocks a component after translated content returns. This option is relevant only when the Select if using Blueprint/Live-copy is been selected. After translated content returns, it automatically unlocks a component, which breaks the MSM inheritance. Warning: This breaks the inheritance between the component and its Blueprint page, so that it no longer inherits new content. However, you can use the CTCRestoreOriginalSync workflow to relock the component and recreate the inheritance. For details, see Relocking Unlocked Components. * If this check box is selected, the Connector automatically unlocks a component after translated content returns. * If this check box is cleared, the Connector does not automatically unlock a component after translated content returns. |
| Allow translate content from Not-Sync components | This option enables users to send content for translation even if it is not synchronized. This means it does not have a relationship to a Blueprint page, so it cannot be synchronized with it. This can happen if you are not using the MSM (Multi Site Manager) feature of Adobe Experience Manager, or if this is a page with regionalized content that does not inherit content from a Blueprint page. * If this check box is selected, users can send out content for translation if it does not have a relationship to a Blueprint page. * If this check box is cleared, users cannot send out content for translation if it does not have a relationship to a Blueprint page. **Important:** The Connector treats certain page properties ( jcr:content, jcr:title, jcr:description) as unlocked page properties. Therefore, if you want the Connector to send these page properties for translation, you must select this check box.**Recommendation:** Select this check box if you are using either the live-copy or the language-copy features. **Note about Blueprint pages**: If the **Pickup Content From Blueprint Pages** setting is specified, then the Connector always acts as though this option is selected, even when it is not. This occurs because only content from locked components is rolled out from Blueprint pages to Livecopy pages. For more information, refer to the Lionbridge Connector for Adobe Experience Manager Installation and Configuration Guide. |
-
Click the Collapse icon
to hide the Translation options section. Alternatively, you can scroll down in the dialog box. -
Optional. In the Comments section, enter any additional information about this workflow step. This is stored in Adobe Experience Manager.
-
Click OK to send the content to the Translation Queue.
Note: To save your changes without sending the content to the Translation Queue, click Skip. You can return later to send the content to the queue.
After the content is in the Translation Queue, either:
-
You must access the Translation Queue and approve the pages you want to send out for translation. For detailed instructions, see Submitting Content for Translation from the Translation Queue.
-
Your company has schedules that automatically send out translation jobs from the Translation Queue. For details, refer to the Lionbridge Connector for Adobe Experience Manager Installation and Configuration Guide.
5 - Monitoring Translation Status and Viewing Translations
You can view the status of your translation jobs from the Translation Status page. The Connector updates the status at different milestones in the translation process.
-
You can view the translation status of all translation jobs together in the Status tab, as described on Monitoring Jobs.
-
You can view the translation status of individual pages within a translation job, and view translated pages, in the Job Details tab, as described on Monitoring Pages in a Translation Job and Viewing Translated Content.
For a list and description of translation statuses, see Translation Statuses.
If you create a translation project and start a translation job in Adobe Experience Manager’s translation integration feature, you can also:
-
Monitor its status within Adobe Experience Manager, as described in Monitoring Translation Jobs Created in the Adobe Experience Manager Translation Integration.
-
View translated content within Adobe Experience Manager’s translation integration feature, as described in Viewing Translated Content from Jobs Started in the Adobe Experience Manager Translation Integration
5.1 - Translation Statuses
Content items have one of the following translation statuses:
| Translation Status | Description | Percentage Translation Complete |
|---|---|---|
| Preparing | The Connector is preparing to send out the item to the translation provider. | 0% |
| Paused | The Connector has prepared the item to send out to the translation provider, but it has been paused, either automatically, if configured to do so, or by clicking the Pause button in the Status tab of the Translation Status page. | 0% |
| Sending | The Connector is sending out the item to the translation provider. | 1% |
| Sent out | The Connector sent the item to the translation provider. Note: This status is relevant only if a quote was not requested for the translation job. |
2% |
| Sent out for quote | The Connector sent the item to the translation provider and requested a quote. Note: This status is relevant only if a quote was requested for the translation job. |
2% |
| Sent to translator | The Connector completed sending out the item to the translation provider. Note: This status is relevant only if a quote was not requested for the translation job. |
5% |
| Sent to translator for quote | The Connector completed sending out the item to the translation provider and requesting a quote. Note: This status is relevant only if a quote was requested for the translation job. |
5% |
| In Translation | The translation provider has received the item for translation and has not yet returned the translated item. Note: Started translation process is displayed in the Job Details tab of the Translation Status page. |
10% |
| Received | The Connector received the translated item back from the translation provider. This is displayed in green in the Job Details tab of the Translation Status page. | 90% |
| Completed | The Connector has returned the translated item to Adobe Experience Manager. This is displayed in green in the Job Details tab of the Translation Status page. | 100% |
| No Translation Required | There are no components to translate in the page. (The components may have been excluded from translation by your company’s configuration, or they may have been translated already, if the Use Local TM option is specified.) | 100% |
5.2 - Monitoring Jobs
You monitor translation jobs in the Status tab of Translation Status page.
-
Do one of the following to monitor the status of jobs sent for translation:
-
In the Touch-Optimized UI of Adobe Experience Manager, click the Tools icon
and then click Lionbridge Connector in the Adobe Experience Manager rail. (This opens the Connector in a new browser tab.) Then, click Translation Status in the Lionbridge Connector rail. -
In the Classic UI of Adobe Experience Manager, scroll down and click Lionbridge Connector in the right pane. Then, click Translation Status in the Lionbridge Connector rail.
-
In your Web browser, navigate to /content/ctctranslation/status.html on your Adobe Experience Manager instance.
-
The Status tab of the Translation Status page opens.
![]()
By default, if you are a non-admin user, you can view jobs that you and your team submitted. If you are a member of the Translation Admin group or if Display all jobs and Delete button for non-admin users has been configured for your company in the Folder and Permissions section of the Configuration page, then you can view all company jobs. For more information about these configuration options, refer to the Lionbridge Connector for Adobe Experience Manager Installation and Configuration Guide.
-
To filter the jobs by date, in the Period and to fields, enter the date range of when the jobs were submitted in the
YYYY-MM-DDformat, or select the dates in the calendar that opens.-
To filter the jobs by submitter, in the Submitted By dropdown list:
- Select Me to display all your jobs.
- Select My Team or My Team(s) to display all jobos submitted by members of your team.
-
This tab displays the following information about each translation job:
| Information | Description |
|---|---|
| Job | The name of this translation job. By default this includes the username, date, and time when the job was created, for example: Submit by [admin] @ 2013-12-20 6.57 PM. |
| Created On | The date and time when the job was submitted, in the following format: MM/DD/YYYY h:mm AA, where AA is two upper-case characters reflecting a.m. (after midnight) or p.m. (after noon). |
| Created By | The username of the user who created and submitted this translation job. By default, jobs in this tab are sorted by username. Note: If a translation job was created in Adobe Experience Manager’s translation integration feature, the username is admin. |
| Est. Words | The estimated number of words to translate in the translation job. If there is a number in brackets, it represents the number of words that have been previously translated and are stored in the local TM (translation memory). Note: The number of words in digital assets, such as JPG or PDF files, is not displayed. |
| LSP | This is one of the following:
|
| Liox Job Id | Liox Job Id is the Global Tracking Id, which gets created in content API dashboard for corresponding job in AEM Connector. |
| Preparing | The number of pages in this job that the Connector is currently preparing to send out for translation. |
| Sending | The number of pages in this job that the Connector is currently sending out for translation. |
| Sent out | The number of pages in this job that sent out for translation. |
| In trans | The number of pages in this job that are currently being translated by the translation provider. |
| Received | The number of pages in this job that the Connector has received back from translation. |
| Completed | The number of pages in this job that the Connector has returned to Adobe Experience Manager. If a job was redelivered by the translation provider, then the number of times it was delivered is displayed, in brackets, following the number of pages. For example, if a job has 3 pages and was delivered 4 times, this column displays 3 (D:4). |
| Error | If there is an error with the job, or an error message from the translation provider (LSP) about displayed content items, then the number of errors is displayed in red. Click the number to open another tab, displaying the error details. |
| TM Updating History | * Hold your mouse over the TM icon
|
| Liox job ID | User can double click on the Liox Job ID to copy the ID and then paste it in the content API, and check status of that job in content API. |
By default, the jobs are displayed alphabetically by the value in the Created column.
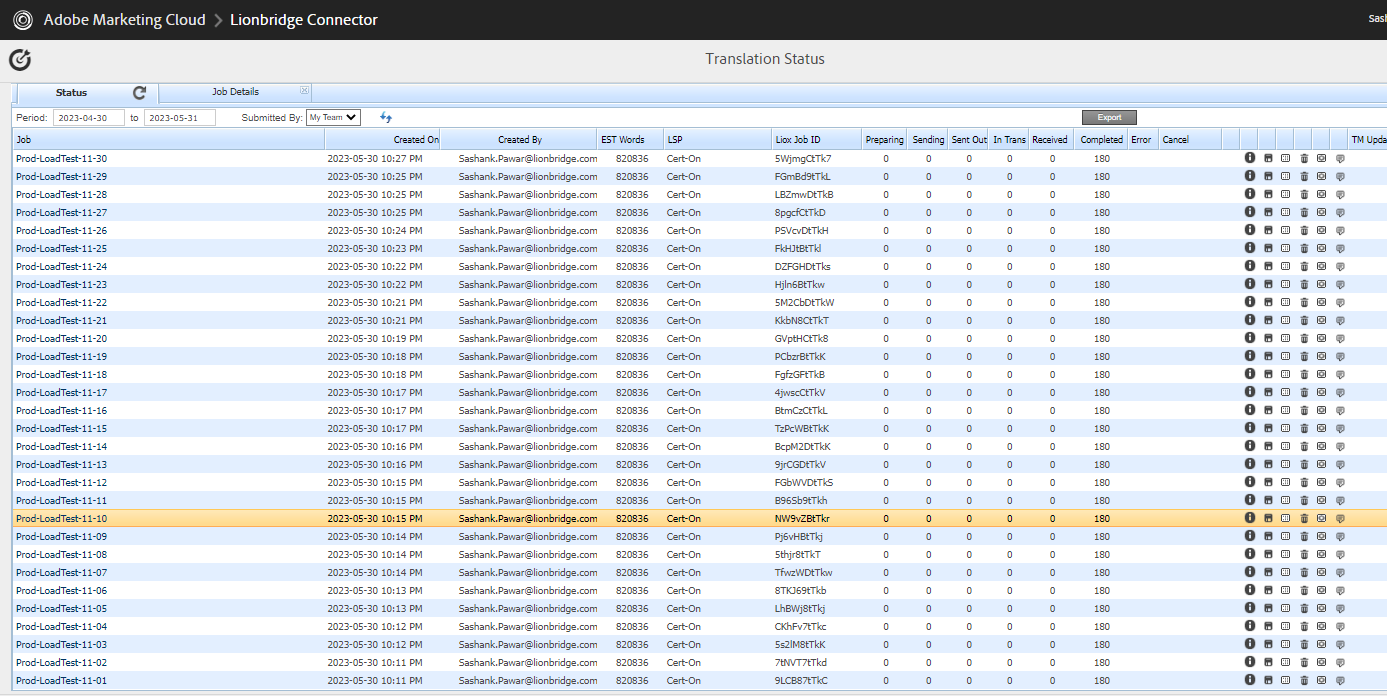
Actions
You can perform the following actions in the Status tab of Translation Status page:
-
To refresh the jobs displayed in the list, click the Refresh icon
 .
. -
To export a summary report about all displayed translation jobs to a Microsoft Excel file (.xls) file, click the Export button in the top-right corner of the Status tab. The Connector downloads the file to your computer.
-
To reverse the sort order or to sort the jobs by another column, click the column heading. The triangle on the right side of the column indicates if the column is sorted in ascending
 or descending
  order.
 -
To view detailed information about each page in a translation job, do one of the following:
-
Click the job name in the Job column.
-
Click the Job Details tab, if it is already open. The job that is already open is highlighted in orange.
-
For details, see Monitoring Pages in a Translation Job and Viewing Translated Content.
-
To cancel the job, in the Cancel column, click Cancel.
-
If the Connector has not yet sent out the job (it has Preparing, Paused, or Sending status), then the the cancellation request is automatically approved. The column displays Approved.
-
Cancel button is not available when translation job is in Sent out, In translation, Translation received and completed status for admin users as well as non-admin users.
-
Important: This step does not cancel the translation job in your LSP. If the Connector has already sent out the job, you must also contact your LSP project manager immediately to cancel the project there.
-
To pause the job if the Connector has not yet sent it out for translation, click the Pause button
 . Depending on your company’s configuration, this button may be available only for users assigned to the Translation Admin group.
 -
To resume a paused job, click the Resume button
 . Depending on your company’s configuration, this button may be available only for users assigned to the Translation Admin group.
 -
To export a report about a translation job to a Microsoft Excel file (.xls) file, click the Export Translation Statuses button
 . The Connector downloads the file to your computer.
Tip: The Source Page column in the report includes the source path. You can use the Load pages button in the Globalization Tool to re-import the source paths of content to send out for translation. For detailed instructions, see Sending Pages and Assets for Translation Using the Globalization Tool.
-
To download a zipped file of the XML files with the content to translate, click the Download Translation Contents button
 .
. -
To delete the translation job, so that the Connector does not send it to the translation provider, and it is removed from the Connector database, click the Delete button
 . A message box opens, confirming that you want to delete this translation job. Click OK to continue.
Tip: To delete multiple translation jobs, press the Ctrl key and click in each row to select the corresponding job. (However, do not click directly on the job name, which opens the Job Details tab.) Then click the Delete button in any row to delete all selected jobs.
Note: This button is available only if you are a member of the Translation Admin group or if your company is configured to display this button for non-admin users.
- To resend the translation job, click the Re-Send button .
The Re-send translation job dialog box opens, enabling you to modify the content items, source and target languages, translation provider, translation options, and job options and specify an LSP-specific configuration for the job to resend. For detailed instructions, see Resending a Translation Job.
- To update the translation memory for this job based on translated pages that you updated, click the Update TM button
 . For detailed instructions, see Updating a Translation Memory for Multiple Pages.
Note: Relevant only if you already updated the translated content of one or more pages in the translation job.
5.3 - Monitoring Pages in a Translation Job and Viewing Translated Content
You monitor the status of individual pages in a translation job in the Job Details tab of the Translation Status page.
- Open the Status tab of the Translation Status page, as described in Monitoring Jobs.
This tab displays the status of jobs that were sent for translation.
- Click a job to view detailed translation-status information for each page in the job in the Job Details tab, which displays information for each page in the job.
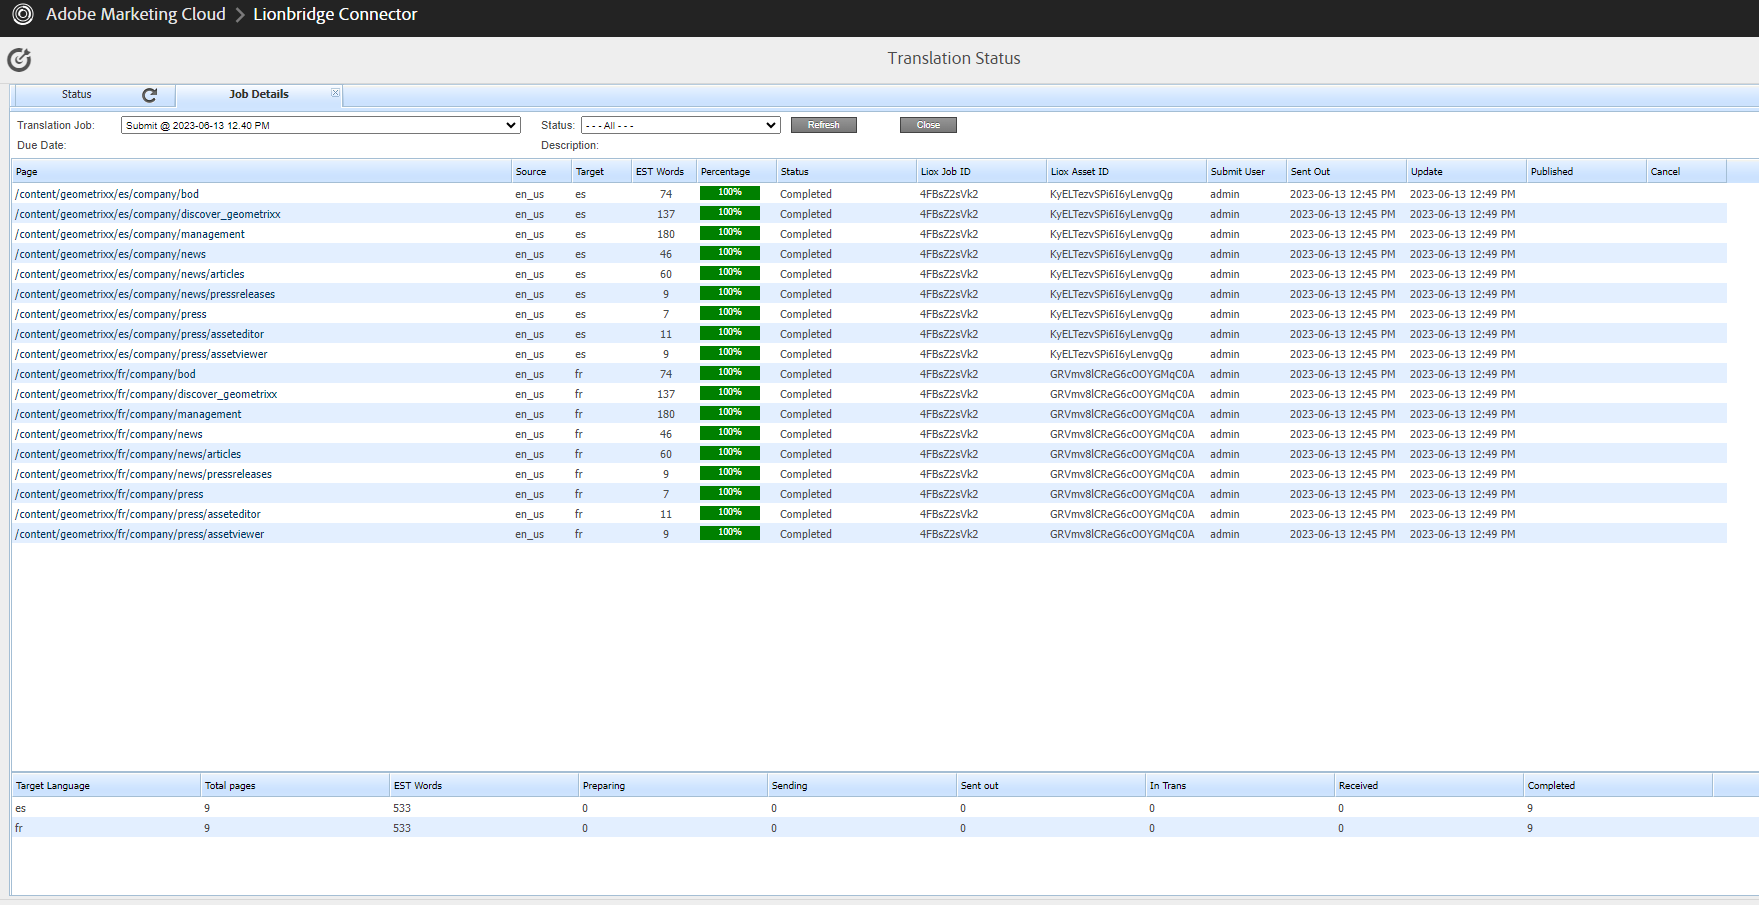
Note: The Job Details tab opens automatically when you send a job for translation from the Translation Queue, described on Submitting Content for Translation from the Translation Queue, or from the Bulk Translation wizard, described on Sending Content for Translation Using the Bulk Translation Wizard.
This page displays the following information about the translation job:
-
Translation Job: The name of the translation job.
-
Description: If a description was entered when the job was sent out for translation, it is displayed here.
This page displays the following information about each page in the translation job:
| Column | Description |
|---|---|
| Page | The path and the name of the page, fragment, i18n dictionary item, tag, form, or digital asset (DAM) sent for translation. |
| Source | The language code of the source language of the page sent for translation. |
| Target | The language codes of the target languages into which to translate the content item. Note: When the Connector is preparing to send out the page for translation, multiple target languages are grouped into a single row. After the page is sent for translation, each target language is displayed in a separate row. |
| Est. Words | The estimated number of words to translate in this page. If there is a number in brackets, it represents the number of words that have been previously translated and are stored in the local TM (translation memory). For digital assets (DAM), this column displays n/a. |
| Percentage | A percentage indicating how much of the content item has been translated. This is based on the translation status, which is described in Translation Statuses. |
| Status | For a list and description of translation statuses, see Translation Statuses. If a content item is in Completed status, and it was redelivered by the translation provider, then the number of times it was delivered is also displayed, in brackets. For example, if a content item was delivered 4 times, this column displays Completed (D:4). |
| Liox Job Id | Liox Job Id is the Global Tracking Id, which gets created in content API dashboard for corresponding job in AEM Connector. |
| Liox Aseet Id | This is an “Asset Task Id” which is created in the Content API dashboard for each language pair for the corresponding job that is sent from AEM connector (Asset tasks are translation tasks for source files. An asset task specifies the necessary information for file transfer, as well as the source language it is in and the target language it needs to be translated into). |
| Submit User | The username of the user who submitted this page for translation. |
| Sent out | Displays the date on which the page was sent for translation and the time it was sent. |
| Updated | Displays the date on which the page was updated and the time it was updated. |
| Published | This column displays the published date, published time, and the user who published the page. For example, it shows as 2020-01-05 11:50AM(admin). For an unpublished page, this column is blank. |
| Liox job ID | User can double click on the Liox Job ID to copy the ID and then paste it in the content API, and check status of that job in content API. |
-
Optional. You can filter which pages are displayed in the list.
From the Translation Job dropdown list, select the translation job whose pages you want to view in the list.
From the Status dropdown list, select the status of the pages to display in the list. For a list and description of statuses, see Translation Statuses.
-
Optional. To view the translated page or fragment, click the link in the Page column. The translated page or fragment opens in a new browser tab. It opens in either the Touch UI or the Classic UI, depending on your company’s configuration. Available only for pages or fragments that have Completed status.
-
Optional. To cancel the translation of a content item, in the Cancel column, click Cancel.
-
If the Connector has not yet sent out the job (it has Preparing, Paused, or Sending status), then the the cancellation request is automatically approved. The column displays Approved.
-
If the Connector has already sent out the job, (it has Sent out, Sent out for quote, Sent to translator, Sent to translator for quote, Quote approved, or Started translation process status), then the column displays the Requested button, which you can click to resend the cancellation request. After approval, the column displays Approved.
Important: This step does not cancel the translation job in your LSP. If the Connector has already sent out the job, you must also contact your LSP project manager immediately to cancel the project there.
The bottom of this page displays a summary of the status of pages and the estimated number of words by target language.
-
To update the translation status of the displayed pages, click the Refresh button.
-
To view information about other translation jobs, click the Close button or click the Status tab. For details, see Monitoring Jobs.
5.4 - Monitoring Translation Jobs Created in Adobe Experience Manager Translation Integration
After you start a translation job in Adobe Experience Manager’s translation integration, you can monitor its progress from within Adobe Experience Manager.
You can monitor translation jobs created in Adobe Experience Manager’s translation integration feature, either:
- From within Adobe Experience Manager, on the corresponding translation project’s Translation Job tile, as described in “Monitoring the Status of a Translation Job” in the Adobe Experience Manager documentation:
- version 6.2: https://helpx.adobe.com/experience-manager/6-2/sites/administering/using/tc-manage.html
- version 6.3: https://helpx.adobe.com/experience-manager/6-3/sites/administering/using/tc-manage.html
- version 6.4: https://helpx.adobe.com/experience-manager/6-4/sites/administering/using/tc-manage.html
- version 6.5: https://helpx.adobe.com/experience-manager/6-5/sites/administering/using/tc-manage.html
Notes: The Scope Requested status is not relevant to jobs sent from Adobe Experience Manager’s translation integration feature using the Connector.
Important: From within Adobe Experience Manager, you can view the status only of translation jobs only that were started in Adobe Experience Manager’s translation integration feature, as described in Sending Content for Translation from Adobe Experience Manager Translation Integration. For example, if content is submitted for translation from the Adobe Experience Manager Sidekick, you cannot monitor its progress from Adobe Experience Manager’s translation integration feature.
- On the Connector’s Translation Status page, as described in Monitoring Jobs and Monitoring Pages in a Translation Job and Viewing Translated Content.
5.5 - Viewing Translated Content from Jobs Created in Adobe Experience Manager Translation Integration
You can view translated content of translation jobs started in Adobe Experience Manager’s translation integration feature, either:
- From within Adobe Experience Manager, if the Translation Job tile displays the Ready for review status, then the translated files are ready for review.
For detailed instructions, see “Reviewing and Promoting Updated Content” in the Adobe Experience Manager documentation:
- version 6.2: https://helpx.adobe.com/experience-manager/6-2/sites/administering/using/tc-manage.html
- version 6.3: https://helpx.adobe.com/experience-manager/6-3/sites/administering/using/tc-manage.html
- version 6.4: https://helpx.adobe.com/experience-manager/6-4/sites/administering/using/tc-manage.html
- version 6.5: https://helpx.adobe.com/experience-manager/6-5/sites/administering/using/tc-manage.html
Note: If some, but not all, pages are translated, then the Translation Job tile displays the Translation in progress status. In this scenario, click Translation Job in the tile to display the list of pages in the project. Select the check box for any page with Ready for review status, and in the top-left corner, click Reveal in Sites.
- In the Connector, on the Job Details tab of the Translation Status page, by clicking the link to the translated page, as described in Monitoring Pages in a Translation Job and Viewing Translated Content.
6 - Post-Translation Tasks
In general, you use the Adobe Experience Manager workflow to review, approve and publish translated content.
After the translation is complete, you can perform the following additional optional tasks:
| Task | Description | Details |
|---|---|---|
| relock unlocked components | If you set your translation setting to unlock translated components after they return from translation, you can use the CTCRestoreOriginalSync workflow to restore the components' original inheritance. | Relocking Unlocked Components |
| update translation memory for a single page | If an in-country reviewer updates your translated content, you can send these updates to the translation memory, so that they will be available to the translation provider for subsequent translations. | Updating a Translation Memory for a Single Page from the Adobe Experience Manager Sidekick |
| update translation memory for multiple pages | Updating a Translation Memory for Multiple Pages | |
| view updates to translation memory | You can review and update translated content and then send these updates to the translation memory, so that they will be available for future translations. | Viewing Updates to a Translation Memory |
| view reports | Open the Reports folder in the Tools console. | Viewing Adobe Experience Manager Reports |
| view log files | View log files to troubleshoot and to optimize your installation. | Viewing Log Files |
6.1 - Relocking Unlocked Components
If you set your translation setting to unlock translated components after they return from translation, you can use the CTCRestoreOriginalSync workflow to restore the components' original inheritance. This translation setting is one of the following:
| Option Name | User Interface |
|---|---|
| Unlock When Done | Sidekick (simple UI with options and wizard with options) |
| Unlock the component after translated content come back | Sidekick workflow |
| Leave Unlock | Translation Queue (columns) |
| Leave component unlock after putting back translated content | Translation Queue (Overwrite section) |
| Unlock the component after translated content come back | Bulk Translation wizard, Options page |
| Unlock the component after translated content come back | I and Default Settings section of the Configuration page (used for rollout) |
In general you set this option when you use roll out a site, Adobe Experience Manager copies the Blueprint (source) to the (target), as described in Adobe Experience Manager’s MSM and the Rollout Process.
To relock unlocked components and restore their inheritance relationship:
-
Ensure that you are using the Adobe Experience Manager Classic UI.
-
Double-click a page to open it with Sidekick, which is a floating toolbar.
-
In Sidekick, click the Workflow tab
 .
. -
In the Workflow tab, select the CTCRestoreOriginalSync workflow from the Workflow list, and then click Start Workflow.
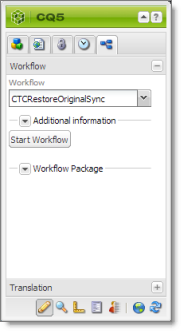
6.2 - Updating a Remote Translation Memory (TM)
After the Connector returns translated content from the translation provider to Adobe Experience Manager, in-country marketers or reviewers can review the translation and update it in Adobe Experience Manager. These reviewers can then send their post-translation updates to their translation technology or provider. The translation provider can then update the translation memory (TM) with these content updates. This means that the updates will be available to the translation provider for subsequent translations. This makes the translation process more efficient.
To send updates to the translation provider’s translation memory:
-
Do one of the following:
-
Send updates for multiple pages in a job from the Translation Status page in the Connector. For detailed instructions, see Updating a Translation Memory for Multiple Pages.
-
Send updates for a single page from the Sidekick, which is available only in Adobe Experience Manager’s Classic UI. For detailed instructions, see Updating a Translation Memory for a Single Page from the Adobe Experience Manager Sidekick.
-
Send updates for a single page from the Touch-Optimzed UI, which is available only in Adobe Experience Manager 6.3 and higher. For detailed instructions, see Updating a Translation Memory for a Single Page from the Touch-Optimized UI (Adobe Experience Manager version 6.3 and higher only).
-
The Connectors sends a TMX file to the translation technology or provider with the updates. This file includes:
- the original source content
- the original translated content
- the updated translated content
- the name of the translation job
- the page path and the property name
Tip: When you send an update for a single page, you can add a comment for your translator about why you are updating the translation for that page.
Best practices for updating a remote translation memory (TM):
-
Make only small post- translation updates in the Adobe Experience Manager authoring environment, and then use this feature to send those updates to the translation provider. If you require large updates or rewrites, discuss this directly with your translation provider to ensure that all changes are captured efficiently. In this scenario, the translation provider can redo the translations and redeliver the updates via the Connector.
-
Create a primary review process for translation that captures most changes to translated content, so that the translation provider can update its TM directly. The secondary review process in Adobe Experience Manager then captures only small and minor post-translation updates.
-
Review your remote TM updates on the TM Update page in the Connector. For detailed instructions, see Viewing Updates to a Translation Memory. If you have any changes that you do not want to send to the remote TM, you can delete them on the TM Update page.
-
A project manager at the translation provider should review the suggested updates and ensure that the translation memory is updated with these changes.
Important: Updating the remote TM is not an automatic process. The translation provider must review all the changes and transform them into a format to update the TM. The translation provider may charge a service fee for this work.
6.2.1 - Updating a Translation Memory for a Single Page from the Adobe Experience Manager Sidekick
After translated content returns from the translation provider to Adobe Experience Manager, you can review the translation and update it. You can then send these updates to the translation memory, so that they will be available to the translation provider for subsequent translations.
If you are using the Adobe Experience Manager Classic UI, you can update translated content and send these changes to the translation memory using Sidekick.
Tips: If you update translated content in multiple pages of a translation job, you can send all the updates to the translation memory in a single action using the Update TM button in the Status tab of the Translation Status page. For details, see Updating a Translation Memory for Multiple Pages. In Adobe Experience Manager version 6.3 and higher, you can update translated content and send these changes to the translation memory from the Touch-Optimized UI. For details, see Updating a Translation Memory for a Single Page from the Touch-Optimized UI (Adobe Experience Manager version 6.3 and higher only).
To update the translation memory for a single page from the Sidekick:
-
In Adobe Experience Manager, click the open icon
 to open a translated page with Sidekick, which is a floating toolbar.
 -
Update the translated content.
-
Reload the page in your browser window.
-
In Sidekick, click the Page tab
. -
In the Page tab, scroll down and click the Update Remote TM option.
Note: This option is available only from a source language page, and only when the Use Local TM check box is not selected on the Configuration page. This option is described in detail in the Lionbridge Connector for Adobe Experience Manager Installation and Configuration Guide.
The Update Remote TM dialog box opens, displaying the paragraph you edited.
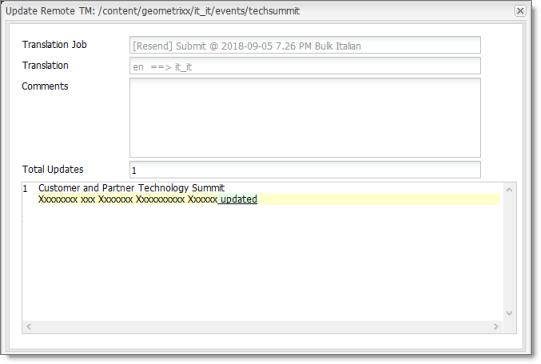
The following information about the translation is displayed in read-only fields at the top of the dialog box:
| Field | Description |
|---|---|
| Translation Job | The name of the translation job in which this page was sent out for translation. |
| Translation | The language code of the source language that was translated, followed by an arrow, followed by the language code of the target language of the translation, for example: en ==> it_it. This indicates that the page was translated from English to Italian. |
| Total Updates | The number of times that this content has been updated. |
- Optional. In the Comments field, you can add a comment for your translator about why you are updating the translation of this page.
The large text box below these fields displays the content:
- The source-language content is displayed on top, with no background.
- The translated content is displayed on a yellow background.
- Your changes to the translated content are displayed on a green background.
- Click Submit.
A message box opens, confirming that the content has been sent to the translation memory.
- Click OK to close the message box and the dialog box.
6.2.2 - Updating a Translation Memory for a Single Page from the Touch-Optimized UI (Adobe Experience Manager version 6.3 and higher only)
After translated content returns from the translation provider to Adobe Experience Manager, you can review the translation and update it. You can then send these updates to the translation memory, so that they will be available to the translation provider for subsequent translations.
In Adobe Experience Manager version 6.3 and higher, you can update translated content and send these changes to the translation memory from the Touch-Optimized UI.
Tips: If you update translated content in multiple pages of a translation job, you can send all the updates to the translation memory in a single action using the Update TM button in the Status tab of the Translation Status page. For details, see Updating a Translation Memory for Multiple Pages. In the Adobe Experience Manager Classic UI, you can also update translated content and send these changes to the translation memory from the Sidekick. For details, see Updating a Translation Memory for a Single Page from the Adobe Experience Manager Sidekick.
To update the translation memory for a single page from the Touch-Optimized UI:
-
In the Adobe Experience Manager Touch-Optimized UI, navigate to the page you want to update.
-
Hover over the page to update, and then click the Edit button
 to open the page for editing.
The page opens for editing in a new browser tab.
-
Click the component to edit, and then click the Edit button
 in the floating toolbar.
 -
Update the translated content.
-
In the top-left corner, click the Page Information icon
. -
In the menu that opens, click Update Remote TM, which is the last menu option.
Note: This option is available only from a target language page, and only when the Use Local TM check box is not selected on the Configuration page. This option is described in detail in the Lionbridge Connector for Adobe Experience Manager Installation and Configuration Guide.
The Update Remote TM dialog box opens, displaying the paragraph you edited.
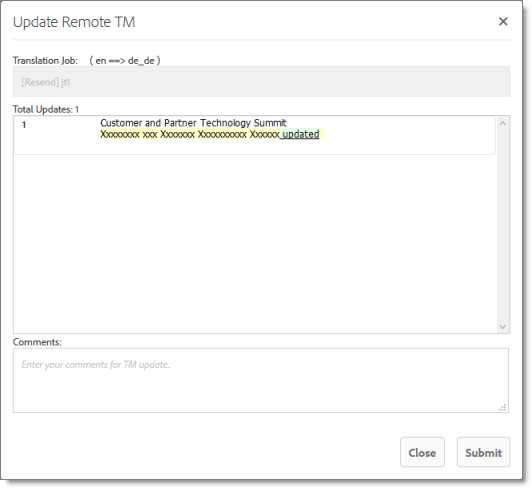
The following information about the translation is displayed in read-only fields at the top of the dialog box:
| Field | Description |
|---|---|
| Translation Job | The name of the translation job in which this page was sent out for translation. The text above the field displays the language code of the source language that was translated, followed by an arrow, followed by the language code of the target language of the translation, for example: en ==> de_de. This indicates that the page was translated from English to German. |
| Total Updates | The number of times that this content has been updated. |
- Optional. In the Comments field, you can add a comment for your translator about why you are updating the translation of this page.
The large text box below these fields displays the updated content:
- The source-language content is displayed on top, with no background.
- The translated content is displayed on a pink background, with strikethrough.
- Your changes to the translated content are displayed on a green background, underlined.
- Click Submit.
A message box at the top of the page indicates that the content was sent to the translation memory.
6.2.3 - Updating a Translation Memory for Multiple Pages
After translated content returns from the translation provider to Adobe Experience Manager, you can review the translation and update it. You can then send these updates to the translation memory, so that they will be available to the translation provider for subsequent translations.
You can send updates for multiple translated pages from the Status tab of Translation Status page.
To update the translation memory for multiple pages in a single job:
-
In Adobe Experience Manager, update one or more translated pages that were part of a single translation job.
-
Do one of the following to open the Status tab of Translation Status page:
![]()
-
In the Touch-Optimized UI of Adobe Experience Manager, click the Tools icon
and then click Lionbridge Connector in the Adobe Experience Manager rail. (This opens the Connector in a new browser tab.) Then, click Translation Status in the Lionbridge Connector rail. -
In the Classic UI of Adobe Experience Manager, scroll down and click Lionbridge Connector in the right pane. Then, click Translation Status in the Lionbridge Connector rail.
-
In your Web browser, navigate to /content/ctctranslation/status.html on your Adobe Experience Manager instance.
For a detailed description of this page, see Monitoring Jobs.
- In the Job column, locate the translation job with the updated translation, and click the Update TM button .
The Update TM] dialog box opens, displaying all the languages in which the translation has been modified.
![]()
- Click Submit to submit the updates to the specified target languages to the translation memory.
A message box opens, confirming that you want to send the updates to the translation memory.
- Click OK to proceed.
6.2.4 - Viewing Updates to a Translation Memory
You can view your in-country reviewers' updates to your translated content that are sent to the translation memory.
To view a list of these updates:
-
Do one of the following to open the TM Update page:
-
In the Touch-Optimized UI of Adobe Experience Manager, click the Tools icon
and then click Lionbridge Connector in the Adobe Experience Manager rail. (This opens the Connector in a new browser tab.) Then, click TM Update in the Lionbridge Connector rail. -
In the Classic UI of Adobe Experience Manager, scroll down and click Lionbridge Connector in the right pane. Then, click TM Update in the Lionbridge Connector rail.
-
In your Web browser, navigate to /content/ctctranslation/updatetm.html on your Adobe Experience Manager instance.
-
The TM Updates tab of the TM Update page opens.
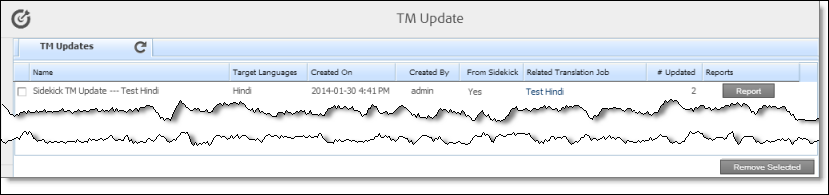
Tip: This page also opens when you click the TM icon
in the Status tab of the Translation Status page. For details, see Monitoring Jobs.
This page displays a list of updates to the translation memory. The page displays the following information about each update:
| Column | Description |
|---|---|
| Name | The name of this update. * For updates sent from the **Translation Status** page, this is a concatenation of TM Update and the name of the translation job. * For updates sent from **Sidekick**, this is a concatenation of Sidekick, TM Update, and the name of the translation job. |
| Target Languages | The language code of the target language of the page that was updated. |
| Created On | The date and time when the page was last updated, in the following format: MM/DD/YYYY h:mm AA, where AA is two upper-case characters reflecting a.m. (after midnight) or p.m. (after noon). |
| Created By | The username of the user who updated the page and sent the update to the translation memory. |
| From Sidekick | Indicates whether or not the user sent the update to the translation memory from the Sidekick. It has the following values: * Yes: The user sent the update from the **Sidekick**. * No: The user did not send the update from the **Sidekick**. The user sent the update from the **Translation Status** page or from the Touch-Optimized UI. |
| Related Translation Job | The name of the translation job in which this page was originally translated. |
| # Updated | The number of updates to this page after the initial translation. |
- To view the update, click Report in the Reports column.
The Update TM Details](#) tab opens.
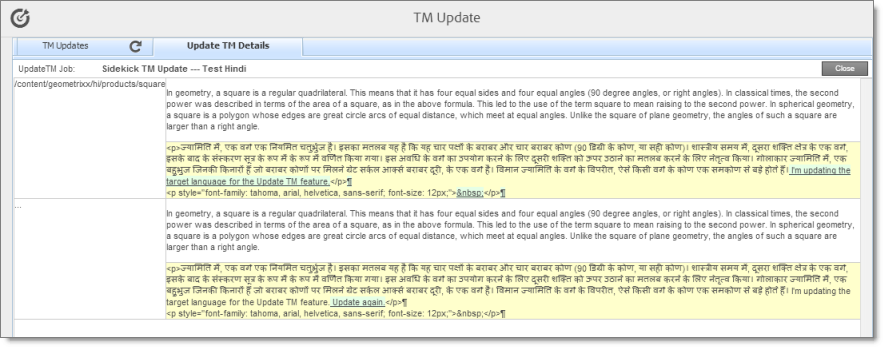
- The left column displays the path of the page that was updated.
- Each row displays a separate update.
- In the right column:
- The source-language content is displayed on top, with no background.
- The translated content is displayed on a yellow background.
- Updates to the translated content are displayed on a green background.
-
Click Close to close this tab and return to the TM Updates tab.
-
Optional. To refresh the list of updates, click the Refresh icon
in the TM Updates tab. -
Optional. To remove updates from this list, select the corresponding check boxes and click Remove Selected at the bottom of the page.
6.3 - Viewing Adobe Experience Manager Reports
The Connector provides a quick link to the Reports folder in the Tools console.
To access this folder, do one of the following:
-
In the Touch-Optimized UI of Adobe Experience Manager, click the Tools icon
and then click Lionbridge Connector in the Adobe Experience Manager rail. (This opens the Connector in a new browser tab.) Then, click Reports in the Lionbridge Connector rail. -
In the Classic UI of Adobe Experience Manager, scroll down and click Lionbridge Connector in the right pane. Then, click Reports in the Lionbridge Connector rail.
For information about Adobe Experience Manager reports, refer to the Adobe Experience Manager documentation, available at: https://helpx.adobe.com/ca/experience-manager/6-5/sites/administering/using/reporting.html.
6.4 - Viewing Log Files
You can view log files to troubleshoot and to optimize your installation.
To view log files:
-
Do one of the following to open the Translation Log page:
-
In the Touch-Optimized UI of Adobe Experience Manager, click the Tools icon
and then click Lionbridge Connector in the Adobe Experience Manager rail. (This opens the Connector in a new browser tab.) Then, click Logs in the Lionbridge Connector rail. -
In the Classic UI of Adobe Experience Manager, scroll down and click Lionbridge Connector in the right pane. Then, click Logs in the Lionbridge Connector rail.
-
In your Web browser, navigate to /content/ctctranslation/ctclog.html on your Adobe Experience Manager instance.
-
The Log Files tab of the Translation Log page opens.
![]()
This page displays a list of log files. There is a different log file for each day and type of file. The page displays the following information about each file:
| Column | Description |
|---|---|
| File | The name of the log file. This is made up of the date and the type of log file, in the following format: YYYY_MM_DD.Type.log, for example: 2014_01_24.Update.log. |
| Type | The type of log file. Each type describes a different type of activities. This is one of the following: * AlarmFields: The Connector checks the specified paths for new components and sends relevant email notifications. * CTT: Captures events that are not captured in other log files, such as workflow messages. The maximum size of this log file is 10 MB. When a log file reaches this size, it is renamed from YYYY_MM_DD.Ctt.log, for example, 2015_06_24.Ctt.log, to YYYY_MM_DD.Ctt.log.1, for example, 2015_05_24.Ctt.log.1. The next time this log file reaches 10 MB, it is renamed to YYYY_MM_DD.Ctt.log.2. These files are stored in the ctcdata/logs folder. * Download: The Connector receives translated files to return to Adobe Experience Manager. * General (type not specified in the file name): General activities, such as connecting to the database and configuring CRX access, which do not fit into other types of log files. * Status: The Connector checks for updates about translation status. * UpdateTM: The Connector updates the translation memory. * Upload: The Connector is preparing to send files for translation. * Web: User actions, such as submitting a new translation job, removing translation files from the queue, creating translation requests based on user actions, such as in the Sidekick UI. |
| Size | The size of the file. |
| Last Updated | The date and time when the file was last updated, in the following format: MM/DD/YYYY h:mm AA, where AA is two upper-case characters reflecting a.m. (after midnight) or p.m. (after noon). |
By default, the list of jobs are displayed in reverse chronological order by the value in the Last Updated column.
-
Optional. To download log files, select the corresponding check boxes and click Download.
-
Click View to view a log file.
The log file opens in a new tab.
- To refresh the information displayed, click the Refresh icon .
- To close the tab displaying the log file, click Close.
- To return to the main page and refresh the list of log files, click the Log Files tab.
Note: You can change the type of information in the log files and the number of days that the Connector maintains logs. For detailed instructions, refer to the Lionbridge Connector for Adobe Experience Manager Installation and Configuration Guide.
7 - Performing Actions on Multiple Pages and Digital Assets
You can use the Globalization Tool to perform actions on multiple pages and digital assets simultaneously, sometimes including multiple language copies of those items. You can perform the following action using the Globalization Tool:
- generate reports
- update page properties
- update DAM (digital-asset) metadata
- activate pages
- deactivate pages
- set future activation date of pages
- lock pages
- unlock pages
- create a new version of pages
- delete multiple pages and the corresponding translated pages
- import page content from XML
- export page content to XML
- copy page metadata
- run workflows
- roll out changes (MSM)
- create livecopy relationships (MSM)
- remove livecopy relationships (MSM)
For detailed instructions on sending out pages for translation using the Globalization Tool, see Sending Pages and Assets for Translation Using the Globalization Tool.
Important: By default, this feature is hidden. To use the Globalization Tool, you must select the Show Globalization Tool check box in the UI and Default Settings section of the Configuration page. For detailed instructions, refer to the Lionbridge Connector for Adobe Experience Manager Installation and Configuration Guide.
To perform bulk actions on multiple pages and digital assets:
- Do one of the following to open the Globalization Tool:
-
In the Touch-Optimized UI of Adobe Experience Manager, click the Tools icon
and then click Lionbridge Connector in the Adobe Experience Manager rail. (This opens the Connector in a new browser tab.) Then, click Globalization Tool in the Lionbridge Connector rail. -
In the Classic UI of Adobe Experience Manager, scroll down and click Lionbridge Connector in the right pane. Then, click Globalization Tool in the Lionbridge Connector rail
-
In your Web browser, navigate to /content/ctctranslation/advbulk.html on your Adobe Experience Manager instance.
The Globalization Tool opens.
-
Optional. If you are a member of multiple teams, then in the Profile dropdown list, select the team profile to use with the Globalization Tool. This displays the source and target languages and the translation providers specified for the team profile. To always use the selected profile with the Globalization Tool, click Set as default.
-
In the Select Pages section, you either set the parent path of one or more files to upload, apply filters, and then use an agent to upload the files, or you upload one or more files containing the paths of pages. You repeat this step until you have added all the paths and files to add. Do one of the following to select pages:
- To set the parent path of one or more files to upload, apply filters, and then use an agent to upload the files:
a. In the Search from Site Path field, specify the highest root folder of all source pages or the full path of a page of a website. Either:
-
Click the arrow at the end of the field
, navigate to that path, select it, and click Select. -
Type the path in one of the following formats: /content/geometrixx/en or
http://localhost:4502/content/geometrixx/en/company.html.
Tips: You can select a previously entered path. Alternatively, you can click Load Saved to load the last set of previously saved page paths to the list.
b. Optional. Specify any of the following filters:
| Filter | Description | How To Specify… |
|---|---|---|
| Modification Filter | The range of dates when the page was modified. | * In the From and To boxes, enter the dates in YYYY-MM-DD format. * Select the **Apply modification filter** check box. |
| Publishing Filter | The range of dates when the page was published. | * In the From and To boxes, enter the dates in YYYY-MM-DD format. * Select the **Apply publishing filter** check box. |
| Off time (expiration) | The range of dates when the page was off time, or unpublished. | * In the From and To boxes, enter the dates in YYYY-MM-DD format. * Select the Apply offtime filter check box. |
| On time | The range of dates when the page was on time. | * In the From and To boxes, enter the dates in YYYY-MM-DD format. * Select the **Apply ontime filter** check box. |
| Page template filter | The Adobe Experience Manager template used to create the page. | Select the check boxes for the templates to include, or select the check box in the list header to include all templates. |
Tip: For precise descriptions of some of these terms, refer to the Adobe Experience Manager documentation, available at: https://docs.adobe.com/docs/en/aem/6-2/author/page-authoring/publishing-pages.html.
c. Optional. In the Page activation state section, select one or more of the following activation states for the pages to include:
- Activated: The page has been activated (published).
- DeActivated: The page was activated (published) and then deactivated (unpublished).
- Never Activated: The page has never been activated (published).
d. In the Search Using Agent field, select an agent to collect items to send for translation. Select a custom agent or one of the following pre-configured agents from the list:
-
Get current page: Default. The agent collects the root page of the path specified in the Search from Site Path box, above.
-
Get all children pages: The agent collects all children pages of the path specified in the Search from Site Path box, above. It does not collect any pages in the root path.
-
Get current page and all children pages: The agent collects the root page and all children pages of the path specified in the Search from Site Path box, above.
e. Click Add.
You can repeat these steps to add multiple sets of pages with different root folders to the list of pages.
- To upload a file with the paths of the source content or import pages from a previously sent translation job, click the Load pages button:
The Select a file to upload dialog box opens.
Do one of the following:
-
To upload a file with the paths of the source content:
-
Click Choose File.
-
In the browser dialog box that opens, navigate to the XLS or CSV file containing the paths of the source files, select it, and click Open, or similar, to close the browser dialog box.
-
The Select a file to upload dialog box displays the path of the file you selected.
-
Click Upload to upload the file.
A message box confirms that the file is added.
- Click OK to close the message box.
The specified agent collects all items that match the search criteria and adds them to the list. You can repeat these steps to add additional files containing paths of pages to the list.
-
-
To import pages from a previously sent translation job:
a. In the Import pages from translation job – From dropdown list, select the time range of previous translation jobs to display. The default value is Last two weeks.
b. Click the Refresh icon
 to populate the list of previous translation jobs in the list below.
c. Select the previous translation job to import from the dropdown list at the bottom of the dialog box.
d. Click Import.
The Connectors adds the content items from the selected job to the list.
The following summary information is displayed in the Pages x/y field, where:
- X is the total number of pages available for selection.
- Y is the number of pages selected to send out for translation.
The following information is displayed about each page:
| Column | Description |
|---|---|
| blank | A locked padlock icon indicates if the page is locked. |
| Path | The path to the page. Tip: Click the link to open the page, fragment, or form in a new browser tab. The page opens in either the Touch UI or the Classic UI, depending on your company’s configuration. |
| Lng | The Adobe Experience Manager language of the page. |
| Loc | The Adobe Experience Manager locale of the page. |
| Template | The Adobe Experience Manager template used to create the page. |
| T. Status | Optional. The custom translation status configured for the translation provider (LSP) that translated the page. Note: This column is displayed only if custom translation-status values are configured. For instructions, refer to the Lionbridge Connector for Adobe Experience Manager Installation and Configuration Guide. |
| Activation | Whether the page is activated or deactivated. |
| Activation/De-Activation Date | * The date and time when the page was last activated or de-activated, in the following format: YYYY-MM-DD kk:mm:ss, where kk is the hour represented by a 24-hour clock. * The username of the user who activated or deactivated the page. * One of the following codes, indicating whether the page was last activated or de-activated: * CTA: Activated * CTD: Deactivated. |
| Modification | * The date and time when the item was last modified, in the following format: YYYY-MM-DD kk:mm:ss, where kk is the hour represented by a 24-hour clock. * The (m) following the date and time indicates that the item was modified. The username of the user who last modified the item is displayed in parentheses, for example, [admin]. * One of the following codes, indicating how the page was last modified: * CTT: Translation * CTU: Update * CTI: Import* CTR: Rollout |
- Highlight pages to apply actions from the tabs (in the bottom part of the page) to them. The tabs are described in step 8, below.
To highlight a page, click in the corresponding row.
Note: Do not click the actual path in the Path column, because that is a link to the page.
- To highlight multiple adjacent pages, press and hold the Shift key.
- To highlight multiple non-adjacent pages, press and hold the Ctrl key.
- To highlight all the pages in the list, click Highlight All.
- To remove the highlight all the pages in the list, click Remove Highlighted.
- Optional. Use the following features to update the page list:
- To remove all the pages from the list, even if they are highlighted, click Clear.
- To update information about pages displayed in list, such as modification date, click Refresh.
- To switch the language version of all highlighted pages in the list, click Switch Languages. A dialog box opens, displaying the available language versions. Highlight one or more languages, and click Switch.
Tip: This enables you to roll out content from secondary Blueprint pages to country pages. For example, you can roll out content from us-en to
xa-en(Asia English) and then fromxa-entokr-koand other country sites. To roll out content, you use the Rollout tab of the Globalization Tool, as described in Rolling Out Changes to Multiple Pages.
To save the page paths displayed in the list, so that you can reload them later, click Save.
-
Optional. To view a page, click the path in the Path column. The page opens in a new browser tab.
-
Specify settings for highlighted pages in the list in the following tabs:
Note: For a description of the Translation tab, see Sending Pages and Assets for Translation Using the Globalization Tool.
| Tab | Description | For Details, See |
|---|---|---|
| Reporting | You can generate the following Adobe Experience Manager reports about multiple pages: * **Field report:** Displays which of specified fields are in multiple pages, including multiple language versions of these pages. * **Lock report:** Displays which of multiple pages, including multiple language versions of these pages, are locked or unlocked. * **Content report:** Displays the relationships between multiple page paths and all associated language versions. * **Sitemap report:** Displays the sitemap relationships among multiple pages for all languages. * **Translation report:** Displays the translation history for a date range and specified LSPs (translation providers) and TMSs. |
Generating Reports about Multiple Pages |
| Page Property Updating | You can update page properties for multiple pages, including multiple language copies of those pages. | Updating Page Properties for Multiple Pages |
| DAM Metadata Update | You can update the metadata of multiple digital assets, including multiple language copies of those digital assets. | Updating Metadata of Multiple Digital Assets |
| Activation | You can perform the same action on multiple pages, including multiple language copies. You can perform the following types of actions: * activate pages * deactivate pages * set future activation date of pages * lock pages * unlock pages * create a new version of pages * delete pages and the corresponding translated pages * import page content from XML * export page content to XML |
Activating Multiple Pages and Digital Assets |
| Copy Metadata | You can copy metadata to multiple pages, including multiple language copies of those pages. This includes copying metadata from source Blueprint pages to the corresponding livecopy language copies of those pages. | Copying Metadata to Multiple Pages |
| Run Workflows | You can run workflows on multiple pages, including multiple language copies of those pages. | Running Workflows on Multiple Pages |
| Rollout | You can perform the following MSM (Multi Site Manager) tasks on multiple pages, including language versions of those pages: * rolling out changes from the source (Blueprint) pages to the target (live copy), including language versions of those pages * creating livecopy relationships from the source (Blueprint) pages to the target (live copy), including language versions of those pages * removing livecopy relationships between the source (Blueprint) pages to the target (live copy), including language versions of those pages |
Performing Rollout Tasks on Multiple Pages |
7.1 - Generating Reports about Multiple Pages
You use the Reporting tab of the Globalization Tool to generate reports about multiple pages that you highlight in the page list in the Globalization Tool.
You can generate the following reports:
| Report Name | Description | For Detailed Instructions, See… |
|---|---|---|
| Field Report | Displays which of specified fields are in multiple pages, including multiple language versions of these pages. Note: In the Report Fields Configuration section of the Advanced Settings page, you can configure which fields are available for selection when generating the Field report from the Reporting tab of the Globalization Tool. For detailed instructions, refer to the Lionbridge Connector for Adobe Experience Manager Installation and Configuration Guide. |
Field Report |
| Lock Report | Displays which of multiple pages, including multiple language versions of these pages, are locked or unlocked. | Lock Report |
| Content Report | Displays the relationships between multiple page paths and all associated language versions. | Content Report |
| Sitemap Report | Displays the sitemap relationships among multiple pages for all languages. | Sitemap Report |
| Translation Report | Displays the translation history for a date range and specified LSPs (translation providers) and TMSs. | Translation Report |
7.1.1 - Field Report
You can generate the Field report about multiple pages, which displays which of the specified fields are in multiple pages, including multiple language versions of these pages.
The report includes field contents for multiple language versions of the selected pages. This information is displayed in a separate tab in the Microsoft Excel file for each language version. It can indicate if pages are missing specific language versions.
If configured, it can also include the PageTemplate and PageType Adobe Experience Manager standard fields and the custom TranslationStatus field.
Note: You can configure which fields are available for selection when generating the Field report. For detailed instructions, refer to the Lionbridge Connector for Adobe Experience Manager Installation and Configuration Guide.
To generate the Field report:
- In the Globalization Tool, display and highlight the pages you want this report to include. For detailed instructions, see Performing Actions on Multiple Pages and Digital Assets.
- To highlight a page, click in the corresponding row.
Note: Do not click the actual path in the Path column, because that is a link to the page.
- To highlight multiple adjacent pages, press and hold the Shift key.
- To highlight multiple non-adjacent pages, press and hold the Ctrl key.
- To highlight all the pages in the list, click Highlight All.
- To remove the highlight from all the pages in the list, click Remove Highlighted.
- To update the numbers of selected pages, highlighted pages, and total pages at the top-left corner of the list, click Re-Count.
- The number after the check box displays the number of selected pages.
- The number after the highlight displays the number of highlighted pages.
- The number after the slash ( / ) displays the total number of pages.
For example:
Important: Ensure that you highlight the pages in the list, instead of selecting the check boxes.
- In the bottom of the Globalization Tool, click the Reporting tab.
You generate the Field report in the leftmost section of this tab, which is highlighted in the following screen capture:
- In the dropdown list at the top of the section, select whether to generate the report for the highlighted pages in the source language or in the specified target languages. Select one of the following:
- Highlighted Pages for Languages: The Connector will generate the report for highlighted pages in the languages selected in the list below the dropdown list. All source and target languages defined for your team profile are displayed in this list.
- To select multiple adjacent languages, press and hold the Shift key.
- To select multiple non-adjacent languages, press and hold the Ctrl key.
- Highlighted Pages Only: The Connector will generate the report for highlighted pages only.
- In the Fields list, select the fields to include in the generated report. By default, all available fields are selected.
- To select multiple adjacent fields, press and hold the Shift key.
- To select multiple non-adjacent fields, press and hold the Ctrl key.
- Click Field Report.
The Submit a new task dialog box opens.
The generated report will be displayed as a task on the Backend Tasks page.
- Define the parameters for this task:
| Field | Description |
|---|---|
| Priority | One of the following priority levels for this task: * Normal: The Connector generates the corresponding report with normal priority. * Urgent: The Connector generates the corresponding report before generating reports for tasks with Normal priority. * Wait for approval: This task must be approved before the Connector generates the corresponding report. |
| Task Name | The name of the report, as it will be displayed on the Backend Tasks page. |
| Notification | To receive an email notification when the report is generated and ready for viewing, select the Need email notification check box. |
| Email addresses | If you selected the Need email notification check box, described above, enter the email addresses that will receive a notification when the report is generated and ready for viewing. |
- Click Submit.
A message box states that the task has been saved.
- Click OK to close the message box.
You can access your report from the Backend Tasks page, which you open by clicking Tasks in the Lionbridge Connector rail. If the task requires approval before the report is generated, you can approve it there. For detailed instructions, see Managing Tasks and Accessing Reports.
7.1.2 - Lock Report
You can generate the Lock report about multiple pages. This report displays which pages, including multiple language versions, are locked or unlocked.
To generate the Lock report:
- In the Globalization Tool, display and highlight the pages you want this report to include. For detailed instructions, see Performing Actions on Multiple Pages and Digital Assets.
- To highlight a page, click in the corresponding row.
Note: Do not click the actual path in the Path column, because that is a link to the page.
- To highlight multiple adjacent pages, press and hold the Shift key.
- To highlight multiple non-adjacent pages, press and hold the Ctrl key.
- To highlight all the pages in the list, click Highlight All.
- To remove the highlight from all the pages in the list, click Remove Highlighted.
- To update the numbers of selected pages, highlighted pages, and total pages at the top-left corner of the list, click Re-Count.
- The number after the check box displays the number of selected pages.
- The number after the highlight displays the number of highlighted pages.
- The number after the slash ( / ) displays the total number of pages.
For example:
Important: Ensure that you highlight the pages in the list, instead of selecting the check boxes.
- In the bottom of the Globalization Tool, click the Reporting tab.
You generate the Lock report in the middle section of this tab, which is highlighted in the following screen capture:
- Select the languages for which to generate the report for the highlighted pages in the list.
- To select multiple adjacent languages, press and hold the Shift key.
- To select multiple non-adjacent languages, press and hold the Ctrl key.
- Click Lock Report.
The Submit a new task dialog box opens.
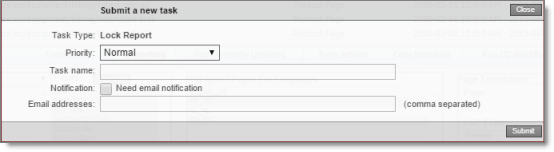
The generated report will be displayed as a task on the Backend Tasks page.
- Define the parameters for this task:
| Field | Description |
|---|---|
| Priority | One of the following priority levels for this task: * Normal: The Connector generates the corresponding report with normal priority. * Urgent: The Connector generates the corresponding report before generating reports for tasks with Normal priority. * Wait for approval: This task must be approved before the Connector generates the corresponding report. |
| Task Name | The name of the report, as it will be displayed on the Backend Tasks page. |
| Notification | To receive an email notification when the report is generated and ready for viewing, select the Need email notification check box. |
| Email addresses | If you selected the Need email notification check box, described above, enter the email addresses that will receive a notification when the report is generated and ready for viewing. |
- Click Submit.
A message box states that the task has been saved.
- Click OK to close the message box.
You can access your report from the Backend Tasks page, which you open by clicking Tasks in the Lionbridge Connector rail. If the task requires approval before the report is generated, you can approve it there. For detailed instructions, see Managing Tasks and Accessing Reports.
7.1.3 - Content Report
You can generate the Content report about multiple pages. This report displays the relationships between multiple page paths and all associated language versions.
To generate the Content report:
- In the Globalization Tool, display and highlight the pages you want this report to include. For detailed instructions, see Performing Actions on Multiple Pages and Digital Assets.
- To highlight a page, click in the corresponding row.
Note: Do not click the actual path in the Path column, because that is a link to the page.
- To highlight multiple adjacent pages, press and hold the Shift key.
- To highlight multiple non-adjacent pages, press and hold the Ctrl key.
- To highlight all the pages in the list, click Highlight All.
- To remove the highlight from all the pages in the list, click Remove Highlighted.
- To update the numbers of selected pages, highlighted pages, and total pages at the top-left corner of the list, click Re-Count.
- The number after the check box displays the number of selected pages.
- The number after the highlight displays the number of highlighted pages.
- The number after the slash ( / ) displays the total number of pages.
For example:
Important: Ensure that you highlight the pages in the list, instead of selecting the check boxes.
- In the bottom of the Globalization Tool, click the Reporting tab.
You generate the Content report in the middle section of this tab, which is highlighted in the following screen capture:
- Select the languages for which to generate the report for the highlighted pages in the list.
- To select multiple adjacent languages, press and hold the Shift key.
- To select multiple non-adjacent languages, press and hold the Ctrl key.
- Click Content Report.
The Submit a new task dialog box opens.
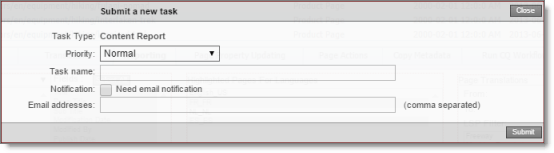
The generated report will be displayed as a task on the Backend Tasks page.
- Define the parameters for this task:
| Field | Description |
|---|---|
| Priority | One of the following priority levels for this task: * Normal: The Connector generates the corresponding report with normal priority. * Urgent: The Connector generates the corresponding report before generating reports for tasks with Normal priority. * Wait for approval: This task must be approved before the Connector generates the corresponding report. |
| Task Name | The name of the report, as it will be displayed on the Backend Tasks page. |
| Notification | To receive an email notification when the report is generated and ready for viewing, select the Need email notification check box. |
| Email addresses | If you selected the Need email notification check box, described above, enter the email addresses that will receive a notification when the report is generated and ready for viewing. |
- Click Submit.
A message box states that the task has been saved.
- Click OK to close the message box.
You can access your report from the Backend Tasks page, which you open by clicking Tasks in the Lionbridge Connector rail. If the task requires approval before the report is generated, you can approve it there. For detailed instructions, see Managing Tasks and Accessing Reports.
7.1.4 - Sitemap Report
You can generate the Sitemap report about multiple pages. This report displays the sitemap relationships among multiple pages for all languages.
To generate the Sitemap report:
- In the Globalization Tool, display and highlight the pages you want this report to include. For detailed instructions, see Performing Actions on Multiple Pages and Digital Assets.
- To highlight a page, click in the corresponding row.
Note: Do not click the actual path in the Path column, because that is a link to the page.
- To highlight multiple adjacent pages, press and hold the Shift key.
- To highlight multiple non-adjacent pages, press and hold the Ctrl key.
- To highlight all the pages in the list, click Highlight All.
- To remove the highlight from all the pages in the list, click Remove Highlighted.
- To update the numbers of selected pages, highlighted pages, and total pages at the top-left corner of the list, click Re-Count.
- The number after the check box displays the number of selected pages.
- The number after the highlight displays the number of highlighted pages.
- The number after the slash ( / ) displays the total number of pages.
For example:
Important: Ensure that you highlight the pages in the list, instead of selecting the check boxes.
- In the bottom of the Globalization Tool, click the Reporting tab.
You generate the Sitemap report in the middle section of this tab, which is highlighted in the following screen capture:
- Select the languages for which to generate the report for the highlighted pages in the list.
- To select multiple adjacent languages, press and hold the Shift key.
- To select multiple non-adjacent languages, press and hold the Ctrl key.
- Click Sitemap Report.
The Submit a new task dialog box opens.
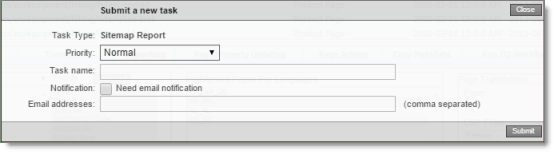
The generated report will be displayed as a task on the Backend Tasks page.
- Define the parameters for this task:
| Field | escription |
|---|---|
| Priority | One of the following priority levels for this task: * Normal: The Connector generates the corresponding report with normal priority. * Urgent: The Connector generates the corresponding report before generating reports for tasks with Normal priority. * Wait for approval: This task must be approved before the Connector generates the corresponding report. |
| Task Name | The name of the report, as it will be displayed on the Backend Tasks page. |
| Notification | To receive an email notification when the report is generated and ready for viewing, select the Need email notification check box. |
| Email addresses | If you selected the Need email notification check box, described above, enter the email addresses that will receive a notification when the report is generated and ready for viewing. |
- Click Submit.
A message box states that the task has been saved.
- Click OK to close the message box.
You can access your report from the Backend Tasks page, which you open by clicking Tasks in the Lionbridge Connector rail. If the task requires approval before the report is generated, you can approve it there. For detailed instructions, see Managing Tasks and Accessing Reports.
7.1.5 - Translation Report
You can generate the Translation report. This report displays the translation history for a date range for the specified LSPs (translation providers) and TMSs.
Note: This report does not reference highlighted pages.
To generate the Translation report:
- In the bottom of the Globalization Tool, click the Reporting tab.
You generate the Translation report in the rightmost section of this tab, which is highlighted in the following screen capture:

-
In the From and To fields, select the date range to include in the generated report.
-
In the LSP Filter section, select the LSPs (translation providers) for which to generate the report.
- To select multiple adjacent LSPs, press and hold the Shift key.
- To select multiple non-adjacent LSPs, press and hold the Ctrl key.
- To select all LSPs, click All.
- To clear all selected LSPs, click None.
- In the TMS Filter section, select the TMSs for which to generate the report.
- To select multiple adjacent TMSs , press and hold the Shift key.
- To select multiple non-adjacent TMSs , press and hold the Ctrl key.
- To select all TMSs , click All.
- To clear all selected TMSs , click None.
- Click Translation Report.
The Submit a new task dialog box opens.
![]()
The generated report will be displayed as a task on the Backend Tasks page.
- Define the parameters for this task:
| Field | Description |
|---|---|
| Priority | One of the following priority levels for this task: * **Normal:** The Connector generates the corresponding report with normal priority. * **Urgent:** The Connector generates the corresponding report before generating reports for tasks with Normal priority. * **Wait for approval:** This task must be approved before the Connector generates the corresponding report. |
| Task Name | The name of the report, as it will be displayed on the Backend Tasks page. |
| Notification | To receive an email notification when the report is generated and ready for viewing, select the Need email notification check box. |
| Email addresses | If you selected the Need email notification check box, described above, enter the email addresses that will receive a notification when the report is generated and ready for viewing. |
- Click Submit.
A message box states that the task has been saved.
- Click OK to close the message box.
You can access your report from the Backend Tasks page, which you open by clicking Tasks in the Lionbridge Connector rail. If the task requires approval before the report is generated, you can approve it there. For detailed instructions, see Managing Tasks and Accessing Reports.
7.2 - Updating Page Properties for Multiple Pages
You use the Page Property Updating tab of the Globalization Tool to update page properties for multiple pages that you highlight in the page list in the Globalization Tool, including multiple language copies of those pages.
Note: If the Connector is configured to translate and copy metadata fields, these are displayed in the right side of the tab. For information about this feature, refer to the Lionbridge Connector for Adobe Experience Manager Installation and Configuration Guide.
To update page properties for multiple pages:
- In the Globalization Tool, display and highlight the pages for which you want to update the page properties. For detailed instructions, see Performing Actions on Multiple Pages and Digital Assets.
- To highlight a page, click in the corresponding row.
Note: Do not click the actual path in the Path column, because that is a link to the page.
- To highlight multiple adjacent pages, press and hold the Shift key.
- To highlight multiple non-adjacent pages, press and hold the Ctrl key.
- To highlight all the pages in the list, click Highlight All.
- To remove the highlight of all the pages in the list, click Remove Highlighted.
- To update the numbers of selected pages, highlighted pages, and total pages at the top-left corner of the list, click Re-Count.
- The number after the check box displays the number of selected pages.
- The number after the highlight displays the number of highlighted pages.
- The number after the slash ( / ) displays the total number of pages.
For example:
Important: Ensure that you highlight the pages in the list, instead of selecting the check boxes.
- In the bottom of the Globalization Tool, click the Page Property Updating tab.
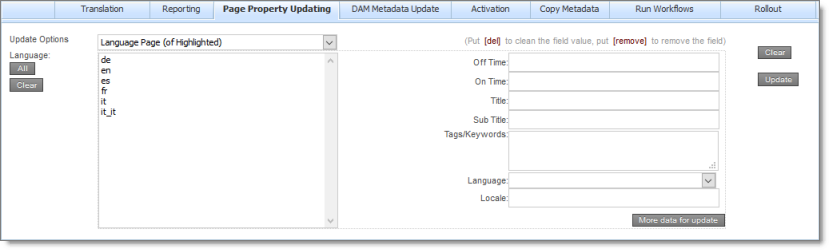
- In the Update Options dropdown list, select one of the following:
- Highlighted Page: The Connector will update the page properties for the highlighted pages.
- Language Page (of Highlighted): The Connector will update the page properties for highlighted pages in the languages selected in the Language section. All source and target languages defined for your team profile are displayed in this list.
- Highlighted Page and Language Page: The Connector will update the page properties for the highlighted pages and in the languages selected in the Language section. All source and target languages defined for your team profile are displayed in this list.
- In the Language section, select the language copies of the highlighted pages that will have updated page properties. This is relevant only if Language Page (of Highlighted) or Highlighted Page and Language Page is selected in the Update Options dropdown list, as described in the previous step.
- To select multiple adjacent languages, press and hold the Shift key.
- To select multiple non-adjacent languages, press and hold the Ctrl key.
- To select all languages, click All.
- To clear all selected languages, click Clear.
- In the right side of the tab, you specify the page properties to update and their values. For a description of these page properties, refer to the Adobe Experience Manager documentation, available at: https://helpx.adobe.com/experience-manager/6-3/sites/authoring/using/editing-page-properties.html.
- To remove a value from a page property, type [del] in the corresponding field.
- To remove a page property, type [remove] in the corresponding field.
- To clear all values, including those in the Language section, click Clear.
- To display additional page-property fields, click More data for update. The page expands, displaying additional fields. Click this button again to collapse the page.
- Click Update.
The Submit a new task dialog box opens.
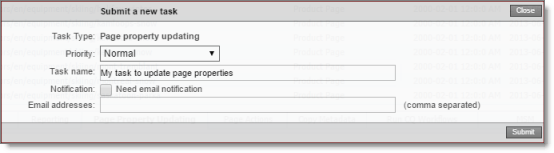
Updating page properties will be displayed as a task on the Backend Tasks page.
- Define the parameters for this task:
| Field | Description |
|---|---|
| Priority | The priority level for this task. This is one of the following: * Normal: The Connector executes this task with normal priority. * Urgent: The Connector executes this task before executing tasks with Normal priority. * Wait for approval: This task must be approved before the Connector executes it. |
| Task Name | The name of the task, as it will be displayed on the Backend Tasks page. |
| Notification | To receive an email notification when the task is executed, select the Need email notification check box. |
| Email addresses | If you selected the Need email notification check box, described above, enter the email addresses that will receive a notification when the task is executed. |
- Click Submit.
A message box states that the task has been saved.
- Click OK to close the message box.
You can view your task on the Backend Tasks page, which you open by clicking Tasks in the Lionbridge Connector rail. If the task requires approval before the report is generated, you can approve it there. For detailed instructions, see Managing Tasks and Accessing Reports.
7.3 - Updating Metadata of Multiple Digital Assets
You use the DAM Metadata Update tab of the Globalization Tool to update the metadata of multiple digital assets that you highlight in the list in the Globalization Tool, including multiple language copies of those digital assets.
To update metadata of multiple digital assets:
- In the Globalization Tool, display and highlight the digital assets for which you want to update the metadata. For detailed instructions, see Performing Actions on Multiple Pages and Digital Assets.
- To highlight a digital asset, click in the corresponding row.
Note: Do not click the actual path in the Path column, because that is a link to the digital asset.
- To highlight multiple adjacent digital assets, press and hold the Shift key.
- To highlight multiple non-adjacent digital assets, press and hold the Ctrl key.
- To highlight all the digital assets in the list, click Highlight All.
- To remove the highlight of all the digital assets in the list, click Remove Highlighted.
- To update the numbers of selected digital assets, highlighted digital assets, and total digital assets at the top-left corner of the list, click Re-Count.
- The number after the check box displays the number of selected digital assets.
- The number after the highlight displays the number of highlighted digital assets.
- The number after the slash ( / ) displays the total number of digital assets.
For example:
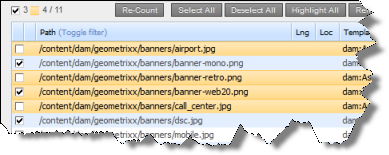
Important: Ensure that you highlight the pages in the list, instead of selecting the check boxes.
- In the bottom of the Globalization Tool, click the DAM Metadata Update tab.
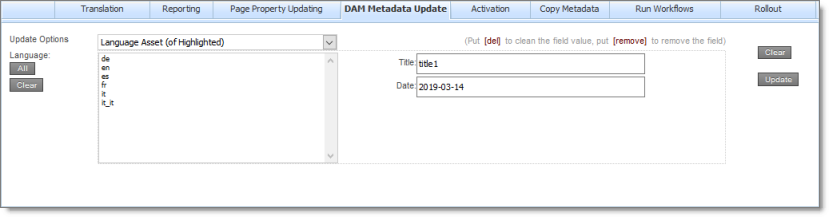
- In the Update Options dropdown list, select one of the following:
- Highlighted Asset: The Connector will update the metadata of the highlighted digital assets.
- Language Asset(of Highlighted): The Connector will update the metadata of the highlighted digital assets in the languages selected in the Language section. All target languages defined for your team profile are displayed in this list.
Note: Languages that are defined only as source languages for your team profile are not displayed here.
- Highlighted Asset and Language Asset: The Connector will update the metadata for highlighted digital assets and in the languages selected in the Language section. All source and target languages defined for your team profile are displayed in this list.
- In the Language section, select the language copies of the highlighted assets that will have updated metadata. This is relevant only if Language Asset (of Highlighted) or Highlighted Asset and Language Asset is selected in the Update Options dropdown list, as described in the previous step.
- To select multiple adjacent languages, press and hold the Shift key.
- To select multiple non-adjacent languages, press and hold the Ctrl key.
- To select all languages, click All.
- To clear all selected languages, click Clear.
- In the right side of the tab, you specify the metadata fields to update and their new values. These fields are defined in the DAM Metadata Configuration section of the Advanced Settings page. For detailed instructions, refer to the Lionbridge Connector for Adobe Experience Manager Installation and Configuration Guide.
- To remove a value from a metadata field, type [del] in that field.
- To remove a metadata field, type [remove] in that field.
- To clear all values, including those in the Language section, click Clear.
- Click Update.
The Submit a new task dialog box opens.
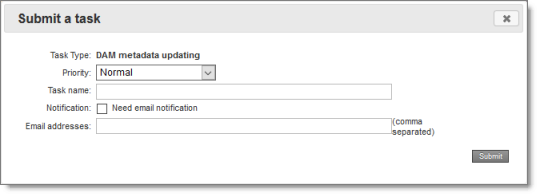
DAM metadata updating will be displayed as a task on the Backend Tasks page.
- Define the parameters for this task:
| Field | Description |
|---|---|
| Priority | The priority level for this task. This is one of the following: * Normal: The Connector executes this task with normal priority. * Urgent: The Connector executes this task before executing tasks with Normal priority. * Wait for approval: This task must be approved before the Connector executes it. |
| Task Name | The name of the task, as it will be displayed on the Backend Tasks page. |
| Notification | To receive an email notification when the task is executed, select the Need email notification check box. |
| Email addresses | If you selected the Need email notification check box, described above, enter the email addresses that will receive a notification when the task is executed. |
- Click Submit.
A message box states that the task has been saved.
- Click OK to close the message box.
You can view your task on the Backend Tasks page, which you open by clicking Tasks in the Lionbridge Connector rail. If the task requires approval before the report is generated, you can approve it there. For detailed instructions, see Managing Tasks and Accessing Reports.
7.4 - Activating Multiple Pages
You use the Activation tab of the Globalization Tool to perform the same action on multiple pages that you highlight in the list in the Globalization Tool, including multiple language copies of those items. You can perform the following types of actions:
- activate pages
- deactivate pages
- set future activation date of pages
- lock pages
- unlock pages
- create a new version of pages
- delete pages and the corresponding translated pages
- import page content from XML
- export page content to XML
To perform actions on multiple pages:
- In the Globalization Tool, display and highlight the pages on which you want to perform the actions. For detailed instructions, see Performing Actions on Multiple Pages and Digital Assets.
- To highlight a page, click in the corresponding row.
Note: Do not click the actual path in the Path column, because that is a link to the page.
- To highlight multiple adjacent pages, press and hold the Shift key.
- To highlight multiple non-adjacent pages, press and hold the Ctrl key.
- To highlight all the pages in the list, click Highlight All.
- To remove the highlight all the pages in the list, click Remove Highlighted.
- To update the numbers of selected, highlighted, and total pages at the top-left corner of the list, click Re-Count.
- The number after the check box displays the number of selected pages.
- The number after the highlight displays the number of highlighted pages.
- The number after the slash ( / ) displays the total number of pages.
For example:
Important: Ensure that you highlight the pages in the list, instead of selecting the check boxes.
- In the bottom of the Globalization Tool, click the Activation tab.
- In the dropdown list at the top of the page, select one of the following:
- Highlighted pages for languages: The Connector will perform the action on the highlighted pages in the languages selected in the section below the dropdown list. All source and target languages defined for your team profile are displayed in this list.
- Highlighted pages only: The Connector will perform the action on the highlighted pages.
- In the section below the dropdown list, select the language copies of the highlighted pages on which you will perform the action. This is relevant only if Highlighted pages for languages was selected in the dropdown list, as described in the previous step.
- To select multiple adjacent languages, press and hold the Shift key.
- To select multiple non-adjacent languages, press and hold the Ctrl key.
- Do one of the following to specify which action to perform:
-
To activate the specified pages, in the Activate/Deactivate section, click Activate.
-
To deactivate the specified pages, in the Activate/Deactivate section, click Deactivate.
-
To set the future activation date of the specified pages, in the Activate Later section: a. Click in the Activation Date field and select the activation date in the calendar that opens. b. In the adjacent dropdown list, select the activation time. c. Click Activate Later.
-
To lock the specified pages, in the Page Lock/Unlock section, click Lock.
-
To unlock the specified pages, in the Page Lock/Unlock section, click Unlock.
-
To create a new version for the specified pages, in the Versioning section, click Create new version.
-
To delete the specified pages, in the Page Deletion section, click Delete highlighted pages and their translated pages.
-
To export page content for the specified pages to XML, on the right side of the tab, select the languages for the language copies of the pages to export, and then click Export XML.
-
To import page content for the specified pages from XML, on the right side of the tab, select the languages for the language copies of the pages to import, and then click Import XML.
- Click Update.
The Submit a new task dialog box opens.
The action will be displayed as a task on the Backend Tasks page.
- Define the parameters for this task:
| Field | Description |
|---|---|
| Priority | The priority level for this task. This is one of the following: * Normal: The Connector executes this task with normal priority. * Urgent: The Connector executes this task before executing tasks with Normal priority. * Wait for approval: This task must be approved before the Connector executes it. |
| Task Name | The name of the task, as it will be displayed on the Backend Tasks page. |
| Notification | To receive an email notification when the task is executed, select the Need email notification check box. |
| Email addresses | If you selected the Need email notification check box, described above, enter the email addresses that will receive a notification when the task is executed. |
- Click Submit.
A message box states that the task has been saved.
- Click OK to close the message box.
You can view your task on the Backend Tasks page, which you open by clicking Tasks in the Lionbridge Connector rail. If the task requires approval before the report is generated, you can approve it there. For detailed instructions, see Managing Tasks and Accessing Reports.
7.5 - Copying Metadata to Multiple Pages
You use the Copy Metadata tab of the Globalization Tool to copy metadata to multiple pages that you highlight in the page list in the Globalization Tool, including multiple language copies of those pages. This includes copying metadata from source Blueprint pages to the corresponding livecopy language copies of those pages.
As an optional next step, you can then send out for translation, as a single job, the metadata that was copied over. For details, see Sending Metadata in Multiple Pages for Translation.
Note: In the Page Metadata Configuration section of the Advanced Settings page, you configure which metadata fields are available for selection in the Copy Metadata tab. For detailed configuration instructions, refer to the Lionbridge Connector for Adobe Experience Manager Installation and Configuration Guide.
To copy metadata to multiple pages:
- In the Globalization Tool, display and highlight the pages to which you want to copy metadata. For detailed instructions, see Performing Actions on Multiple Pages and Digital Assets.
- To highlight a page, click in the corresponding row.
Note: Do not click the actual path in the Path column, because that is a link to the page.
- To highlight multiple adjacent pages, press and hold the Shift key.
- To highlight multiple non-adjacent pages, press and hold the Ctrl key.
- To highlight all the pages in the list, click Highlight All.
- To remove the highlight of all the pages in the list, click Remove Highlighted.
- To update the numbers of selected pages, highlighted pages, and total pages at the top-left corner of the list, click Re-Count.
- The number after the check box displays the number of selected pages.
- The number after the highlight displays the number of highlighted pages.
- The number after the slash ( / ) displays the total number of pages.
For example:
Important: Ensure that you highlight the pages in the list, instead of selecting the check boxes.
- In the bottom of the Globalization Tool, click the Copy Metadata tab.
- In the Metadata Updating Options dropdown list, select one of the following:
- Copy from highlighted pages to languages: The Connector will copy the specified metadata from the highlighted pages to the corresponding language copies of those pages. You specify the languages in the section below the list. All source and target languages defined for your team profile are displayed in this list.
- Copy from Blueprint for languages: The Connector copies to the livecopy pages specified in the Language list from the corresponding livecopy source pages.
- In the section below the Metadata Updating Options dropdown list, select the language copies of the highlighted pages to which the Connector will copy the specified metadata.
- To select multiple adjacent languages, press and hold the Shift key.
- To select multiple non-adjacent languages, press and hold the Ctrl key.
- In the Metadata fields to copy section, you select which metadata fields to copy.
Select the check boxes for the metadata fields to copy, or select the Check All check box to select the check boxes for all available metadata fields.
Note: By default, no fields are configured. You must configure these fields in the Page Metadata Configuration section of the Advanced Settings page. For detailed instructions, refer to the Lionbridge Connector for Adobe Experience Manager Installation and Configuration Guide.
- Click Update metadata.
The Submit a new task dialog box opens.
Copying metadata will be displayed as a task on the Backend Tasks page.
- Define the parameters for this task:
| Field | Description |
|---|---|
| Priority | The priority level for this task. This is one of the following: * Normal: The Connector executes this task with normal priority. * Urgent: The Connector executes this task before executing tasks with Normal priority. * Wait for approval: This task must be approved before the Connector executes it. |
| Task Name | The name of the task, as it will be displayed on the Backend Tasks page. |
| Notification | To receive an email notification when the task is executed, select the Need email notification check box. |
| Email addresses | If you selected the Need email notification check box, described above, enter the email addresses that will receive a notification when the task is executed. |
- Click Submit.
A message box states that the task has been saved.
- Click OK to close the message box.
You can view your task on the Backend Tasks page, which you open by clicking Tasks in the Lionbridge Connector rail. If the task requires approval before the report is generated, you can approve it there. For detailed instructions, see Managing Tasks and Accessing Reports.
Important: If you want to send out for translation the metadata that was copied over, first ensure that the Copy metadata task you submitted, described above, has completed. Next, follow the instructions in Sending Metadata in Multiple Pages for Translation.
7.5.1 - Sending Metadata in Multiple Pages for Translation
After you copy metadata to multiple pages in the Copy Metadata tab of the Globalization Tool, as described in Copying Metadata to Multiple Pages, you can send the copied metadata for translation as a single job.
Important: Ensure that the Copy metadata task is complete before sending out the copied metadata for translation.
Note: In the Page Metadata Configuration section of the Advanced Settings page, you configure which metadata fields are available for selection in the Copy Metadata tab. For detailed configuration instructions, refer to the Lionbridge Connector for Adobe Experience Manager Installation and Configuration Guide.
To send for translation metadata that was copied to multiple pages:
- In the Globalization Tool, display and highlight the pages to which you want to copy metadata. For detailed instructions, see Performing Actions on Multiple Pages and Digital Assets.
- To highlight a page, click in the corresponding row.
Note: Do not click the actual path in the Path column, because that is a link to the page.
- To highlight multiple adjacent pages, press and hold the Shift key.
- To highlight multiple non-adjacent pages, press and hold the Ctrl key.
- To highlight all the pages in the list, click Highlight All.
- To remove the highlight of all the pages in the list, click Remove Highlighted.
- To update the numbers of selected pages, highlighted pages, and total pages at the top-left corner of the list, click Re-Count.
- The number after the check box displays the number of selected pages.
- The number after the highlight displays the number of highlighted pages.
- The number after the slash ( / ) displays the total number of pages.
For example:
Important: Ensure that you highlight the pages in the list, instead of selecting the check boxes.
Tip: Ensure that you highlight the same pages that you highlighted previously, when you copied over the metadata, as described in Copying Metadata to Multiple Pages.
- In the bottom of the Globalization Tool, click the Copy Metadata tab.
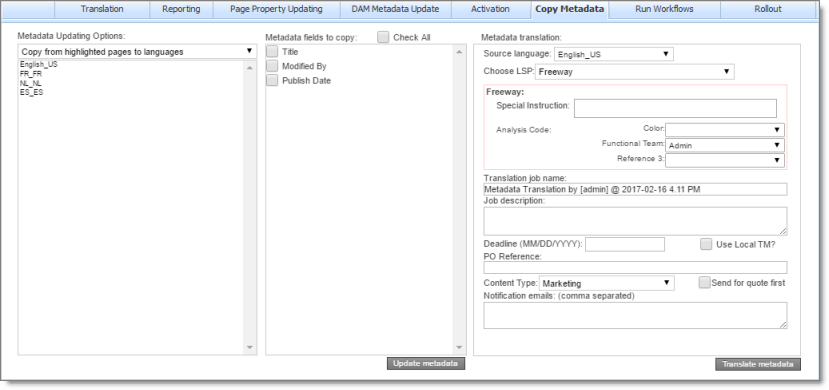
Note: When sending out metadata for translation, the Connector ignores the setting in the Metadata Updating Options dropdown list. That setting is relevant only when copying metadata.
- In the section below the Metadata Updating Options dropdown list, select the language copies of the highlighted pages to which the Connector will copy the specified metadata.
Tip: Select the same languages that you selected previously, when you copied over the metadata.
- To select multiple adjacent languages, press and hold the Shift key.
- To select multiple non-adjacent languages, press and hold the Ctrl key.
- In the Metadata fields to copy section, you select which metadata fields to copy.
Select the check boxes for the metadata fields to copy, or select the Check All check box to select the check boxes for all available metadata fields.
Tip: Select the same languages that you selected previously, when you copied over the metadata.
Note: By default, no fields are configured. You must configure these fields in the Page Metadata Configuration section of the Advanced Settings page. For detailed instructions, refer to the Lionbridge Connector for Adobe Experience Manager Installation and Configuration Guide.
- In the Metadata translation section, enter the following translation settings:
| Field | Description |
|---|---|
| Source language | Select the source language for translation. The Connector will send metadata in this source language for translation. |
| Choose LSP | Select your translation provider (LSP). If you select Lionbridge Freeway, the section expands to display additional fields. |
| Special Instruction | Any additional instructions for Freeway, which are sent as metadata. Available only if the selected translation provider in the Choose LSP box, above, is the Lionbridge Freeway Type. |
| Analysis Code | The analysis codes for the translation. Displayed only if Lionbridge Freeway is selected in the Choose LSP box, above. You specify the analysis codes that are relevant to your content. Your Lionbridge setup determines which analysis codes are available for you to specify, and the values available for selection for each analysis code. In this example, the Color, Functional Team, and Reference 3 analysis codes are available for you to specify. |
| Translation job name | Your name for this translation job. By default this includes information that this is a metadata translation job, the username, date, and time when you created the job, for example: Metadata Translation by [admin] @ 2017-02-16 4.11 PM. This is stored in the CQJobName attribute in the XML that the Connector sends to the translation provider. |
| Job description | Additional information about this job. This is stored in the CQJobDescription attribute in the XML that the Connector sends to the translation provider. |
| Deadline | The date you are requesting for the translated content to return. Click in the field and select a date in the calendar that opens. This information is sent to the translation provider as metadata of the translation package. Recommendation: Discuss whether to use this feature with your translation provider(s). |
| Use Local TM? | This feature determines whether to check each component in the source version of the item for any content changes, and send only changed components out for translation. If a component was previously translated and it has not changed, then the Connector does not send it for translation again: Instead, it uses the stored translation. This feature reduces the quantity of content that the Connector sends to translation providers, which reduces your cost. However, it needs the Connector translation backup data, and it increases the Connector processing time before sending out the items for translation. * If this check box is selectedcolumn has a value of Yes, the Connector checks whether content was already translated before sending it out for translation. * If this check box is clearedcolumn is blank, the Connector sends out content for translation without checking whether it has already been translated. |
| PO Reference | The purchase order reference number for this translation job. |
| Content Type | You can tag the content in a translation job as a specific content type. Depending on your company’s configuration, the Content API Platform may send the content to a specific translation provider based on the content type. Select one of the following content types: * Marketing * Technical * Legal **Note:** You may see different content types if your company has configured custom content types. |
| Send for quote first | Select this check box to inform the translation provider that you want to receive a quote before the translation process starts. Note: This check box is displayed only if the selected translation provider is configured to support providing a quote before the translation process starts. |
| Notification emails | Enter one or more email addresses that will receive notification when the content leaves Adobe Experience Manager and when it returns to Adobe Experience Manager. Use a comma to separate multiple email addresses. |
- Click Translate metadata.
The Connector sends the translation job to the translation provider you specified.
7.6 - Running Workflows on Multiple Pages
You use the Run Workflows tab of the Globalization Tool to run workflows on multiple pages that you highlight in the page list in the Globalization Tool, including multiple language copies of those pages.
Note: In the Workflow Selections section of the Advanced Settings page, you configure which workflows are available for selection in the Run Workflows tab. For detailed configuration instructions, refer to the Lionbridge Connector for Adobe Experience Manager Installation and Configuration Guide.
To run workflows on multiple pages:
- In the Globalization Tool, display and highlight the pages on which you want to run workflows. For detailed instructions, see Performing Actions on Multiple Pages and Digital Assets.
- To highlight a page, click in the corresponding row.
Note: Do not click the actual path in the Path column, because that is a link to the page.
- To highlight multiple adjacent pages, press and hold the Shift key.
- To highlight multiple non-adjacent pages, press and hold the Ctrl key.
- To highlight all the pages in the list, click Highlight All.
- To remove the highlight of all the pages in the list, click Remove Highlighted.
- To update the numbers of selected pages, highlighted pages, and total pages at the top-left corner of the list, click Re-Count.
- The number after the check box displays the number of selected pages.
- The number after the highlight displays the number of highlighted pages.
- The number after the slash ( / ) displays the total number of pages.
For example:
Important: Ensure that you highlight the pages in the list, instead of selecting the check boxes.
- In the bottom of the Globalization Tool, click the Run Workflows tab.
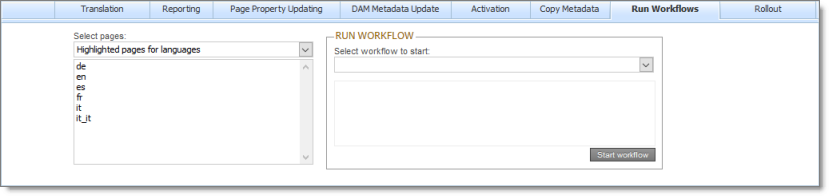
- In the Select pages dropdown list, select one of the following:
- Highlighted pages for languages: The Connector will run the selected workflow on the highlighted pages for the corresponding language copies of those pages. You specify the languages in the section below the list. All source and target languages defined for your team profile are displayed in this list.
- Highlighted pages only: The Connector will run the selected workflow on the highlighted pages.
- In the section below the Select pages dropdown list, select the language copies of the highlighted pages on which the Connector will run the selected workflow. This is relevant only if you selected Highlighted pages for languages from the Select pages dropdown list.
- To select multiple adjacent languages, press and hold the Shift key.
- To select multiple non-adjacent languages, press and hold the Ctrl key.
- In the Run Workflow section, you select the workflow to run from the Select workflow to start dropdown list. When you select a workflow in the list, its description is displayed below.
Note: By default, no workflows are configured for selection. You must configure these workflows in the Workflow Selections section of the Advanced Settings page. For detailed instructions, refer to the Lionbridge Connector for Adobe Experience Manager Installation and Configuration Guide.
- Click Start workflow.
The Submit a new task dialog box opens.
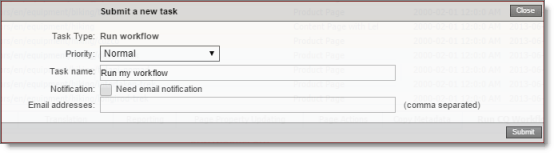
Running the workflow will be displayed as a task on the Backend Tasks page.
- Define the parameters for this task:
| Field | Description |
|---|---|
| Priority | The priority level for this task. This is one of the following: * Normal: The Connector executes this task with normal priority. * Urgent: The Connector executes this task before executing tasks with Normal priority. * Wait for approval: This task must be approved before the Connector executes it. |
| Task Name | The name of the task, as it will be displayed on the Backend Tasks page. |
| Notification | To receive an email notification when the task is executed, select the Need email notification check box. |
| Email addresses | If you selected the Need email notification check box, described above, enter the email addresses that will receive a notification when the task is executed. |
- Click Submit.
A message box states that the task has been saved.
- Click OK to close the message box.
You can view your task on the Backend Tasks page, which you open by clicking Tasks in the Lionbridge Connector rail. If the task requires approval before the report is generated, you can approve it there. For detailed instructions, see Managing Tasks and Accessing Reports.
7.7 - Performing Rollout Tasks on Multiple Pages
You use the Rollout tab of the Globalization Tool to perform the following rollout tasks on multiple pages, including language versions of those pages:
| Rollout Task | For Detailed Instructions, See… |
|---|---|
| rolling out changes from the highlighted source (Blueprint) pages to the target (live copy), including language versions of those pages | Rolling Out Changes to Multiple Pages |
| resuming livecopy relationships from the highlighted source (Blueprint) pages to the target (live copy), including language versions of those pages | Resuming or Suspending Livecopy Relationships on Multiple Pages |
| suspending livecopy relationships between the highlighted source (Blueprint) pages to the target (live copy), including language versions of those pages |
7.7.1 - Rolling Out Changes to Multiple Pages
You use the MSM Rollout section in the Rollout tab of the Globalization Tool to roll out changes from the highlighted source (Blueprint) pages to the target (live copy), including language versions of those pages.
To roll out changes to multiple pages:
- In the Globalization Tool, display and highlight the Blueprint pages you want to roll out. For detailed instructions, see Performing Actions on Multiple Pages and Digital Assets.
- To highlight a page, click in the corresponding row.
Note: Do not click the actual path in the Path column, because that is a link to the page.
- To highlight multiple adjacent pages, press and hold the Shift key.
- To highlight multiple non-adjacent pages, press and hold the Ctrl key.
- To highlight all the pages in the list, click Highlight All.
- To remove the highlight of all the pages in the list, click Remove Highlighted.
- To update the numbers of selected pages, highlighted pages, and total pages at the top-left corner of the list, click Re-Count.
- The number after the check box displays the number of selected pages.
- The number after the highlight displays the number of highlighted pages.
- The number after the slash ( / ) displays the total number of pages.
For example:
Important: Ensure that you highlight the pages in the list, instead of selecting the check boxes.
- In the bottom of the Globalization Tool, click the Rollout tab.
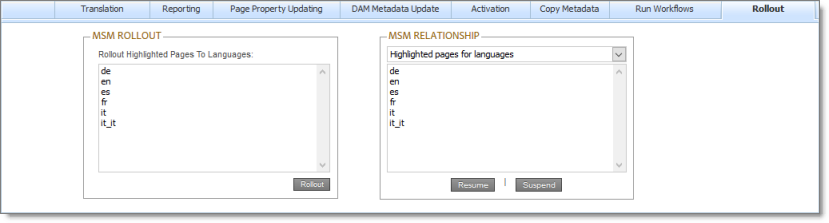
- In the MSM Rollout section, select the language version of the target (live copy) pages to which the Connector will roll out the Blueprint pages.
- To select multiple adjacent languages, press and hold the Shift key.
- To select multiple non-adjacent languages, press and hold the Ctrl key.
- Click Rollout.
A message box states that the Connector will roll out the highlighted pages to the specified target languages.
- Click OK to close the message box.
A progress bar indicates the rollout progress.
7.7.2 - Resuming or Suspending Livecopy Relationships on Multiple Pages
You use the MSM Relationship section in the Rollout tab of the Globalization Tool to resume or suspend livecopy relationships from the highlighted source (Blueprint) pages to the target (live copy), including language versions of those pages.
Note: The livecopy relationship is resumed, rather than created, based on the assumption that the page was a livecopy of the Blueprint. Similarly, a livecopy relationship is suspended, rather than deleted. The functionality described in this section is relevant only for pages that are already in a livecopy relationship. It is not applicable to non-related pages.
To resume or suspend livecopy relationships on multiple pages:
- In the Globalization Tool, display and highlight the source (Blueprint) pages for which you want to resume or suspend livecopy relationships. For detailed instructions, see Performing Actions on Multiple Pages and Digital Assets.
- To highlight a page, click in the corresponding row.
Note: Do not click the actual path in the Path column, because that is a link to the page.
- To highlight multiple adjacent pages, press and hold the Shift key.
- To highlight multiple non-adjacent pages, press and hold the Ctrl key.
- To highlight all the pages in the list, click Highlight All.
- To remove the highlight of all the pages in the list, click Remove Highlighted.
- To update the numbers of selected pages, highlighted pages, and total pages at the top-left corner of the list, click Re-Count.
- The number after the check box displays the number of selected pages.
- The number after the highlight displays the number of highlighted pages.
- The number after the slash ( / ) displays the total number of pages.
For example:
Important: Ensure that you highlight the pages in the list, instead of selecting the check boxes.
- In the bottom of the Globalization Tool, click the MSM tab.
-
In the MSM Relationship section, select one of the following options from the dropdown list:
- Highlighted pages for languages: The Connector will resume or suspend livecopy relationships on the highlighted pages for the corresponding language versions of those pages. You specify the languages in the section below the list. All source and target languages defined for your team profile are displayed in this list.
- Highlighted pages only: The Connector will resume or suspend livecopy relationships on the highlighted pages.
-
If you selected Highlighted pages for languages in the previous step, then select the language versions of the Blueprint pages for which the Connector will resume or suspend livecopy relationships.
- To select multiple adjacent languages, press and hold the Shift key.
- To select multiple non-adjacent languages, press and hold the Ctrl key.
-
Do one of the following:
- To resume the livecopy relationships, click Resume.
- To suspend the livecopy relationships, click Suspend.
The Submit a new task dialog box opens.
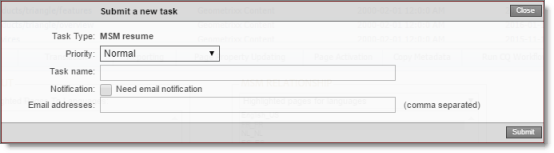
The MSM task will be displayed on the Backend Tasks page.
- Define the parameters for this task:
| Field | Description |
|---|---|
| Priority | The priority level for this task. This is one of the following: * Normal: The Connector executes this task with normal priority. * Urgent: The Connector executes this task before executing tasks with Normal priority. * Wait for approval: This task must be approved before the Connector executes it. |
| Task Name | The name of the task, as it will be displayed on the Backend Tasks page. |
| Notification | To receive an email notification when the task is executed, select the Need email notification check box. |
| Email addresses | If you selected the Need email notification check box, described above, enter the email addresses that will receive a notification when the task is executed. |
- Click Submit.
A message box states that the task has been saved.
- Click OK to close the message box.
You can view your task on the Backend Tasks page, which you open by clicking Tasks in the Lionbridge Connector rail. If the task requires approval before the report is generated, you can approve it there. For detailed instructions, see Managing Tasks and Accessing Reports.
8 - Managing Tasks and Accessing Reports
If you created a task in the Globalization Tool, you can view and update the priority of this task in the Backend Tasks page. You can also access generated reports from this page.
To manage tasks and access generated reports:
- Do one of the following to open the Backend Tasks page:
- In the Touch-Optimized UI of Adobe Experience Manager, click the Tools icon and then click Lionbridge Connector in the Adobe Experience Manager rail. (This opens the Connector in a new browser tab.) Then, click Tasks in the Lionbridge Connector rail.
- In the Classic UI of Adobe Experience Manager, scroll down and click Lionbridge Connector in the right pane. Then, click Tasks in the Lionbridge Connector rail.
- In your Web browser, navigate to /content/ctctranslation/tasks.html on your Adobe Experience Manager instance.
The Tasks tab of the Backend Tasks page opens.

This tab displays tasks that were created in the Globalization Tool. If your task generated a report, you can access it here.
- Optional. You can filter the list of tasks by date.
- In the Period and to date fields, enter the date range of when the tasks were submitted, in the following format:
YYYY-MM-DD, or click in the date fields and select the dates in the calendar that opens. - Click the Refresh icon to update the list based on your selection and with any new tasks that were added since opening the page.
The following information is displayed about each task in the list:
| Column | Description |
|---|---|
| Name | The name of the task, which you created when you submitted it. |
| Type | The type of task. * For a report-generation task, you can see a list and description of report types in Generating Reports about Multiple Pages. * For other tasks, this is related to the type of action you performed before submitting the task. |
| Details | Click the ellipsis button to display additional information about the parameters of the task. This information is displayed in the pane below the list. The parameters that are displayed depend on the type of task. For detailed information about the report parameters, see the description of the specific report type: * For a report-generation task, you can see a list and description of report parameters: * Field Report * Lock Report * Content Report * Sitemap Report * Translation Report * For other tasks,refer to the description of the relevant user interface in a tab at the bottom of the Globalization Tool. |
| Created | The date and time that this task was submitted, in the following format: YYYY-MM-DD h:mm AA, where AA is two upper-case characters reflecting a.m. (after midnight) or p.m. (after noon). |
| By | The username of the user who created and submitted the task. |
| Priority | The priority level for this task. This is one of the following: * Normal: The Connector executes this task with normal priority. * Urgent: The Connector executes this task before executing tasks with Normal priority. * Wait for approval: This task must be approved before the Connector executes it. |
| Status | The status of the report-generation task. This is one of the following: * Waiting: The task has not yet been completed, so the report has not yet been generated. This may be because the task priority is Wait for approval, or it may be because there are currently other tasks being processed. * Completed: The task has been completed, and the report has been generated. * Cancelled: The task has been cancelled, and the corresponding report will not be generated. |
| Report | If the task has Completed status, you can view the corresponding generated report by clicking the link to it. |
| Information | If the task has Completed status, this displays the date and time that this report was generated, in the following format: YYYY-MM-DD h:mm AA, where AA is two upper-case characters reflecting a.m. (after midnight) or p.m. (after noon). |
- You can change the priority level of tasks if they have not yet been executed. This step is required for tasks submitted with the Wait for approval priority level.
Note: You cannot change the priority level for a task with Cancelled or Completed status.
a. In the list, highlight the tasks whose priority level you want to change. For example, highlight the tasks with the Wait for approval priority level.
Important: Do not select the check boxes for the tasks.
- To select multiple adjacent tasks, press and hold the Shift key.
- To select multiple non-adjacent tasks, press and hold the Ctrl key.
b. In the Priority dropdown list in the top-left corner of the page, select the new priority level to apply to the highlighted tasks. For example, select the Normal priority level.
c. Click Change for highlighted tasks.
The priority changes for the highlighted tasks. If any tasks with the Wait for approval priority level now have the Normal priority level, they are ready to be executed.
You can also perform the following actions on this page:
- To update the list for recently added tasks or for changes to the date filter at the top of the page, click the Refresh icon .
- To view or download a generated report in XLS format, click the link in the Report column.
- To view the parameters of a task, click the ellipsis button in the Details column.
The parameters are displayed in the bottom pane of the page, below the task list.
- To cancel tasks for reports that the Connector has not yet executed:
Important: You cannot execute tasks (including generating reports) for tasks that you cancel.
- Highlight the tasks to cancel. The tasks must have Waiting status.
Important: Do not select the check boxes for the tasks.
- To select all tasks, click the Check All button at the top of the page.
- To select multiple adjacent tasks, press and hold the Shift key.
- To select multiple non-adjacent tasks, press and hold the Ctrl key.
- To clear all selected tasks, click the Uncheck All button at the top of the page.
- Click Cancel highlighted tasks.
The status of the tasks changes to Cancelled.
- To delete tasks:
Important: Download any generated report for a task before you delete it. Otherwise, you will lose the report.
- Select the check boxes for the tasks to delete.
Tip: To select all tasks, click the Check All button at the top of the page.
- Click Delete selected tasks.
A message box confirms that you want to delete the tasks.
- Click OK to continue.
The tasks are deleted. If the tasks had Completed status, the corresponding generated reports are also deleted.