| Issue | Description |
|---|---|
| Lionbridge Connector Does Not Load | The Lionbridge Connector does not load, or only the Connector landing page loads, but the Connector does not run. |
| Communication Errors When Sending Content for Translation | You experience communication errors when sending content for translation. |
| Error Displayed about LSPs when Submitting a Job | When attempting to send out content for translation, the Connector displays errors about checking LSP keys. |
| Search Agents Are Not Displayed | - The default search agents are not displayed in the Search Agents page. (Click Admin Tools > Search Agents in the Lionbridge Connector rail to open the Search Agents page.) - The default search agents are not available for selection from the Search Using Agent dropdown list in the Pages page of the Bulk Translation wizard. |
| Inaccurate Translation Status | Either: - A submitted job is stuck at 1% or 2% -A returned translation job is stuck at 90%. |
| The Connector Does Not Send Out Submitted Jobs or Return Translated Content | The Connector does not process any jobs and one or all of the Connector chains is red. |
| The Connector Does Not Send Out Submitted Jobs | The Connector does not process any jobs and the Upload Service chain is red. |
| The Translation Provider Does Not Receive Content in New or Custom Languages | The Connector successfully sends content for translation in new or custom languages but it does not reach the translation provider. |
| The Connector Does Not Process Returned Translations after Language Mapping Changes | Changes to language mapping occurred while content in the changed language was out for translation. After the translated content returns, the Connector does not process it. |
| Job Submitted for Translation Is Missing Some Strings | The Connector successfully sent the job to the LSP, but some of the source content is missing from the job and it was not sent. |
| Cannot Select New Translation Provider When Sending Out Content for Translation | After using an account license key to install a new translation provider (LSP), it is not available for selection when submitting a new job. |
| New Target Language Is Not Available When Sending Out Content for Translation | After configuring a new target language, it is not available for selection when submitting a new job. |
| Adobe Experience Manager Service Authentication | If you are using Adobe Experience Manager 6.3 or higher with versions 3.2.0 and higher of the Connector, the following problems may occur:
|
| Freeway Analysis Codes not Displayed when Sending Out Content for Translation | The add-on for Lionbridge Freeway is installed, and Freeway analysis codes specified, but they are not displayed or available for selection when sending out content for translation. |
This the multi-page printable view of this section. Click here to print.
Troubleshooting Installation and Configuration Issues
- 1: Lionbridge Connector Does Not Load
- 2: Keys not Displayed
- 2.1: Exporting an SSL Certificate in Google Chrome
- 2.2: Downloading an SSL Certificate in Mozilla Firefox
- 2.3: Importing an SSL Certificate into Your Chrome Certificate Store
- 2.4: Importing an SSL Certificate into Your Firefox Certificate Store
- 3: Communication Errors When Sending Content for Translation
- 3.1: Importing an SSL Certificate into Your Java Trusted Keystore with Java (JDK)
- 3.2: Importing an SSL Certificate into Your Java Trusted Keystore with JRE
- 4: Error Displayed about LSPs when Submitting a Job
- 5: Search Agents Are Not Displayed
- 6: Inaccurate Translation Status
- 7: The Connector Does Not Send Out Submitted Jobs or Return Translated Content
- 8: The Connector Does Not Send Out Submitted Jobs
- 9: The Translation Provider Does Not Receive Content in New or Custom Languages
- 10: The Connector Does Not Process Returned Translations after Language Mapping Changes
- 11: Job Submitted for Translation Is Missing Some Strings
- 12: Cannot Select New Translation Provider When Sending Out Content for Translation
- 13: New Target Language Is Not Available When Sending Out Content for Translation
- 14: Service Authentication
- 15: Freeway Analysis Codes not Displayed when Sending Out Content for Translation
1 - Lionbridge Connector Does Not Load
One or both of the following issues may cause the Lionbridge Connector not to load, or may cause only the Connector landing page to load, but the Connector does not run.
| Possible Issue | Explanation | Solution |
|---|---|---|
| Configuration files are loaded from the InitConfig Lionbridge Connector local directory, and the user accessing this directory does not have read/write permissions. | If you are trying to load configuration files from InitConfig Lionbridge Connector local directory, the user accessing this directory must have read/write permissions. | For detailed configuration instructions, see Automatically Updating Your Connector Configuration. |
| The configuration files are pointing to an incorrect database location. | Refer to the general log file for details. If there are database errors, such as all database statements are failing, or if there is a general communications link failure, the database may be incorrectly configured. | Check the database strings in the configuration file. |
2 - Keys not Displayed
Issue
In the LSP & Keys page, in the LSP and Keys section, the license keys are not displayed or available selection after clicking Retrieve next to the License Key field.
Explanation
Your firewall is blocking access to the Content API Server.
-
You must configure your ports so that the Connector can communicate with the server.
-
You must import the SSL certificate into your browser’s certificate store.
Solutions
If you have a firewall:
-
Configure your ports so that the Connector can communicate with the Content API Server. The URL of this server is
https://api.clay-tablet.net/license/v1. For more information, see Configuring Network Settings for a Firewall. -
Download or export the SSL certificate from the Clay Tablet License Server (https://api.clay-tablet.net/license/v1). For detailed instructions, see:
- Import the downloaded SSL certificate into your browser’s certificate store. For detailed instructions, see:
2.1 - Exporting an SSL Certificate in Google Chrome
This section provides detailed information about exporting an SSL certificate in Google Chrome:
- from the Content API Server, as instructed in License Keys not Displayed or Communication Errors When Sending Content for Translation
To export an SSL Certificate in Chrome:
-
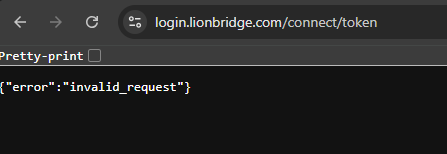
In the Chrome browser, go to one of the following URLs:
- To resolve token generation errors with the Content API Server, use
https://login.lionbridge.com/connect/token. - To resolve communication errors with the Content API Server, use
https://content-api.staging.lionbridge.com/v2. - If errors persist then repeat for all endpoints listed at Configuring Network Settings for a Firewall.
- To resolve token generation errors with the Content API Server, use
The page opens.
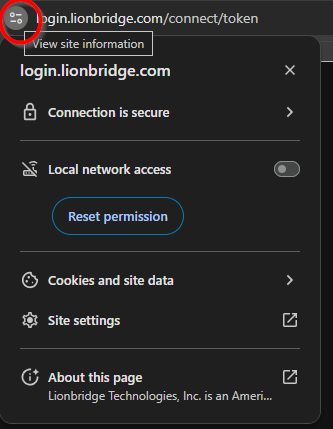
- Click the site information in the address bar.
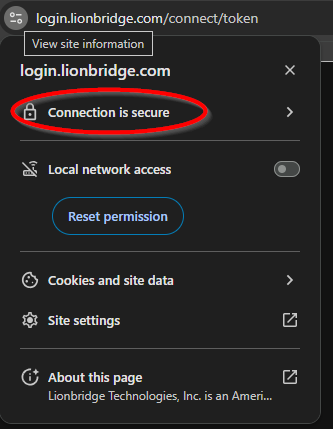
- Select Connection is secure.
- Click Certificate is valid.
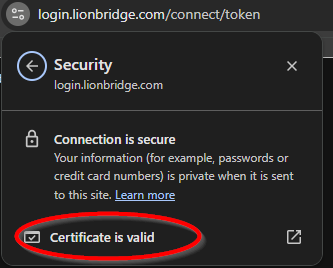
The Certificate Viewer dialog box opens, displaying the General tab.
- Click the Details tab to view it.
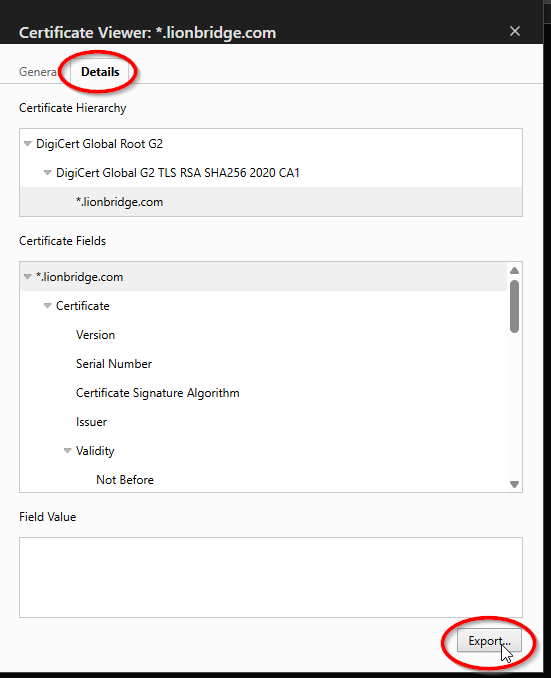
- Click Export.
After clicking the Export button, the browser prompts a Save As dialog to save the certificate file.
- When prompted to save the certificate:
- Choose the DER encoded certificate format.
- Save the file using the .cer extension.
Note: In some versions of Google Chrome, clicking Export saves the certificate file directly using the browser’s download mechanism.
- Next, you do one of the following:
- To resolve communication errors with the Content API Server, you import the exported SSL certificate into your Chrome certificate store. For detailed instructions, see Importing an SSL Certificate into Your Chrome Certificate Store.
2.2 - Downloading an SSL Certificate in Mozilla Firefox
This section provides detailed information about downloading an SSL certificate in Mozilla Firefox:
-
from AWS S3, as instructed in Communication Errors When Sending Content for Translation
-
from the Clay Tablet License Server, as instructed in License Keys not Displayed
To download an SSL Certificate from Firefox:
-
In the Firefox browser, go to one of the following URLs:
-
To resolve communication errors with the Clay Tablet License Server, use
https://api.clay-tablet.net/license/v1. -
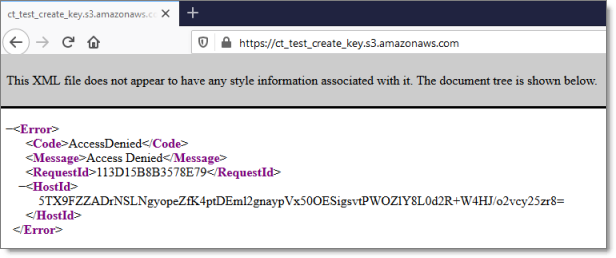
To resolve communication errors with AWS S3, use https://ct_test_create_key.s3.amazonaws.com.
-
The page opens.
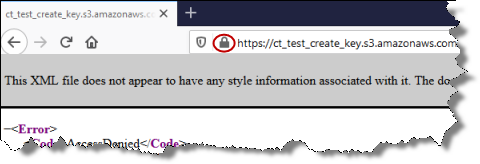
- Click the padlock in the address bar.
- Click the arrow beside Connection Secure.
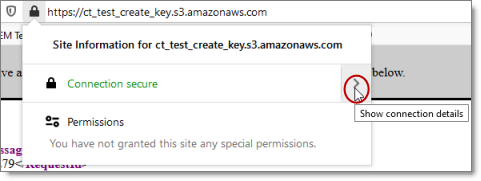
- Click More Information.
The Page Info dialog box opens.
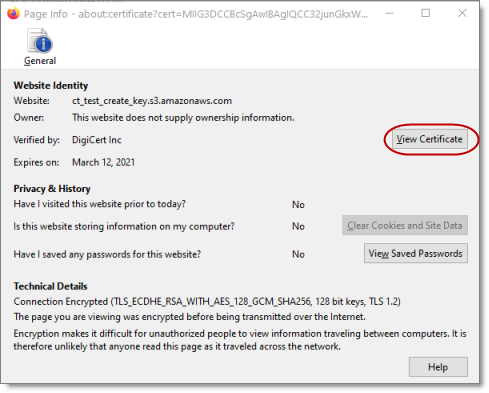
- Click View Certificate.
The Certificate page opens.
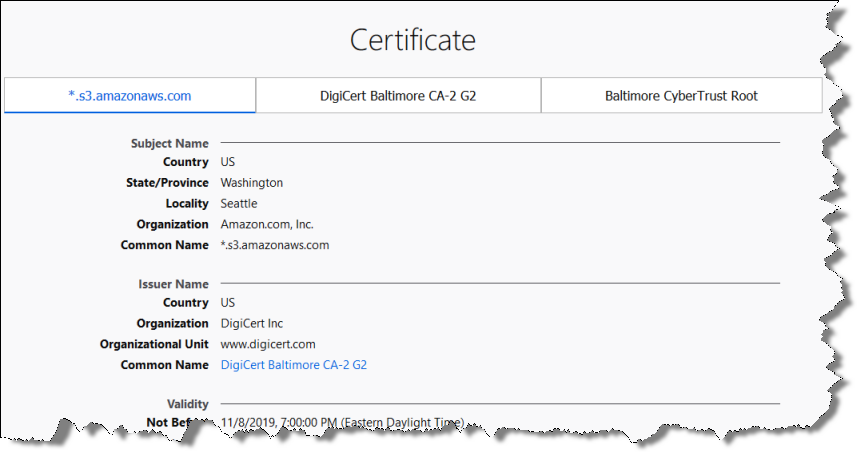
-
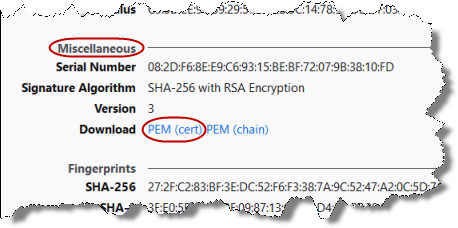
Scroll down to the Miscellaneous section.
-
In the Download row, click the PEM (cert) link.
- In the dialog box that opens, click OK to save the certificate file to a known location.
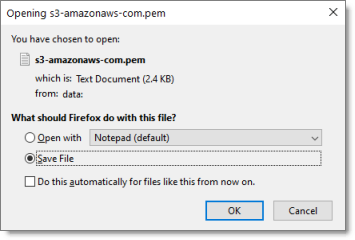
-
Navigate to the location for saving the file, and then click Save.
-
Next, you do one of the following:
-
To resolve communication errors with the Clay Tablet License Server, you import the downloaded SSL certificate into your Firefox certificate store. For detailed instructions, see Importing an SSL Certificate into Your Firefox Certificate Store.
-
To resolve communication errors with AWS S3, you import the exported SSL certificate into Your Java Trusted Keystore. Do one of the following:
-
If Java (JDK) is installed on the server where Adobe Experience Manager is hosted, follow these instructions: Importing an SSL Certificate into Your Java Trusted Keystore with Java (JDK).
-
If JRE is installed on the server where Adobe Experience Manager is hosted, follow these instructions: Importing an SSL Certificate into Your Java Trusted Keystore with JRE.
-
2.3 - Importing an SSL Certificate into Your Chrome Certificate Store
You import an exported SSL certificate into your Chrome certificate store to display the license keys for the Clay Tablet License Server so that they are available for selection.
To import an SSL Certificate into your Chrome certificate store:
- In the Chrome browser, click the Customize and control Google Chrome icon in the top right corner, and then click Settings.
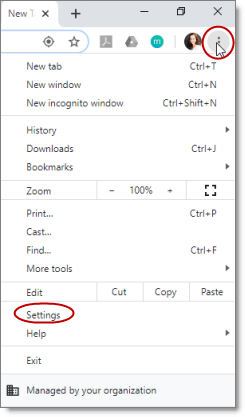
The Settings page opens.
-
In the menu on the left, click Privacy and Security.
-
Scroll down to the bottom of the section.
-
In the Manage certificates sub-section, click the icon.
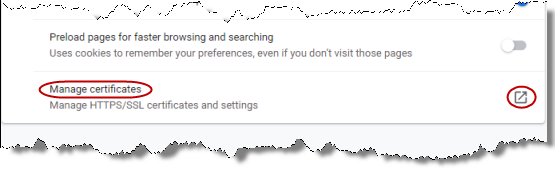
The Certificates dialog box opens.
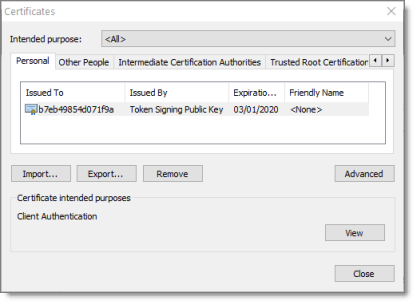
- Click Import.
The Certificate Import Wizard opens.
- Click Next.
The File to Import page of the wizard opens.
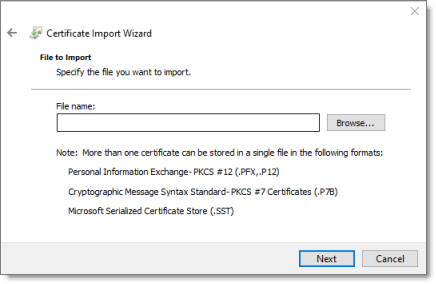
-
Click Browse, and navigate to and select the SSL certificate you previously exported. Then click Open.
-
Click Next.
-
In the Certificate Store page of the wizard, browse to the certificate store where you want to save the certificate. Then click Next.
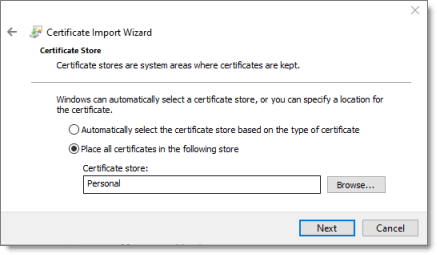
- In the final page of the wizard, review your settings and click Finish.
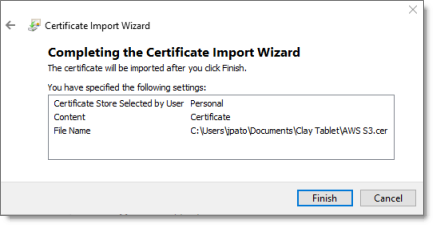
The certificate is imported into your Chrome certificate store.
2.4 - Importing an SSL Certificate into Your Firefox Certificate Store
You import a downloaded SSL certificate into your Firefox certificate store to display the license keys for the Clay Tablet License Server so that they are available for selection.
To import an SSL Certificate into your Firefox certificate store:
- In the Firefox browser, click the Open menu icon in the top-right corner, and then click Options.
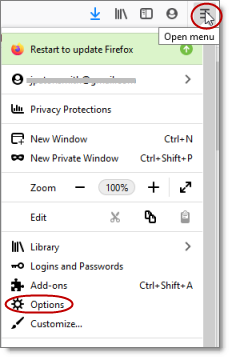
The Preferences page opens.
-
In the menu on the left, click Privacy & Security.
-
Scroll down to the Security section and the Certificates sub-section.
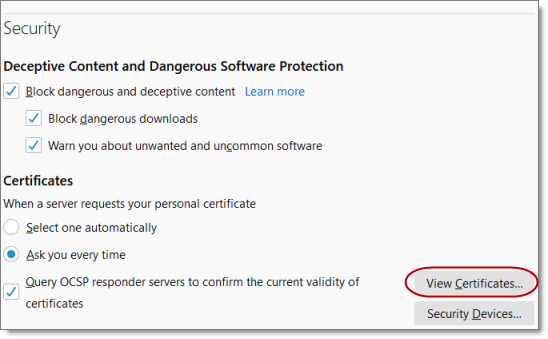
- Click View Certificates.
The Certificate Manager opens.
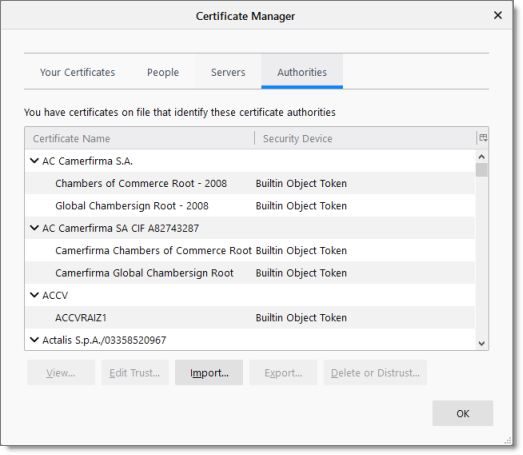
-
Click Import.
-
In the dialog box that opens, navigate to and select the SSL certificate you previously exported. Then click Open.
The certificate is imported into your Firefox certificate store, and a message box states that the import was successful.
3 - Communication Errors When Sending Content for Translation
Issue
Communication errors occur when sending content for translation.
Explanation
Your firewall is blocking access to AWS S3 and SQS. You must import the SSL certificates from AWS S3 and SQS into your Java trusted keystore. This enables HTTPS support, which means support for the SSL/TLS protocols.
Solution
The following general steps are required:
-
Downloading or exporting the AWS SSL certificates from your browser’s certificate store. For detailed instructions, see:
-
Importing the downloaded/exported certificates into your Java trusted keystore. The instructions are different depending on whether Java or the JRE is installed on the server where Adobe Experience Manager is hosted. For detailed instructions, see:
Note: You must update these certificates whenever AWS renews them. This is likely once a year.
3.1 - Importing an SSL Certificate into Your Java Trusted Keystore with Java (JDK)
You import the downloaded/exported SSL certificate into your Java trusted keystore to resolve communication issues with AWS S3 and SQS. There are different instructions depending on whether Java (JDK) or JRE is installed on the server where Adobe Experience Manager is hosted.
To import an SSL certificate into your Java trusted keystore with JRE:
- Run the keytool -import -alias ALIAS -file public.cert -storetype TYPE -keystore server.truststore command. For example:
keytool -import -alias teiid -file public.cert -storetype JKS -keystore server.truststore
-
If the specified truststore already exists, enter the existing password for that truststore, otherwise enter a new password.
-
When you are prompted to trust the certificate, enter yes.
The certificate in public.cert has been added to the new truststore named server.truststore.
3.2 - Importing an SSL Certificate into Your Java Trusted Keystore with JRE
You import the downloaded/exported SSL certificate into your Java trusted keystore to resolve communication issues with AWS S3 and SQS. There are different instructions depending on whether Java (JDK) or JRE is installed on the server where Adobe Experience Manager is hosted.
To import an SSL certificate into your Java trusted keystore with JRE:
-
Run the Java keytool command to import the certificate into the keystore.
a. Open a command prompt and change to the following directory: <location> \bin\jre\6.0\bin.
where <location> is the file directory where Adobe Experience Manager is installed.
Note: On 64-bit computers, add the certificates to the
bin64folder.
b. Run the following command line. Although for formatting purposes the command is displayed with line breaks, you should enter the entire command on one line.
keytool -import -file "C:\<location>\bin\ssl\applixca.pem"

-keystore "C:\<location>\bin\jre\6.0\lib\security\cacerts"

-storepass "changeit"Copy
For 64-bit installations, target the 64-bit folder when dealing with the certificates. For example, this sample command targets the 64-bit jre:
cd C:\Program Files (x86)\AEM\TM1\_64\bin64\jre\6.0\binCopy
The following command is an example used on 64-bit systems. Although for formatting purposes the command is displayed with line breaks, you should enter the entire command on one line.
keytool -import -file "C:\Program Files (x86)\AEM\TM1\_64\bin64\

ssl\applixca.pem" -keystore "C:\Program Files (x86)\AEM\TM1\_64\bin64\

jre\6.0\lib\security\cacerts" -storepass "changeit"Copy
Note: If you do not correctly target the 64-bit locations for certificates when running a 64-bit installation, a warning message is displayed, indicating that you cannot contact the servers.
c. When prompted to trust or add the certificate, enter yes.
The following message is displayed: Certificate was added to keystore.
- You may need to restart the server where Adobe Experience Manager is hosted for the change take effect.
4 - Error Displayed about LSPs when Submitting a Job
Issue
When attempting to send out content for translation, the Connector displays errors about checking LSP keys.
Explanation
The URLs of the Content API Server are whitelisted using the entire address, including the key names from the URL.
Solution
If you have a firewall:
-
Click Admin Tools > LSP and Keys in the Lionbridge Connector rail to open the LSP & Keys page.
-
In the Content API URLs section, which displays a list of URLs used by the Content API Platform, instead of whitelisting the entire address, exclude the key names from the URL. For example, enter ctt-platform-prod-us-east-1/*. For more information, see Editing a License Key.
5 - Search Agents Are Not Displayed
| Possible Issue | Explanation | Solution |
|---|---|---|
| The default search agents are not displayed in the Search Agents page. (Click Admin Tools > Search Agents in the Lionbridge Connector rail to open the Search Agents page.) | The configuration files are pointing to an incorrect database location. Refer to the general log file for details. If there are database errors, such as all database statements are failing, or if there is a general communications link failure, the database may be incorrectly configured. | Check the database strings in the configuration file. |
| The default search agents are not available for selection from the Search Using Agent dropdown list in the Pages page of the Bulk Translation wizard. |
6 - Inaccurate Translation Status
The displayed translation status is inaccurate.
![]()
| Possible Issue | Explanation | Solution |
|---|---|---|
| Either: - A job was submitted and the translation provider has confirmed receipt, but in the Job Details tab of the Translation Status page, some but not all pages are at 10%/In Translation. - The translation provider has confirmed that all files were successfully delivered, but in the Translation Status page, some but not all pages are at 100%/Completed. An example is displayed in the screen capture below. |
Either: - The key used for the translation job was duplicated in another environment. - The environment from which the job was submitted has been cloned. Do not duplicate these keys or install them on multiple Adobe Experience Manager Author Server instances, because this is a violation of the License Agreement. Using the same keys on multiple Adobe Experience Manager Author Server instances will cause the Connector to behave unexpectedly, which can result in lost translation content, orphaned projects, and inaccurate translation status reports. Lionbridge Connector Support will support technical issues caused by duplicating or incorrectly installing keys only on a time and materials basis. |
1.Remove any duplicate keys or cloned environments. For detailed setup instructions, see Configuring Translation Providers and License Keys. - If some but not all pages are at 10%/In Translation, cancel the original translation job and resubmit it. - If some but not all pages are at 100%/Completed, ask the translation provider to redeliver the translation job. |
| The Lionbridge Connector database has been shared with another environment. The Connector requires a unique, non-shared, database for storing translations returned to the Connector. Sharing a database can result in another environment processing the returned translations into that environment. |
1. Change the database user name and password. 2. In the JDBC SQL Connection section of the Configuration page, update the Login Name and Login Password. For detailed instructions, see JDBC SQL Connection. 3. Ask the translation provider to redeliver the translation job. |
7 - The Connector Does Not Send Out Submitted Jobs or Return Translated Content
The Connector does not process any jobs and one or all of the Connector chains is red.
Generally, the chain should be green: |
However, at least one element in the chain is red: |
| Possible Issue | Explanation | Solution |
|---|---|---|
| One or more of the required Connector services is not running. | For the Connector to function correctly, all Connector components must be installed and active. | Verify that all Connector components are active. For detailed instructions, see Verifying that the Bundle and All Connector Components Are Active. |
8 - The Connector Does Not Send Out Submitted Jobs
The Connector does not seem to process any jobs and the Upload Service is inactive (red).
| Generally, the chain should be green: |
However, the Upload Service in the chain is red: |
| Possible Issue | Explanation | Solution |
|---|---|---|
| Multiple jobs are stuck in Preparing and/or Sending status. | When there many failed attempts to send out jobs, the log files are spammed with job processing details. This may cause the Upload Service to become inactive (red). | Open the Translation Status page (/content/ctctranslation/status.html), and delete all the jobs that have been stuck in Preparing and/or Sending status for an extended period of time. |
9 - The Translation Provider Does Not Receive Content in New or Custom Languages
The Connector successfully sends content for translation in new or custom languages but it does not reach the translation provider.
| Possible Issue | Explanation | Solution |
|---|---|---|
| The Content API Platform does not have the updated language mapping. | Your company and your translation provider may use different language codes in their technology/workflows. The Content API Platform can map language codes in Adobe Experience Manager to those expected by the translation provider. | Contact Lionbridge Connector Support to request a review of the Connector language mapping for the translation provider to ensure that the new language is correctly mapped for the target platform. For details, see How to Contact Lionbridge Connector Support. |
| The translation provider requires that source-target languages pairs are configured before any new translation requests. | The translation platforms of most translation provider require that source-target language pairs are configured. | Contact the translation provider and verify that the all source-target language pairs are configured. |
10 - The Connector Does Not Process Returned Translations after Language Mapping Changes
| Possible Issue | Explanation | Solution |
|---|---|---|
| Changes to language mapping occurred while content in the changed language was out for translation. After the translated content returns, the Connector does not process it. | The changes to language mapping changed the language reference path in CRX. The Connector uses the page path to return translated content back to Adobe Experience Manager. If that page path is changed while content is out for translation, then the Connector cannot return the translated content to Adobe Experience Manager.For details, see Configuring Connector Languages. |
Do not change the name of a language or delete a language if there is translation content in the Translation Queue, or if there are translation jobs in progress. If this occurs accidentally, then resend the job with the new language name, and notify your translation provider that this replaces the previous job. |
11 - Job Submitted for Translation Is Missing Some Strings
The Connector successfully sent the job to the LSP, but some of the source content is missing from the job and it was not sent.
| Possible Issue | Explanation | Solution |
|---|---|---|
| Either component mapping was not done, or it was not updated for components that were recently added or used in new content. | The content of an Adobe Experience Manager page is created from a collection of page components. A component has different properties, which are types of fields. You must configure which components and properties the Connector can send out for translation. | Update the component mapping and resend the job for translation. For detailed instructions, see Configuring which Components and Properties to Send Out for Translation. Recommendation: If you are submitting new nodes in your content tree for translation, validate component mapping in a pre-production environment to ensure that only the required components are mapped. |
| All components were successfully sent for translation in the pre-production environment, but they are missing in the production environment. | Component mapping is managed on a per-Adobe Experience Manager-instance basis. You must import any changes in component mapping from the pre-production environment into the production environment before submitting jobs from there. | Either: - Manually make the same component mapping changes in the production environment. - Migrate your component mapping from the pre-production environment to the production environment. For detailed instructions, see Automatically Updating Your Connector Configuration. |
12 - Cannot Select New Translation Provider When Sending Out Content for Translation
After using an account license key to install a new translation provider (LSP), it is not available for selection when sending out a new job for translation.
| Possible Issue | Explanation | Solution |
|---|---|---|
| Your team profile was not updated to support sending content to the new translation provider (LSP). | The Connector uses profiles to define the set of users who can send out content for translation to a specific translation provider (LSP). Note: Profiles also define the source-target pairs that users are allowed to send out for translation. |
Ask your Adobe Experience Manager administrator to update the appropriate team profile to include the new translation provider.For detailed instructions, see Configuring Team Profiles. |
13 - New Target Language Is Not Available When Sending Out Content for Translation
| Possible Issue | Explanation | Solution |
|---|---|---|
| After configuring a new target language, it is not available for selection when submitting a new job. | Your team profile was not updated to support sending content for translation to the new target language. The Connector uses profiles to define the set of users who can send out content for translation with specific source-target language pairs. Note: Profiles also define who can send out content for translation to a specific translation provider (LSP). |
Ask your Adobe Experience Manager administrator to update the appropriate team profile to include the source-target language pairs.For detailed instructions, see Configuring Team Profiles. |
14 - Service Authentication
Possible issues
If you are using Adobe Experience Manager 6.3 or higher with version 3.2.0 or higher of the Connector, the following problems may occur:
-
You cannot save all Connector configurations.
-
Translated content does not return to Adobe Experience Manager.
-
You cannot perform most Globalization Tool functionality with the default settings.
Explanation
These problems occur because in Adobe Experience Manager 6.3 and higher, Adobe has deprecated support for administrative login methods for services.
In response, the starting with version 3.2.0, Connector adds a new system user, claytablet-service, which the claytablet bundle uses for operations.
The Connector adds the following new configurations to CRXDE Lite, which are described in detail below:
-
/apps/ctctranslation/config/org.apache.sling.serviceusermapping.impl.ServiceUserMapperImpl.amended-claytablet
-
/apps/ctctranslation/config/com.day.cq.security.ACLSetup
-
/home/users/system/claytablet-service
Note: Under normal circumstances, you should not need to edit any of these configurations.
Detailed explanations
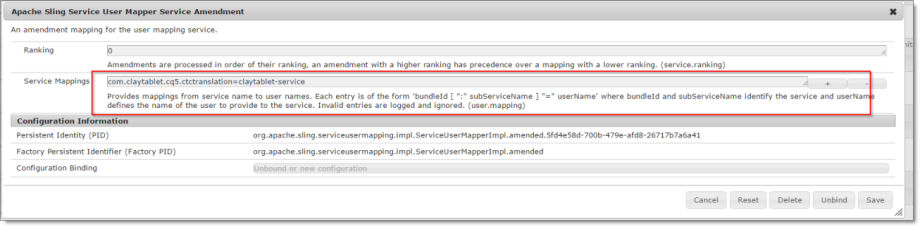
/apps/ctctranslation/config/org.apache.sling.serviceusermapping.impl.ServiceUserMapperImpl.amended-claytablet.xml
This is an OSGi configuration that adds a mapping between the claytablet bundle and the claytablet-service system user for the Connector.
To locate this configuration in the system console:
-
In your Web browser, navigate to /system/console/configMgr.
-
In the Adobe Experience Manager Web Console Configuration page, search for Service Amendment.

- Next, search for claytablet.
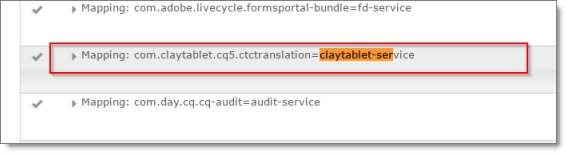
- Double-click this entry to view the value in the Service Mappings field:
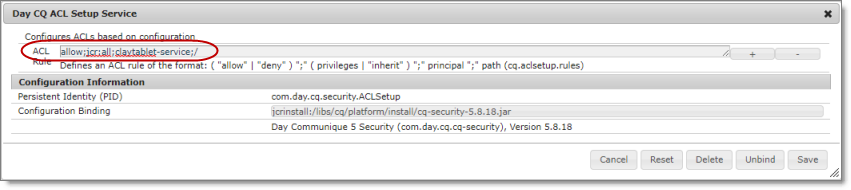
/apps/ctctranslation/config/com.day.cq.security.ACLSetup.xml
This OSGi configuration grants the all permission to the claytablet-service system user for /. This system user has all permissions on every path in the repository.
Note: This is the same as loginAdminstrative() in pre-3.2.0 versions of the Connector.
To locate this configuration in the system console:
- In your Web browser, navigate to /system/console/configMgr.
In the Adobe Experience Manager Web Console Configuration page, search for Day CQ ACL.

- Click this entry to view the details.
/home/users/system/claytablet-service
The new claytablet-service system user has permission to everything, because of the ACLSetup. If necessary, you can modify the permission settings. However, the Connector requires full permission to the following directories:
- /content
- /apps
- /etc
- /var
To locate the claytablet-service system user and view its permissions:
-
In your Web browser, navigate to /useradmin.
-
In the AEM Security page, locate the claytablet-service user in the left pane.
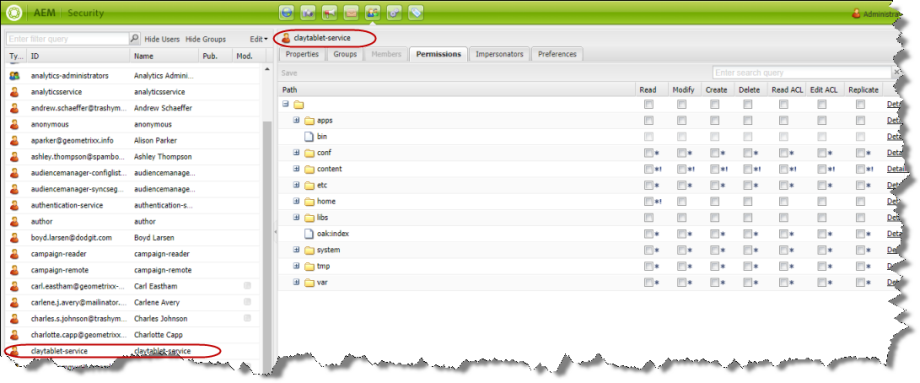
Tip: To simplify the permission settings for the claytable-service user, you can add claytable-service to the Adobe Experience Manager administrators user group. The reason this works is that before the API changes in Adobe Experience Manager 6.3, the Connector used the administrator permission of an admin session from Adobe Experience Manager API to perform all the actions.
For more information, refer to: https://cwiki.apache.org/confluence/display/SLING/Service+Authentication.
15 - Freeway Analysis Codes not Displayed when Sending Out Content for Translation
Issue
The add-on for Lionbridge Freeway is installed, and Freeway analysis codes specified, but they are not displayed or available for selection when sending out content for translation.
Explanation
The URLs where Lionbridge Freeway provides the authentication service and the analysis code service are not correctly configured. If you have a firewall, you must configure your ports so that the Connector can communicate with these services.
Solution
- In the Freeway Config section of the Configuration page, enter the following settings:
| Configuration Option | Description |
|---|---|
| Freeway Auth URL | The URL where Lionbridge Freeway provides the authentication service. This is https://fwapi.lionbridge.com/obvibundles/freewayauth.asmx. |
| Freeway Service URL | The URL where Lionbridge Freeway provides the analysis code service. This is https://fwapi.lionbridge.com/obvibundles/service.asmx. |
For detailed instructions, see Freeway Config.
- If you have a firewall, you must configure your ports so that the Connector can communicate with these URLs. For detailed instructions, see Configuring Network Settings for a Firewall.