After installing the Connector, you complete the tasks below to verify that your installation was successful. Important: The Adobe Experience Manager admin user must perform the post-installation and configuration tasks for the first time after installation.
This the multi-page printable view of this section. Click here to print.
Post-Installation Tasks
- 1: Configuring the Data Folder and Database Connection
- 2: Verifying that the Bundle and All Connector Components Are Active
- 3: Verifying that the Connector Nodes are Installed
- 4: Configuring Network Settings for a Firewall
1 - Configuring the Data Folder and Database Connection
Note: This section is not applicable to the AEM Cloud Connector.
After installing the Connector, you configure the database connection and the data folder, and then you restart the Connector bundle, so that you can verify that all Connector nodes are active.
- Recommended for MySQL and Microsoft SQL Server databases. Set your default database collation as follows:
- MySQL and Oracle 11g/12c:
utf8_general_ci - Microsoft SQL Server:
SQL_Latin1_General_CP1_CI_AS
Note: This is highly recommended to ensure that content includes local characters.
Note about support for hexadecimal emoji characters: To support hexadecimal emoji characters, set your default database collation to:
utf8mb4_unicode_ci. For a list of supported hexadecimal emoji characters, see http://www.unicode.org/emoji/charts/full-emoji-list.html. For complete instructions, contact Lionbridge Connector Support. For details, see How to Contact Lionbridge Connector Support.
Note: The Connector versions 4.0.3 and higher supports Microsoft SQL Server 2012 and higher versions, and does not support Microsoft SQL Server 2008 and 2008 R2 versions.
-
Click Admin Tools > Configuration in the Lionbridge Connector rail to open the Configuration page. For information on opening the Lionbridge Connector rail, see Configuring the Connector.
-
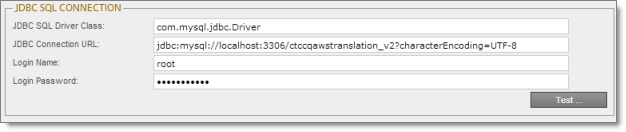
In the JDBC SQL Connection section, configure the Connector’s database connection. For detailed instructions, see JDBC SQL Connection.
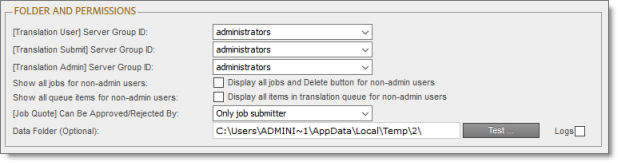
- In the Folder and Permissions section, configure the Connector’s data folder. For detailed instructions, see Folder and Permissions.
2 - Verifying that the Bundle and All Connector Components Are Active
Note: This section is not applicable to the AEM Cloud Connector.
You must access the Apache Felix Web Console to verify that the bundle and all 24 Connector components are installed and active.
Note: The Apache Felix Web Console is not available in the Adobe Experience Manager Cloud.
Verifying the bundle
- In your browser, navigate to: /system/console/bundles on your Adobe Experience Manager instance.
The Adobe Experience Manager Web Console Bundles page opens.
- In the Search box in the top-left corner of the page, type clay, and click Apply Filter.
The Connector bundle is displayed.
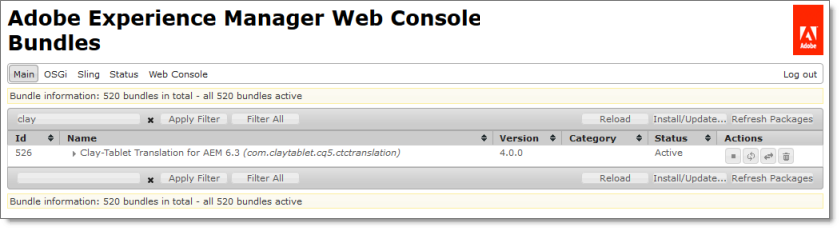
- Verify that the Connector bundle has active status.
Verifying the Connector components
- In your browser, navigate to: /system/console/components on your Adobe Experience Manager instance.
The Adobe Experience Manager Web Console Components page opens. This page displays all components alphabetically, by name.
-
Scroll down to locate the Connector components, whose names all start with com.claytablet.
-
Verify that all the following Connector components are installed and active:
-
com.claytablet.cq5.ctctranslation.impl.CTCAlarmFieldsServiceImpl
-
com.claytablet.cq5.ctctranslation.impl.CTCAuthServiceImpl
-
com.claytablet.cq5.ctctranslation.impl.CTCacheMonitoringServiceImpl
-
com.claytablet.cq5.ctctranslation.impl.CTCCacheServiceImpl
-
com.claytablet.cq5.ctctranslation.impl.CTCConfigServiceImpl
-
com.claytablet.cq5.ctctranslation.impl.CTCDataServiceImpl
-
com.claytablet.cq5.ctctranslation.impl.CTCDownloadServiceImpl
-
com.claytablet.cq5.ctctranslation.impl.CTCEventServiceImpl
-
com.claytablet.cq5.ctctranslation.impl.CTCInitServiceImpl
-
com.claytablet.cq5.ctctranslation.impl.CTCJDBCPoolServiceImpl
-
com.claytablet.cq5.ctctranslation.impl.CTCLocalTMServiceImpl
-
com.claytablet.cq5.ctctranslation.impl.CTCLogServiceImpl
-
com.claytablet.cq5.ctctranslation.impl.CTCPageServiceImpl
-
com.claytablet.cq5.ctctranslation.impl.CTCPipeProcessServiceImpl
-
com.claytablet.cq5.ctctranslation.impl.CTCPrepareServiceImpl
-
com.claytablet.cq5.ctctranslation.impl.CTCQueueScheduleServiceImpl
-
com.claytablet.cq5.ctctranslation.impl.CTCRolloutCheckServiceImpl
-
com.claytablet.cq5.ctctranslation.impl.CTCStatusServiceImpl
-
com.claytablet.cq5.ctctranslation.impl.CTCTaskServiceImpl
-
com.claytablet.cq5.ctctranslation.impl.CTCUpdateTMServiceImpl
-
com.claytablet.cq5.ctctranslation.impl.CTCUploadServiceImpl
-
com.claytablet.cq5.ctctranslation.impl.CTCWordsCountServiceImpl
-
com.claytablet.cq5.ctctranslation.service.configMonitor.CTConfigMonitor
-
com.claytablet.cq5.ctctranslation.service.PublishEventHandle.PublishEventCTHandler
-
com.claytablet.cq5.ctctranslation.service.RolloutEventHandle.RolloutEventCTHandler
-
com.claytablet.cq5.ctctranslation.service.UserPermissionChangeEventHandle.UserResourceChangeListener
-
com.claytablet.cq5.ctctranslation.workflow.RestoreCTCUnlockedProcess
-
com.claytablet.cq5.ctctranslation.workflow.RolloutCTCQueueProcess
-
com.claytablet.cq5.ctctranslation.workflow.RolloutCTCTranslationProcess
-
com.claytablet.cq5.ctctranslation.translationapi.impl.config.DummyTranslationAdapterFactory
-
com.claytablet.cq5.ctctranslation.translationapi.impl.CTCTranslationJobManagerImpl
-
com.claytablet.cq5.ctctranslation.translationapi.impl.CTCTranslationServiceFactoryImpl
3 - Verifying that the Connector Nodes are Installed
Note: This section is not applicable for the AEM Cloud Connector. Refer to the Adobe’s Debugging AEM as a Cloud Service with Repository Browser documentation for AEM Cloud debugging.
After installing the Connector, you must access the CRXDE Lite interface to ensure that all 12 Connector nodes are installed.
- Do one of the following:
- In the Touch-Optimized UI of Adobe Experience Manager, click Tools in the Adobe Experience Manager rail. Then, in the Navigation page, click CRXDE Lite.
- In the Classic UI of Adobe Experience Manager, click CRXDE Lite in the right pane.
- In your Web browser, navigate to /crx/de/index.jsp on your Adobe Experience Manager instance.
CRXDE Lite opens.
-
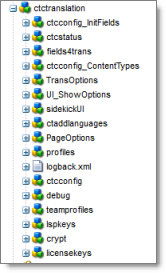
In the navigation pane on the left, navigate to /etc/ctctranslation.
-
Verify that the following 16 nodes are present:
- ctcconfig_InitFields
- ctcstatus
- fields4trans
- ctcconfig_ContentTypes
- TransOptions
- UI_ShowOptions
- sidekickUI
- ctaddlanguages
- PageOptions
- profiles
- ctcconfig
- debug
- teamprofiles
- lspkeys
- crypt
- license keys
Note: The
logback.xmlfile is also displayed. This is log configuration file that is injected into the Adobe Experience Manager log service.
View screen capture.
4 - Configuring Network Settings for a Firewall
Note: This section is not applicable to the AEM Cloud Connector.
Optional step. If you have a firewall, you must configure your ports so that the Connector can communicate with the Content API Platform. The Connector must be able to communicate with the Content API Platform by initiating the following outbound network connections:
| Protocol | Port Number | Description | Locations to Configure |
|---|---|---|---|
| HTTPS | Port 443 | For secure access to the Content API Platform Services | https://contentapi.lionbridge.com/* https://content-api.staging.lionbridge.com/* https://login.lionbridge.com/* https://fms.lionbridge.com/* https://fms-staging.lionbridge.com/* |
Key points:
-
You can’t edit existing license keys, V5.0 still supports old license keys to retrieve the translations or translation re-deliveries sent out with old license keys. But, you can disable a license key, if you don’t want the connector to retrieve the translations or translation re-deliveries sent out with the key.
-
You can’t send a translation job with old license key anymore, you can only use new CAPI keys to send content for translation.