Configuring Advanced Settings in the User Interface
In the Advanced Settings page, you can configure advanced Connector settings. To open the Advanced Settings page, click Admin Tools > Advanced Settings in the Lionbridge Connector rail.
The advanced Connector settings are organized into the following sections:
| Section |
Description |
For Detailed Configuration Instructions, See… |
| Translation Status |
You can create a page property to store custom translation-status values that are attached to individual pages, for example MT (for machine translation) or HT (for human translation). After you associate a custom value with a translation provider (LSP), you can view this value for translated pages in the page list of the Globalization Tool. |
Creating a Page Property to Store Custom Translation-Status Values |
| Prevent Translation of Pages |
You can prevent the Connector from sending pages with certain properties for translation. |
Preventing the Translation of Pages |
| Report Fields Configuration |
You specify which fields are available to generate the Field Report, which you generate from the Reporting tab of the Globalization Tool. |
Configuring which Fields Are Available for the Field Report |
| Workflow Selections |
You specify which workflows are available to run on multiple pages, including language copies of these pages, in the Run Workflows tab of the Globalization Tool. |
Configuring which Workflows Are Available to Run |
| Action Permissions |
You configure which user group has permission to perform specific actions in the Globalization Tool. |
Configuring Who Can Use the Globalization Tool |
| Prevent URL Conversions |
If either or both of the Language Conversion (URL Reference) and Language Conversion (Content Link) options are configured in the Translation Settings section of the Configuration page, as described in Translation Settings, you can prevent the Connector from converting links to specific files or file types. |
Preventing Specific URL and Content-Link Conversions |
| Automatically Remove/Replace Character from Translation Content |
You can configure the connector to automatically remove or replace certain characters on the translation content. |
Removing or Replacing Character from Translation Content |
| Skip Translation with Local TM |
You can configure which components, or property names of components, will be ignored by the local TM (translation memory) when users send content for translation with the Use Local TM option. This setting prevents the Connector from using any previous translations of the specified components that are stored in the local TM. |
Skipping Translations in the Local TM |
| Log JCR Property During Translation |
You specify which JCR properties to write to the log file during translation. |
Logging JCR Properties During Translation |
| Page Metadata Configuration |
You specify:- which metadata is available for copying to multiple pages, including multiple language copies of those pages
- which metadata is available for sending out for translation
- SEO flags to include in the XML translation files
Notes: You can copy metadata to multiple pages from the Copy Metadata tab of the Globalization Tool. You can send metadata for translation from the Bulk Translation wizard, the Translation Queue, and the Translation tab of the Globalization Tool. |
Configuring which Page Metadata is Available for Copying and Translation |
| Page Property Update Configuration |
You specify which metadata fields are available for translation and copying to the Page Property Updating tab of the Globalization Tool. |
Configuring which Metadata Fields Are Available for Translation and Copying |
| DAM Metadata Configuration |
You specify which digital asset (DAM)A metadata is available for updating, including multiple language copies of those assets
Note: You can update DAM metadata for multiple assets from the DAM Metadata Update tab of the Globalization Tool. |
Configuring which Digital Asset Metadata is Available for Updating |
| DITA Metadata Configuration |
You specify which DITA metadata is available for Translation and Copying
Note: You can update DITA metadata for multiple assets from the DITA Metadata Update tab of the Globalization Tool.
This feature is only available for the On-Premise version. |
Configuring which DITA Metadata is Available for Translation and Copying |
| DITA Property Configuration |
You specify which DITA property is available for Translation and Copying
Note: You can update DITA property for multiple assets from the DITA Property Update tab of the Globalization Tool.
This feature is only available for the On-Premise version. |
Configuring which DITA Property is Available for Translation and Copying |
| Configuration for Catching Published Pages to Queue |
You configure the source and target languages and translation settings for the following options that add published pages to the Translation Queue:
- Catch Published Workflow Pages to Queue
- Catch Pages from Publish Event to Queue
You specify both these features by selecting the corresponding check boxes in the Translation Settings section of the Configuration page. For more information about these features, see Translation Settings. |
Configuring Translation Settings for Catching Pages to the Translation Queue |
| Configuration for Catching Rollout Pages to Queue |
You configure the paths for adding rollout pages to the Translation Queue: |
Configuring Paths for Catching Rollout Pages to the Translation Queue |
| Default Job Name Format for Bulk Translation |
You specify the default job name for Bulk Translation. |
Configuring Default Job Name for Bulk Translation |
You can perform the following actions on this page:
- To save your changes to each section, click the corresponding Save Configuration button.
Note: The settings from each section are saved in a single file.
-
To export your configuration settings as an XML file, at the top of the page, click Export. The Connector downloads the advancedSettings.xml file.
-
To import a previously exported configuration file:
a. At the top of the page, click Import.
The Select a file to upload dialog box opens.

b. Click Choose File.
c. In the browser dialog box that opens, navigate to the XML file to import, select it, and click Open, or similar, to close the browser dialog box.
The Select a file to upload dialog box displays the path of the file you selected.
d. Click Upload to upload the file.
The Connector imports the file and updates the configuration.
1 - Creating a Page Property to Store Custom Translation-Status Values
In the Translation Status section of the Advanced Settings page, you can create custom translation-status properties that are attached to individual pages, for example MT (for machine translation) or HT (for human translation). After you associate a custom property with a translation provider (LSP), you can view this property for translated pages in the page list of the Globalization Tool.
To create custom translation-status properties:
-
Click Admin Tools > Advanced Settings in the Lionbridge Connector rail. For information on opening the Lionbridge Connector rail, see Configuring the Connector.
The Advanced Settings page opens, displaying the Translation Status section at the top of the page.

-
To create a JCR property that will hold custom translation-status values, enter it in the JCR Property for translation status field. For example, enter: jcr:TranslationMethod.
-
Click Save Configuration to save your changes.
A message in red at the top of the page states that the metadata configuration was saved.
This property is attached to pages after they return from translation.
-
To complete the configuration of this feature, you specify values for this property for each translation provider (LSP). These are the values that will be displayed in the page list of the Globalization Tool.
-
For SDL TMS, you specify this value in the Translation Status field of the TMS GUID Config page. For detailed instructions, see Installing the Add-On for SDL TMS.
-
For all other translation providers (LSPs), you specify this value in the Translation Status field of the LSP & Keys page. For detailed instructions, see Editing a License Key.
2 - Preventing the Translation of Pages
In the Prevent Translation of Pages section of the Advanced Settings page, you can prevent the Connector from sending pages with certain properties for translation.
To prevent the Connector from sending certain pages for translation:
-
Click Admin Tools > Advanced Settings in the Lionbridge Connector rail. For information on opening the Lionbridge Connector rail, see Configuring the Connector.
The Advanced Settings page opens, displaying the Prevent Translation of Pages section near the top of the page.
-
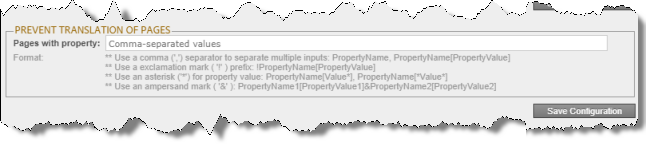
Enter the page property or properties that identify pages for the Connector to ignore when sending content out for translation.
- To separate multiple page properties, use a comma ( , ) separator, for example: PropertyName, PropertyName[PropertyValue].
- To find all pages that do not have properties, use an exclamation mark ( ! ) prefix, for example: !PropertyName[PropertyValue]. For example, !PropertyName finds !PropertyNameA, !PropertyNameB, and !PropertyNameC.
- To find a page property whose values all contain some letters or numbers, use an asterisk wildcard ( * ) for the property value, for example: PropertyName[Value*], PropertyName[*Value*].
- To instruct the Connector to ignore pages with specific multiple properties, use an ampersand ( & ), for example: PropertyName1[PropertyValue1]&PropertyName2[PropertyValue2].
-
Click Save Configuration to save your changes.
3 - Configuring which Fields Are Available for the Field Report
In the Report Fields Configuration section of the Advanced Settings page, you can configure which fields are available to include in the Field report. You can generate this report for multiple pages in the Reporting tab of the Globalization Tool. For instructions on generating this report, refer to the Lionbridge Connector for Adobe Experience Manager User Guide.
-
Click Admin Tools > Advanced Settings in the Lionbridge Connector rail. For information on opening the Lionbridge Connector rail, see Configuring the Connector.
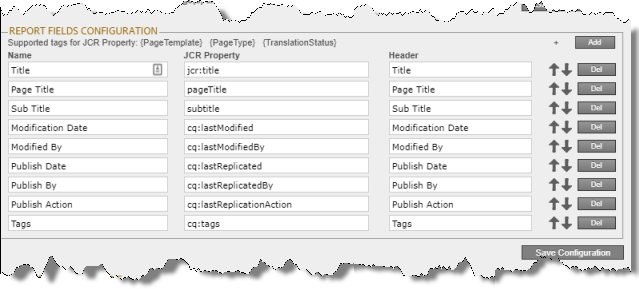
The Advanced Settings page opens. The Report Fields Configuration section of this page lists the JCR properties that are available for display in the Reporting tab of the Globalization Tool, where you can select them for inclusion in the generated Field report.
-
You can add, edit, or delete the JCR properties that are included in the Field report.
-
To add a JCR property, so that it is included in the report, click Add, in the top-right corner of this section. This adds a blank row at the top of the list. In this row, enter the information about the property to add.
-
To edit a JCR property, which modifies the information in the report, edit the corresponding information in the list.
-
To delete a JCR property, so that it is excluded from the report, click Del in the corresponding row. A message box confirms that you want to delete this field in the report. Click OK to confirm.
-
You can add the {PageTemplate}, {PageType}, and {TranslationStatus} tags to display the corresponding information in the report, for example:
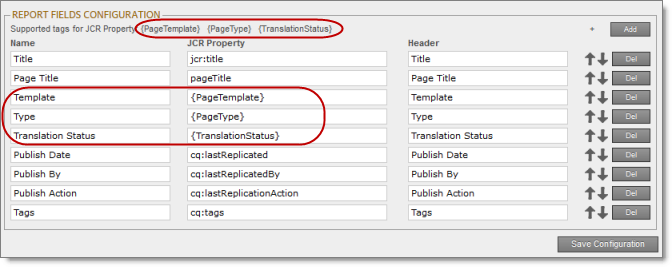
Note: {PageTemplate} and {PageType} are standard fields in Adobe Experience Manager. {TranslationStatus} is a custom property defined in the Translation Status section at the top of this page. For details, see Creating a Page Property to Store Custom Translation-Status Values.
For a list and description of JCR properties, refer to the Adobe Experience Manager documentation, which is available at: https://docs.adobe.com/docs/en/aem/6-2/develop/components.html.
-
You can use the Move Up  and Move Down
  buttons to modify the order in which the fields are displayed in the generated report.
-
Click Save Configuration to save your changes.
A message in red at the top of the page states that the Field-report configuration was saved.
4 - Configuring which Workflows Are Available to Run
In the Workflow Selections section of the Advanced Settings page, you can configure which workflows are available to run against multiple pages in the Run Workflows tab of the Globalization Tool. For instructions on running workflows against multiple pages, refer to the Lionbridge Connector for Adobe Experience Manager User Guide.
-
Click Admin Tools > Advanced Settings in the Lionbridge Connector rail. For information on opening the Lionbridge Connector rail, see Configuring the Connector.
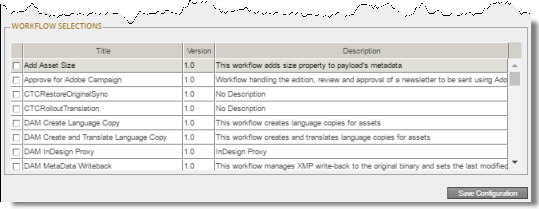
The Advanced Settings page opens. The Workflow Selections section of this page lists the workflows that are available for display in the Run Workflows tab of the Globalization Tool, where you can select them to run against multiple pages.
-
Select the check boxes for the workflows to display in the Run Workflows tab of the Globalization Tool.
-
Click Save Configuration to save your changes.
A message in red at the top of the page states that your workflow selection was saved.
5 - Configuring who Can Use the Globalization Tool
In the Action Permissions section of the Advanced Settings page, you can configure which user groups can perform specific actions in the Globalization Tool.
For instructions on using the Globalization Tool, refer to the Lionbridge Connector for Adobe Experience Manager User Guide.
-
Click Admin Tools > Advanced Settings in the Lionbridge Connector rail. For information on opening the Lionbridge Connector rail, see Configuring the Connector.
The Advanced Settings page opens. The Action Permissions section at the bottom of this page lists all the actions that are available in the Globalization Tool.
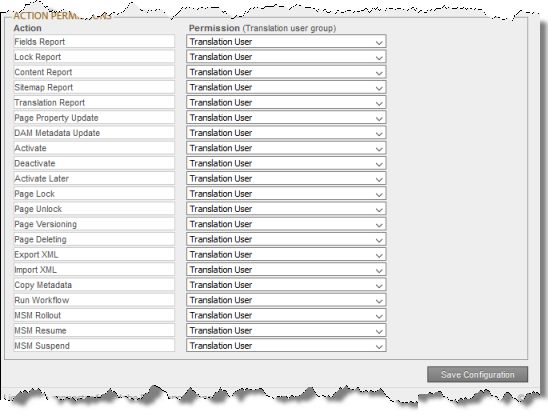
- For each action, you can select the user group whose members can perform the action in the Globalization Tool. By default, members of the Translation User user group have permission to perform each action. For a list and description of user groups, see Configuring Adobe Experience Manager User Permissions for Translation Users.
| Action |
Description |
| Fields Report |
Generating the Field report from the Reporting tab of the Globalization Tool. |
| Lock Report |
Generating the Lockreport about multiple pages from the Reporting tab of the Globalization Tool. |
| Content Report |
Generating the Content report about multiple pages from the Reporting tab of the Globalization Tool. |
| Sitemap Report |
Generating the Sitemap report about multiple pages from the Reporting tab of the Globalization Tool. |
| Translation Report |
Generating the Translation report about multiple pages from the Reporting tab of the Globalization Tool. |
| Page Property Update |
Updating page properties for multiple pages from the Page Property Updating tab of the Globalization Tool. |
| DAM Metadata Update |
Updating metadata for multiple digital assets (DAM) from the DAM Metadata Update tab of the Globalization Tool. |
| Activate |
Activating multiple pages from the Activation tab of the Globalization Tool. |
| Deactivate |
Deactivating multiple pages from the Activation tab of the Globalization Tool. |
| Activate Later |
Specifying multiple pages to activate later from the Activation tab of the Globalization Tool. |
| Page Lock |
Locking multiple pages from the Activation tab of the Globalization Tool. |
| Page Unlock |
Unlocking multiple pages from the Activation tab of the Globalization Tool. |
| Page Versioning |
Creating new versions of multiple pages from the Activation tab of the Globalization Tool. |
| Page Deleting |
Deleting multiple pages and the corresponding translated pages from the Activation tab of the Globalization Tool. |
| Export XML |
Exporting the content of multiple pages as XML from the Activation tab of the Globalization Tool. |
| Import XML |
Importing the content of multiple pages as XML from the Activation tab of the Globalization Tool. |
| Copy Metadata |
In the Copy Metadata tab of the Globalization Tool:
- copying metadata to multiple pages
- sending metadata from multiple pages for translation as a single job |
| Run Workflow |
Running workflows on multiple pages from the Run Workflows tab of the Globalization Tool. |
| MSM Rollout |
Rolling out changes to multiple pages from the Rollout tab of the Globalization Tool. |
| MSM Resume |
Resuming the Livecopy relationships on multiple pages from the Rollout tab of the Globalization Tool. |
| MSM Suspend |
Suspending the Livecopy relationships on multiple pages from the Rollout tab of the Globalization Tool. |
- Click Save Configuration to save your changes.
6 - Automatically Remove/Replace Character from Translation Content
In the Automatically Remove/Replace Character from Translation Content section of the Advanced Settings page, you can can configure the list of characteres that can be either removed or replaced by another while sending translation content.
To configure characteres to be removed or replace from translation content:
-
Click Admin Tools > Advanced Settings in the Lionbridge Connector rail. For information on opening the Lionbridge Connector rail, see Configuring the Connector.
The Advanced Settings page opens, displaying the Automatically Remove/Replace Character from Translation Content section near the top of the page.
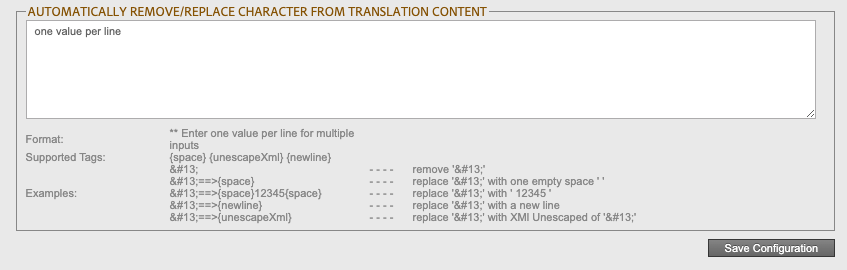
-
According to the intended behavior (remove/replace) follow the format:
-
Click Save Configuration to save your changes.
7 - Preventing Specific URL and Content-Link Conversions
In the Prevent URL Conversions section of the Advanced Settings page, you can prevent the Connector from converting links to specific files or file types.
Note: This option is relevant only if either or both of the Language Conversion (URL Reference) and Language Conversion (Content Link) options are configured in the Translation Settings section of the Configuration page, as described in Translation Settings.
To prevent the Connector from converting specific URL and content links:
-
Click Admin Tools > Advanced Settings in the Lionbridge Connector rail. For information on opening the Lionbridge Connector rail, see Configuring the Connector.
The Advanced Settings page opens, displaying the Prevent URL Conversions section near the top of the page.
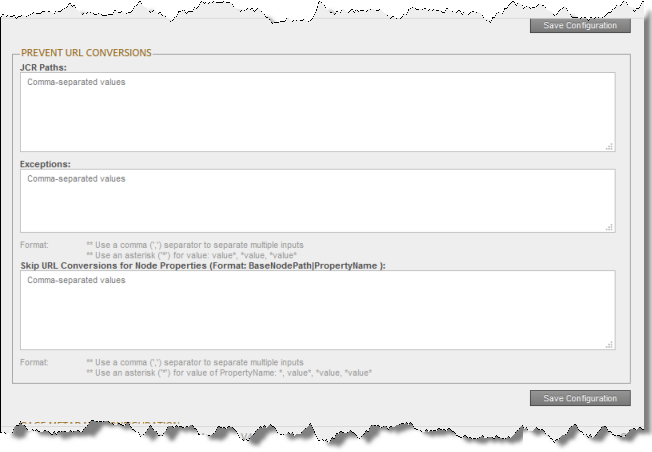
- In the JCR Paths field, enter the JCR (Java Content Repository) path of specific files or pages. This prevents the Connector from converting any links to these files or pages.
Tip: You can also enter a file type, to prevent converting all links to files with a specific file type. For example, you can enter *.jpg to exclude all files with that extension.
Notes: Use a comma ( , ) to separate multiple entries. Entries are not case sensitive.
- In the Exceptions field, enter the JCR (Java Content Repository) path of pages or files to exclude from the exclusion list, in the JCR Paths field, above. For example, suppose you want to prevent converting links to all .JPG files, but you want to convert the link to
filename.jpg: In the JCR Paths field, above, you enter *.jpg; while in the Exceptions field, you enter the path to filename.jpg. Use a comma ( , ) to separate multiple entries. Entries are not case sensitive.
Notes: Use a comma ( , ) to separate multiple entries. Entries are not case sensitive.
-
In the Skip URL Conversions for Node Properties field, enter the names of node properties. This prevents the Connector from converting any URLs for these nodes. You can exclude either all instances of a node or only instances of a node for a specified path.
-
To prevent URL conversion of a node for all sites, add the /content prefix for to the node property. For example, to exclude the cq:master node property from URL conversion for all sites, enter the base node path as /content|cq:master.
-
To prevent URL conversion of a node for a specific path, specify that path. For example, to exclude the cq:master node property from URL conversion for the “company A” site, specify /content/companyA|cq:master.
Tip: To substitute a wildcard as part of the property name, use an asterisk (*). For example, specifying /content|cq:* prevents URL conversion for any property whose name starts with cq: for all sites.
- Click Save Configuration to save your changes.
A message in red at the top of the page states that the configuration was saved.
8 - Skipping Translations in the Local TM
In the Skip Translation with LocalTM section of the Advanced Settings page, you can prevent the Connector from using any previous translations of the specified components that are stored in the local TM.
Note: This option is relevant only if user select the Use Local TM option when sending out content for translation. For more information about this feature, refer to the Lionbridge Connector for Adobe Experience Manager User Guide.
To prevent the Connector from using any previous translations of the specified components that are stored in the local TM:
- Click Admin Tools > Advanced Settings in the Lionbridge Connector rail. For information on opening the Lionbridge Connector rail, see Configuring the Connector.
The Advanced Settings page opens. The Skip Translation with LocalTM section is in the middle of the page.
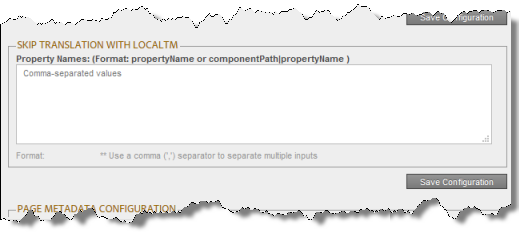
- In the text box, enter either the names of the properties or component properties in the following formats:
Notes: Use a comma ( , ) to separate multiple entries. Entries are not case sensitive.
- Click Save Configuration to save your changes.
A message in red at the top of the page states that the configuration was saved.
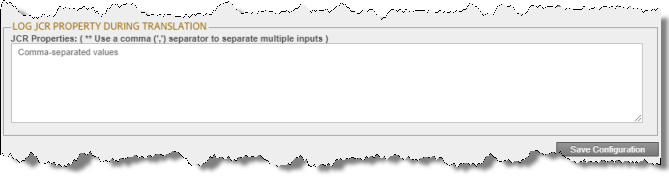
9 - Logging JCR Properties During Translation
In the Log JCR Properties During Translation section of the Advanced Settings page, you specify which JCR properties to write to the log file during translation.
To specify which JCR properties to write to the log file:
-
Click Admin Tools > Advanced Settings in the Lionbridge Connector rail. For information on opening the Lionbridge Connector rail, see Configuring the Connector.
The Advanced Settings page opens, displaying the Log JCR Properties During Translation section in the middle of the page.
-
In the text box, enter the JCR properties to write to the log file during translation. Use a comma ( , ) separator to separate multiple JCR properties.
-
Click Save Configuration to save your changes.
A message in red at the top of the page states that the configuration was saved.
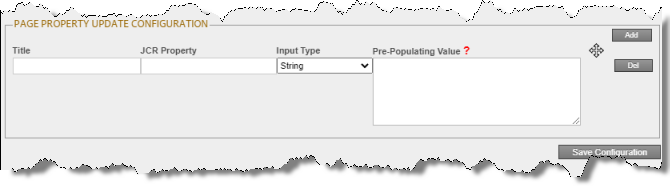
10 - Configuring which Metadata Fields Are Available for Translation and Copying
In the Page Property Update Configuration section of the Advanced Settings page, you can configure the Connector to translate and copy metadata fields to the Page Property Updating tab of the Globalization Tool.
-
Click Admin Tools > Advanced Settings in the Lionbridge Connector rail. For information on opening the Lionbridge Connector rail, see Configuring the Connector.
The Advanced Settings page opens. In the Page Property Update Configuration section of this page, you can specify the parameters of the metadata fields that will be translated and copied to the Page Property Updating tab of the Globalization Tool.
-
To specify the parameters of the metadata fields to translate and copy:
a. Click Add, in the top-right corner of this section.
This adds a blank row at the top of the list.
b. In this row, enter the following information:
| Column |
Description |
| Title |
The title of the metadata field. |
| JCR Property |
The JCR property of the metadata field, for example: dc:title. |
| Input Type |
The type of metadata field. |
| Pre-Populating Value |
The default value that will be displayed in the Page Property Updating tab of the Globalization Tool. Enter one value per line.
-Supported format of value for selection is Display Text. - Value, for example: Machine Translation - MT.
-Supported tag of a value for date input: {Today}.
- Supported tag of a value for date and time input: {Now}. |
For a list and description of JCR properties, refer to the Adobe Experience Manager documentation, which is available at: https://docs.adobe.com/docs/en/aem/6-2/develop/components.html.
c. Repeat the previous sub-steps to add rows with additional metadata fields.
- Click Save Configuration to save your changes.
A message in red at the top of the page states that the metadata-field configuration was saved.
Tips: To edit a set of parameters, edit the corresponding information in the list. To delete a set of parameters, so that it is excluded from the list of metadata fields, click Del in the corresponding row. A message box confirms that you want to delete this field. Click OK to confirm.
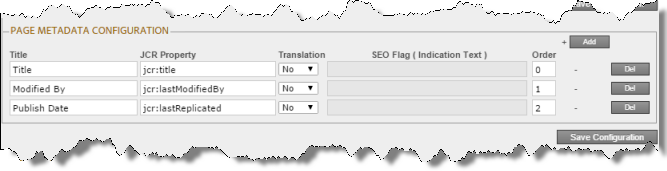
11 - Configuring which Page Metadata is Available for Copying and Translation
In the Page Metadata Configuration section of the Advanced Settings page, you can configure:
- which metadata is available for copying to multiple pages, including multiple language copies of those pages, in the Copy Metadata tab of the Globalization Tool
- which metadata is available to send out for translation by selecting the Translate Metadata check box in:
- the Options page of the Bulk Translation wizard
- the Translation Queue
- the Translation tab of the Globalization Tool
- the Translation Options tab of the Translate Content dialog box, available from the Touch-Optimized UI (Adobe Experience Manager version 6.3 and higher only
- the LSP and Options tab of the Re-send translation job dialog box
- SEO flags to include in the XML translation files
For instructions on copying metadata and sending it for translation, refer to the Lionbridge Connector for Adobe Experience Manager User Guide.
For instructions on configuring which metadata of digital assets (DAM) is available for updating, including multiple language copies of those assets, see Configuring which Digital Asset Metadata is Available for Updating.
- Click Admin Tools > Advanced Settings in the Lionbridge Connector rail. For information on opening the Lionbridge Connector rail, see Configuring the Connector.
The Advanced Settings page opens. The Page Metadata Configuration section of this page lists the JCR properties that are available for selection in the Copy Metadata tab of the Globalization Tool, where you can copy metadata to multiple pages. You can also send these properties for translation, as described above.
-
To add the JCR properties as metadata available for selection to copy to multiple pages or to send for translation:
a. Click Add, in the top-right corner of this section.
This adds a blank row at the top of the list.
b. In this row, enter the following information:
| Column |
Description |
| Title |
The title of the metadata. |
| JCR Property |
The JCR property of the metadata, for example: jcr:title. |
| Translation |
Indicate whether the metadata is available only for copying or also for translation. Select one of the following:- Yes: The metadata is available for both translation and copying.
- No: The metadata is not available for translation. It is available for copying.
|
| SEO Flag |
Specify the SEO flag to include in the XML translation files for this metadata.
Important: To enable this feature, you must specify the Indicate SEO field in translation file option in the UI and Default Settings section of the Configuration page. For details, see UI and Default Settings. |
| Order |
The order for copying or translating the metadata. This is the order in which the metadata is displayed in the file. |
For a list and description of JCR properties, refer to the Adobe Experience Manager documentation, which is available at: https://docs.adobe.com/docs/en/aem/6-2/develop/components.html.
c. Repeat the previous sub-steps to add rows with additional metadata.
- Click Save Configuration to save your changes.
A message in red at the top of the page states that the metadata configuration was saved.
Tips: To edit a JCR property, edit the corresponding information in the list. To delete a JCR property, so that it is excluded from the list of available metadata, click Del in the corresponding row. A message box confirms that you want to delete this field in the report. Click OK to confirm.
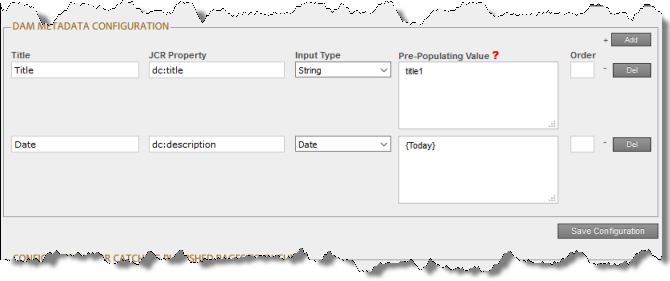
12 - Configuring which Digital Asset Metadata is Available for Updating
In the DAM Metadata Configuration section of the Advanced Settings page, you can configure which metadata of digital assets (DAM) is available for updating, including multiple language copies of those assets, in the DAM Metadata Update tab of the Globalization Tool.
For instructions on updating metadata of digital assets, refer to the Lionbridge Connector for Adobe Experience Manager User Guide.
-
Click Admin Tools > Advanced Settings in the Lionbridge Connector rail. For information on opening the Lionbridge Connector rail, see Configuring the Connector.
The Advanced Settings page opens. In the DAM Metadata Configuration section of this page, you can enter the digital asset metadata fields that are available for selection in the DAM Metadata Update tab of the Globalization Tool, where you can update the metadata of multiple digital assets, including multiple language versions of these assets.
-
To add the JCR properties as metadata available for selection to update:
a. Click Add, in the top-right corner of this section.
This adds a blank row at the top of the list.
b. In this row, enter the following information:
| Column |
Description |
| Title |
The title of the DAM metadata. |
| JCR Property |
The JCR property of the DAM metadata, for example: dc:title. |
| Input Type |
The type of DAM metadata that is available for updating. |
| Pre-Populating Value |
The default value for input or initial selection options. Enter one value per line.- Supported format of value for selection is Display Text - Value, for example: Machine Translation- MT.
- Supported tag of a value for date input: {Today}.
- Supported tag of a value for date and time input: {Now}.
|
| Order |
The order for updating the DAM metadata. This is the order in which the DAM metadata is displayed in the file. |
For a list and description of JCR properties, refer to the Adobe Experience Manager documentation, which is available at: https://docs.adobe.com/docs/en/aem/6-2/develop/components.html.
c. Repeat the previous sub-steps to add rows with additional metadata.
- Click Save Configuration to save your changes.
A message in red at the top of the page states that the DAM metadata configuration was saved.
Tips: To edit a JCR property, edit the corresponding information in the list. To delete a JCR property, so that it is excluded from the list of available metadata, click Del in the corresponding row. A message box confirms that you want to delete this field in the report. Click OK to confirm.
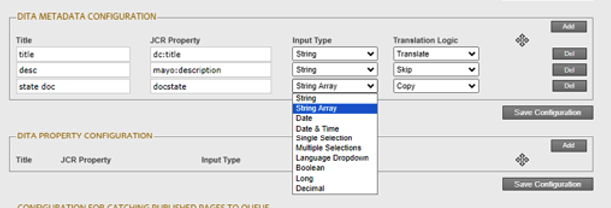
13 - Configuring which DITA Metadata is Available for Translation and Copying
Note: Please note that this options are only available for the on-premises users, Cloud users may not find these features while using the Lionbridge AEM Connector.
In the DITA Metdata Configuration section of the Advanced Settings page, you can configure the Connector to translate/copy or skip DITA metadata fields.
-
Click Admin Tools > Advanced Settings in the Lionbridge Connector rail. For information on opening the Lionbridge Connector rail, see Configuring the Connector.
The Advanced Settings page opens. In the DITA Metadata Configuration section of this page, you can specify the parameters of the metadata fields and the intended logic.
-
To specify the parameters of the metadata fields and its behavior:
a. Click Add, in the top-right corner of this section.
This adds a blank row at the top of the list.
b. In this row, enter the following information:
| Column |
Description |
| Title |
The title of the metadata field. |
| JCR Property |
The JCR property of the metadata field, for example: dc:title. |
| Input Type |
The type of metadata field. |
| Translation Logic |
You can select the required input type from this dropdown. Example: - Copy, Translate, and Skip. Please refer to the detailed Summary to understand how each of the following Translation Logic functions.
- Translate: - The property value is translated into the target language.
- Copy: - 1. The property value is not translated into the target language. - 2. The property value from the source language is copied into the target language.
- Skip: - The property value is not changed. |
For a list and description of JCR properties, refer to the Adobe Experience Manager documentation, which is available at: Adobe Experience Manager (AEM) Components - The Basics.
c. Repeat the previous sub-steps to add rows with additional metadata fields.
- Click Save Configuration to save your changes.
A message in red at the top of the page states that the metadata-field configuration was saved.
Tips: To edit a set of parameters, edit the corresponding information in the list. To delete a set of parameters, so that it is excluded from the list of metadata fields, click Del in the corresponding row. A message box confirms that you want to delete this field. Click OK to confirm.
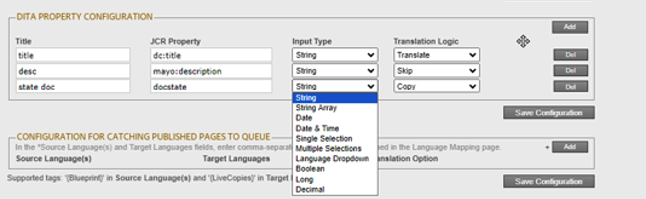
14 - Configuring which DITA Property is Available for Translation and Copying
Note: Please note that this options are only available for the on-premises users, Cloud users may not find these features while using the Lionbridge AEM Connector.
In the DITA Property Configuration section of the Advanced Settings page, you can configure the Connector to translate/copy or skip DITA property fields of a specific DAM asset.
-
Click Admin Tools > Advanced Settings in the Lionbridge Connector rail. For information on opening the Lionbridge Connector rail, see Configuring the Connector.
The Advanced Settings page opens. In the DITA Metadata Configuration section of this page, you can specify the parameters of the metadata fields and the intended logic.
-
To specify the parameters of the metadata fields and its behavior:
a. Click Add, in the top-right corner of this section.
This adds a blank row at the top of the list.
b. In this row, enter the following information:
| Column |
Description |
| Title |
The title of the metadata field. |
| JCR Property |
The JCR property of the metadata field, for example: dc:title. |
| Input Type |
The type of metadata field. |
| Translation Logic |
You can select the required input type from this dropdown. Example: - Copy, Translate, and Skip. Please refer to the detailed Summary to understand how each of the following Translation Logic functions.
- Translate: - The property value is translated into the target language.
- Copy: - 1. The property value is not translated into the target language. - 2. The property value from the source language is copied into the target language.
- Skip: - The property value is not changed. |
For a list and description of JCR properties, refer to the Adobe Experience Manager documentation, which is available at: Adobe Experience Manager (AEM) Components - The Basics.
c. Repeat the previous sub-steps to add rows with additional metadata fields.
- Click Save Configuration to save your changes.
A message in red at the top of the page states that the metadata-field configuration was saved.
Tips: To edit a set of parameters, edit the corresponding information in the list. To delete a set of parameters, so that it is excluded from the list of metadata fields, click Del in the corresponding row. A message box confirms that you want to delete this field. Click OK to confirm.
15 - Configuring Translation Settings for Catching Pages to the Translation Queue
In the Configuration for Catching Published Pages to Queue section of the Advanced Settings page, you specify the translation settings for published pages that you add to the Translation Queue, using one of the following features:
- Catch Published Workflow Pages to Queue
- Catch Pages from Publish Event to Queue
You specify both these features by selecting the corresponding check boxes in the Translation Settings section of the Configuration page. For more information about these features, see Translation Settings.
To configure the translation settings when sending published pages directly to the Translation Queue:
-
Click Admin Tools > Advanced Settings in the Lionbridge Connector rail. For information on opening the Lionbridge Connector rail, see Configuring the Connector.
The Advanced Settings page opens. The Configuration for Catching Published Pages to Queue section is near the bottom of the page.

-
Click Add.
The section expands.
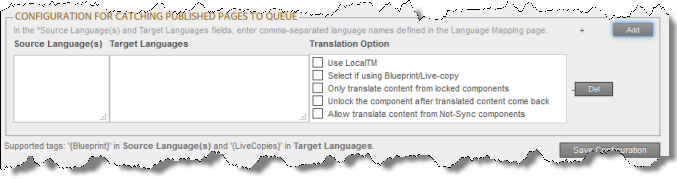
- Specify the following translation settings for published pages that are added to the Translation Queue:
| Field |
Description |
| Source Language(s) |
The source language(s) of the published pages to add to the Translation Queue.- Enter comma-separated language names, as they are defined in the Language Mapping page, described in Configuring Connector Languages.
- To specify the source language that the Connector will detect from the relevant Blueprint pages, add the {Blueprint} tag.
|
| Target Languages |
The target languages into which to translate the published pages that are added to the Translation Queue.- Enter comma-separated language names, as they are defined in the Language Mapping page, described in Configuring Connector Languages.
- To specify the target languages that the Connector will detect from the relevant live copies of Blueprint pages, add the {LiveCopies} tag.
|
| Use LocalTM |
This feature determines whether to check each component in the source version of the item for any content changes, and send only changed components out for translation. If a component was previously translated and it has not changed, then the Connector does not send it for translation again: Instead, it uses the stored translation. This feature reduces the quantity of content that the Connector sends to translation providers, which reduces your cost. However, it needs the Connector translation backup data, and it increases the Connector processing time before sending out the items for translation.- If this check box is selected, the Connector checks whether content was already translated before sending it out for translation.
- If this check box is cleared, the Connector sends out content for translation without checking whether it has already been translated.
|
| Select if using Blueprint/Live-copy |
This option is relevant when the target pages are MSM (Multi Site Manager) live copy pages, which means that Adobe Experience Manager automatically updates a target page when the corresponding source page changes. It prevents the Connector from overwriting unique source content that already exists in the target pages.
This is useful when you are sending a page for translation that has been used in the past to push content to other pages, and includes target page content which has been changed, for example, regionalized. In this scenario you do not want to overwrite the regionalized content as the translation process occurs. Select this option when you do not want the Connector to overwrite components in the target pages that include regionalized content with the newly translated content.- If this check box is selected, the Connector does not overwrite unique source content that already exists in the target pages.
- If this check box is cleared, the Connector does overwrite unique source content that already exists in the target pages.
Recommendation: Select this check box if you are using the live-copy feature. |
| Only translate content from locked components |
This option enables users to send out only content from locked components for translation.- If this check box is selected, users can send out content for translation only if it is from a locked component.
- If this check box is cleared, users can send out content for translation whether or not it is from a locked component.
Note: Locked components have an inheritance relationship between a source Blueprint page and the connected live copy page. When sending content for translation using Sidekick, users can choose whether to send for translation the content from locked components, which is inherited from a Blueprint component. This is useful if, for example, the page has both global and regional information and you only want to translate (replace) the global content that is created via a Blueprint page. In this scenario, suppose that the regional content on the page is manually translated in house, and that it has not changed. You would not want to tamper with it. However, using the same scenario, the global content from head office has changed and needs translation. You would select this check box to separate the content and localize only the new, inherited content.
Note about Blueprint pages: If the Pickup Content From Blueprint Pages setting is specified, then the Connector always acts as though this option is selected, even if it is not selected. This occurs because only content from locked components are rolled out from Blueprint pages to Livecopy pages. For more information, see UI and Default Settings. |
| Unlock the component after translated content come back |
This option automatically unlocks a component after translated content returns.This option is relevant only when the Select if using Blueprint/Live-copy is been selected. After translated content returns, it automatically unlocks a component, which breaks the MSM inheritance.
Warning: This breaks the inheritance between the component and its Blueprint page, so that it no longer inherits new content. However, you can use the CTCRestoreOriginalSync workflow to relock the component and recreate the inheritance. For details, see Viewing the Restore Original Sync Workflow- If this check box is selected, the Connector automatically unlocks a component after translated content returns.
- If this check box is cleared, the Connector does not automatically unlock a component after translated content returns.
|
| Allow translate content from Not-Sync’d components |
This option enables users to send content for translation even if it is not synchronized. This means it does not have a relationship to a Blueprint page, so it cannot be synchronized with it. This can happen if you are not using the MSM (Multi Site Manager) feature of Adobe Experience Manager, or if this is a page with regionalized content that does not inherit content from a Blueprint page.- If this check box is selected, users can send out content for translation if it does not have a relationship to a Blueprint page.
- If this check box is cleared, users cannot send out content for translation if it does not have a relationship to a Blueprint page.
Important: The Connector treats certain page properties (jcr:content, jcr:title, jcr:description) as unlocked page properties. Therefore, if you want the Connector to send these page properties for translation, you must select this check box.
Recommendation: Select this check box if you are using either the live-copy or the language-copy features.
Note about Blueprint pages: If the Pickup Content From Blueprint Pages setting is specified, then the Connector always acts as though this option is selected, even when it is not. This occurs because only content from locked components is rolled out from Blueprint pages to Livecopy pages. For more information, see Enabling Content Collection from Blueprint Pages |
- Click Save Configuration to save your changes.
A message in red at the top of the page states that the configuration was saved.
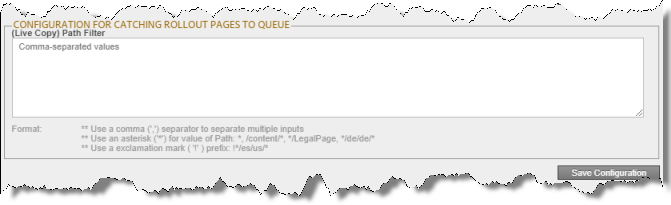
16 - Configuring Paths for Catching Rollout Pages to the Translation Queue
In the Configuration for Catching Rollout Pages to Queue section of the Advanced Settings page, you can specify the paths to filter rollout pages to add to the Translation Queue.
Note: To enable the Connector to automatically add rollout pages to the Translation Queue, you must select the Catch rollout pages to [rollout] queue check box in the Translation Settings section of the Configuration page. For detailed instructions, see Translation Settings.
To specify the paths for filtering rollout pages to add directly to the Translation Queue:
-
Click Admin Tools > Advanced Settings in the Lionbridge Connector rail. For information on opening the Lionbridge Connector rail, see Configuring the Connector.
The Advanced Settings page opens, displaying the Configuration for Catching Rollout Pages to Queue section near the bottom of the page.
-
In the text box, enter the live-copy paths to filter the rollout pages to catch and add to the Translation Queue, using the following formatting:
- Use a comma ( , ) separator to separate multiple paths.
- Use an asterisk ( * ) for to indicate a wildcard value in a path, for example: *, /content/*, */LegalPage, */de/de/*.
- Use an exclamation mark ( ! ) prefix to indicate a path to exclude, for example: !*/es/us/*.
-
Click Save Configuration to save your changes.
A message in red at the top of the page states that the configuration was saved.
17 - Configuring Default Job Name for Bulk Translation
In the Configuring default job name for Bulk Translation tab of the Advanced Settings page, you specify the default job name for Bulk Translation.
-
Click Admin Tools > Advanced Settings in the Lionbridge Connector rail. For information on opening the Lionbridge Connector rail, see Configuring the Connector.
The Advanced Settings page opens, Default Job Name Format for Bulk Translation section at the top of the page.
-
Enter in Job Name Format: with the help of tags
support tags: {targets} {totalTargets} {totalPages} {time}
Example: SUBMIT: {targets} ({totalTargets} targets for {totalPages} pages) @ {time}.
This will create job name as SUBMIT: de,es,fr (3 targets for 2 pages) @ 2022-06-18 12.36 PM.
-
Click the Save Configuration to save your changes.