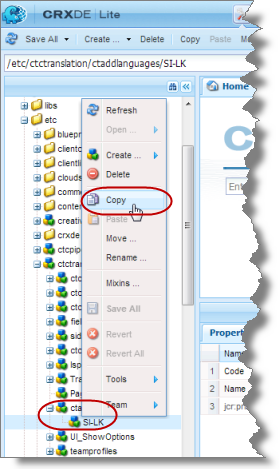
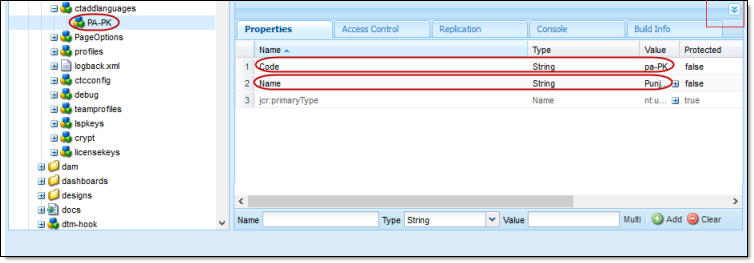
You configure the language branches in the Web site structure where the Connector returns translated content, and you configure the language options for the Bulk Translation wizard and Sidekick.
You must correctly configure all the languages you are using on your site before sending any jobs for translation.
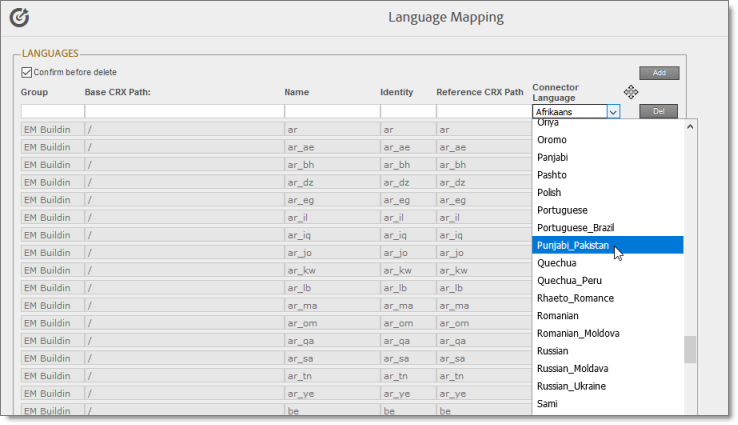
Note about Adobe Experience Manager built-in languages: In Adobe Experience Manager, the Connector provides default language mapping for Adobe Experience Manager built-in languages. Additional setup is not required, and therefore, these languages are not available for further configuration, as shown below. However, you can add additional language mappings, as described in this section.

Note about adaptive forms: If you plan to send adaptive forms for translation, add all required default Adobe built-in languages in this page. Do not rely on the default Adobe language mapping.
Note about i18n dictionary items: If you plan to send i18n dictionary items for translation, you must configure the languages for these items separately, as described in the Adobe Experience Manager documentation, here: https://experienceleague.adobe.com/en/docs/experience-manager-65/content/implementing/developing/components/internationalization/i18n-translator. In addition, the i18n dictionaries language codes may be different from the language codes used in pages. For details, see: https://experienceleague.adobe.com/en/docs/experience-manager-65/content/implementing/developing/components/internationalization/i18n-translator#managing-supported-lanuages.
Important: Do not change the name of a language or delete a language if there is translation content in the Translation Queue, or if there are translation jobs in progress.
Note: You can also adding custom Connector languages and codes. For details, see Adding Custom Connector Languages and Codes.
Note: There are two types of i18n in AEM.
Used by old AEM version and still works with AEM 6.5, node structured i18n. The language code is just a part of i18n path. Ex.: /apps/[CUSTOMER]/i18n/en, /apps/[CUSTOMER]/i18n/de. If the language code used in path is NOT standard AEM language code, the Language Mapping will need to be define. This is only required if the language code used in path is standard AEM language code. Json based i18n. Ex. /apps/[CUSTOMER]/i18n/en.json, /apps/[CUSTOMER]/i18n/de.json. If the the language code used in file name is a standard AEM language code, then, no Language Mapping is required.
To configure languages for the Connector:
- Click Admin Tools > Language Mapping in the Lionbridge Connector rail to open the Language Mapping page. For information on opening the Lionbridge Connector rail, see Configuring the Connector.

-
Click Add in the top-right corner of the page to add a new language.
A blank row is displayed at the bottom of the list. Enter the new language in this row.
-
Enter the following information in the appropriate columns:
Note: If you have multiple sites in the same Adobe Experience Manager instance with different language structures (for example, en and en_US), and you want to convert links to point to the corresponding pages in the target language, then you must map the languages for these sites to each other, using the Group, Base CRX Path, and Identity columns, as described below. Otherwise, leave these columns blank. For information about this feature, see the descriptions of the Language Conversion (URL Reference) and Language Conversion (Content Link) check boxes in the Translation Settings section of the Configuration page, in Translation Settings.
| Column | Description | Example |
|---|---|---|
| Group | Required only if you have multiple sites with different language structures, and if you want to convert links to point to the corresponding pages in the target language. This is the site identifier. For example, if the web1 site has the /content/web1/en/us and /content/web1/fr/fr pages, and the web2 site has the /content/web2/en and /content/web2/fr pages, then you can define two groups, web1 and web2:
Note: Do not use the “AEM” built-in group for any custom languages. That group is only for default AEM languages. Maximum length is 50 characters. |
Site1 |
| Base CRX Path | Required only if you have multiple sites with different language structures, and if you want to convert links to point to the corresponding pages in the target language. This is the base content path for the group, described above. For example:
There are additional configuration options:
|
/content |
| Name | The name of the language, which is the language identifier. Note: Do not use a space between the language code and country code. Instead, use an underscore (_). |
CA_FR |
| Identity | Required only if you have multiple sites with different language structures, and if you want to convert links to point to the corresponding pages in the target language. Links the same language across multiple sites. For example, both web1-us-en (Reference CRX Path: en/us) and web2-en (Reference CRX Path: en) have the same identity: en-us.Notes about adaptive forms : In the UI and Default Settings sub-section of the Configuration page, clear the Disable default language mapping (6.1+) check box. For details, see UI and Default Settings. If you are translating adaptive forms into a custom language, then enter the corresponding default Adobe language code in this column. This step is required because adaptive forms support only the locales defined in Adobe languages. |
en_us |
| Reference CRX Path | The path to the content for the language in CRXDE Lite.
|
ca/fr |
| Connector Language | The corresponding Connector language code. Select it from the list. For a list and description of Connector language codes, see Appendix: Language Codes. Note: For the AEM Connector use the Language Identifier. Note: For the AEM Cloud Connector use the ISO Language Code. |
French_Canada fr-CA |
Note: Any new language you add is not automatically displayed in the Bulk Translation wizard or in Sidekick. For the language to be displayed there, you must add it to the relevant team profile, as described in Configuring Team Profiles.
-
Repeat steps 2 and 3 for any additional languages to add.
-
You can modify the values for any other languages in the list.
-
You can drag-and-drop the languages on this page to modify the order in which they are displayed in the list of languages for the users.
-
When you are done, click Save Configuration at the bottom of the page.
This language configuration will be displayed in the Bulk Translation wizard and when accessing the Connector from Sidekick.
- To delete a language so that it will no longer be displayed in the Bulk Translation wizard and when accessing the Connector from Sidekick, click the corresponding Del button. A confirmation message box is displayed before the language is deleted.
Tip: To prevent displaying the confirmation message box each time you delete a language mapping, clear the Confirm before delete check box.
- To export the language settings to an XML file, click Export at the bottom of the page. The Connector downloads the XML file.


