This the multi-page printable view of this section. Click here to print.

Return to the regular view of this page.

Configuring How the Connector Handles Special Characters

You can configure how the Connector handles special characters. This is important because it determines how special characters are displayed for your translators.

Background

The Connector exports your content from Adobe Experience Manager and sends it for translation as XML files. A valid XML file cannot contain any of the special characters listed in the table below. Instead, a valid XML file must use the following entity references to represent special characters:

Special Character Represented by This Entity Reference
< &lt;
> &gt;
& &amp;
' &apos;
" &quot;

Escaping is the term that describes creating valid XML by converting any XML special characters to their entity references.

How does Adobe Experience Manager handle special characters?

There are two types of text within Adobe Experience Manager:

  • plain text
  • rich text, which can contain HTML formatting, links. etc.

You can use CRXDE Lite to view how Adobe Experience Manger stores content.

CRXDE Lite handles special characters differently, depending on whether they are in a plain text title, or a rich text paragraph.

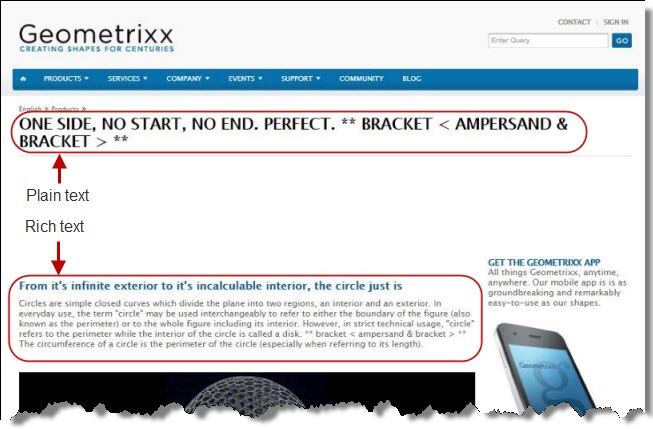
  • In plain text, CRXDE Lite does not escape special characters. It displays them as the actual characters. For example, it displays & as &.
  • In rich text, CRXDE Lite escapes special characters. It displays them as their corresponding entity references. For example, it displays & as &.
How does the Connector handle special characters?

When the Connector prepares content for translation, it packages all content into XML translation files. This necessitates escaping all special characters into their corresponding entity references. However, the Connector does not differentiate between plain text (which displays the actual special characters) and rich text (which displays the entity references instead of the special characters). Therefore, the Connector escapes all special characters.

As a result, the rich text that the translator receives may contain a combination of special characters and entity references.

For example:

Suppose that the rich-text paragraph contains the text that is rendered as follows in the CRXDE Lite viewer: &.

CRXDE Lite actually stores this rich-text content as its corresponding entity reference: &.

When the Connector processes this rich-text content to create XML files to send out for translation, it escapes this content as follows:

  • & becomes &
  • amp; remains amp;

As a result, this content is escaped twice (once by CRXDE Lite and then by the Connector).

The Connector then stores this content as &amp; in the XML translation file, which it sends to the translator.

However, some translation systems cannot handle double-escaped special characters such as &amp; or a mix of single-escaped and double-escaped special characters.

1 - Why do translators encounter problems with special characters?

Some translation systems can handle double-escaped special characters, such as &amp;, by displaying them as & or &. However, some translation systems cannot handle double-escaped special characters, such as &amp;.

There are several ways to handle this.

Recommendation 1 – Same as Source option

If your translator’s translation system supports the “Same as Source” option, then instruct your translator to select this option. This converts and returns all special characters–actual characters, escaped characters, and double-escaped characters–as they were received.

However, this feature is not supported by all translation systems or they may not be able to change this setting. In those scenarios, or if you see a combination of single- and double-escaped characters, consider one of the following recommendations.

Recommendation 2 – All single encoded

Your translator should handle each type of special character consistently. For example, in the target XML:

  • Your translator can return the following special characters as single escaped:

    • <

    • >

    • &

  • Your translator can return the following special characters as the actual characters:

    • '

    • "

Recommendation 3 – Use CData tags

Changing the Use_CData setting from its default value of false to true. This setting instructs the Connector to wrap content in CData tags, which prevents the Connector from escaping special characters, and avoids the scenario of double-escaped characters. However, this setting does not prevent Adobe Experience Manager from single-escaping special characters in rich text.

Note: The Connector adds and removes the CData tags, so they are not displayed within Adobe Experience Manager’s CRXDE Lite.

Important: If you change this setting, your translators must return the translated content in CData tags, just as they received the source content in CData tags. They should not run any post-translation scripts to escape the special characters before returning the content.

Warning: If you change this setting in the middle of a translation job, it can interfere with the integrity of the translation memory.

For detailed instructions on changing the Use_CData setting from its default value of false to true, see Adding CData Tags to Translation Files.

2 - Adding CData Tags to Translation Files

You can change the Use_CData setting from its default value of false to true to add CData tags to translation files, which prevents your translators from viewing double-escaped special characters, such as &amp;.

To configure this setting:
  1. Do one of the following to open CRXDE Lite:

    • In the Touch-Optimized UI of Adobe Experience Manager, click Tools in the Adobe Experience Manager rail. Then,in the Navigation page, click CRXDE Lite.
    • In the Classic UI of Adobe Experience Manager, click CRXDE Lite in the right pane.
    • In your Web browser, navigate to /crx/de/index.jsp on your Adobe Experience Manager instance.

CRXDE Lite opens.

  1. In the Explorer pane on the left, navigate to /etc/ctctranslation/TransOptions.
  2. Locate the Use_CData property.
  3. Double-click in the Value column, and select true from the dropdown list.
  4. In the CRXDE Lite menu, click Save All.

The Connector will now automatically wrap every XML translation file it sends out for translation in CData tags.