If the Rollout feature is enabled, then when users roll out files, the Connector automatically sends them to the Translation Queue, using your company’s default translation settings. There are three settings for this feature. The setting you choose determines the configuration method you use:
- You can configure the Connector to send all your rollout pages to the Translation Queue.
- You can configure the Connector to send only some of your rollout pages to the Translation Queue, using a workflow.
- You can configure the Connector to send only some of your rollout pages to the Translation Queue, using a filter.
Note: The setting determines the configuration method you use.
Important information: Adobe Experience Manager has language-mappings that are included by default and that cannot be removed. When you roll out pages, the Connector automatically sends all configured languages, including these defaults, to the Translation Queue. You can configure the Connector to send only configured languages to the Translation Queue. For more information and detailed instructions, see Configuring Default Language-Mapping Settings for the Rollout Feature.
Configure the Connector to send all rollout pages to the Translation Queue
-
In the Translation Settings section of the Configuration page, select the Catch rollout pages to [Rollout] Queue check box. For details, see Translation Settings.
-
When creating a Livecopy site, use the default Adobe Experience Manager rollout configuration.
Configure the Connector to send only some rollout pages to the Translation Queue, using a workflow
Important information for updated Connector installations: For new installations of the Connector, no additional steps are required. If you are updating your Connector installation from a version before 2.3.0, you must perform the steps described in Update the CTCRolloutTranslation workflow to update the workflow before performing the following steps.
-
In the Translation Settings section of the Configuration page, clear the Catch rollout pages to [Rollout] Queue check box. For details, see Translation Settings.
-
Create your own rollout configuration in CRXDE Lite that includes the CTCRolloutTranslation workflow. For detailed instructions on creating a rollout config, refer to the Adobe Experience Manager documentation at: https://helpx.adobe.com/experience-manager/6-5/sites/administering/using/msm-sync.html#CreatingaRolloutConfiguration.
For a description of the CTCRolloutTranslation workflow, see Viewing the Rollout Workflow.
- When creating a Livecopy site, select the rollout configuration you created.
Update the CTCRolloutTranslation workflow
Important: These steps are required only for a Connector installation updated from a version before 2.3.0, and when configuring the Connector to send only some rollout pages to the Translation Queue using a workflow, as described above.
-
In your Web browser, navigate to /libs/cq/workflow/content/console.html on your Adobe Experience Manager instance to open the AEM WCM page.
-
Locate the CTCRolloutTranslation workflow. Click to select it, and then right-click and select Edit from the context menu.
The workflow opens for editing in a new Web page.
-
Mouseover the CTC Rollout Translation workflow, right-click, and select Edit from the context menu.
-
In the Process tab:
- Ensure that the Process is com.claytablet.cq5.ctctranslation.workflow.RolloutCTCQueueProcess (and not RolloutCTCTranslationProcess).
- Select the Handler Advance check box.
- Click OK to close the dialog box.
-
Click Save to save your changes.
Configure the Connector to send only some rollout pages to the Translation Queue, using a filter
-
In your browser, navigate to: /system/console/components on your Adobe Experience Manager instance.
The Adobe Experience Manager Web Console Components page opens. This page displays all components alphabetically, by name.
-
Scroll down to locate the Connector components, whose names all start with com.claytablet.
-
Verify that the following Content API component is installed and active in Adobe Experience Manager: com.claytablet.cq5.ctctranslation.impl.CTCRolloutCheckServiceImpl.
-
Code a filter class to call the following Content API interface: com.claytablet.cq5.ctctranslation.service.Rollout.IRolloutTranslationFilter. See the sample code, at the bottom of this section.
-
Implement the following function:
final String bluePrintPage,

final String liveCopyPage,

final Session jcrSession,

final ResourceResolver resourceResolver,

final LiveRelationshipManager liveRelationshipManager,

final CTCPageService ctcPageService,

final CTLogService ctcLogService,

final CTCDataService ctcDataService

);
-
If the Connector Translation Queue will capture the rollout pages, the function should return a Boolean value of True.
-
Do one of the following to open CRXDE Lite, where you can configure the Rollout Filter in the Adobe Experience Manager CRXDE interface:
- In the Touch-Optimized UI of Adobe Experience Manager, click Tools in the Adobe Experience Manager rail. Then, in the Navigation page, click CRXDE Lite.
- In the Classic UI of Adobe Experience Manager, click CRXDE Lite in the right pane.
- In your Web browser, navigate to /crx/de/index.jsp on your Adobe Experience Manager instance.
CRXDE Lite opens.
-
In the navigation pane on the left, navigate to /etc/ctcpipelineconfig/ctcRolloutTranslationFilter.
-
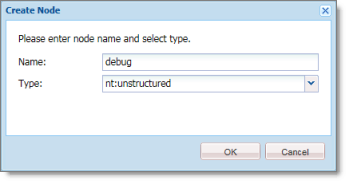
Create a child note of type nt:unstructured and give it a human-readable name, for example, CustomTestFilter.
-
Add the following node properties:

- Name = Active, Type = Boolean, Value = True
- Name = ImplementedClass, Type = String, Value = Filter Class name, for example: com.testguru.ctfilter.test.CTFilterTest.CustomRolloutFilter
- In the CRXDE Lite Menu, click Save All.
Clay Tablet interface sample code
Note:. The following sample code is also included in the following package, which is in the following location in CRXDE Lite: /apps/CTFilterTest/src/impl/src/main/java/com/testguru/ctfilter/test/ CTFilterTest/impl/Activator.java. You can install this package using the CRX Package Manager. For detailed instructions on using the CRX Package Manager, see Installing the Lionbridge Connector.
package com.testguru.ctfilter.test.CTFilterTest;

import javax.jcr.Session;
import org.apache.sling.api.resource.ResourceResolver;
import com.claytablet.cq5.ctctranslation.service.CTCDataService;
import com.claytablet.cq5.ctctranslation.service.CTCPageService;
import com.claytablet.cq5.ctctranslation.service.CTLogService;
import com.day.cq.wcm.msm.api.LiveRelationshipManager;
import com.claytablet.cq5.ctctranslation.service.Rollout.IRolloutTranslationFilter;

public class CustomRolloutFilter implements IRolloutTranslationFilter
{

    public boolean catchRolloutToTranslation(final String bluePrintPage,
    final String liveCopyPage,  final Session jcrSession,
    final ResourceResolver resourceResolver,
    final LiveRelationshipManager liveRelationshipManager,
    final CTCPageService ctcPageService,
    final CTLogService ctcLogService,
    final CTCDataService ctcDataService )
    {
        ctcLogService.LogRolloutDebug("[CustomRolloutFilter] passed Blueprint page: "
        + bluePrintPage  );
        ctcLogService.LogRolloutDebug("[CustomRolloutFilter] passed liveCopyPage page: "
        + liveCopyPage  );

        // Add your own logic here.
        if (bluePrintPage.startsWith("/content/geometrixx/en/blog"))
        {
            ctcLogService.LogRolloutDebug("[CustomRolloutFilter] Blueprint page "  +
        "is starting with path [/content/geometrixx/en/blog], ignored.");
            return false;
        }
        else
            return true;
    // Do not close passed JCR Session and ResourceResolver. Clay Tablet needs these
    // to do more filter calls.
    }
}