Configuring Advanced Settings in CRXDE Lite
Note: This section is not applicable to the AEM Cloud Connector.
You can use CRXDE Lite to configure the some Connector options. CRXDE Lite (Content Repository Extreme Development Environment Lite) is embedded into Adobe Experience Manager. It enables you to perform standard development tasks in the browser. For more information about CRXDE Lite, refer to the Adobe documentation, at: https://helpx.adobe.com/experience-manager/6-4/sites/developing/using/developing-with-crxde-lite.html. If you have a different version of Adobe Experience Manager, you can navigate to the correct version of the documentation from that page.
You can use CRXDE Lite to configure the following Connector options:
Note: The following Connector options are only available in the Debug Settings:
- Excluding Child Nodes from Translation
- Configuring the TMX to Include the Original Translation
- Excluding Properties from Translation
Adobe Experience Manager Cloud users may not have access to CRXDE. Therefore, in the AEM Cloud Connector, following four Connector options can be configured using the Debug Settings:
- Excluding Child Nodes from Translation
- Configuring the TMX to Include the Original Translation
- Excluding Properties from Translation
- Disabling the Cache Service
To configure the Connector options using the Debug Settings:
- Double click Build: 5.0.1-2022-12121913 for AEM as a Cloud Service (depending on your version you may have a different build number) to navigate to Debug Settings from Config page. The Debug page appears.

- On the Debug page, click Debug Settings. The Debug Settings page appears.
- Configure the Connectors and click Save.
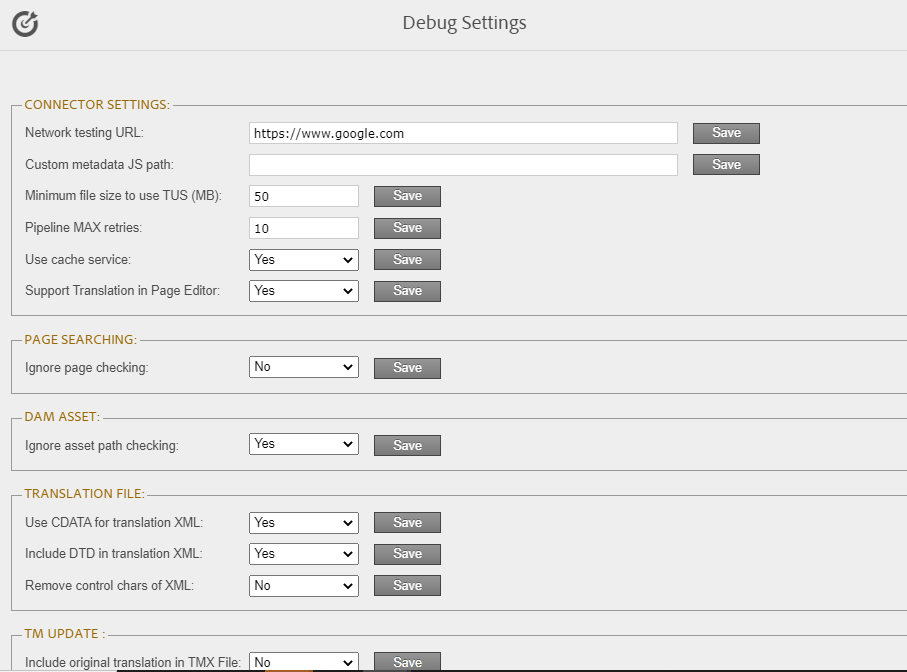
- Disabling the Cache Service:
You can disable the Connector cache service on the Debug Settings page.
To disable the Connector cache service, on the Debug Settings page, from the Use cache service dropdown, select No and click Save.
- Excluding Child Nodes from Translation:
On the Debug Settings page, you can exclude nodes from targe page.
To exlude child nodes from translation:
Enter the name of the node to be excluded in the Excluded nodes from target page text box. Include additional nodes to exclude using comma separator and then click Save.

- Configuring the TMX to Include the Original Translation:
On the Debug Settings page you can configuring the TMX to include the original translation. To configure this settings, on Debug Settings page Select the Include original translation in TMX File: dropdown value to Yes.
- Excluding Properties from Translation:
On the Debug Settings page, some properties can be excluded from target page when connector copies source page to target page for translation.
In the text box, enter the name of the property to exclude additional properties you can add multiple properties separated by a comma and then click on Save.
1 - Configuring How the Connector Handles Special Characters
You can configure how the Connector handles special characters. This is important because it determines how special characters are displayed for your translators.
Background
The Connector exports your content from Adobe Experience Manager and sends it for translation as XML files. A valid XML file cannot contain any of the special characters listed in the table below. Instead, a valid XML file must use the following entity references to represent special characters:
| Special Character |
Represented by This Entity Reference |
| < |
< |
| > |
> |
| & |
& |
| ' |
' |
| " |
" |
Escaping is the term that describes creating valid XML by converting any XML special characters to their entity references.
How does Adobe Experience Manager handle special characters?
There are two types of text within Adobe Experience Manager:
- plain text
- rich text, which can contain HTML formatting, links. etc.
You can use CRXDE Lite to view how Adobe Experience Manger stores content.
CRXDE Lite handles special characters differently, depending on whether they are in a plain text title, or a rich text paragraph.
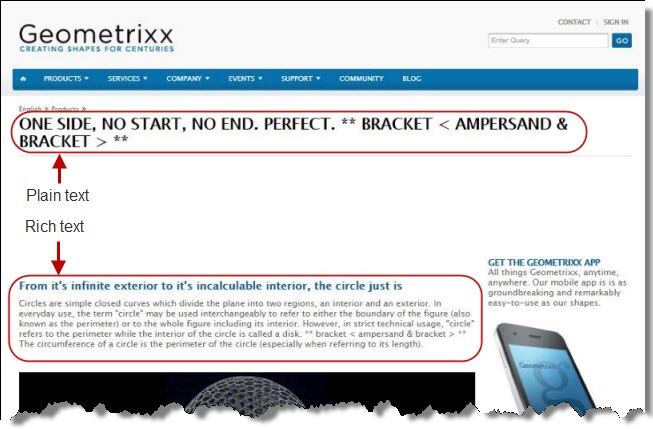
- In plain text, CRXDE Lite does not escape special characters. It displays them as the actual characters. For example, it displays & as &.
- In rich text, CRXDE Lite escapes special characters. It displays them as their corresponding entity references. For example, it displays & as &.
How does the Connector handle special characters?
When the Connector prepares content for translation, it packages all content into XML translation files. This necessitates escaping all special characters into their corresponding entity references. However, the Connector does not differentiate between plain text (which displays the actual special characters) and rich text (which displays the entity references instead of the special characters). Therefore, the Connector escapes all special characters.
As a result, the rich text that the translator receives may contain a combination of special characters and entity references.
For example:
Suppose that the rich-text paragraph contains the text that is rendered as follows in the CRXDE Lite viewer: &.
CRXDE Lite actually stores this rich-text content as its corresponding entity reference: &.
When the Connector processes this rich-text content to create XML files to send out for translation, it escapes this content as follows:
- & becomes &
- amp; remains amp;
As a result, this content is escaped twice (once by CRXDE Lite and then by the Connector).
The Connector then stores this content as & in the XML translation file, which it sends to the translator.
However, some translation systems cannot handle double-escaped special characters such as & or a mix of single-escaped and double-escaped special characters.
1.1 - Why do translators encounter problems with special characters?
Some translation systems can handle double-escaped special characters, such as &, by displaying them as & or &. However, some translation systems cannot handle double-escaped special characters, such as &.
There are several ways to handle this.
Recommendation 1 – Same as Source option
If your translator’s translation system supports the “Same as Source” option, then instruct your translator to select this option. This converts and returns all special characters–actual characters, escaped characters, and double-escaped characters–as they were received.
However, this feature is not supported by all translation systems or they may not be able to change this setting. In those scenarios, or if you see a combination of single- and double-escaped characters, consider one of the following recommendations.
Recommendation 2 – All single encoded
Your translator should handle each type of special character consistently. For example, in the target XML:
Changing the Use_CData setting from its default value of false to true. This setting instructs the Connector to wrap content in CData tags, which prevents the Connector from escaping special characters, and avoids the scenario of double-escaped characters. However, this setting does not prevent Adobe Experience Manager from single-escaping special characters in rich text.
Note: The Connector adds and removes the CData tags, so they are not displayed within Adobe Experience Manager’s CRXDE Lite.
Important: If you change this setting, your translators must return the translated content in CData tags, just as they received the source content in CData tags. They should not run any post-translation scripts to escape the special characters before returning the content.
Warning: If you change this setting in the middle of a translation job, it can interfere with the integrity of the translation memory.
For detailed instructions on changing the Use_CData setting from its default value of false to true, see Adding CData Tags to Translation Files.
1.2 - Adding CData Tags to Translation Files
You can change the Use_CData setting from its default value of false to true to add CData tags to translation files, which prevents your translators from viewing double-escaped special characters, such as &.
-
Do one of the following to open CRXDE Lite:
- In the Touch-Optimized UI of Adobe Experience Manager, click Tools in the Adobe Experience Manager rail. Then,in the Navigation page, click CRXDE Lite.
- In the Classic UI of Adobe Experience Manager, click CRXDE Lite in the right pane.
- In your Web browser, navigate to /crx/de/index.jsp on your Adobe Experience Manager instance.
CRXDE Lite opens.
- In the Explorer pane on the left, navigate to /etc/ctctranslation/TransOptions.
- Locate the Use_CData property.
- Double-click in the Value column, and select true from the dropdown list.
- In the CRXDE Lite menu, click Save All.
The Connector will now automatically wrap every XML translation file it sends out for translation in CData tags.
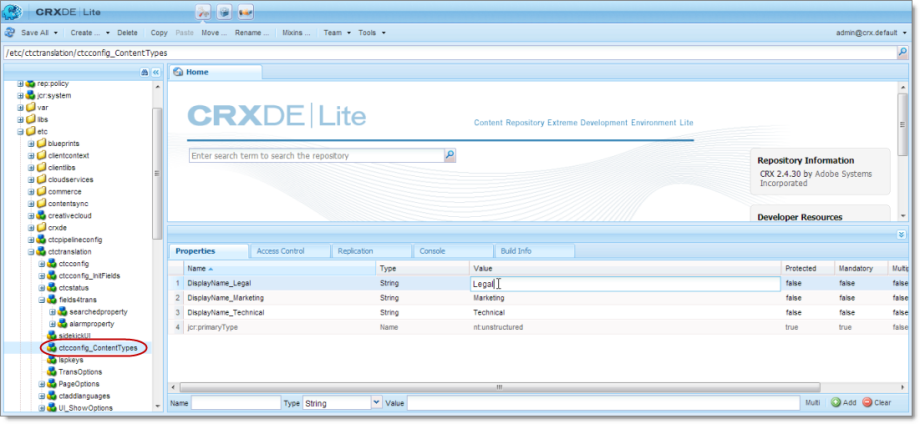
2 - Configuring Custom Content Types
When you send content for translation using the Bulk Translation wizard, the Translation Queue, or Sidekick you can use the content type to filter the content you want to send.
Note: Specifying the content type in Sidekick is available only when working with the Sidekick wizard user interfaces.
The Connector can also configure routing rules to send content of each type to a different translation provider.
By default, the Connector includes three content types, which have the following default labels:
- Marketing
- Technical
- Legal
You can change these labels to reflect your company’s needs. For example, you can send all your marketing content to your translation provider, and all your user-generated content to a machine translation service. In the Content API Platform, the Connector can configure content rules based on content types as follows:
- You can send different content types to different translation providers.
- You can send different content types to different TMSs (translation management systems).
- You can send different content types to different processing profiles within a single TMS instance.
Note: Please contact Lionbridge Connector Support before proceeding. For details, see How to Contact Lionbridge Connector Support.
-
Do one of the following to open CRXDE Lite, where you can configure custom content types:
- In the Touch-Optimized UI of Adobe Experience Manager, click Tools in the Adobe Experience Manager rail. Then, in the Navigation page, click CRXDE Lite.
- In the Classic UI of Adobe Experience Manager, click CRXDE Lite in the right pane.
- In your Web browser, navigate to /crx/de/index.jsp on your Adobe Experience Manager instance.
CRXDE Lite opens.
- In the navigation pane on the left, navigate to /etc/ctctranslation/ctcconfig_ContentTypes.
-
In the Properties tab in the Home tab, double-click in the Value column of the content-type label to change, and type the new label.
-
Repeat the previous step for each content-type label you want to change.
-
In the CRXDE Lite Menu, click Save All.
3 - Configuring the Rollout Feature
If the Rollout feature is enabled, then when users roll out files, the Connector automatically sends them to the Translation Queue, using your company’s default translation settings. There are three settings for this feature. The setting you choose determines the configuration method you use:
- You can configure the Connector to send all your rollout pages to the Translation Queue.
- You can configure the Connector to send only some of your rollout pages to the Translation Queue, using a workflow.
- You can configure the Connector to send only some of your rollout pages to the Translation Queue, using a filter.
Note: The setting determines the configuration method you use.
Important information: Adobe Experience Manager has language-mappings that are included by default and that cannot be removed. When you roll out pages, the Connector automatically sends all configured languages, including these defaults, to the Translation Queue. You can configure the Connector to send only configured languages to the Translation Queue. For more information and detailed instructions, see Configuring Default Language-Mapping Settings for the Rollout Feature.
Configure the Connector to send all rollout pages to the Translation Queue
-
In the Translation Settings section of the Configuration page, select the Catch rollout pages to [Rollout] Queue check box. For details, see Translation Settings.
-
When creating a Livecopy site, use the default Adobe Experience Manager rollout configuration.
Configure the Connector to send only some rollout pages to the Translation Queue, using a workflow
Important information for updated Connector installations: For new installations of the Connector, no additional steps are required. If you are updating your Connector installation from a version before 2.3.0, you must perform the steps described in Update the CTCRolloutTranslation workflow to update the workflow before performing the following steps.
-
In the Translation Settings section of the Configuration page, clear the Catch rollout pages to [Rollout] Queue check box. For details, see Translation Settings.
-
Create your own rollout configuration in CRXDE Lite that includes the CTCRolloutTranslation workflow. For detailed instructions on creating a rollout config, refer to the Adobe Experience Manager documentation at: https://helpx.adobe.com/experience-manager/6-5/sites/administering/using/msm-sync.html#CreatingaRolloutConfiguration.
For a description of the CTCRolloutTranslation workflow, see Viewing the Rollout Workflow.
- When creating a Livecopy site, select the rollout configuration you created.
Update the CTCRolloutTranslation workflow
Important: These steps are required only for a Connector installation updated from a version before 2.3.0, and when configuring the Connector to send only some rollout pages to the Translation Queue using a workflow, as described above.
-
In your Web browser, navigate to /libs/cq/workflow/content/console.html on your Adobe Experience Manager instance to open the AEM WCM page.
-
Locate the CTCRolloutTranslation workflow. Click to select it, and then right-click and select Edit from the context menu.
The workflow opens for editing in a new Web page.
-
Mouseover the CTC Rollout Translation workflow, right-click, and select Edit from the context menu.
-
In the Process tab:
- Ensure that the Process is com.claytablet.cq5.ctctranslation.workflow.RolloutCTCQueueProcess (and not RolloutCTCTranslationProcess).
- Select the Handler Advance check box.
- Click OK to close the dialog box.
-
Click Save to save your changes.
Configure the Connector to send only some rollout pages to the Translation Queue, using a filter
-
In your browser, navigate to: /system/console/components on your Adobe Experience Manager instance.
The Adobe Experience Manager Web Console Components page opens. This page displays all components alphabetically, by name.
-
Scroll down to locate the Connector components, whose names all start with com.claytablet.
-
Verify that the following Content API component is installed and active in Adobe Experience Manager: com.claytablet.cq5.ctctranslation.impl.CTCRolloutCheckServiceImpl.
-
Code a filter class to call the following Content API interface: com.claytablet.cq5.ctctranslation.service.Rollout.IRolloutTranslationFilter. See the sample code, at the bottom of this section.
-
Implement the following function:
final String bluePrintPage,

final String liveCopyPage,

final Session jcrSession,

final ResourceResolver resourceResolver,

final LiveRelationshipManager liveRelationshipManager,

final CTCPageService ctcPageService,

final CTLogService ctcLogService,

final CTCDataService ctcDataService

);
-
If the Connector Translation Queue will capture the rollout pages, the function should return a Boolean value of True.
-
Do one of the following to open CRXDE Lite, where you can configure the Rollout Filter in the Adobe Experience Manager CRXDE interface:
- In the Touch-Optimized UI of Adobe Experience Manager, click Tools in the Adobe Experience Manager rail. Then, in the Navigation page, click CRXDE Lite.
- In the Classic UI of Adobe Experience Manager, click CRXDE Lite in the right pane.
- In your Web browser, navigate to /crx/de/index.jsp on your Adobe Experience Manager instance.
CRXDE Lite opens.
-
In the navigation pane on the left, navigate to /etc/ctcpipelineconfig/ctcRolloutTranslationFilter.
-
Create a child note of type nt:unstructured and give it a human-readable name, for example, CustomTestFilter.
-
Add the following node properties:

- Name = Active, Type = Boolean, Value = True
- Name = ImplementedClass, Type = String, Value = Filter Class name, for example: com.testguru.ctfilter.test.CTFilterTest.CustomRolloutFilter
- In the CRXDE Lite Menu, click Save All.
Clay Tablet interface sample code
Note:. The following sample code is also included in the following package, which is in the following location in CRXDE Lite: /apps/CTFilterTest/src/impl/src/main/java/com/testguru/ctfilter/test/
CTFilterTest/impl/Activator.java. You can install this package using the CRX Package Manager. For detailed instructions on using the CRX Package Manager, see Installing the Lionbridge Connector.
package com.testguru.ctfilter.test.CTFilterTest;

import javax.jcr.Session;
import org.apache.sling.api.resource.ResourceResolver;
import com.claytablet.cq5.ctctranslation.service.CTCDataService;
import com.claytablet.cq5.ctctranslation.service.CTCPageService;
import com.claytablet.cq5.ctctranslation.service.CTLogService;
import com.day.cq.wcm.msm.api.LiveRelationshipManager;
import com.claytablet.cq5.ctctranslation.service.Rollout.IRolloutTranslationFilter;

public class CustomRolloutFilter implements IRolloutTranslationFilter
{

    public boolean catchRolloutToTranslation(final String bluePrintPage,
    final String liveCopyPage,  final Session jcrSession,
    final ResourceResolver resourceResolver,
    final LiveRelationshipManager liveRelationshipManager,
    final CTCPageService ctcPageService,
    final CTLogService ctcLogService,
    final CTCDataService ctcDataService )
    {
        ctcLogService.LogRolloutDebug("[CustomRolloutFilter] passed Blueprint page: "
        + bluePrintPage  );
        ctcLogService.LogRolloutDebug("[CustomRolloutFilter] passed liveCopyPage page: "
        + liveCopyPage  );

        // Add your own logic here.
        if (bluePrintPage.startsWith("/content/geometrixx/en/blog"))
        {
            ctcLogService.LogRolloutDebug("[CustomRolloutFilter] Blueprint page "  +
        "is starting with path [/content/geometrixx/en/blog], ignored.");
            return false;
        }
        else
            return true;
    // Do not close passed JCR Session and ResourceResolver. Clay Tablet needs these
    // to do more filter calls.
    }
}
3.1 - Configuring Default Language Mapping Settings for the Rollout Feature
Adobe Experience Manager has language-mappings that are included by default and that cannot be removed. If the Connector is configured to send content to the Translation Queue when you roll out files, then it sends content to the queue for these default languages. You can configure the Connector so that it sends only content for configured languages to the queue.
-
Do one of the following to open CRXDE Lite:
-
In the Touch-Optimized UI of Adobe Experience Manager, click Tools in the Adobe Experience Manager rail. Then, in the Navigation page, click CRXDE Lite.
-
In the Classic UI of Adobe Experience Manager, click CRXDE Lite in the right pane.
-
In your Web browser, navigate to /crx/de/index.jsp on your Adobe Experience Manager instance.
CRXDE Lite opens.
-
In the Explorer pane on the left, navigate to /etc/ctctranslation.
-
If the debug node does not exist, then create it.
a. Select the ctctranslation node.
b. Select Create > Create Node from the context menu.
The Create Node dialog box opens.
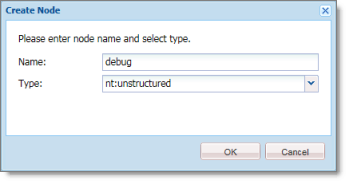
c. In the Name field, enter debug.
d. In the Type dropdown list, select nt:structured.
e. Click OK.
-
Right-click the /etc/ctctranslation node, and select Refresh from the context menu.
-
Create the AEM61DefaultLanguageMapping property in the debug node you just created.
a. Locate and select the debug node you just created.
b. In the Name field in the bottom of the right pane, enter AEM61DefaultLanguageMapping.
c. In the Type dropdown list in the bottom of the right pane, accept the default of String.
d. In the Value field in the bottom of the right pane, enter disabled.
e. Click Add  .
.
-
In the CRXDE Lite Menu, click Save All.
The AEM61DefaultLanguageMapping is displayed at the top of the pane.
The Connector will now send only configured languages to the Translation Queue when you roll out pages.
4 - Enabling Content Collection from Blueprint Pages
You can instruct the Connector to globally collect content from Blueprint pages using the Pickup Content from Blueprint Pages CRX setting in CRXDE Lite.
Note: When this feature is enabled, the Connector synchronizes non-translatable properties, such as images, from a locked component.
How the Pickup Content From Blueprint Pages setting interacts with other related settings
-
This setting is available only when the Select if using Blueprint/Live-copy check box is selected.
-
If this setting is specified, the Connector always acts as though the Translate Non-Sync’d Components on this page check box is not selected, even if it is selected. This occurs because only content from locked components is rolled out from Blueprint pages to live copy pages:
-
In general, during MSM rollout, content from Blueprint pages overwrites the content of locked components in live copy pages. The Connector retrieves content from the live copy pages and sends it out for translation. Until the translation returns, the live copy page has the un-localized content from the Blueprint page.
-
However, if there is no MSM rollout or if there is a custom rollout configuration that excludes copying over the content, then the content from the Blueprint page does not overwrite the content of the locked components in the live copy page. Live copy pages may contain the old version of localized content.
In both scenarios, the Connector returns the translated content to the live copy page.
- The PickupContentFromBlueprintPages_LockedOnly page option in CRXDE Lite enables the Connector to read properties of Blueprint pages for locked components of live-copy pages when the PickupContentFromBlueprintPages option is set to true. This setting enables collecting content for translation from locked components.
For descriptions of all the related settings, see UI and Default Settings.
To enable the Pickup Content From Blueprint Pages setting:
-
Do one of the following to open CRXDE Lite:
-
In the Touch-Optimized UI of Adobe Experience Manager, click Tools in the Adobe Experience Manager rail. Then, in the Navigation page, click CRXDE Lite.
-
In the Classic UI of Adobe Experience Manager, click CRXDE Lite in the right pane.
-
In your Web browser, navigate to /crx/de/index.jsp on your Adobe Experience Manager instance.
CRXDE Lite opens.
-
In the Explorer pane on the left, navigate to /etc/ctctranslation/PageOptions.
-
Locate the PickupContentFromBlueprintPages property.
-
Double-click in the Value column, and select true from the dropdown list.
The Pickup Content From Blueprint Pages setting is now enabled. This enables the Connector to collect content from locked components.
Note: To turn off this setting, repeat the previous steps, but in the last step, select false from the dropdown list.
-
To force the Connector to collect content only from locked components, when the PickupContentFromBlueprintPages property is sent to true:
a. In the same location, create a child note of type nt:unstructured and give it the following name: PickupContentFromBlueprintPages_LockedOnly.
b. Add the following node properties: Name = Active, Type = Boolean, Value = True.
The Connector can now collect content for translation from locked components only.
- In the CRXDE Lite Menu, click Save All.
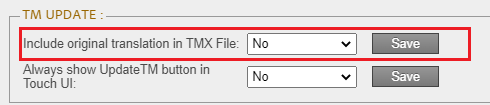
5 - Configuring the TMX to Include the Original Translation
By default, when you use the Update TM functionality, the Connector updates the TM (translation memory) with the following information from the TMX file:
- the original source content
- the original translated content
- the updated translated content
- the name of the translation job
- the page path and the property name
You can configure the Connector to also include the original translation returned by the translation provider in the TMX file.
-
Do one of the following to open CRXDE Lite:
- In the Touch-Optimized UI of Adobe Experience Manager, click Tools in the Adobe Experience Manager rail. Then, in the Navigation page, click CRXDE Lite.
- In the Classic UI of Adobe Experience Manager, click CRXDE Lite in the right pane.
- In your Web browser, navigate to /crx/de/index.jsp on your Adobe Experience Manager instance.
CRXDE Lite opens.
-
In the Explorer pane on the left, navigate to /etc/ctctranslation/TransOptions.
-
Locate the TMXIncludeOriginalTranslation property.
-
Double-click in the Value column, and select true from the dropdown list.
-
In the CRXDE Lite Menu, click Save All.
The Connector will now send the original translation returned by the translation provider to the TM.
6 - Excluding Properties from Translation
You can use the TargetPageExcludedProperties property in the etc/ctctranslation/PageOptions node in CRXDE Lite to specify any properties in your content that you want to exclude from being sent for translation. This is useful, for example, if you have a custom identifier property for each file that you do not want to replicate in the target content.
To exclude properties from translation:
-
Do one of the following to open CRXDE Lite:
- In the Touch-Optimized UI of Adobe Experience Manager, click Tools in the Adobe Experience Manager rail. Then, in the Navigation page, click CRXDE Lite.
- In the Classic UI of Adobe Experience Manager, click CRXDE Lite in the right pane.
- In your Web browser, navigate to /crx/de/index.jsp on your Adobe Experience Manager instance.
CRXDE Lite opens.
-
In the Explorer pane on the left, navigate to /etc/ctctranslation/PageOptions.
-
Double-click the TargetPageExcludedProperties property.
The Edit TargetPageExcludedProperties dialog box opens.
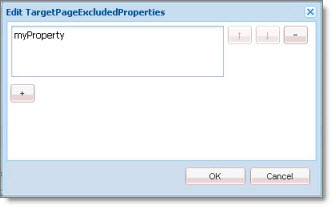
-
In the text box, enter the name of the property to exclude.
-
To exclude additional properties, click the plus button  .
.
-
Click OK.
-
In the CRXDE Lite Menu, click Save All.
7 - Excluding Child Nodes from Translation
Before the Connector sends out content for translation, it copies over the source files to the target location. in CRXDE Lite:
-
You can use the TargetPageExcludedNodes property in the etc/ctctranslation/PageOptions node to delete child nodes after copying from the source to the target.
-
You can use the TargetPagePreservedNodes property in the etc/ctctranslation/PageOptions node to exclude child nodes when copying from the source to the target.
These settings are both useful if you want to exclude certain child nodes from translation while sending their parent nodes for translation.
To exclude child nodes from translation:
-
Do one of the following to open CRXDE Lite:
- In the Touch-Optimized UI of Adobe Experience Manager, click Tools in the Adobe Experience Manager rail. Then, in the Navigation page, click CRXDE Lite.
- In the Classic UI of Adobe Experience Manager, click CRXDE Lite in the right pane.
- In your Web browser, navigate to /crx/de/index.jsp on your Adobe Experience Manager instance.
CRXDE Lite opens.
-
In the Explorer pane on the left, navigate to /etc/ctctranslation/PageOptions.
-
Do one of the following:
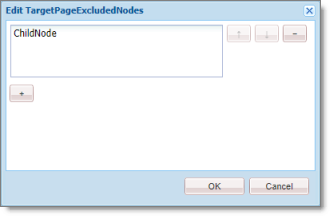
- To delete child nodes after copying from the source to the target, double-click the TargetPageExcludedNodes property.
The Edit TargetPageExcludedNodes dialog box opens. Click the plus button .
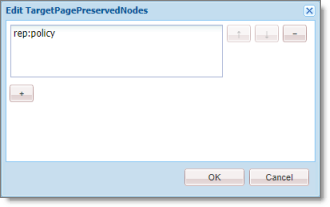
- To avoid overwriting existing child nodes, when copying from the source to the target, double-click the TargetPagePreservedNodes property.
The Edit TargetPagePreservedNodes dialog box opens. Click the plus button .
-
In the text box, enter the name of the node to exclude.
-
To exclude additional nodes, click the plus button .
-
Click OK.
-
In the CRXDE Lite Menu, click Save All.
8 - Configuring All Jobs to Pause
In CRXDE Lite, you can configure all jobs to pause before the Connector sends them out for translation. The jobs pause after Preparing status (0%) but before Sending status (1%). This is useful if you want to review or export reports of content items, or download the XML files before sending them out for translation.
Note: You can also configure this setting using the Pause job before sending check box in the UI and Default Settings section of the Configuration page. For details, see UI and Default Settings.
-
Do one of the following to open CRXDE Lite:
- In the Touch-Optimized UI of Adobe Experience Manager, click Tools in the Adobe Experience Manager rail. Then, in the Navigation page, click CRXDE Lite.
- In the Classic UI of Adobe Experience Manager, click CRXDE Lite in the right pane.
- In your Web browser, navigate to /crx/de/index.jsp on your Adobe Experience Manager instance.
CRXDE Lite opens.
-
In the Explorer pane on the left, navigate to /etc/ctctranslation/TransOptions.
-
Locate the PauseBeforeSend property.
-
Double-click in the Value column, and select true from the dropdown list.
-
In the CRXDE Lite Menu, click Save All.
The Connector will now automatically pause every job before it sends it out for translation.
Important: To resume the job and send it out for translation, in the Translation Status page, you must click Resume for the job. For detailed instructions, refer to the Lionbridge Connector for Adobe Experience Manager User Guide.
9 - Configuring Catching Pages from Publish Events to the Translation Queue
Selecting the Catch Pages from Publish Event to Queue check box in the Translation Settings section of the Configuration page instructs the Connector to automatically listen to publish events and add published pages to the Translation Queue. By default, this check box is hidden. To display this check box, you add the ShowCatchPublishEventPageToQueueInCTConfig property to the /etc/ctctranslation/ctcconfig node in CRXDE Lite.
To display the Catch Pages from Publish Event to Queue check box:
-
Do one of the following to open CRXDE Lite:
- In the Touch-Optimized UI of Adobe Experience Manager, click Tools in the Adobe Experience Manager rail. Then, in the Navigation page, click CRXDE Lite.
- In the Classic UI of Adobe Experience Manager, click CRXDE Lite in the right pane.
- In your Web browser, navigate to /crx/de/index.jsp on your Adobe Experience Manager instance.
CRXDE Lite opens.
-
In the Explorer pane on the left, navigate to /etc/ctctranslation/ctcconfig.
-
Create the ShowCatchPublishEventPageToQueueInCTConfig property in this node.
-
In the Name field in the bottom of the right pane, enter ShowCatchPublishEventPageToQueueInCTConfig.
-
In the Type dropdown list in the bottom of the right pane, accept the default of String.
-
In the Value field in the bottom of the right pane, enter true.
-
Click Add .
-
In the CRXDE Lite Menu, click Save All.
The ShowCatchPublishEventPageToQueueInCTConfig is displayed at the top of the pane.
The Connector will now display the Catch Pages from Publish Event to Queue check box in the Translation Settings section of the Configuration page.
10 - Configuring which Properties of i18n Dictionary Items to Collect for Translation
You can send out i18n dictionary items and tags for translation using the Bulk Translation wizard. For detailed instructions, refer to the Lionbridge Connector for Adobe Experience Manager User Guide.
- In i18n dictionary items, by default the Connector sends out the sling:message property.
- In tags, by default the Connector sends out the jcr:title property.
In both i18n dictionary and tag items, if there is no source language specified, the Connector now uses the default title or message as the source:
- For i18n dictionary items, if the sling:message property is empty, the Connector now uses the
sling:key property.
- For tags, in the jcr:title property is empty, the Connector now uses the jcr:title.<source language> property, for example, jcr:title.en.
You can use the disableUseDefaultAsSourceForTagsAndI18N property to disable this behavior, which prevents the Connector from using the default title or message as the source if there is no source language specified.
To prevent the Connector from using the default title or message as the source if there is no source language specified:
-
Do one of the following to open CRXDE Lite:
- In the Touch-Optimized UI of Adobe Experience Manager, click Tools in the Adobe Experience Manager rail. Then, in the Navigation page, click CRXDE Lite.
- In the Classic UI of Adobe Experience Manager, click CRXDE Lite in the right pane.
- In your Web browser, navigate to /crx/de/index.jsp on your Adobe Experience Manager instance.
CRXDE Lite opens.
-
In the Explorer pane on the left, navigate to /etc/ctctranslation/ctcconfig/debug.
-
Create the disableUseDefaultAsSourceForTagsAndI18N property in this node.
-
In the Name field in the bottom of the right pane, enter disableUseDefaultAsSourceForTagsAndI18N.
-
In the Type dropdown list in the bottom of the right pane, accept the default of String.
-
In the Value field in the bottom of the right pane, enter any value.
-
Click Add .
-
In the CRXDE Lite Menu, click Save All.
The disableUseDefaultAsSourceForTagsAndI18N is displayed at the top of the pane.
If there is no source language specified for i18 dictionary items or tags, the Connector will now not use the default properties as source, when sending out items and tags for translation.
11 - Disabling the Cache Service
The Connector’s cache service caches the current user’s settings, including:
The cache service enables the Connector to obtain the user’s setting quickly, without querying Adobe Experience Manager each time, which is slower. By default, the Connector’s the cache service is enabled.
You can disable the Connector cache service by adding the usingCacheService Boolean property with the false value to the /etc/ctctranslation/debug node in CRXDE Lite. This forces the Connector to query Adobe Experience Manager each time for user settings.
To disable the Connector cache service:
-
Do one of the following to open CRXDE Lite:
- In the Touch-Optimized UI of Adobe Experience Manager, click Tools in the Adobe Experience Manager rail. Then, in the Navigation page, click CRXDE Lite.
- In the Classic UI of Adobe Experience Manager, click CRXDE Lite in the right pane.
- In your Web browser, navigate to /crx/de/index.jsp on your Adobe Experience Manager instance.
CRXDE Lite opens.
-
In the Explorer pane on the left, navigate to /etc/ctctranslation/debug.
-
Create the usingCacheService property in this node.
a. In the Name field in the bottom of the right pane, enter usingCacheService.
b. In the Type dropdown list in the bottom of the right pane, select boolean.
c. In the Value field in the bottom of the right pane, enter false to disable the cache service.
Tip: Alternatively, to re-enable the cache service after disabling it, enter true.
d. Click Add .
- In the CRXDE Lite Menu, click Save All.
The usingCacheService property is displayed at the top of the pane.
The Connector will now use the specified setting to enable or disable the cache.