Before You Install
Before you begin to install the Lionbridge Connector (“Connector”) for Adobe Experience Manager, please review the system requirements, described in System Requirements, and perform the following pre-installation procedures (Note: This requirement doesn’t apply to AEM Cloud):
Very important: Do not use the same account keys on multiple instances, because this is a violation of the License Agreement. Using the same account keys on multiple instances will cause the Connector to behave unexpectedly, which can result in lost translation content, orphaned projects, and inaccurate translation status reports. The Lionbridge Connector team will support technical issues caused by duplicating or incorrectly installing CMS address keys only on a time and materials basis.
Note: If you are installing the Connector in a clustered environment, see Installing the Connector in a Clustered Environment.
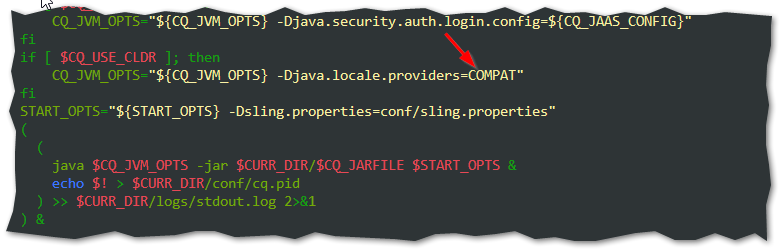
Note: If you are installing on Java version 8 or above, make sure you specify the JVM option -Djava.locale.providers=COMPAT under the AEM startup script, as described in the next image:
1 - System Requirements
Note: This section is not applicable for the AEM Cloud Connector.
The Lionbridge Connector for Adobe Experience Manager must be installed on the Adobe Experience Manager Author server. The Lionbridge Connector for Adobe Experience Manager supports Adobe Experience Manager versions 6.3 and higher.
The Lionbridge Connector for Adobe Experience Manager has no additional server level hardware or software requirements beyond those of Adobe Experience Manager. For detailed requirements, refer to the appropriate version of the Adobe Experience Manager Technical Requirements.
The Connector does require a separate database as described in Creating or Updating a Connector Database on your Database Server Instance.
2 - Setting Your System Date, Time, and Time Zone Correctly
The Connector sends content to and receives content from the Content API Platform, which is hosted in the Lionbridge environment and requires any machines that connect to its applications to have the correct system time and date settings.
Important: Before proceeding, ensure that the system date, time, and time zone are set correctly on any systems that will run the Connector. If these settings are incorrect, the following error message is displayed: Error. The difference between the request time and the current time is too large.
4 - Deploying the connector through the Cloud Manager CI/CD Pipelines
In order to deploy the Lionbridge connector for AEM Cloud, it’s required to include the Lionbridege Maven repository connector references in your Adobe Cloud Manager CI/CD Pipeline configuration. For more details on how to integrate customizations into AEM Cloud, please refer to Adobe’s official Cloud Manager CI/CD Pipelines documentation, or contact your Adobe’s Support Agent through the Adobe’s Support Channels.
To include the connector Maven references into the POM.xml AEM Cloud project:
- Add Lionbridge repo to POM.xml of project:
<repository>
<id>ctctranslation-libs-release</id>
<name>ctctranslation-libs-release</name>
<url>https://lionbridge-artifactory.eastus.cloudapp.azure.com/artifactory/ctctranslation-libs-release/</url>
<releases>
<enabled>true</enabled>
<updatePolicy>daily</updatePolicy>
</releases>
<snapshots>
<enabled>false</enabled>
</snapshots>
</repository>
- Embed Lionbridge cloud connector package to “All” package of the project.
Edit your POM.xml of ‘all’ package:
<plugin>
<groupId>org.apache.jackrabbit</groupId>
<artifactId>filevault-package-maven-plugin</artifactId>
<extensions>true</extensions>
<configuration>
...
<embeddeds> <embedded> <groupId>com.adobe.cloud.translation.connector</groupId> <artifactId>lionbridge-connector.all</artifactId> <type>zip</type> <target>/apps/lionbridge-connector-packages/container/install</target> </embedded>
</configuration>
</plugin>
Also add the following dependency and then edit the filter.xml to allow path: /apps/lionbridge-connector-packages:
<dependency>
<groupId>com.adobe.cloud.translation.connector</groupId>
<artifactId>lionbridge-connector.all</artifactId>
<version>[Latest Version]</version>
<type>zip</type>
</dependency>
After performing the steps, a sample cloud site is generated with Adobe Archetype, which has Lionbridge Cloud Connector which includes all the packages.
You can download it and do Maven build to test how to embed Lionbridge Cloud Connector.
Note If you want to do dev with reference to Lionbridge Cloud connector, then you need to add two dependencies:
<dependency>
<groupId>com.adobe.cloud.translation.connector</groupId>
<artifactId>lionbridge-connector.api</artifactId>
<version>[Latest Version]</version>
<scope>provided</scope>
</dependency>
<dependency>
<groupId>com.adobe.cloud.translation.connector</groupId>
<artifactId>lionbridge-connector.core</artifactId>
<version>[Latest Version]</version>
<scope>provided</scope>
</dependency>
For more information, see Deploying to AEM as a Cloud Service.
5 - Creating the Connector Folders
Note: This section is not applicable to the AEM Cloud Connector.
This section describes how to create a data folder that the AEM On-Premise Connector uses to store licensing information and translation data. This step is optional. The Connector uses the sub-folders to store data for translation updates and shared configuration files. It may also store log files.
-
On your Adobe Experience Manager server, navigate to the file system and create a folder called CTCdata.
-
Unzip the CTCData.zip archive folder from the delivery package you downloaded and unzipped, as described in Downloading the Delivery Package, and extract all the included folders into the target CTCdata folder. This creates the following two subfolders in the CTCdata folder:
| Sub-Folder |
Folder Access Permissions |
Description |
| update |
Full |
This folder will contain manually updated translated files.
Note: Use this feature only if translation providers have edited XML files that were already returned into Adobe Experience Manager, or if a file was not successfully inserted back into Adobe Experience Manager. |
| logs |
Full |
This folder may be used by the Connector to store Connector log files, if you select the Logs check box in the Folder and Permissions section of the Configuration page. For details, see Folder and Permissions. |
- Set the access permission for each folder according to the above table.
6 - Creating or Updating a Connector Database on your Database Server Instance
Note: This section is not applicable to the AEM Cloud Connector.
The Connector requires one of the following databases for its database engine:
- MySQL version 5.0 or higher
- Microsoft SQL Server version 2012 or higher
- Oracle 11g and 12c
- PostgreSQL
For new Connector installations, create a database container, such as CTCTRANSLATION. The Connector will automatically create all tables and columns.
When upgrading from a previous version, the Connector automatically updates all tables and columns.
Note: If the automatic upgrade of the database fails while upgrading your version of the Connector, for example, because of insufficient permissions, the Errors and SQL Scripts buttons are displayed in the JDBC SQL Connection section of the Configuration page. Click Errors to view the related error messages. Click SQL Scripts to download the generated SQL scripts. A DBA can then run the scripts. Refer to the ct_db_update.Sql file in the Adobe Experience Manager quickstart folder for the list of SQL commands required to manually update the database.
Note about MySQL: You may need to edit the mysql.ini file to add the following lines:
[mysql]
default-character-set=utf8
[mysqld]
character-set-server=utf8
Translation Database Size Requirements
|
|
| Minimum size |
1 GB |
| Recommended size |
10 GB |
Recommendation: Increase the database size relative to the site content.