This the multi-page printable view of this section. Click here to print.
Installation and Configuration Guide
- 1: Welcome to the Connector
- 1.1: Terminology
- 1.2: About the Content API Platform
- 1.3: How the Connector Works with Adobe Experience Manager
- 1.4: Using this Guide
- 1.5: How to Contact Lionbridge Connector Support
- 2: Before You Install
- 2.1: System Requirements
- 2.2: Setting Your System Date, Time, and Time Zone Correctly
- 2.3: Downloading the Delivery Package
- 2.4: Deploying the connector through the Cloud Manager CI/CD Pipelines
- 2.5: Creating the Connector Folders
- 2.6: Creating or Updating a Connector Database on your Database Server Instance
- 3: Installing the Lionbridge Connector
- 4: Post-Installation Tasks
- 4.1: Configuring the Data Folder and Database Connection
- 4.2: Verifying that the Bundle and All Connector Components Are Active
- 4.3: Verifying that the Connector Nodes are Installed
- 4.4: Configuring Network Settings for a Firewall
- 5: Configuring the Connector
- 5.1: Configuring Connector Global Settings
- 5.1.1: Server URL
- 5.1.2: Network Configuration
- 5.1.3: Translation Platform
- 5.1.4: JDBC SQL Connection
- 5.1.5: Freeway Config
- 5.1.6: Folder and Permissions
- 5.1.7: Translation Settings
- 5.1.8: Email Notifications for Stuck Jobs
- 5.1.9: In-Context Preview
- 5.1.10: Automatic Cleanup Translation Jobs
- 5.1.11: Mail Server Settings
- 5.1.12: Automatic Split Job to Reduce Memory Usage and Improve Performance
- 5.1.13: Log Service
- 5.1.14: Agent Services
- 5.1.15: Encryption Keystore (Lionbridge Freeway and SDL TMS only)
- 5.1.16: UI and Default Settings
- 5.1.16.1: Sidekick Options
- 5.1.16.2: MSM and Rollout settings
- 5.2: Configuring Connector Languages
- 5.3: Configuring which Components and Properties to Send Out for Translation
- 5.4: Subscribing to Email Notifications about New Fields and Components
- 5.5: Configuring Translation Providers and License Keys
- 5.5.1: Migrating a License Key
- 5.5.2: Adding a New License Key
- 5.5.3: Editing a License Key
- 5.5.4: Configuring Translation Providers and License Keys when Installing a New or Updated Connector Package
- 5.6: Configuring Team Profiles
- 5.7: Configuring Adobe Experience Manager User Permissions for Translation Users
- 5.8: Configuring Connector Search Agents
- 5.9: Scheduling Translation Jobs to Send Out Content from the Translation Queue
- 5.10: Configuring the Service Components
- 5.11: Configuring Translation Settings for Digital Assets
- 5.12: Creating a Custom Asset Handler
- 5.13: Configuring Advanced Settings in CRXDE Lite
- 5.13.1: Configuring How the Connector Handles Special Characters
- 5.13.1.1: Why do translators encounter problems with special characters?
- 5.13.1.2: Adding CData Tags to Translation Files
- 5.13.2: Configuring Custom Content Types
- 5.13.3: Configuring the Rollout Feature
- 5.13.4: Enabling Content Collection from Blueprint Pages
- 5.13.5: Configuring the TMX to Include the Original Translation
- 5.13.6: Excluding Properties from Translation
- 5.13.7: Excluding Child Nodes from Translation
- 5.13.8: Configuring All Jobs to Pause
- 5.13.9: Configuring Catching Pages from Publish Events to the Translation Queue
- 5.13.10: Configuring which Properties of i18n Dictionary Items to Collect for Translation
- 5.13.11: Disabling the Cache Service
- 5.14: Configuring Advanced Settings in the User Interface
- 5.14.1: Creating a Page Property to Store Custom Translation-Status Values
- 5.14.2: Preventing the Translation of Pages
- 5.14.3: Configuring which Fields Are Available for the Field Report
- 5.14.4: Configuring which Workflows Are Available to Run
- 5.14.5: Configuring who Can Use the Globalization Tool
- 5.14.6: Automatically Remove/Replace Character from Translation Content
- 5.14.7: Preventing Specific URL and Content-Link Conversions
- 5.14.8: Skipping Translations in the Local TM
- 5.14.9: Logging JCR Properties During Translation
- 5.14.10: Configuring which Metadata Fields Are Available for Translation and Copying
- 5.14.11: Configuring which Page Metadata is Available for Copying and Translation
- 5.14.12: Configuring which Digital Asset Metadata is Available for Updating
- 5.14.13: Configuring which DITA Metadata is Available for Translation and Copying
- 5.14.14: Configuring which DITA Property is Available for Translation and Copying
- 5.14.15: Configuring Translation Settings for Catching Pages to the Translation Queue
- 5.14.16: Configuring Paths for Catching Rollout Pages to the Translation Queue
- 5.14.17: Configuring Default Job Name for Bulk Translation
- 6: Integrating the Connector with Adobe Experience Manager Workflows
- 6.1: Installing the Optional Workflow Package
- 6.2: Viewing the Rollout Workflow
- 6.3: Viewing the Restore Original Sync Workflow
- 7: Implementing an Event Listener to Catch Translation Events
- 8: Installing the Connector in a Clustered Environment
- 9: Automatically Updating Your Connector Configuration
- 10: Troubleshooting Installation and Configuration Issues
- 10.1: Lionbridge Connector Does Not Load
- 10.2: Keys not Displayed
- 10.2.1: Exporting an SSL Certificate in Google Chrome
- 10.2.2: Downloading an SSL Certificate in Mozilla Firefox
- 10.2.3: Importing an SSL Certificate into Your Chrome Certificate Store
- 10.2.4: Importing an SSL Certificate into Your Firefox Certificate Store
- 10.3: Communication Errors When Sending Content for Translation
- 10.3.1: Importing an SSL Certificate into Your Java Trusted Keystore with Java (JDK)
- 10.3.2: Importing an SSL Certificate into Your Java Trusted Keystore with JRE
- 10.4: Error Displayed about LSPs when Submitting a Job
- 10.5: Search Agents Are Not Displayed
- 10.6: Inaccurate Translation Status
- 10.7: The Connector Does Not Send Out Submitted Jobs or Return Translated Content
- 10.8: The Connector Does Not Send Out Submitted Jobs
- 10.9: The Translation Provider Does Not Receive Content in New or Custom Languages
- 10.10: The Connector Does Not Process Returned Translations after Language Mapping Changes
- 10.11: Job Submitted for Translation Is Missing Some Strings
- 10.12: Cannot Select New Translation Provider When Sending Out Content for Translation
- 10.13: New Target Language Is Not Available When Sending Out Content for Translation
- 10.14: Service Authentication
- 10.15: Freeway Analysis Codes not Displayed when Sending Out Content for Translation
- 11: Testing the Connector
- 12: Language Codes
- 13: Configuring an Adobe Experience Manager Team Profile for the Translation Integration Framework
- 14: Configuring LSP and Keys for the Translation Integration Framework
- 15: Configuring the Connector for the Translation Integration Framework
- 16: Creating a Translation Integration Configuration for the Connector
- 17: Creating an Adobe Experience Manager Cloud Configuration for the Connector
- 18: Editing Connector Cloud Configuration Settings
- 19: Integrating the Connector with Adobe Experience Manager's Translation Integration Framework
1 - Welcome to the Connector
Welcome to the Lionbridge Connector for Adobe Experience Manager
Welcome to the Lionbridge Connector for Adobe Experience Manager (“Connector”). This is the connector between Adobe Experience Manager and the Lionbridge Translation Services. The Connector enables you to automate sending and retrieving content from Adobe Experience Manager, which dramatically reduces the effort required to create, maintain, and publish Web content in multiple languages. If the Connector’s add-on for Lionbridge is enabled, you can automate sending and retrieving content from Adobe Experience Manager directly to and from the Lionbridge Translation Services. The connector supports installation into AEM On Premise (including Adobe Managed Service) and AEM as a Cloud Service (AEMaaCS or “AEM Cloud”).
1.1 - Terminology
| Asset | Any content or document being sent for translation, including metadata. Assets are created by the Connector. |
| Content API Platform | The hosted connectivity platform that receives and routes content from content systems, including content management systems (CMSs), to translation providers and back during implementation. The Lionbridge Connector Team configures the Platform based on the number and nature of systems involved in your system architecture. |
| Freeway | The name of the Lionbridge translation portal for submitting content to and retrieving content from the Lionbridge translation provider. |
| FTP Server | File Transfer Protocol (FTP) is a standard network protocol used to transfer files from one host to another host over a TCP-based network, such as the Internet. Translation providers may receive and send files for translation using an FTP server. |
| Keys | The Connector uses keys to establish a secure, discrete connection between the Connector instance and the Platform. Very important Do not use the same account keys on multiple instances, because this is a violation of the License Agreement. Using the same account keys on multiple instances will cause the Connector to behave unexpectedly, which can result in lost translation content, orphaned projects, and inaccurate translation status reports. The Lionbridge Connector team will support technical issues caused by duplicating or incorrectly installing CMS address keys only on a time and materials basis.** |
| Lionbridge | The publisher of the Freeway translation portal and a translation provider. Users connect to the Freeway translation portal to submit content to and retrieve content from the Lionbridge translation provider. |
| Lionbridge Connector for Adobe Experience Manager (Connector) | The connector software that Clay Tablet Technologies has developed and provides, which plugs into your Adobe Experience Manager installation to provide connectivity to our hosted Platform. In this document it is referred to as the Connector. This is the software you are installing and configuring as you work through this document. |
| MT | Machine translation. The translation provider can be a machine translation service, such as Bing. |
| Producer | CMS or another system that sends content or documents out for translation. In this case, this is your Adobe Experience Manager. |
| Provider | provider of translation services. The delivery of assets to the provider may be via an FTP server or a TMS connector. |
| Support Asset | Supporting documents and their metadata. Support assets are not translated by the translation provider, but they provide helpful context for the translator. |
| TMS | Translation management system that the translation provider uses. |
1.2 - About the Content API Platform
About the Content API Platform
The Content API translation-connectivity platform is the easiest, most flexible way to integrate content systems, including content management systems (CMSs) and other content producers, with translation providers and translation technologies.
Content API Platform is the hosted (IaaS) connectivity platform that receives and routes content from content management systems to translation providers and back, including to Lionbridge via Freeway. During implementation, the Lionbridge Connector Team configures the Platform for your translation solution, based on the translation providers or systems you use.
1.3 - How the Connector Works with Adobe Experience Manager
The Lionbridge Connector (“Connector”) is an important part of the Content API translation solution.
The Connector is installed on your system as an add-on to Adobe Experience Manager. Its functionality is displayed to the users as part of Adobe Experience Manager.

Your translation systems architecture might look like the configuration above. It may have additional CMSs or translation providers, but the core concepts remain the same. If your translation provider is Lionbridge, it is accessed via Freeway.
During implementation, Lionbridge Connector Support works with you and your translation providers to configure and test the other elements of your translation solution, which are the Content API Platform’s connections to your translation providers' systems.
1.4 - Using this Guide
Purpose of this guide
This guide describes everything you need to know to install and configure the Lionbridge Connector (“Connector”) for Adobe Experience Manager. It describes the delivery package contents, system requirements, installation instructions, and configuration procedures.
Note: This guide describes using both the Adobe Experience Manager Touch-Optimized UI and the Classic UI. The terminology in this guide is for classic devices, such desktops and laptops, although it is also relevant to mobile devices, such as tablets. For detailed information about the UIs and views, as well as differences in terminology depending on device types, refer to the Adobe Experience Manager documentation, available at http://helpx.adobe.com/marketing-cloud/experience-manager.html?t2.
Recommendation: Review the user guide to fully understand the powerful features of the Connector.
Who should use this guide
This guide is intended for Adobe Experience Manager administrators and system integrators.
What you should already know
This document assumes that your company already has an installed instance of Adobe Experience Manager. It assumes that you have a strong working knowledge of Adobe Experience Manager and its features. If Lionbridge is your company’s translation provider, it assumes that Freeway is already set up for your company.
How to find out more about the Lionbridge Connector for Adobe Experience Manager
For information on using the Lionbridge Connector to send and receive content for translation from Adobe Experience Manager, read the Lionbridge Connector for Adobe Experience Manager User Guide.
To access all Lionbridge Connector for Adobe Experience Manager documentation:
-
Log into Adobe Experience Manager.
-
Do one of the following:
- In the Touch-Optimized UI of Adobe Experience Manager, click the Tools icon
 and then click Lionbridge Connector in the Adobe Experience Manager rail. (This opens the Connector in a new browser tab.)
 - In the Classic UI of Adobe Experience Manager, scroll down and click Lionbridge Connector in the right pane.
- In your Web browser, navigate to /content/ctctranslation/status.html on your Adobe Experience Manager instance.
- In the Touch-Optimized UI of Adobe Experience Manager, click the Tools icon
-
In the Lionbridge Connector rail, click Admin Tools.
- This displays the Admin Tools menu options.
-
Click Help.
- A new Web page opens, displaying links to the Lionbridge Connector for Adobe Experience Manager documentation.
Documentation conventions
This guide uses the following conventions:
| Convention | Description |
|---|---|
| Bold | Highlights screen elements such as buttons, menu items, and fields. |
| Courier | Highlights input, file names, and paths. |
| Italics | Highlights terms for emphasis, variables, or document titles. |
| > | Indicates a menu choice. For example, Select Admin Tools > Configuration. |
1.5 - How to Contact Lionbridge Connector Support
How to Contact Lionbridge Connector Support
You can submit a support ticket either:
- by emailing connectors@lionbridge.com
- from the Lionbridge Connector Zendesk page https://lionbridge-connectors.zendesk.com/
See also:
2 - Before You Install
Before you begin to install the Lionbridge Connector (“Connector”) for Adobe Experience Manager, please review the system requirements, described in System Requirements, and perform the following pre-installation procedures (Note: This requirement doesn’t apply to AEM Cloud):
-
Or, Deploying the connector through the Cloud Manager CI/CD Pipelines. Note: This following requirements only apply to AEM On-Premise:
-
Creating or Updating a Connector Database on your Database Server Instance.
-
Optional. Creating the Connector Folders. These are the folders where the Connector stores data for manual translation updates and shared configuration files. It may also store log files.
Very important: Do not use the same account keys on multiple instances, because this is a violation of the License Agreement. Using the same account keys on multiple instances will cause the Connector to behave unexpectedly, which can result in lost translation content, orphaned projects, and inaccurate translation status reports. The Lionbridge Connector team will support technical issues caused by duplicating or incorrectly installing CMS address keys only on a time and materials basis.
Note: If you are installing the Connector in a clustered environment, see Installing the Connector in a Clustered Environment.
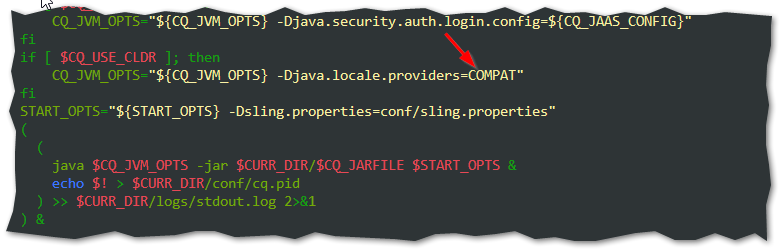
Note: If you are installing on Java version 8 or above, make sure you specify the JVM option -Djava.locale.providers=COMPAT under the AEM startup script, as described in the next image:
2.1 - System Requirements
Note: This section is not applicable for the AEM Cloud Connector.
The Lionbridge Connector for Adobe Experience Manager must be installed on the Adobe Experience Manager Author server. The Lionbridge Connector for Adobe Experience Manager supports Adobe Experience Manager versions 6.3 and higher.
The Lionbridge Connector for Adobe Experience Manager has no additional hardware or software requirements beyond those of Adobe Experience Manager. For detailed requirements, refer to the appropriate version of the Adobe Experience Manager Technical Requirements.
2.2 - Setting Your System Date, Time, and Time Zone Correctly
The Connector sends content to and receives content from the Content API Platform, which is hosted in the Lionbridge environment and requires any machines that connect to its applications to have the correct system time and date settings.
Important: Before proceeding, ensure that the system date, time, and time zone are set correctly on any systems that will run the Connector. If these settings are incorrect, the following error message is displayed: Error. The difference between the request time and the current time is too large.
2.3 - Downloading the Delivery Package
- Download the Lionbridge Connector (“Connector”) delivery package from the link that Lionbridge Connector Support sends you. This is a .zip file, and it contains the following folders:
| Folder Name | Description |
|---|---|
| Lionbridge connector for Adobe Experience Manager a.v-x.y.z-<datetimestamp> | The installation package that you will install into your Adobe Experience Manager system using the Package Manager tool. This has the following format: Lionbridge connector for Adobe Experience Manager a.v-x.y.z-yyyy-MMddkkmm.zip, where a.v is the supported Adobe Experience Manager version number, and x.y.z is the Connector version number, for example, Lionbridge connector for Adobe Experience Manager 6.3-4.0.0-2019-03141609.zip. Note about upgrading from a previous version of the Connector: There is a single package for both new installations and upgrades from previous installations. This redesigned package prevents overwriting your configuration settings while upgrading. |
| Freeway support package | Lionbridge connector addon - Freeway Support.zip, which is the Freeway-support add-on installation package that you will install into your Adobe Experience Manager system using the Package Manager tool. This package supports all versions of Adobe Experience Manager On-Premise (Doesn’t apply for AEM Cloud), and all versions of the Connector. Note: This is required only if you are using the Connector’s add-on for Lionbridge Freeway. |
| CTC Data | The Connector Data folder zip archive, CTCData.zip. Note: This folder is optional. |
| Documents | 1. Lionbridge Connector for Adobe Experience Manager Installation and Configuration Guide (this document) 2. Lionbridge Connector for Adobe Experience Manager User Guide |
| Key Client ID for CTCConfig UI | This is the file containing the license for the configuration UI if the Clay-Tablet Platform, used only by connector versions below 5.0.0. The file name is License_ID.txt. |
- Unzip the delivery package file you downloaded, and save its contents to a convenient location.
2.4 - Deploying the connector through the Cloud Manager CI/CD Pipelines
In order to deploy the Lionbridge connector for AEM Cloud, it’s required to include the Lionbridege Maven repository connector references in your Adobe Cloud Manager CI/CD Pipeline configuration. For more details on how to integrate customizations into AEM Cloud, please refer to Adobe’s official Cloud Manager CI/CD Pipelines documentation, or contact your Adobe’s Support Agent through the Adobe’s Support Channels.
To include the connector Maven references into the POM.xml AEM Cloud project:
- Add Lionbridge repo to POM.xml of project:
<repository>
<id>ctctranslation-libs-release</id>
<name>ctctranslation-libs-release</name>
<url>https://lionbridge-artifactory.eastus.cloudapp.azure.com/artifactory/ctctranslation-libs-release/</url>
<releases>
<enabled>true</enabled>
<updatePolicy>daily</updatePolicy>
</releases>
<snapshots>
<enabled>false</enabled>
</snapshots>
</repository>
- Embed Lionbridge cloud connector package to “All” package of the project. Edit your POM.xml of ‘all’ package:
<plugin>
<groupId>org.apache.jackrabbit</groupId>
<artifactId>filevault-package-maven-plugin</artifactId>
<extensions>true</extensions>
<configuration>
...
<embeddeds> <embedded> <groupId>com.adobe.cloud.translation.connector</groupId> <artifactId>lionbridge-connector.all</artifactId> <type>zip</type> <target>/apps/lionbridge-connector-packages/container/install</target> </embedded>
</configuration>
</plugin>
Also add the following dependency and then edit the filter.xml to allow path: /apps/lionbridge-connector-packages:
<dependency>
<groupId>com.adobe.cloud.translation.connector</groupId>
<artifactId>lionbridge-connector.all</artifactId>
<version>[Latest Version]</version>
<type>zip</type>
</dependency>
After performing the steps, a sample cloud site is generated with Adobe Archetype, which has Lionbridge Cloud Connector which includes all the packages. You can download it and do Maven build to test how to embed Lionbridge Cloud Connector.
Note If you want to do dev with reference to Lionbridge Cloud connector, then you need to add two dependencies:
<dependency>
<groupId>com.adobe.cloud.translation.connector</groupId>
<artifactId>lionbridge-connector.api</artifactId>
<version>[Latest Version]</version>
<scope>provided</scope>
</dependency>
<dependency>
<groupId>com.adobe.cloud.translation.connector</groupId>
<artifactId>lionbridge-connector.core</artifactId>
<version>[Latest Version]</version>
<scope>provided</scope>
</dependency>
For more information, see Deploying to AEM as a Cloud Service.
2.5 - Creating the Connector Folders
Note: This section is not applicable to the AEM Cloud Connector.
This section describes how to create a data folder that the AEM On-Premise Connector uses to store licensing information and translation data. This step is optional. The Connector uses the sub-folders to store data for translation updates and shared configuration files. It may also store log files.
-
On your Adobe Experience Manager server, navigate to the file system and create a folder called CTCdata.
-
Unzip the CTCData.zip archive folder from the delivery package you downloaded and unzipped, as described in Downloading the Delivery Package, and extract all the included folders into the target CTCdata folder. This creates the following two subfolders in the CTCdata folder:
| Sub-Folder | Folder Access Permissions | Description |
|---|---|---|
| update | Full | This folder will contain manually updated translated files. Note: Use this feature only if translation providers have edited XML files that were already returned into Adobe Experience Manager, or if a file was not successfully inserted back into Adobe Experience Manager. |
| logs | Full | This folder may be used by the Connector to store Connector log files, if you select the Logs check box in the Folder and Permissions section of the Configuration page. For details, see Folder and Permissions. |
- Set the access permission for each folder according to the above table.
2.6 - Creating or Updating a Connector Database on your Database Server Instance
Note: This section is not applicable to the AEM Cloud Connector.
The Connector requires one of the following databases for its database engine:
- MySQL version 5.0 or higher
- Microsoft SQL Server version 2012 or higher
- Oracle 11g and 12c
- PostgreSQL
For new Connector installations, create a database container, such as CTCTRANSLATION. The Connector will automatically create all tables and columns.
When upgrading from a previous version, the Connector automatically updates all tables and columns.
Note: If the automatic upgrade of the database fails while upgrading your version of the Connector, for example, because of insufficient permissions, the Errors and SQL Scripts buttons are displayed in the JDBC SQL Connection section of the Configuration page. Click Errors to view the related error messages. Click SQL Scripts to download the generated SQL scripts. A DBA can then run the scripts. Refer to the
ct_db_update.Sqlfile in the Adobe Experience Managerquickstartfolder for the list of SQL commands required to manually update the database.
Note about MySQL: You may need to edit the
mysql.inifile to add the following lines:
[mysql]
default-character-set=utf8
[mysqld]
character-set-server=utf8
Translation Database Size Requirements
| Minimum size | 1 GB |
| Recommended size | 10 GB |
Recommendation: Increase the database size relative to the site content.
3 - Installing the Lionbridge Connector
This section describes how to install the Connector installation package you downloaded earlier into your Adobe Experience Manager system, as described in Downloading the Delivery Package.
Before you install the Connector, verify that you have reviewed the system requirements and followed all the pre-installation procedures described in Before You Install.
Note: If you are installing the Connector in a clustered environment, see Installing the Connector in a Clustered Environment.
To install the Connector into Adobe Experience Manager:
-
Do one of the following:
- In the Touch-Optimized UI of Adobe Experience Manager, click Tools in the Adobe Experience Manager rail, and then click Deployment. Then, in the Navigation page, click Packages.
- In the Classic UI of Adobe Experience Manager, scroll down and click Packages in the right pane.
- In your Web browser, navigate to /crx/packmgr/index.jsp on your Adobe Experience Manager instance.
The CRX Package Manager opens.
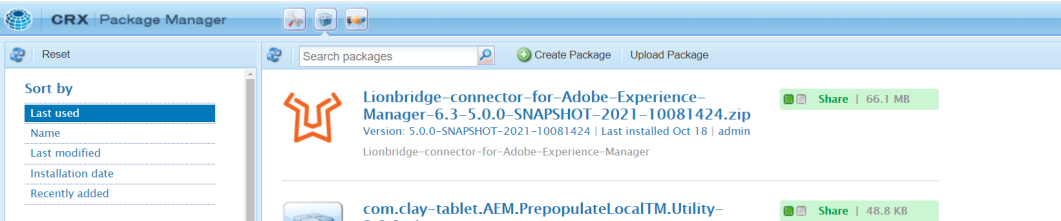
-
Click Upload Package to upload the Lionbridge Connector package to the Adobe Experience Manager server.
-
Click the name of the package you uploaded earlier, and follow the on-screen instructions.
-
Optional. If you are using Connector’s add-on for Lionbridge Freeway, repeat steps 2 and 3 to upload and install the Connector Freeway Support solution package (Lionbridge connector addon - Freeway Support.zip) using the Package Manager. This package supports all versions of Adobe Experience Manager and the Connector.
Note: If you are integrating the Connector with Adobe Experience Manager’s Translation Integration Framework, return to Integrating the Connector with Adobe Experience Manager’s Translation Integration Framework, and follow the instructions.
Tip: To prevent the installed Lionbridge Connector bundle from starting automatically, you can add the adding any file called
ct_bundle_stop_starting.configto the Adobe Experience Manager quickstart folder. The file can be blank or have any content. The process that activates the Lionbridge Connector bundle then throws a exception to stop activating.
3.1 - Installing the Add-On for SDL TMS
Note: This feature is available only when using the Clay Tablet Translation Connector for SDL TMS.
You can specify the SDL TMS configuration for submitting your content for translation. This feature requires installing the Add-On for SDL TMS, as described below:
To install the add-on into Adobe Experience Manager:
-
Do one of the following:
- In the Touch-Optimized UI of Adobe Experience Manager, click Tools in the Adobe Experience Manager rail, and then click Deployment. Then, in the Navigation page, click Packages.
- In the Classic UI of Adobe Experience Manager, scroll down and click Packages in the right pane.
- In your Web browser, navigate to /crx/packmgr/index.jsp on your Adobe Experience Manager instance.
The CRX Package Manager opens.

- Click Upload Package to upload the Lionbridge connector addon - SDL TMS Support.zip package to the Adobe Experience Manager server. . This package supports all versions of Adobe Experience Manager and the Connector.
- Click Lionbridge connector addon - SDL TMS Support.zip, and follow the on-screen installation instructions.
- In your Web browser, navigate to /content/ctctranslation/status.html# on your Adobe Experience Manager instance to display the Lionbridge Connector rail.
- In the Lionbridge Connector rail, click Admin Tools > TMS GUID Config.
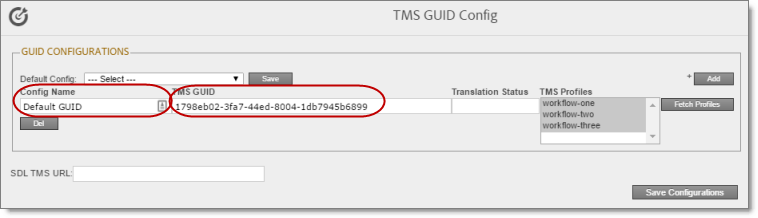
The TMS GUID Config page opens.
Note: A GUID is a Globally Unique Identifier, which is a unique reference number used as an identifier in software.
- Click Add in the top-right corner of the page and enter the following information about your configuration:
| Column | Description |
|---|---|
| Config Name | Your meaningful name for the TMS configuration, for example, Default GUID. |
| TMS GUID | Each translation provider can have multiple configurations, so that it can manage multiple sets of translation requirements, Each configuration in the provider’s system has its own GUID. |
Note: You can enter multiple GUIDs for each TMS configuration. Repeat this step for each TMS GUID configuration.
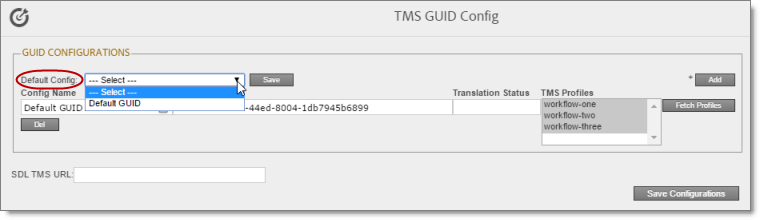
- In the Default Config dropdown list at the top of the page, select the SDL configuration you created, and click Save. For example, select Default GUID from the list.
- Optional. In the Translation Status field, enter a custom translation-status value that will be displayed in the page list of the Globalization Tool for all pages translated with this TMS configuration. This value is one of the following:
- A single value, such as MT (for machine translation) or HT (for human translation).
- A paired value, which is a value-title pair, with the -|- separator, for example 1-|-HT, where 1 is the value stored in a custom page property, while HT is the value displayed in the Globalization Tool.
This value will be stored in a custom page property that you create. For instructions, see Creating a Page Property to Store Custom Translation-Status Values.
- Optional. If you want to retrieve the workflow list from the SDL TMS server, then at the bottom of the page, enter the URL for your SDL TMS instance in the SDL TMS URL field.
- At the bottom of the page, click Save Configuration.
- In the Lionbridge Connector rail, click Admin Tools > LSP and Keys.
The LSP and Keys page opens. For more information about this page, see Editing a License Key.
-
In the LSP and License Keys section of page, click Edit beside the SDL TMS configuration.
-
In the LSP Type dropdown list, select SDL TMS.

- At the bottom of the page, click Update to save this change.
For more information about the LSP & Keys page, see Editing a License Key.
- Test this configuration by sending encrypted content for translation. For detailed instructions, refer to the Lionbridge Connector for Adobe Experience Manager User Guide.
Important: When you send a job for translation, in the Choose LSP list, verify that all the configurations you added on the TMS GUID Config page are displayed.
4 - Post-Installation Tasks
After installing the Connector, you complete the tasks below to verify that your installation was successful. Important: The Adobe Experience Manager admin user must perform the post-installation and configuration tasks for the first time after installation.
4.1 - Configuring the Data Folder and Database Connection
Note: This section is not applicable to the AEM Cloud Connector.
After installing the Connector, you configure the database connection and the data folder, and then you restart the Connector bundle, so that you can verify that all Connector nodes are active.
- Recommended for MySQL and Microsoft SQL Server databases. Set your default database collation as follows:
- MySQL and Oracle 11g/12c:
utf8_general_ci - Microsoft SQL Server:
SQL_Latin1_General_CP1_CI_AS
Note: This is highly recommended to ensure that content includes local characters.
Note about support for hexadecimal emoji characters: To support hexadecimal emoji characters, set your default database collation to:
utf8mb4_unicode_ci. For a list of supported hexadecimal emoji characters, see http://www.unicode.org/emoji/charts/full-emoji-list.html. For complete instructions, contact Lionbridge Connector Support. For details, see How to Contact Lionbridge Connector Support.
Note: The Connector versions 4.0.3 and higher supports Microsoft SQL Server 2012 and higher versions, and does not support Microsoft SQL Server 2008 and 2008 R2 versions.
-
Click Admin Tools > Configuration in the Lionbridge Connector rail to open the Configuration page. For information on opening the Lionbridge Connector rail, see Configuring the Connector.
-
In the JDBC SQL Connection section, configure the Connector’s database connection. For detailed instructions, see JDBC SQL Connection.

- In the Folder and Permissions section, configure the Connector’s data folder. For detailed instructions, see Folder and Permissions.

4.2 - Verifying that the Bundle and All Connector Components Are Active
Note: This section is not applicable to the AEM Cloud Connector.
You must access the Apache Felix Web Console to verify that the bundle and all 24 Connector components are installed and active.
Note: The Apache Felix Web Console is not available in the Adobe Experience Manager Cloud.
Verifying the bundle
- In your browser, navigate to: /system/console/bundles on your Adobe Experience Manager instance.
The Adobe Experience Manager Web Console Bundles page opens.
- In the Search box in the top-left corner of the page, type clay, and click Apply Filter.
The Connector bundle is displayed.
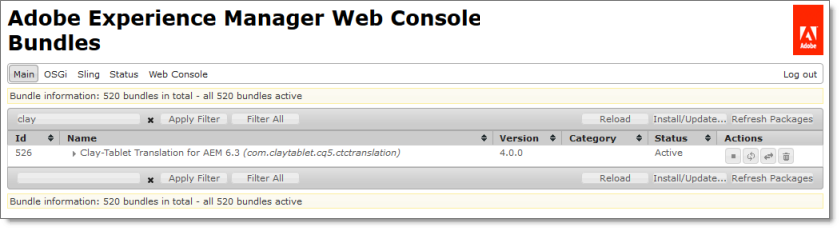
- Verify that the Connector bundle has active status.
Verifying the Connector components
- In your browser, navigate to: /system/console/components on your Adobe Experience Manager instance.
The Adobe Experience Manager Web Console Components page opens. This page displays all components alphabetically, by name.
-
Scroll down to locate the Connector components, whose names all start with com.claytablet.
-
Verify that all the following Connector components are installed and active:
-
com.claytablet.cq5.ctctranslation.impl.CTCAlarmFieldsServiceImpl
-
com.claytablet.cq5.ctctranslation.impl.CTCAuthServiceImpl
-
com.claytablet.cq5.ctctranslation.impl.CTCacheMonitoringServiceImpl
-
com.claytablet.cq5.ctctranslation.impl.CTCCacheServiceImpl
-
com.claytablet.cq5.ctctranslation.impl.CTCConfigServiceImpl
-
com.claytablet.cq5.ctctranslation.impl.CTCDataServiceImpl
-
com.claytablet.cq5.ctctranslation.impl.CTCDownloadServiceImpl
-
com.claytablet.cq5.ctctranslation.impl.CTCEventServiceImpl
-
com.claytablet.cq5.ctctranslation.impl.CTCInitServiceImpl
-
com.claytablet.cq5.ctctranslation.impl.CTCJDBCPoolServiceImpl
-
com.claytablet.cq5.ctctranslation.impl.CTCLocalTMServiceImpl
-
com.claytablet.cq5.ctctranslation.impl.CTCLogServiceImpl
-
com.claytablet.cq5.ctctranslation.impl.CTCPageServiceImpl
-
com.claytablet.cq5.ctctranslation.impl.CTCPipeProcessServiceImpl
-
com.claytablet.cq5.ctctranslation.impl.CTCPrepareServiceImpl
-
com.claytablet.cq5.ctctranslation.impl.CTCQueueScheduleServiceImpl
-
com.claytablet.cq5.ctctranslation.impl.CTCRolloutCheckServiceImpl
-
com.claytablet.cq5.ctctranslation.impl.CTCStatusServiceImpl
-
com.claytablet.cq5.ctctranslation.impl.CTCTaskServiceImpl
-
com.claytablet.cq5.ctctranslation.impl.CTCUpdateTMServiceImpl
-
com.claytablet.cq5.ctctranslation.impl.CTCUploadServiceImpl
-
com.claytablet.cq5.ctctranslation.impl.CTCWordsCountServiceImpl
-
com.claytablet.cq5.ctctranslation.service.configMonitor.CTConfigMonitor
-
com.claytablet.cq5.ctctranslation.service.PublishEventHandle.PublishEventCTHandler
-
com.claytablet.cq5.ctctranslation.service.RolloutEventHandle.RolloutEventCTHandler
-
com.claytablet.cq5.ctctranslation.service.UserPermissionChangeEventHandle.UserResourceChangeListener
-
com.claytablet.cq5.ctctranslation.workflow.RestoreCTCUnlockedProcess
-
com.claytablet.cq5.ctctranslation.workflow.RolloutCTCQueueProcess
-
com.claytablet.cq5.ctctranslation.workflow.RolloutCTCTranslationProcess
-
com.claytablet.cq5.ctctranslation.translationapi.impl.config.DummyTranslationAdapterFactory
-
com.claytablet.cq5.ctctranslation.translationapi.impl.CTCTranslationJobManagerImpl
-
com.claytablet.cq5.ctctranslation.translationapi.impl.CTCTranslationServiceFactoryImpl
4.3 - Verifying that the Connector Nodes are Installed
Note: This section is not applicable for the AEM Cloud Connector. Refer to the Adobe’s Debugging AEM as a Cloud Service with Repository Browser documentation for AEM Cloud debugging.
After installing the Connector, you must access the CRXDE Lite interface to ensure that all 12 Connector nodes are installed.
- Do one of the following:
- In the Touch-Optimized UI of Adobe Experience Manager, click Tools in the Adobe Experience Manager rail. Then, in the Navigation page, click CRXDE Lite.
- In the Classic UI of Adobe Experience Manager, click CRXDE Lite in the right pane.
- In your Web browser, navigate to /crx/de/index.jsp on your Adobe Experience Manager instance.
CRXDE Lite opens.
-
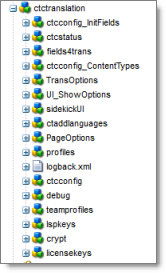
In the navigation pane on the left, navigate to /etc/ctctranslation.
-
Verify that the following 16 nodes are present:
- ctcconfig_InitFields
- ctcstatus
- fields4trans
- ctcconfig_ContentTypes
- TransOptions
- UI_ShowOptions
- sidekickUI
- ctaddlanguages
- PageOptions
- profiles
- ctcconfig
- debug
- teamprofiles
- lspkeys
- crypt
- license keys
Note: The
logback.xmlfile is also displayed. This is log configuration file that is injected into the Adobe Experience Manager log service.
View screen capture.
4.4 - Configuring Network Settings for a Firewall
Note: This section is not applicable to the AEM Cloud Connector.
Optional step. If you have a firewall, you must configure your ports so that the Connector can communicate with the Content API Platform. The Connector must be able to communicate with the Content API Platform by initiating the following outbound network connections:
| Protocol | Port Number | Description | Locations to Configure |
|---|---|---|---|
| HTTPS | Port 443 | For secure access to the Content API Platform Services | https://contentapi.lionbridge.com/* https://content-api.staging.lionbridge.com/* https://login.lionbridge.com/* https://fms.lionbridge.com/* https://fms-staging.lionbridge.com/* |
Key points:
-
You can’t edit existing license keys, V5.0 still supports old license keys to retrieve the translations or translation re-deliveries sent out with old license keys. But, you can disable a license key, if you don’t want the connector to retrieve the translations or translation re-deliveries sent out with the key.
-
You can’t send a translation job with old license key anymore, you can only use new CAPI keys to send content for translation.
5 - Configuring the Connector
You configure the Connector for Adobe Experience Manager mostly via the Lionbridge Connector rail, as described below.
-
Log in to Adobe Experience Manager with the admin account to start configuring the Connector.
-
Do one of the following:
- In the Touch-Optimized UI of Adobe Experience Manager, click the Tools icon and then click Lionbridge Connector in the Adobe Experience Manager rail. (This opens the Connector in a new browser tab.)
- In the Classic UI of Adobe Experience Manager, scroll down and click Lionbridge Connector in the right pane.
- In your Web browser, navigate to /content/ctctranslation/status.html on your Adobe Experience Manager instance.
- In the Touch-Optimized UI of Adobe Experience Manager, click the Tools icon
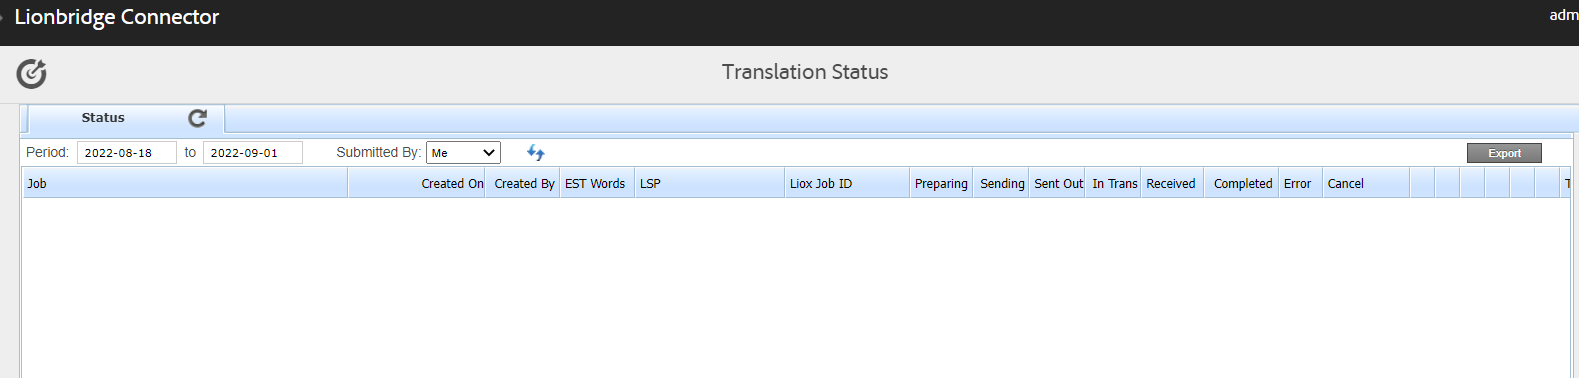
The Translation Status page opens.


(This is the Drop-down text)
- In the Lionbridge Connector rail, click Admin Tools.
This displays the Admin Tools menu options. You can perform most Connector configuration changes using these tools.
Note: After the Connector is installed, you must start configuring the Connector by selecting Admin Tools > Configuration. If you do not begin with this, subsequent configuration options will not be available. For details, see Configuring Connector Global Settings.
The following menu options are available:
| Menu Option | Purpose | For Details, See… |
|---|---|---|
| Configuration | Configure Connector global settings, including translation options. | Configuring Connector Global Settings |
| Language Mapping | Configure the language branches in the Web site structure where the Connector returns translated content, and configure the language lists displayed in Sidekick and the Bulk Translation wizard. | Configuring Connector Languages |
| Component Mapping | Configure the types of components and fields that the Connector can send out for translation when you send out content for translation. | Configuring which Components and Properties to Send Out for Translation |
| LSP and Keys | Configure the translation provider and the license keys. Migrate license keys to the new license server. | Configuring Translation Providers and License Keys |
| Advanced Settings | Configure:
|
Configuring Advanced Settings in the User Interface |
| Team Profiles | Define sets of Connector users who are allowed to send content out for translation from the specified source languages, to the specified source languages, using the specified translation providers. | Configuring Team Profiles |
| Search Agents | Configure search agents to collect pages for translation in the Bulk Translation wizard. | Configuring Connector Search Agents |
| Queue Schedulers |
Schedule translation jobs that send out content for translation from the Translation Queue. | Scheduling Translation Jobs to Send Out Content from the Translation Queue |
| TMS GUID Config | Configure the TMS GUID (global unique identifier), which is required for the following features when using the SDL TMS Add-On for the Connector:
|
Installing the Add-On for SDL TMS |
| Help | Open the home page of the Connector documentation (http://connectors.lionbridge.com/docs/Online_Help_Only/Product_Pages/AEM.htm) in a new Web browser tab. | N/A |
- The following additional configuration steps are optional:
| Configuration | For Details, See… |
|---|---|
| Subscribe to receive email notifications when new components are added to your site or when previously deleted components are added back. This is useful if you are planning to add new components in the future. | Subscribing to Email Notifications about New Fields and Components |
| Configure Adobe Experience Manager user permissions for translation users. | Configuring Adobe Experience Manager User Permissions for Translation Users |
| Configure the frequency that the Connector checks for processing, sending, and receiving translations. | Configuring the Service Components |
| Configure custom content types, using CRXDE Lite. | Configuring Custom Content Types |
| Configure the rollout feature. | Configuring the Rollout Feature |
| Configure content collection from Blueprint pages. | Enabling Content Collection from Blueprint Pages |
| Configure which content the Connector includes in TM (translation memory) updates. | Configuring the TMX to Include the Original Translation |
| Configure which properties to exclude from translation. | Excluding Properties from Translation |
| Configure all jobs to pause before the Connector sends them out for translation. | Configuring All Jobs to Pause |
| Configure the Connector to automatically listen to publish events and add published pages to the Translation Queue. | Configuring Catching Pages from Publish Events to the Translation Queue |
| Configure which properties of i18n dDictionary items and tags to collect for translation when using the Bulk Translation wizard. | Configuring which Properties of i18n Dictionary Items and Tags to Collect for Translation |
| Configure the translation settings for digital assets. | Configuring Translation Settings for Digital Assets |
| Create a custom asset handler that modifies the translation settings of specific asset types. | Creating a Custom Asset Handler |
5.1 - Configuring Connector Global Settings
- To configure Connector global settings, click Admin Tools > Configuration in the Lionbridge Connector rail to open the Configuration page. For information on opening the Lionbridge Connector rail, see Configuring the Connector.
The configuration options are organized into the following sections:
| Configuration Section | Purpose |
|---|---|
| Server URL | Specify the base URL that is used to generate a full page review URL. |
| Network Configuration | Specify the network configuration details for proxy server implementations. |
| Translation Platform | Enter the CAPI Client ID and CAPI Client Secret, which receives and routes content between the Connector and translation providers through CAPI. Note: In general, you configure the license immediately after installation. |
| JDBC SQL Connection | Configure the JDBC SQL connection to the Connector database. Note: In general, you configure the database connection immediately after installation. |
| Freeway Config | If Lionbridge Freeway is your translation provider, configure its credentials and Freeway-specific settings. |
| Folder and Permissions | Configure the Connector data folder and its permissions. Note: In general, you configure the Connector data folder immediately after installation. > Note: This option is not applicable to the AEM Cloud Connector. |
| Translation Settings | Configure translation-specific options. |
| In-Context Preview Optional |
Configure the settings for the In-Context Preview feature. This feature enables those without Adobe Experience Manager access (such as translators) to preview items in the XML files for translation as Adobe Experience Manager would render them. |
| Mail Server Settings | Specify the email settings for notification emails that the Connector can send. |
| Log Service | Specify the Connector log settings. |
| Agent Services | Configure the settings for the ctcPrepareService and ctcUploadService services. |
| Encryption Keystore (Lionbridge Freeway and SDL TMS only) | Specify the keystore location and password for content encryption and decryption. |
| UI and Default Settings | Specify the default user interface settings that are displayed to users, and configure the Connector to support editing multiple versions of a source page concurrently. |
Note: For the AEM Cloud Connector, Server URL, Network Configuration, JDBC SQL Connection, and Encryption Keystore are not applicable.
When you are done, you can perform the actions described below. The corresponding buttons are displayed at the bottom of the Configuration page:
-
To export all your configuration settings, from all configuration pages, click Export All Configurations. The Connector downloads the XML files as a single ZIP file. By default, these files are downloaded to the following location: AEM_QuickStart_Folder\CTC_Configs\Export. For a detailed description of the exported files and how to reimport them, see Automatically Updating Your Connector Configuration,
-
To export your configuration settings (excluding the translation options) as an XML file, click Export Configuration. The Connector downloads the file.
-
To export your translation options as an XML file, click Export Translation Options. The Connector downloads the file.
-
To update the Connector with changes to Adobe Experience Manager users or groups, click Reload Cache. This facilitates Connector access for newly added or modified users or groups.
-
To save your changes to the Configuration page, click Save Configuration.
5.1.1 - Server URL
The Server URL section of the Configuration page specifies the base URL that is used to generate a full page review URL.

| Configuration Option | Description |
|---|---|
| Server Base URL | This is the base URL that is used to generate a full page review URL. For example, if the URL of the Adobe Experience Manager server is http://www.xxx.com:4502, then the full URL of page /content/www/product is http://www.xxx.com:4502/content/www/product.html in the file for translation. |
5.1.2 - Network Configuration
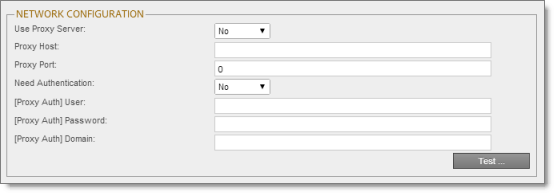
The Network Configuration section of the Configuration page specifies the network configuration details for proxy server implementations.
| Configuration Option | Description |
|---|---|
| Use Proxy Server | Indicates whether the Connector uses a proxy server. If this is No, the other settings in this section are not required. |
| Proxy Host | The IP address or domain name for the proxy server. |
| Proxy Port | The port number for the proxy server. |
| Need Authentication | Indicates whether authentication is required to access the proxy server. If this is No, the remaining settings in this section are not required. |
| [Proxy Auth] User | The user name for authentication to the proxy server. |
| [Proxy Auth] Password | The password for authentication to the proxy server. |
| [Proxy Auth] Domain | The domain for authentication to the proxy server. |
- To verify the network configuration and credentials for a proxy server, click the Test button. After testing, a message box indicates whether your configuration passed the test.
5.1.3 - Translation Platform
The Translation Platform section of the Configuration page contains the CAPI Client ID and CAPI Client Secrete, which receives and routes content between the Connector and translation providers through CAPI.
![]()
| Configuration Option | Description |
|---|---|
| License ID (Optional) | For backward compatibility with the Lionbridge Clay-Tablet Platform; Enter the license ID from the License_ID.txt file in the package you downloaded. For details, see Downloading the Delivery Package. |
| CAPI Client ID | Enter the CAPI (Content API) Client ID provided by the Connector’s Support team. |
| CAPI Client Secret | Enter, or leave empty, the CAPI (Content API) Client Secret provided by the Connector’s Support team. |
| CAPI Base URL | Enter the CAPI (Content API) Base URL provided by the Connector’s Support team. In the case of leaving it empty, the connector will automatically identify the correct value. |
5.1.4 - JDBC SQL Connection
Note: This section is not applicable to the AEM Cloud Connector.
The JDBC SQL Connection section of the Configuration page configures the JDBC SQL connection to the Connector database.
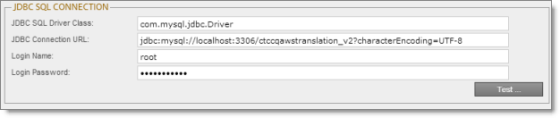
The options in this section configure the JDBC SQL connection to the Connector database. The Connector supports the MySQL, Microsoft SQL Server, Oracle, and PostgreSQL databases.
Important: Every Adobe Experience Manager server with the Connector installed needs its own Connector database. Mirrored or load-balanced servers can point to the same Connector database.
| Configuration Option | Description |
|---|---|
| JDBC SQL Driver class | Enter the appropriate configuration parameter for your database implementation:
|
| JDBC Connection URL | Enter the appropriate configuration parameter for your database implementation: jdbc:sqlserver://192.168.1.66:1433;databaseName=ctctranslation;. jdbc:mysql://192.168.1.90:3306/ctctranslation?characterEncoding=UTF-8. jdbc:oracle:thin:@//192.168.1.66:1521/CTCTRANSLATION. - jdbc:postgresql://localhost:5432/ctctranslation?charSet=utf-8 if SSL is not required - jdbc:postgresql://localhost:5432/ctctranslation?charSet=utf-8&ssl=true if SSL is required Note: You can use the DNS name or IP address of the server where the PostgreSQL database resides. |
| Login name | The name for logging in to the SQL database. |
| Login password | The password for logging in to the SQL database. |
General notes: In the examples above, 192.168.1.66 is the IP address of the database server. Alternatively, you can enter the domain name of the database server.
Notes for MySQL users: Ensure that characterEncoding=UTF-8 is configured for MySQL. 3306 is the default port of MySQL Server. If your database server uses a different port, change the port number in the example to match your port number.
Note for Microsoft SQL Server users:
-
1433 is the default port of the Microsoft SQL Server. If your database server uses a different port, change the port number in the example to match your port number.
-
The Connector versions 4.0.3 and higher do not support Microsoft SQLServer 2008 and 2008 R2 versions.
Note for Oracle users: 1521 is the default port of the Oracle DB Server. If your database server uses a different port, change the port number in the example to match your port number.
- To verify the JDBC connection and credentials, click the Test button. After testing, a message box indicates whether your configuration passed the test. This message box also displays a list of all Adobe Experience Manager instances that access this Connector database, and when the database was last accessed, which facilitate troubleshooting.
Upgrading the database while upgrading your version of the Connector
If upgrading the database fails while upgrading your version of the Connector, the Errors and SQL Scripts buttons are displayed:
-
Click Errors to view the related error messages.
-
Click SQL Scripts to download the generated SQL scripts. A DBA can then run the scripts.
5.1.5 - Freeway Config
If Lionbridge Freeway is your translation provider, the Freeway Config section of the Configuration page configures its credentials and Freeway-specific settings.

Note: This section is displayed and relevant only if you are using the Connector’s add-on for Lionbridge Freeway.
| Configuration Option | Description |
|---|---|
| Freeway Auth URL | The URL where Lionbridge Freeway provides the authentication service. This is https://fwapi.lionbridge.com/obvibundles/freewayauth.asmx. |
| Freeway Service URL | The URL where Lionbridge Freeway provides the analysis code service. This is https://fwapi.lionbridge.com/obvibundles/service.asmx. |
| Login Name | The login name for the Freeway server. |
| Login Password | The login password for the Freeway server. |
| Test | Click this to test the Freeway login credentials, above. After testing, a message box indicates whether the credentials passed the test. |
| Freeway Analysis Codes | Each check box indicates whether to display the corresponding analysis-code field to users when they send out content for translation to Lionbridge Freeway.
Warning: This configuration is required for full integration between the Connector and Freeway. Otherwise, the Connector cannot retrieve and display analysis code options, and the user cannot specify analysis codes for projects submitted to Freeway. However, even without this configuration, the Connector can still send submitted content to Freeway. |
| Use Analysis Codes as Queue Metadata | Indicates whether to use only Level-2 queue metadata as analysis codes. Select this check box to display the following user interfaces:
|
| Include instructions in content | Indicates whether the Connector sends the content of the Special Instruction field to Freeway as content in the XML translation files. |
| Include instructions in metadata | Indicates whether the Connector sends the content of the Special Instruction field to Freeway as metadata. |
| Summarize notes in instructions | Indicates whether the Connector merges any notes about individual content files into the instructions it sends to Freeway. Note: If you select this check box, you must select either or both of the Include instructions in content and Include instructions in metadata check boxes. Otherwise, the content will not be delivered to Freeway. |
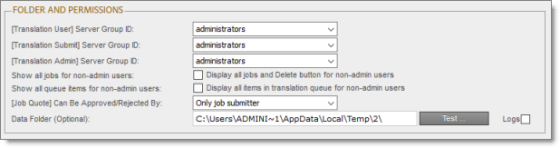
5.1.6 - Folder and Permissions
Note: This section is not applicable to the AEM Cloud Connector.
The Folder and Permissions section of the Configuration page configures the Connector data folder and its permissions.
| Configuration Option | Description |
|---|---|
| [Translation User] Server Group ID | Select the ID of the Adobe server group whose members can submit content from the Bulk Translation wizard only to the Translation Queue. The members cannot send out content directly for translation or submit content from Sidekick. |
| [Translation Submit] Server Group ID | Select the ID of the Adobe server group whose members can submit translation jobs from the Bulk Translation wizard or Sidekick to the Translation Queue and send out content directly for translation. |
| [Translation Admin] Server Group ID | Select the ID of the Adobe server group whose members can send out jobs for translation, configure the Connector, and remove completed translation jobs and statuses. |
| Display all jobs and Delete button for non-admin users | To display the Delete button and all jobs in the Status tab of the Translation Status page to users who are not members of the Translation Admin group, select this check box. Note: If you do not select this check box, then only users who are members of the Translation Admin group can access the Delete button and view all jobs. |
| [Job Quote] Can be approved/rejected by | Select the user group whose members can approve or reject translation job quotes. |
| Data Folder (Optional) | Optional. This is the path to the folder you created, where Connector will store translation data. For details, see Creating the Connector Folders.
Note: The files/update subfolder should have full access permissions for Java processes.
|
| Logs | To save the log files in the logs sub-folder of the folder specified in the Data Folder (Optional) field, select this check box. Note: If you do not select this check box, the log files are saved in crx-quickstart/logs. |
5.1.7 - Translation Settings
The Translation Settings section of the Configuration page configures translation-specific options.
![]()
| Configuration Option | Description |
|---|---|
| Project Identifier | The project name, as it will be displayed in the Translation Status page. If you leave this field blank, the project name is concatenated with the username and the date and time stamps in translation projects your company submits for translation. Recommendation: Enter your company name as the project identifier. |
| MAX # pages per File | This setting determines the maximum number of Adobe Experience Manager pages that the Connector packs into a single XML file for translation. You can adjust the number to better suit your translation requirements. Note: Translation providers translate an entire XML file before returning it. Therefore, it takes more time to translate an XML file with more pages packed into it than an XML file with fewer pages packed into it. Specifying a lower maximum number of pages per file generally results in a faster turnaround time. The default value is 100, which means the Connector will package content from 100 Adobe Experience Manager pages into a single XML file. Recommendation: Discuss this with your translation provider. |
| Submit user name and email as job metadata | This setting determines whether the Connector includes or excludes a submitter’s username and email address when submitting a job for translation. By default, this check box is not selected, which means the Connector excludes a submitter’s username and email address when submitting a job for translation. This feature supports the EU’s General Data Protection Regulation. |
| Catch Rollout Pages to [Rollout] Queue | Select this check box to enable users to send content to the Translation Queue when using Adobe Experience Manager’s MSM Rollout functionality. If this check box is selected, when users roll out pages, the Connector automatically sends content to the Translation Queue. Note: Alternatively, you can use the CTCRolloutTranslation workflow to enable this functionality. For details, see Viewing the Rollout Workflow. For information about when to use which configuration method, see Configuring the Rollout Feature. |
| Catch Published Workflow Pages to Queue | Select this check box to automatically catch pages published by a workflow and send them to the Translation Queue. Note: This requires adding the Add Published Page to Translation Queue step to your workflow. To do this, you add the Type: Process step, Process: com.claytablet.cq5.ctctranslation.workflow.PublishCTCQueueProcess workflow step to your workflow, and then you use this workflow to publish, instead of using Adobe Experience Manager’s built-in publish feature. For detailed instructions, refer to the Adobe Experience Manager documentation, at https://docs.adobe.com/docs/en/aem/6-2/develop/extending/workflows/step-ref.html. Note about settings for this feature: You configure the source and target languages and the translation settings for this feature in the Configuration for Catching Published Pages to Queue section of the Advanced Settings page. For detailed instructions, see Configuring Translation Settings for Catching Pages to the Translation Queue. |
| Catch Pages from Publish Event to Queue | Select this check box to automatically listen to publish events and add published pages to the Translation Queue. Note: To display this option, you must create the ShowCatchPublishEventPageToQueueInCTConfig property in /etc/ctctranslation/ctcconfig. For detailed instructions, see Configuring Catching Pages from Publish Events to the Translation Queue. Note about settings for this feature: You configure the source and target languages and the translation settings for this feature in the Configuration for Catching Published Pages to Queue section of the Advanced Settings page. For detailed instructions, see Configuring Translation Settings for Catching Pages to the Translation Queue. |
| Remove Control Characters | Some control characters, such as 0X10 and 0X13, will cause an XML file to be invalid. However, some translation providers and translation management systems may not be able to handle control characters. This option instructs the Connector to automatically remove all control (non-printing) characters (0x00-0x1F) from an XML file before sending it out for translation. |
| Translate Page Annotations | This setting determines whether the Connector sends out page annotations for translation.
For information about annotations, refer to the Adobe Experience Manager documentation, at: https://helpx.adobe.com/experience-manager/6-3/sites/authoring/using/annotations.html. |
| Translate Dependent CF | This setting determines whether the Connector sends out for translation Content Fragments that are referenced in pages, Experience Fragments, and adaptive forms.
|
| Save Translation to Local TM | This setting determines whether the translated content is stored at a property level in the local TM (translation memory). You can view these properties in CRXDE Lite.
|
| Language Conversion (URL Reference) | For fields in Adobe Experience Manager pages that contain only internal URLs to sites hosted on the same Adobe Experience Manager instance, the Connector can automatically find the referring target URL and exclude this field from the page translation process.
Note: If the sites use different language structures, for example, one site uses en and the other uses en-US, you must configure the languages using the Group, Base CRX Path, and Reference CRX Path columns in the Language Mapping page. For details, see Configuring Connector Languages. |
| Language Conversion (Content Link) | For fields in Adobe Experience Manager pages that contain internal links to sites hosted on the same Adobe Experience Manager instance, the Connector can automatically convert these internal links to point to the corresponding pages in the target language.
Note: If the sites use different language structures, for example, one site uses en and the other uses en-US, you must configure the languages using the Group, Base CRX Path, and Reference CRX Path columns in the Language Mapping page. For details, see Configuring Connector Languages. |
| Language Conversion option | - Select this check box to convert the URL references and the content links in a page to the corresponding target language even if the target folder does not exist. In this case, the URL references and the content links point to the Target language after a successful translation in the corresponding target page.
|
| Send translation events | Select this check box to prevent or enable writing Connector translation events to OSGi events. These events occur when a page translation status changes. By default, this check box is cleared, so that these events are not written to OSGi events. |
| “Send-Out” Notification | Select this check box if you want the Connector to send an email notification when it sends out a page for translation. |
| Email addresses for receiving “Send-Out” Notification | Comma-separated email addresses that will receive notification emails when the Connector sends out a page for translation. |
| “Completed” Notification | Select this check box if you want the Connector to send an email notification when a page translation has been completed. |
| Email addresses for receiving “Completed” Notification | Comma -separated email addresses that will receive notification emails when a page translation has been completed. |
Note about email notifications: The above settings are global, so the Connector will send email notifications to these addresses for all translation projects. In the Connector, users can also add email notifications on a project basis. For details, refer to the Lionbridge Connector for Adobe Experience Manager User Guide.
Note: The Catch Rollout Pages to [Rollout] Queue configuration option is not available for AEM cloud connector.
5.1.8 - Email Notifications for Stuck Jobs
The connector can be configured to send a stuck job notification when a job is sent for translation.

To configure the stuck job notification:
- Set the CAPI Job creation time + Delay Threshold hours = Time to send email.
- Set Delay threshold hours on Configuration page.
- Send a job that will be stuck at ‘sent out’ or ‘In translation’ status.
- When job is stuck at ‘sent out’ or ‘In translation’ status, wait for email.
5.1.9 - In-Context Preview
The In-Context Preview (ICP) section of the Configuration page specifies the settings for the In-Context Preview feature. This feature enables those without Adobe Experience Manager access (such as translators) to preview items as Adobe Experience Manager would render them.

Note: This feature requires pre-configuration steps to be completed by Lionbridge. Please reach out to connectors@lionbridge.com before filling out any of these settings.
| Configuration Option | Description | Sample Value |
|---|---|---|
| External Preview URL (for source) | The URL that enables translators or external reviewers to preview the source item on the Connector Preview server. For instructions on configuring this setting, contact Lionbridge Connector Support, as described in How to Contact Lionbridge Connector Support. | https://ct-preview-server-url?chunk={chunkid}&lang={lang} |
| External Preview URL (for target) | The URL that enables translators or external reviewers to preview the target item the Connector Preview server. For instructions on configuring this setting, contact Lionbridge Connector Support, as described in How to Contact Lionbridge Connector Support. | https://ct-preview-server-url?chunk={chunkid}&lang={targetlang} |
You can use the following parameters listed in the table below to configure the URLs described above:
| Parameter | Description |
|---|---|
| {lang} | The source language of the Adobe Experience Manager item sent for translation. |
| {targetlang} | The target language of the translated Adobe Experience Manager item. |
| {chunkid} | The globally unique ID generated by the Connector, which identifies each translatable field (chunk) in the XML file generated by the Connector. |
5.1.10 - Automatic Cleanup Translation Jobs
You can set the Delete all completed jobs older than value as shown in the follwoing figure.

The translation jobs older than set numbers of days are deleted.

Note:
- The number of days are not calculated by exactly 24 hours but by the total number of days. For example, if you set value as 2 days and send a job today, then the job will be deleted after end of second day that is after 12 am beginning of the third day once the two days are complete.
- There is no limit for maximum number of days.
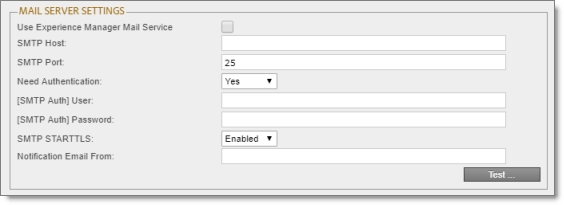
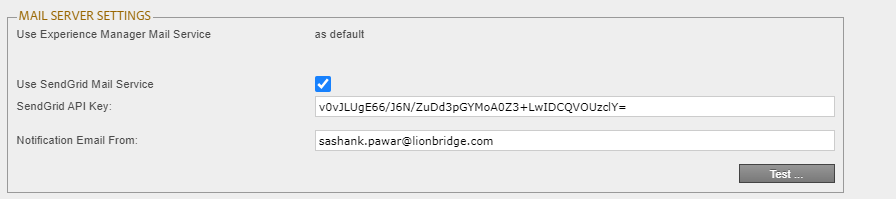
5.1.11 - Mail Server Settings
The Mail Server Settings section of the Configuration page specifies the mail-server settings for notification emails that the Connector can send.
The following figure shows the Mail Server Settings option in the AEM Cloud version:
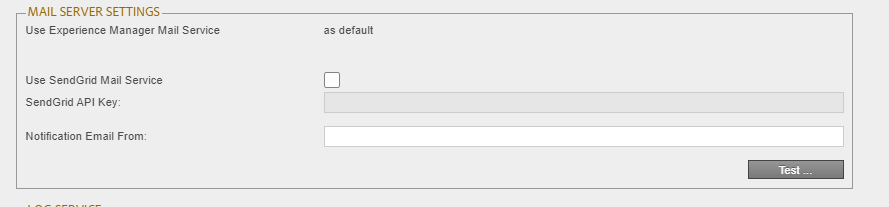
Note: If the Use SendGrid Mail Service checkbox is not checked, Use Experience Mail Service option is selected by default.
This section is required if you configured the Connector to send notification emails. For details, see Translation Settings.
| Configuration Option | Description |
|---|---|
| Use Experience Manager Mail Service | You can use either Day CQ Mail Service’s email notification settings or the Connector’s own settings to send email notifications from the Connector. - To configure the Connector to use Day CQ Mail Service’s email notification settings, select this check box, and leave the remaining settings in this section blank. For instructions on configuring Day CQ Mail Service’s email notification, refer to https://docs.adobe.com/docs/en/aem/6-1/administer/operations/notification.html#Configuring. Note: The Connector uses only the Day CQ Mail Service. The other settings described on the Adobe Experience Manager page are not relevant. - To configure the Connector to use its own email notification settings, clear this check box, and populate the rest of the settings in this section, as described below. |
| Note: The following settings are relevant only if the Use Experience Manager Mail Service check box, described above, is cleared. | |
| SMTP Host | The IP address or domain name of your SMTP server. |
| SMTP Port | The port used by your SMTP service. |
| Need Authentication | Indicates whether the SMTP server needs authentication. If necessary, contact your network administrator for this information. |
| [SMTP Auth] User | The login name or account if your SMTP server needs authentication. |
| [SMTP Auth] Password | The password to log in to your SMTP server if it needs authentication. |
| SMTP STARTTLS | Indicates whether your SMTP server supports the StartTLS protocol. If necessary, contact your network administrator for this information. |
| Notification email from | The email address from which Connector notification emails will be sent. If this is not specified, the default email address is ctcnotification@clay-tablet.com. |
-
To verify the email settings, click the Test button. After testing, a message box indicates whether your configuration passed the test.
-
The SMTP server settings are only avaiable for AEM on-premise version. For AEM cloud version, you can use SendGrid mail service on AEM cloud. User must aquire the SendGrid API key to fill in the SendGrid API key field of Mail Server Settings box.
5.1.12 - Automatic Split Job to Reduce Memory Usage and Improve Performance
Note: This section is only applicable for AEM cloud connector.
The automatic split job setting splits the job with more than configured number of items to multiple jobs.

5.1.13 - Log Service
The Log Service section of the Configuration page specifies Connector log settings.

| Configuration Option | Description |
|---|---|
| Log Level | There are three levels of logging: Info, Debug, and Trace. Recommendation: Initially set the log level to Debug, since this level of logging has all the details of the Connector translation process. This level of detail is required for Lionbridge Connector Support to assist you with any implementation issues. After the end-to-end translation process is running smoothly, you can change this to Info, so that only warnings and errors are logged. |
| Log Archive (Days) | By default, the Connector maintains 15 days of logs. |
5.1.14 - Agent Services
The Agent Services section of the Configuration page configures the settings for the ctcPrepareService and ctcUploadService services.

| Configuration Option | Description |
|---|---|
| Speed | You can choose a level from 1 to 20 to adjust the load of the ctcPrepareService and ctcUploadService agent services present to your servers. Setting 1 is very fast and therefore more resource intensive. The default value is 1 (fastest). Based on Connector testing, this setting will push CPU usage to 60% on average. You can monitor your server performance, and if the Connector uses too many server resources, you may need to adjust the speed level. Note: This speed setting affects all Connector agent services. |
| Multiple Threads | This is the maximum number of threads that the Connector can use for the JDBC pool, and to concurrently prepare, send, download, and return translations to Adobe Experience Manager. It is between 1 and 20. |
5.1.15 - Encryption Keystore (Lionbridge Freeway and SDL TMS only)
The Encryption Keystore section of the Configuration page configures the settings for the keystore that is used to encrypt and decrypt content for translation and translated content.

Note about the encryption framework: This is Java Cryptography Extension (JCE). This is an officially released Standard Extension to the Java Platform, which is described here:
https://docs.oracle.com/javase/7/docs/technotes/guides/security/SunProviders.html#SunJCEProvider. For more information, refer to the Lionbridge Connector for Adobe Experience Manager User Guide.
Note about the keytool utility: This is Java’s keytool – Key and Certificate Management Tool, which is described here: https://docs.oracle.com/javase/6/docs/technotes/tools/solaris/keytool.html. For more information, refer to the Lionbridge Connector for Adobe Experience Manager User Guide.
| Configuration Option | Description |
|---|---|
| Path | The file path of the encryption keystore. |
| Password | The keystore password. |
- To verify the keystore password, click the Test button. After testing, a message box indicates whether the password passed the test.
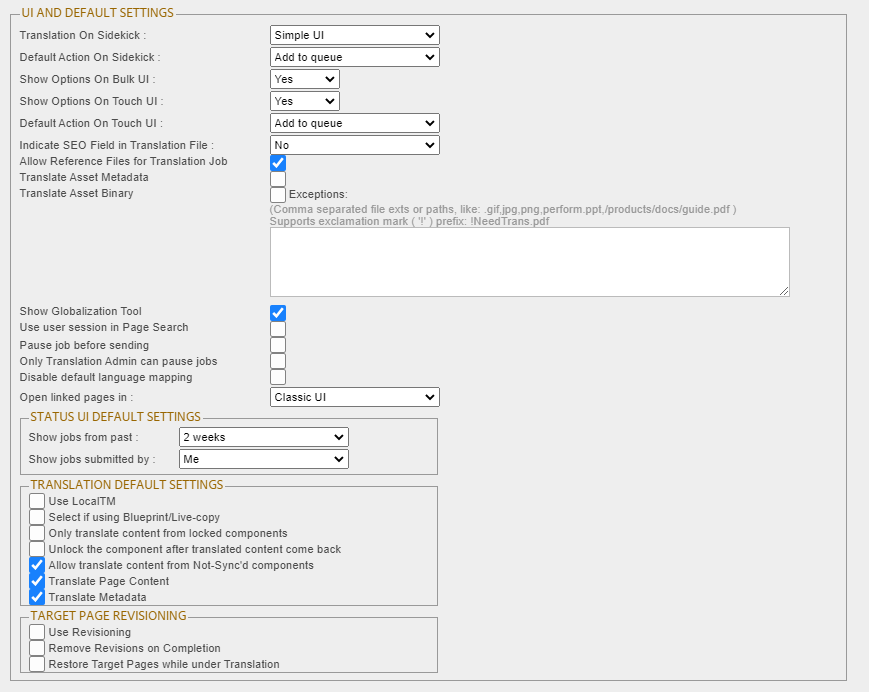
5.1.16 - UI and Default Settings
The UI and Default Settings section of the Configuration page specifies the default user interface settings that are displayed to users.
| Configuration Option | Description |
|---|---|
| Translation on Sidekick | This setting determines the user interface displayed when clicking Translate Content on the Page tab of the Sidekick. Some companies prefer a simplified process where users cannot choose advanced translation options, while others prefer to empower their content editors to set various parameters each time they send out content. For instance contributors can choose to ensure source content is not overwritten during the translation process, as it pertains to MSM rollout processes. The following options are available: - Simple UI: Users can submit content to the Translation Queue. All options are displayed in a single dialog box. Advanced translation options are not displayed. - Simple UI with all options: Users can submit content to the Translation Queue. All options are displayed in a single dialog box. Advanced translation options are displayed. - Wizard: Users can either submit content to the Translation Queue or send content out for translation. Options are displayed in a two-page wizard. Advanced translation options are not displayed. This is the default setting. - Wizard with all options: Users can either submit content to the Translation Queue or send content out for translation. Options are displayed in a two-page wizard. Advanced translation options are displayed. This is the default setting. For more information about these options, including screen captures of the user interfaces displayed in Sidekick, see Sidekick Options. |
| Show options on Bulk UI | This setting determines whether to display the Options page in the Bulk Translation wizard. The Options page enables users to change the following options: - Use Local TM - Select if using Blueprint/Live-copy - Only translate content from locked components - Unlock the component after translated content come back - Allow translate content from Not-Sync’d components - Translate Page Content - Translate Metadata These options are individually configurable, and they are described in the Translation Default Settings section, below. |
| Show options on Touch UI | This setting determines whether to display the Options tab in the Translate Content page, which opens from Adobe Experience Manager’s Touch-Optimized UI. The Options tab enables users to change the following options: - Use Local TM - Select if using Blueprint/Live-copy - Only translate content from locked components - Unlock the component after translated content come back - Allow translate content from Not-Sync’d components - Translate Page Content - Translate Metadata These options are individually configurable, and they are described in the Translation Default Settings section, below. Note: This is displayed only in Adobe Experience Manager versions 6.3 and higher, and it is relevant only for those versions. |
| Indicate SEO field in translation file | You can include SEO flags in XML translation files to indicate page field and property translations that must be Search Engine Optimized (SEO). Select the method for including this information in the file: - Yes, use attribute: The Connector adds the SEO_Flag attribute to PropertyContent in the XML file. For example: <PropertyContent IsMultipleValue=“No” NodePath=“jcr:content” PropertyName=“jcr:title” SEO_Flag=“This is a SEO field” <=== this text “This is a SEO field” is configurated in Metadata config> Products </PropertyContent> - Yes, add extra line: The Connector adds a extra PropertyContent to the XML file to indicate that the next field is an SEO field: <PropertyContent IsMultipleValue=“No” NeedTranslation=“false” SEO_Flag=“true”> The next field is a SEO field <=== this text “The next field is a SEO field” is configurated in Metadata config </PropertyContent> <PropertyContent IsMultipleValue=“No” NodePath=“jcr:content” PropertyName=“jcr:title”> Products </PropertyContent> If you select No (the default value), then the Connector does not include SEO flags in the XML translation files. Important: If you specify this setting, you must specify which SEO flags to include in the Page Metadata Configuration section of the Advanced Settings page. For details, see Configuring which Page Metadata is Available for Copying and Translation. |
| Allow Reference Files for Translation Job | Select this check box to enable users to attach references files (support assets) when sending out a translation job. This determines whether the Reference Files feature is available in the Translation Queue, Bulk Translation Wizard, Globalization Tool, and the Sidekick wizard. |
| Translate Asset Metadata | Select this check box to enable users to send out properties of digital-asset metadata properties for translation. For more information about this feature, see Configuring Translation Settings for Digital Assets. Important: You must configure the asset properties to send for translation in the Component Mapping page, in the same way that you configure other component. After you click Collect for an asset to add it to the component list, you must click Set for all components to send all components with a specific property for translation. For detailed instructions, see Configuring which Components and Properties to Send Out for Translation |
| Translate Asset Binary | Select this check box to enable users to send out digital assets for translation, for example, actual JPG or PDF files. For more information about this feature, see Configuring Translation Settings for Digital Assets. Tip: In the Exceptions text field, you can prevent assets with specific file-type extensions or asset paths from being sent out for translation. Separate each file type or path with a comma ( , ), for example: gif,jpg,png,perform.ppt,/products/docs/guide.pdf You can use the exclamation mark ( ! ) wild-card character as a prefix for file names to exclude, for example: !NeedTrans.pdf. Note: When the Connector sends the actual asset for translation, it sends the original rendition. There may be multiple renditions of an asset, for example, there may be multiple versions of an image with different resolutions, such as for Web and print. For more information, refer to “Managing Renditions” in the Adobe Experience Manager documentation, at: https://docs.adobe.com/docs/en/aem/6-3/author/assets/managing-assets-touch-ui.html#Managing%20Renditions. |
| Show Globalization Tool | Select this check box to display the Globalization Tool menu item in the Lionbridge Connector rail and the corresponding Globalization Tool. You can use the Globalization Tool to perform actions on multiple pages simultaneously. For a detailed description of this feature, refer to the Lionbridge Connector for Adobe Experience Manager User Guide. |
| Use user session in page search | This setting determines whether the Connector uses Adobe Experience Manager’s built-in permission settings so that a user can access only part of the content repository. - To use Adobe Experience Manager’s built-in permission settings, select this check box. - To ignore Adobe Experience Manager’s built-in permission settings, clear this check box (default value). By default, a user can access all content. Tip: You can also limit a user’s access by using team profiles. For details, see Configuring Team Profiles. |
| Pause job before sending | This setting determines whether the Connector automatically pauses a job before sending it out for translation, after Preparing status (0%) but before Sending status (1%). This is useful if you want to review or export reports of content items, or download the XML files before sending them out for translation. You can resume a paused job in the Translation Status page. - To configure the Connector to automatically pause jobs before sending them out, select this check box. - To prevent the Connector from automatically pausing jobs before sending them out, clear this check box (default value). Note: You can also configure this setting using the PauseBeforeSend property in CRXDE Lite. For details, see Configuring All Jobs to Pause. |
| Only Translation Admin can pause jobs | This setting determines who can use the pause button in the Translation Status page. You can pause a job before sending it out for translation, after Preparing status (0%) but before Sending status (1%). This is useful if you want to review or export reports about XML files with content items, or download the XML files before sending them out for translation. - To display the pause button only for users assigned to the Translation Admin group, select this check box. -To display the pause button for all users, select this check box (default value). |
| Disable default language mapping | This setting disable Adobe Experience Manager’s default language mapping feature. - To disable Adobe Experience Manager’s default language mapping, select this check box. - To enable Adobe Experience Manager’s default language mapping, select this check box (default value). Note about adaptive forms: If you are sending out adaptive forms for translation, clear this check box to enable Adobe Experience Manager’s default language mapping. If you are using custom languages, then in the Language Mapping page, use the Identity column to link your custom languages to the corresponding default Adobe languages. For detailed instructions, see Configuring Connector Languages. This step is required because adaptive forms support only the locales defined in Adobe languages. |
| Open linked pages in | This setting configures whether the Connector opens page-path links in either Adobe Experience Manager’s Touch UI or its Classic UI. These page-path links are displayed in the following Connector interfaces: - Bulk Translation wizard - Translation Queue - Globalization Tool - Translation Status page, Job Details tab |
| Status UI Default Settings | This sub-section determines the default values for UI elements in the Translation Status page. |
| Show jobs from past | This setting determines the default date range for displaying translation jobs in the Translation Status page. A job’s date is its submission date. The supported values are: - 1 week - 2 weeks (default value) - 3 weeks - 1 month - 3 months - 1/2 year - 1 year Note: In the Translation Status page, the user can use the Period fields and date choosers to change the date range for displayed translation jobs. |
| Show jobs submitted by | This setting determine the default value of the Submitted By dropdown list in the Translation Status page. The supported values are: - Me: The page displays only the jobs submitted by the current user. - My team(s): The page displays the jobs submitted by all members of the current user’s team. Note: The user can change this selection in the Translation Status page. |
| Translation Default Settings | This sub-section determines the default settings of these options when they are displayed in the Bulk Translation wizard, the Translation Queue, the Translate Content page in the Touch-Optimized UI, and in the Sidekick. The Connector also uses these default translation options for catching rollout pages to the Translation Queue, if the Catch rollout pages to [Rollout] Queue check box is selected in the Translation Settings section of the Configuration page. For all these options: - If a check box is selected, then the default value of this option is selected. - If a check box is cleared, then the default value of this option is cleared. Note about the Catch rollout pages to [Rollout] Queue feature: If a check box is enabled, then the option is selected. This feature has no user interface for changing the value. Many of the options in this section are related to Adobe Experience Manager’s MSM (Multi Site Manager) and Rollout features. For a description of these features and related concepts, as well as integration with the Connector, see MSM and Rollout Settings. Note: Depending on your company’s configuration, users may not be able to change these values. For example, if the Show options on Bulk UI check box, described above, is not selected, then users cannot change these settings in the Bulk Translation wizard. In that case, this section determines the default value of these settings. |
| Use Local TM | This feature determines whether to check each component in the source version of the item for any content changes, and send only changed components out for translation. If a component was previously translated and it has not changed, then the Connector does not send it for translation again: Instead, it uses the stored translation. This feature reduces the quantity of content that the Connector sends to translation providers, which reduces your cost. However, it needs the Connector translation backup data, and it increases the Connector processing time before sending out the items for translation. - If this check box is selected, the Connector checks whether content was already translated before sending it out for translation. - If this check box is cleared, the Connector sends out content for translation without checking whether it has already been translated. |
| Select if using Blueprint/ Live-copy |
This option is relevant when the target pages are MSM (Multi Site Manager) live copy pages, which means that Adobe Experience Manager automatically updates a target page when the corresponding source page changes. It prevents the Connector from overwriting unique source content that already exists in the target pages. This is useful when you are sending a page for translation that has been used in the past to push content to other pages, and includes target page content which has been changed, for example, regionalized. In this scenario you do not want to overwrite the regionalized content as the translation process occurs. Select this option when you do not want the Connector to overwrite components in the target pages that include regionalized content with the newly translated content. - If this check box is selected, the Connector does not overwrite unique source content that already exists in the target pages. - If this check box is cleared, the Connector does overwrite unique source content that already exists in the target pages. Recommendation: Select this check box if you are using the live-copy feature. |
| Only translate content from locked components | This option enables users to send out only content from locked components for translation. - If this check box is selected, users can send out content for translation only if it is from a locked component. - If this check box is cleared, users can send out content for translation whether or not it is from a locked component. Note: Locked components have an inheritance relationship between a source Blueprint page and the connected live copy page. When sending content for translation using Sidekick, users can choose whether to send for translation the content from locked components, which is inherited from a Blueprint component. This is useful if, for example, the page has both global and regional information and you only want to translate (replace) the global content that is created via a Blueprint page. In this scenario, suppose that the regional content on the page is manually translated in house, and that it has not changed. You would not want to tamper with it. However, using the same scenario, the global content from head office has changed and needs translation. You would select this check box to separate the content and localize only the new, inherited content. Note about Blueprint pages: If the Pickup Content From Blueprint Pages setting is specified, then the Connector always acts as though this option is selected, even if it is not selected. This occurs because only content from locked components are rolled out from Blueprint pages to Livecopy pages. For more information, see UI and Default Settings |
| Unlock the component after translated content come back | This option automatically unlocks a component after translated content returns. This option is relevant only when the Select if using Blueprint/Live-copy is been selected. After translated content returns, it automatically unlocks a component, which breaks the MSM inheritance. Warning: This breaks the inheritance between the component and its Blueprint page, so that it no longer inherits new content. However, you can use the CTCRestoreOriginalSync workflow to relock the component and recreate the inheritance. For details, see Viewing the Restore Original Sync Workflow. - If this check box is selected, the Connector automatically unlocks a component after translated content returns. - If this check box is cleared, the Connector does not automatically unlock a component after translated content returns. |
| Allow translated content from Not-Sync’d components | This option enables users to send content for translation even if it is not synchronized. This means it does not have a relationship to a Blueprint page, so it cannot be synchronized with it. This can happen if you are not using the MSM (Multi Site Manager) feature of Adobe Experience Manager, or if this is a page with regionalized content that does not inherit content from a Blueprint page. - If this check box is selected, users can send out content for translation if it does not have a relationship to a Blueprint page. - If this check box is cleared, users cannot send out content for translation if it does not have a relationship to a Blueprint page. Important: The Connector treats certain page properties ( jcr:content, jcr:title, jcr:description) as unlocked page properties. Therefore, if you want the Connector to send these page properties for translation, you must select this check box.Recommendation: Select this check box if you are using either the live-copy or the language-copy features. Note about Blueprint pages: If the Pickup Content From Blueprint Pages setting is specified, then the Connector always acts as though this option is selected, even when it is not. This occurs because only content from locked components is rolled out from Blueprint pages to Livecopy pages. For more information, see Enabling Content Collection from Blueprint Pages. |
| Translate Page Content | Important: To send out words on pages for translation, you must select this option. The corresponding check box is displayed when sending out content for translation from: - the Bulk Translation wizard (only if Pages is selected in the Item Type page of the wizard) - the Translation tab of the Globalization Tool - the Translate Content page in Adobe Experience Manager’s Touch-Optimized UI (relevant only for Adobe Experience Manager versions 6.3 and higher) |
| Translate Metadata | This option enables users to send out for translation metadata fields that are defined in the Page Metadata Configuration section of the Advanced Settings page. For details, see Configuring which Page Metadata is Available for Copying and Translation. These are properties under the /jcr:content node. The corresponding check box is displayed when sending out content for translation from: - the Bulk Translation wizard (only if Pages is selected in the Item Type page of the wizard) - the Translation tab of the Globalization Tool - the Translate Content page in Adobe Experience Manager’s Touch-Optimized UI (relevant only for Adobe Experience Manager versions 6.3 and higher) |
| Use Revisioning | Selecting this check box enables the Target Page Revisioning feature, described above. - When this check box is cleared, the Connector ignores the values of the Remove Revisions on Completion and Restore Target Pages while under Translation check boxes, described below. - When this check box is selected, the Connector creates the following revisions of the target page during the translation process, and the job name is part of the revision name: - Before <job name>: The Connector creates this revision before modifying the page to send it out for translation. This is the original target content. - During <job name>: The Connector creates this revision after it sends out the job for translation. This is the source content for translation that the Connector copied to the target, to send out for translation. - Completed <job name>: The Connector creates this revision after the translated content returns from translation and the Connector imports it into Adobe Experience Manager. This is the target page that has been updated with translated content. Note: The page revision name is visible only in Adobe Experience Manager’s Classic UI. In Adobe Experience Manager’s Touch-Optimized UI, the revision is displayed without a name. |
| Remove Revisions on Completion | If you select this check box, then after the Connector imports the translated content into Adobe Experience Manager, it removes the Before <job name> and During <job name> revisions, described above. The Connector does not remove the Completed <job name> revision, because this is the target page that has been updated with translated content. Note: Relevant only if the Use Revisioning check box, described above, is selected. Otherwise, the Connector ignores this setting. |
| Restore Target Pages while under Translation | If you select this check box, then as soon as the Connector sends out content for translation, it restores the Before <job name> revision of the page. This revision contains the previously translated version of the page. If you do not select this check box, then the updated source content that has been sent out for translation is the current target content, which is the default Connector behavior. Important: Relevant only if the Use Revisioning check box, described above, is selected. Otherwise, the Connector ignores this setting. |
5.1.16.1 - Sidekick Options
The following table describes the possible values for the Translation on Sidekick option in the UI and Default Settings section of the Configuration page. This page is described in UI and Default Settings.
| Translation on Sidekick Value | Where User Can Submit Content | User Interface | Advanced Translation Options Available |
|---|---|---|---|
| Simple UI | Translation Queue only | dialog box | |
| Simple UI with all options | Translation Queue only | dialog box | |
| Wizard | Translation Queue or directly to translation | two-page wizard | |
| Wizard with all options | Translation Queue or directly to translation | two-page wizard |
Screen captures of each option follow. For a detailed description of the translation interface within Sidekick, refer to the Lionbridge Connector for Adobe Experience Manager User Guide.
Simple UI
This option enables users to submit content to the Translation Queue. It does not display advanced translation options.
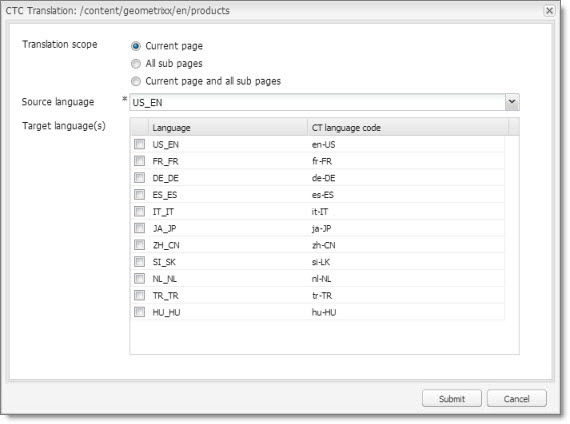
Simple UI with options
This option enables users to submit content to the Translation Queue. It displays advanced translation options.
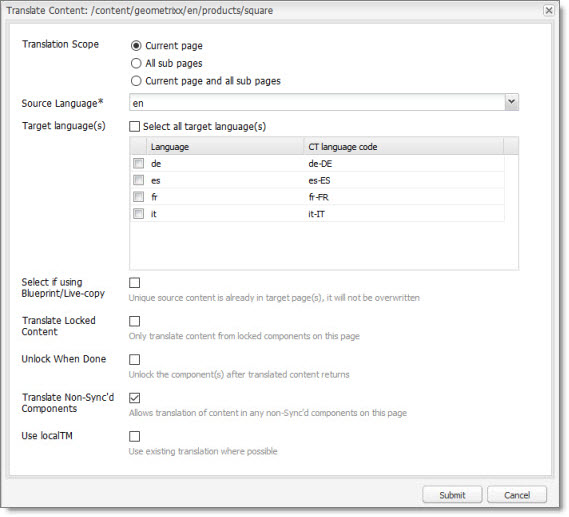
Wizard
This option enables users to send content either to the Translation Queue or directly out for translation. It does not display advanced translation options. It is a two-page wizard.
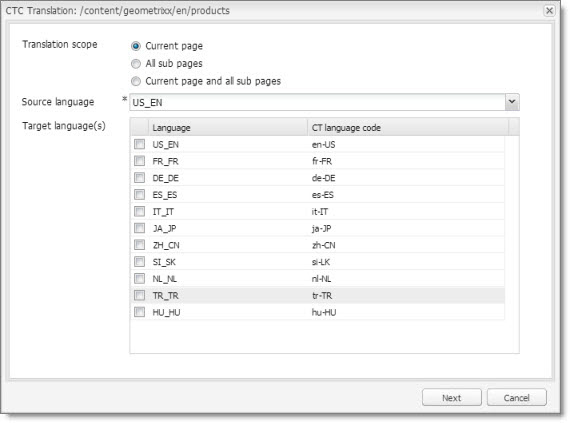
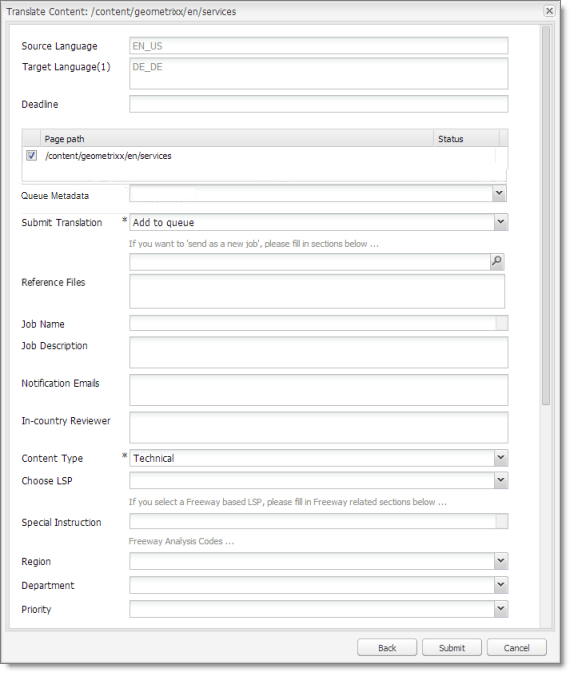
Note: You can configure whether by default the wizard sends content to the Translation Queue or directly out for translation. For details, see Configuring the default value of the Submit Translation dropdown list in the Sidekick wizard.
Wizard with options
This option enables users to send content either to the Translation Queue or directly out for translation. It displays advanced translation options. It is a two-page wizard.
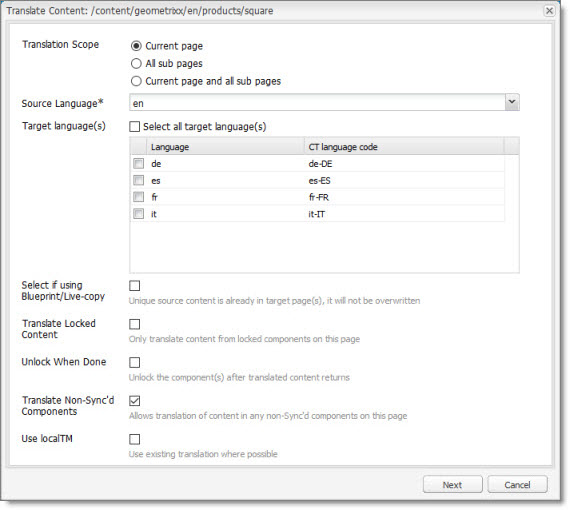
Note: You can configure whether by default the wizard sends content to the Translation Queue or directly out for translation. For details, see Configuring the default value of the Submit Translation dropdown list in the Sidekick wizard.
Configuring the default value of the Submit Translation dropdown list in the Sidekick wizard
You can configure the default value of the Submit Translation dropdown list in the Sidekick wizard.
-
To change the default from Add to queue to Send as a new job:
a. In CRX, edit the /etc/ctctranslation/sidekickUI node.
b. Add a new property namedskOptionDefaultSubmitType, of type String, with value job.
c. Save all.
d. On the page with Sidekick, press Ctrl and F5 to delete the client-side cache.The default is now Send as a new job.
-
To hide the Add to queue value:
a. In CRX, edit the /etc/ctctranslation/sidekickUI node.
b. Add a new property namedskOptionHideSubmitType, of typeString, with value queue, which is a multi-value property.
c. Save all.
d. On the page with Sidekick, press Ctrl and F5 to delete the client-side cache.The Add to queue option is no longer displayed.
5.1.16.2 - MSM and Rollout settings
Adobe Experience Manager’s MSM and the Rollout Process
Adobe Experience Manager includes the powerful Multi Site Manager (MSM), which facilitates managing multiple versions of web sites. The versions may be region specific, for example, a car company may have a different English version of its web site for each English-speaking country where it sells cars. Typically, one version of the site is considered the “source” site. Content in each target website may have different kinds of relationships to the version in the “source” site:
- Some content may be common to all web sites, such as the car company’s history.
- Some content may be a mix of common and specific. For example, the company may sell the same cars in many countries, but the cars may have slightly different features in some countries, depending on local regulations.
- Some content may be specific to a specific version of the site, such as information about car dealerships in a particular country.
Rollout is a process that propagates the changes made from the source (Blueprint) to the target (live copy). When you roll out a site, Adobe Experience Manager copies the Blueprint (source) to the live copy (target). If the components are locked, then whenever the source content changes, Adobe Experience Manager automatically updates the target content.
The following Adobe Experience Manager concepts are helpful to understanding MSM and rollout, and how to configure and use the Connector accordingly:
| Concept | Description |
|---|---|
| Blueprint | A source template for multiple pages, which can be rolled out. |
| Live copy | A copy of an existing page or Blueprint, which is the target. Adobe Experience Manager can automatically update the live copy when changes occur to the source. Important: If you use this feature, you must select the Select if using Blueprint/Live-copy option. The Allow translate content from Not-Sync’d components setting is optional. |
| Locked | Specifies the inheritance relationship between the target and the source. When the source changes, Adobe Experience Manager automatically updates a locked component in the target. In the car company example, this is useful for pages that have the same content in all versions, such as information about the history of the company. |
| Unlocked | Specifies the inheritance relationship between the target and the source. When the source changes, Adobe Experience Manager does not update an unlocked component in the target. In the car company example, this is useful for regionalized pages that should not be updated, such as a list of local car dealerships. |
For more information about these features and the rollout process, refer to the Adobe Experience Manager user documentation, available at: https://helpx.adobe.com/experience-manager/6-4/sites/administering/using/msm-sync.html
Important: For instructions on configuring the Rollout feature, see Configuring the Rollout Feature.
Why Integrate the Connector with Rollout
The Connector extends the MSM functionality by adding the translation component to the rollout feature. This facilitates using rollout not only to manage multiple region-specific sites, but also to manage multiple language-specific sites. The following table describes the advantages of using the Connector with rollout:
| Using Rollout | Not Using Rollout | |
|---|---|---|
| Process | Roll out pages, which automatically sends them to the Translation Queue. | - Roll out a same-language version. - Translate copied version. |
| Number of steps | One step. | Two steps. |
| link between source and content | Source and target can be linked, so when source is updated, changes are automatically sent to the Translation Queue. | No linkage between source and target. |
How the Connector Fits into MSM and Rollouts
The Connector does not have its own user interface during rollout: when you roll out content, you use Adobe Experience Manager’s rollout interface. The Connector manages the translation during the rollout based on your company’s settings for the following options:
- Only translate content from locked components
- Select if using Blueprint/Live-copy
- Unlock the component after translated content come back
- Allow translated content from Not-Sync’d components
5.2 - Configuring Connector Languages
You configure the language branches in the Web site structure where the Connector returns translated content, and you configure the language options for the Bulk Translation wizard and Sidekick.
You must correctly configure all the languages you are using on your site before sending any jobs for translation.
Note about Adobe Experience Manager built-in languages: In Adobe Experience Manager, the Connector provides default language mapping for Adobe Experience Manager built-in languages. Additional setup is not required, and therefore, these languages are not available for further configuration, as shown below. However, you can add additional language mappings, as described in this section.

Note about adaptive forms: If you plan to send adaptive forms for translation, add all required default Adobe built-in languages in this page. Do not rely on the default Adobe language mapping.
Note about i18n dictionary items: If you plan to send i18n dictionary items for translation, you must configure the languages for these items separately, as described in the Adobe Experience Manager documentation, here: https://helpx.adobe.com/experience-manager/6-3/sites/developing/using/i18n-translator.html. In addition, the i18n dictionaries language codes may be different from the language codes used in pages. For details, see: https://helpx.adobe.com/experience-manager/6-3/sites/developing/using/i18n-translator.html#ManagingSupportedLanguages.
Important: Do not change the name of a language or delete a language if there is translation content in the Translation Queue, or if there are translation jobs in progress.
Note: You can also adding custom Connector languages and codes. For details, see Adding Custom Connector Languages and Codes.
Note: There are two types of i18n in AEM.
Used by old AEM version and still works with AEM 6.5, node structured i18n. The language code is just a part of i18n path. Ex.: /apps/[CUSTOMER]/i18n/en, /apps/[CUSTOMER]/i18n/de. If the language code used in path is NOT standard AEM language code, the Language Mapping will need to be define. This is only required if the language code used in path is standard AEM language code. Json based i18n. Ex. /apps/[CUSTOMER]/i18n/en.json, /apps/[CUSTOMER]/i18n/de.json. If the the language code used in file name is a standard AEM language code, then, no Language Mapping is required.
To configure languages for the Connector:
- Click Admin Tools > Language Mapping in the Lionbridge Connector rail to open the Language Mapping page. For information on opening the Lionbridge Connector rail, see Configuring the Connector.
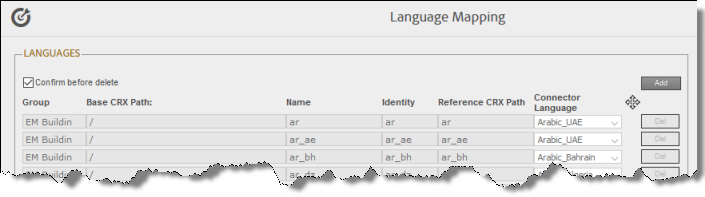
-
Click Add in the top-right corner of the page to add a new language.
A blank row is displayed at the bottom of the list. Enter the new language in this row.
-
Enter the following information in the appropriate columns:
Note: If you have multiple sites in the same Adobe Experience Manager instance with different language structures (for example, en and en_US), and you want to convert links to point to the corresponding pages in the target language, then you must map the languages for these sites to each other, using the Group, Base CRX Path, and Identity columns, as described below. Otherwise, leave these columns blank. For information about this feature, see the descriptions of the Language Conversion (URL Reference) and Language Conversion (Content Link) check boxes in the Translation Settings section of the Configuration page, in Translation Settings.
| Column | Description | Example |
|---|---|---|
| Group | Required only if you have multiple sites with different language structures, and if you want to convert links to point to the corresponding pages in the target language. This is the site identifier. For example, if the web1 site has the /content/web1/en/us and /content/web1/fr/fr pages, and the web2 site has the /content/web2/en and /content/web2/fr pages, then you can define two groups, web1 and web2:
Note: Do not use the “AEM” built-in group for any custom languages. That group is only for default AEM languages. Maximum length is 50 characters. |
Site1 |
| Base CRX Path | Required only if you have multiple sites with different language structures, and if you want to convert links to point to the corresponding pages in the target language. This is the base content path for the group, described above. For example:
There are additional configuration options:
|
/content |
| Name | The name of the language, which is the language identifier. Note: Do not use a space between the language code and country code. Instead, use an underscore (_). |
CA_FR |
| Identity | Required only if you have multiple sites with different language structures, and if you want to convert links to point to the corresponding pages in the target language. Links the same language across multiple sites. For example, both web1-us-en (Reference CRX Path: en/us) and web2-en (Reference CRX Path: en) have the same identity: en-us.Notes about adaptive forms : In the UI and Default Settings sub-section of the Configuration page, clear the Disable default language mapping (6.1+) check box. For details, see UI and Default Settings. If you are translating adaptive forms into a custom language, then enter the corresponding default Adobe language code in this column. This step is required because adaptive forms support only the locales defined in Adobe languages. |
en_us |
| Reference CRX Path | The path to the content for the language in CRXDE Lite.
|
ca/fr |
| Connector Language | The corresponding Connector language code. Select it from the list. For a list and description of Connector language codes, see Appendix: Language Codes. | French_Canada |
Note: Any new language you add is not automatically displayed in the Bulk Translation wizard or in Sidekick. For the language to be displayed there, you must add it to the relevant team profile, as described in Configuring Team Profiles.
-
Repeat steps 2 and 3 for any additional languages to add.
-
You can modify the values for any other languages in the list.
-
You can drag-and-drop the languages on this page to modify the order in which they are displayed in the list of languages for the users.
-
When you are done, click Save Configuration at the bottom of the page.
This language configuration will be displayed in the Bulk Translation wizard and when accessing the Connector from Sidekick.
- To delete a language so that it will no longer be displayed in the Bulk Translation wizard and when accessing the Connector from Sidekick, click the corresponding Del button. A confirmation message box is displayed before the language is deleted.
Tip: To prevent displaying the confirmation message box each time you delete a language mapping, clear the Confirm before delete check box.
- To export the language settings to an XML file, click Export at the bottom of the page. The Connector downloads the XML file.
5.2.1 - Adding Custom Connector Languages and Codes
The Connector SDK includes a list of pre-defined languages and language codes. If your company wants to use an additional language that does not have a corresponding Connector language and code, then you can create a custom Connector language and language code support.
However, your company will be sending content to a translation management system (TMS) that does not support your new language code. Therefore, you must contact both Lionbridge Connector Support and the translation provider so that they can map your language codes to those supported by the TMS.
Recommendation: Use standard Connector language codes. For a list and description of Connector language codes, see Appendix: Language Codes.
-
To add a custom language, do one of the following:
- In the Touch-Optimized UI of Adobe Experience Manager, click Tools in the Adobe Experience Manager rail. Then, in the Navigation page, click CRXDE Lite.
- In the Classic UI of Adobe Experience Manager, click CRXDE Lite in the right pane.
- In your Web browser, navigate to /crx/de/index.jsp on your Adobe Experience Manager instance.
CRXDE Lite opens.
-
In the navigation pane on the left, navigate to /etc/ctctranslation/ctaddlanguages.
-
Select the sample language node, and copy and paste it as a new node.
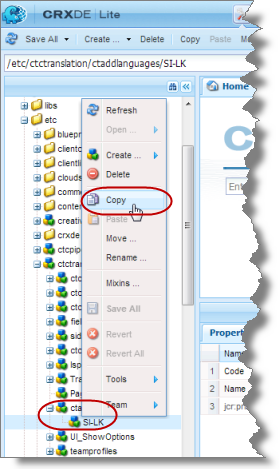
- Rename the new node, and change the values of the Code and Name properties.
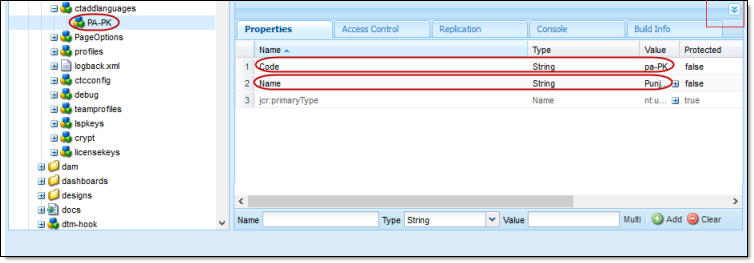
- In the CRXDE Lite Menu, click Save All.
The new language code is now available for selection in the Language Mapping page, which is described on Configuring Connector Languages.
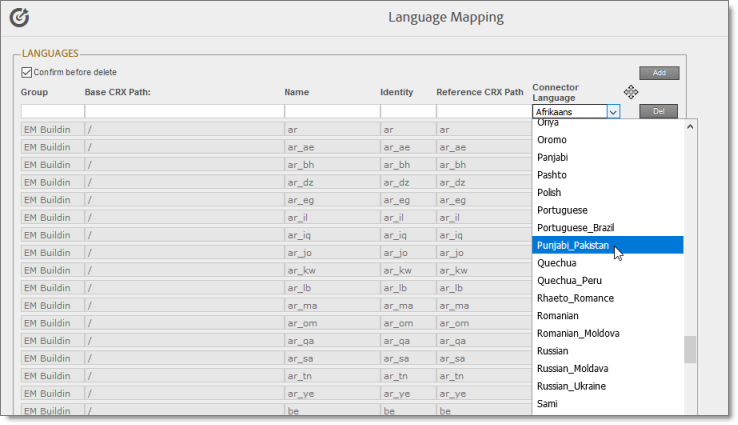
5.3 - Configuring which Components and Properties to Send Out for Translation
The content of an Adobe Experience Manager page is created from a collection of page components. A component has different properties, which are types of fields. You must configure which components and properties the Connector can send out for translation.
Note: This is required when sending out pages and Experience Fragments for translation. This is not required when sending out adaptive forms, Content Fragments, i18n dictionaries, and tags for translation.
To configure which components and properties the Connector sends out for translation:
- Click Admin Tools > Component Mapping in the Lionbridge Connector rail to open the Component Mapping page. For information on opening the Lionbridge Connector rail, see Configuring the Connector.
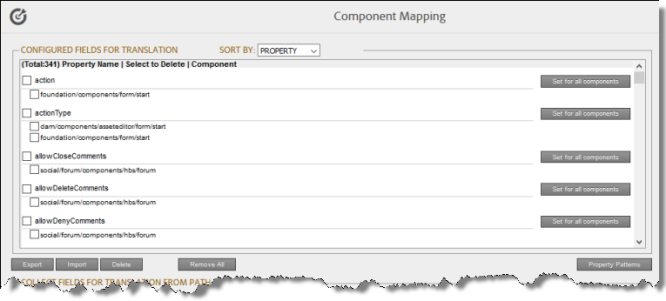
For information on using this page to subscribe to email notifications when new components are added, see Subscribing to Email Notifications about New Fields and Components.
The Configured Fields for Translation section at the top of the page displays all the components and properties that are currently configured for the Connector to send out for translation.
-
Optional. You view a list organized either by property, or by the component.
-
To view the list organized by property, in the Sort By field, select Property. This is the default setting.
-
To view the list organized by component, in the Sort By field, select Component.
-
-
Optional. You can instruct the Connector to collect all properties that are in a specific component for translation. Similarly, you can instruct the Connector to collect all components that have a specific property for translation. You can also remove any component or property from the list, so that the Connector does not collect it to send for translation.
- If you are viewing the list organized by property, then the properties are displayed in alphabetical order. Each component that has this property is displayed underneath it. The components are listed alphabetically by path.
- To instruct the Connector to send all components with a specific property for translation, click the corresponding Set for all components button. The list under the property updates, and the Connector displays [ALL] instead of a list of all components.
- If you are viewing the list organized by property, then the properties are displayed in alphabetical order. Each component that has this property is displayed underneath it. The components are listed alphabetically by path.
Note: When selecting components to instruct the Connector to send digital asset properties for translation, click the corresponding Set for all components button, so that the Connector displays [ALL] instead of a list of all components. Additional steps are required to configure translation settings for digital assets. For details, see Configuring Translation Settings for Digital Assets.
- To remove a component from the list for a property, select the corresponding check box and click Delete. This prevents the Connector from sending out for translation this property in this component.
-
If you are viewing the list organized by component, then the components are displayed in alphabetical order. Each property in a component is displayed underneath it. If there are any properties displayed in all components, these are at the top of the list, under [ALL].
-
To remove a component from the list, so that the Connector does not send it out for translation, select the corresponding check box and click Delete.
-
To remove a property under a component from the list, so that the Connector does not send out that property for translation when it is in that component, select the corresponding check box and click Delete.
-
-
Optional. To remove the mapping for all configured components, click Remove All.
-
Optional. You can export as an XML file the list of fields that the Connector sends out for translation. Click Export at the bottom of this section. The Connector downloads the file, fields4trans.xml.
-
Optional. You can import an XML or a CSV file:
-
You can import a previously exported XML file that is in the same format as fields4trans.xml, described above. This is useful for restoring backed-up properties.
-
You can import a CSV file with comma-separated property names. The Connector will add the properties in this file to all components.
-
Note: The Connector recognizes both ComponentPath and PropertyName as headers and not as actual data.
To import a file:
a. Click Import at the bottom of this section.
The Select a file to upload dialog box opens.
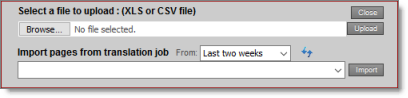
b. Click Choose File.
c. In the browser dialog box that opens, navigate to the XLS or CSV file to import, select it, and click Open, or similar, to close the browser dialog box.
The Select a file to upload dialog box displays the path of the file you selected.
d. Click Upload to upload the file.
The Connector imports the file and updates the configured properties and components.
- Optional. To add a string to a property name to instruct the Connector either to send that property for translation or to avoid sending that property for translation, click Property Patterns.
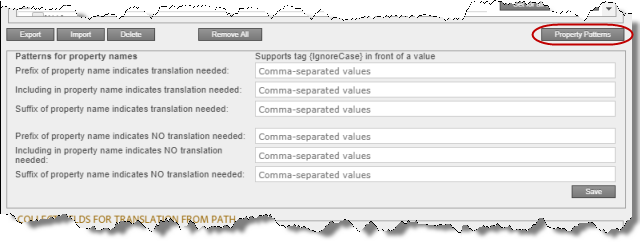
The Patterns for property names subsection is displayed. Add tags to configure one or more of the settings below.
Note: The tags are not case sensitive.
| Setting | Description |
|---|---|
| Prefix of property name indicates translation needed | The string at the beginning of a property name indicating that translation is required. |
| Including in property name indicates translation needed | The string in the middle of a property name indicating that translation is required. |
| Suffix of property name indicates translation needed | The string at the end of a property name indicating that translation is required. |
| Prefix of property name indicates no translation needed | The string at the beginning of a property name indicating that translation is not required. |
| Including in property name indicates no translation needed | The string in the middle of a property name indicating that translation is not required. |
| Suffix of property name indicates no translation needed | The string at the end of a property name indicating that translation is not required. |
-
Optional. In the Collect Fields for Translation from Path section, you can add additional properties to the list that the Connector can send out for translation.
a. In the Site path field, specify the highest-level folder that contains the component with the properties you want to include.
-
Click the arrow at the end of the field
 , browse to the folder, and click Select.
 -
Enter the CRX path of the folder in the following format: /content/www/us/en.
b. Click Collect.
The Connector searches all components and finds the string-type properties (fields) for all items. When it is done, the Connector displays the lists of properties in the specified folder in the Collected Possible Property Fields for Translation list. Under each property, the Connector displays the path of the component where it is located. To the right, the Connector displays the sample value of the string and underneath it, the path of origin of the sample value.
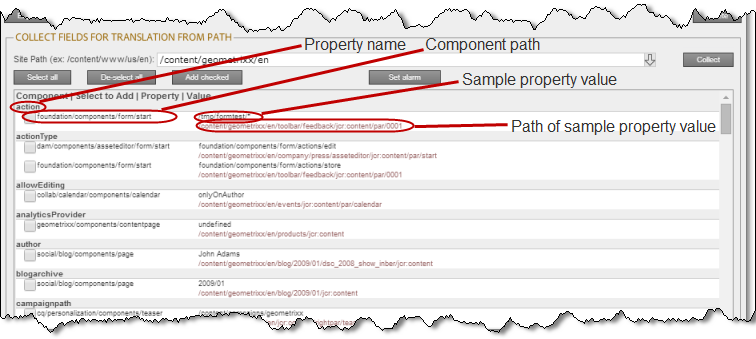
c. Select the check boxes for all the properties you want the Connector to send out for translation.
d. Click Add checked.
-
These property fields are now displayed in the Configured Fields for Translation section at the top of the page.
In the Collected Possible Property Fields for Translation section, you can also perform the following actions:
- To clear all selected check boxes, click De-select all.
- To select all check boxes, click Select all.
- To subscribe to email notifications when new components are added to your site, click Set alarm. For details, see Subscribing to Email Notifications about New Fields and Components.
5.4 - Subscribing to Email Notifications about New Fields and Components
If you are planning to add new components in the future, you can subscribe to receive email notifications when new components are added to your site or when previously deleted components are added back. In these scenarios, you receive an email notification listing the new components, and you can then configure the Connector to send out the new properties for translation.
Subscribing to email notifications about new fields and components is recommended in the following scenarios:
-
If you want to collect a lot of content for translation, for example, if you are still building your site.
-
If you are planning to add new components in the future. When new components are added, the specified user receives an email notification listing the new components.
- Click Admin Tools > Component Mapping in the Lionbridge Connector rail to open the Component Mapping page. For information on opening the Lionbridge Connector rail, see Configuring the Connector.
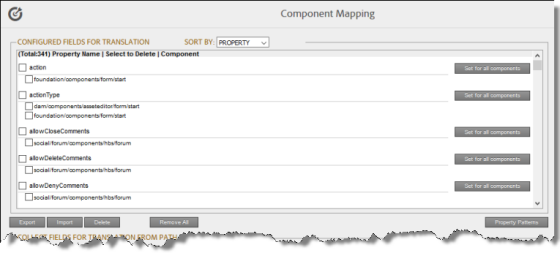
For information on using this page to configure which properties and components to send out for translation, see Configuring which Components and Properties to Send Out for Translation.
- Click Set alarm.
The Setup alarm for new fields dialog box opens.

-
In the Site path to search box, type in the path to the content for which to receive email notifications when new components are added. You can add multiple paths in the Site path to search box.
-
In the Email address to notify box, enter the email address that will receive email notifications when new components are added under the specified path. You can add multiple email addresses in the Email address to notify box.
-
Click Save.
Every hour, the Connector searches for and collects new components for translation. Whenever the Connector collects new components, it sends an email notification to the specified email address. The email notification is similar to the following:
    From: claytabletqa@gmail.com [mailto:claytabletqa@gmail.com]
    To: smith@example.com
    Subject: Found 2 new Properties

    Found 2 new added Properties.
    1) Property Name: jcr:description
    Value:
    Component: foundation/components/form/text
    Path: /content/geometrixx/en/toolbar/feedback/jcr:content/par/0002
    2) Property Name: options
    Value:
    Component: foundation/components/form/dropdown
    Path: /content/geometrixx/en/toolbar/profiles/edit/jcr:content/par/dropdown
- After you receive this email notification, return to the Component Mapping page, and click Load alarm fields. The Collected Possible Property Fields for Translation list displays the collected properties.
- Select the check boxes for the properties to add, and click Add checked.
This configures the Connector to send out the selected properties for translation.
5.5 - Configuring Translation Providers and License Keys
Lionbridge Connector Support generates the license keys for you using the CAPI Client ID and CAPI Client Secrete ID number you entered in the Translation Platform section of the Configuration page. For details, see Translation Platform. You then configure these license keys in the LSP & Keys page.
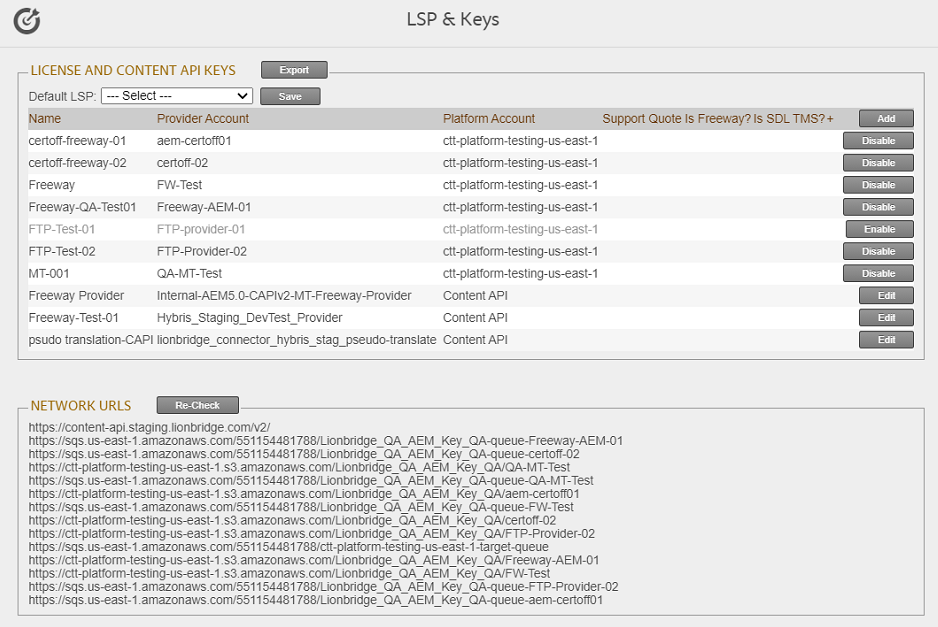
Important - Keys: Do not use the same provider keys on multiple Production instances. Otherwise, installation of the same keys on more than one Production server will cause unpredictable behaviour by the Connector resulting in, at least, lost translation content, orphaned projects and inaccurate status reports. You can use the same test provider key on multiple non-Production instances.
In the LSP & Keys page:
-
If you are upgrading your Connector installation from version 3.x, 4.x to 5.x, you must migrate the license keys for your current translation providers to the new license server. For detailed instructions, see Migrating a License Key.
-
You can add a license key for a new translation provider. For detailed instructions, see Adding a New License Key.
-
You can edit a license key for a current translation provider. For detailed instructions, see Editing a License Key.
Note: You must migrate a license key to the new license server before you can edit it.
Tip: To delete a license key, open it for editing, as described in Editing a License Key, and then click Delete.
5.5.1 - Migrating a License Key
If you are upgrading your Connector installation from version 3.x, 4.x to 5.x, you can still receive the outstanding job from old license keys but could not send the new job for translation. To obtain your new keys associated with the Client ID and Client Secret ID, contact Lionbridge Connector Support. For details, see How to Contact Lionbridge Connector Support.
Note: Once the migration is successful, you can only use old keys to receive outstanding job but not new job.
To migrate a license key:
-
To see migrated license key, Click Admin Tools > LSP and Keys in the Lionbridge Connector rail to open the LSP & Keys page. For information on opening the Lionbridge Connector rail, see Configuring the Connector.
The LSP & Keys page opens.

The Legacy and Content API Keys section at the top of the page displays the following information about the translation providers that were configured in an earlier version of the Connector.
| Column | Description |
|---|---|
| Name | The name of the translation provider as it is displayed when users send content for translation. |
| Provider Account | The legacy license key of the translation provider, which was generated for you by Lionbridge Connector Support. |
| Platform Account | The key to the Clay Tablet Platform, which was generated for you by Lionbridge Connector Support. |
| Support Quote | Indicates whether this translation provider supports providing a quote before starting a translation job. |
| Is Freeway? | Indicates whether this translation provider is Lionbridge Freeway. |
| Is SDL TMS? | Indicates whether this translation provider is SDL TMS. |
- Optional. Select your default translation provider and click Save.

- Optional. To export and download the information in the LSP and Keys section as an XML file, click Export.
5.5.2 - Adding a New License Key
You can add a new license key, for example, if you add a new translation provider.
To add a new license key:
- Click Admin Tools > LSP and Keys in the Lionbridge Connector rail to open the LSP & Keys page. For information on opening the Lionbridge Connector rail, see Configuring the Connector.
The LSP & Keys page opens.
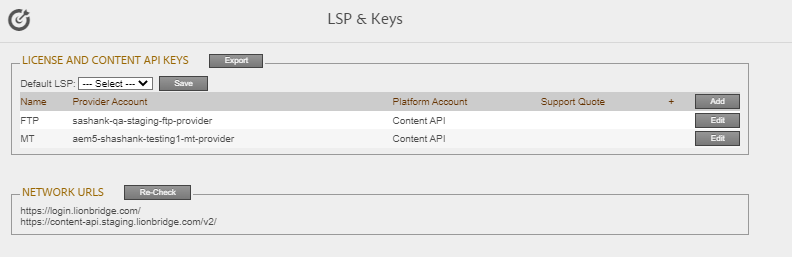
Note: If the Legacy Keys Migration section is displayed at the top of the page, you must migrate the license keys for translation providers that were created in an earlier version of the Connector. For detailed instructions, see Migrating a License Key.
- In the LSP and License Keys section, click the Add button in the top-right corner.
The New Provider dialog box opens.
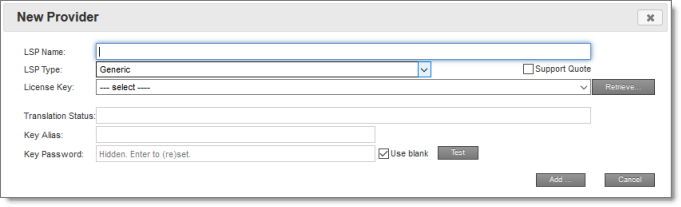
The New Provider dialog box in the AEM Cloud version:
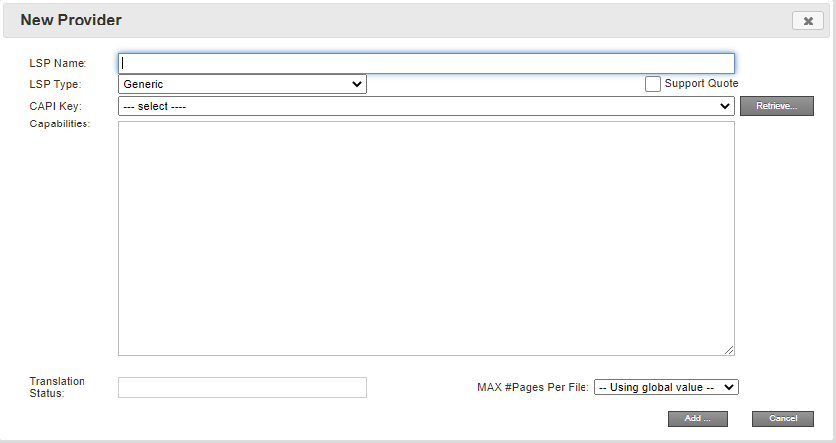
Note: For the AEM Cloud Connector, the alias and password fields are not applicable.
- Specify the following licensing information:
| Field | Description |
|---|---|
| LSP Name | The name of the translation provider that will be displayed when users send content for translation. |
| LSP Type | Your translation provider, if displayed. If your translation provider is not displayed, then select Generic. The type of translation provider determines whether additional configuration is required. |
| Support Quote | This check box indicates whether this translation provider supports providing a quote before starting a translation job. |
| License Key | The license key of the translation provider, which was generated for you by Lionbridge Connector Support. To populate the list of available license keys, click Retrieve and select the license key for the translation provider. Note: After a key has been configured, you cannot select it again for use. It is displayed in the drop down list as unavailable, in gray. Troubleshooting: - If keys are not displayed in the dropdown list, verify that you entered the license ID in the Translation Platform section of the Configuration page, as described in Freeway Config. - If keys are still not displayed, you may need to configure a proxy server, as described in Network Configuration. |
| Translation Status | Optional. A custom translation-status value that will be displayed in the page list of the Globalization Tool for all pages translated by this provider. - A single value, such as MT (for machine translation) or HT (for human translation). - A paired value, which is a value-title pair, with the - |
-
When you are done, click Add.
If there are multiple translation providers, the Default LSP dropdown list is displayed at the top of the LSP and License Keys section of the page.
-
Optional. Select your default translation provider and click Save.
-
Optional. To export and download the information in the LSP and Keys section as an XML file, click Export.
-
Optional. The AWS URLs section displays a list of URLs used by the Content API Platform, which is hosted on Lionbridge Envirment. This is useful if you are using a proxy server to control the network traffic, so that you can whitelist these URLs. Click Re-Check to update this list.
Note: If the Connector displays errors about checking LSP keys when sending out content for translation, then instead of whitelisting the entire address, exclude the key names from the URL. For example, enter ctt-platform-prod-us-east-1/*.
5.5.3 - Editing a License Key
You can edit information for an active license key, for example, if you want to change the name of the associated translation provider as it is displayed to users when sending out content for translation or when viewing the status of a translation job.
To edit license key information:
- Click Admin Tools > LSP and Keys in the Lionbridge Connector rail to open the LSP & Keys page. For information on opening the Lionbridge Connector rail, see Configuring the Connector.
The LSP & Keys page opens.
Note: If the Legacy Keys Migration section is displayed at the top of the page, you must migrate the license keys for translation providers that were created in an earlier version of the Connector. For detailed instructions, see Migrating a License Key.
The LSP and Keys section displays all keys that are available for editing.
- To edit a license key in this section, click the corresponding Edit button.
The Edit Provider dialog box opens.

The Edit Provider dialog box in the AEM Cloud version:
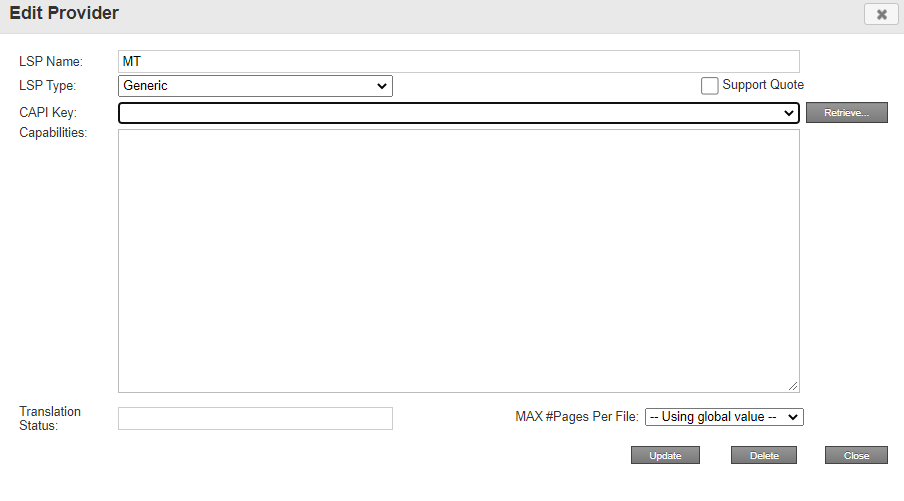
Note: For the AEM Cloud Connector, the alias and password fields are not applicable.
- Edit any of the following licensing information:
| Field | Description |
|---|---|
| LSP Name | The name of the translation provider that is displayed when users send content for translation. |
| LSP Type | Your translation provider, if displayed. If your translation provider is not displayed, then select Generic. The type of translation provider determines whether additional configuration is required. |
| Support Quote | This check box indicates whether this translation provider supports providing a quote before starting a translation job. |
| License Key | The license key of the translation provider, which was generated for you by Lionbridge Connector Support. To select a different license key, click Retrieve and select the license key for the translation provider. Note: After a key has been configured, you cannot select it again for use. It is displayed in the drop down list as unavailable, in gray. Troubleshooting: - If keys are not displayed in the dropdown list, verify that you entered the license ID in the Translation Platform section of the Configuration page, as described in Freeway Config. - If keys are still not displayed, you may need to configure a proxy server, as described in Network Configuration. |
| Key JSON | The license key information in JSON format. In general, you should not modify this text, which should be retrieved automatically from the Content API server. However, if your firewall setting blocks access to the Content API server, you may need to input it manually. For assistance, please contact Lionbridge Connector Support, as described in How to Contact Lionbridge Connector Support. If you modify this text, click Test beside the Key JSON box. A message box indicates whether this key passed the test. |
| Translation Status | Optional. A custom translation-status value that will be displayed in the page list of the Globalization Tool for all pages translated by this provider. - A single value, such as MT (for machine translation) or HT (for human translation). - A paired value, which is a value-title pair, with the `- |
-
When you are done, click Update.
If there are multiple translation providers, the Default LSP dropdown list is displayed at the top of the LSP and Keys section of the page.
-
Optional. Select your default translation provider and click Save.
-
Optional. To export and download the information in the LSP and Keys section as an XML file, click Export.
-
Optional. The AWS URLs section displays a list of URLs used by the Content API Platform, which is hosted on AWS (Amazon Web Services). This is useful if you are using a proxy server to control the network traffic, so that you can whitelist these URLs. Click Re-Check to update this list.
Note: If the Connector displays errors about checking LSP keys when sending out content for translation, then instead of whitelisting the entire address, exclude the key names from the URL. For example, enter ctt-platform-prod-us-east-1/*.
5.5.4 - Configuring Translation Providers and License Keys when Installing a New or Updated Connector Package
When you install a new or updated Connector package, you must reconfigure your translation providers and keys. If your keys are displayed in gray and you cannot select them when you attempt to retrieve them, please contact Lionbridge Connector Support to request releasing your keys. For details, see How to Contact Lionbridge Connector Support.
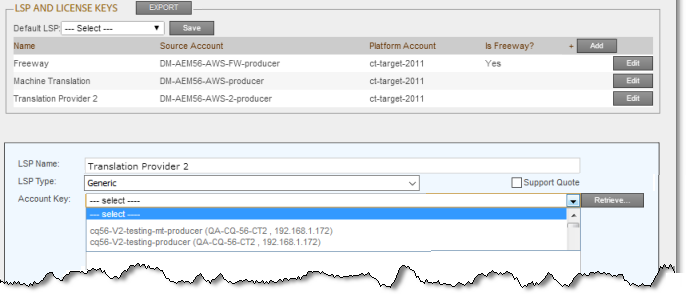
5.6 - Configuring Team Profiles
A team profile defines a set of Connector users who are allowed to send content out for translation from the specified source languages, to the specified target languages, using the specified translation providers.
To create a team profile:
- Click Admin Tools > Team Profiles in the Lionbridge Connector rail to open the Team Profiles page. For information on opening the Lionbridge Connector rail, see Configuring the Connector.
The Team Profiles page opens, displaying any team profiles that have already been created.
- In the top-right corner of the page, click Add.
The page expands, displaying the Profiles section.
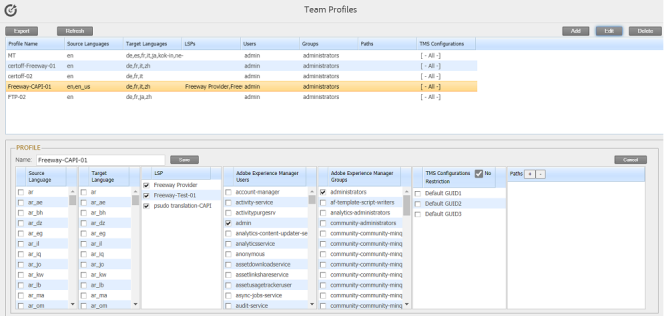
- Specify the following information about the team profile:
| Field/Column | Description |
|---|---|
| Name | The name of the team profile. |
| Source Language | Select the check boxes of the source languages in which team members can send out content for translation. The list of available languages is based on the configured languages. For details, see Configuring Connector Languages. Warning: Do not include languages from different groups in a single team profile, because submitted jobs will fail. For example, if you use the rollout feature to submit jobs, then the Connector removes items from the job and it stops, with an error message that the source asset is not found. |
| Target Language | Select the check boxes of the target languages for which team members can send out content for translation. The list of available languages is based on the configured languages. For details, see Configuring Connector Languages. Warning: Do not include languages from different groups in a single team profile, because submitted jobs will fail. For example, if you use the rollout feature to submit jobs, then the Connector removes items from the job and it stops, with an error message that the source asset is not found. |
| LSP | Select the check boxes of the translation providers to which team members can send out content for translation. The list of available translation providers is based on the configured translation providers. For details, see Configuring Translation Providers and License Keys. |
| Adobe Experience Manager Users | Select the check boxes of the Adobe Experience Manager users to include in the team profile.Adobe Experience Manager users are identified by their display names. If a display name is not configured for an Adobe Experience Manager user, the email address is displayed instead. |
| Adobe Experience Manager Groups | Select the check boxes of the Adobe Experience Manager groups to include in the team profile. |
| Paths | If one or more paths are specified, then team members can send pages for translation only if the content is in these paths.
Note: This feature is supported only for pages. It is not supported for digital assets, tags, and dictionaries (i18n items). |
| TMS Configurations | User can configure TMS setting as per the requirement. |
-
Click Save.
-
You can also perform the following optional actions on this page:
- To export the team profiles and settings as an XML file, click Export in the top-left corner of this page. The Connector downloads the file, teamprofiles.xml.
- To update the list of team profiles, click Refresh in the top-left corner of this page.
- To edit an existing team profile, select the team profile in the list, and in the top-right corner of the page, click Edit. Then follow the instructions in steps 3 and 4 above.
- To delete a existing team profile, select the team profile in the list, and in the top-right corner of the page, click Delete. A message box confirms that you want to delete the team profile. Click OK to continue.
5.7 - Configuring Adobe Experience Manager User Permissions for Translation Users
You configure user permissions in the Permissions tab of the User Admin page on your Adobe Experience Manager instance. In your browser, navigate to /useradmin on your Adobe Experience Manager instance to open this page.
Suppose that your Adobe Experience Manager instance has the following user groups:
- Translation Submission
- Translation User
- Translation Admin
Users assigned to these groups can send content for translation as follows:
| User Group | Bulk Translation | Blueprint Rollout | Sidekick |
|---|---|---|---|
| Translation User | Users can send content only to the Translation Queue. The required user permissions are Read, Modify, Create, and Delete. | Users can send content only to the Translation Queue. The required user permissions are: Read, Modify, Create, and Delete. | Users can send content only to the Translation Queue. The required user permissions are: Read, Modify, Create, and Delete. |
| Translation Submitter | Users can send content either to the Translation Queue or directly out for translation. The required user permission is Read. | ||
| Translation Admin | Users can send content either to the Translation Queue or directly out for translation. The required user permission is Read. | Users can send content either to the Translation Queue or directly out for translation. The required user permissions are: Read, Modify, Create, and Delete. |
Tip: Ensure that you set up the correct permissions for this group in the Folder and Permissions section of the Configuration page. For detailed instructions, see Folder and Permissions.
5.8 - Configuring Connector Search Agents
The Connector can use a search agent to collect pages for translation in the Bulk Translation wizard. The Connector installs the following pre-configured agents:
- Page agents:
- Get current page
- Get all children pages
- Get current page and all children pages
- Tag agent: Get current and child tags
- i18n-dictionary agent: Get i18n
You can create additional custom search agents to find any kind of content in your site for translation.
To make a custom search agent available to the Bulk Translation wizard:
-
Write a search agent as a Java class and upload it.
This Java class should implement the PageSearchProcess interface. It should use the following method: public List<CollectedPage> collectPages4Translation(String searchRootPath, Session session, PageManager pageManager).
This requires the Connector for Adobe Experience Manager API, which includes sample code. To request this API, contact Lionbridge Connector Support, as described on How to Contact Lionbridge Connector Support.
-
Upload the search agent you just created. You can do this either by including this in the Connector for Adobe Experience Manager package you install, or you can install it separately using the Apache Felix Web Console, which you access at /system/console/components on your Adobe Experience Manager instance.
-
Click Admin Tools > Search Agents in the Lionbridge Connector rail to open the Search Agents page. For information on opening the Lionbridge Connector rail, see Configuring the Connector.
The Search Agents page opens, displaying the pre-configured agents.
-
Click Add in the top-right corner of the page.
The page expands to display the Add a New Page Search Agent section.

-
In the Add a New Page Search Agent section, add the following information:
- Name: The name that will be displayed for the custom agent in the Search using agent dropdown list in the Bulk Translation wizard.
- Class: The Java class for the custom agent.
- Name: The name that will be displayed for the custom agent in the Search using agent dropdown list in the Bulk Translation wizard.
-
Click Test.
A window opens where you enter an Adobe Experience Manager folder path. The Connector then calls the new agent class to search the path you entered. This tests whether the Connector can call the new agent and search successfully for pages.
-
If the test is successful, click Add at the bottom-right corner of the page to add the custom agent to the user interface of the Bulk Translation wizard.
5.9 - Scheduling Translation Jobs to Send Out Content from the Translation Queue
You can create a schedule that sends out translation jobs from the Translation Queue. The schedule defines the parameters for these jobs, including source and target languages, which content items to include, and when to send out the jobs. You can create multiple schedules, each with a different set of parameters for the translation jobs it creates.
To create a schedule that sends out translation jobs from the Translation Queue:
- Click Admin Tools > Queue Scheduler in the Lionbridge Connector rail to open the Queue Scheduler page. For information on opening the Lionbridge Connector rail, see Configuring the Connector.
![]()
- Click Add.
The page expands to display the Queue Schedule box, where you can create a schedule for translation jobs.
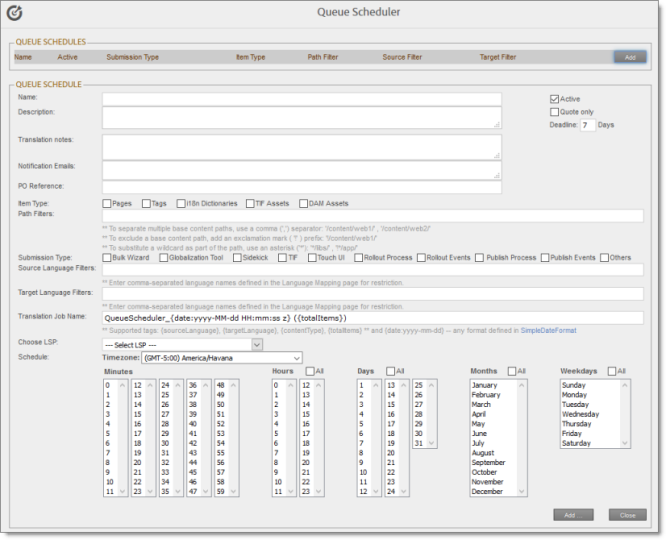
- Enter the following information and settings for the translation jobs that this schedule sends:
| Setting | Description |
|---|---|
| Name | Your name for this schedule, which sends out translation jobs from the Translation Queue. |
| Active | Select this check box if the schedule is active, which means that it creates translation jobs based on the parameters and schedule you define below. |
| Description | Additional information about the translation jobs created by this schedule. This is stored in the CQJobDescription attribute in the XML that the Connector sends to the translation provider. |
| Quote only | Select this check box to inform the translation provider that you want to receive a quote before the translation process starts. Note: This check box is displayed only if the selected translation provider is configured to support providing a quote before the translation process starts. |
| Deadline / Days | The number of days requested for receiving the translated item back from the translation provider. |
| Translation notes | Enter any additional information about translation jobs created by this schedule. This information is sent to the translation provider as a comment in the metadata of the translation package. |
| Notification Emails | Enter one or more email addresses that will receive notification when the content leaves Adobe Experience Manager and when it returns to Adobe Experience Manager. Use a comma to separate multiple email addresses. |
| PO Reference | The purchase order reference number for this translation job. |
| Item Type | Select one or more of the following check boxes to specify the types of content items to include in translation jobs created by this schedule: - Pages: Web pages. - Tags: Metadata assigned to a content item within Adobe Experience Manager (usually a page), which act as keywords or labels attached to that content item. - i18n Dictionaries: Texts and their translations in a CQ5 Translator dictionary. - TIF Assets: Translation files packaged and sent to the Translation Queue by Adobe’s Translation Integration Framework (TIF). These files are packaged in Adobe Experience Manager TIF’s own format. - DAM Assets: Digital assets. |
| Path Filters | Optional. Enter the base path of content items to include in translation jobs created by this schedule: - To separate multiple base content paths, use a comma (,) separator, for example: ‘/content/web1/’ , ‘/content/web2/' - To exclude a base content path, add an exclamation mark (!) prefix, for example: ‘!/content/web1/' - To substitute a wildcard as part of the path, use an asterisk (*), for example: ‘*/libs/’ , ‘!*/app/’ |
| Submission Type | Select one or more of the following check boxes to specify how the items to include in translation jobs created by this schedule are submitted to the Translation Queue: - Bulk Wizard: The items (including pages, i18n dictionaries, and tags) were submitted to the queue from the Bulk Translation wizard. - Globalization Tool: The pages were submitted to the queue from the Translation tab of the Globalization Tool. - Sidekick: The pages were submitted to the queue from the Sidekick. - TIF: The pages were submitted to the queue from Adobe’s Translation Integration Framework (TIF). - Touch UI: The pages were submitted to the queue from the Translate Content page in Adobe Experience Manager’s Touch-Optimized UI. Relevant only for Adobe Experience Manager versions 6.3 and higher. - Rollout Process: The pages were submitted to the queue by the CTCRolloutTranslation workflow, which is part of your company’s rollout configuration. - Rollout Events: The pages were submitted to the queue from a rollout event, based on your company’s rollout configuration. - Publish Process: The pages were submitted to the queue by the Add Published Page to Translation Queue step in your workflow, based on your company’s Connector configuration. - Publish Events: The pages were submitted to the queue from a publish event, based on your company’s Connector configuration. - Others: The pages were submitted to the queue in another submission manner, such as a custom pipeline. |
| Source Language Filters | Optional. By default, the schedule sends content items out for translation in all available source languages. However, you can use this field to restrict the source language(s) of the content items in the translation job. Enter comma-separated language names, as they are defined in the Language Mapping page, described in Configuring Connector Languages. |
| Target Language Filters | Optional. By default, the schedule sends content items out for translation into all available target languages. However, you can use this field to restrict the target languages of the content items in the translation job. Enter comma-separated language names, as they are defined in the Language Mapping page, described in Configuring Connector Languages. |
| Translation Job Name | By default, the names of the translation jobs created by this schedule have the following format: QueueScheduler_{date:yyyy-MM-dd HH:mm:ss z} ({totalItems}). However, you can use any of the following tags to change the format: - {sourceLanguage}: The language name, as it is defined in the Language Mapping page. - {targetLanguage}: The language name, as it is defined in the Language Mapping page. - {contentType}: The type of content items, which is one of the values listed in Content Type, described above. - {totalItems}: The total number of content items in the translation job. - {date:yyyy-MM-dd}: Any format defined in Java’s SimpleDateFormat class. For details, see : https://docs.oracle.com/javase/7/api/java/text/SimpleDateFormat.html. |
| Choose LSP | If multiple translation providers are defined for your company, select the translation provider to whom you want to send this translation job. |
| Schedule | Specify the days and times to send out a translation job from the Translation Queue. - Minutes: Highlight the minute components of the times to send out a translation job. For example, to send translation jobs every 15 minutes, you can highlight 00, 15, 30, and 45. To highlight multiple values, press and hold the Ctrl button. - Hours: Highlight the hour components of the times to send out a translation job. The hour components are based on a 24-hour clock. For example, to send translation jobs at 9 a.m. and 9 p.m., you highlight 9 and 21. To highlight multiple values, press and hold the Ctrl button. To highlight all hour components, select the corresponding All check box. - Days: Highlight the day components of the dates to send out a translation job. For example, to send translation jobs on the 1st and 15th days of the month, you highlight 1 and 15. To highlight multiple values, press and hold the Ctrl button. To highlight all day components, select the corresponding All check box. - Months: Highlight the month components of the dates to send out a translation job. For example, to send translation jobs in January and July, you highlight those months. To highlight multiple values, press and hold the Ctrl button. To highlight all month components, select the corresponding All check box. - Weekdays: Highlight the weekdays to send out a translation job. For example, to send translation jobs on Mondays and Thursdays, you highlight those weekdays. To highlight multiple values, press and hold the Ctrl button. To highlight all weekdays, select the corresponding All check box. |
-
Click Add.
The schedule is added to the Queue Scheduler list at the top of the page.

This list displays the following information about the schedules in the list:
- Name: Your name for the schedule.
- Active: A green dot indicates that the schedule is active.
- Submission Type: How the items in translation jobs created by this schedule are submitted to the Translation Queue. For a list of submission types, see the previous step.
- Item Type: The types of content items to include in translation jobs created by this schedule. For a list of item types, see the previous step.
- Path Filter: The base path of content items to include in translation jobs created by this schedule.
- Source Filter: If the schedule sends content items in all available source languages, this is blank. If the schedule is restricted to specific source language(s), this displays the comma-separated language names, as they are defined in the Language Mapping page, described in Configuring Connector Languages.
- Target Filter: If the schedule sends content items for translation into all available target languages, this is blank. If the schedule is restricted to specific target languages, this displays the comma-separated language names, as they are defined in the Language Mapping page, described in Configuring Connector Languages.
- You can do one of the following:
- To add another schedule, click Add, and enter the information described in step 3, above.
- To edit an existing schedule, click the corresponding edit icon
 . After you edit the schedule, click Update to save your changes.
 - To delete, a schedule, click the corresponding delete icon
 . A message box confirms that you want to delete the schedule. Click OK.
5.10 - Configuring the Service Components
You can configure how frequently the Connector checks for processing, sending, and receiving translations.
- The ctcPrepareService agent controls the frequency that the Connector checks for processing translations.
- The ctcUploadService agent controls the frequency that the Connector checks for sending and receiving translations.
To configure these agents:
- If the Adobe Experience Manager Web Console Components page is not already open, then in your browser, navigate to /system/console/components on your Adobe Experience Manager instance to open it.
This page displays all components alphabetically, by name.
- Scroll down to locate one of these Connector components in the list:
- com.claytablet.cq5.ctctranslation.impl.CTCPrepareServiceImpl
- com.claytablet.cq5.ctctranslation.impl.CTCUploadServiceImpl
-
In the Actions column, click the corresponding Configure button
 .
.The configuration dialog box for the service opens.
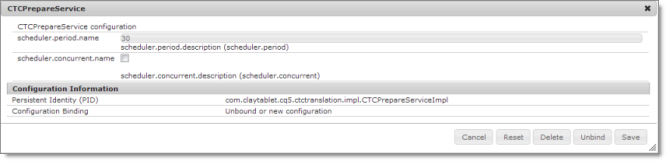
- In the scheduler.period.name field, you can edit the frequency of this task.
-
The default value of the ctcPrepareService agent is 30 seconds.
-
The default value of the ctcUploadService agent is 60 seconds.
You can change this value to meet your particular requirements.
- Click Save to save your changes.
- If desired, repeat steps 2-5 for the other agent.
5.11 - Configuring Translation Settings for Digital Assets
You can send digital assets for translation from the Bulk Translation wizard or the Globalization Tool. Adobe Experience Manager stores digital assets in the following location: /content/dam.
The Connector can send digital assets for translation when they are under a correctly configured language root, for example: /content/dam/geometrixx/en/icons/office-building.png. For more information, refer to “Preparing Assets for Translation” in the Adobe Experience Manager documentation, at: https://docs.adobe.com/docs/en/aem/6-3/author/assets/managing-assets-touch-ui/preparing-assets-for-translation.html.
You configure translation settings for digital assets in the UI and Default Settings section of the Configuration page, which is described in UI and Default Settings:
- To configure sending the properties of the asset metadata for translation, you select the Translate Asset Metadata check box.
Important: You must configure the asset properties to send for translation in the Component Mapping page, in the same way that you configure other component. After you click Collect for an asset to add it to the component list, you must click Set for all components to send all components with a specific property for translation. For detailed instructions, see Configuring which Components and Properties to Send Out for Translation
- To configure sending the actual asset for translation, such as the JPG or PDF file, you select the Translate Asset Binary check box.
Note: When the Connector sends the actual asset for translation, it sends the original rendition. There may be multiple renditions of an asset, for example, there may be multiple versions of an image with different resolutions, such as for Web and print. For more information, refer to “Managing Renditions” in the Adobe Experience Manager documentation, at: https://docs.adobe.com/docs/en/aem/6-3/author/assets/managing-assets-touch-ui.html#Managing%20Renditions.
Depending on whether you select one or both check boxes, the Connector will generate either one or two items from one asset in a job. Each item will be listed in the job details.
Tip: You can create a custom asset handler that modifies the translation settings of specific asset types, such as digital assets. For details, see Creating a Custom Asset Handler.
5.12 - Creating a Custom Asset Handler
You can create a custom asset handler that modifies the translation settings of specific asset types. This can be useful, if for example, you want to change settings for a type of digital assets that you send for translation. For example, suppose that when you translate video subtitles, you do not want to use the Language Mapping configurations to convert the path of the source subtitle text files to the path of the target files. Instead, you want the translated video subtitle text files to be in the same location as the source video subtitle text files, but you want to change the name of the translated subtitle files.
In this scenario, you can now create a custom asset handler to configure a custom path mapping for converting source paths to target paths. For example, you can convert /content/dam/wwww/us/en/…/video/subtitle/12345_us_en_xxxxx.txt to /content/dam/wwww/us/en/…/video/subtitle/12345_fr_fr_xxxxx.txt, instead of to /content/dam/wwww/fr/fr/…/video/subtitle/12345_us_en_xxxxx.txt
To create a custom asset handler:
- Click Admin Tools > Asset Handlers in the Lionbridge Connector rail to open the Custom Asset Handlers page. For information on opening the Lionbridge Connector rail, see Configuring the Connector.

- Click Add in the top-right corner of the page to add a new custom asset handler.
The New Asset Handler dialog box opens.
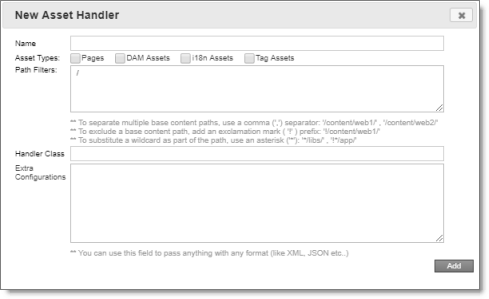
-
In the Name field, enter the name for the new custom asset handler.
-
In the Asset Types section, select the check boxes of the asset types for which this asset handler is relevant.
-
In the Path Filters box, you can specify the base content path of the assets for applying this custom handler. By default, the value is /, so it is relevant to all paths.
- To specify multiple base content paths, use a comma ( , ) separator between the paths, for example: /content/web1/ , /content/web2/.
- To exclude a base content path, use an exclamation mark ( ! ) prefix, for example: !/content/web1/.
- To substitute a wildcard for part of a base content path, use an asterisk ( * ), for example: */libs/or !*/app/.
- To specify multiple base content paths, use a comma ( , ) separator between the paths, for example: /content/web1/ , /content/web2/.
-
In the Handler Class field, enter the full class name of your custom asset handler, as instructed by Lionbridge Connector Support. For details, see How to Contact Lionbridge Connector Support.
Note: You must also deploy your handler bundle to Adobe Experience Manager.
- In the Extra Configurations box, enter any additional configuration for this custom handler, such as XML or JSON.
- Click Add to save your changes and close the dialog box.
5.13 - Configuring Advanced Settings in CRXDE Lite
Note: This section is not applicable to the AEM Cloud Connector.
You can use CRXDE Lite to configure the some Connector options. CRXDE Lite (Content Repository Extreme Development Environment Lite) is embedded into Adobe Experience Manager. It enables you to perform standard development tasks in the browser. For more information about CRXDE Lite, refer to the Adobe documentation, at: https://helpx.adobe.com/experience-manager/6-4/sites/developing/using/developing-with-crxde-lite.html. If you have a different version of Adobe Experience Manager, you can navigate to the correct version of the documentation from that page.
You can use CRXDE Lite to configure the following Connector options:
-
Configuring Catching Pages from Publish Events to the Translation Queue
-
Configuring which Properties of i18n Dictionary Items and Tags to Collect for Translation
Note: The following Connector options are only available in the Debug Settings:
- Excluding Child Nodes from Translation
- Configuring the TMX to Include the Original Translation
- Excluding Properties from Translation
Adobe Experience Manager Cloud users may not have access to CRXDE. Therefore, in the AEM Cloud Connector, following four Connector options can be configured using the Debug Settings:
- Excluding Child Nodes from Translation
- Configuring the TMX to Include the Original Translation
- Excluding Properties from Translation
- Disabling the Cache Service
To configure the Connector options using the Debug Settings:
- Double click Build: 5.0.1-2022-12121913 for AEM as a Cloud Service (depending on your version you may have a different build number) to navigate to Debug Settings from Config page. The Debug page appears.

- On the Debug page, click Debug Settings. The Debug Settings page appears.
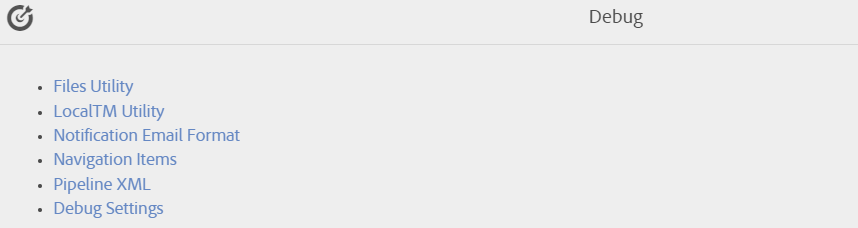
- Configure the Connectors and click Save.
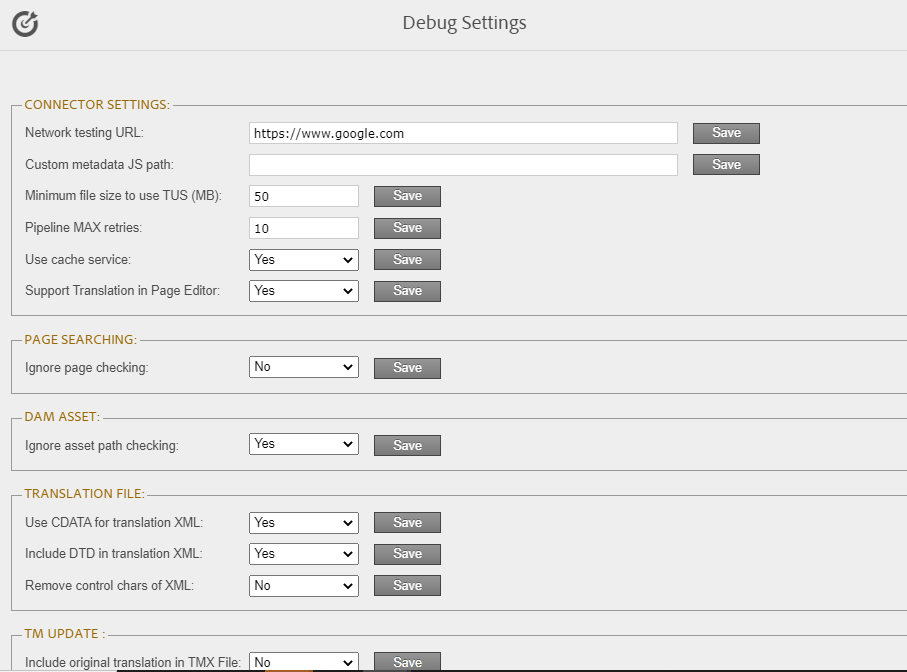
- Disabling the Cache Service: You can disable the Connector cache service on the Debug Settings page. To disable the Connector cache service, on the Debug Settings page, from the Use cache service dropdown, select No and click Save.
- Excluding Child Nodes from Translation: On the Debug Settings page, you can exclude nodes from targe page. To exlude child nodes from translation: Enter the name of the node to be excluded in the Excluded nodes from target page text box. Include additional nodes to exclude using comma separator and then click Save.

- Configuring the TMX to Include the Original Translation: On the Debug Settings page you can configuring the TMX to include the original translation. To configure this settings, on Debug Settings page Select the Include original translation in TMX File: dropdown value to Yes.
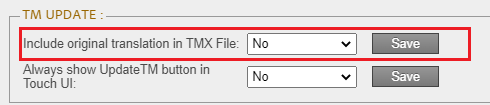
- Excluding Properties from Translation: On the Debug Settings page, some properties can be excluded from target page when connector copies source page to target page for translation.
In the text box, enter the name of the property to exclude additional properties you can add multiple properties separated by a comma and then click on Save.
5.13.1 - Configuring How the Connector Handles Special Characters
You can configure how the Connector handles special characters. This is important because it determines how special characters are displayed for your translators.
Background
The Connector exports your content from Adobe Experience Manager and sends it for translation as XML files. A valid XML file cannot contain any of the special characters listed in the table below. Instead, a valid XML file must use the following entity references to represent special characters:
| Special Character | Represented by This Entity Reference |
|---|---|
| < | < |
| > | > |
| & | & |
| ' | ' |
| " | " |
Escaping is the term that describes creating valid XML by converting any XML special characters to their entity references.
How does Adobe Experience Manager handle special characters?
There are two types of text within Adobe Experience Manager:
- plain text
- rich text, which can contain HTML formatting, links. etc.
You can use CRXDE Lite to view how Adobe Experience Manger stores content.
CRXDE Lite handles special characters differently, depending on whether they are in a plain text title, or a rich text paragraph.
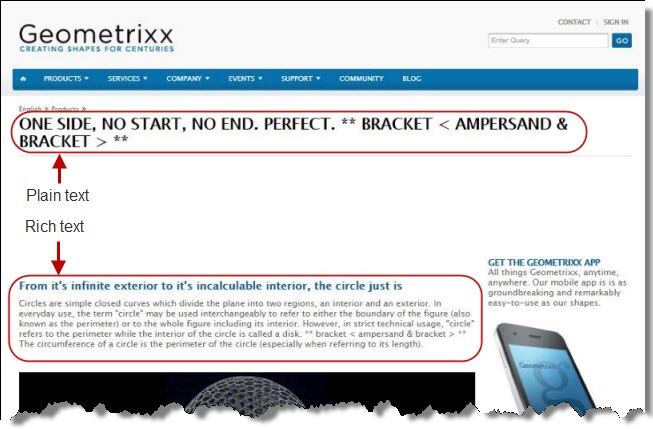
- In plain text, CRXDE Lite does not escape special characters. It displays them as the actual characters. For example, it displays & as &.
- In rich text, CRXDE Lite escapes special characters. It displays them as their corresponding entity references. For example, it displays & as &.
How does the Connector handle special characters?
When the Connector prepares content for translation, it packages all content into XML translation files. This necessitates escaping all special characters into their corresponding entity references. However, the Connector does not differentiate between plain text (which displays the actual special characters) and rich text (which displays the entity references instead of the special characters). Therefore, the Connector escapes all special characters.
As a result, the rich text that the translator receives may contain a combination of special characters and entity references.
For example:
Suppose that the rich-text paragraph contains the text that is rendered as follows in the CRXDE Lite viewer: &.
CRXDE Lite actually stores this rich-text content as its corresponding entity reference: &.
When the Connector processes this rich-text content to create XML files to send out for translation, it escapes this content as follows:
- & becomes &
- amp; remains amp;
As a result, this content is escaped twice (once by CRXDE Lite and then by the Connector).
The Connector then stores this content as & in the XML translation file, which it sends to the translator.
However, some translation systems cannot handle double-escaped special characters such as & or a mix of single-escaped and double-escaped special characters.
5.13.1.1 - Why do translators encounter problems with special characters?
Some translation systems can handle double-escaped special characters, such as &, by displaying them as & or &. However, some translation systems cannot handle double-escaped special characters, such as &.
There are several ways to handle this.
Recommendation 1 – Same as Source option
If your translator’s translation system supports the “Same as Source” option, then instruct your translator to select this option. This converts and returns all special characters–actual characters, escaped characters, and double-escaped characters–as they were received.
However, this feature is not supported by all translation systems or they may not be able to change this setting. In those scenarios, or if you see a combination of single- and double-escaped characters, consider one of the following recommendations.
Recommendation 2 – All single encoded
Your translator should handle each type of special character consistently. For example, in the target XML:
-
Your translator can return the following special characters as single escaped:
-
<
-
>
-
&
-
-
Your translator can return the following special characters as the actual characters:
-
'
-
"
-
Recommendation 3 – Use CData tags
Changing the Use_CData setting from its default value of false to true. This setting instructs the Connector to wrap content in CData tags, which prevents the Connector from escaping special characters, and avoids the scenario of double-escaped characters. However, this setting does not prevent Adobe Experience Manager from single-escaping special characters in rich text.
Note: The Connector adds and removes the CData tags, so they are not displayed within Adobe Experience Manager’s CRXDE Lite.
Important: If you change this setting, your translators must return the translated content in CData tags, just as they received the source content in CData tags. They should not run any post-translation scripts to escape the special characters before returning the content.
Warning: If you change this setting in the middle of a translation job, it can interfere with the integrity of the translation memory.
For detailed instructions on changing the Use_CData setting from its default value of false to true, see Adding CData Tags to Translation Files.
5.13.1.2 - Adding CData Tags to Translation Files
You can change the Use_CData setting from its default value of false to true to add CData tags to translation files, which prevents your translators from viewing double-escaped special characters, such as &.
To configure this setting:
-
Do one of the following to open CRXDE Lite:
- In the Touch-Optimized UI of Adobe Experience Manager, click Tools in the Adobe Experience Manager rail. Then,in the Navigation page, click CRXDE Lite.
- In the Classic UI of Adobe Experience Manager, click CRXDE Lite in the right pane.
- In your Web browser, navigate to /crx/de/index.jsp on your Adobe Experience Manager instance.
CRXDE Lite opens.
- In the Explorer pane on the left, navigate to /etc/ctctranslation/TransOptions.
- Locate the Use_CData property.
- Double-click in the Value column, and select true from the dropdown list.
- In the CRXDE Lite menu, click Save All.
The Connector will now automatically wrap every XML translation file it sends out for translation in CData tags.
5.13.2 - Configuring Custom Content Types
When you send content for translation using the Bulk Translation wizard, the Translation Queue, or Sidekick you can use the content type to filter the content you want to send.
Note: Specifying the content type in Sidekick is available only when working with the Sidekick wizard user interfaces.
The Connector can also configure routing rules to send content of each type to a different translation provider.
By default, the Connector includes three content types, which have the following default labels:
- Marketing
- Technical
- Legal
You can change these labels to reflect your company’s needs. For example, you can send all your marketing content to your translation provider, and all your user-generated content to a machine translation service. In the Content API Platform, the Connector can configure content rules based on content types as follows:
- You can send different content types to different translation providers.
- You can send different content types to different TMSs (translation management systems).
- You can send different content types to different processing profiles within a single TMS instance.
Note: Please contact Lionbridge Connector Support before proceeding. For details, see How to Contact Lionbridge Connector Support.
-
Do one of the following to open CRXDE Lite, where you can configure custom content types:
- In the Touch-Optimized UI of Adobe Experience Manager, click Tools in the Adobe Experience Manager rail. Then, in the Navigation page, click CRXDE Lite.
- In the Classic UI of Adobe Experience Manager, click CRXDE Lite in the right pane.
- In your Web browser, navigate to /crx/de/index.jsp on your Adobe Experience Manager instance.
CRXDE Lite opens.
- In the navigation pane on the left, navigate to /etc/ctctranslation/ctcconfig_ContentTypes.
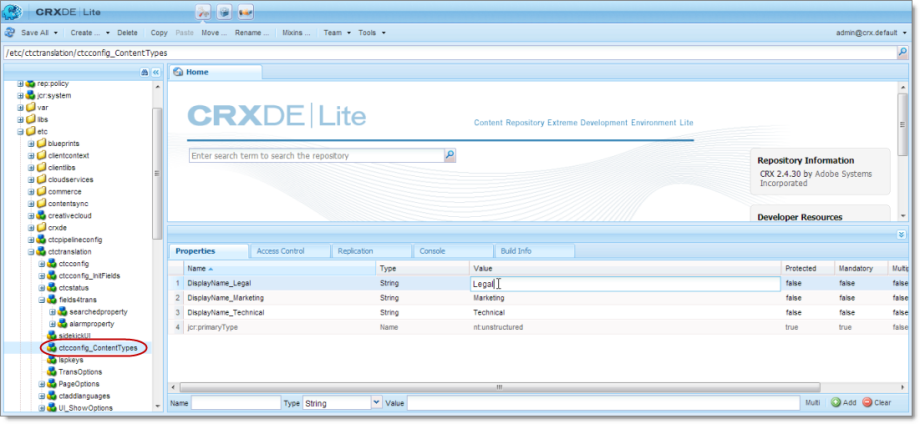
-
In the Properties tab in the Home tab, double-click in the Value column of the content-type label to change, and type the new label.
-
Repeat the previous step for each content-type label you want to change.
-
In the CRXDE Lite Menu, click Save All.
5.13.3 - Configuring the Rollout Feature
If the Rollout feature is enabled, then when users roll out files, the Connector automatically sends them to the Translation Queue, using your company’s default translation settings. There are three settings for this feature. The setting you choose determines the configuration method you use:
- You can configure the Connector to send all your rollout pages to the Translation Queue.
- You can configure the Connector to send only some of your rollout pages to the Translation Queue, using a workflow.
- You can configure the Connector to send only some of your rollout pages to the Translation Queue, using a filter.
Note: The setting determines the configuration method you use.
Important information: Adobe Experience Manager has language-mappings that are included by default and that cannot be removed. When you roll out pages, the Connector automatically sends all configured languages, including these defaults, to the Translation Queue. You can configure the Connector to send only configured languages to the Translation Queue. For more information and detailed instructions, see Configuring Default Language-Mapping Settings for the Rollout Feature.
Configure the Connector to send all rollout pages to the Translation Queue
-
In the Translation Settings section of the Configuration page, select the Catch rollout pages to [Rollout] Queue check box. For details, see Translation Settings.
-
When creating a Livecopy site, use the default Adobe Experience Manager rollout configuration.
Configure the Connector to send only some rollout pages to the Translation Queue, using a workflow
Important information for updated Connector installations: For new installations of the Connector, no additional steps are required. If you are updating your Connector installation from a version before 2.3.0, you must perform the steps described in Update the CTCRolloutTranslation workflow to update the workflow before performing the following steps.
-
In the Translation Settings section of the Configuration page, clear the Catch rollout pages to [Rollout] Queue check box. For details, see Translation Settings.
-
Create your own rollout configuration in CRXDE Lite that includes the CTCRolloutTranslation workflow. For detailed instructions on creating a rollout config, refer to the Adobe Experience Manager documentation at: https://helpx.adobe.com/experience-manager/6-5/sites/administering/using/msm-sync.html#CreatingaRolloutConfiguration.
For a description of the CTCRolloutTranslation workflow, see Viewing the Rollout Workflow.
- When creating a Livecopy site, select the rollout configuration you created.
Update the CTCRolloutTranslation workflow
Important: These steps are required only for a Connector installation updated from a version before 2.3.0, and when configuring the Connector to send only some rollout pages to the Translation Queue using a workflow, as described above.
-
In your Web browser, navigate to /libs/cq/workflow/content/console.html on your Adobe Experience Manager instance to open the AEM WCM page.
-
Locate the CTCRolloutTranslation workflow. Click to select it, and then right-click and select Edit from the context menu.
The workflow opens for editing in a new Web page.
-
Mouseover the CTC Rollout Translation workflow, right-click, and select Edit from the context menu.
-
In the Process tab:
- Ensure that the Process is com.claytablet.cq5.ctctranslation.workflow.RolloutCTCQueueProcess (and not RolloutCTCTranslationProcess).
- Select the Handler Advance check box.
- Click OK to close the dialog box.
-
Click Save to save your changes.
Configure the Connector to send only some rollout pages to the Translation Queue, using a filter
-
In your browser, navigate to: /system/console/components on your Adobe Experience Manager instance.
The Adobe Experience Manager Web Console Components page opens. This page displays all components alphabetically, by name.
-
Scroll down to locate the Connector components, whose names all start with com.claytablet.
-
Verify that the following Content API component is installed and active in Adobe Experience Manager: com.claytablet.cq5.ctctranslation.impl.CTCRolloutCheckServiceImpl.
-
Code a filter class to call the following Content API interface: com.claytablet.cq5.ctctranslation.service.Rollout.IRolloutTranslationFilter. See the sample code, at the bottom of this section.
-
Implement the following function:
final String bluePrintPage,

final String liveCopyPage,

final Session jcrSession,

final ResourceResolver resourceResolver,

final LiveRelationshipManager liveRelationshipManager,

final CTCPageService ctcPageService,

final CTLogService ctcLogService,

final CTCDataService ctcDataService

);
-
If the Connector Translation Queue will capture the rollout pages, the function should return a Boolean value of True.
-
Do one of the following to open CRXDE Lite, where you can configure the Rollout Filter in the Adobe Experience Manager CRXDE interface:
- In the Touch-Optimized UI of Adobe Experience Manager, click Tools in the Adobe Experience Manager rail. Then, in the Navigation page, click CRXDE Lite.
- In the Classic UI of Adobe Experience Manager, click CRXDE Lite in the right pane.
- In your Web browser, navigate to /crx/de/index.jsp on your Adobe Experience Manager instance.
CRXDE Lite opens.
-
In the navigation pane on the left, navigate to /etc/ctcpipelineconfig/ctcRolloutTranslationFilter.
-
Create a child note of type nt:unstructured and give it a human-readable name, for example, CustomTestFilter.
-
Add the following node properties:

- Name = Active, Type = Boolean, Value = True
- Name = ImplementedClass, Type = String, Value = Filter Class name, for example: com.testguru.ctfilter.test.CTFilterTest.CustomRolloutFilter
- In the CRXDE Lite Menu, click Save All.
Clay Tablet interface sample code
Note:. The following sample code is also included in the following package, which is in the following location in CRXDE Lite: /apps/CTFilterTest/src/impl/src/main/java/com/testguru/ctfilter/test/ CTFilterTest/impl/Activator.java. You can install this package using the CRX Package Manager. For detailed instructions on using the CRX Package Manager, see Installing the Lionbridge Connector.
package com.testguru.ctfilter.test.CTFilterTest;

import javax.jcr.Session;
import org.apache.sling.api.resource.ResourceResolver;
import com.claytablet.cq5.ctctranslation.service.CTCDataService;
import com.claytablet.cq5.ctctranslation.service.CTCPageService;
import com.claytablet.cq5.ctctranslation.service.CTLogService;
import com.day.cq.wcm.msm.api.LiveRelationshipManager;
import com.claytablet.cq5.ctctranslation.service.Rollout.IRolloutTranslationFilter;

public class CustomRolloutFilter implements IRolloutTranslationFilter
{

    public boolean catchRolloutToTranslation(final String bluePrintPage,
    final String liveCopyPage,  final Session jcrSession,
    final ResourceResolver resourceResolver,
    final LiveRelationshipManager liveRelationshipManager,
    final CTCPageService ctcPageService,
    final CTLogService ctcLogService,
    final CTCDataService ctcDataService )
    {
        ctcLogService.LogRolloutDebug("[CustomRolloutFilter] passed Blueprint page: "
        + bluePrintPage  );
        ctcLogService.LogRolloutDebug("[CustomRolloutFilter] passed liveCopyPage page: "
        + liveCopyPage  );

        // Add your own logic here.
        if (bluePrintPage.startsWith("/content/geometrixx/en/blog"))
        {
            ctcLogService.LogRolloutDebug("[CustomRolloutFilter] Blueprint page "  +
        "is starting with path [/content/geometrixx/en/blog], ignored.");
            return false;
        }
        else
            return true;
    // Do not close passed JCR Session and ResourceResolver. Clay Tablet needs these
    // to do more filter calls.
    }
}
5.13.3.1 - Configuring Default Language Mapping Settings for the Rollout Feature
Adobe Experience Manager has language-mappings that are included by default and that cannot be removed. If the Connector is configured to send content to the Translation Queue when you roll out files, then it sends content to the queue for these default languages. You can configure the Connector so that it sends only content for configured languages to the queue.
To configure this setting:
-
Do one of the following to open CRXDE Lite:
-
In the Touch-Optimized UI of Adobe Experience Manager, click Tools in the Adobe Experience Manager rail. Then, in the Navigation page, click CRXDE Lite.
-
In the Classic UI of Adobe Experience Manager, click CRXDE Lite in the right pane.
-
In your Web browser, navigate to /crx/de/index.jsp on your Adobe Experience Manager instance.
-
CRXDE Lite opens.
-
In the Explorer pane on the left, navigate to /etc/ctctranslation.
-
If the debug node does not exist, then create it.
a. Select the ctctranslation node.
b. Select Create > Create Node from the context menu.
The Create Node dialog box opens.
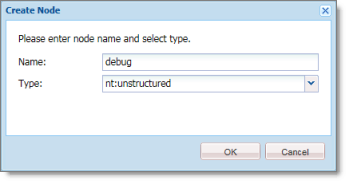
c. In the Name field, enter debug.
d. In the Type dropdown list, select nt:structured.
e. Click OK.
-
Right-click the /etc/ctctranslation node, and select Refresh from the context menu.
-
Create the AEM61DefaultLanguageMapping property in the debug node you just created.
a. Locate and select the debug node you just created.
b. In the Name field in the bottom of the right pane, enter AEM61DefaultLanguageMapping.
c. In the Type dropdown list in the bottom of the right pane, accept the default of String.
d. In the Value field in the bottom of the right pane, enter disabled.
e. Click Add .
. -
In the CRXDE Lite Menu, click Save All.
The AEM61DefaultLanguageMapping is displayed at the top of the pane.
The Connector will now send only configured languages to the Translation Queue when you roll out pages.
5.13.4 - Enabling Content Collection from Blueprint Pages
You can instruct the Connector to globally collect content from Blueprint pages using the Pickup Content from Blueprint Pages CRX setting in CRXDE Lite.
Note: When this feature is enabled, the Connector synchronizes non-translatable properties, such as images, from a locked component.
How the Pickup Content From Blueprint Pages setting interacts with other related settings
-
This setting is available only when the Select if using Blueprint/Live-copy check box is selected.
-
If this setting is specified, the Connector always acts as though the Translate Non-Sync’d Components on this page check box is not selected, even if it is selected. This occurs because only content from locked components is rolled out from Blueprint pages to live copy pages:
-
In general, during MSM rollout, content from Blueprint pages overwrites the content of locked components in live copy pages. The Connector retrieves content from the live copy pages and sends it out for translation. Until the translation returns, the live copy page has the un-localized content from the Blueprint page.
-
However, if there is no MSM rollout or if there is a custom rollout configuration that excludes copying over the content, then the content from the Blueprint page does not overwrite the content of the locked components in the live copy page. Live copy pages may contain the old version of localized content.
-
In both scenarios, the Connector returns the translated content to the live copy page.
- The PickupContentFromBlueprintPages_LockedOnly page option in CRXDE Lite enables the Connector to read properties of Blueprint pages for locked components of live-copy pages when the PickupContentFromBlueprintPages option is set to true. This setting enables collecting content for translation from locked components.
For descriptions of all the related settings, see UI and Default Settings.
To enable the Pickup Content From Blueprint Pages setting:
-
Do one of the following to open CRXDE Lite:
-
In the Touch-Optimized UI of Adobe Experience Manager, click Tools in the Adobe Experience Manager rail. Then, in the Navigation page, click CRXDE Lite.
-
In the Classic UI of Adobe Experience Manager, click CRXDE Lite in the right pane.
-
In your Web browser, navigate to /crx/de/index.jsp on your Adobe Experience Manager instance.
-
CRXDE Lite opens.
-
In the Explorer pane on the left, navigate to /etc/ctctranslation/PageOptions.
-
Locate the PickupContentFromBlueprintPages property.
-
Double-click in the Value column, and select true from the dropdown list.
The Pickup Content From Blueprint Pages setting is now enabled. This enables the Connector to collect content from locked components.
Note: To turn off this setting, repeat the previous steps, but in the last step, select false from the dropdown list.
-
To force the Connector to collect content only from locked components, when the PickupContentFromBlueprintPages property is sent to true:
a. In the same location, create a child note of type nt:unstructured and give it the following name: PickupContentFromBlueprintPages_LockedOnly.
b. Add the following node properties: Name = Active, Type = Boolean, Value = True.
The Connector can now collect content for translation from locked components only.
- In the CRXDE Lite Menu, click Save All.
5.13.5 - Configuring the TMX to Include the Original Translation
By default, when you use the Update TM functionality, the Connector updates the TM (translation memory) with the following information from the TMX file:
- the original source content
- the original translated content
- the updated translated content
- the name of the translation job
- the page path and the property name
You can configure the Connector to also include the original translation returned by the translation provider in the TMX file.
To configure this setting:
-
Do one of the following to open CRXDE Lite:
- In the Touch-Optimized UI of Adobe Experience Manager, click Tools in the Adobe Experience Manager rail. Then, in the Navigation page, click CRXDE Lite.
- In the Classic UI of Adobe Experience Manager, click CRXDE Lite in the right pane.
- In your Web browser, navigate to /crx/de/index.jsp on your Adobe Experience Manager instance.
CRXDE Lite opens.
-
In the Explorer pane on the left, navigate to /etc/ctctranslation/TransOptions.
-
Locate the TMXIncludeOriginalTranslation property.
-
Double-click in the Value column, and select true from the dropdown list.
-
In the CRXDE Lite Menu, click Save All.
The Connector will now send the original translation returned by the translation provider to the TM.
5.13.6 - Excluding Properties from Translation
You can use the TargetPageExcludedProperties property in the etc/ctctranslation/PageOptions node in CRXDE Lite to specify any properties in your content that you want to exclude from being sent for translation. This is useful, for example, if you have a custom identifier property for each file that you do not want to replicate in the target content.
To exclude properties from translation:
-
Do one of the following to open CRXDE Lite:
- In the Touch-Optimized UI of Adobe Experience Manager, click Tools in the Adobe Experience Manager rail. Then, in the Navigation page, click CRXDE Lite.
- In the Classic UI of Adobe Experience Manager, click CRXDE Lite in the right pane.
- In your Web browser, navigate to /crx/de/index.jsp on your Adobe Experience Manager instance.
CRXDE Lite opens.
-
In the Explorer pane on the left, navigate to /etc/ctctranslation/PageOptions.
-
Double-click the TargetPageExcludedProperties property.
The Edit TargetPageExcludedProperties dialog box opens.
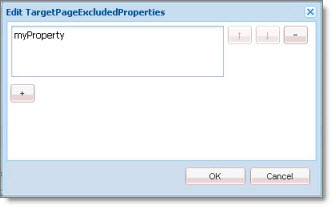
-
In the text box, enter the name of the property to exclude.
-
To exclude additional properties, click the plus button
 .
. -
Click OK.
-
In the CRXDE Lite Menu, click Save All.
5.13.7 - Excluding Child Nodes from Translation
Before the Connector sends out content for translation, it copies over the source files to the target location. in CRXDE Lite:
-
You can use the TargetPageExcludedNodes property in the
etc/ctctranslation/PageOptionsnode to delete child nodes after copying from the source to the target. -
You can use the TargetPagePreservedNodes property in the
etc/ctctranslation/PageOptionsnode to exclude child nodes when copying from the source to the target.
These settings are both useful if you want to exclude certain child nodes from translation while sending their parent nodes for translation.
To exclude child nodes from translation:
-
Do one of the following to open CRXDE Lite:
- In the Touch-Optimized UI of Adobe Experience Manager, click Tools in the Adobe Experience Manager rail. Then, in the Navigation page, click CRXDE Lite.
- In the Classic UI of Adobe Experience Manager, click CRXDE Lite in the right pane.
- In your Web browser, navigate to /crx/de/index.jsp on your Adobe Experience Manager instance.
CRXDE Lite opens.
-
In the Explorer pane on the left, navigate to /etc/ctctranslation/PageOptions.
-
Do one of the following:
- To delete child nodes after copying from the source to the target, double-click the TargetPageExcludedNodes property.
The Edit TargetPageExcludedNodes dialog box opens. Click the plus button
.
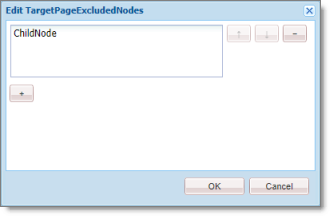
- To avoid overwriting existing child nodes, when copying from the source to the target, double-click the TargetPagePreservedNodes property.
The Edit TargetPagePreservedNodes dialog box opens. Click the plus button ![]() .
.
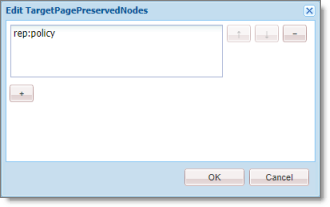
-
In the text box, enter the name of the node to exclude.
-
To exclude additional nodes, click the plus button
. -
Click OK.
-
In the CRXDE Lite Menu, click Save All.
5.13.8 - Configuring All Jobs to Pause
In CRXDE Lite, you can configure all jobs to pause before the Connector sends them out for translation. The jobs pause after Preparing status (0%) but before Sending status (1%). This is useful if you want to review or export reports of content items, or download the XML files before sending them out for translation.
Note: You can also configure this setting using the Pause job before sending check box in the UI and Default Settings section of the Configuration page. For details, see UI and Default Settings.
To configure this setting:
-
Do one of the following to open CRXDE Lite:
- In the Touch-Optimized UI of Adobe Experience Manager, click Tools in the Adobe Experience Manager rail. Then, in the Navigation page, click CRXDE Lite.
- In the Classic UI of Adobe Experience Manager, click CRXDE Lite in the right pane.
- In your Web browser, navigate to /crx/de/index.jsp on your Adobe Experience Manager instance.
CRXDE Lite opens.
-
In the Explorer pane on the left, navigate to /etc/ctctranslation/TransOptions.
-
Locate the PauseBeforeSend property.
-
Double-click in the Value column, and select true from the dropdown list.
-
In the CRXDE Lite Menu, click Save All.
The Connector will now automatically pause every job before it sends it out for translation.
Important: To resume the job and send it out for translation, in the Translation Status page, you must click Resume for the job. For detailed instructions, refer to the Lionbridge Connector for Adobe Experience Manager User Guide.
5.13.9 - Configuring Catching Pages from Publish Events to the Translation Queue
Selecting the Catch Pages from Publish Event to Queue check box in the Translation Settings section of the Configuration page instructs the Connector to automatically listen to publish events and add published pages to the Translation Queue. By default, this check box is hidden. To display this check box, you add the ShowCatchPublishEventPageToQueueInCTConfig property to the /etc/ctctranslation/ctcconfig node in CRXDE Lite.
To display the Catch Pages from Publish Event to Queue check box:
-
Do one of the following to open CRXDE Lite:
- In the Touch-Optimized UI of Adobe Experience Manager, click Tools in the Adobe Experience Manager rail. Then, in the Navigation page, click CRXDE Lite.
- In the Classic UI of Adobe Experience Manager, click CRXDE Lite in the right pane.
- In your Web browser, navigate to /crx/de/index.jsp on your Adobe Experience Manager instance.
CRXDE Lite opens.
-
In the Explorer pane on the left, navigate to /etc/ctctranslation/ctcconfig.
-
Create the ShowCatchPublishEventPageToQueueInCTConfig property in this node.
-
In the Name field in the bottom of the right pane, enter ShowCatchPublishEventPageToQueueInCTConfig.
-
In the Type dropdown list in the bottom of the right pane, accept the default of String.
-
In the Value field in the bottom of the right pane, enter true.
-
Click Add
.
-
-
In the CRXDE Lite Menu, click Save All.
The ShowCatchPublishEventPageToQueueInCTConfig is displayed at the top of the pane.
The Connector will now display the Catch Pages from Publish Event to Queue check box in the Translation Settings section of the Configuration page.
5.13.10 - Configuring which Properties of i18n Dictionary Items to Collect for Translation
You can send out i18n dictionary items and tags for translation using the Bulk Translation wizard. For detailed instructions, refer to the Lionbridge Connector for Adobe Experience Manager User Guide.
- In i18n dictionary items, by default the Connector sends out the sling:message property.
- In tags, by default the Connector sends out the jcr:title property.
In both i18n dictionary and tag items, if there is no source language specified, the Connector now uses the default title or message as the source:
- For i18n dictionary items, if the sling:message property is empty, the Connector now uses the
sling:keyproperty. - For tags, in the jcr:title property is empty, the Connector now uses the jcr:title.<source language> property, for example, jcr:title.en.
You can use the disableUseDefaultAsSourceForTagsAndI18N property to disable this behavior, which prevents the Connector from using the default title or message as the source if there is no source language specified.
To prevent the Connector from using the default title or message as the source if there is no source language specified:
-
Do one of the following to open CRXDE Lite:
- In the Touch-Optimized UI of Adobe Experience Manager, click Tools in the Adobe Experience Manager rail. Then, in the Navigation page, click CRXDE Lite.
- In the Classic UI of Adobe Experience Manager, click CRXDE Lite in the right pane.
- In your Web browser, navigate to /crx/de/index.jsp on your Adobe Experience Manager instance.
CRXDE Lite opens.
-
In the Explorer pane on the left, navigate to /etc/ctctranslation/ctcconfig/debug.
-
Create the disableUseDefaultAsSourceForTagsAndI18N property in this node.
-
In the Name field in the bottom of the right pane, enter disableUseDefaultAsSourceForTagsAndI18N.
-
In the Type dropdown list in the bottom of the right pane, accept the default of String.
-
In the Value field in the bottom of the right pane, enter any value.
-
Click Add
.
-
-
In the CRXDE Lite Menu, click Save All.
The disableUseDefaultAsSourceForTagsAndI18N is displayed at the top of the pane.
If there is no source language specified for i18 dictionary items or tags, the Connector will now not use the default properties as source, when sending out items and tags for translation.
5.13.11 - Disabling the Cache Service
The Connector’s cache service caches the current user’s settings, including:
-
user permissions
-
all the AEM groups to which the user belongs (since groups can be nested)
-
the available source and target languages
The cache service enables the Connector to obtain the user’s setting quickly, without querying Adobe Experience Manager each time, which is slower. By default, the Connector’s the cache service is enabled.
You can disable the Connector cache service by adding the usingCacheService Boolean property with the false value to the /etc/ctctranslation/debug node in CRXDE Lite. This forces the Connector to query Adobe Experience Manager each time for user settings.
To disable the Connector cache service:
-
Do one of the following to open CRXDE Lite:
- In the Touch-Optimized UI of Adobe Experience Manager, click Tools in the Adobe Experience Manager rail. Then, in the Navigation page, click CRXDE Lite.
- In the Classic UI of Adobe Experience Manager, click CRXDE Lite in the right pane.
- In your Web browser, navigate to /crx/de/index.jsp on your Adobe Experience Manager instance.
CRXDE Lite opens.
-
In the Explorer pane on the left, navigate to /etc/ctctranslation/debug.
-
Create the usingCacheService property in this node.
a. In the Name field in the bottom of the right pane, enter usingCacheService.
b. In the Type dropdown list in the bottom of the right pane, select boolean.
c. In the Value field in the bottom of the right pane, enter false to disable the cache service.
Tip: Alternatively, to re-enable the cache service after disabling it, enter true.
d. Click Add ![]() .
.
- In the CRXDE Lite Menu, click Save All.
The usingCacheService property is displayed at the top of the pane.
The Connector will now use the specified setting to enable or disable the cache.
5.14 - Configuring Advanced Settings in the User Interface
In the Advanced Settings page, you can configure advanced Connector settings. To open the Advanced Settings page, click Admin Tools > Advanced Settings in the Lionbridge Connector rail.
The advanced Connector settings are organized into the following sections:
| Section | Description | For Detailed Configuration Instructions, See… |
|---|---|---|
| Translation Status | You can create a page property to store custom translation-status values that are attached to individual pages, for example MT (for machine translation) or HT (for human translation). After you associate a custom value with a translation provider (LSP), you can view this value for translated pages in the page list of the Globalization Tool. | Creating a Page Property to Store Custom Translation-Status Values |
| Prevent Translation of Pages | You can prevent the Connector from sending pages with certain properties for translation. | Preventing the Translation of Pages |
| Report Fields Configuration | You specify which fields are available to generate the Field Report, which you generate from the Reporting tab of the Globalization Tool. | Configuring which Fields Are Available for the Field Report |
| Workflow Selections | You specify which workflows are available to run on multiple pages, including language copies of these pages, in the Run Workflows tab of the Globalization Tool. | Configuring which Workflows Are Available to Run |
| Action Permissions | You configure which user group has permission to perform specific actions in the Globalization Tool. | Configuring Who Can Use the Globalization Tool |
| Prevent URL Conversions | If either or both of the Language Conversion (URL Reference) and Language Conversion (Content Link) options are configured in the Translation Settings section of the Configuration page, as described in Translation Settings, you can prevent the Connector from converting links to specific files or file types. | Preventing Specific URL and Content-Link Conversions |
| Automatically Remove/Replace Character from Translation Content | You can configure the connector to automatically remove or replace certain characters on the translation content. | Removing or Replacing Character from Translation Content |
| Skip Translation with Local TM | You can configure which components, or property names of components, will be ignored by the local TM (translation memory) when users send content for translation with the Use Local TM option. This setting prevents the Connector from using any previous translations of the specified components that are stored in the local TM. | Skipping Translations in the Local TM |
| Log JCR Property During Translation | You specify which JCR properties to write to the log file during translation. | Logging JCR Properties During Translation |
| Page Metadata Configuration | You specify:
Notes: You can copy metadata to multiple pages from the Copy Metadata tab of the Globalization Tool. You can send metadata for translation from the Bulk Translation wizard, the Translation Queue, and the Translation tab of the Globalization Tool. |
Configuring which Page Metadata is Available for Copying and Translation |
| Page Property Update Configuration | You specify which metadata fields are available for translation and copying to the Page Property Updating tab of the Globalization Tool. | Configuring which Metadata Fields Are Available for Translation and Copying |
| DAM Metadata Configuration | You specify which digital asset (DAM)A metadata is available for updating, including multiple language copies of those assets Note: You can update DAM metadata for multiple assets from the DAM Metadata Update tab of the Globalization Tool. |
Configuring which Digital Asset Metadata is Available for Updating |
| DITA Metadata Configuration | You specify which DITA metadata is available for Translation and Copying Note: You can update DITA metadata for multiple assets from the DITA Metadata Update tab of the Globalization Tool. This feature is only available for the On-Premise version. |
Configuring which DITA Metadata is Available for Translation and Copying |
| DITA Property Configuration | You specify which DITA property is available for Translation and Copying Note: You can update DITA property for multiple assets from the DITA Property Update tab of the Globalization Tool. This feature is only available for the On-Premise version. |
Configuring which DITA Property is Available for Translation and Copying |
| Configuration for Catching Published Pages to Queue | You configure the source and target languages and translation settings for the following options that add published pages to the Translation Queue: - Catch Published Workflow Pages to Queue - Catch Pages from Publish Event to Queue You specify both these features by selecting the corresponding check boxes in the Translation Settings section of the Configuration page. For more information about these features, see Translation Settings. |
Configuring Translation Settings for Catching Pages to the Translation Queue |
| Configuration for Catching Rollout Pages to Queue | You configure the paths for adding rollout pages to the Translation Queue: | Configuring Paths for Catching Rollout Pages to the Translation Queue |
| Default Job Name Format for Bulk Translation | You specify the default job name for Bulk Translation. | Configuring Default Job Name for Bulk Translation |
You can perform the following actions on this page:
- To save your changes to each section, click the corresponding Save Configuration button.
Note: The settings from each section are saved in a single file.
-
To export your configuration settings as an XML file, at the top of the page, click Export. The Connector downloads the advancedSettings.xml file.
-
To import a previously exported configuration file:
a. At the top of the page, click Import.
The Select a file to upload dialog box opens.

b. Click Choose File.
c. In the browser dialog box that opens, navigate to the XML file to import, select it, and click Open, or similar, to close the browser dialog box.
The Select a file to upload dialog box displays the path of the file you selected.
d. Click Upload to upload the file.
The Connector imports the file and updates the configuration.
5.14.1 - Creating a Page Property to Store Custom Translation-Status Values
In the Translation Status section of the Advanced Settings page, you can create custom translation-status properties that are attached to individual pages, for example MT (for machine translation) or HT (for human translation). After you associate a custom property with a translation provider (LSP), you can view this property for translated pages in the page list of the Globalization Tool.
To create custom translation-status properties:
-
Click Admin Tools > Advanced Settings in the Lionbridge Connector rail. For information on opening the Lionbridge Connector rail, see Configuring the Connector.
The Advanced Settings page opens, displaying the Translation Status section at the top of the page.
![]()
-
To create a JCR property that will hold custom translation-status values, enter it in the JCR Property for translation status field. For example, enter: jcr:TranslationMethod.
-
Click Save Configuration to save your changes.
A message in red at the top of the page states that the metadata configuration was saved.
This property is attached to pages after they return from translation.
-
To complete the configuration of this feature, you specify values for this property for each translation provider (LSP). These are the values that will be displayed in the page list of the Globalization Tool.
-
For SDL TMS, you specify this value in the Translation Status field of the TMS GUID Config page. For detailed instructions, see Installing the Add-On for SDL TMS.
-
For all other translation providers (LSPs), you specify this value in the Translation Status field of the LSP & Keys page. For detailed instructions, see Editing a License Key.
-
5.14.2 - Preventing the Translation of Pages
In the Prevent Translation of Pages section of the Advanced Settings page, you can prevent the Connector from sending pages with certain properties for translation.
To prevent the Connector from sending certain pages for translation:
-
Click Admin Tools > Advanced Settings in the Lionbridge Connector rail. For information on opening the Lionbridge Connector rail, see Configuring the Connector.
The Advanced Settings page opens, displaying the Prevent Translation of Pages section near the top of the page.
![]()
-
Enter the page property or properties that identify pages for the Connector to ignore when sending content out for translation.
- To separate multiple page properties, use a comma ( , ) separator, for example: PropertyName, PropertyName[PropertyValue].
- To find all pages that do not have properties, use an exclamation mark ( ! ) prefix, for example: !PropertyName[PropertyValue]. For example, !PropertyName finds !PropertyNameA, !PropertyNameB, and !PropertyNameC.
- To find a page property whose values all contain some letters or numbers, use an asterisk wildcard ( * ) for the property value, for example: PropertyName[Value*], PropertyName[*Value*].
- To instruct the Connector to ignore pages with specific multiple properties, use an ampersand ( & ), for example: PropertyName1[PropertyValue1]&PropertyName2[PropertyValue2].
-
Click Save Configuration to save your changes.
5.14.3 - Configuring which Fields Are Available for the Field Report
In the Report Fields Configuration section of the Advanced Settings page, you can configure which fields are available to include in the Field report. You can generate this report for multiple pages in the Reporting tab of the Globalization Tool. For instructions on generating this report, refer to the Lionbridge Connector for Adobe Experience Manager User Guide.
To configure the Field report:
-
Click Admin Tools > Advanced Settings in the Lionbridge Connector rail. For information on opening the Lionbridge Connector rail, see Configuring the Connector.
The Advanced Settings page opens. The Report Fields Configuration section of this page lists the JCR properties that are available for display in the Reporting tab of the Globalization Tool, where you can select them for inclusion in the generated Field report.
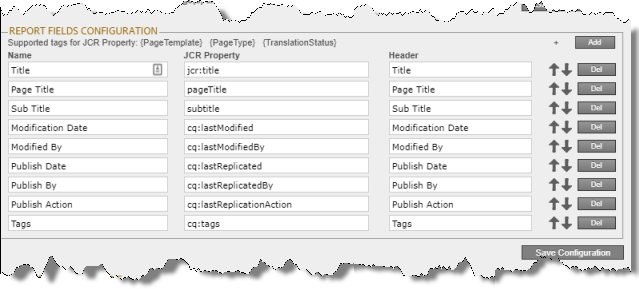
-
You can add, edit, or delete the JCR properties that are included in the Field report.
-
To add a JCR property, so that it is included in the report, click Add, in the top-right corner of this section. This adds a blank row at the top of the list. In this row, enter the information about the property to add.
-
To edit a JCR property, which modifies the information in the report, edit the corresponding information in the list.
-
To delete a JCR property, so that it is excluded from the report, click Del in the corresponding row. A message box confirms that you want to delete this field in the report. Click OK to confirm.
-
You can add the {PageTemplate}, {PageType}, and {TranslationStatus} tags to display the corresponding information in the report, for example:
-
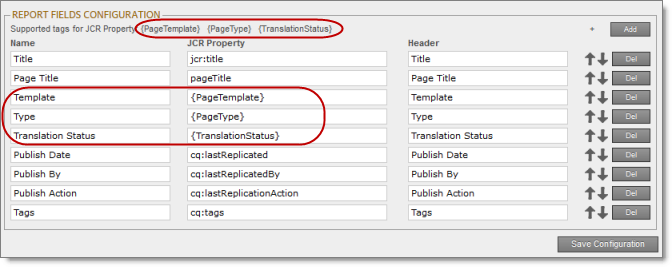
Note: {PageTemplate} and {PageType} are standard fields in Adobe Experience Manager. {TranslationStatus} is a custom property defined in the Translation Status section at the top of this page. For details, see Creating a Page Property to Store Custom Translation-Status Values.
For a list and description of JCR properties, refer to the Adobe Experience Manager documentation, which is available at: https://docs.adobe.com/docs/en/aem/6-2/develop/components.html.
-
You can use the Move Up
 and Move Down
  buttons to modify the order in which the fields are displayed in the generated report.
 -
Click Save Configuration to save your changes.
A message in red at the top of the page states that the Field-report configuration was saved.
5.14.4 - Configuring which Workflows Are Available to Run
In the Workflow Selections section of the Advanced Settings page, you can configure which workflows are available to run against multiple pages in the Run Workflows tab of the Globalization Tool. For instructions on running workflows against multiple pages, refer to the Lionbridge Connector for Adobe Experience Manager User Guide.
To configure which workflows are available to run:
-
Click Admin Tools > Advanced Settings in the Lionbridge Connector rail. For information on opening the Lionbridge Connector rail, see Configuring the Connector.
The Advanced Settings page opens. The Workflow Selections section of this page lists the workflows that are available for display in the Run Workflows tab of the Globalization Tool, where you can select them to run against multiple pages.
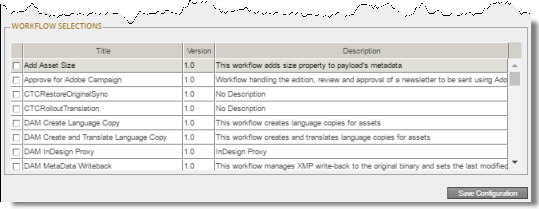
-
Select the check boxes for the workflows to display in the Run Workflows tab of the Globalization Tool.
-
Click Save Configuration to save your changes.
A message in red at the top of the page states that your workflow selection was saved.
5.14.5 - Configuring who Can Use the Globalization Tool
In the Action Permissions section of the Advanced Settings page, you can configure which user groups can perform specific actions in the Globalization Tool.
For instructions on using the Globalization Tool, refer to the Lionbridge Connector for Adobe Experience Manager User Guide.
To configure which user groups can perform specific actions in the Globalization Tool:
-
Click Admin Tools > Advanced Settings in the Lionbridge Connector rail. For information on opening the Lionbridge Connector rail, see Configuring the Connector.
The Advanced Settings page opens. The Action Permissions section at the bottom of this page lists all the actions that are available in the Globalization Tool.
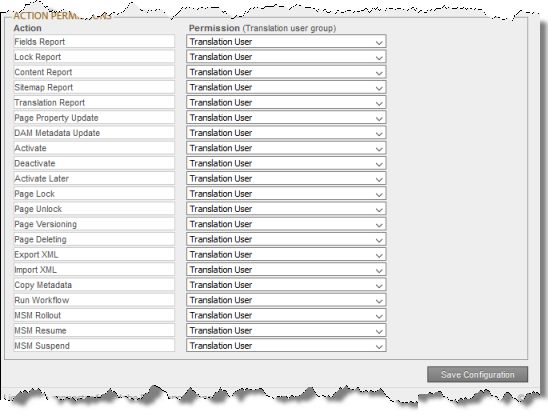
- For each action, you can select the user group whose members can perform the action in the Globalization Tool. By default, members of the Translation User user group have permission to perform each action. For a list and description of user groups, see Configuring Adobe Experience Manager User Permissions for Translation Users.
| Action | Description |
|---|---|
| Fields Report | Generating the Field report from the Reporting tab of the Globalization Tool. |
| Lock Report | Generating the Lockreport about multiple pages from the Reporting tab of the Globalization Tool. |
| Content Report | Generating the Content report about multiple pages from the Reporting tab of the Globalization Tool. |
| Sitemap Report | Generating the Sitemap report about multiple pages from the Reporting tab of the Globalization Tool. |
| Translation Report | Generating the Translation report about multiple pages from the Reporting tab of the Globalization Tool. |
| Page Property Update | Updating page properties for multiple pages from the Page Property Updating tab of the Globalization Tool. |
| DAM Metadata Update | Updating metadata for multiple digital assets (DAM) from the DAM Metadata Update tab of the Globalization Tool. |
| Activate | Activating multiple pages from the Activation tab of the Globalization Tool. |
| Deactivate | Deactivating multiple pages from the Activation tab of the Globalization Tool. |
| Activate Later | Specifying multiple pages to activate later from the Activation tab of the Globalization Tool. |
| Page Lock | Locking multiple pages from the Activation tab of the Globalization Tool. |
| Page Unlock | Unlocking multiple pages from the Activation tab of the Globalization Tool. |
| Page Versioning | Creating new versions of multiple pages from the Activation tab of the Globalization Tool. |
| Page Deleting | Deleting multiple pages and the corresponding translated pages from the Activation tab of the Globalization Tool. |
| Export XML | Exporting the content of multiple pages as XML from the Activation tab of the Globalization Tool. |
| Import XML | Importing the content of multiple pages as XML from the Activation tab of the Globalization Tool. |
| Copy Metadata | In the Copy Metadata tab of the Globalization Tool: - copying metadata to multiple pages - sending metadata from multiple pages for translation as a single job |
| Run Workflow | Running workflows on multiple pages from the Run Workflows tab of the Globalization Tool. |
| MSM Rollout | Rolling out changes to multiple pages from the Rollout tab of the Globalization Tool. |
| MSM Resume | Resuming the Livecopy relationships on multiple pages from the Rollout tab of the Globalization Tool. |
| MSM Suspend | Suspending the Livecopy relationships on multiple pages from the Rollout tab of the Globalization Tool. |
- Click Save Configuration to save your changes.
5.14.6 - Automatically Remove/Replace Character from Translation Content
In the Automatically Remove/Replace Character from Translation Content section of the Advanced Settings page, you can can configure the list of characteres that can be either removed or replaced by another while sending translation content.
To configure characteres to be removed or replace from translation content:
-
Click Admin Tools > Advanced Settings in the Lionbridge Connector rail. For information on opening the Lionbridge Connector rail, see Configuring the Connector.
The Advanced Settings page opens, displaying the Automatically Remove/Replace Character from Translation Content section near the top of the page.
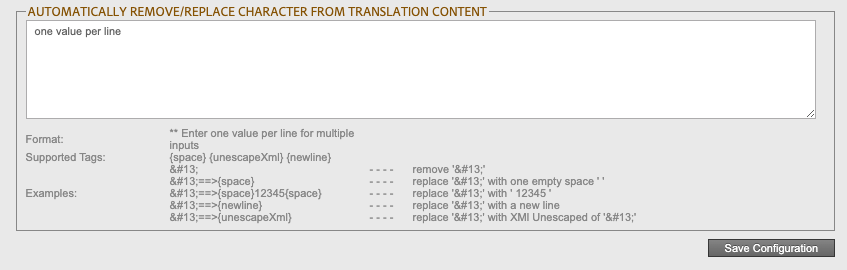
-
According to the intended behavior (remove/replace) follow the format:
-
Format: ** Enter one value per line for multiple
-
The following tags are supported while replacing characteres:
- {space}
- {unescapeXml}
- {newline}
-
Examples:
- - - - - remove ‘ ’
- ==>{space} - - - - replace ‘ ’ with one empty space ' '
- ==>{space}12345{space} - - - - replace ‘ ’ with ' 12345 '
- ==>{newline} - - - - replace ‘ ’ with a new line
- ==>{unescapeXml} - - - - replace ‘ ’ with XMl Unescaped of ‘ ’
-
-
Click Save Configuration to save your changes.
5.14.7 - Preventing Specific URL and Content-Link Conversions
In the Prevent URL Conversions section of the Advanced Settings page, you can prevent the Connector from converting links to specific files or file types.
Note: This option is relevant only if either or both of the Language Conversion (URL Reference) and Language Conversion (Content Link) options are configured in the Translation Settings section of the Configuration page, as described in Translation Settings.
To prevent the Connector from converting specific URL and content links:
-
Click Admin Tools > Advanced Settings in the Lionbridge Connector rail. For information on opening the Lionbridge Connector rail, see Configuring the Connector.
The Advanced Settings page opens, displaying the Prevent URL Conversions section near the top of the page.
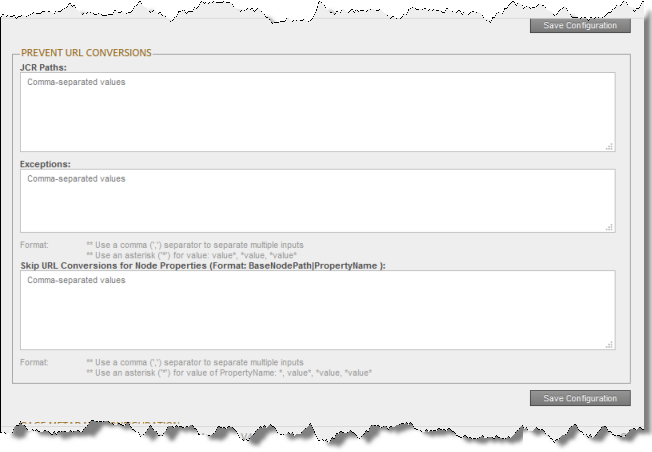
- In the JCR Paths field, enter the JCR (Java Content Repository) path of specific files or pages. This prevents the Connector from converting any links to these files or pages.
Tip: You can also enter a file type, to prevent converting all links to files with a specific file type. For example, you can enter *.jpg to exclude all files with that extension. Notes: Use a comma ( , ) to separate multiple entries. Entries are not case sensitive.
- In the Exceptions field, enter the JCR (Java Content Repository) path of pages or files to exclude from the exclusion list, in the JCR Paths field, above. For example, suppose you want to prevent converting links to all .JPG files, but you want to convert the link to
filename.jpg: In the JCR Paths field, above, you enter *.jpg; while in the Exceptions field, you enter the path tofilename.jpg. Use a comma ( , ) to separate multiple entries. Entries are not case sensitive.
Notes: Use a comma ( , ) to separate multiple entries. Entries are not case sensitive.
-
In the Skip URL Conversions for Node Properties field, enter the names of node properties. This prevents the Connector from converting any URLs for these nodes. You can exclude either all instances of a node or only instances of a node for a specified path.
-
To prevent URL conversion of a node for all sites, add the /content prefix for to the node property. For example, to exclude the cq:master node property from URL conversion for all sites, enter the base node path as /content|cq:master.
-
To prevent URL conversion of a node for a specific path, specify that path. For example, to exclude the cq:master node property from URL conversion for the “company A” site, specify /content/companyA|cq:master.
-
Tip: To substitute a wildcard as part of the property name, use an asterisk (*). For example, specifying /content|cq:* prevents URL conversion for any property whose name starts with cq: for all sites.
- Click Save Configuration to save your changes.
A message in red at the top of the page states that the configuration was saved.
5.14.8 - Skipping Translations in the Local TM
In the Skip Translation with LocalTM section of the Advanced Settings page, you can prevent the Connector from using any previous translations of the specified components that are stored in the local TM.
Note: This option is relevant only if user select the Use Local TM option when sending out content for translation. For more information about this feature, refer to the Lionbridge Connector for Adobe Experience Manager User Guide.
To prevent the Connector from using any previous translations of the specified components that are stored in the local TM:
- Click Admin Tools > Advanced Settings in the Lionbridge Connector rail. For information on opening the Lionbridge Connector rail, see Configuring the Connector.
The Advanced Settings page opens. The Skip Translation with LocalTM section is in the middle of the page.
![]()
- In the text box, enter either the names of the properties or component properties in the following formats:
-
propertyName
-
componentPath|propertyName
Notes: Use a comma ( , ) to separate multiple entries. Entries are not case sensitive.
- Click Save Configuration to save your changes.
A message in red at the top of the page states that the configuration was saved.
5.14.9 - Logging JCR Properties During Translation
In the Log JCR Properties During Translation section of the Advanced Settings page, you specify which JCR properties to write to the log file during translation.
To specify which JCR properties to write to the log file:
-
Click Admin Tools > Advanced Settings in the Lionbridge Connector rail. For information on opening the Lionbridge Connector rail, see Configuring the Connector.
The Advanced Settings page opens, displaying the Log JCR Properties During Translation section in the middle of the page.
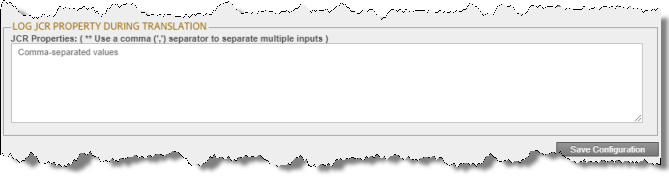
-
In the text box, enter the JCR properties to write to the log file during translation. Use a comma ( , ) separator to separate multiple JCR properties.
-
Click Save Configuration to save your changes.
A message in red at the top of the page states that the configuration was saved.
5.14.10 - Configuring which Metadata Fields Are Available for Translation and Copying
In the Page Property Update Configuration section of the Advanced Settings page, you can configure the Connector to translate and copy metadata fields to the Page Property Updating tab of the Globalization Tool.
To configure which metadata fields will be translated and copied:
-
Click Admin Tools > Advanced Settings in the Lionbridge Connector rail. For information on opening the Lionbridge Connector rail, see Configuring the Connector.
The Advanced Settings page opens. In the Page Property Update Configuration section of this page, you can specify the parameters of the metadata fields that will be translated and copied to the Page Property Updating tab of the Globalization Tool.
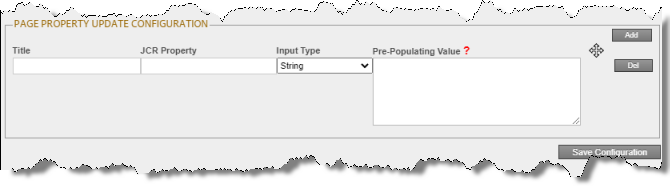
-
To specify the parameters of the metadata fields to translate and copy:
a. Click Add, in the top-right corner of this section.
This adds a blank row at the top of the list.
b. In this row, enter the following information:
| Column | Description |
|---|---|
| Title | The title of the metadata field. |
| JCR Property | The JCR property of the metadata field, for example: dc:title. |
| Input Type | The type of metadata field. |
| Pre-Populating Value | The default value that will be displayed in the Page Property Updating tab of the Globalization Tool. Enter one value per line. -Supported format of value for selection is Display Text. - Value, for example: Machine Translation - MT. -Supported tag of a value for date input: {Today}. - Supported tag of a value for date and time input: {Now}. |
For a list and description of JCR properties, refer to the Adobe Experience Manager documentation, which is available at: https://docs.adobe.com/docs/en/aem/6-2/develop/components.html.
c. Repeat the previous sub-steps to add rows with additional metadata fields.
- Click Save Configuration to save your changes.
A message in red at the top of the page states that the metadata-field configuration was saved.
Tips: To edit a set of parameters, edit the corresponding information in the list. To delete a set of parameters, so that it is excluded from the list of metadata fields, click Del in the corresponding row. A message box confirms that you want to delete this field. Click OK to confirm.
5.14.11 - Configuring which Page Metadata is Available for Copying and Translation
In the Page Metadata Configuration section of the Advanced Settings page, you can configure:
- which metadata is available for copying to multiple pages, including multiple language copies of those pages, in the Copy Metadata tab of the Globalization Tool
- which metadata is available to send out for translation by selecting the Translate Metadata check box in:
- the Options page of the Bulk Translation wizard
- the Translation Queue
- the Translation tab of the Globalization Tool
- the Translation Options tab of the Translate Content dialog box, available from the Touch-Optimized UI (Adobe Experience Manager version 6.3 and higher only
- the LSP and Options tab of the Re-send translation job dialog box
- SEO flags to include in the XML translation files
For instructions on copying metadata and sending it for translation, refer to the Lionbridge Connector for Adobe Experience Manager User Guide.
For instructions on configuring which metadata of digital assets (DAM) is available for updating, including multiple language copies of those assets, see Configuring which Digital Asset Metadata is Available for Updating.
To configure which metadata is available for copying and translation:
- Click Admin Tools > Advanced Settings in the Lionbridge Connector rail. For information on opening the Lionbridge Connector rail, see Configuring the Connector.
The Advanced Settings page opens. The Page Metadata Configuration section of this page lists the JCR properties that are available for selection in the Copy Metadata tab of the Globalization Tool, where you can copy metadata to multiple pages. You can also send these properties for translation, as described above.
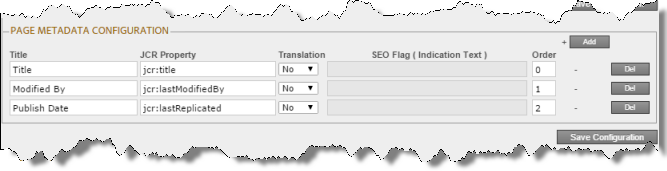
-
To add the JCR properties as metadata available for selection to copy to multiple pages or to send for translation:
a. Click Add, in the top-right corner of this section.
This adds a blank row at the top of the list.
b. In this row, enter the following information:
| Column | Description |
|---|---|
| Title | The title of the metadata. |
| JCR Property | The JCR property of the metadata, for example: jcr:title. |
| Translation | Indicate whether the metadata is available only for copying or also for translation. Select one of the following:
|
| SEO Flag | Specify the SEO flag to include in the XML translation files for this metadata. Important: To enable this feature, you must specify the Indicate SEO field in translation file option in the UI and Default Settings section of the Configuration page. For details, see UI and Default Settings. |
| Order | The order for copying or translating the metadata. This is the order in which the metadata is displayed in the file. |
For a list and description of JCR properties, refer to the Adobe Experience Manager documentation, which is available at: https://docs.adobe.com/docs/en/aem/6-2/develop/components.html.
c. Repeat the previous sub-steps to add rows with additional metadata.
- Click Save Configuration to save your changes.
A message in red at the top of the page states that the metadata configuration was saved.
Tips: To edit a JCR property, edit the corresponding information in the list. To delete a JCR property, so that it is excluded from the list of available metadata, click Del in the corresponding row. A message box confirms that you want to delete this field in the report. Click OK to confirm.
5.14.12 - Configuring which Digital Asset Metadata is Available for Updating
In the DAM Metadata Configuration section of the Advanced Settings page, you can configure which metadata of digital assets (DAM) is available for updating, including multiple language copies of those assets, in the DAM Metadata Update tab of the Globalization Tool.
For instructions on updating metadata of digital assets, refer to the Lionbridge Connector for Adobe Experience Manager User Guide.
To configure which metadata of digital assets is available for updating:
-
Click Admin Tools > Advanced Settings in the Lionbridge Connector rail. For information on opening the Lionbridge Connector rail, see Configuring the Connector.
The Advanced Settings page opens. In the DAM Metadata Configuration section of this page, you can enter the digital asset metadata fields that are available for selection in the DAM Metadata Update tab of the Globalization Tool, where you can update the metadata of multiple digital assets, including multiple language versions of these assets.
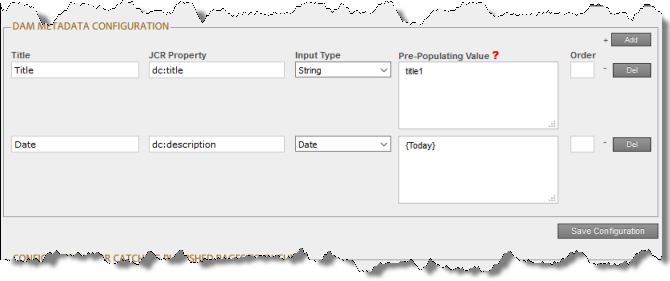
-
To add the JCR properties as metadata available for selection to update:
a. Click Add, in the top-right corner of this section.
This adds a blank row at the top of the list.
b. In this row, enter the following information:
| Column | Description |
|---|---|
| Title | The title of the DAM metadata. |
| JCR Property | The JCR property of the DAM metadata, for example: dc:title. |
| Input Type | The type of DAM metadata that is available for updating. |
| Pre-Populating Value | The default value for input or initial selection options. Enter one value per line.
|
| Order | The order for updating the DAM metadata. This is the order in which the DAM metadata is displayed in the file. |
For a list and description of JCR properties, refer to the Adobe Experience Manager documentation, which is available at: https://docs.adobe.com/docs/en/aem/6-2/develop/components.html.
c. Repeat the previous sub-steps to add rows with additional metadata.
- Click Save Configuration to save your changes.
A message in red at the top of the page states that the DAM metadata configuration was saved.
Tips: To edit a JCR property, edit the corresponding information in the list. To delete a JCR property, so that it is excluded from the list of available metadata, click Del in the corresponding row. A message box confirms that you want to delete this field in the report. Click OK to confirm.
5.14.13 - Configuring which DITA Metadata is Available for Translation and Copying
Note: Please note that this options are only available for the on-premises users, Cloud users may not find these features while using the Lionbridge AEM Connector.
In the DITA Metdata Configuration section of the Advanced Settings page, you can configure the Connector to translate/copy or skip DITA metadata fields.
To configure the translation logic of the DITA metadata fields:
-
Click Admin Tools > Advanced Settings in the Lionbridge Connector rail. For information on opening the Lionbridge Connector rail, see Configuring the Connector.
The Advanced Settings page opens. In the DITA Metadata Configuration section of this page, you can specify the parameters of the metadata fields and the intended logic.
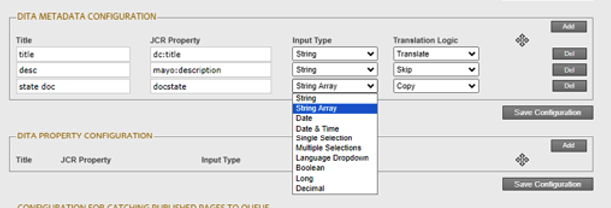
-
To specify the parameters of the metadata fields and its behavior:
a. Click Add, in the top-right corner of this section.
This adds a blank row at the top of the list.
b. In this row, enter the following information:
| Column | Description |
|---|---|
| Title | The title of the metadata field. |
| JCR Property | The JCR property of the metadata field, for example: dc:title. |
| Input Type | The type of metadata field. |
| Translation Logic | You can select the required input type from this dropdown. Example: - Copy, Translate, and Skip. Please refer to the detailed Summary to understand how each of the following Translation Logic functions. - Translate: - The property value is translated into the target language. - Copy: - 1. The property value is not translated into the target language. - 2. The property value from the source language is copied into the target language. - Skip: - The property value is not changed. |
For a list and description of JCR properties, refer to the Adobe Experience Manager documentation, which is available at: Adobe Experience Manager (AEM) Components - The Basics.
c. Repeat the previous sub-steps to add rows with additional metadata fields.
- Click Save Configuration to save your changes.
A message in red at the top of the page states that the metadata-field configuration was saved.
Tips: To edit a set of parameters, edit the corresponding information in the list. To delete a set of parameters, so that it is excluded from the list of metadata fields, click Del in the corresponding row. A message box confirms that you want to delete this field. Click OK to confirm.
5.14.14 - Configuring which DITA Property is Available for Translation and Copying
Note: Please note that this options are only available for the on-premises users, Cloud users may not find these features while using the Lionbridge AEM Connector.
In the DITA Property Configuration section of the Advanced Settings page, you can configure the Connector to translate/copy or skip DITA property fields of a specific DAM asset.
To configure the translation logic of the DITA property fields:
-
Click Admin Tools > Advanced Settings in the Lionbridge Connector rail. For information on opening the Lionbridge Connector rail, see Configuring the Connector.
The Advanced Settings page opens. In the DITA Metadata Configuration section of this page, you can specify the parameters of the metadata fields and the intended logic.
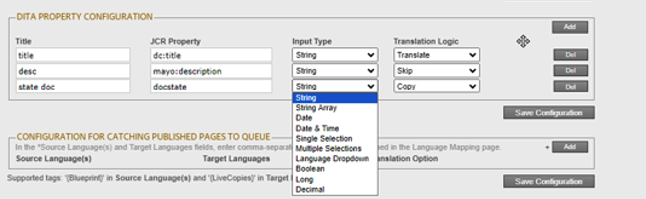
-
To specify the parameters of the metadata fields and its behavior:
a. Click Add, in the top-right corner of this section.
This adds a blank row at the top of the list.
b. In this row, enter the following information:
| Column | Description |
|---|---|
| Title | The title of the metadata field. |
| JCR Property | The JCR property of the metadata field, for example: dc:title. |
| Input Type | The type of metadata field. |
| Translation Logic | You can select the required input type from this dropdown. Example: - Copy, Translate, and Skip. Please refer to the detailed Summary to understand how each of the following Translation Logic functions. - Translate: - The property value is translated into the target language. - Copy: - 1. The property value is not translated into the target language. - 2. The property value from the source language is copied into the target language. - Skip: - The property value is not changed. |
For a list and description of JCR properties, refer to the Adobe Experience Manager documentation, which is available at: Adobe Experience Manager (AEM) Components - The Basics.
c. Repeat the previous sub-steps to add rows with additional metadata fields.
- Click Save Configuration to save your changes.
A message in red at the top of the page states that the metadata-field configuration was saved.
Tips: To edit a set of parameters, edit the corresponding information in the list. To delete a set of parameters, so that it is excluded from the list of metadata fields, click Del in the corresponding row. A message box confirms that you want to delete this field. Click OK to confirm.
5.14.15 - Configuring Translation Settings for Catching Pages to the Translation Queue
In the Configuration for Catching Published Pages to Queue section of the Advanced Settings page, you specify the translation settings for published pages that you add to the Translation Queue, using one of the following features:
- Catch Published Workflow Pages to Queue
- Catch Pages from Publish Event to Queue
You specify both these features by selecting the corresponding check boxes in the Translation Settings section of the Configuration page. For more information about these features, see Translation Settings.
To configure the translation settings when sending published pages directly to the Translation Queue:
-
Click Admin Tools > Advanced Settings in the Lionbridge Connector rail. For information on opening the Lionbridge Connector rail, see Configuring the Connector.
The Advanced Settings page opens. The Configuration for Catching Published Pages to Queue section is near the bottom of the page.
![]()
-
Click Add.
The section expands.
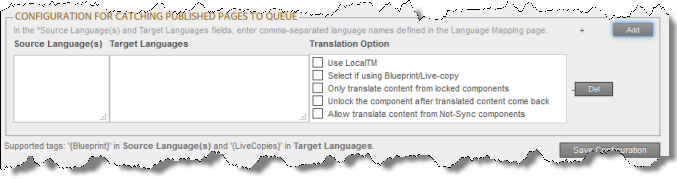
- Specify the following translation settings for published pages that are added to the Translation Queue:
| Field | Description |
|---|---|
| Source Language(s) | The source language(s) of the published pages to add to the Translation Queue.
|
| Target Languages | The target languages into which to translate the published pages that are added to the Translation Queue.
|
| Use LocalTM | This feature determines whether to check each component in the source version of the item for any content changes, and send only changed components out for translation. If a component was previously translated and it has not changed, then the Connector does not send it for translation again: Instead, it uses the stored translation. This feature reduces the quantity of content that the Connector sends to translation providers, which reduces your cost. However, it needs the Connector translation backup data, and it increases the Connector processing time before sending out the items for translation.
|
| Select if using Blueprint/Live-copy | This option is relevant when the target pages are MSM (Multi Site Manager) live copy pages, which means that Adobe Experience Manager automatically updates a target page when the corresponding source page changes. It prevents the Connector from overwriting unique source content that already exists in the target pages. This is useful when you are sending a page for translation that has been used in the past to push content to other pages, and includes target page content which has been changed, for example, regionalized. In this scenario you do not want to overwrite the regionalized content as the translation process occurs. Select this option when you do not want the Connector to overwrite components in the target pages that include regionalized content with the newly translated content.
Recommendation: Select this check box if you are using the live-copy feature. |
| Only translate content from locked components | This option enables users to send out only content from locked components for translation.
Note: Locked components have an inheritance relationship between a source Blueprint page and the connected live copy page. When sending content for translation using Sidekick, users can choose whether to send for translation the content from locked components, which is inherited from a Blueprint component. This is useful if, for example, the page has both global and regional information and you only want to translate (replace) the global content that is created via a Blueprint page. In this scenario, suppose that the regional content on the page is manually translated in house, and that it has not changed. You would not want to tamper with it. However, using the same scenario, the global content from head office has changed and needs translation. You would select this check box to separate the content and localize only the new, inherited content. Note about Blueprint pages: If the Pickup Content From Blueprint Pages setting is specified, then the Connector always acts as though this option is selected, even if it is not selected. This occurs because only content from locked components are rolled out from Blueprint pages to Livecopy pages. For more information, see UI and Default Settings. |
| Unlock the component after translated content come back | This option automatically unlocks a component after translated content returns.This option is relevant only when the Select if using Blueprint/Live-copy is been selected. After translated content returns, it automatically unlocks a component, which breaks the MSM inheritance. Warning: This breaks the inheritance between the component and its Blueprint page, so that it no longer inherits new content. However, you can use the CTCRestoreOriginalSync workflow to relock the component and recreate the inheritance. For details, see Viewing the Restore Original Sync Workflow
|
| Allow translate content from Not-Sync’d components | This option enables users to send content for translation even if it is not synchronized. This means it does not have a relationship to a Blueprint page, so it cannot be synchronized with it. This can happen if you are not using the MSM (Multi Site Manager) feature of Adobe Experience Manager, or if this is a page with regionalized content that does not inherit content from a Blueprint page.
Important: The Connector treats certain page properties ( jcr:content, jcr:title, jcr:description) as unlocked page properties. Therefore, if you want the Connector to send these page properties for translation, you must select this check box.Recommendation: Select this check box if you are using either the live-copy or the language-copy features. Note about Blueprint pages: If the Pickup Content From Blueprint Pages setting is specified, then the Connector always acts as though this option is selected, even when it is not. This occurs because only content from locked components is rolled out from Blueprint pages to Livecopy pages. For more information, see Enabling Content Collection from Blueprint Pages |
- Click Save Configuration to save your changes.
A message in red at the top of the page states that the configuration was saved.
5.14.16 - Configuring Paths for Catching Rollout Pages to the Translation Queue
In the Configuration for Catching Rollout Pages to Queue section of the Advanced Settings page, you can specify the paths to filter rollout pages to add to the Translation Queue.
Note: To enable the Connector to automatically add rollout pages to the Translation Queue, you must select the Catch rollout pages to [rollout] queue check box in the Translation Settings section of the Configuration page. For detailed instructions, see Translation Settings.
To specify the paths for filtering rollout pages to add directly to the Translation Queue:
-
Click Admin Tools > Advanced Settings in the Lionbridge Connector rail. For information on opening the Lionbridge Connector rail, see Configuring the Connector.
The Advanced Settings page opens, displaying the Configuration for Catching Rollout Pages to Queue section near the bottom of the page.
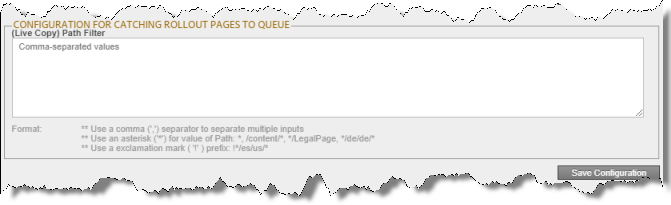
-
In the text box, enter the live-copy paths to filter the rollout pages to catch and add to the Translation Queue, using the following formatting:
- Use a comma ( , ) separator to separate multiple paths.
- Use an asterisk ( * ) for to indicate a wildcard value in a path, for example: *, /content/*, */LegalPage, */de/de/*.
- Use an exclamation mark ( ! ) prefix to indicate a path to exclude, for example: !*/es/us/*.
-
Click Save Configuration to save your changes.
A message in red at the top of the page states that the configuration was saved.
5.14.17 - Configuring Default Job Name for Bulk Translation
In the Configuring default job name for Bulk Translation tab of the Advanced Settings page, you specify the default job name for Bulk Translation.
To Configure default job name for Bulk Translation:
-
Click Admin Tools > Advanced Settings in the Lionbridge Connector rail. For information on opening the Lionbridge Connector rail, see Configuring the Connector.
The Advanced Settings page opens, Default Job Name Format for Bulk Translation section at the top of the page.
![]()
-
Enter in Job Name Format: with the help of tags support tags: {targets} {totalTargets} {totalPages} {time} Example: SUBMIT: {targets} ({totalTargets} targets for {totalPages} pages) @ {time}. This will create job name as SUBMIT: de,es,fr (3 targets for 2 pages) @ 2022-06-18 12.36 PM.
-
Click the Save Configuration to save your changes.
6 - Integrating the Connector with Adobe Experience Manager Workflows
This section is optional. The core Connector workflow package includes the CTCRestoreOriginalSync and CTCRolloutTranslation workflows. If you want to use the Sample_CT_Workflow_Translation workflow, you install the optional workflow package.
| Workflow | Description |
|---|---|
| CTCRestoreOriginalSync | If the Leave component unlock after putting back translated content is specified, you can run this workflow to lock components and restore their original inheritance. This workflow does not require installation or customization. For a description of this workflow, see Viewing the Restore Original Sync Workflow. |
| CTCRolloutTranslation | This is the sample workflow for sending out files for translation when you roll out files. If you use this method to set up the rollout integration with the Connector, you include this workflow in your own rollout configuration. This workflow does not require installation or customization. For a description of this workflow, see Viewing the Rollout Workflow. Note: Alternatively, you can use the Catch rollout pages to [Rollout] Queue setting in the Translation Settings section of the Configuration page to set up the rollout integration with the Connector. For details, see Translation Settings. For more information on configuring this feature, see Configuring the Rollout Feature. |
| Sample_CT_Workflow_Translation | You can use the Sample_CT_Workflow_Translation workflow to send a page to the Translation Queue. You can customize this workflow.
|
6.1 - Installing the Optional Workflow Package
-
To install the optional workflow package, so that you can use the Sample_CT_Workflow_Translation workflow, do one of the following:
- In the Touch-Optimized UI of Adobe Experience Manager, click Tools in the Adobe Experience Manager rail, and then click Deployment. Then, in the Navigation page, click Packages.
- In the Classic UI of Adobe Experience Manager, scroll down and click Packages in the right pane.
- In your Web browser, navigate to /crx/packmgr/index.jsp on your Adobe Experience Manager instance.
The CRX Package Manager opens.

-
Click the Content API Sample Workflow package, and follow the on-screen instructions to install it.
-
After the package is installed, do one of the following to open the AEM WCM page:
- In the Touch-Optimized UI of Adobe Experience Manager, click Tools in the Adobe Experience Manager rail. Then, in the CQ Operations section, click Workflows.
- In the Classic UI of Adobe Experience Manager, click Workflows in the right pane.
- In your Web browser, navigate to /libs/cq/workflow/content/console.html on your Adobe Experience Manager instance.
The workflows you installed are displayed in the page.
-
To customize a workflow, click to select it, and then right-click and select Edit from the context menu.
Tip: To locate the Sample_CT_Workflow_Translation workflow , click the Next Page button
.
For instructions on customizing the Sample_CT_Workflow_Translation workflow, see Customizing the Standard Translation Workflow.
6.1.1 - Customizing the Standard Translation Workflow
You can customize the Sample_CT_Workflow_Translation workflow, which you can use to send a page to the Translation Queue.
-
Open the AEM WCM page, as described on Installing the Optional Workflow Package.
-
Locate the Sample_CT_Workflow_Translation workflow. Click to select it, and then right-click and select Edit from the context menu.
Tip: To locate the Sample_CT_Workflow_Translation workflow , click the Next Page button
The workflow opens in a new browser tab.
![]()
By default, this workflow includes the following two steps, which are required to integrate Adobe Experience Manager with the Connector processes:
- Translation setting: This is a participant type of workflow step, where a user must specify some translation settings and can enter comments.
- Add page translation: This is a process type of workflow step, where Connector retrieves translation settings from the previous step and adds page translation properties.
Warning: Do not modify these steps, except for the titles. Otherwise the Connector integration with the Adobe Experience Manager workflow may not work properly.
You can add additional steps as needed to meet your company’s business requirements. For detailed instructions on setting up workflows, refer to the Adobe Experience Manager workflow documentation, available at: https://helpx.adobe.com/experience-manager/6-5/sites/administering/using/workflows-starting.html.
6.2 - Viewing the Rollout Workflow
You can add the CTCRolloutTranslation workflow to your custom rollout configuration to integrate the Connector with rollout. This is the configuration method to use when you want the Connector to send only some rollout files to the Translation Queue.
Note: Alternatively, you can use the Catch rollout pages to [Rollout] Queue setting in the Translation Settings section of the Configuration page to enable this functionality, as described in Translation Settings. This option is the configuration method to use when you want the Connector to send out all rollout files to the Translation Queue. For more information about configuring this feature, see Configuring the Rollout Feature.
-
Open the AEM WCM page, as described on Installing the Optional Workflow Package.
-
Locate the CTCRolloutTranslation workflow. Click to select it, and then right-click and select Edit from the context menu.
The workflow opens in a new browser tab.
![]()
By default, this workflow includes the CTC Rollout Translation step, which is required to integrate Adobe Experience Manager with the Connector processes. This is a process type of workflow step, where Connector adds rollout pages to the Translation Queue.
Warning: Do not modify this step, except for the title. Otherwise the Connector integration with the Adobe Experience Manager workflow may not work properly.
6.3 - Viewing the Restore Original Sync Workflow
You can view the CTCRestoreOriginalSync workflow. After users send out components for translation, they can use this workflow to relock them to restore their original inheritance.
-
Open the AEM WCM page, as described on Installing the Optional Workflow Package.
-
Locate the CTCRestoreOriginalSync workflow. Click to select it, and then right-click and select Edit from the context menu.
The workflow opens in a new browser tab.
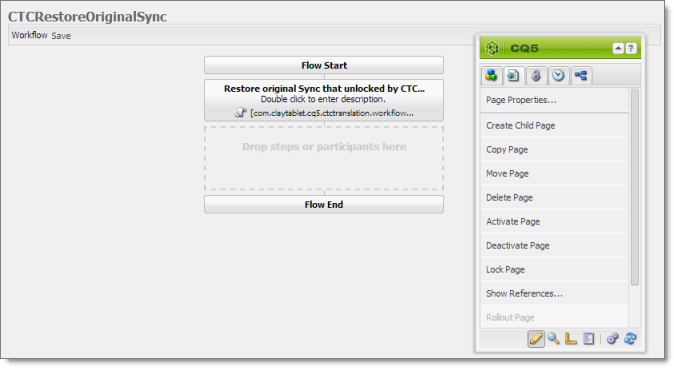
By default, this workflow includes the Restore original Sync that unlocked by CTC translation step, which is required to integrate Adobe Experience Manager with the Connector processes. This is a process type of workflow step, where Connector relocks components and restores their original inheritance.
Warning: Do not modify this step, except for the title. Otherwise the Connector integration with the Adobe Experience Manager workflow may not work properly.
7 - Implementing an Event Listener to Catch Translation Events
Note: This section is not applicable for the AEM Cloud Connector as CRXDE is not available in Adobe Experience Manager Cloud.
The Connector fires events for translation-related actions. You can create an event handler to receive these events, and you can take action when these events occur.
Translation events
There are eight Connector translation events defined in the following class:
com.claytablet.cq5.ctctranslation.Events.EventDetailType

package com.claytablet.cq5.ctctranslation.Events;

public enum EventDetailType {
    QueueApproved,
    QueuePrepared,
    SentOut,
    Reached\_Platform,
    StartedTranslation,
    ReceivedTranslationBack,
    CompletedTranslationProcess,
    CompletedJobTranslations
}
For above Translation events one more
Event topics
An Event Topic is com/claytablet/TRANSLATION, defined in the
com.claytablet.cq5.ctctranslation.Events.TranslationEvent class, which can be used as:

com.claytablet.cq5.ctctranslation.Events.TranslationEvent.EVENT\_TOPIC.
Creating an event handler:
-
To retrieve a translation event, use: TranslationEvent translationEvent = TranslationEvent.fromEvent(Event event);
-
To retrieve a translation event type, use: EventDetailType eventType = translationEvent.getEventDetailType();
Event listener sample code
Note:. The following sample code is also included in the following package, which is in the following location in CRXDE Lite: /apps/CTEventHanlder/src/impl/src/main/java/com/testguru/ctevents/ hanlder/CTEventHanlder/impl/CTEventsHanlderImpl.java. You can install this package using the CRX Package Manager. For detailed instructions on using the CRX Package Manager, see Installing the Lionbridge Connector.
package com.testguru.ctevents.handler.CTEventHandler.impl;

import java.io.File;
import java.util.Iterator;
import org.apache.commons.io.FileUtils;
import org.apache.sling.event.EventUtil;
import org.osgi.service.component.ComponentContext;
import org.osgi.service.event.Event;
import org.osgi.service.event.EventConstants;
import org.osgi.service.event.EventHandler;
import com.claytablet.cq5.ctctranslation.Utils.IdGenerator;
import com.claytablet.cq5.ctctranslation.service.CTLogService;
import com.claytablet.cq5.ctctranslation.service.ctcdata.PreparedItem;
import com.claytablet.cq5.ctctranslation.service.ctcdata.Queue;
import com.claytablet.cq5.ctctranslation.service.ctcdata.TranslatedItem;
import com.claytablet.cq5.ctctranslation.service.ctcdata.TranslationItem;
import com.claytablet.cq5.ctctranslation.Events.TranslationEvent;
import com.claytablet.cq5.ctctranslation.Events.ApprovedQueueDetails;
import com.claytablet.cq5.ctctranslation.Events.EventDetailType;
import com.claytablet.cq5.ctctranslation.Events.PageTranslationInfo;
import com.claytablet.cq5.ctctranslation.Events.PreparedQueueDetails;
import com.claytablet.cq5.ctctranslation.Events.TranslationItemDetails;
import com.claytablet.cq5.ctctranslation.Events.TranslatedItemDetails;

/\*\*
\*
\* @scr.component enabled="true" immediate="true" policy="ignore"
\* @scr.service interface="EventHandler"
\* @scr.property name="event.topics" valueRef="TranslationEvent.EVENT\_TOPIC"
\*/

public class CTEventsHandlerImpl implements EventHandler {

    /\*\*
    \* @scr.reference policy="static"
    \*/

    private CTLogService ctcLogService;

    public void activate(ComponentContext context) {

        ctcLogService.LogDebug("[CTEventsHandler] activated.");
    }

    public void deactivate(ComponentContext context) {
        ctcLogService.LogDebug("[CTEventsHandler] de-activated.");
    }

    public void handleEvent(Event event)
    {
        ctcLogService.LogRolloutDebug("[CTEventsHandler] handleEvent called ...Start");
        try
        {

            ctcLogService.LogDebug("[CTEventsHandler] Get a event: " + event.getTopic());
            if (EventUtil.isLocal(event) )
            {
                try
                {
                    TranslationEvent translationEvent = TranslationEvent.fromEvent
                    (event);

                    if (translationEvent != null)
                    {
                        EventDetailType  eventType = translationEvent.getEventDetailType();
                        PageTranslationInfo pageTranslationInfo =
                        translationEvent.getPageTranslationInfo();
                        if (pageTranslationInfo == null)
                            ctcLogService.LogError("[CTEventsHandler] got PageTranslationInfo object as NULL.");
                        else
                        {
                            ctcLogService.LogDebug("[CTEventsHandler] got TranslationJob name: " + pageTranslationInfo.getTranslationJob().getJobName());
                            ctcLogService.LogDebug("[CTEventsHandler] TranslationJob
                            submitted by: " +
                            pageTranslationInfo.getTranslationJob().getSubmitBy());
                            ctcLogService.LogDebug("[CTEventsHandler] got SourcePagePath: "
                            + pageTranslationInfo.getSourcePagePath());
                            ctcLogService.LogDebug("[CTEventsHandler] got
                            SourcePageLanguage: " +
                            pageTranslationInfo.getSourcePageLanguage());
                            ctcLogService.LogDebug("[CTEventsHandler] got TargetPagePath: "+
                            pageTranslationInfo.getTargetPagePath() );
                            ctcLogService.LogDebug("[CTEventsHandler] got
                            TargetPageLanguage: "+
                            pageTranslationInfo.getTargetPageLanguage() );
                        }

                        if (eventType == EventDetailType.QueueApproved)
                        {
                            ctcLogService.LogDebug("[CTEventsHandler] is a QueueApproved event.");
                            ApprovedQueueDetails  approvedQueueDetails = translationEvent.getApprovedQueueDetails();
                            if (approvedQueueDetails == null)
                                ctcLogService.LogError("[CTEventsHandler] got ApprovedQueueDetails object as NULL.");
                            else
                            {
                                Queue approvedQueue = approvedQueueDetails.getQueue();
                                if (approvedQueue == null)
                                    ctcLogService.LogError("[CTEventsHandler] got Queue object as NULL.");
                                else
                                    ctcLogService.LogDebug("[CTEventsHandler] got total words:
                                    " + approvedQueue.getCountedWords());
                            }
                        }
                        else if (eventType == EventDetailType.QueuePrepared)
                        {
                            ctcLogService.LogDebug("[CTEventsHandler] is a QueuePrepared
                            event.");
                            PreparedQueueDetails  preparedQueueDetails =
                            translationEvent.getPreparedQueueDetails();

                            if (preparedQueueDetails == null)
                                ctcLogService.LogError("[CTEventsHandler] got preparedQueueDetails object as NULL.");
                            else
                            {
                                PreparedItem preparedItem = preparedQueueDetails.getPreparedItem();
                                if (preparedItem == null)
                                    ctcLogService.LogError("[CTEventsHandler] got PreparedItem object as NULL.");
                                else
                                    ctcLogService.LogDebug("[CTEventsHandler] got total EST words: " + preparedItem.getEstWords());
                            }
                        }
                        else if (eventType == EventDetailType.SentOut)
                        {
                            ctcLogService.LogDebug("[CTEventsHandler] is a SentOut event.");
                            TranslationItemDetails  translationItemDetails = translationEvent.getTranslationItemDetails();
                            if (translationItemDetails == null)
                                ctcLogService.LogError("[CTEventsHandler] got TranslationItemDetails object as NULL.");
                            else
                            {
                                TranslationItem translationItem = translationItemDetails.getTranslationItem();
                                if (translationItem == null)
                                    ctcLogService.LogError("[CTEventsHandler] got TranslationItem object as NULL.");
                                else
                                    ctcLogService.LogDebug("[CTEventsHandler] got status percentage: " + translationItem.getItemPercentage());
                            }
                        }
                        else if (eventType == EventDetailType.Reached\_Platform)
                        {
                            ctcLogService.LogDebug("[CTEventsHandler] is a Reached\_Platform event.");
                            TranslationItemDetails  translationItemDetails = translationEvent.getTranslationItemDetails();
                            if (translationItemDetails == null)
                                ctcLogService.LogError("[CTEventsHandler] got TranslationItemDetails object as NULL.");
                            else
                            {
                                TranslationItem translationItem = translationItemDetails.getTranslationItem();
                                if (translationItem == null)
                                    ctcLogService.LogError("[CTEventsHandler] got TranslationItem object as NULL.");
                                else
                                    ctcLogService.LogDebug("[CTEventsHandler] got status percentage: " + translationItem.getItemPercentage());
                            }
                        }
                        else if (eventType == EventDetailType.StartedTranslation)
                        {
                            ctcLogService.LogDebug("[CTEventsHandler] is a StartedTranslation event.");
                            TranslationItemDetails  translationItemDetails = translationEvent.getTranslationItemDetails();
                            if (translationItemDetails == null)
                                ctcLogService.LogError("[CTEventsHandler] got TranslationItemDetails object as NULL.");
                            else
                            {
                                TranslationItem translationItem = translationItemDetails.getTranslationItem();
                                if (translationItem == null)
                                    ctcLogService.LogError("[CTEventsHandler] got TranslationItem object as NULL.");
                                else
                                ctcLogService.LogDebug("[CTEventsHandler] got status percentage: " + translationItem.getItemPercentage());
                            }
                        }
                        else if (eventType == EventDetailType.ReceivedTranslationBack)
                        {
                            ctcLogService.LogDebug("[CTEventsHandler] is a ReceivedTranslationBack event.");
                            TranslationItemDetails  translationItemDetails = translationEvent.getTranslationItemDetails();
                            if (translationItemDetails == null)
                                ctcLogService.LogError("[CTEventsHandler] got TranslationItemDetails object as NULL.");
                            else
                            {
                                TranslationItem translationItem = translationItemDetails.getTranslationItem();
                                if (translationItem == null)
                                    ctcLogService.LogError("[CTEventsHandler] got TranslationItem object as NULL.");
                                else
                                    ctcLogService.LogDebug("[CTEventsHandler] got status percentage: " + translationItem.getItemPercentage());
                            }
                            TranslatedItemDetails  translatedItemDetails = translationEvent.getTranslatedItemDetails();
                            if (translatedItemDetails == null)
                                ctcLogService.LogError("[CTEventsHandler] got TranslatedItemDetails object as NULL.");
                            else
                            {
                                TranslatedItem translatedItem = translatedItemDetails.getTranslatedItem();
                                if (translatedItem == null)
                                    ctcLogService.LogError("[CTEventsHandler] got TranslatedItem object as NULL.");
                                else
                                    ctcLogService.LogDebug("[CTEventsHandler] got totsl translated fields: " +
                                        translatedItem.getTranslatedPageContent().getPropertyContents().size());
                            }
                        }
                        else if (eventType == EventDetailType.CompletedTranslationProcess)
                        {
                            ctcLogService.LogDebug("[CTEventsHandler] is a CompletedTranslationProcess event.");
                            TranslationItemDetails  translationItemDetails = translationEvent.getTranslationItemDetails();
                            if (translationItemDetails == null)
                                ctcLogService.LogError("[CTEventsHandler] got TranslationItemDetails object as NULL.");
                            else
                            {
                                TranslationItem translationItem = translationItemDetails.getTranslationItem();
                                if (translationItem == null)
                                    ctcLogService.LogError("[CTEventsHandler] got TranslationItem object as NULL.");
                                else
                                    ctcLogService.LogDebug("[CTEventsHandler] got status percentage: " + translationItem.getItemPercentage());
                            }
                            TranslatedItemDetails  translatedItemDetails = translationEvent.getTranslatedItemDetails();
                            if (translatedItemDetails == null)
                                ctcLogService.LogError("[CTEventsHandler] got TranslatedItemDetails object as NULL.");
                            else
                            {
                                TranslatedItem translatedItem = translatedItemDetails.getTranslatedItem();
                                if (translatedItem == null)
                                    ctcLogService.LogError("[CTEventsHandler] got TranslatedItem object as NULL.");
                                else
                                    ctcLogService.LogDebug("[CTEventsHandler] got totsl translated fields: " + translatedItem.getTranslatedPageContent().getPropertyContents().size());
                            }
                        }
                    }
                    else
                    {
                        ctcLogService.LogDebug("[CTEventsHandler] Is not a CT TranslationEvent event. ignore.");
                    }
                }
                catch (Exception te) {
                    ctcLogService.LogRolloutError("[CTEventsHandler] Error: " + te.getMessage() );
                }
                finally {
            }
        }
    }
    catch (Exception finale) {}
        ctcLogService.LogRolloutDebug("[CTEventsHandler] handleEvent called...Done!");
    }
}
8 - Installing the Connector in a Clustered Environment
Note: This section is not applicable for the AEM Cloud Connector.
This section describes how to install the Connector for Adobe Experience Manager in a clustered environment.
To install the Connector in a clustered environment, you install it on a single instance in the cluster. This installation is the same as installing the Connector in a non-clustered environment, as described in Installing the Lionbridge Connector.
After you install the Connector package on a single node in the cluster, it is automatically installed on the other nodes in the cluster, using the same configuration.
You can access each node in the cluster separately by its URL, using the Adobe Experience Manager Dispatcher. For detailed instructions, see https://docs.adobe.com/docs/en/dispatcher.html.
Before you begin to install the Connector in a clustered environment, please review the system requirements, described on System Requirements, and verify that each host that will be a cluster node in the cluster meets the requirements.
To install the Connector in a clustered environment:
- Prevent users from deliberately or accidentally sending items for translation during the upgrade process.
Recommendation: Remove users from groups with permission to send new translation jobs.
-
Setting Your System Date, Time, and Time Zone Correctly. Do this on each host that will be a cluster node.
-
Downloading the Delivery Package. Do this once. Save the package to a location that is accessible to all hosts that will be cluster nodes.
-
Creating or Updating a Connector Database on your Database Server Instance. Ensure that the database is accessible to all hosts that will be cluster nodes.
-
Creating the Connector Folders. These are the optional folders where the Connector stores your licensing information and your translation data. If your environment will use these folders, then create one set of folders and sub-folders on each host that will be a cluster node.
Recommendation: These folders should not be shared folders.
9 - Automatically Updating Your Connector Configuration
You can configure the Connector to automatically load and update its configuration. This is useful in the following scenarios:
- upgrading your instance of the Connector
- moving your installation to a new environment
- copying your installation to a new environment
To export your configuration from the Connector:
Each Connector configuration page corresponds to an XML configuration file. The table below indicates which Connector configuration page corresponds to a particular configuration file.
- To download all these configurations as a single ZIP file, click Admin Tools > Configuration in the Lionbridge Connector rail. For information on opening the Lionbridge Connector rail, see Configuring the Connector.
The Configuration page opens.
- At the bottom of the Configuration page, click Export All Configurations.
Alternatively, for pages marked below with an asterisk (*), you can download the individual configuration files from those pages. For detailed instructions, refer to the last column in the table.
| Configuration Page | Corresponding Configuration File | For Details, See… |
|---|---|---|
| Configuration page: - configuration options * - translation options * |
ctcconfig.xml | Configuring Connector Global Settings |
| Language Mapping page * | languagemapping.xml | Configuring Connector Languages |
| Component Mapping page * | fields4trans.xml | Configuring which Components and Properties to Send Out for Translation |
| LSP and Keys page * Note: You cannot import license-key settings from 3.x versions of the Connector to 4.x versions, because they use different license-key formats. |
lspkeys.xml | Configuring Translation Providers and License Keys |
| Advanced Settings page * | advancedSettings.xml | Configuring Advanced Settings in the User Interface |
| Team Profiles page | teamprofiles.xml | Configuring Team Profiles |
| Queue Scheduler | queueschedules.xml | Scheduling Translation Jobs to Send Out Content from the Translation Queue |
| Custom Asset Handlers | assethandlers.xml | Creating a Custom Asset Handler |
To set up the Connector to automatically import configuration files from the Configuration page:
-
Click the Import Configuration button on the Configuration page.

-
Choose the xml file to import then click the Upload button.

After clicking the Upload button, you can see an Imported Successfully message. Now close the pop up window.
Note: The following procedure is not applicable for the AEM Cloud Connector.
To set up the Connector to automatically import configuration files from the default location:
- Place the files to import in the following location: AEM_QuickStart_Folder\CTC_Configs\Import. The Connector monitors this location and imports any new files.
To set up the Connector to automatically import configuration files from any location:
-
Create the CTC_INIT_HOME environment variable on the Adobe Experience Manager server.
-
In Windows, you create an environment variable by clicking the Environment Variables button in the Advanced tab of the System Properties dialog box, which you can open from the Control Panel.
-
In Linux, you can add the environment variable by adding the following export statement to one of the files described in the table below:
-
export CTC_INIT_HOME=/root/adobe/ctcdata/init_config
| File | Description |
|---|---|
| ~/.bash_profile | This file runs when the local user profile logs in to a terminal window. If you start Adobe Experience Manager by typing the start command, then you can use this file so that CTC_INIT_HOME is always available when you run Adobe Experience Manager. |
| /etc/environment | This file is the global UNIX configuration file. After adding the export statement above and rebooting the machine, CTC_INIT_HOME will be available everywhere. Note: This file is intended specifically for system-wide environment variable settings. It is not a script file, and it consists of one assignment expression per line. |
| startup script: crx-quickstart/bin/start | This file is the startup script of your Adobe Experience Manager instance. Adding the export statement to this file initializes the CTC_INIT_HOME variable locally, within the Adobe Experience Manager process. |
-
Set the value of this environment variable to a directory with read and write permissions that is accessible to the Adobe Experience Manager process or instance, for example:
-
Windows: C:\ctcdata\init_config\
-
Linux: export CTC_INIT_HOME=/var/adobe/ctcdata/init_config
-
-
Restart the Adobe Experience Manager server.
The Connector now monitors this directory and automatically loads any configuration files in this directory. It saves the configuration files to the following location on the Adobe Experience Manager server: /etc/ctctranslation.
To specify which configuration files to import:
- Copy the configuration files exported previously into the directory specified by the CTC_INIT_HOME environment variable.
The Connector automatically loads these configuration files and updates its configuration.
10 - Troubleshooting Installation and Configuration Issues
| Issue | Description |
|---|---|
| Lionbridge Connector Does Not Load | The Lionbridge Connector does not load, or only the Connector landing page loads, but the Connector does not run. |
| Communication Errors When Sending Content for Translation | You experience communication errors when sending content for translation. |
| Error Displayed about LSPs when Submitting a Job | When attempting to send out content for translation, the Connector displays errors about checking LSP keys. |
| Search Agents Are Not Displayed | - The default search agents are not displayed in the Search Agents page. (Click Admin Tools > Search Agents in the Lionbridge Connector rail to open the Search Agents page.) - The default search agents are not available for selection from the Search Using Agent dropdown list in the Pages page of the Bulk Translation wizard. |
| Inaccurate Translation Status | Either: - A submitted job is stuck at 1% or 2% -A returned translation job is stuck at 90%. |
| The Connector Does Not Send Out Submitted Jobs or Return Translated Content | The Connector does not process any jobs and one or all of the Connector chains is red. |
| The Connector Does Not Send Out Submitted Jobs | The Connector does not process any jobs and the Upload Service chain is red. |
| The Translation Provider Does Not Receive Content in New or Custom Languages | The Connector successfully sends content for translation in new or custom languages but it does not reach the translation provider. |
| The Connector Does Not Process Returned Translations after Language Mapping Changes | Changes to language mapping occurred while content in the changed language was out for translation. After the translated content returns, the Connector does not process it. |
| Job Submitted for Translation Is Missing Some Strings | The Connector successfully sent the job to the LSP, but some of the source content is missing from the job and it was not sent. |
| Cannot Select New Translation Provider When Sending Out Content for Translation | After using an account license key to install a new translation provider (LSP), it is not available for selection when submitting a new job. |
| New Target Language Is Not Available When Sending Out Content for Translation | After configuring a new target language, it is not available for selection when submitting a new job. |
| Adobe Experience Manager Service Authentication | If you are using Adobe Experience Manager 6.3 or higher with versions 3.2.0 and higher of the Connector, the following problems may occur:
|
| Freeway Analysis Codes not Displayed when Sending Out Content for Translation | The add-on for Lionbridge Freeway is installed, and Freeway analysis codes specified, but they are not displayed or available for selection when sending out content for translation. |
10.1 - Lionbridge Connector Does Not Load
One or both of the following issues may cause the Lionbridge Connector not to load, or may cause only the Connector landing page to load, but the Connector does not run.
| Possible Issue | Explanation | Solution |
|---|---|---|
| Configuration files are loaded from the InitConfig Lionbridge Connector local directory, and the user accessing this directory does not have read/write permissions. | If you are trying to load configuration files from InitConfig Lionbridge Connector local directory, the user accessing this directory must have read/write permissions. | For detailed configuration instructions, see Automatically Updating Your Connector Configuration. |
| The configuration files are pointing to an incorrect database location. | Refer to the general log file for details. If there are database errors, such as all database statements are failing, or if there is a general communications link failure, the database may be incorrectly configured. | Check the database strings in the configuration file. |
10.2 - Keys not Displayed
Issue
In the LSP & Keys page, in the LSP and Keys section, the license keys are not displayed or available selection after clicking Retrieve next to the License Key field.
Explanation
Your firewall is blocking access to the Content API Server.
-
You must configure your ports so that the Connector can communicate with the server.
-
You must import the SSL certificate into your browser’s certificate store.
Solutions
If you have a firewall:
-
Configure your ports so that the Connector can communicate with the Content API Server. The URL of this server is
https://api.clay-tablet.net/license/v1. For more information, see Configuring Network Settings for a Firewall. -
Download or export the SSL certificate from the Clay Tablet License Server (https://api.clay-tablet.net/license/v1). For detailed instructions, see:
- Import the downloaded SSL certificate into your browser’s certificate store. For detailed instructions, see:
10.2.1 - Exporting an SSL Certificate in Google Chrome
This section provides detailed information about exporting an SSL certificate in Google Chrome:
-
from AWS S3, as instructed in Communication Errors When Sending Content for Translation
-
from the Clay Tablet License Server, as instructed in License Keys not Displayed
To export an SSL Certificate in Chrome:
-
In the Chrome browser, go to one of the following URLs:
-
To resolve communication errors with the Clay Tablet License Server, use
https://api.clay-tablet.net/license/v1. -
To resolve communication errors with AWS S3, use https://ct_test_create_key.s3.amazonaws.com.
-
The page opens.
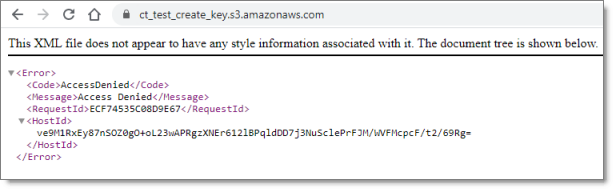
Note: Ignore the Access Denied error message in the page that opens.
- Click the padlock in the address bar.
The Connection is secure dialog box opens.
- Click Certificate.
The Certificate dialog box opens, displaying the General tab.

- Click the Details tab to view it.
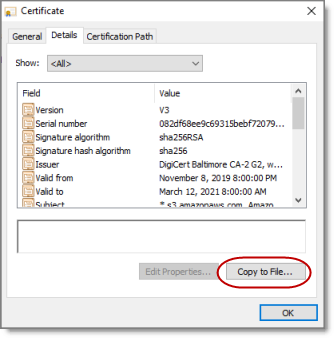
- Click Copy to File.
The Certificate Export Wizard opens.
- Click Next.
The Export File Format page of the wizard opens.
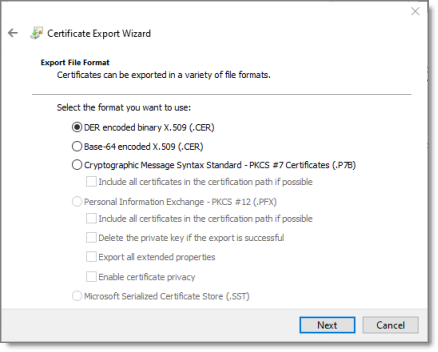
- Accept the default format of DER encoded binary X.509, and click Next.
The File to Export page of the wizard opens.
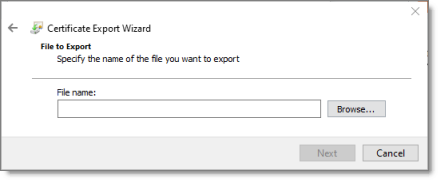
-
Do one of the following:
-
In the File name text box, enter the path and name of the file in which you want to save the certificate. The file has a .cer extension. For example, enter C:\Users\jsmith\Documents\SSL certificates\AWS S3.cer.
-
Click Browse, and in the Save As dialog box:
-
Navigate to the folder where you want to save the file.
-
Assign a filename with a .cer extension.
-
Click Save.
-
-
-
When you are done, click Next.
The Completing the Certificate Export Wizard page opens, displaying the filename, path and format.
-
Click Finish to close the wizard.
The Certificate Export Wizard message box states that the export was successful.
-
Click OK to close the Certificate dialog box.
-
Next, you do one of the following:
-
To resolve communication errors with the Clay Tablet License Server, you import the exported SSL certificate into your Chrome certificate store. For detailed instructions, see Importing an SSL Certificate into Your Chrome Certificate Store.
-
To resolve communication errors with AWS S3, you import the exported SSL certificate into Your Java Trusted Keystore. Do one of the following:
-
If Java (JDK) is installed on the server where Adobe Experience Manager is hosted, follow these instructions: Importing an SSL Certificate into Your Java Trusted Keystore with Java (JDK).
-
If JRE is installed on the server where Adobe Experience Manager is hosted, follow these instructions: Importing an SSL Certificate into Your Java Trusted Keystore with JRE.
-
10.2.2 - Downloading an SSL Certificate in Mozilla Firefox
This section provides detailed information about downloading an SSL certificate in Mozilla Firefox:
-
from AWS S3, as instructed in Communication Errors When Sending Content for Translation
-
from the Clay Tablet License Server, as instructed in License Keys not Displayed
To download an SSL Certificate from Firefox:
-
In the Firefox browser, go to one of the following URLs:
-
To resolve communication errors with the Clay Tablet License Server, use
https://api.clay-tablet.net/license/v1. -
To resolve communication errors with AWS S3, use https://ct_test_create_key.s3.amazonaws.com.
-
The page opens.
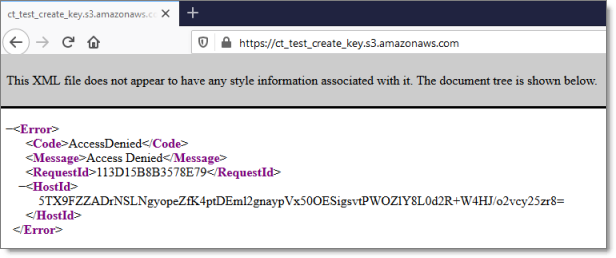
- Click the padlock in the address bar.
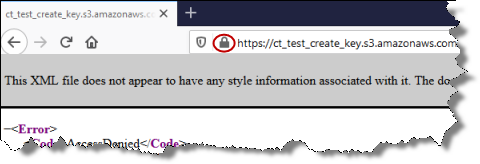
- Click the arrow beside Connection Secure.
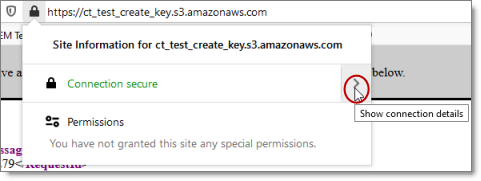
- Click More Information.
The Page Info dialog box opens.
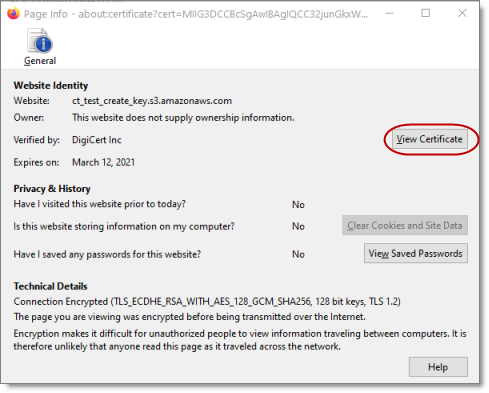
- Click View Certificate.
The Certificate page opens.
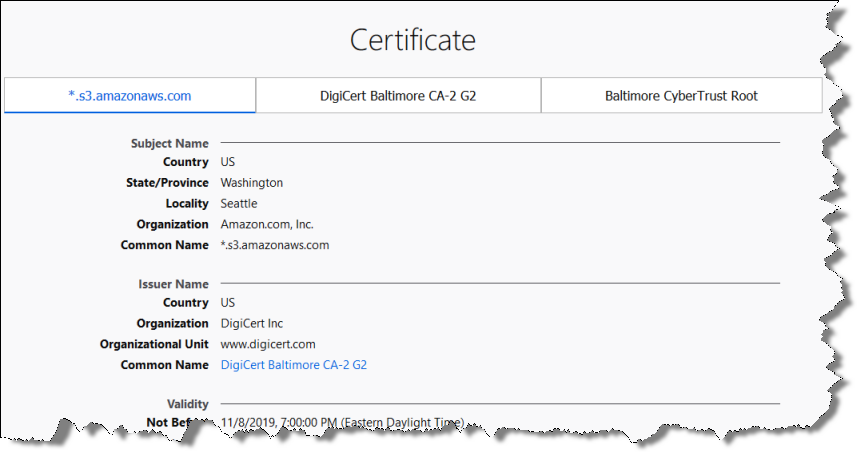
-
Scroll down to the Miscellaneous section.
-
In the Download row, click the PEM (cert) link.
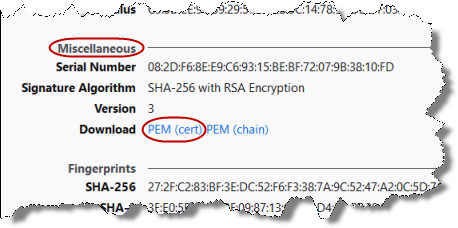
- In the dialog box that opens, click OK to save the certificate file to a known location.
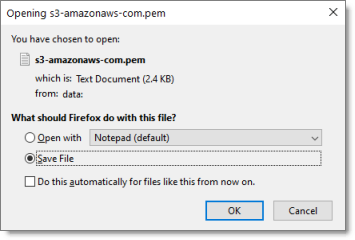
-
Navigate to the location for saving the file, and then click Save.
-
Next, you do one of the following:
-
To resolve communication errors with the Clay Tablet License Server, you import the downloaded SSL certificate into your Firefox certificate store. For detailed instructions, see Importing an SSL Certificate into Your Firefox Certificate Store.
-
To resolve communication errors with AWS S3, you import the exported SSL certificate into Your Java Trusted Keystore. Do one of the following:
-
If Java (JDK) is installed on the server where Adobe Experience Manager is hosted, follow these instructions: Importing an SSL Certificate into Your Java Trusted Keystore with Java (JDK).
-
If JRE is installed on the server where Adobe Experience Manager is hosted, follow these instructions: Importing an SSL Certificate into Your Java Trusted Keystore with JRE.
-
10.2.3 - Importing an SSL Certificate into Your Chrome Certificate Store
You import an exported SSL certificate into your Chrome certificate store to display the license keys for the Clay Tablet License Server so that they are available for selection.
To import an SSL Certificate into your Chrome certificate store:
- In the Chrome browser, click the Customize and control Google Chrome icon in the top right corner, and then click Settings.
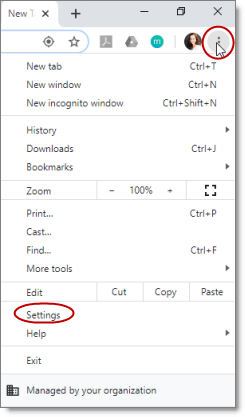
The Settings page opens.
-
In the menu on the left, click Privacy and Security.
-
Scroll down to the bottom of the section.
-
In the Manage certificates sub-section, click the icon.
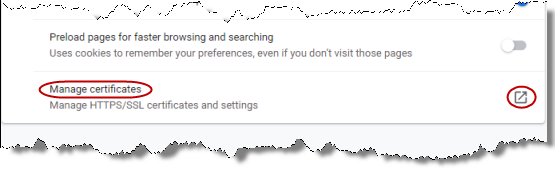
The Certificates dialog box opens.
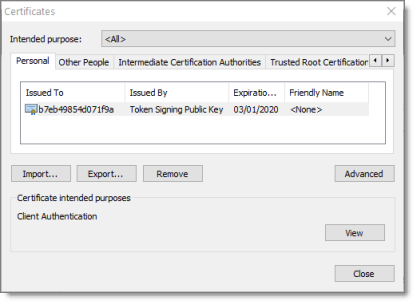
- Click Import.
The Certificate Import Wizard opens.
- Click Next.
The File to Import page of the wizard opens.
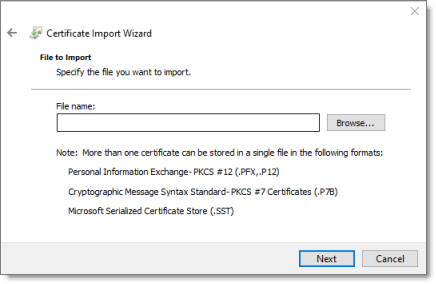
-
Click Browse, and navigate to and select the SSL certificate you previously exported. Then click Open.
-
Click Next.
-
In the Certificate Store page of the wizard, browse to the certificate store where you want to save the certificate. Then click Next.
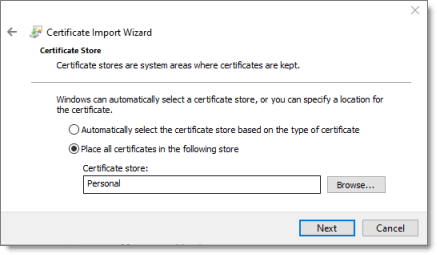
- In the final page of the wizard, review your settings and click Finish.
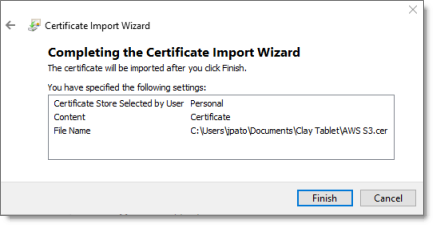
The certificate is imported into your Chrome certificate store.
10.2.4 - Importing an SSL Certificate into Your Firefox Certificate Store
You import a downloaded SSL certificate into your Firefox certificate store to display the license keys for the Clay Tablet License Server so that they are available for selection.
To import an SSL Certificate into your Firefox certificate store:
- In the Firefox browser, click the Open menu icon in the top-right corner, and then click Options.
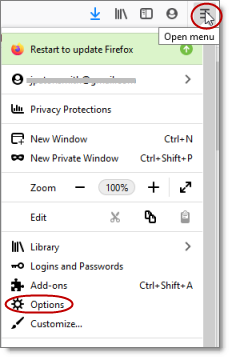
The Preferences page opens.
-
In the menu on the left, click Privacy & Security.
-
Scroll down to the Security section and the Certificates sub-section.
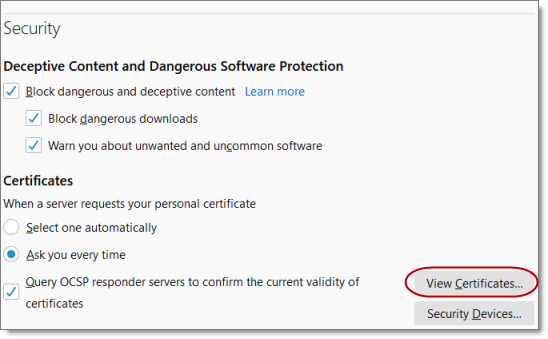
- Click View Certificates.
The Certificate Manager opens.
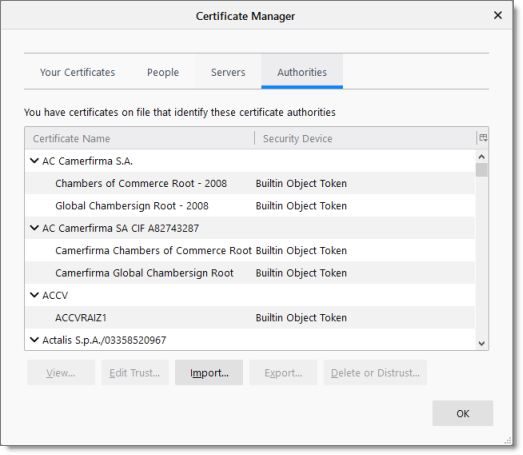
-
Click Import.
-
In the dialog box that opens, navigate to and select the SSL certificate you previously exported. Then click Open.
The certificate is imported into your Firefox certificate store, and a message box states that the import was successful.
10.3 - Communication Errors When Sending Content for Translation
Issue
Communication errors occur when sending content for translation.
Explanation
Your firewall is blocking access to AWS S3 and SQS. You must import the SSL certificates from AWS S3 and SQS into your Java trusted keystore. This enables HTTPS support, which means support for the SSL/TLS protocols.
Solution
The following general steps are required:
-
Downloading or exporting the AWS SSL certificates from your browser’s certificate store. For detailed instructions, see:
-
Importing the downloaded/exported certificates into your Java trusted keystore. The instructions are different depending on whether Java or the JRE is installed on the server where Adobe Experience Manager is hosted. For detailed instructions, see:
Note: You must update these certificates whenever AWS renews them. This is likely once a year.
10.3.1 - Importing an SSL Certificate into Your Java Trusted Keystore with Java (JDK)
You import the downloaded/exported SSL certificate into your Java trusted keystore to resolve communication issues with AWS S3 and SQS. There are different instructions depending on whether Java (JDK) or JRE is installed on the server where Adobe Experience Manager is hosted.
To import an SSL certificate into your Java trusted keystore with JRE:
- Run the keytool -import -alias ALIAS -file public.cert -storetype TYPE -keystore server.truststore command. For example:
keytool -import -alias teiid -file public.cert -storetype JKS -keystore server.truststore
-
If the specified truststore already exists, enter the existing password for that truststore, otherwise enter a new password.
-
When you are prompted to trust the certificate, enter yes.
The certificate in public.cert has been added to the new truststore named server.truststore.
10.3.2 - Importing an SSL Certificate into Your Java Trusted Keystore with JRE
You import the downloaded/exported SSL certificate into your Java trusted keystore to resolve communication issues with AWS S3 and SQS. There are different instructions depending on whether Java (JDK) or JRE is installed on the server where Adobe Experience Manager is hosted.
To import an SSL certificate into your Java trusted keystore with JRE:
-
Run the Java keytool command to import the certificate into the keystore.
a. Open a command prompt and change to the following directory: <location> \bin\jre\6.0\bin.
where <location> is the file directory where Adobe Experience Manager is installed.
Note: On 64-bit computers, add the certificates to the
bin64folder.
b. Run the following command line. Although for formatting purposes the command is displayed with line breaks, you should enter the entire command on one line.
keytool -import -file "C:\<location>\bin\ssl\applixca.pem"

-keystore "C:\<location>\bin\jre\6.0\lib\security\cacerts"

-storepass "changeit"Copy
For 64-bit installations, target the 64-bit folder when dealing with the certificates. For example, this sample command targets the 64-bit jre:
cd C:\Program Files (x86)\AEM\TM1\_64\bin64\jre\6.0\binCopy
The following command is an example used on 64-bit systems. Although for formatting purposes the command is displayed with line breaks, you should enter the entire command on one line.
keytool -import -file "C:\Program Files (x86)\AEM\TM1\_64\bin64\

ssl\applixca.pem" -keystore "C:\Program Files (x86)\AEM\TM1\_64\bin64\

jre\6.0\lib\security\cacerts" -storepass "changeit"Copy
Note: If you do not correctly target the 64-bit locations for certificates when running a 64-bit installation, a warning message is displayed, indicating that you cannot contact the servers.
c. When prompted to trust or add the certificate, enter yes.
The following message is displayed: Certificate was added to keystore.
- You may need to restart the server where Adobe Experience Manager is hosted for the change take effect.
10.4 - Error Displayed about LSPs when Submitting a Job
Issue
When attempting to send out content for translation, the Connector displays errors about checking LSP keys.
Explanation
The URLs of the Content API Server are whitelisted using the entire address, including the key names from the URL.
Solution
If you have a firewall:
-
Click Admin Tools > LSP and Keys in the Lionbridge Connector rail to open the LSP & Keys page.
-
In the Content API URLs section, which displays a list of URLs used by the Content API Platform, instead of whitelisting the entire address, exclude the key names from the URL. For example, enter ctt-platform-prod-us-east-1/*. For more information, see Editing a License Key.
10.5 - Search Agents Are Not Displayed
| Possible Issue | Explanation | Solution |
|---|---|---|
| The default search agents are not displayed in the Search Agents page. (Click Admin Tools > Search Agents in the Lionbridge Connector rail to open the Search Agents page.) | The configuration files are pointing to an incorrect database location. Refer to the general log file for details. If there are database errors, such as all database statements are failing, or if there is a general communications link failure, the database may be incorrectly configured. | Check the database strings in the configuration file. |
| The default search agents are not available for selection from the Search Using Agent dropdown list in the Pages page of the Bulk Translation wizard. |
10.6 - Inaccurate Translation Status
The displayed translation status is inaccurate.
![]()
| Possible Issue | Explanation | Solution |
|---|---|---|
| Either: - A job was submitted and the translation provider has confirmed receipt, but in the Job Details tab of the Translation Status page, some but not all pages are at 10%/In Translation. - The translation provider has confirmed that all files were successfully delivered, but in the Translation Status page, some but not all pages are at 100%/Completed. An example is displayed in the screen capture below. |
Either: - The key used for the translation job was duplicated in another environment. - The environment from which the job was submitted has been cloned. Do not duplicate these keys or install them on multiple Adobe Experience Manager Author Server instances, because this is a violation of the License Agreement. Using the same keys on multiple Adobe Experience Manager Author Server instances will cause the Connector to behave unexpectedly, which can result in lost translation content, orphaned projects, and inaccurate translation status reports. Lionbridge Connector Support will support technical issues caused by duplicating or incorrectly installing keys only on a time and materials basis. |
1.Remove any duplicate keys or cloned environments. For detailed setup instructions, see Configuring Translation Providers and License Keys. - If some but not all pages are at 10%/In Translation, cancel the original translation job and resubmit it. - If some but not all pages are at 100%/Completed, ask the translation provider to redeliver the translation job. |
| The Lionbridge Connector database has been shared with another environment. The Connector requires a unique, non-shared, database for storing translations returned to the Connector. Sharing a database can result in another environment processing the returned translations into that environment. |
1. Change the database user name and password. 2. In the JDBC SQL Connection section of the Configuration page, update the Login Name and Login Password. For detailed instructions, see JDBC SQL Connection. 3. Ask the translation provider to redeliver the translation job. |
10.7 - The Connector Does Not Send Out Submitted Jobs or Return Translated Content
The Connector does not process any jobs and one or all of the Connector chains is red.
Generally, the chain should be green: |
However, at least one element in the chain is red: |
| Possible Issue | Explanation | Solution |
|---|---|---|
| One or more of the required Connector services is not running. | For the Connector to function correctly, all Connector components must be installed and active. | Verify that all Connector components are active. For detailed instructions, see Verifying that the Bundle and All Connector Components Are Active. |
10.8 - The Connector Does Not Send Out Submitted Jobs
The Connector does not seem to process any jobs and the Upload Service is inactive (red).
| Generally, the chain should be green: |
However, the Upload Service in the chain is red: |
| Possible Issue | Explanation | Solution |
|---|---|---|
| Multiple jobs are stuck in Preparing and/or Sending status. | When there many failed attempts to send out jobs, the log files are spammed with job processing details. This may cause the Upload Service to become inactive (red). | Open the Translation Status page (/content/ctctranslation/status.html), and delete all the jobs that have been stuck in Preparing and/or Sending status for an extended period of time. |
10.9 - The Translation Provider Does Not Receive Content in New or Custom Languages
The Connector successfully sends content for translation in new or custom languages but it does not reach the translation provider.
| Possible Issue | Explanation | Solution |
|---|---|---|
| The Content API Platform does not have the updated language mapping. | Your company and your translation provider may use different language codes in their technology/workflows. The Content API Platform can map language codes in Adobe Experience Manager to those expected by the translation provider. | Contact Lionbridge Connector Support to request a review of the Connector language mapping for the translation provider to ensure that the new language is correctly mapped for the target platform. For details, see How to Contact Lionbridge Connector Support. |
| The translation provider requires that source-target languages pairs are configured before any new translation requests. | The translation platforms of most translation provider require that source-target language pairs are configured. | Contact the translation provider and verify that the all source-target language pairs are configured. |
10.10 - The Connector Does Not Process Returned Translations after Language Mapping Changes
| Possible Issue | Explanation | Solution |
|---|---|---|
| Changes to language mapping occurred while content in the changed language was out for translation. After the translated content returns, the Connector does not process it. | The changes to language mapping changed the language reference path in CRX. The Connector uses the page path to return translated content back to Adobe Experience Manager. If that page path is changed while content is out for translation, then the Connector cannot return the translated content to Adobe Experience Manager.For details, see Configuring Connector Languages. |
Do not change the name of a language or delete a language if there is translation content in the Translation Queue, or if there are translation jobs in progress. If this occurs accidentally, then resend the job with the new language name, and notify your translation provider that this replaces the previous job. |
10.11 - Job Submitted for Translation Is Missing Some Strings
The Connector successfully sent the job to the LSP, but some of the source content is missing from the job and it was not sent.
| Possible Issue | Explanation | Solution |
|---|---|---|
| Either component mapping was not done, or it was not updated for components that were recently added or used in new content. | The content of an Adobe Experience Manager page is created from a collection of page components. A component has different properties, which are types of fields. You must configure which components and properties the Connector can send out for translation. | Update the component mapping and resend the job for translation. For detailed instructions, see Configuring which Components and Properties to Send Out for Translation. Recommendation: If you are submitting new nodes in your content tree for translation, validate component mapping in a pre-production environment to ensure that only the required components are mapped. |
| All components were successfully sent for translation in the pre-production environment, but they are missing in the production environment. | Component mapping is managed on a per-Adobe Experience Manager-instance basis. You must import any changes in component mapping from the pre-production environment into the production environment before submitting jobs from there. | Either: - Manually make the same component mapping changes in the production environment. - Migrate your component mapping from the pre-production environment to the production environment. For detailed instructions, see Automatically Updating Your Connector Configuration. |
10.12 - Cannot Select New Translation Provider When Sending Out Content for Translation
After using an account license key to install a new translation provider (LSP), it is not available for selection when sending out a new job for translation.
| Possible Issue | Explanation | Solution |
|---|---|---|
| Your team profile was not updated to support sending content to the new translation provider (LSP). | The Connector uses profiles to define the set of users who can send out content for translation to a specific translation provider (LSP). Note: Profiles also define the source-target pairs that users are allowed to send out for translation. |
Ask your Adobe Experience Manager administrator to update the appropriate team profile to include the new translation provider.For detailed instructions, see Configuring Team Profiles. |
10.13 - New Target Language Is Not Available When Sending Out Content for Translation
| Possible Issue | Explanation | Solution |
|---|---|---|
| After configuring a new target language, it is not available for selection when submitting a new job. | Your team profile was not updated to support sending content for translation to the new target language. The Connector uses profiles to define the set of users who can send out content for translation with specific source-target language pairs. Note: Profiles also define who can send out content for translation to a specific translation provider (LSP). |
Ask your Adobe Experience Manager administrator to update the appropriate team profile to include the source-target language pairs.For detailed instructions, see Configuring Team Profiles. |
10.14 - Service Authentication
Possible issues
If you are using Adobe Experience Manager 6.3 or higher with version 3.2.0 or higher of the Connector, the following problems may occur:
-
You cannot save all Connector configurations.
-
Translated content does not return to Adobe Experience Manager.
-
You cannot perform most Globalization Tool functionality with the default settings.
Explanation
These problems occur because in Adobe Experience Manager 6.3 and higher, Adobe has deprecated support for administrative login methods for services.
In response, the starting with version 3.2.0, Connector adds a new system user, claytablet-service, which the claytablet bundle uses for operations.
The Connector adds the following new configurations to CRXDE Lite, which are described in detail below:
-
/apps/ctctranslation/config/org.apache.sling.serviceusermapping.impl.ServiceUserMapperImpl.amended-claytablet
-
/apps/ctctranslation/config/com.day.cq.security.ACLSetup
-
/home/users/system/claytablet-service
Note: Under normal circumstances, you should not need to edit any of these configurations.
Detailed explanations
/apps/ctctranslation/config/org.apache.sling.serviceusermapping.impl.ServiceUserMapperImpl.amended-claytablet.xml
This is an OSGi configuration that adds a mapping between the claytablet bundle and the claytablet-service system user for the Connector.
To locate this configuration in the system console:
-
In your Web browser, navigate to /system/console/configMgr.
-
In the Adobe Experience Manager Web Console Configuration page, search for Service Amendment.

- Next, search for claytablet.
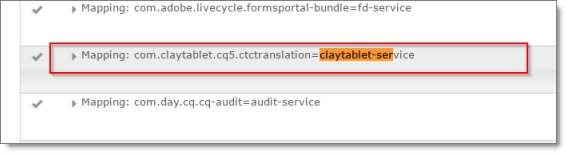
- Double-click this entry to view the value in the Service Mappings field:
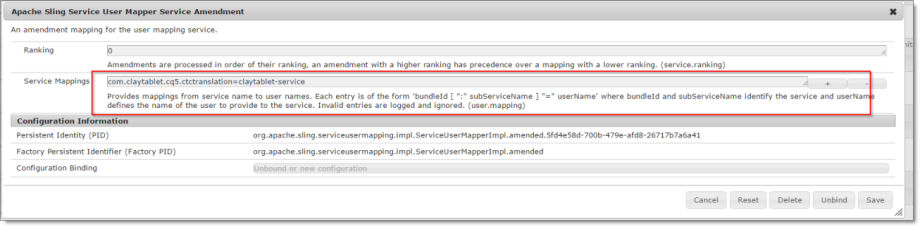
/apps/ctctranslation/config/com.day.cq.security.ACLSetup.xml
This OSGi configuration grants the all permission to the claytablet-service system user for /. This system user has all permissions on every path in the repository.
Note: This is the same as loginAdminstrative() in pre-3.2.0 versions of the Connector.
To locate this configuration in the system console:
- In your Web browser, navigate to /system/console/configMgr.
In the Adobe Experience Manager Web Console Configuration page, search for Day CQ ACL.
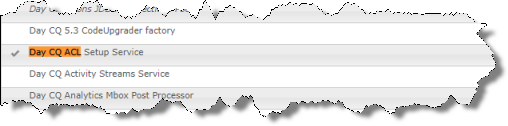
- Click this entry to view the details.
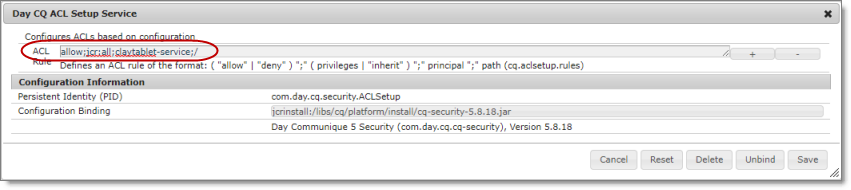
/home/users/system/claytablet-service
The new claytablet-service system user has permission to everything, because of the ACLSetup. If necessary, you can modify the permission settings. However, the Connector requires full permission to the following directories:
- /content
- /apps
- /etc
- /var
To locate the claytablet-service system user and view its permissions:
-
In your Web browser, navigate to /useradmin.
-
In the AEM Security page, locate the claytablet-service user in the left pane.
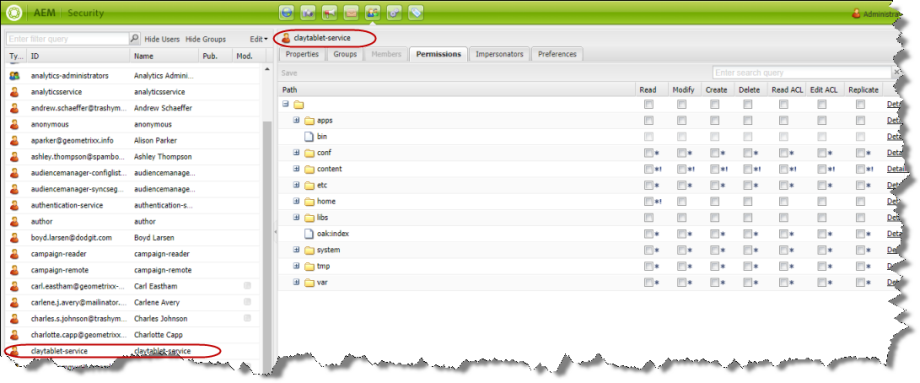
Tip: To simplify the permission settings for the claytable-service user, you can add claytable-service to the Adobe Experience Manager administrators user group. The reason this works is that before the API changes in Adobe Experience Manager 6.3, the Connector used the administrator permission of an admin session from Adobe Experience Manager API to perform all the actions.
For more information, refer to: https://cwiki.apache.org/confluence/display/SLING/Service+Authentication.
10.15 - Freeway Analysis Codes not Displayed when Sending Out Content for Translation
Issue
The add-on for Lionbridge Freeway is installed, and Freeway analysis codes specified, but they are not displayed or available for selection when sending out content for translation.
Explanation
The URLs where Lionbridge Freeway provides the authentication service and the analysis code service are not correctly configured. If you have a firewall, you must configure your ports so that the Connector can communicate with these services.
Solution
- In the Freeway Config section of the Configuration page, enter the following settings:
| Configuration Option | Description |
|---|---|
| Freeway Auth URL | The URL where Lionbridge Freeway provides the authentication service. This is https://fwapi.lionbridge.com/obvibundles/freewayauth.asmx. |
| Freeway Service URL | The URL where Lionbridge Freeway provides the analysis code service. This is https://fwapi.lionbridge.com/obvibundles/service.asmx. |
For detailed instructions, see Freeway Config.
- If you have a firewall, you must configure your ports so that the Connector can communicate with these URLs. For detailed instructions, see Configuring Network Settings for a Firewall.
11 - Testing the Connector
After you complete the configuration, your Lionbridge Connector for Adobe Experience Manager installation is ready for testing. We recommend sending only a few pages for translation in one language as an initial test. For detailed instructions, refer to the Lionbridge Connector for Adobe Experience Manager User Guide. Once successful, you can send as many languages as required.
Please coordinate with your translation provider for this test process.
If you have any concerns or questions, please contact Lionbridge Connector Support. For details, see How to Contact Lionbridge Connector Support.
From a testing perspective, do not treat the Connector as merely standalone software. It integrates into Adobe Experience Manager and your overall translation workflow. You must test the end-to-end process, from content creation to publishing, to ensure that the Connector is working as expected and configured to support your business needs.
In addition to following the guidelines below, you should also include any internal test or use cases that would normally be applied to any software that is deployed to Adobe Experience Manager. You must robustly test the Connector and the translation process against the (non-production) MT (machine translation) service. This saves time and project costs, because trying to solve issues during the production phase is costly and delays your translation timelines.
Recommendations: Complete your testing in a pre-production environment before deploying the Connector to your production environment. If you must perform testing in your production environment, you should create test content that can be deleted after completing the tests. The connector database translation memory must also be cleared in your production environment. For detailed instructions, contact Lionbridge Connector Support, as described in How to Contact Lionbridge Connector Support. Consider any changes in functionality, configuration, or customization between pre-production and production environments in this final test pass.
Testing the connector
- Verify that the Connector is configured to send all required content types for all required languages.
- Ensure that the Connector sends only translatable content for translation.
- Configure email notifications set and ensure that they are generated at the appropriate step in the translation workflow.
Integration with Adobe Experience Manager
- Ensure that the content authors how to interact with the Connector and send content to translation. For detailed instructions, refer them to the Lionbridge Connector for Adobe Experience Manager User Guide.
- Select a method of sending content to translation that aligns with how content authors work in Adobe Experience Manager.
- Ensure that the Connector users have the correct rights to access the Connector within Adobe Experience Manager.
Testing the translation workflow
- Ensure that the Connector translation workflow integrates with your overall strategy of managing source and translated content.
- Validate how the translated content will be reviewed during the translation process.
- Verify that the translation process integrates correctly with the publishing process.
12 - Language Codes
For detailed instructions on setting up the correct Connector language codes for every language your company uses for translation, see Configuring Connector Languages.
The Connector has the following language codes:
| Type | Language Identifier | Language Code |
|---|---|---|
| String | Afrikaans | “af-ZA” |
| String | Albanian | “sq-AL” |
| String | Amharic | “am-ET” |
| String | Arabic_Algeria | “ar-DZ” |
| String | Arabic_Bahrain | “ar-BH” |
| String | Arabic_Egypt | “ar-EG” |
| String | Arabic_Iraq | “ar-IQ” |
| String | Arabic_Jordan | “ar-JO” |
| String | Arabic_Kuwait | “ar-KW” |
| String | Arabic_Lebanon | “ar-LB” |
| String | Arabic_Libya | “ar-LY” |
| String | Arabic_MiddleEast | “ar-XR” |
| String | Arabic_Morocco | “ar-MA” |
| String | Arabic_Oman | “ar-OM” |
| String | Arabic_Qatar | “ar-QA” |
| String | Arabic_Saudi_Arabia | “ar-SA” |
| String | Arabic_Syria | “ar-SY” |
| String | Arabic_Tunisia | “ar-TM” |
| String | Arabic_UAE | “ar-AE” |
| String | Arabic_Yemen | “ar-YE” |
| String | Armenian | “hy-AM” |
| String | Assamese | “as-IN” |
| String | Basque | “eu-ES” |
| String | Belarusian | “be-BY” |
| String | Bengali_Bangladesh | “bn-BD” |
| String | Bengali_India | “bn-IN” |
| String | Bosnian_Bosnia_Herzegovina | “bs-BA” |
| String | Bulgarian | “bg-BG” |
| String | Burmese | “my-MM” |
| String | Catalan | “ca-ES” |
| String | Chinese_Hong_Kong | “zh-HK” |
| String | Chinese_Macao | “zh-MO” |
| String | Chinese_PRC | “zh-CN” |
| String | Chinese_Singapore | “zh-SG” |
| String | Chinese_Taiwan | “zh-TW” |
| String | Croatian | “hr-HR” |
| String | Croatian_Bosnia_Herzegovina | “hr-BA” |
| String | Czech | “cs-CZ” |
| String | Danish | “da-DK” |
| String | Divehi | “dv-MV” |
| String | Dutch | “nl-NL” |
| String | Dutch_Belgium | “nl-BE” |
| String | English_Australia | “en-AU” |
| String | English_Belize | “en-BZ” |
| String | English_Canada | “en-CA” |
| String | English_HongKong | “en-HK” |
| String | English_India | “en-IN” |
| String | English_Indonesia | “en-ID” |
| String | English_Ireland | “en-IE” |
| String | English_Jamaica | “en-JM” |
| String | English_Malaysia | “en-MY” |
| String | English_New_Zealand | “en-NZ” |
| String | English_Philippines | “en-PH” |
| String | English_Singapore | “en-SG” |
| String | English_South_Africa | “en-ZA” |
| String | English_Trinidad | “en-TT” |
| String | English_UK | “en-GB” |
| String | English_US | “en-US” |
| String | English_Zimbabwe | “en-ZW” |
| String | Estonian | “et-EE” |
| String | Faroese | “fo-FO” |
| String | Farsi | “fa-IR” |
| String | Filipino | “fil-PH” |
| String | Finnish | “fi-FI” |
| String | French | “fr-FR” |
| String | French_Belgium | “fr-BE” |
| String | French_Cameroon | “fr-CM” |
| String | French_Canada | “fr-CA” |
| String | French_Cote_d_Ivoire | “fr-CI” |
| String | French_Democratic_Rep_Congo | “fr-CD” |
| String | French_Haiti | “fr-HT” |
| String | French_Luxembourg | “fr-LU” |
| String | French_Mali | “fr-ML” |
| String | French_Monaco | “fr-MC” |
| String | French_Morocco | “fr-MA” |
| String | French_Reunion | “fr-RE” |
| String | French_Senegal | “fr-SN” |
| String | French_Switzerland | “fr-CH” |
| String | Frisian_Netherlands | “fy-NK” |
| String | Fulfulde_Nigeria | “ff-NG” |
| String | FYRO_Macedonian | “mk-MK” |
| String | Gaelic_Ireland | “gd-IE” |
| String | Gaelic_Scotland | “gd-GB” |
| String | Gallegan | “gl-ES” |
| String | Georgian | “ka-GE” |
| String | German | “de-DE” |
| String | German_Austria | “de-AT” |
| String | German_Liechtenstein | “de-LI” |
| String | German_Luxembourg | “de-LU” |
| String | German_Switzerland | “de-CH” |
| String | Greek | “el-GR” |
| String | Guarani | “gn-PY” |
| String | Gujarati | “gu-IN” |
| String | Hausa | “ha-NE” |
| String | Hawaiian | “haw-US” |
| String | Hebrew | “he-IL” |
| String | Hindi | “hi-IN” |
| String | Hungarian | “hu-HU” |
| String | Icelandic | “is-IS” |
| String | Igbo | “ig-NG” |
| String | Indonesian | “id-ID” |
| String | Inuktitut | “iu-CA” |
| String | Italian | “it-IT” |
| String | Italian_Switzerland | “it-CH” |
| String | Japanese | “ja-JP” |
| String | Kannada | “kn-IN” |
| String | Kanuri | “kr-TD” |
| String | Kashmiri | “ks-IN” |
| String | Kazakh | “kk-KZ” |
| String | Khmer | “km-KH” |
| String | Konkani | “kok-IN” |
| String | Korean | “ko-KR” |
| String | Kyrgyz | “ky-KZ” |
| String | Lao | “lo-LA” |
| String | Latin | “la-XL” |
| String | Latvian | “lv-LV” |
| String | Lithuanian | “lt-LT” |
| String | Malay | “ms-MY” |
| String | Malay_Brunei_Darussalam | “ms-BN” |
| String | Malayalam | “ml-IN” |
| String | Maltese | “mt-MT” |
| String | Maori | “mi-NZ” |
| String | Marathi | “mr-IN” |
| String | Mongolian | “mn-MN” |
| String | Nepali | “ne-NP” |
| String | Nepali_India | “ne-IN” |
| String | Norwegian | “nb-NO” |
| String | Norwegian_Nynorsk | “nn-NO” |
| String | Oriya | “or-IN” |
| String | Oromo | “om-ET” |
| String | Panjabi | “pa-PK” |
| String | Polish | “pl-PL” |
| String | Portuguese | “pt-PT” |
| String | Portuguese_Brazil | “pt-BR” |
| String | Punjabi_Pakistan | “pa-PK” |
| String | Pushto | “ps-AF” |
| String | Quechua_Ecuador | “qu-EC” |
| String | Quechua_Peru | “qu-PE” |
| String | Rhaeto_Romance | “rm-IT” |
| String | Romanian | “ro-RO” |
| String | Romanian_Moldova | “ro-MD” |
| String | Russian | “ru-RU” |
| String | Russian_Moldava | “ru-MD” |
| String | Sami | “se-NO” |
| String | Sanskrit | “sa-IN” |
| String | Serbian_Cyrillic | “sr-RS” |
| String | Serbian_Latin | “sr-SP” |
| String | Sindhi_India | “sd-IN” |
| String | Sindhi_Pakistan | “sd-PK” |
| String | Sinhala | “si-LK” |
| String | Slovak | “sk-SK” |
| String | Slovenian | “sl-SI” |
| String | Somali | “so-ET” |
| String | Sorbian | “wen-DE” |
| String | Spanish | “es-ES” |
| String | Spanish_Argentina | “es-AR” |
| String | Spanish_Bolivia | “es-BO” |
| String | Spanish_Chile | “es-CL” |
| String | Spanish_Colombia | “es-CO” |
| String | Spanish_Costa_Rica | “es-CR” |
| String | Spanish_Dominican_Republic | “es-DO” |
| String | Spanish_Ecuador | “es-EC” |
| String | Spanish_El_Salvador | “es-SV” |
| String | Spanish_Honduras | “es-HN” |
| String | Spanish_LatinAmerica | “es-XL” |
| String | Spanish_Mexico | “es-MX” |
| String | Spanish_Nicaragua | “es-NI” |
| String | Spanish_Panama | “es-PA” |
| String | Spanish_Paraguay | “es-PY” |
| String | Spanish_Peru | “es-PE” |
| String | Spanish_Puerto_Rico | “es-PR” |
| String | Spanish_Uruguay | “es-UY” |
| String | Spanish_US | “es-US” |
| String | Spanish_Venezuela | “es-VE” |
| String | Swahili | “sw-TZ” |
| String | Swedish | “sv-SE” |
| String | Swedish_Finland | “sv-FI” |
| String | Syriac | “syr-SY” |
| String | Tajik | “tg-TJ” |
| String | Tamil | “ta-IN” |
| String | Tatar | “tt-RU” |
| String | Telugu | “te-IN” |
| String | Thai | “th-TH” |
| String | Tibetan | “bo-CN” |
| String | Tigrinya_Eritrea | “ti-ER” |
| String | Tigrinya_Ethiopia | “ti-ET” |
| String | Tsonga | “ts-ZA” |
| String | Tswana | “tn-BW” |
| String | Turkish | “tr-TR” |
| String | Turkmen | “tk-TM” |
| String | Uighur | “ug-CN” |
| String | Ukrainian | “uk-UA” |
| String | Urdu | “ur-PK” |
| String | Urdu_India | “ur-IN” |
| String | Uzbek | “uz-UZ” |
| String | Venda | “ve-ZA” |
| String | Vietnamese | “vi-VN” |
| String | Welsh | “cy-GB” |
| String | Xhosa | “xh-ZA” |
| String | Yi | “ii-CN” |
| String | Yiddish | “yi-MD” |
| String | Yoruba | “yo-NG” |
| String | Zulu | “zu-ZA” |
13 - Configuring an Adobe Experience Manager Team Profile for the Translation Integration Framework
You configure an Adobe Experience Manager team profile for Adobe Experience Manager translation integration. This enables users in the team to access the Adobe Experience Manager translation framework.
To configure keys for Adobe Experience Manager integration:
-
In the Lionbridge Connector rail, click Admin Tools > Team Profiles to open the Team Profiles page.
-
In the Name field, enter a name for this team profile.
-
In the Source Language column, select the check box for the source language.
-
In the Target Language column, select the check box(es) for the target language(s).
-
In the LSP column, select the MT check box.
-
In the Adobe Experience Manager Users column, select the admin check box.
-
In the Adobe Experience Manager Groups column, select the administrators check box.
-
Click Save.
For more information about the Team Profiles page, see Configuring Team Profiles.
14 - Configuring LSP and Keys for the Translation Integration Framework
You configure the translation providers and Content API Platform for Adobe Experience Manager translation integration. This supports selecting a translation provider from within the Adobe Experience Manager translation framework.
To configure keys for Adobe Experience Manager integration:
-
In the Lionbridge Connector rail, click Admin Tools > LSP and Keys to open the LSP & Keys page.
-
In the LSP and Keys section, click Add.
-
In the LSP Name field, enter the name of the translation provider. For example, enter MT.
-
In the LSP Type dropdown list, select your translation provider, if displayed. If your translation provider is not displayed, then select Generic.
-
Next to the Key dropdown list, click Retrieve.
-
Select the license key for the translation provider.
-
Click Add. This updates the Name, Source Account, and Platform Account columns in the LSP and Keys section.
For more detailed instructions, see Adding a New License Key.
15 - Configuring the Connector for the Translation Integration Framework
For each Connector configuration that you create within Adobe Experience Manager’s translation integration feature, you configure the Connector on its Configuration page:
To configure the Connector:
-
If the Connector’s Configuration page is not already open, then open it. Either:
Click the here link in the Lionbridge Settings page for the configuration you just created, as described at the end of Creating an Adobe Experience Manager Cloud Configuration for the Connector.
In the Lionbridge Connector rail, click Admin Tools > Configuration.
The Configuration page opens.
-
Scroll down to the Translation Platform section. In the License ID field, enter one of the following:
the license uuid, sent by email
the license ID from the License_ID.txt file in the package you downloaded
For more information about this section of the Configuration page, see Translation Platform.
-
In the JDBC SQL Connection section:
a. Enter the JDBC URL and login credentials.
b. Click Test to verify the JDBC connection and credentials.
After testing, a message box indicates whether your configuration passed the test.
For more information about this section of the Configuration page, see JDBC SQL Connection.
-
In the Folder and Permission section:
a. In the Data Folder field, enter the path to the location where you extracted ctc_data.zip, in step 1 of Integrating the Connector with Adobe Experience Manager’s Translation Integration Framework.
b. Click Test to verify that this path is correct.
After testing, a message box indicates whether your configuration passed the test.
For more information about this section of the Configuration page, see Folder and Permissions.
- At the bottom of the page, click Save Configuration.
16 - Creating a Translation Integration Configuration for the Connector
In Adobe Experience Manager, you create a translation integration configuration and edit its settings. These are the Adobe Experience Manager settings for how to translate your content. You can create multiple configurations, for example, if you have different translation providers for different sites, or if there are different kinds of content that you want to send out for translation for different sites.
To creating a translation integration configuration for the Connector:
- Do one of the following to return to the Adobe Cloud Services page:
- In the configuration page (described in Editing Connector Cloud Configuration Settings), click the Cloud Services link in the top-left corner of the page.
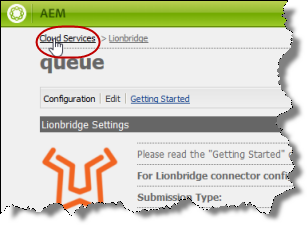
-
In your Web browser, navigate to /etc/cloudservices.html in your Adobe Experience Manager instance.
-
In the Touch-Optimized UI of Adobe Experience Manager, click Tools > Operations > Cloud > Cloud Services in the Adobe Experience Manager rail.
- Under Translation Integration, click Show Configurations.
![]()
- Click the plus sign beside Available Configurations to add a new configuration for the Lionbridge Connector.
The Create Configuration dialog box opens.
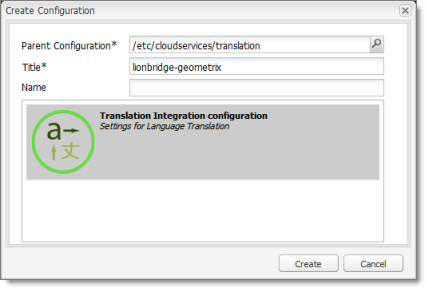
- In the Title field, enter a descriptive title that includes both Lionbridge and the site, for example, lionbridge-geometrix, and then click Create.
The Translation Config dialog box opens.
![]()
- In the Sites tab:
-
For Translation Workflow, select Human Translation.
-
For Translation Provider, select Lionbridge. This name identifies the Connector in the Adobe Experience Manager translation integration framework.
Note about Assets tab: Adobe Experience Manager extracts text associated with metadata into an XML file, which the Connector processes. Some translation providers, such as MT, may not support translating these files.
For descriptions of the other fields and tabs, refer to “Creating a Translation Integration Configuration” in the Adobe Experience Manager documentation:
- version 6.2: http://docs.adobe.com/docs/en/aem/6-2/administer/sites/translation/tc-tic.html
- version 6.3: http://docs.adobe.com/docs/en/aem/6-3/administer/sites/translation/tc-tic.html
- version 6.4: https://docs.adobe.com/content/help/en/experience-manager-64/administering/introduction/tc-tic.html
- version 6.5: https://helpx.adobe.com/experience-manager/6-5/sites/administering/using/tc-tic.html
- Click OK to close the dialog box.
17 - Creating an Adobe Experience Manager Cloud Configuration for the Connector
Within Adobe Experience Manager’s translation integration feature, you create a cloud configuration that connects to the Connector. Each configuration contains a set of Connector settings, which you will configure later. You can create multiple configurations. For example, you can create one configuration to send content to the Translation Queue, and you can created another configuration to send out content directly for translation. You can also create a different configuration for each translation provider.
To create a Connector configuration within Adobe Experience Manager’s translation integration feature:
- Do one of the following to open the Adobe Cloud Services page:
-
In your Web browser, navigate to /etc/cloudservices.html in your Adobe Experience Manager instance.
-
In the Touch-Optimized UI of Adobe Experience Manager, in the Adobe Experience Manager rail, either:
-
Click Tools > Operations > Cloud > Cloud Services (Adobe Experience Manager versions 6.2-6.4).
-
Click Tools > Cloud Services > Legacy Cloud Services (Adobe Experience Manager version 6.5).
-
The Adobe Cloud Services page opens.
- Create a cloud configuration that connects Adobe Experience Manager to the Lionbridge Connector:
a. If you are using Adobe Experience Manager version 6.5, scroll down to the Third Party Services section at the bottom of the page.
b. Scroll down to locate the Lionbridge entry.
c. Click Show Configurations.
d. Click the plus icon to create a new configuration.
The Create Configuration dialog box opens.
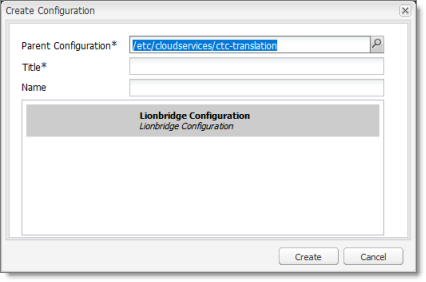
e. In the Title field, enter a descriptive name to identify this configuration. For example, if you will use this configuration to send content directly to the Translation Queue, you can call this queue.
Important: Do not modify the value in the Parent Configuration field.
f. Click Create to save your changes.
The Lionbridge Settings page opens for the configuration you just created.
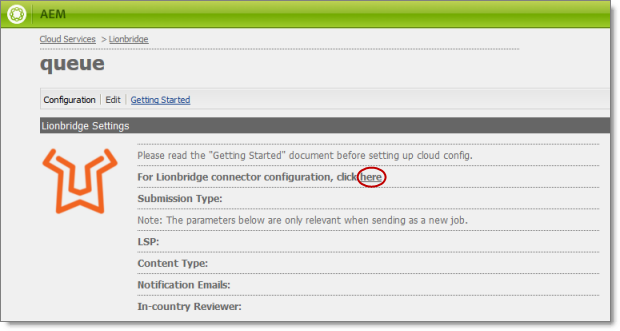
g. Click the following link to open the Connector’s Configuration page: For Lionbridge connector configuration, click here, as shown above.
For detailed instructions on configuring the Connector on the Configuration page for Adobe Experience Manager’s translation integration feature, see Configuring the Connector for the Translation Integration Framework.
18 - Editing Connector Cloud Configuration Settings
In Adobe Experience Manager, you edit the settings for your Connector cloud configuration that you created in Creating an Adobe Experience Manager Cloud Configuration for the Connector.
-
Do one of the following to return to the Adobe Cloud Services page:
-
In your Web browser, navigate to /etc/cloudservices.html in your Adobe Experience Manager instance.
-
In the Touch-Optimized UI of Adobe Experience Manager, click Tools > Operations > Cloud > Cloud Services in the Adobe Experience Manager rail.
-
-
Under Lionbridge, click Show Configurations.
-
Click the link for the configuration you created earlier.
-
At the top of the page that opens, click Edit.
The Edit Component – Lionbridge Translation Settings dialog box opens.
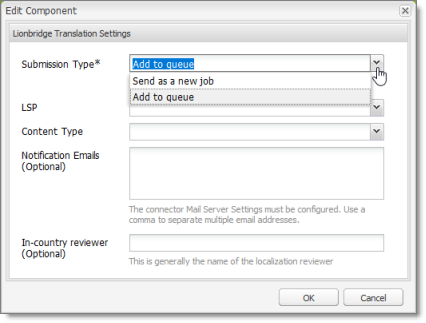
- Enter values for the following settings:
| Setting | Description |
|---|---|
| Submission Type | Select one of the following options:
|
| The remaining settings are relevant only if Submission Type, above, is Send as a new job. Specify the appropriate settings for your company. | |
| LSP | Select the translation provider for your translation jobs. |
| Content Type | You can tag the content in a translation job as a specific content type. Depending on your company’s configuration, the Content API Platform may send the content to a specific translation provider based on the content type. Select one of the following content types:
Note: You may see different content types if your company has configured custom content types. |
| Notification Emails | Enter one or more email addresses that will receive notification when the content leaves Adobe Experience Manager and when it returns to Adobe Experience Manager. Use a comma to separate multiple email addresses. |
| In-country Reviewer | Optional. This is generally the name of the localization reviewer, which is stored in the InCountryReviewer attribute in the XML sent to the translation provider. By default, this field is hidden. |
- Click OK to save your changes and close the dialog box.
19 - Integrating the Connector with Adobe Experience Manager's Translation Integration Framework
This section describes how to integrate and configure Adobe Experience Manager’s translation integration feature with the Connector. For detailed information about this feature, refer to the Adobe Experience Manager documentation, “Translating Content for Multilingual Sites,” which is available at:
- version 6.2: http://docs.adobe.com/docs/en/aem/6-2/administer/sites/translation.html.
- version 6.3: http://docs.adobe.com/docs/en/aem/6-3/administer/sites/translation.html.
- version 6.4: https://docs.adobe.com/content/help/en/experience-manager-64/administering/introduction/translation.html.
- version 6.5: https://helpx.adobe.com/experience-manager/6-5/sites/administering/using/translation.html.
Note: For information on using this feature, refer to steps 4-6 in the Adobe documentation at the above link and “Using the Adobe Experience Manager Translation Integration Framework to Manage Translations” in the Lionbridge Connector for Adobe Experience Manager User Guide.
For detailed instructions about installing and configuring the Connector, refer to the Lionbridge Connector for Adobe Experience Manager User Guide.
Important: When using the Connector with the Translation Integration Framework, the Connector’s component-mapping, team-profiles, and language-mapping features are not available.
To integrate the Connector with Adobe Experience Manager’s translation integration feature:
-
Unzip ctc_data.zip, and save it to a location on the file system that Adobe Experience Manager can access.
-
Install the Connector package. For detailed instructions, see Installing the Lionbridge Connector.
-
In Adobe Experience Manager, create a cloud configuration that connects to the Connector. For detailed instructions, see Creating an Adobe Experience Manager Cloud Configuration for the Connector.
-
In the Connector, configure the Connector for Adobe Experience Manager’s Translation Integration feature. For detailed instructions, see Configuring the Connector for the Translation Integration Framework.
-
In the Connector, configure the translation provider and keys. For detailed instructions, see Configuring LSP and Keys for the Translation Integration Framework.
-
In the Connector, configure the Adobe Experience Manager team profile. For detailed instructions, see Configuring an Adobe Experience Manager Team Profile for the Translation Integration Framework.
-
In Adobe Experience Manager, edit the settings for your Lionbridge Connector cloud configuration. For detailed instructions, see Editing Connector Cloud Configuration Settings.
-
In Adobe Experience Manager, you create a translation integration configuration and edit its settings. This specifies the Adobe Experience Manager settings for translating your content. For detailed instructions, see Creating a Translation Integration Configuration for the Connector.
-
Optional. You can associate part of your web site (a page and descendent pages) with the Connector or with a specific Connector translation integration configuration. For detailed instructions, refer to “Configuring Pages for Translation” in the Adobe Experience Manager documentation at: http://docs.adobe.com/docs/en/aem/6-1/administer/sites/translation/tc-tic.html.
-
Optional. You can specify which content to translate. For detailed instructions, refer to “Identifying Content to Translate” in the Adobe Experience Manager documentation at: http://docs.adobe.com/docs/en/aem/6-1/administer/sites/translation/tc-rules.html.